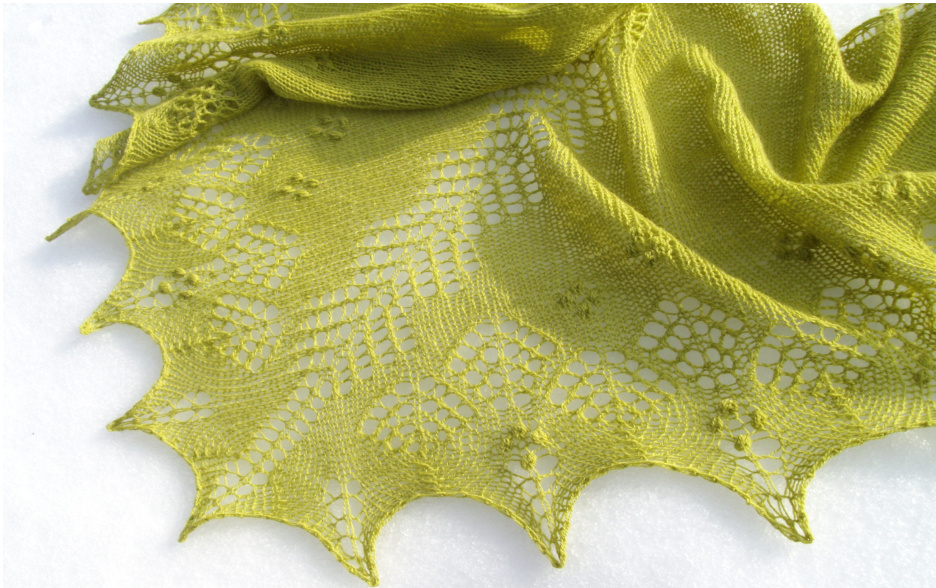
MARJAMETS SHAWL
by Kadri Sts
INTRODUCTION
Marjamets (pronounced mar-ya-mets) is an Estonian word that refers to the forest where berries grow. Estonian forests were my main inspiration in creating this shawl pattern, combining a spruce tree lace pattern and nupps. The shawl is crescent shaped and is knitted top down. The same spruce tree pattern that is used on the edge is incorporated into the center spine, which creates a lacy and delicate look.
MATERIALS AND GAUGE INFORMATION
Yarn: 492 yards/450 m of laceweight yarn. The sample shawl is knitted with 60 g of Midara Roma (100% wool, 820 yds/750 g per 100 g). Needle: size US 4/3.5 mm circular needle, 24"/60 cm or longer. You can also use any other size needles allows you to obtain the gauge or drape you desire. Stitch markers: Minimum 1 stitch marker is recommended. You might wish to use more if you find it easier to place abstitch marker after every lace pattern repeat to keep better track of the pattern. Gauge: One repeat of Center Spruce Chart after blocking = 2.76"/7 cm in width and 1.97"/5 cm in height. However, since it is a lace shawl, gauge is not that important. Feel free to experiment with different yarn weights and needle sizes. Just remember that it might affect the size of your finished object and the yardage required. Size: Approximately 57"/145 cm x 19"/48 cm.
Pattern notes:
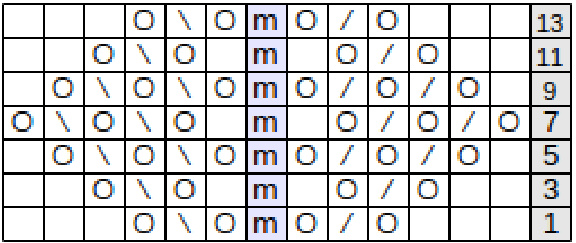
The pattern is charted. One half of the shawl mirrors the other half, so use charts marked as Right for working the right hall of the shawl and charts marked as Left when working the left half of the shawl. All even-numbered rows (WS) are worked in the following way: k3, yo, p until the last 3 stitches, yo, k3. WS rows are not shown on charts, but they are included in the written instructions. The first stitch of each row is slipped knitwise. The edge stitches are shown both on charts and in written instructions. Feel free to make your shawl unique by using beads instead of nupps. Youll need 200 beads.
| Abbreviations | |
| knit | |
| purl | |
| yarn over | |
| marker | |
| place marker | |
| k2tog | knit 2 stitches together |
INSTRUCTIONS
Begin with a Garter Tab cast on: Cast on 3 stitches. Knit 6 rows. At the end of the 6th row, rotate piece 90 degrees clockwise and pick up the 3 stitches on the side. You now have 6 stitches on the needles. Then rotate again and pick up the 3 stitches on the cast on edge. You now have 9 stitches. Row 1 (RS): k3, yo, k1, yo, k1, yo, k1, yo, k3 (13 stitches) Row 2 (WS): k3, y0, p7, yo, k3 (15 stitches) Row 3: k3, yo, k4, yo, k1, yo, k4, yo, k3 (19 stitches) Row 4: k3, y0, p13, y0, k3 (21 stitches) Row 5: k3, yo, k7, yo, pm, k1, yo, k7, yo, k3 (25 stitches) Row 6: k3, y0, p19, y0, k3 (27 stitches) Start working the Body Section. The marker indicates the center stitch of the shawl. Slip the stitch marker on everyrow. Note: you can add another marker 5 stitches before the center stitch marker, but due to the increases you have to move it 1 stitch to the left on every RS row, so that there are always 5 stitches between the two markers. Row 7: k3, yo, k until 5 sts before m, work row 1 of Center Spruce Chart, k until the last 3 stitches, yo, k3 Row 8: k3, yo, p until the last 3 stitches, yo, k3 Row 9: k3, yo, k until 5 sts before m, work row 3 of Center Spruce Chart, k until the last 3 stitches, yo, k3 Row 10: k3, yo, p until the last 3 stitches, yo, k3 Row 11: k3, yo, k until 5 sts before m, work row 5 of Center Spruce Chart, k until the last 3 stitches, yo, k3 Row 12: k3, yo, p until the last 3 stitches, yo, k3 Row 13: k3, yo, k until 5 sts before m, work row 7 of Center Spruce Chart, k until the last 3 stitches, yo, k3 Row 14: k3, yo, p until the last 3 stitches, yo, k3 Row 15: k3, yo, k until 5 sts before m, work row 9 of Center Spruce Chart, k until the last 3 stitches, yo, k3 Row 16: k3, y0, p until the last 3 stitches, yo, k3 Row 17: k3, yo, k until 5 sts before m, work row 11 of Center Spruce Chart, k until the last 3 stitches, yo, k Row 18: k3, yo, p until the last 3 stitches, yo, k3 Row19: k3, yo, k until 5 sts before m, work row 13 of Center Spruce Chart, k until the last 3 stitches, yo, k3 Row 20: k3, y0, p until the last 3 stitches, yo, k3 (69 stitches) Rows 21-82: repeat rows 7-20 4 times more and then rows 7-12 once more (255 stitches). Stitch counts after each repeat of rows 7-20: 1st repeat (row 34): 111 stitches, 2nd repeat (row 48): 153 stitches, 3rd repeat (row 62): 195 stitches, 4th repeat (row 76): 237 stitches. Note: From this point forward don't forget to use charts marked as Right for working the right half of the shawl and charts marked as Left when working the left half of the shawl. Start working the Nupp Charts Row 83: k3, yo, work row 1 of Right Nupp Chart, work row 7 of Center Spruce Chart, work row 1 of Left Nupp Chart, yo, k3 Row 84: k3, yo, p until the last 3 stitches, yo, k3 Row 85: k3, yo, work row 3 of Right Nupp Chart, work row 9 of Center Spruce Chart, work row 3 of Left Nupp Chart, yo, k3 Row 86: k3, yo, p until the last 3 stitches, yo, k3 Row 87: k3, yo, work row 5 of Right Nupp Chart, work row 11 of Center Spruce Chart, work row 5 of Left Nupp Chart, yo, k3 Row 88: k3, yo, p until the last 3 stitches, yo, k3 Row 89: k3, yo, work row 7 of Right Nupp Chart, work row 13 of Center Spruce Chart, work row 7 of Left Nupp Chart, yo, k3 Row 90: k3, y0, p until the last 3 stitches, yo, k3 (279 stitches) Start working the Edge Setup Charts Row 91: k3, yo, work row 1 of Right Edge Setup Chart, work row 1 of Center Spruce Chart, work row 1 of Left Edge Setup Chart, yo, k3 Row 92: k3, yo, p until the last 3 stitches, yo, k3 Row 93: k3, yo, work next row of Right Edge Setup Chart, work next row of Center Spruce Chart, work next row of Left Edge Setup Chart, yo, k3 Row 94: k3, yo, p until the last 3 stitches, yo, k3 Row 95-104: repeat rows 93-94 until you have worked every row of Right and Left Edge Setup Charts (321 stitches) Note: Center Spruce Chart is no longer worked in the Edge Section. Instead work Right Edge Chart until marker, slip marker, k the center stitch and continue with the Left Edge Chart. Row 105: k3, yo, work row 1 of Right Edge Chart, slip marker, k1, work row 1 of Left Edge Chart, yo, k3 Row 106: k3, yo, p until the last 3 stitches, yo, k3 Row 107: k3, yo, work next row of Right Edge Chart, slip marker, k1, work next row of Left Setup Chart, yo,k3 Row 108: k3, yo, p until the last 3 stitches, yo, k3 ows 107-108 until you have worked every row of Right and Left Edge Charts Row 129 (Rs): Bind off as follows: k2, \*slip both sts back to left needle and k2tog, k1\* to last st, slip both sts back to left needle and k2tog. Pull the yarn through last st. Block the shawl. Weave in ends. This original pattern is intended for personal use only.Reproduction or distributionof the pattern in whole or part including text, charts or photographs is prohibited without my consent. @2013 Kadri Sts (Ravelry user name kadris)
Chart legend
knit yo (yam over) k2tog (knit two stitches together) ssk (slip 2 stitches as if to knit, then knit those 2 stitches together) sk2p (slip 1 stitch, knit two together, pass slipped stitch over) nupp (k1, yo, k1, yo, k1, yo, k1 into one stitch, pur those 7 stitches together on the next row), can be replaced with beads edge stitch (k on RS and Ws) marker (this also indicates the center stitch, k on RS, p on Ws) no stitch
Center Spruce Chart
Right Nupp Chart

Left Nupp Chart

Right Edge Setup Chart

Left Edge Setup Chart

Right Edge Chart

Left Edge Chart


