Copyright Notice
Reprinting or dulicating the contents of this webpage for patern sharing by any means, including, computer canning, mail personal websites fax, digital photography and copying machine is illgal. Failure to abide by international copyrights laws willresult in litigation and fines. You can share a link to the source of the pattern You are allowed to make a copy of the pattern for your own personal use. You are also granted limited rights to use a design(s) for Creating itms for sale, craft shows, bazaars, and fund-raisers. Nomore than two of the same designs at any given time should be made and displayed, and credits must be given to the Designer. Mass production of these designs is prohibited.
General Information for Crochet Tatted Lace CAL Designer: Ferosa Harold
Here is a brief overview for the Crochet Tatted lace CAL. Crochet Tatted Lace is a combination of crochet and needle tatting using one tool. A special crochet hook is used to facilitate the execution of both crafts effortlessly. The rings are made using the needle tatting double stitch (ds) and the rest is worked in crochet. To begin learning this technique you must have a working knowledge of the basic crochet stitches: ch, sc, dc, tr, sl st. The lessons will be visual and structured for both right and left-handed Crocheters. CAL wil start on the 25th September and will run for two weeks.
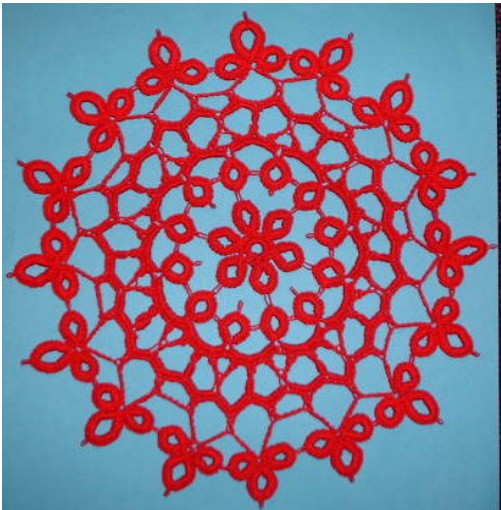
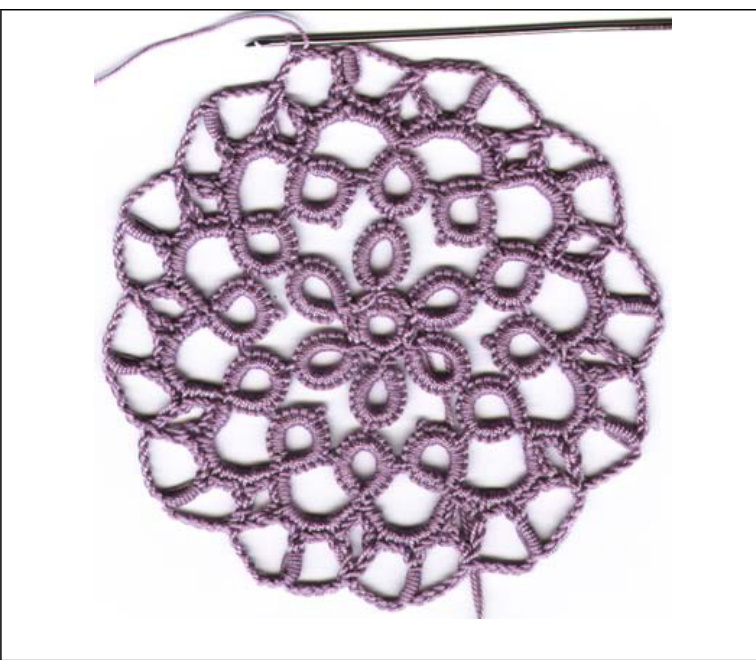
Crochet Tatted Lace Doily
Materials you will need For thread: Cro tat thread (older hook) Or the New Size 6 hook 1 ball of size 10 thread
Crochet Tatted Lace Basics Designer: Ferosa Harold Right Handed Instructions
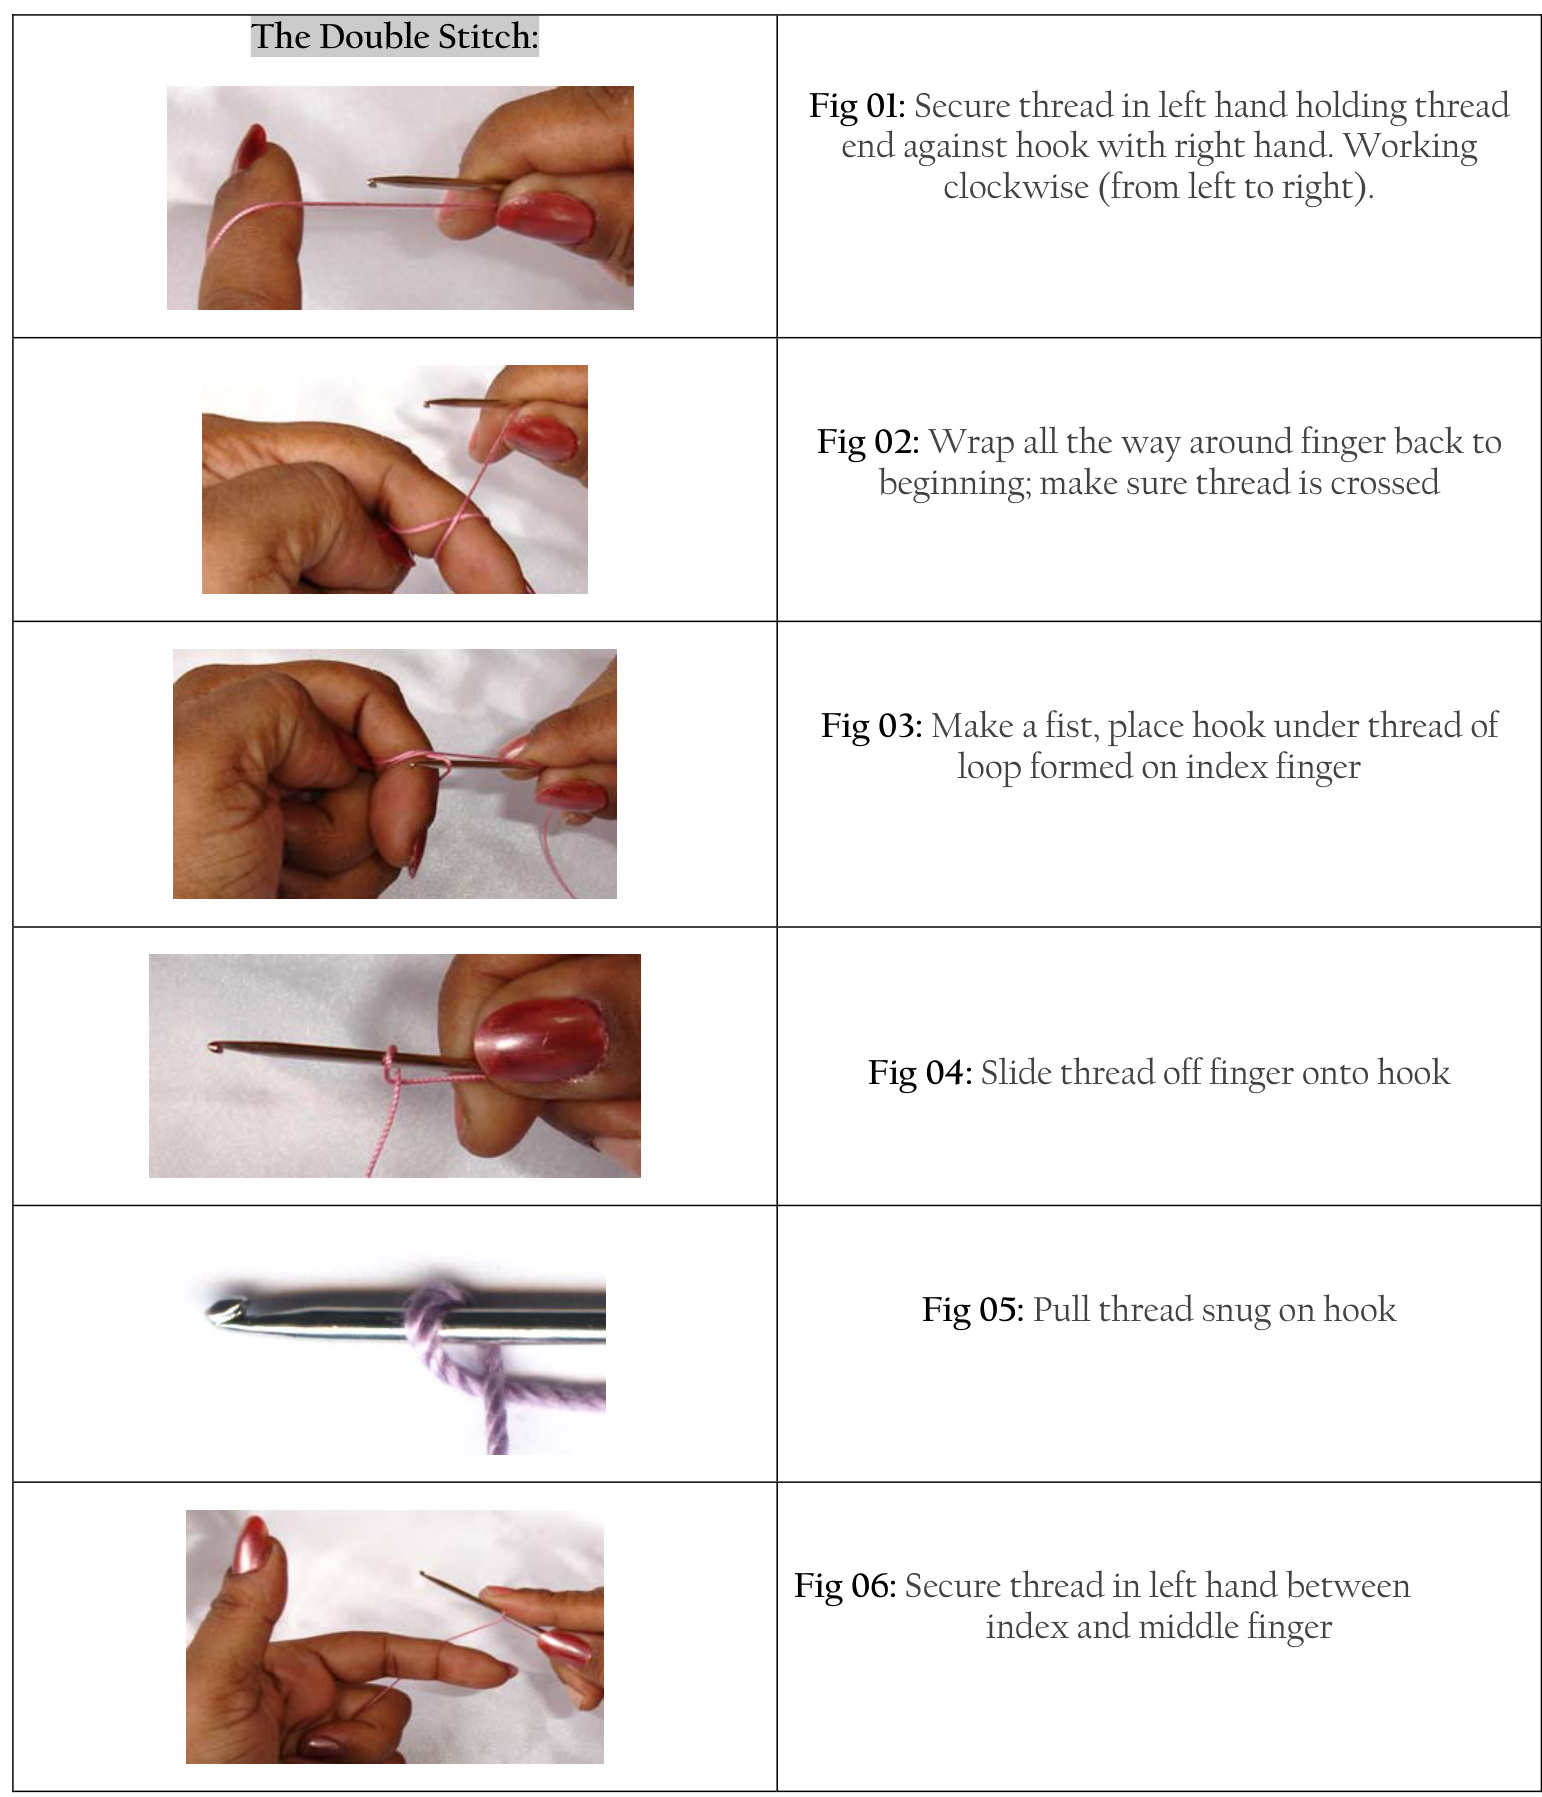
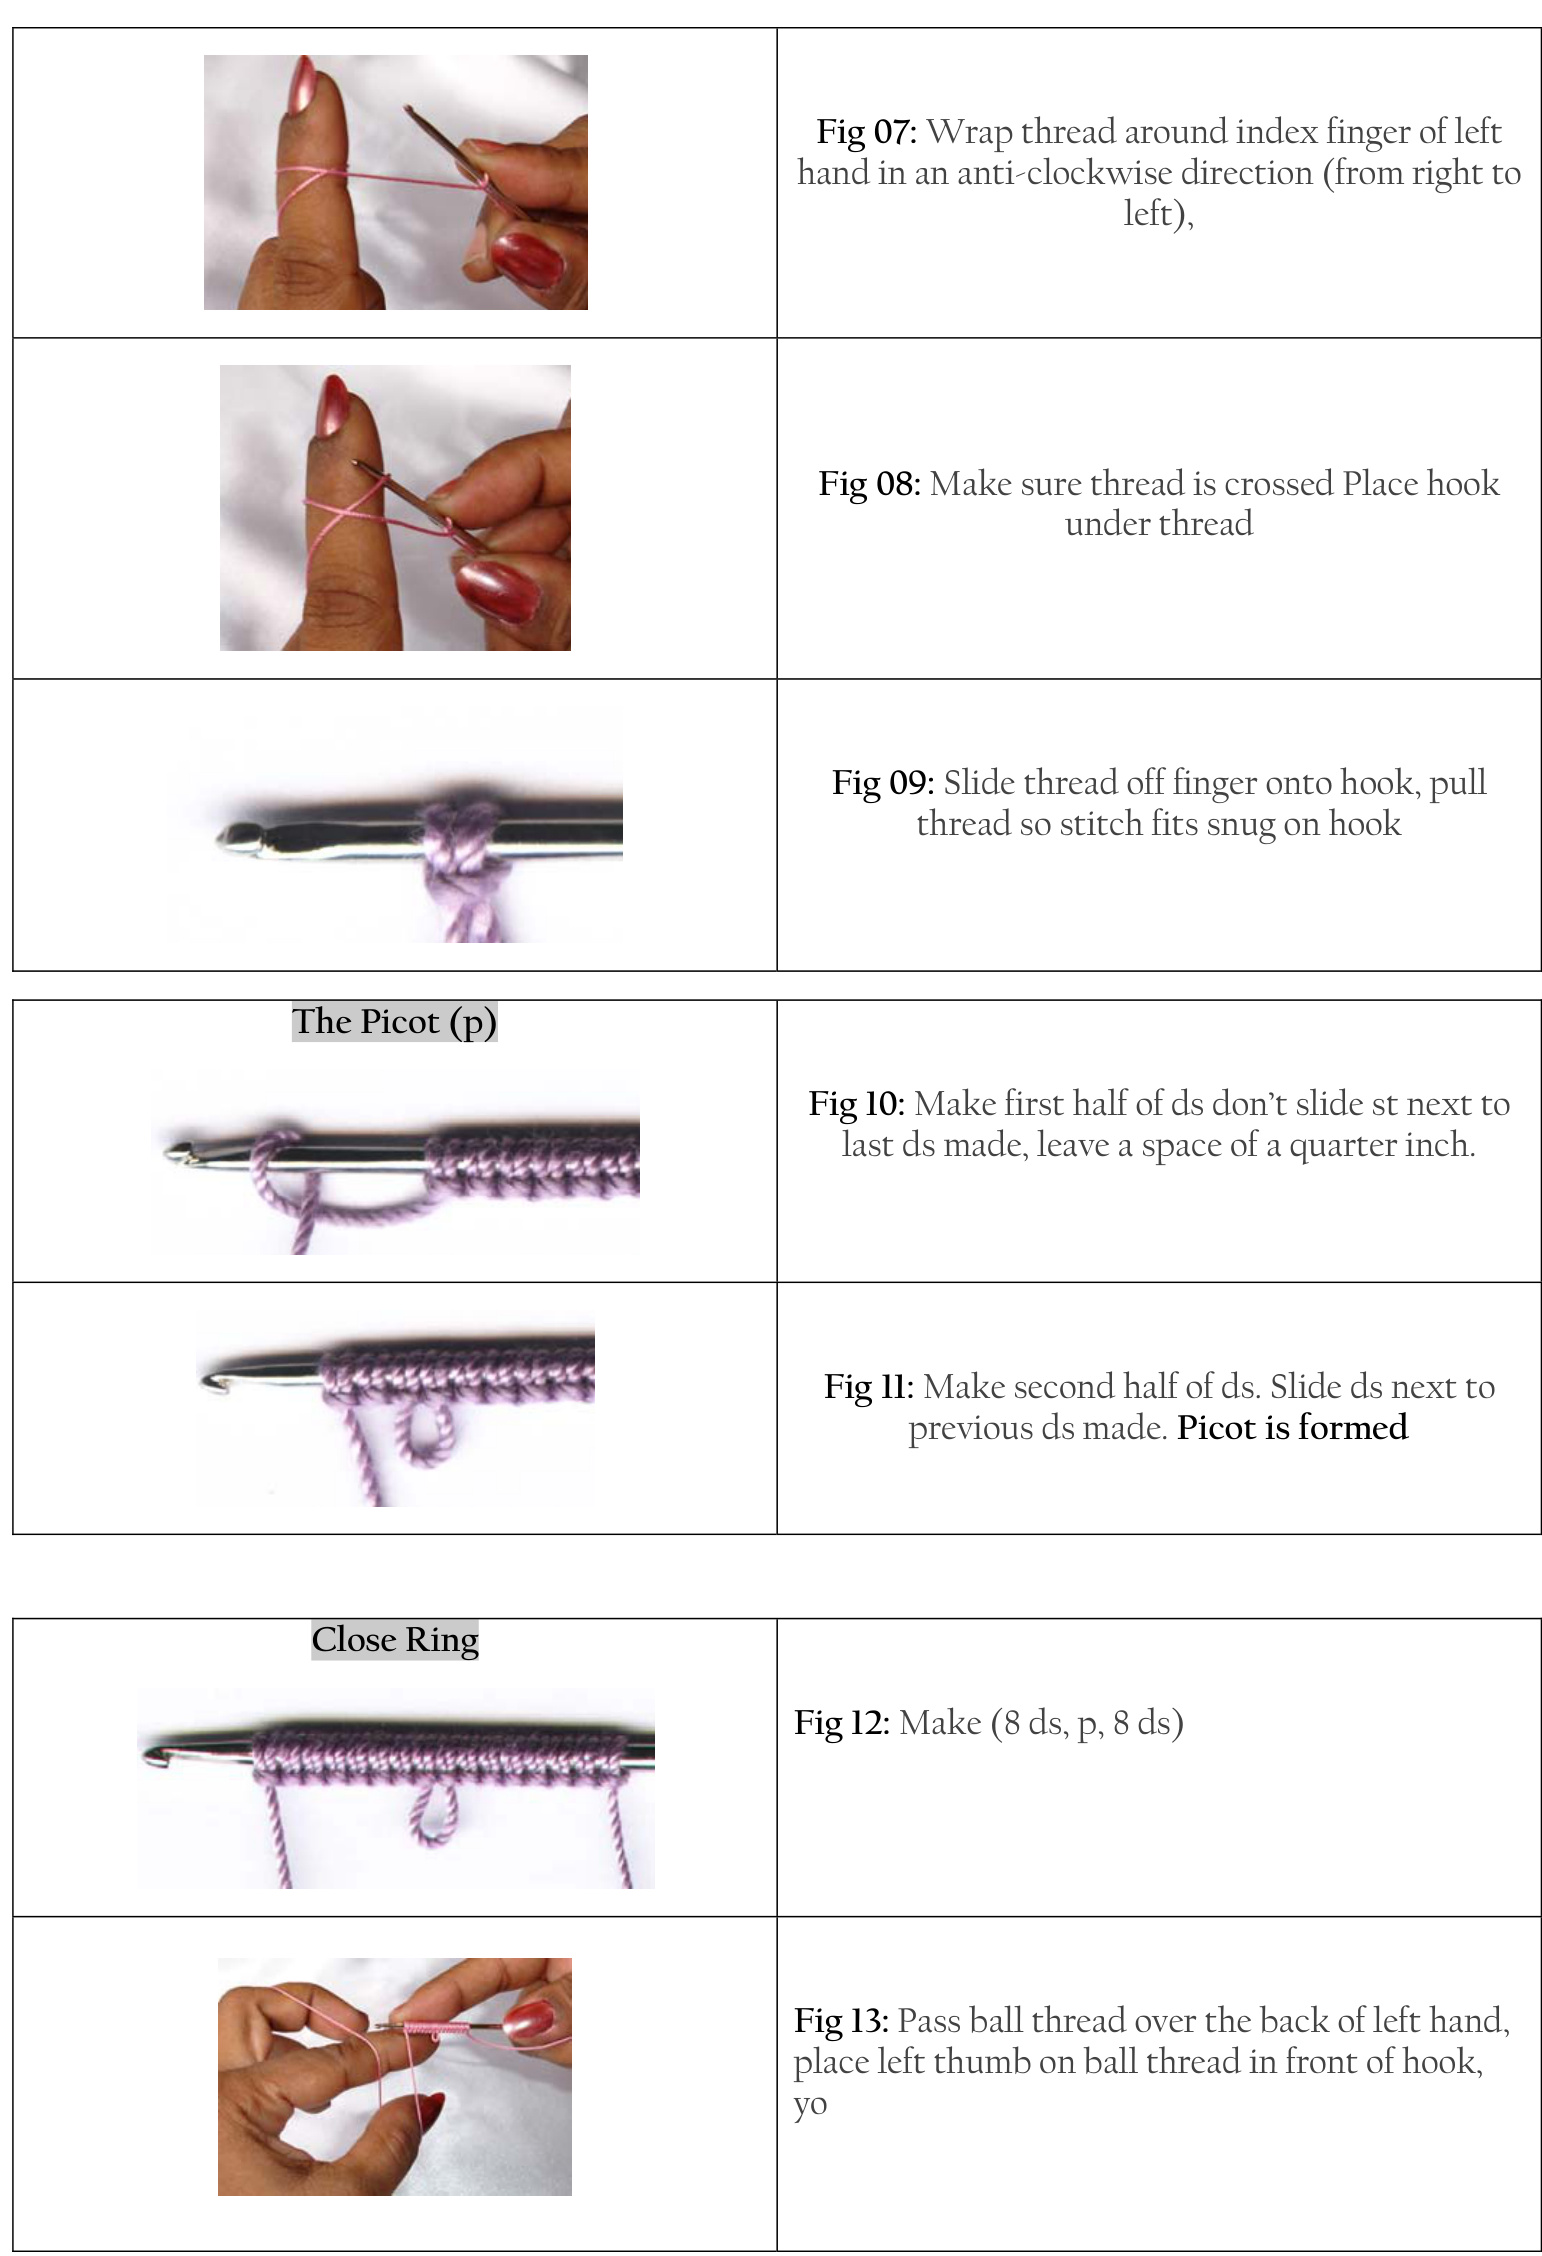
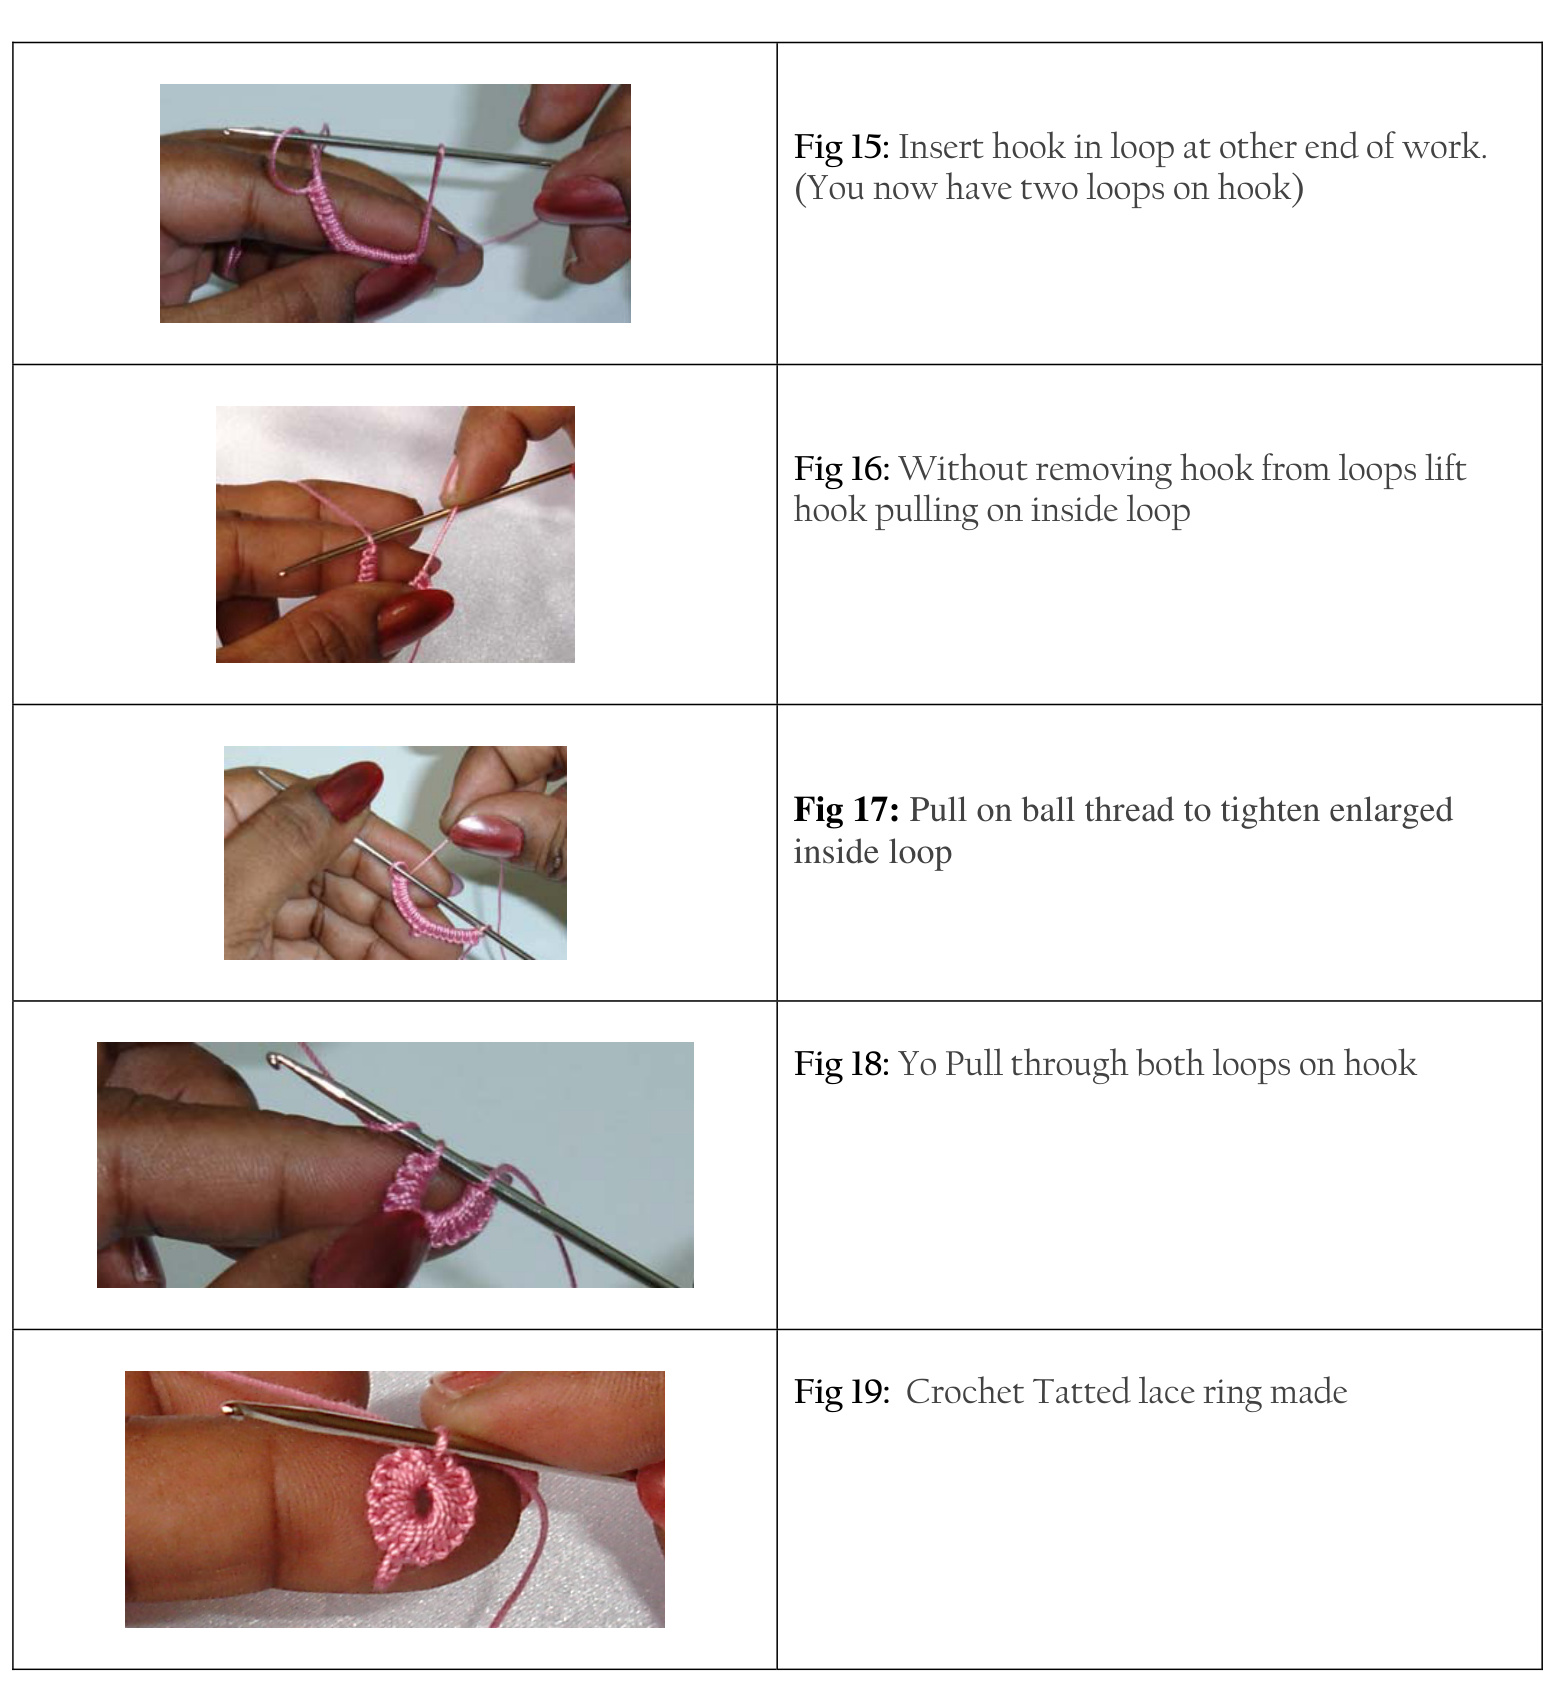
Fig 14: With hook facing down hold sts between index and thumb finger of left hand, pull through all loops on hook
Designer: Ferosa Harold
Pattern
Right Handed Instructions
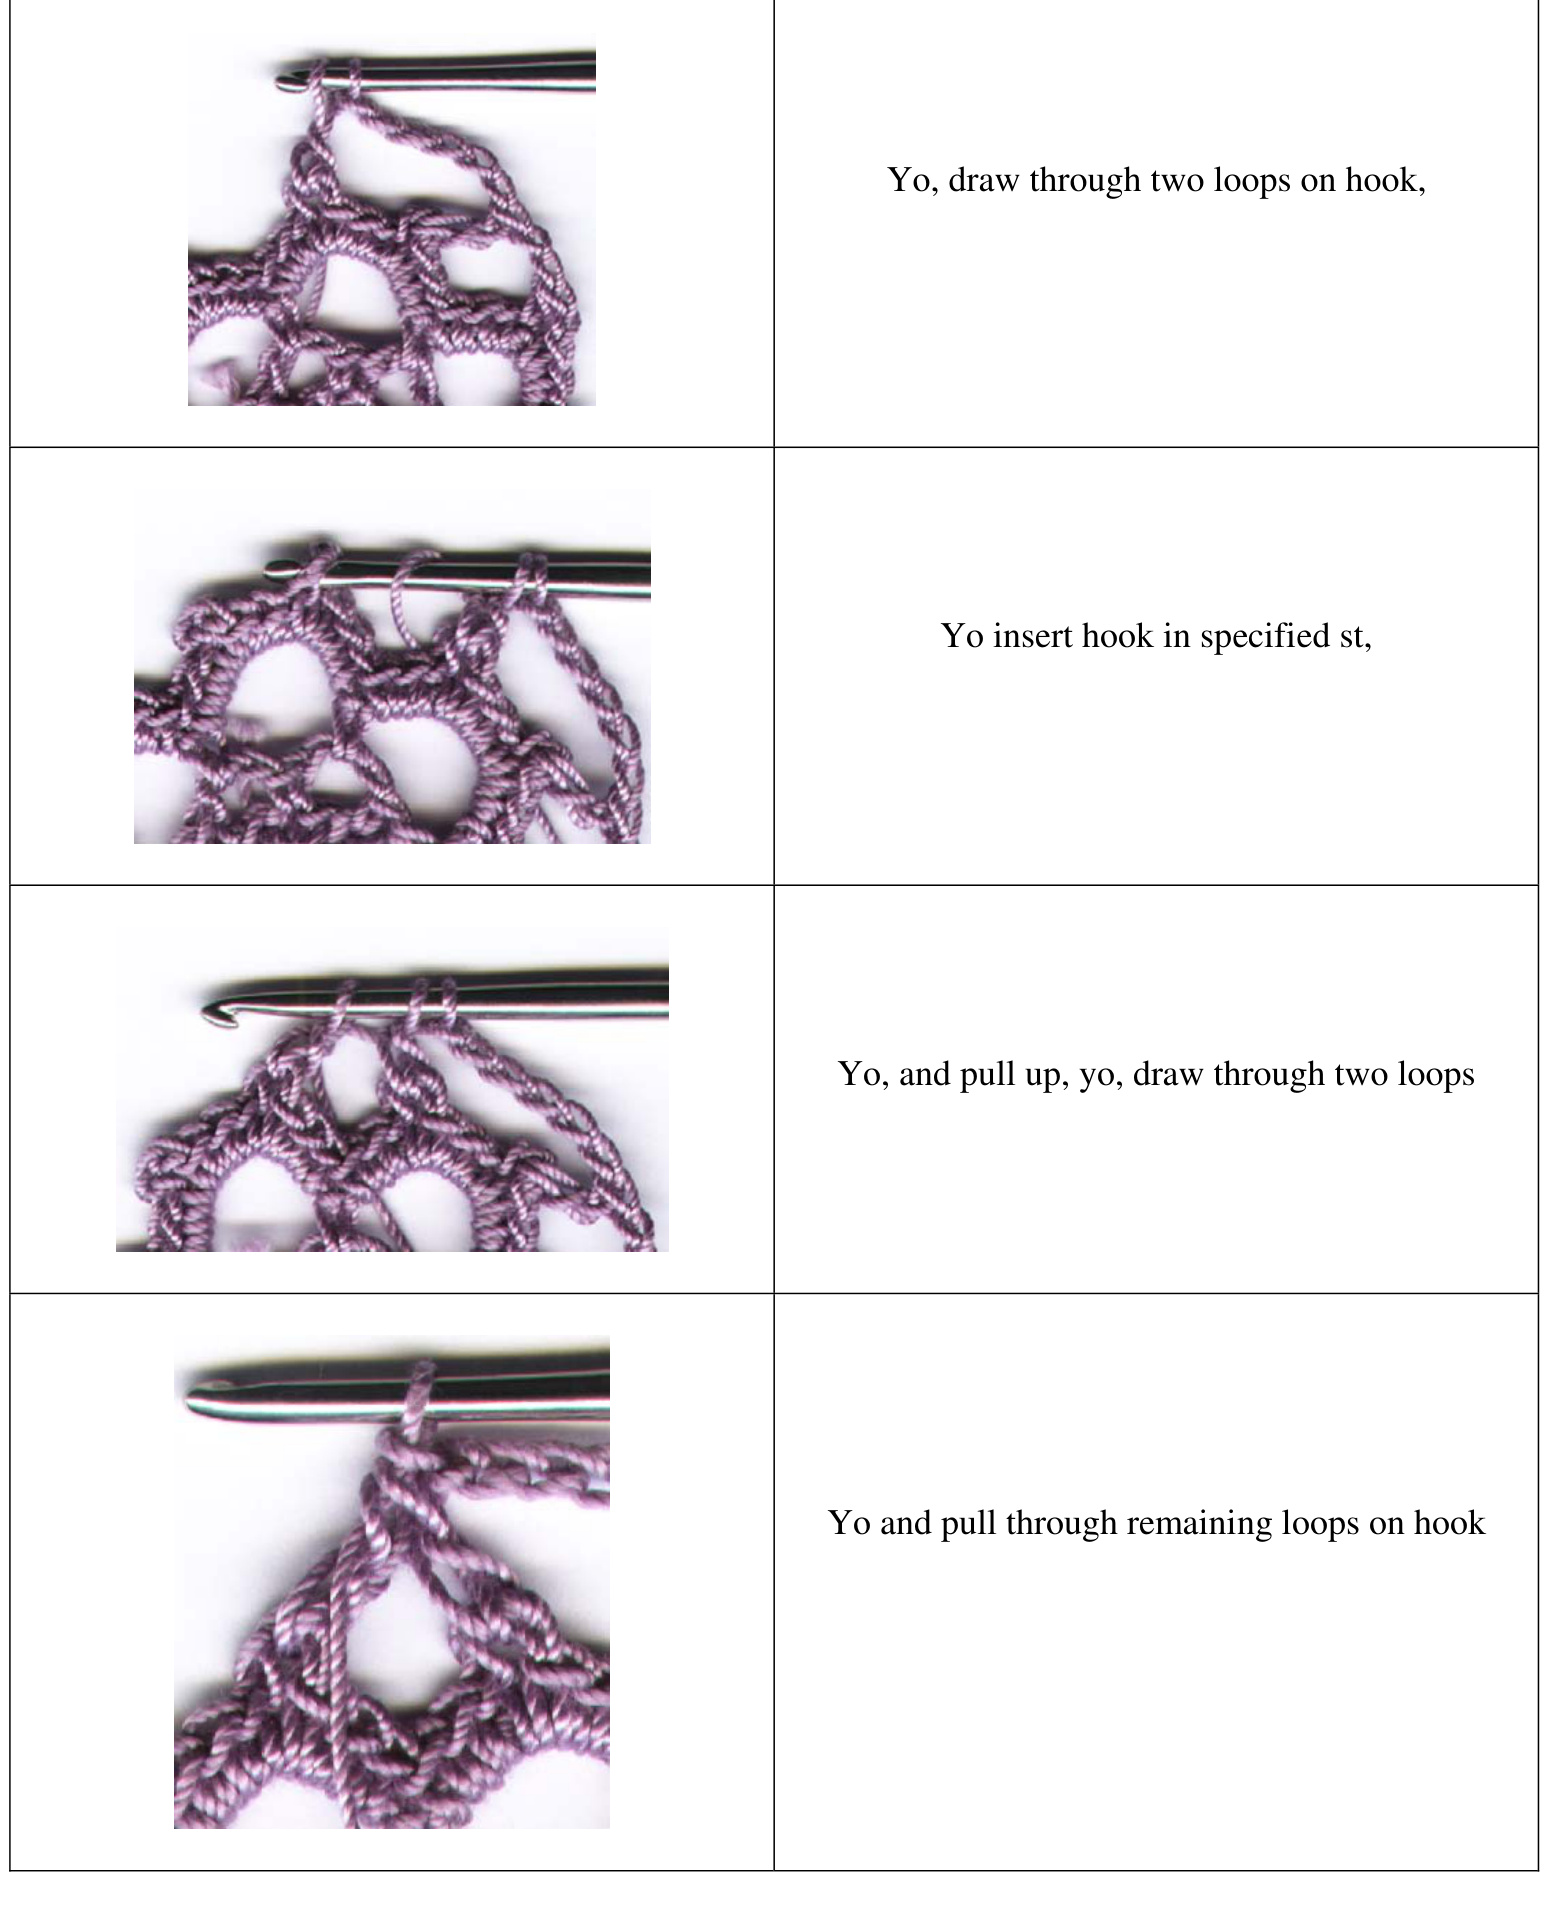
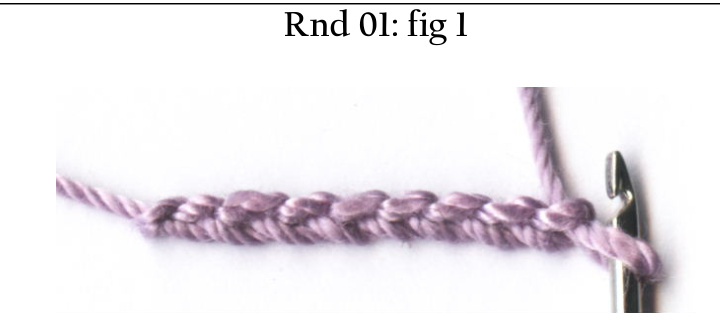
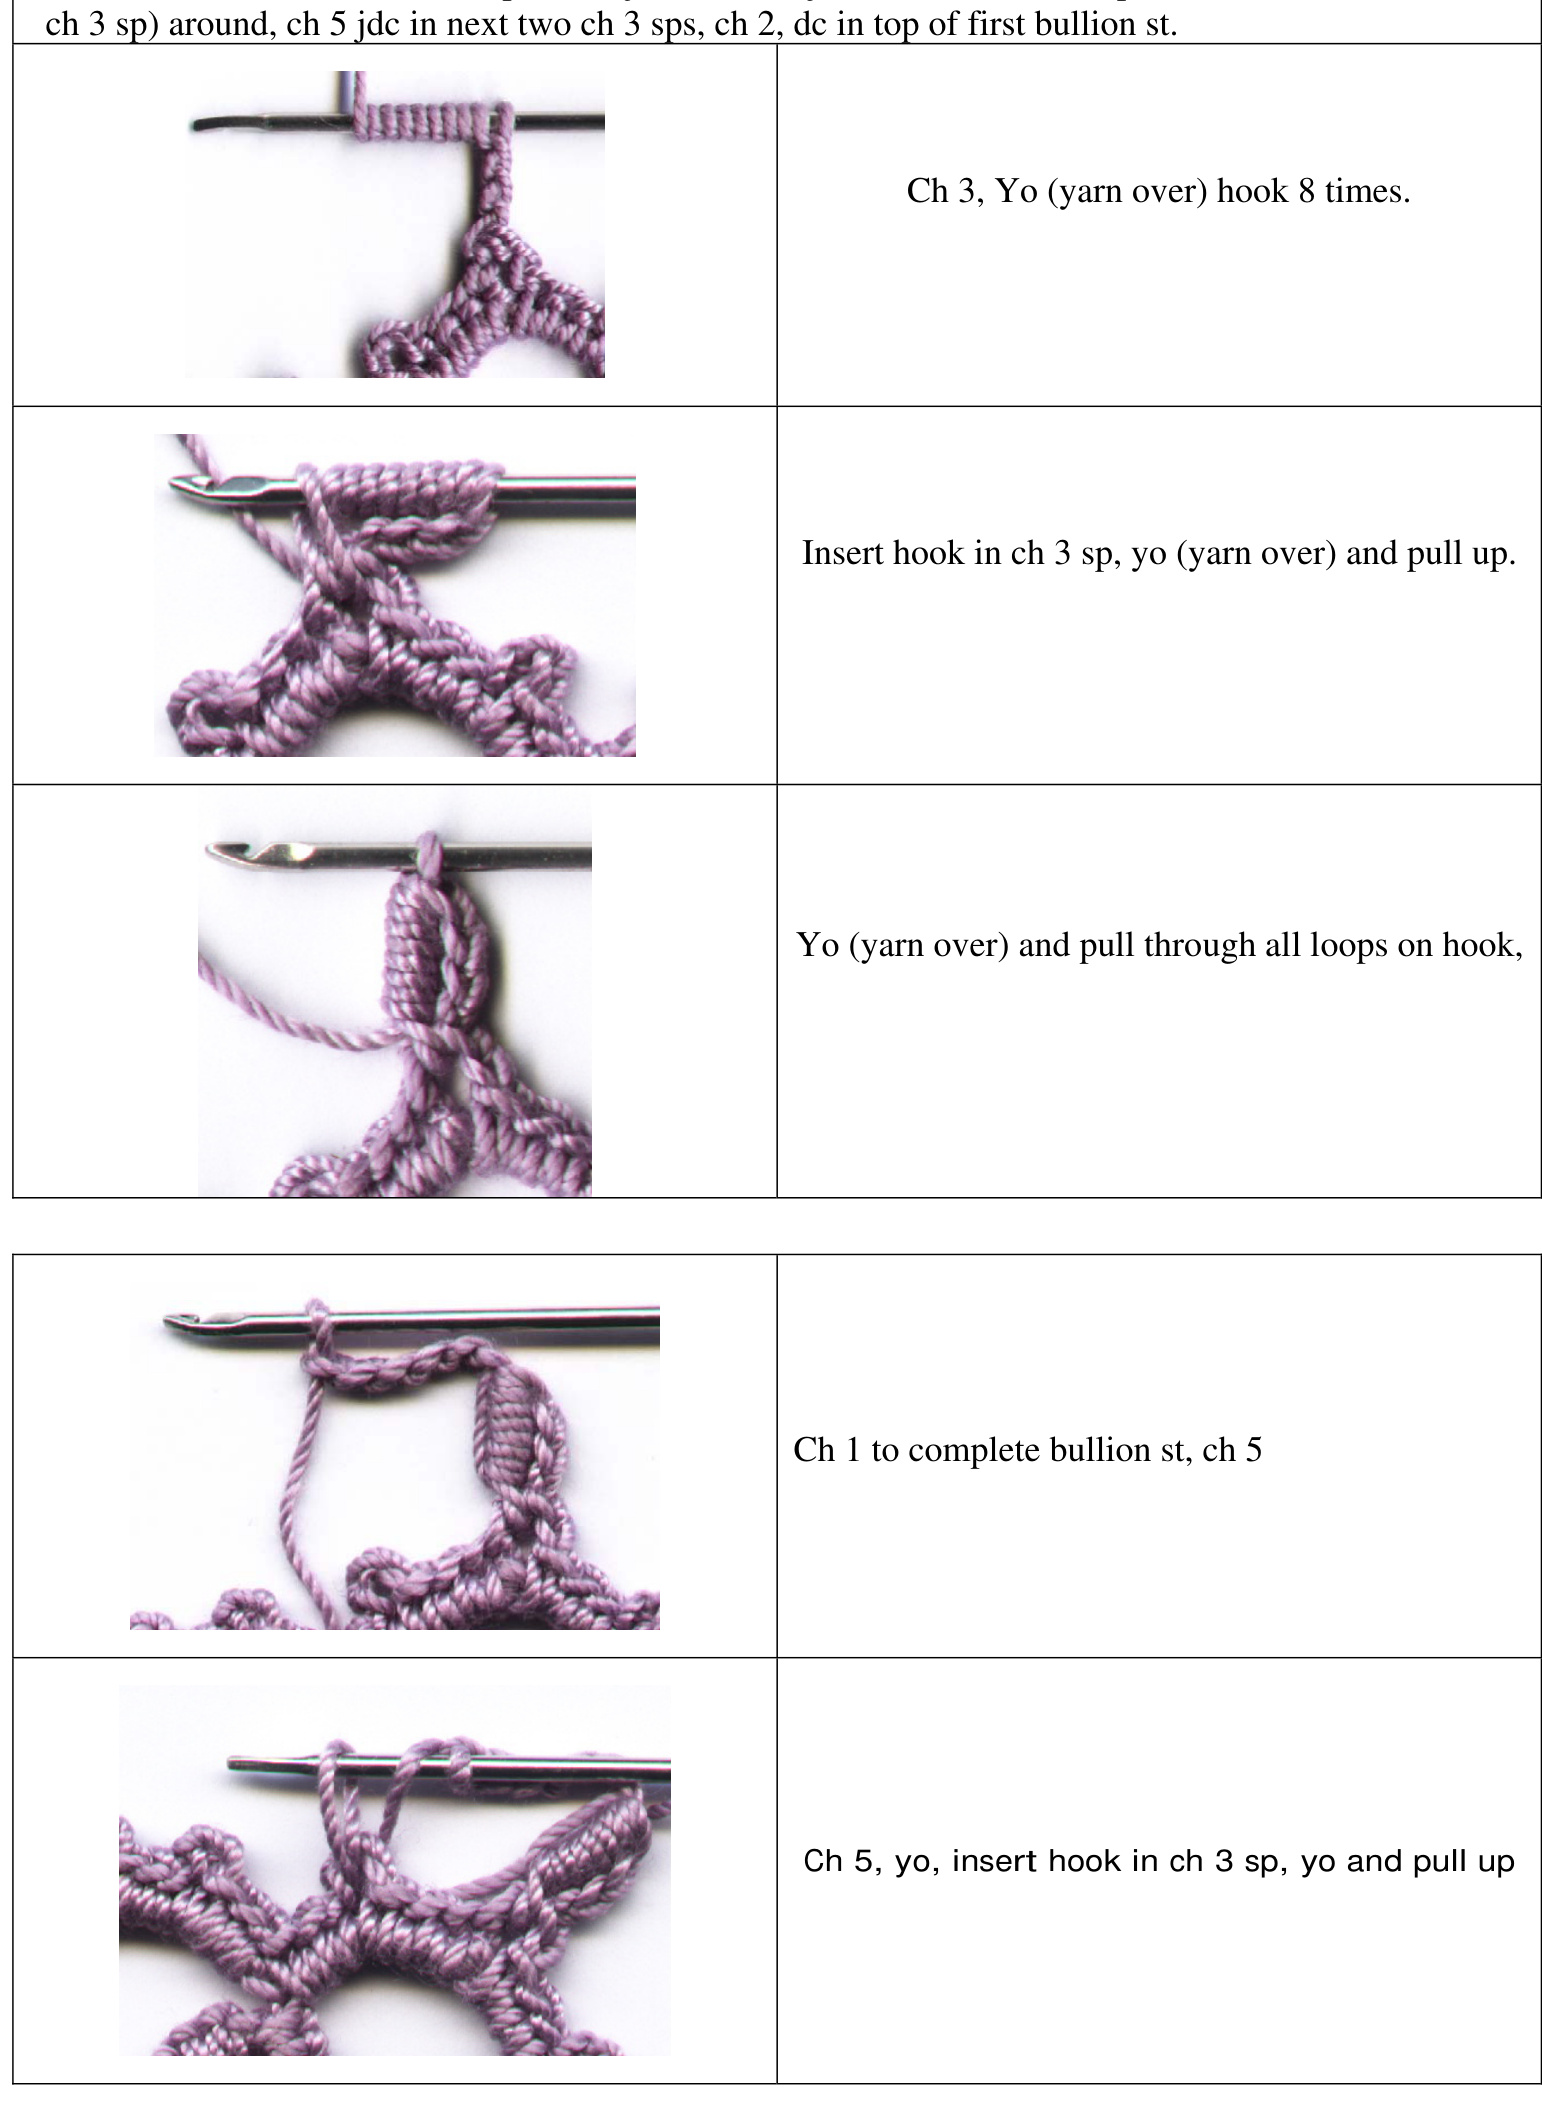
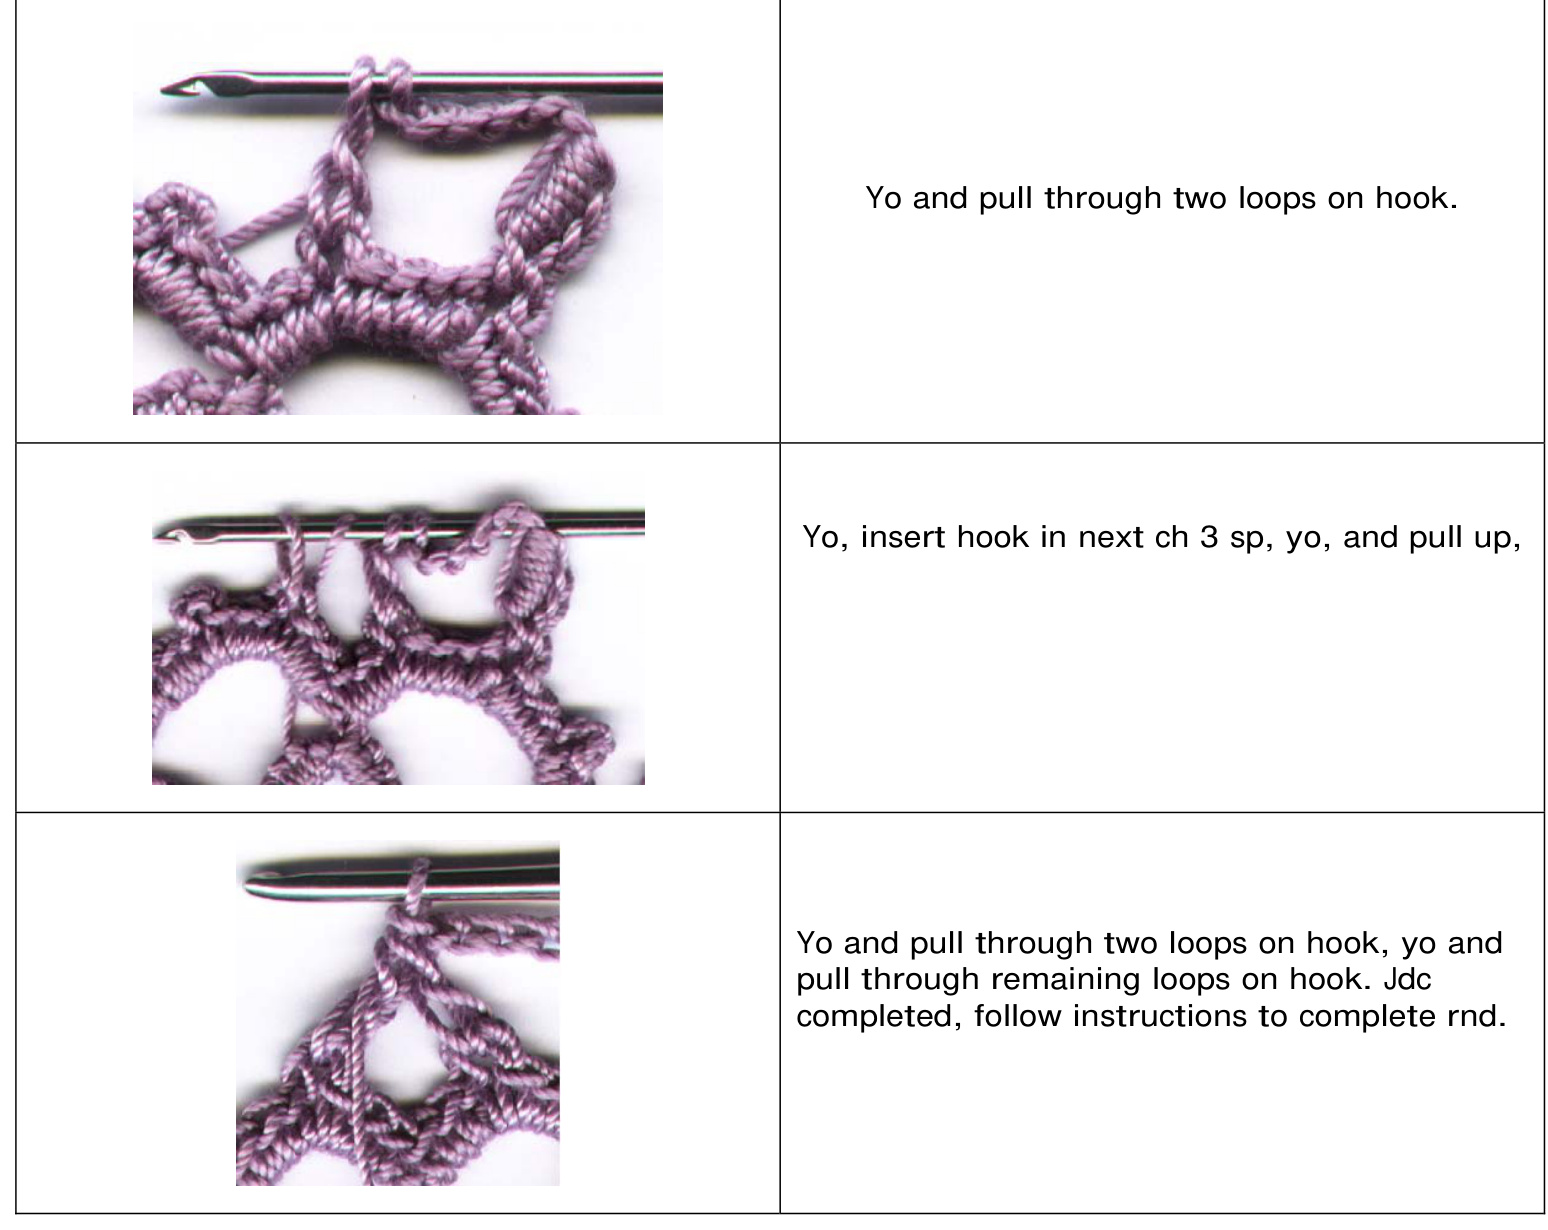
Materials For thread: For yarn: Cro tat thread hook (older hook) Or the New Size 6 hook 1 ball of size 10 thread Cro tat yarn hook size E (If you have another size cro tat hook for yarn that will work also) 1skien cotton worsted weight yarn Daisy $=1$ 5/8inches. Ch, sc, dc, s st, reverse sl st, ds, p. Gauge: Basic Stitches: Special Stitches: idc (joined double crochet). Yo insert hook in specified st, yo, pull up, yo, draw through two loops on hook, yo insert hook in specified st, yo, and pullup, yo, draw through two loops, Yo and pull through remaining loops on hook Bullion st: Yo 8 times, insert hook in specified st, yo and pull up, yo and draw through all loops on hook 7.5 inches (diameter)
Finished Size:
Rnd 01:
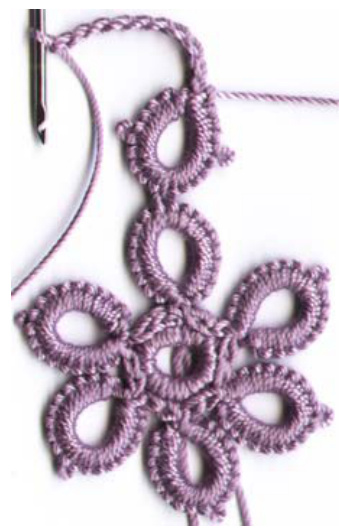
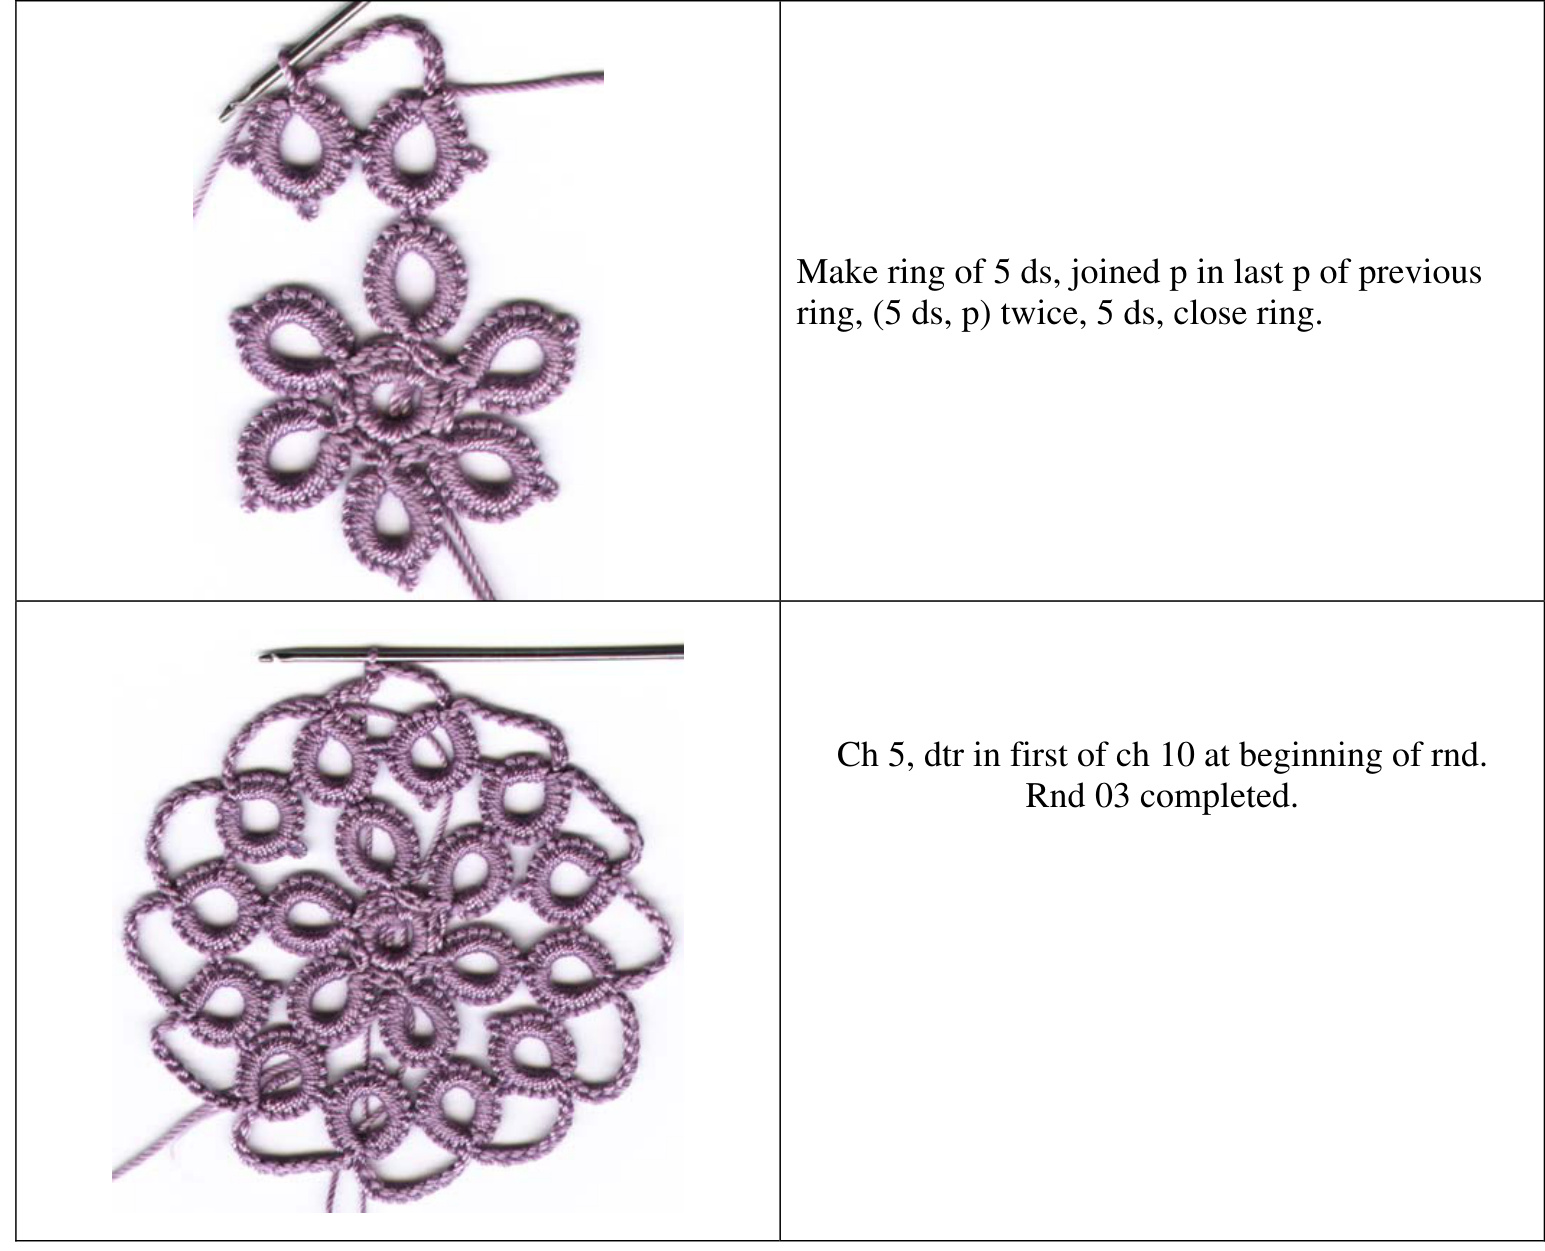
Ch 8, sl st in first ch st to form ring. Ch 1,12 sc in ring, sl st in first sc. Rnd 02: Working from left to right of work \*(make ring of10 ds, p, 10 ds, reverse sl st in next two sc) 6 times. Fasten off; leave at least 6 inches of thread to weave in. (Daisy completed). Rnd 03: Make ring of 5 ds, p, 5 ds, joined p in p of any petal of center daisy, 5 ds, p, 5 ds, (close ring). \*(ch 10, make ring of 5 ds, joined p in last p of previous ring, (5 ds, p) twice, 5 ds, (close ring).ch 10, make ring of 5 ds, joined p in last p of previous ring, 5 ds, joined p in next p of daisy,5 ds, p, 5 ds) 5 times, make ring of 5 ds, joined p in last p of previous ring,5 ds, p, 5 ds, joined p in first p of first ring, 5 ds, (close ring),ch 5, dtr in first of ch 10 at beginning of rnd.
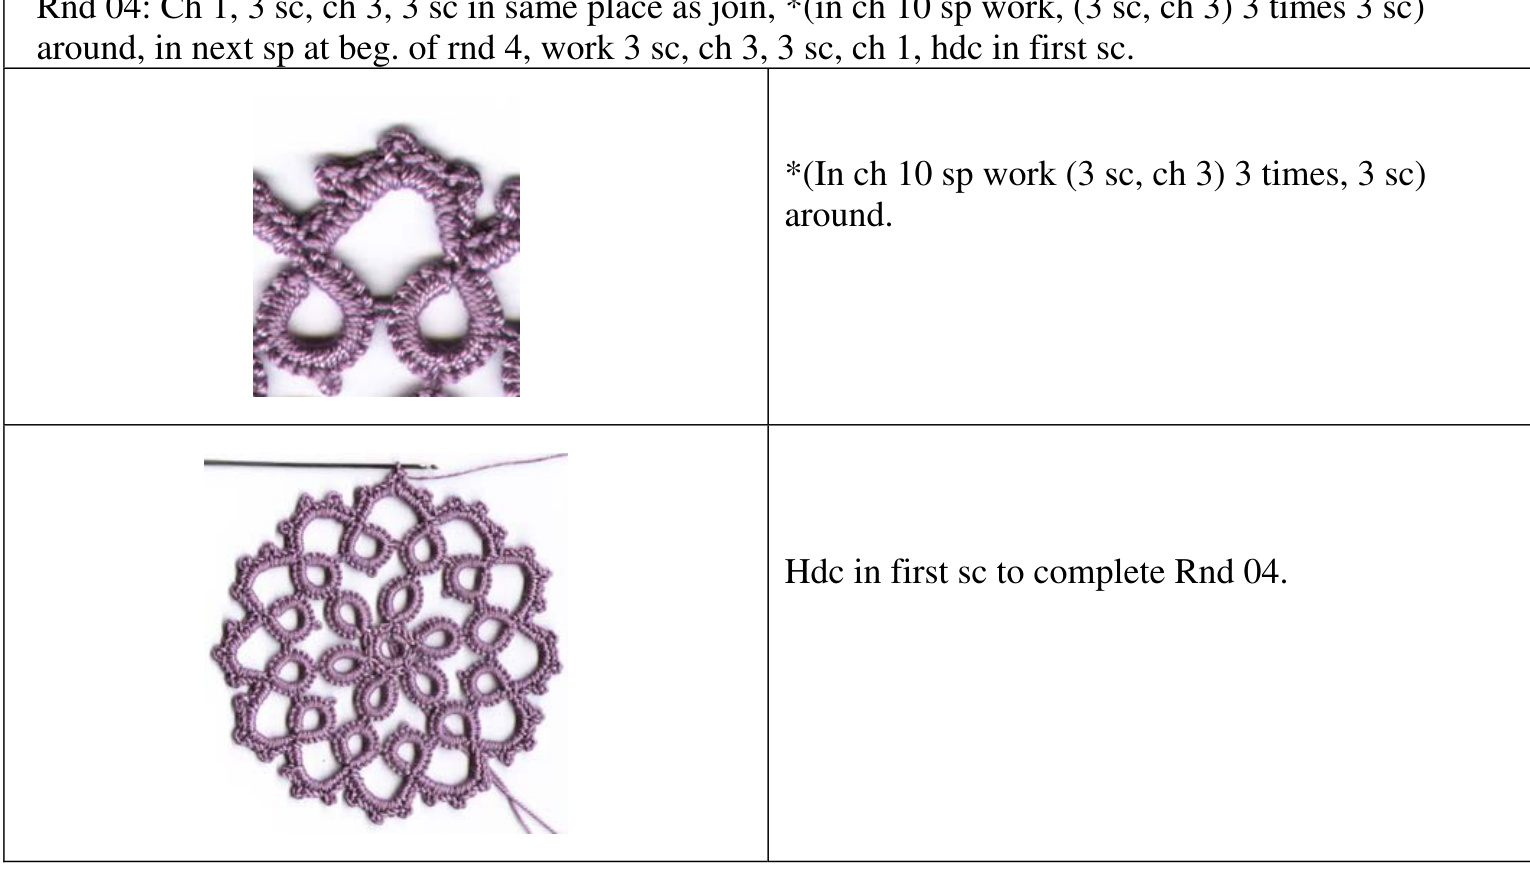
Rnd 04:
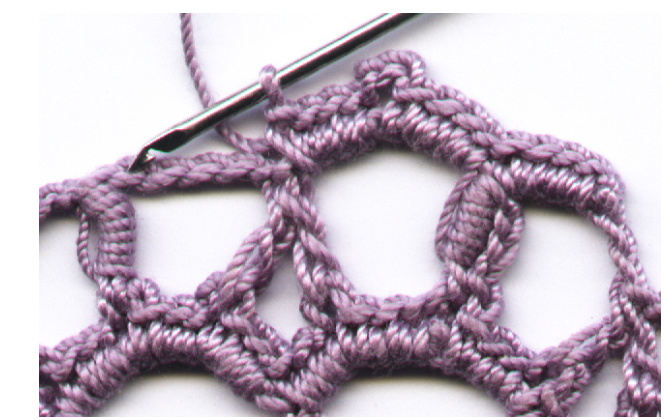
Ch 1, 3 sc, ch 3, 3 sc in same place as join, \*(in next ch 10 sp work, (3 sc, ch 3) 3 times 3 sc) around, in next sp work 3 sc, ch 3, 3 sc, ch 1, hdc in first sc.
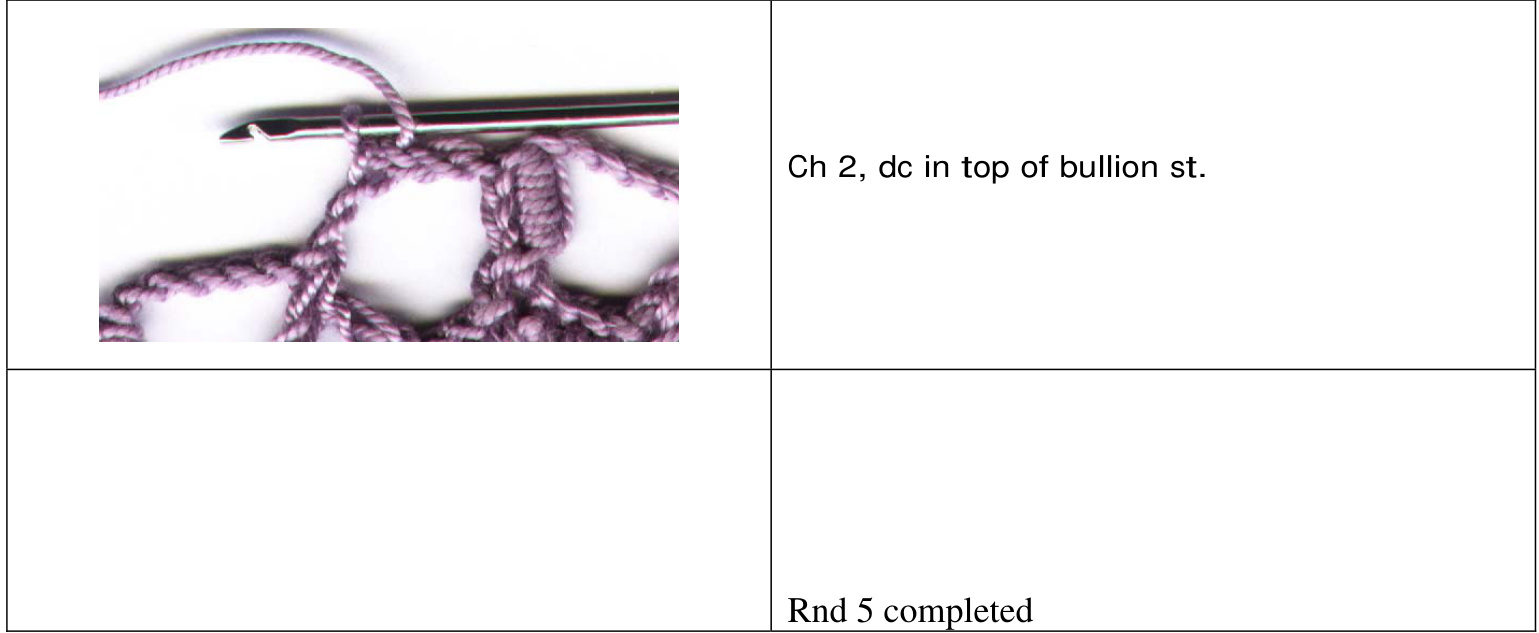
Rnd 05:
Ch 3, bullion st in same place as join, \*(ch 5, jdc in next two ch 3 sps, ch 5, bullion st in next ch $3\;\mathrm{sp}$ ) around, ch 5 jdc in next two ch 3 sps, ch 2, dc in top of first bullion st.
Rnd 06:
Ch 1, 4 sc in same sp, \*(in next ch 5 sp work 4 sc, ch 3, 4 sc) around, 4 sc in next sp, ch1, hdc in first sc.
Rnd 7:
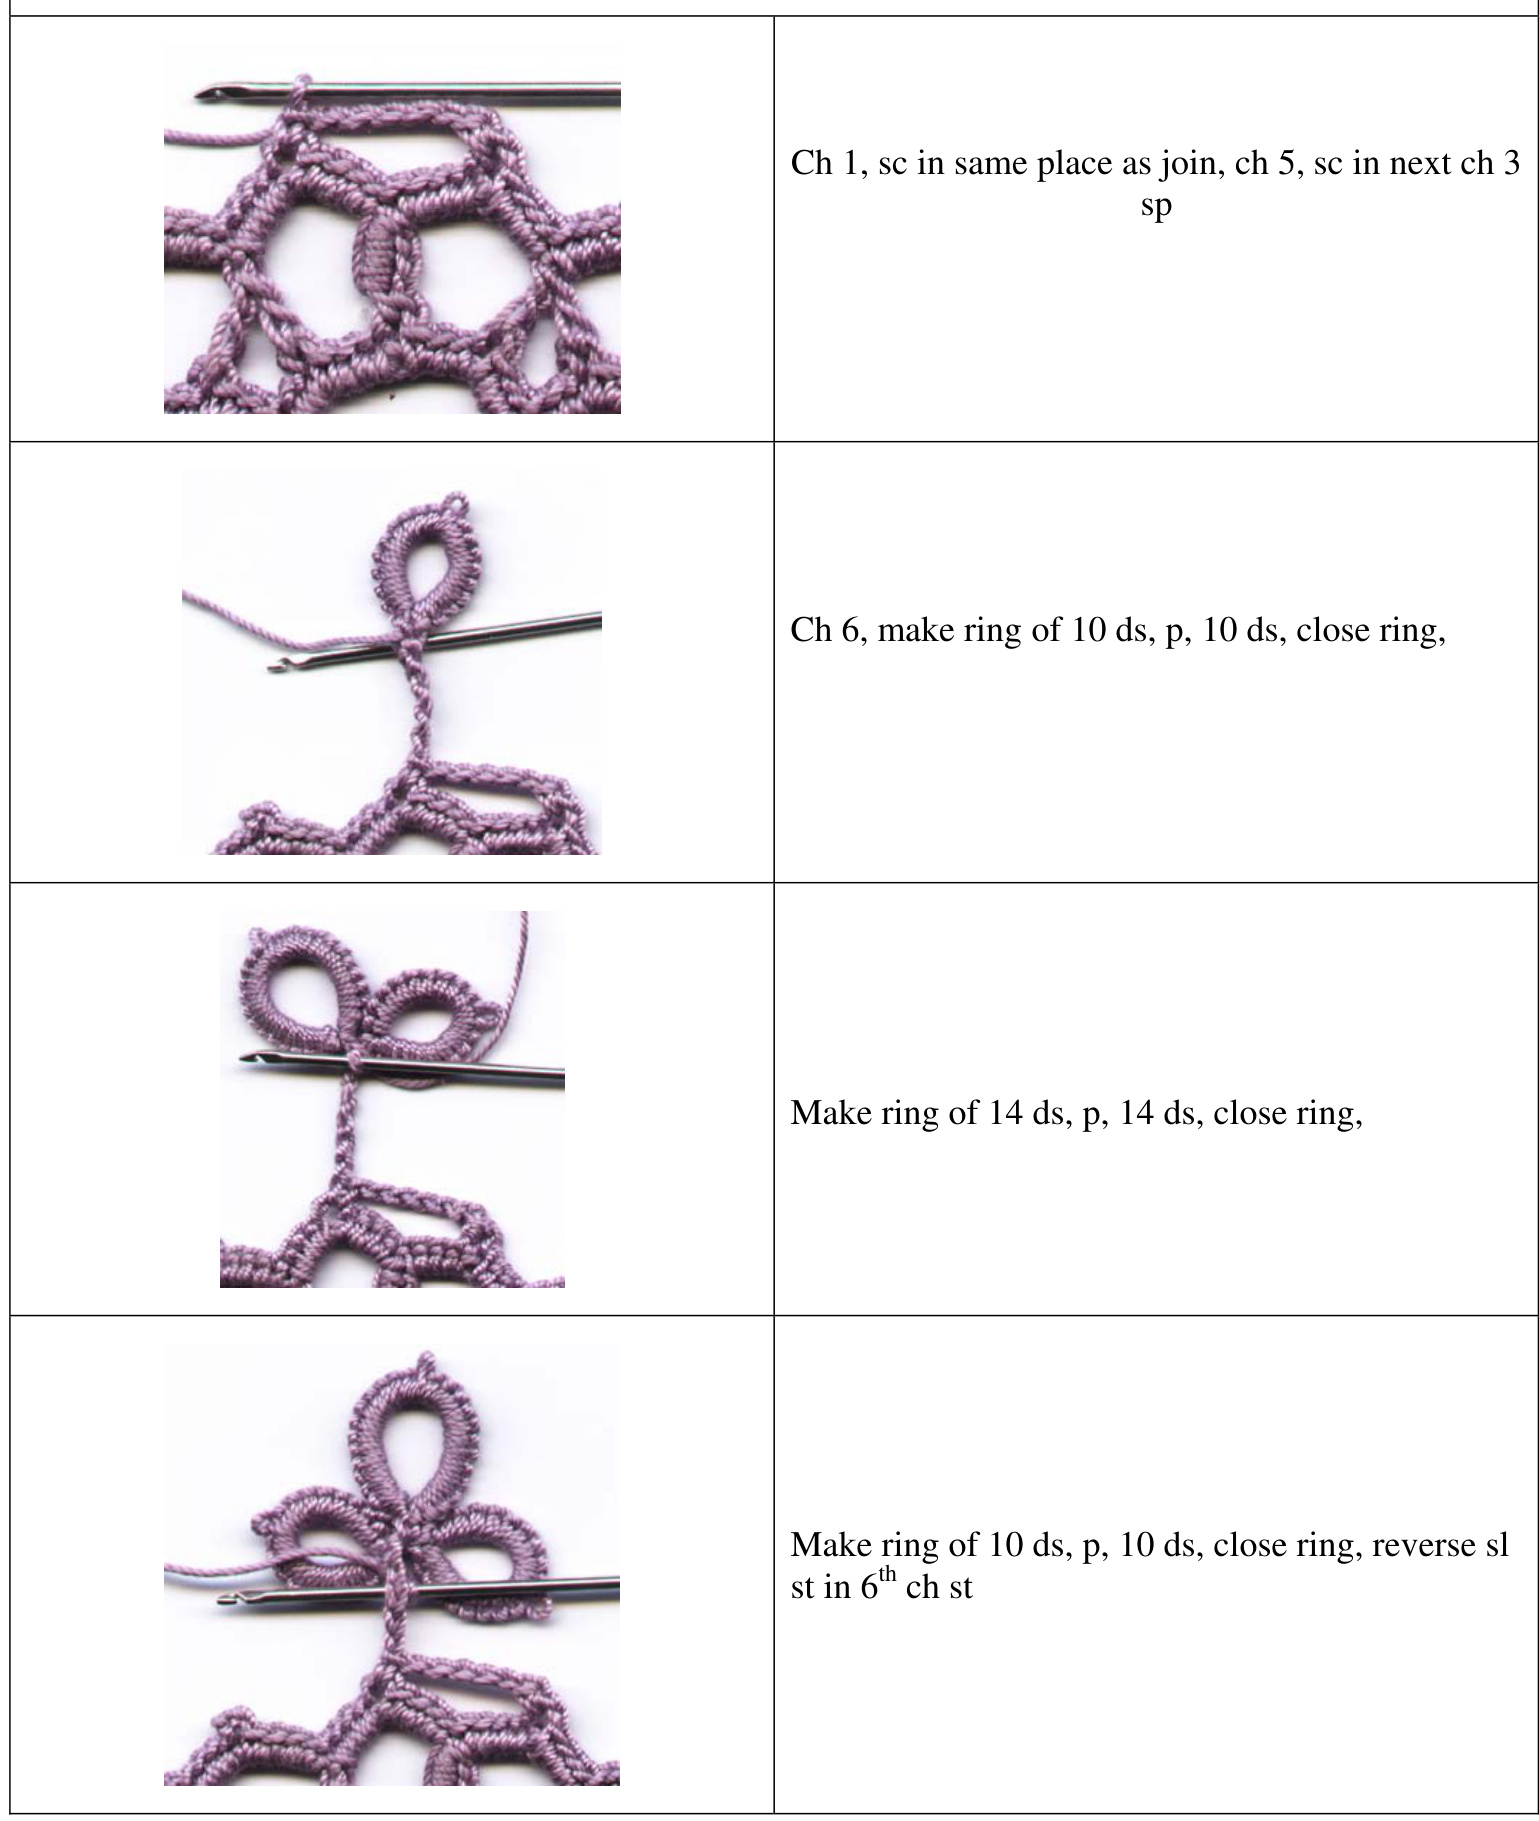
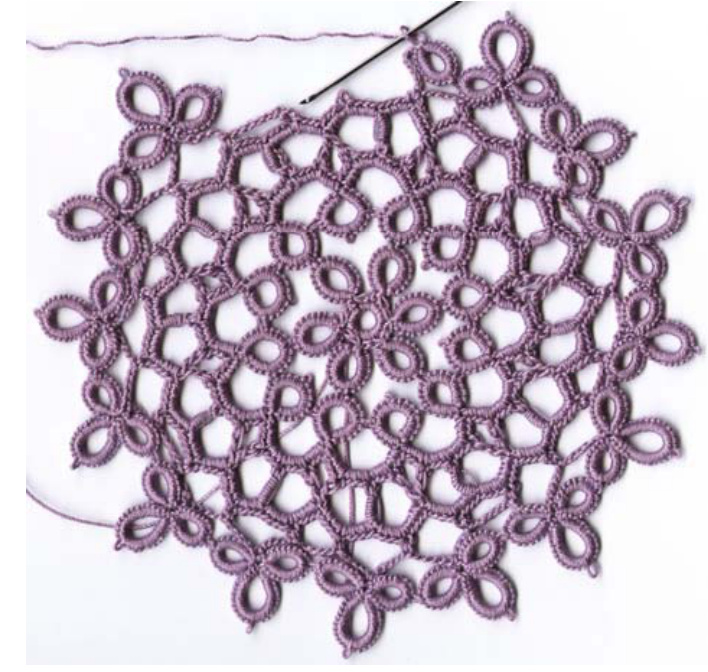
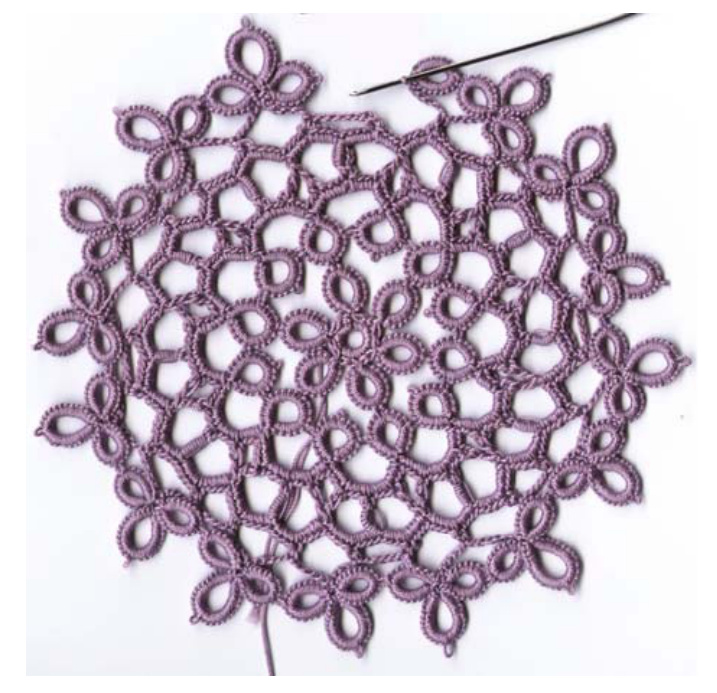
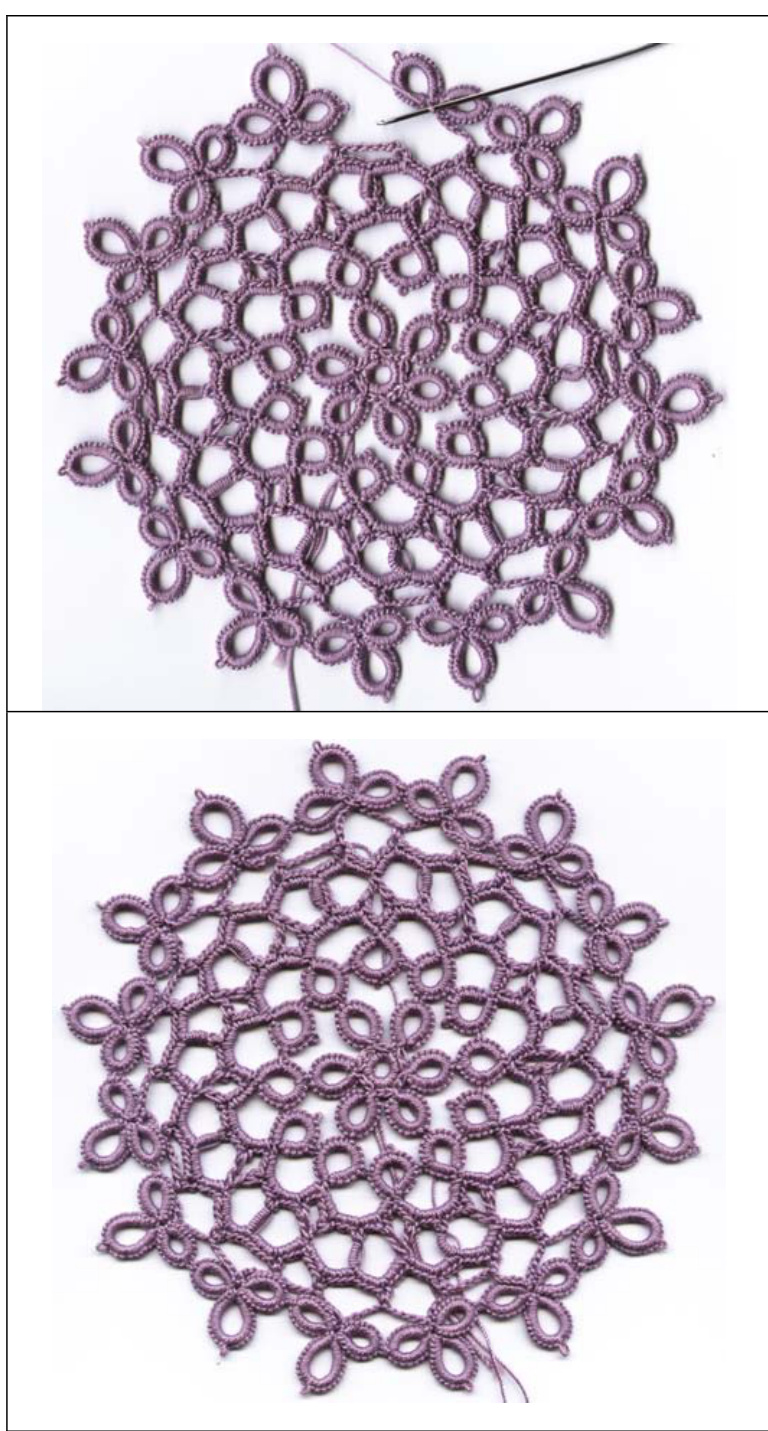
Ch 1, sc in same place as join, ch 5, sc in next ch 3 sp, ch 6, Make ring of 10 ds, p, 10 ds, close ring Step 1: Step 2: Step 3: Make ring of 10 ds, joined p in p of previous ring, 10 ds, close ring Repeat 1 & 2 (ch 5, sc in next ch 3 sp) twice, ch 6 Step 5: Step 6: Step 7: Step 8: Step 9: Step 10: Step 11: Repeat 1 to 7: 6 more times Repeat 1 to 4: once more Repeat step 1 once more. Make ring of 10 ds, joined p in p of first ring, 10 ds, reverse sl st in 6th. ch st. ch 5, sl st in first sc. (fasten off) Wash and lightly starch doily, pin in shape.
Rnd 01: Ch 8, sl st in first ch st to form ring. Ch 1,12 sc in ring, sl st in first sc.
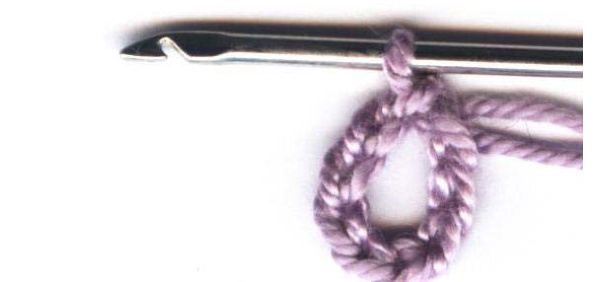
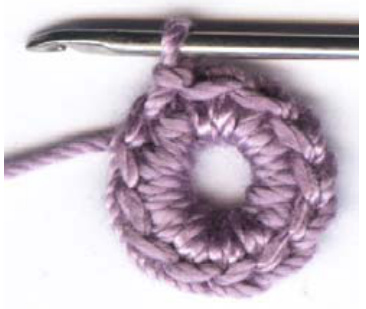
Rnd 01: Ch 8 sl st in first ch st to form ring Ch 1, 12 sc in ring, sl st in first sc Rnd 02: Working from left to right of work \*(make ring of10 ds, p, 10 ds, reverse sl st in next two sc) 6 times. Fasten off; leave at least 6 inches of thread to weave in. (Daisy completed).
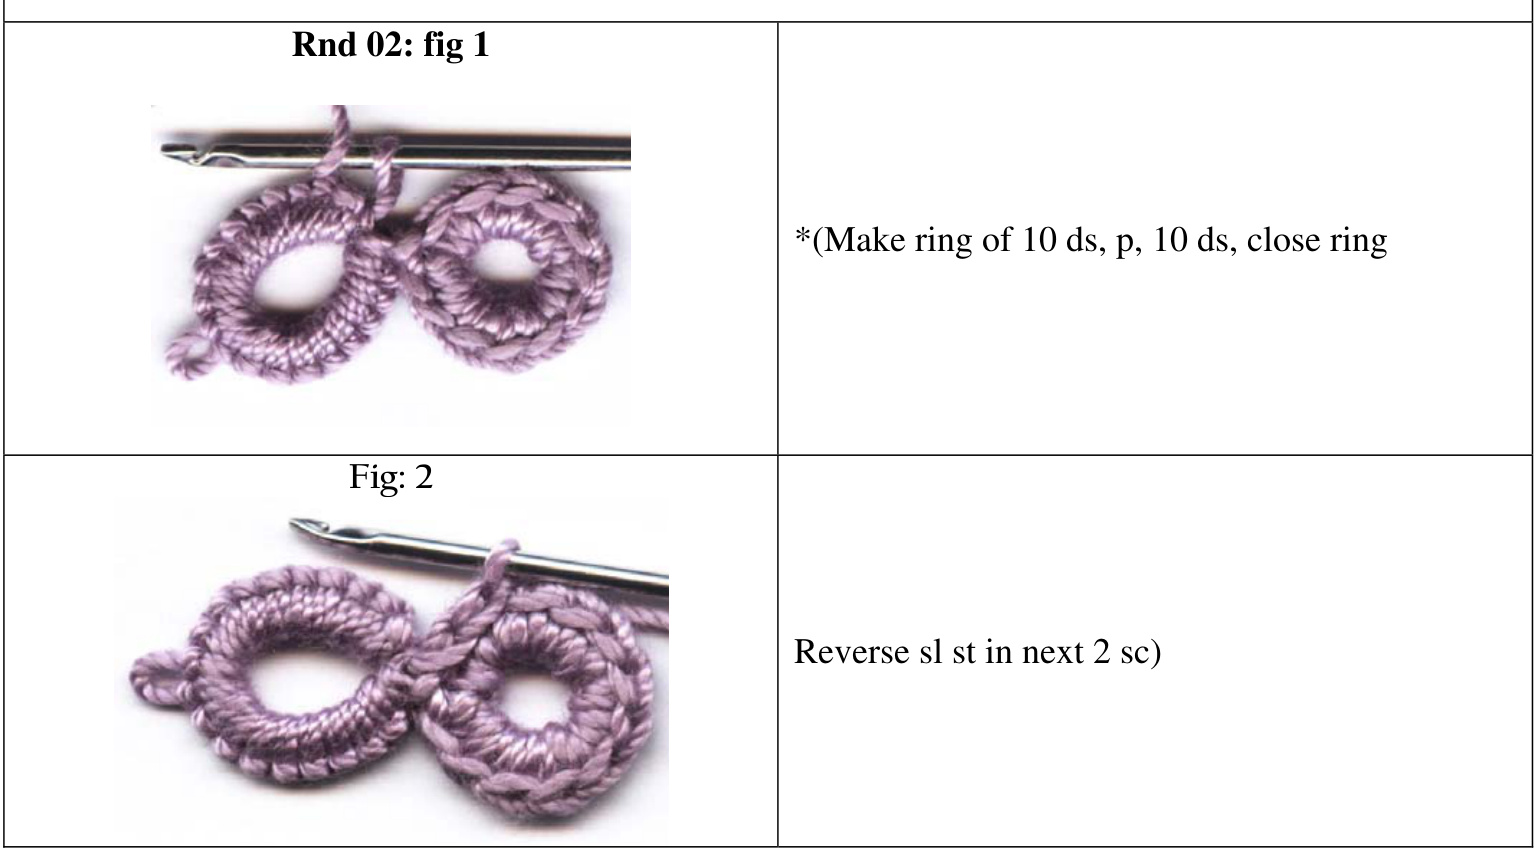
Fig 3
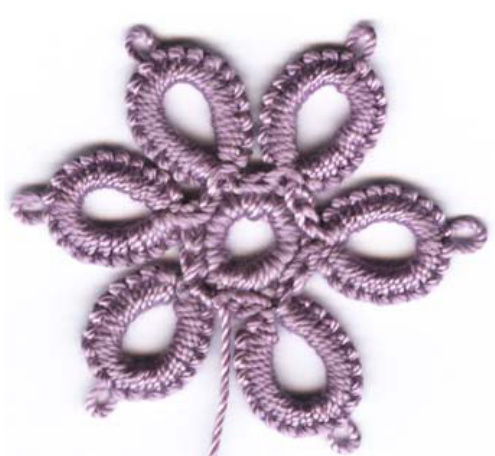
Repeat from $^*6$ times. Fasten off; leave at least 6 inches of thread to weave in. (Daisy completed). Rnd 3: Make ring of 5 ds, p. 5 ds, joined p in p of any petal of center daisy, 5 ds, p, 5 ds, (close ring). \*(ch 10, make ring of 5 ds, joined p in last p of previous ring, (5 ds, p) twice, 5 ds, (close ring).ch 10, make ring of 5 ds, joined p in last p of previous ring, 5 ds, joined p in next p of daisy,5 ds, p, 5 ds) 5 times, make ring of 5 ds, joined p in last p of previous ring,5 ds, p, 5 ds, joined p in first p of first ring, 5 ds, (close ring),ch 5, dtr in first of ch 10 at beginning of rnd.

Make ring of 5 ds, p, 5 ds, joined p in p of any petal of daisy center, 5 ds, p, 5 ds, close ring
Ch 10.
Rnd 5: Ch 3, bullion st in same place as join, \*(ch 5, jdc in next two ch 3 sps, ch 5, bullion st in next Rnd 6: Ch 1, 4 sc in same sp, \*(in next ch 5 sp work 4 sc, ch3, 4 sc) around, 4 sc in next sp, ch1, hdc in first sc.
Ch 1, 4 sc in same sp, in each ch 5 sp work 4 sc, ch 3, 4sc.
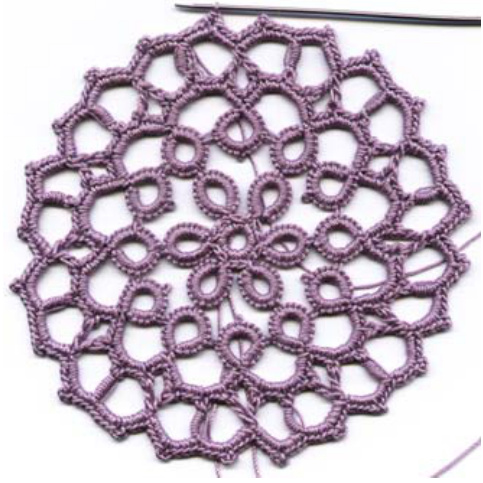
4 sc in next sp, ch1, hdc in first sc, rnd 6 completed. Rnd 7: Ch1, s in same place as join, ch 5, sc in next ch 3 sp, ch6, Make ring of 10 ds, p, 10 ds, cloe ring Step 1: Make ring of 14 ds, p, 14 ds, close ring, Step 2: Make ring of 10 ds, p, 10 ds, close ring, reverse sl st in $6^{\mathrm{th}}$ ch st Step 3: Ch 5, sc in next ch 3 sp, ch 6 Step 4: Make ring of 10 ds, joined p in p of previous ring, 10 ds, close ring Step 5: Repeat 1 & 2 Step 6: (ch 5, sc in next ch 3 sp) twice, ch 6 Step 7: Repeat 4 Step 8: Repeat 1 to 7: 6 more times Step 9: Repeat 1 to 4: once more Step 10: Repeat step 1 once more. Step 11:Makering of 10ds,joined pinpoffirst ring,10 ds, revere sl st in6th. ch st. ch5, slst n first sc. (fasten off) Wash and lightly starch doily, pin in shape.

Repeat step 4
Repeat step 1 to 7: 6 more times Repeat step 1 to 4: once more Repeat step 1 once more.
Make ring of 10 ds, joined p in p of first ring, 10 ds, reverse sl st in 6th. ch st. ch 5, sl st in first sc. (fasten off) Wash and lightly starch doily, pin in shape.


