Nereides stole
Description of Design
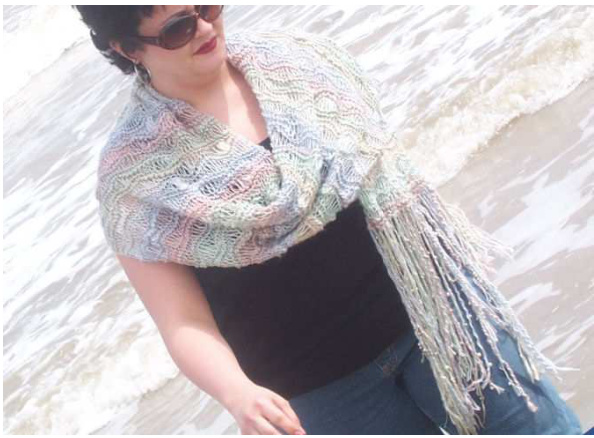
The Nereid es w ere fifty beautiful sea nymphs said to dwell in a silvery cavern at the bottom of the Aegean Sea These shape shifting goddesses had in their care the sea's rich bounty and individually they also represented various facets of the sea, from salty brine, to foam, sand, rocky shores, w aves and currents. They were said to wear shaw ls while on land that if captured gave the holder dominion over them. A sea foam lace pattern makes up the body of the wrap and shows off the thick and thin nature of the silk hand spun yarn while echoing the swell of waves. It is bordered on each end with eyelets on a garter stitch bed (suitable for lacing or adding tassels). The sheen of the silk and subtle color of the y arn reflects the many aspects of the sea. An eclectic fringe studded with multicoloured glass pearls add a nice touch and make this stole equally perfect for a walk on the beach or a night on the town.
Materials
750 yardshand spun yarn US 10 (6mm) straight needles Glass pearlbeads (as few or as many as you like) Beading needle
Yarn substitutes
The sea-foam lace pattern lends itself beautifully to any thick and thin yarn. This would be a great pattern for displaying your own hand spun yan. Silk/silk-blend substitutes: Great Adiron dack Yarn Company- Hand spun silk or Silk Delight, Pearl Drops Starg azer by Fiesta Yarns, or Sari sillk Wool/woolblends: Colinette Point 5 or Shimmer 5, Debbie Bliss Soho, Cherry Tree Hill Mohair Thick & Thin, Malabrigo Gruesa, Cascade di veFiamma Any beads, crystals, or charms you like would compliment this shawl Sizes 23 X60 inch /58 X 152 cm
Gau ge
Gauge is really not crucial for this project. The yarn used varied in thickness from super thin lace weight to super bulky, but worked up to DK-worsted (19-20 sts) range in Stock inete stitch
Any stitch in stru ction s
Cut along length of metallic emb roidery floss and string it w ith pearls, knotting each one on. Randomly combine this beaded strand with work ing yarn to add some beaded places on the body of your wrap. It looks especially good on yarn over rows, but be sure to start knitting during the 6 stitches before or after the y arn overs. If you don't want to knit the beaded strand in you can add it afterward s by using duplicate stitch and stringing and tying off the pearls as you go.
Pattern
Loosely CO 56 sts (go up a needle size or two ifit helps). Garter stith & eyelet edge Rows 1-4: K across. Eyelet row: k6, \*yo, k2tog, k4, (repeat from \* to last 6 stitches), k6. Rows 6-7: K across. Begin Sea-foam lace pattern: Rows1-2: K across. Row 3:k6, YO, k1, YO (2 times), k1, YO (3 times), k1, YO (2 times), k1, YO, k6, repeat across. Row 4: K across, dropping each YO. Row 5-6: K across. Row 7:K1, \* YO, k1, YO (2 times), k1, YO (3 times), k1, YO (2 times), k1, YO, k6, repeat from \*across, end k1. Row 8: K across, dropping each YO. Repeat rows 1-8, 27 times (increase or decrease the number of repeats to change the length of your wrap). Repeat rows 1-4. Garter stitch & eyelet edge Rows 1-4: K across. Eyelet row: k6, \*yo, k2tog, k4, (repeat from \* to last 6 stitches), k6. BO loosely.
Finish in g
Cut 110, 40 inch lengths of yarn for fringe (55 per end) Cut 10, 40 inch lengths metallic embroidery floss. Separate each length into 6 strands. Pair a single strand with every other strand of yarn to fringe. Fold fringe y arn in half and using crochet hook pull the loop end through gaps between stitches on end edge. Pull the tail through the loop and fasten it off with an overhand knot close to the edge. Use a metallic thread with every other fringe group. Tie your fringe len gths at random lengths. Now comes the fun part. Once the fringe is tied add your beads and charms. Use a bead ing needle to string pearls or your beads of choice onto ran dom strands of the metallic thread. Get creative! Here's what I did to the in dividu al fringe strand grou ps: String pearls from top to bottom, knotting them along the length. Knot plain strands · Twist sin gle str an ds together and knot end. Braid groups with 3 or more strands (only ones w ith metalic thread unless you decide to add more fringe.) Ply it- twist the strands in one direction very tightly, pinch at halfway point and bringing tail end to meet top knot, let the end twist back onto itself. · Leave it loose but cut it at odd lengths The possibilities are endless so let your imagination decide. Add shells, stones, charms or whatever reflects your personality. As with all the best knitin g there are no rules.
Sch ema tics

Pattern & images $\copyright$ 2007 Jacquelyn Landry


