Néréis
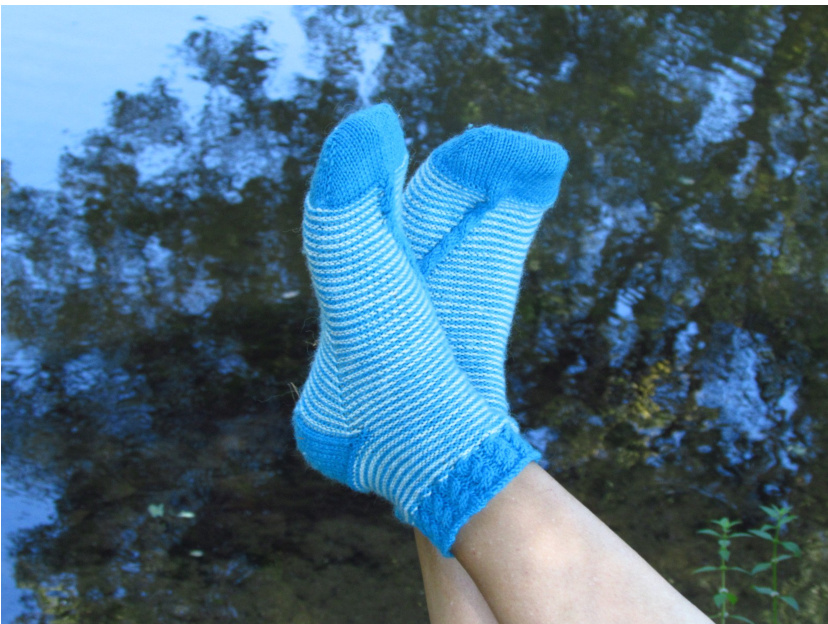
Blue and white stripes ... a cable running along just to keep you on your toes ....and here are your marine socks ! I named them Néréis as a reference to the Greek marine nymphs, the Nereids ( a type of aquatic nymphs). This pattern is not complicated. This is a toe-up knit, which means you start at toes and end at the ankle. It uses a circular needle and the magic loop technique. You just have to keep focused on crossing the threads while making the cable to avoid ugly gaps. There are 7 sizes available, to fit every foot width. Choose your size. according .to, your foot measurement, on the larger part of it (usually, right under the toes). Evenifyouarenotquitefamiliarwiththe techniques used in this pattern, have no worry! They.are fully described in step-by-step video tutorials (links are given in the pattern). Please, be awarethatthevideosareinFrench.ButIthink using thevisualsupportis enoughtounderstand. Stillyou mayfin other videos inyour own language onthenet.
! Material :
Thread : Fingering / 4ply. i My version : I used Sockli, Woll Butt, turquoise (75% wool - !25% polyamide, 50 gr = 209 m), 34 gr in total (about 143 ↓m) and Fabel, white, (75% wool - 25% nylon, (50 gr = 205 i m), 17 gr in total (about 70 m). Circular needles 2.5 mm. A marker. Gauge : 30 st x 42 r = 10 cm (in stockinette).
You have to respect this gauge if you want to obtain indicated final size.
i In accordance with your thread's choice, choose needle size I which give you this exact gauge. You will have smaller or I bigger socks if you do not respect the gauge
Abbreviations :
RS : right side - ws :wrong side Ist:stitch(es) -r:row N1/2 : Needle 1/2 (top/ bottom of the foot). ICN : cable needle. Mc/cc : main color / contrasting color. I M1 : Make one. KF&B / PF&B : Knit Front and Back / Purl Front and I Back. IYou have to knit or purl in the front loop, then the back ! loop, this way you obtain an increase. IssK : Slip, Slip, Knit. i P2tog : Purl two stitches together. I sw : shadow wrap. Short rows technique. iS1 : Slip 1 stitch without knitting. !c4L : Cross 4 to the left. Slip 2 stitches on the CN, on ! the front, K2, K the CN. iC4R:Cross 4 to the right. Slip 2 stitches on the CN, I on the back, K2, K the CN. This pattern is my intellectual property. It's for PERSONAL USE ONLY. It means you cannot sell or distribute this pattern on commercial or non commercial purpose, fully or partially, or any object basedon it.
Advice and information :
You will find links in this pattern. These are several step-by-steps to show you how to do M1, shadows wraps, elastic CO and BO. I advise you to see them, even if you already know those techniques, they might have variations. Sizes available in cm : 19, 20, 21, 22, 23, 24, 25. I highly recommend you to read the whole pattern before beginning, at least once, to avoid any kind of surprise. Moreover, always read entirely each paragraph before continuing. · If you want to save paper and ink, print only p. 2 to 4 ;) .
BEFOREBEGINNING!
Each size is indicated in this order : 19 [20, 21, 22, 23, 24, 25]. Measure your foot's length and cut off 10 %. Keep it for later (cf. s2). For example : My foot measure is 22.5 cm, cut off 10%, we have 20 cm.
PATTERN:
1 -Toes :
Cast on 28 [26, 28, 30, 30, 32, 36] stitches with MC and Turkish cast on (or any similar method). The cast on row is row 1. Do not hesitate to put a marker on the beginning of the row and divide the top from the bottom of thefoot. Knit two rows. Now that the first three rows are done, let's increase to shape the toes. As areminder,needle1 holdstitches of the top,needle2 thebottom R4: N1 : K1, M1, K > 1 st before end, M1, K1. N2 : K1, M1, K > 1 st before end, M1, K1. You have 32[30, 32, 34, 34, 36, 40] stitches. R 5 : Knit (N1+N2). Repeat rows 4 and 5, 5 [6, 6, 6, 7, 7, 7] more times. In other words, a total of 6 [7, 7, 7, 8, 8, 8] increasing rows. You have 52 [54, 56, 58, 62, 64, 68] stitches. On the next paragraph, use charts on N1.
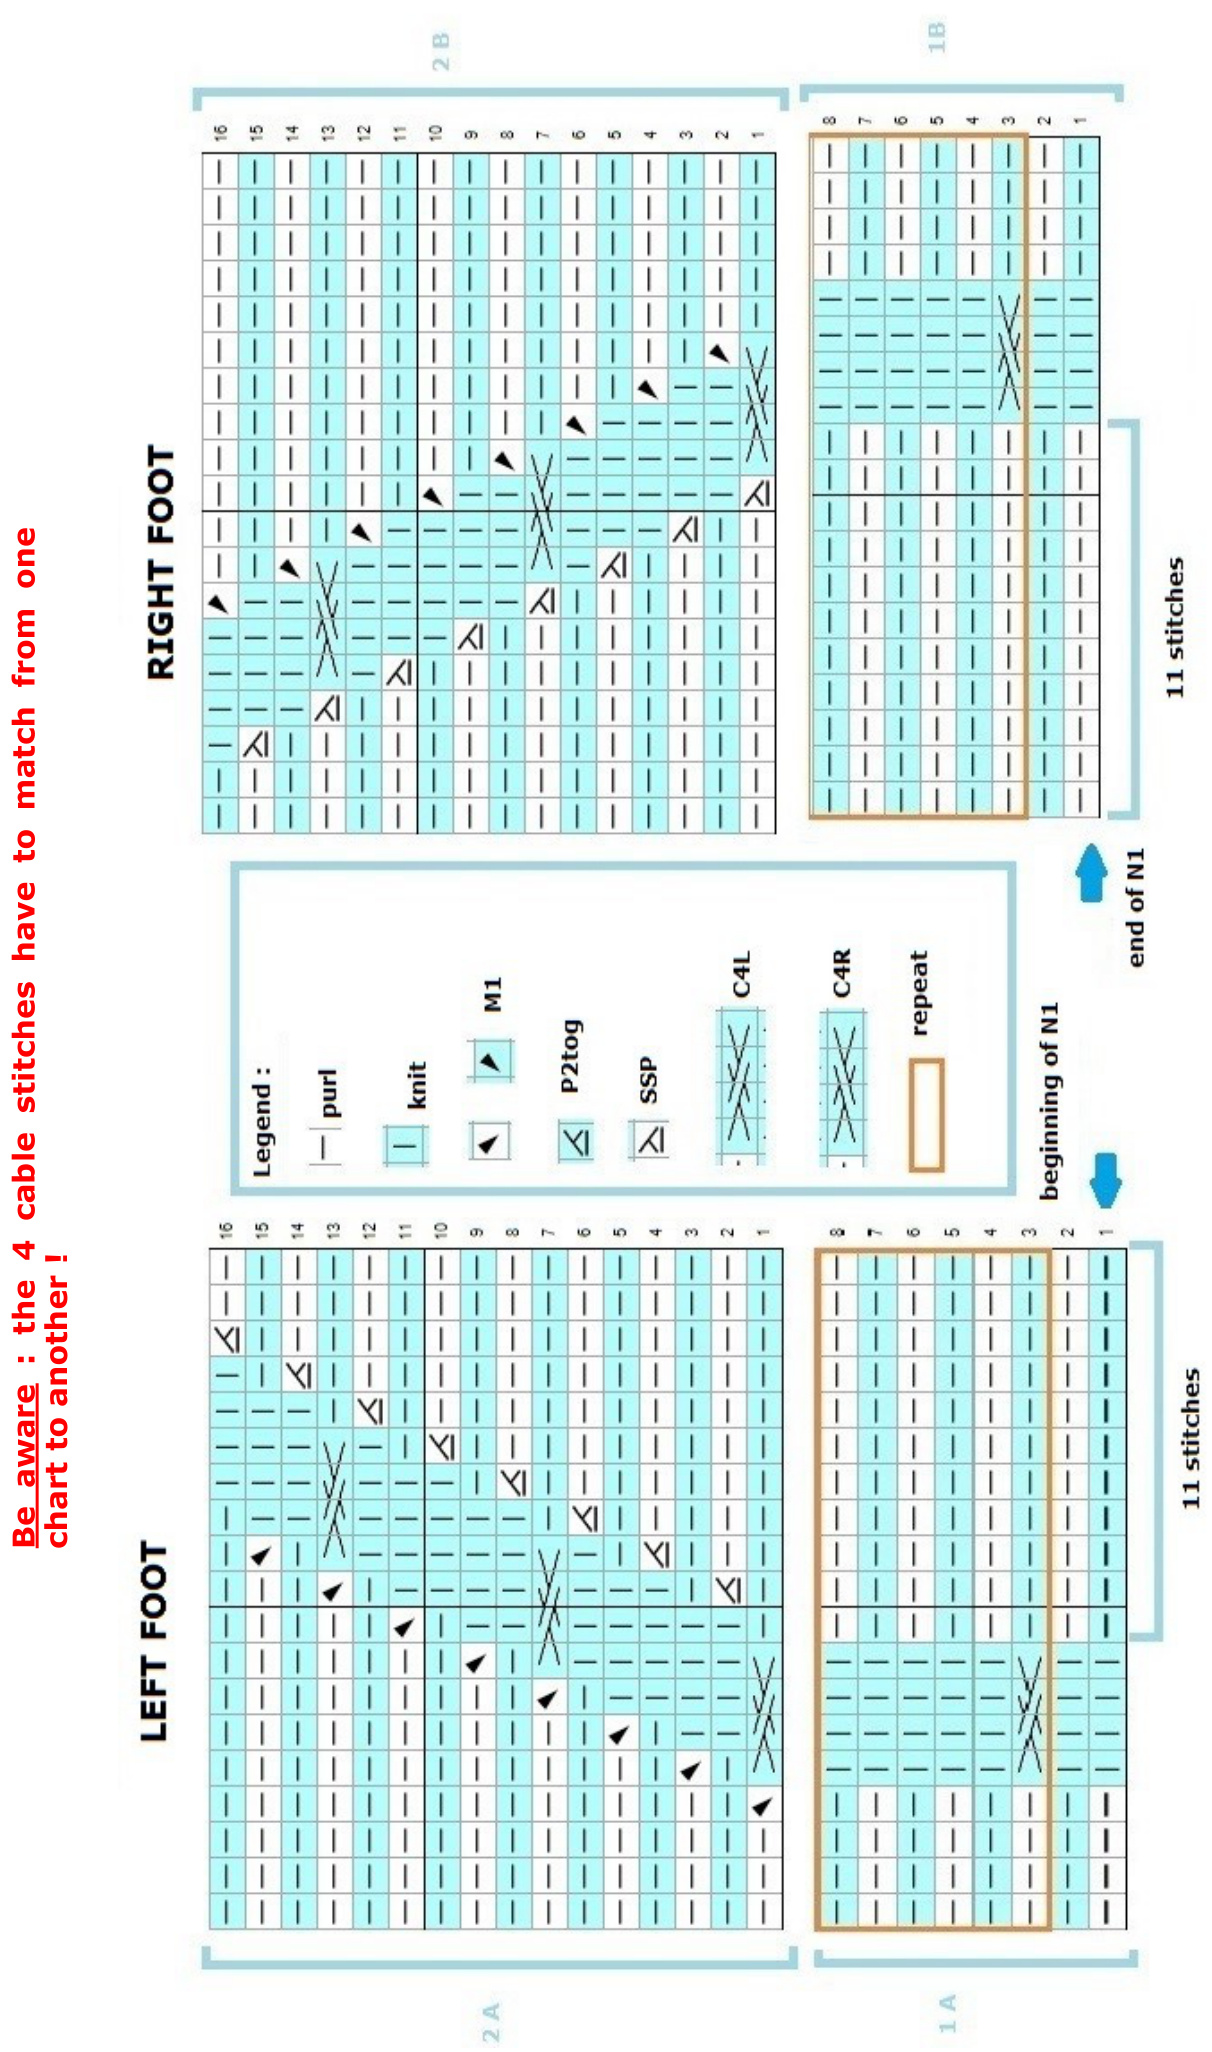
2 - The body of the sock (see charts p.4)
LEFTFOOT IWith MC, purl to 15 stitches before end of N1, K4 (cable). With MC, P11 on N1, K4 (cable). Then purl to end with CC. I Then purl to end with CC. RIGHT FOOT Take back the measure you saved earlier and substract 7,5 cm. Continue until you reach this length. For example : My LF cut off 10% : 20 -7.5 = 12.5 cm. Continue, alternating MC and CC on each row after knitting the cable. Do not forget to cross the threads (avoid gaps). I For the cable : knit chart 1B, then 2B. When you finish the For the cable : knit chart 1A, then 2A. When you finish the Itwo charts, knit 1B again and repeat until you reach the two charts, knit 1A again and repeat until you reach thei measure calculated above. measurecalculated above.
3 -Bottom of the heel:
Let's increase to shape the heel. Continue in purl stockinette, as before (charts) while increasing : Rg 6 :N1 : PurlN2 : P1, M1, P to 1 stitch before end, M1, P1. Rg 7 :N1 : PurlN2 : Purl Repeat rows 6 and 7 until you have 48 [49, 50, 51, 53, 54, 56] stitches onN2, 11 times in total (+ 22 st). Be aware, for sizes 19, 21, 24 and 25, on the last row of N2, M1 anywhere on the row. You have 49 [49, 51, 51, 53, 55, 57] stitches on N2. Make sure the color you will have after the cable is MC before continuing.
4 -Back of the heel :
Purl N1 (changing color for MC). Then, you have to work only on needle 2, back and forth, next rows (this is a short rows time !) : Each size is indicated R 8(RS) :K34 [34,35,35, 36,37, 40] KF&B, K1, SW ; 19 [20, 21, 22, 23 R 9(WS):P21[21,21,21,21, 21, 25] PF&B,K1,SW ; R 10: K19 [19, 19, 19, 19, 19, 23] m end., KF&B, K1, SW ; R 11:P17 [17, 17, 17, 17, 17, 21] m env., PF&B, P1, SW ; R12: K15 [15, 15, 15, 15, 15, 19] m end., KF&B, K1, SW ; R13 : P13 [13, 13, 13, 13, 13, 17] m env., PF&B, P1, SW ; R 14:K11[11, 11, 11, 11, 11, 15] m end., KF&B, K1, SW ; R 15: P9 [9, 9, 9, 9, 9, 13] m env., PF&B, P1, SW ; R 16 : (size 25 only) K1K1, KF&B, K1, SW ; R 17: (size 25 only) P9 m env., PF&, P1, SW. You have 57 [57, 59, 59, 61, 63, 65] stitches on N2. Finish the row on N2, knitting Sw together with the stitch it shadows, as if they were one and only stitch. Purl N1, maintain a strong tension of the thread (to avoid gaps) and change color at the cable level. Although, even if you finish N1 with CC, get back MC to knit the next heel's step (it is better to cut the thread to keep ease OK). Then, again, on N2, back and forth : Be aware, when you S1 on row 18, do it with the thread in the back. R 16: K39 [41, 43, 43, 45, 47, 49], SSK, turn. R 17:S1, P25[25, 27, 27, 29, 31, 33], P2tog, turn. R 18:\*S1,K1\*x 13[13, 14,14, 15, 16, 17] times, SSK, turn. Repeat rows 17 and 18 until every stitch of needle 2 has been knitted. You have 27 [27, 29, 29, 31, 33, 35] stitches on N2. Be careful, when you make the last repeat of row 18, there is not ssK, but a K1 instead.
5 -The ankle :
When you make the junction between the two needles, maintaina strong tension of the thread to avoid gap, but do not forget'to take CC thread to finish according to the chart. If it is not enough, you may pick up a stitch before the first stitch of needle 1 and knit them both together with. Same thing forthesecond junction. If you have a big ankle or calf, you can keep those new stitches instead of decreasing them. You can, also, add some more if needed. Now, repeat chart 2 and continue as before. Make sure you reach the desired length on the row before a crossing on the cable, while adjusting the number of stitches to a multiple of 5 (upper if large calf, lower if thin calf) so that you can continue this cable at the same pace as before. Then: LEFT FOOT R 1:\* P1,C4R\* R 2: \*P1, K4\* Repeat row 2, 4 more times. IRIGHTFOOT : R 1:\* P1, 4CL\* R 2:\*P1,K4\* Repeat row 2, 4 more times. Repeat row 1 and [5 x row 2], 3 times in total. IRepeat row 1 and [5 x row 2], 3 times in total.
6 -Bind off :
Use a really elastic bind off so that your ankle or your calf does not get hurt by the pressure of the sock. Make the second sock, block then and it's over ;).
7 - Advice for blocking :
I invite you to wet block your socks. It worth it. It's quite simple. Soak them for about twenty minutes in tepid soapy water. Press the socks in a towel to pull out water and block them on sock blockers. You do not have sock blockers ? No problem, there is a solution. You have paper ? You have card and scissors ? That's all you need! You can print those sock blocker templates for example : there. Match your size and cut. Copy the templates on card (3mm width at least), twice and cut. I advise you to frame your card with adhesive tape, this way, it will not become soft while socks dry on it. Some waterproof thing. It is not aesthetically pleasing but it works well !