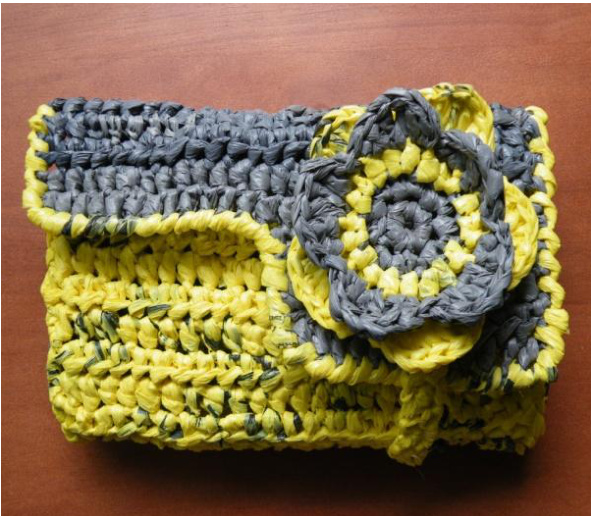
lastiqueRecreations handmadefashionable&functionalplasticyarn designs
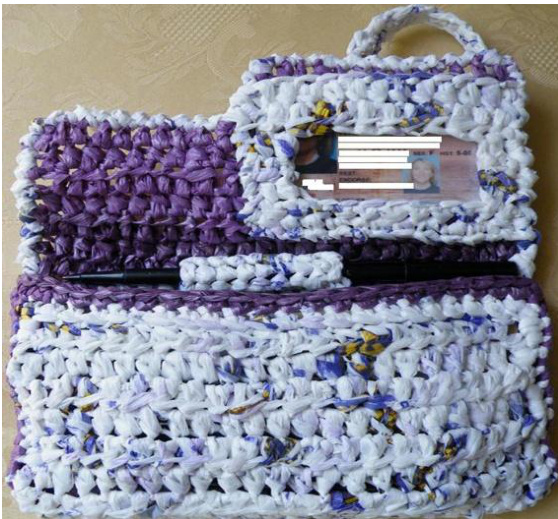
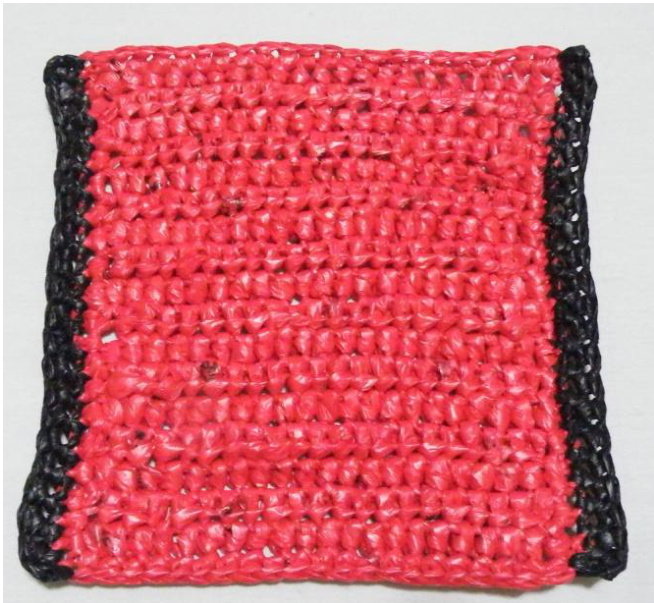
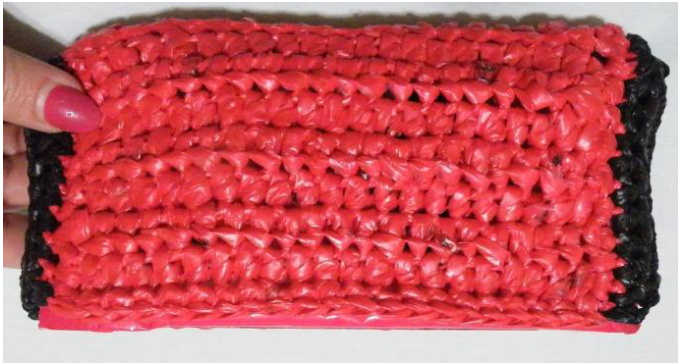
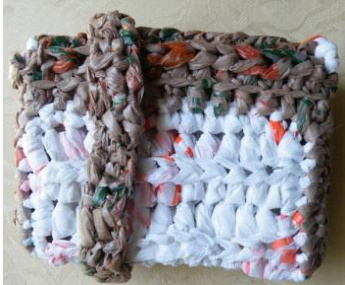
WRAP & GO?- Plarn Wallet/Checkbook Organizer
| LeftPicture: | RightPicture: |
| DollarGenera&Lowe's | TacoBell&newspapersleeve |
What is Plarn: It is a creative way to recycle plastic bags. [Plastic + Yarn=Plarn] The Wallet/Checkbook Organizer with wraparound closure is the perfect accessory to stay organized. Did you ever get to the checkout counter and have to rummage through your purse to find the checkbook? Then you have to find a pen and of course, they want to see your driver's license. Those days are over!! Now, it's all in one place.
SKILL LEVEL: Easy
MATERIALS:
Crochet Hook - Size F & H Plastic Yarn (NOTE: 12 - 1" strips per standard size plastic bag = 6 yards): OMain Color - Approximately 20 plastic bags OContrasting Color - Approximately 20 plastic bags Craft needle Remember:Notall plasticismade thesameWhenusing plarn,achieving thedesiredsizeorgauge dependsagreat dealonthe texture and thickness of the plastic yarn being used for the project.The texture and thicknesscanimpact the numberof rows or rounds indicated in a pattern. SIZE: Width-7 1/2"; Height-5" GAUGE: 5 hdc = 1"; 3 rows = 1 14" CARE INSTRUCTIONS: Machine or hand wash, air dry This pattern is foryourpersonal use only.Purchase of this pattern does not transfer copyright.This pattern may not be sold, published, reproduced-mechanically or electronically, orby any other means, including photocopying from any website(s) or electronic mailing lists, etc.. Please do not offer, sell or distribute this pattern in any way to anyone else. Wrap & Go? - Plarn Wallet/Checkbook Organizer with wraparound band closure Copyright @ 2010 Plastique Recreations Designer, Teresa Wooley Email: plastiquerecreations@yahoo.com
lastique Recreations handmadefashionable&functionalplasticyarndesigns
| ABBREVIATIONS | |
| blo=backlooponly | ch(s) = chain(s) |
| dc=doublecrochet | flo-frontlooponly |
| hdc=halfdoublecrochet | revsc=reversesinglecrochet |
| sc=singlecrochet | sl = slip |
| sp=space | st(s)=stitch(es) |
| tog=together | tr(treble or triple) |
Helpful Tips:
Read through pattern instructions before beginning. See Tutorials' for instructions on how-to: 0 Double Loop Cutting and Looping method 0 Adjustable Ring O Reverse single crochet To make a color change - pull the new color through instead of the old color when completing the st. Place the tail of the old color behind your work to crochet over i when making the next couple of stitches. This willsave you time later when weaving in your ends. When using plarn, it's a good idea to stretch your work after every couple of rows. This wil give you a more realistic view of what you have completed up to that point. Plastic in general is susceptible to ripping/tearing due to its very nature. oWeaving in ends - it is best to maneuver your craft needle in between stitches and not through a stitch to avoid splitting the plastic yarn. Attaching - When sewing a button to a finished product, use the open spaces in between the sts.
Practice Swatch:
Itypically don't suggest making a practice swatch because achieving a certain height/width is an individual preference.However,it is suggested to ensure the Organizeris the wide enough for what you propose to put in it . Ch 22, hdc in 2nd ch from hook and each st across. Row 2-4: Hdc in each st across. Lay piece on flat surface and place the widest item that you wil put in the Organizer once it is completed on top. The piece should be slightly (not much) wider than the item. If more width is needed, make additional swatch with additional # of ch sts until desired width is achieved.
Instructions:
With Main Color, ch 22 or # determined with practice swatch. Row 1: Hdc in 2nd ch from hook and in each ch across. Row 2 - 22 (or desired height): Hdc in each st across. (Tip: Depth determines Height. To ensure an accurate height is achieved, fold the piece in half and place a number of items that you will be using it for (e.g. checkbook, calculator, cell phone, etc.) inside. This gives a more accurate way of determining if additional rows will need to be added.
Wrap & Go? - Plarn Wallet/Checkbook Organizer with wraparound band closure Copyright @ 2010 Plastique Recreations Designer, Teresa Wooley Email: plastiquerecreations@yahoo.com
lastique Recreations handmadefashionable&functionalplasticyarndesigns
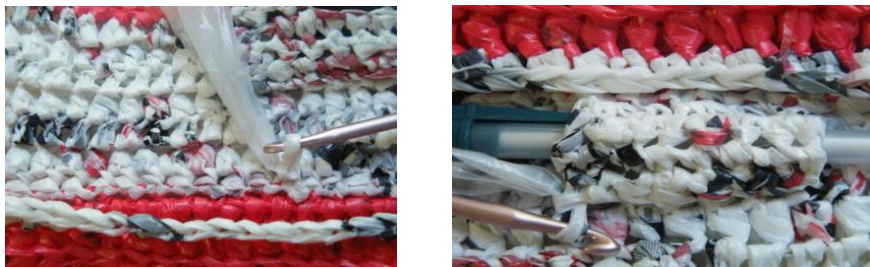
Ch 1, sc in end st (1st corner) and in end st of each row, 3 sc in corner, across edge to corner, 3 sc in corner, sc in end st of each row matching up with opposite side (Important: make sure you match up sts or the rows will not appear even when stitching up the sides), 3 sc in corner, across edge back to corner, 2 sc in corner (back at 1st corner), join with a sl st in beginning sc. Fasten off, weave in ends.
Sides (repeat for both sides): With contrasting color and wrong side facing you, join with a sl st at the corner and sc in each st across, ch 1 turn. Sc in each st across. (Note: for more expand-ability on the sides, add more rows.) Fasten off leaving about 6" tail for sewing sides together.
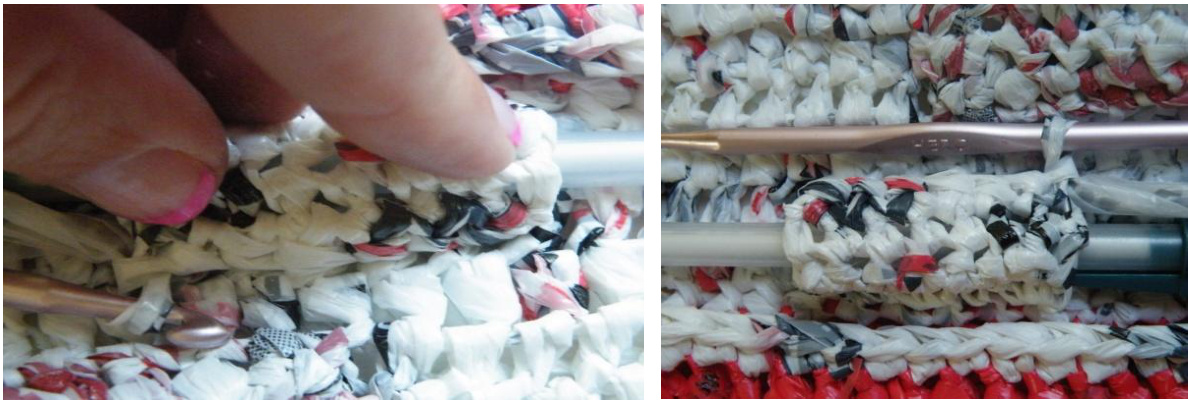
Fold piece inhalflengthwise with right sides together wrong side out), st sides togetherwith tail (Stitch Suggestion-whip st the bloof one side and flo of other side the 2 sts back to back). Fasten off; weave in all lose plarn ends.
Wrap & Go? - Plarn Wallet/Checkbook Organizer with wraparound band closure Copyright @ 2010 Plastique Recreations Designer, Teresa Wooley Email: plastiquerecreations@yahoo.com
lastique Recreations handmadefashionable&functionalplasticyarndesigns
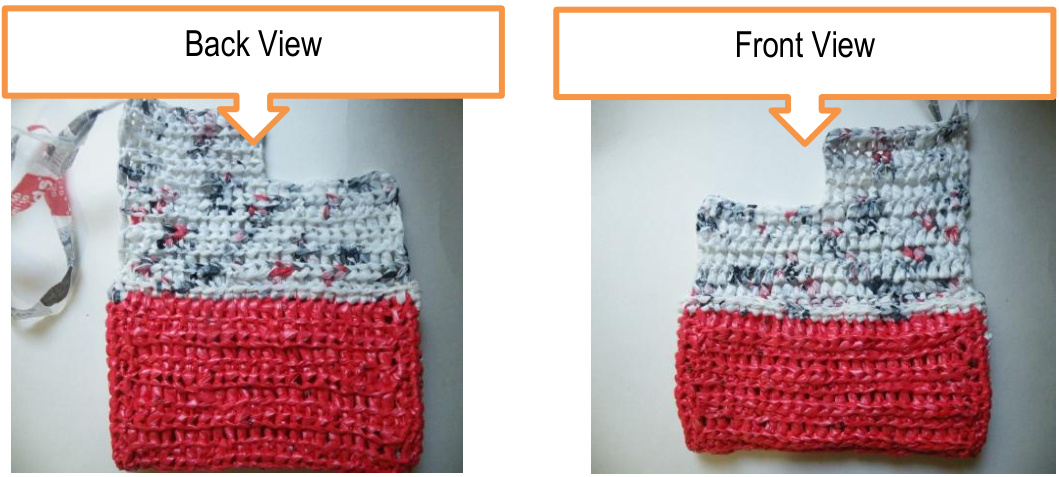
Turn pouch inside out and push out bottom corners. Just give the poucha good stretch, tug and pullon both the front and sides. aslst in 1st Scst.
Fold over Flap:
Decide which side of pouch willbe the back, then attach contrasting color with a sl st in back corner st. Row 1 & 2: Sc in same st and in each st across. Row 3: In blo, hdc in each st across. Turn. Row 4 -7: Hdc in each st across. End with wrong side. Row 8: (This row will be the width of your driver's license or card you will put in holder) Hdc in each st across only for the desire width of the card. Turn.
Row 9 - 15: Hdc in each st across. Fasten off, weave in ends.
Wrap & Go - Plarn Wallet/Checkbook Organizer with wraparound band closure Copyright @ 2010 Plastique Recreations Designer, Teresa Wooley Email: plastiquerecreations@yahoo.com
Plastique Recreations handmadefashionable&functionalplasticyarndesigns
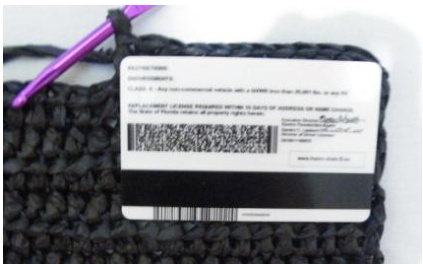
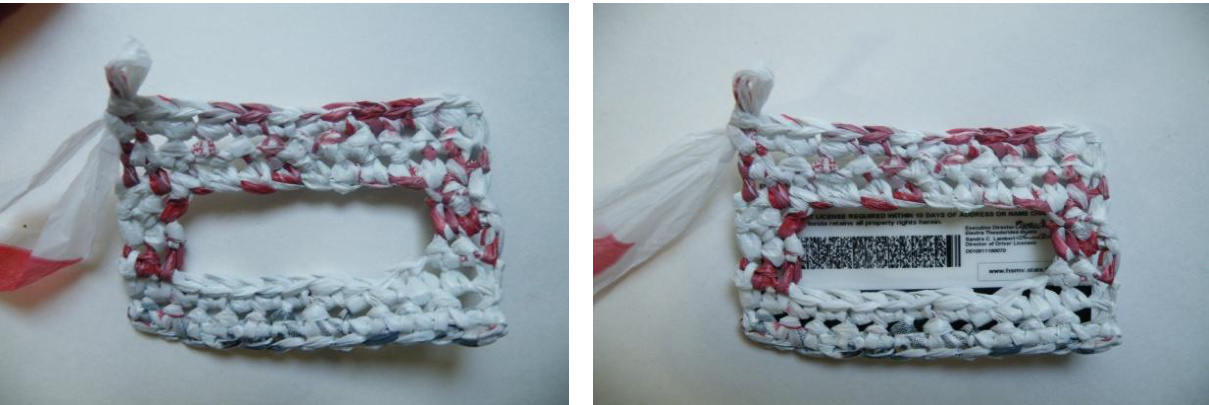
ID Pocket:
Row 1: Ch the same # of sts to match with Row 8 plus 1. (Ex. If you hdc in only 15 sts across on Row 8, make a ch of 9) Hdc in 2nd ch from hook and in each ch across. Turn. Row 2: Hdc in each st across. Turn. Row 3: Hdc in next 2 sts. Turn. Row 4: Repeat row 3. Turn. Remove st off hook. Join sl st in 1st st on opposite side on Row 3, hdc in same st and in next st. Repeat row 3 & 4. Row 5: Place hook back on st on opposite side, hdc in next 2 sts, ch 9, hdc in the 2 hdc on opposite side. Row 6 - 8 (or desired height of I.D. card): Hdc in each st across. Fasten off, weave in ends.
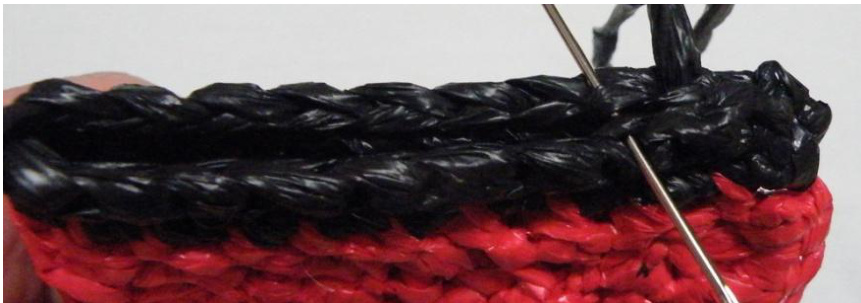
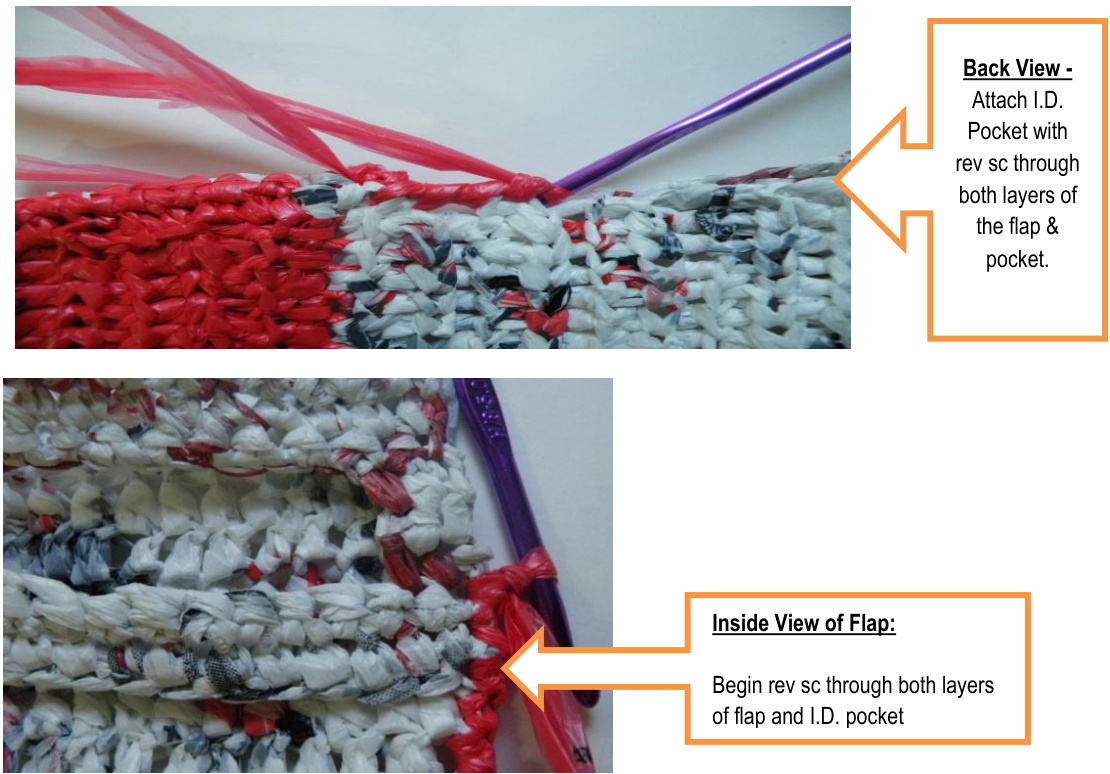
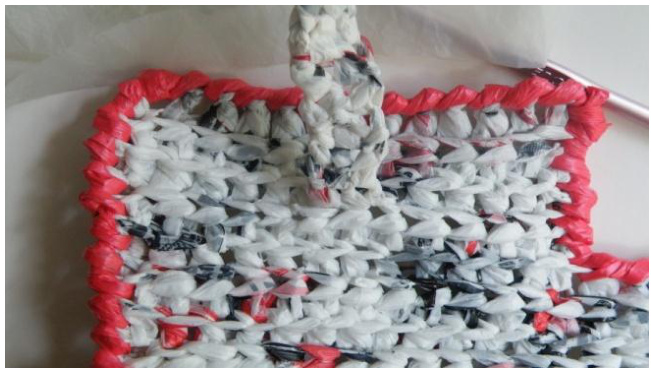
(Note: The I.D. Pocket is attached with a rev sc through both layers of the flap and pocket. Place pocket on flap to determine what row the rev sc will begin.) With contrasting color and back of pouch facing you, join with a sl st in lower left corner. Rev sc up the side attaching I.D. pocket, 2 rev sc in corner, rev sc across top (in flap only), 2 rev sc in corner and back down opposite side (including I.D. pocket) of flap.
Wrap & Go? - Plarn Wallet/Checkbook Organizer with wraparound band closure Copyright @ 2010 Plastique Recreations Designer, Teresa Wooley Email: plastiquerecreations@yahoo.com
lastique Recreations handmadefashionable&functionalplasticyarndesigns
Pen Holder:
At inside of flap in a row just above pouch, join with a sl st and sc in next 8 sts. Turn, sc in each st across for4 total rows or # of rows needed for width of pen.
SIl st pen holder to flap.
Wraparound Band:
Row 1: Working on top oflap in the middle, with Fhook attach contrasting colr with aslst in on top ofast, sc insame st and in next st, ch 1, turn. (Note: the flower will be placed over this spot hiding the area.)
Wrap & Go - Plarn Wallet/Checkbook Organizer with wraparound band closure Copyright @ 2010 Plastique Recreations Designer, Teresa Wooley Email: plastiquerecreations@yahoo.com
lastiqueRecreations handmadefashionable&functionalplasticyarndesigns
Row 2 - 16 (or desired length of band): Hdc in each st across, ch 1, turn. Before fastening off, test the length making sure it is long enough by wrapping band around pouch and position end at beginning of band. Even though plarn does stretch, you want the band a little loose so it isn't so tight when you fillthe pouch. Fasten off leaving long enough tail to st end of band to top of flap. Stitch end of band to front of flap.
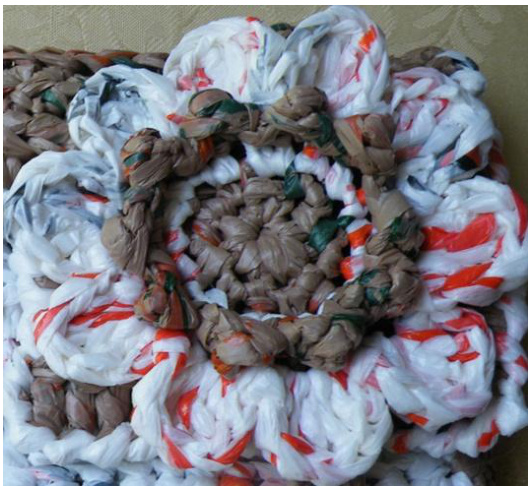
Flower:
ound 1: With main color and H hook, using the adjustable ring method, make 8 sc in ring, join with a sl st in 1st sc. Round 2: 2 sc in each st around. Fasten off. Round 3a: With contrasting color, \*2 sc in same st, 1 sc in next st. Repeat around. Do not fasten off but pull out a big enough loop so the stitch doesn't come out as you willbe coming back to it. Round 3b: Petal pattern: Attach main color in flo of round 3a and make petals as follws: \*in same st-sc, hdc, sc, sl st in next petal. \*Repeat around.Fastenoff,weave inends. Round 4: Insert hook back into loop of round 3a, follow petal pattern around: in same st - \*hdc, dc, tr, dc, hdc, sl st in next petal. \*Repeat around.Fasten off,weave in ends. Position middle of flower over band ends on top of flap, sew flower to flap.
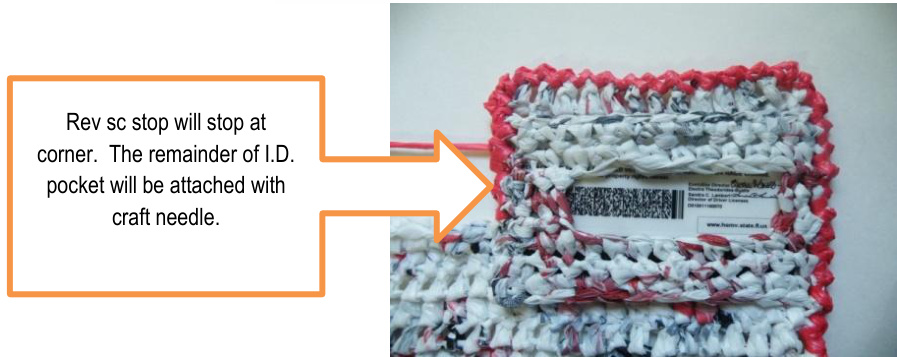
Final touch, with matching plarn and craft needle, sew remainder of I.D. pocket to flap.
Enjoy!!!!
Wrap & Go? - Plarn Wallet/Checkbook Organizer with wraparound band closure
lastiqueRecreations handmadefashionable&functionalplasticyarndesigns
TUTORIALS
Double Strand Cutting and Looping:
Cutting Strips: Lay the plastic bag out flat, straightening out the straps. Fold bag in half (folding bottom up even with the top) matching up the handles. Do this a couple more times for easier cutting. Cut handles off at the base. Cut bottom seam off. Just a sliverisall that is needed. Begin cutting strips the width necessary to meet your project/pattern needs. (Typically, strips are cut not less than 1". 1 /2" to 2" are standard cut sizes.)

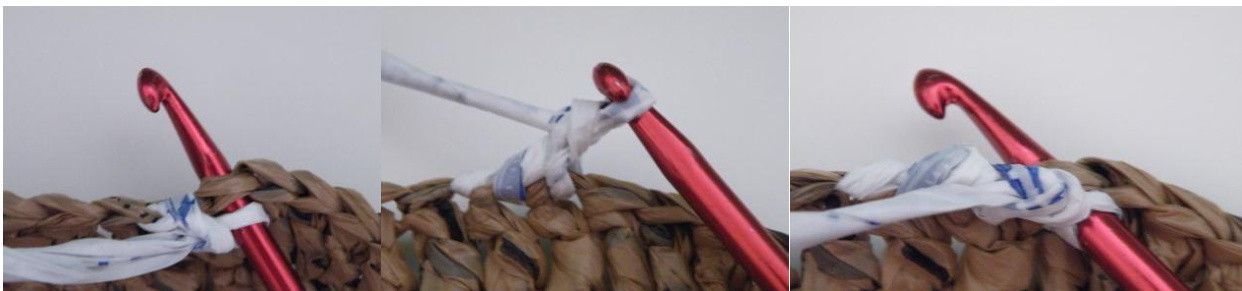
Looping Strips Together: Hang 2 strips from yourhand. Using youropposite hand, reach through the middle of 1st stripand grab the bottom of the 2nd strip. Pull the 2nd strip through te middle of 1st strip. Drop the 1stsripfrom your hand. You now have what looks like a T as the 1ststripis hanging on top of 2nd srip.

Whichever hand you prefer, pulla strip through the center of strip on other hand. (In the picture below, the let hand went through the middle of strip in right hand.) Grab the strip that was pulled through and let go of other strip. Looking at the picture below, the right hand drops the strip it is currently holding and it willay on top of the left hand. The right hand grabs the strip from the left hand. Using the available hand, grab the bottom strip and pull to make a knot. Your primary objective is to make as small knot as possible without breaking the strip. Breaking the strip is inevitable if you pull the strips too tight.
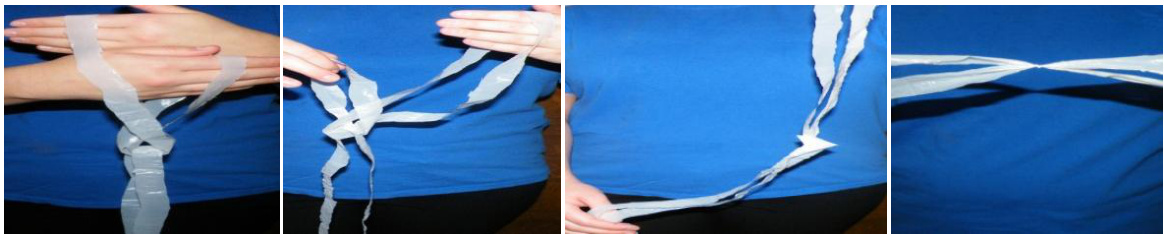
Contiueadding n stripsto theexisting st: Th new stripwillaaysbpuled throughthemiddeof theexisting stripalwing theexisting stt be the T'.
Important Tips:
Make the knot as small as it wil go. But remember, if you pull too tight, one of the strips will break. Make sure the 2-strand strips are even. There's nothing more inconvenient when crocheting or kniting with plastic yarn then to have to work with extra plastic on one of the strips. When adding a new strip, on Step #7 - grab the previous knot made when puling the new strip with the opposite hand to make the knot. This will helpkeep the2-strands even.
Forming the Ball
The easiest way I have found to make a ballis put together your pointer and middle fingers. Place the plastic yarn tail between the fingers and begin wrapping the plastic yarn around both fingers about 5 times. Pull the wrap offthe fingers then begin wrapping the plastic yarn around to start forming the ball. Note: To avoid tangles, start making the ballafter a small pile forms from loping the strips together. Wrap & Go - Plarn Wallet/Checkbook Organizer with wraparound band closure Copyright @ 2010 Plastique Recreations Designer, Teresa Wooley Email: plastiquerecreations@yahoo.com
lastique Recreations handmadefashionable&functionalplasticyarndesigns
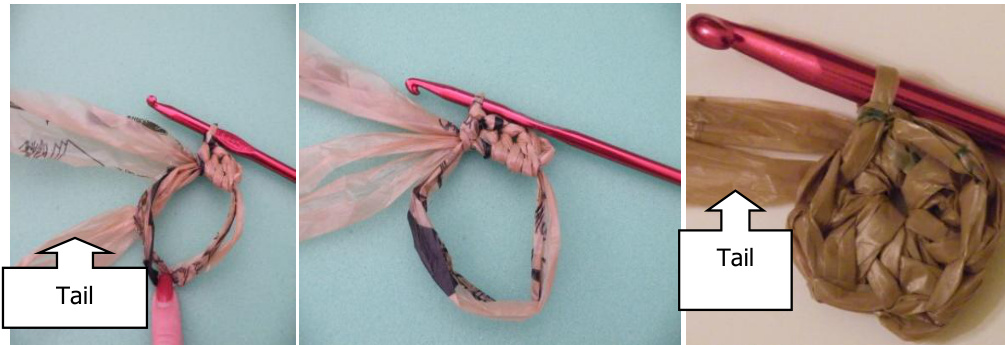
Adjustable Ring:
Make aloopas ifto forma knot giving yourselfabout4" to 6" of tail Insert hook through middle of loop(front toback). Grab plastic yarn or plarn over, and pull hook back through (back to front. You now should have 1 loop on your hook.
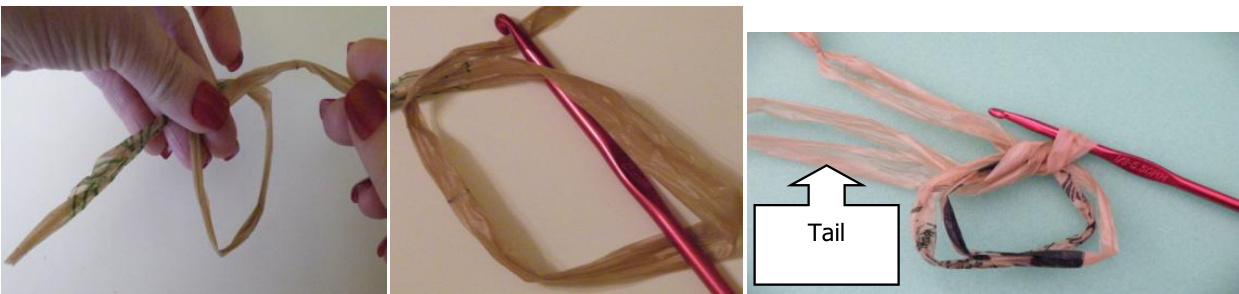
Ch 2 as this willcount as your frst hdc. (The standard is ch 1=sc; ch 2=hdc; ch 3=dc). Make 9 hdc in the loop making sure to crochet around both the plastic yarn and tail. I suggest making the stitches a litle loose so it will be easier to pullthe plarn tail. If you start running out of tail, pull the tail to give you more slack, however, you will notice that the loop will get smaller. Now for the fun part - grab the tail and gently pull the stitches together. As you do this, the inner circle getssmaller.
Reverse Single Crochet
Ise you're going in the opposite direction (i.e. left to right) than normal. Insert hook, plarn over and pull through (2 loops on hool I both loops. Insert hook in next sc, plarn over and pull through, two lops on hook, plarn over and pull through both loops.
Wrap & Go - Plarn Wallet/Checkbook Organizer with wraparound band closure Copyright @ 2010 Plastique Recreations Designer, Teresa Wooley Email: plastiquerecreations@yahoo.com


