The Convertible Fish Tail Pattern Pack
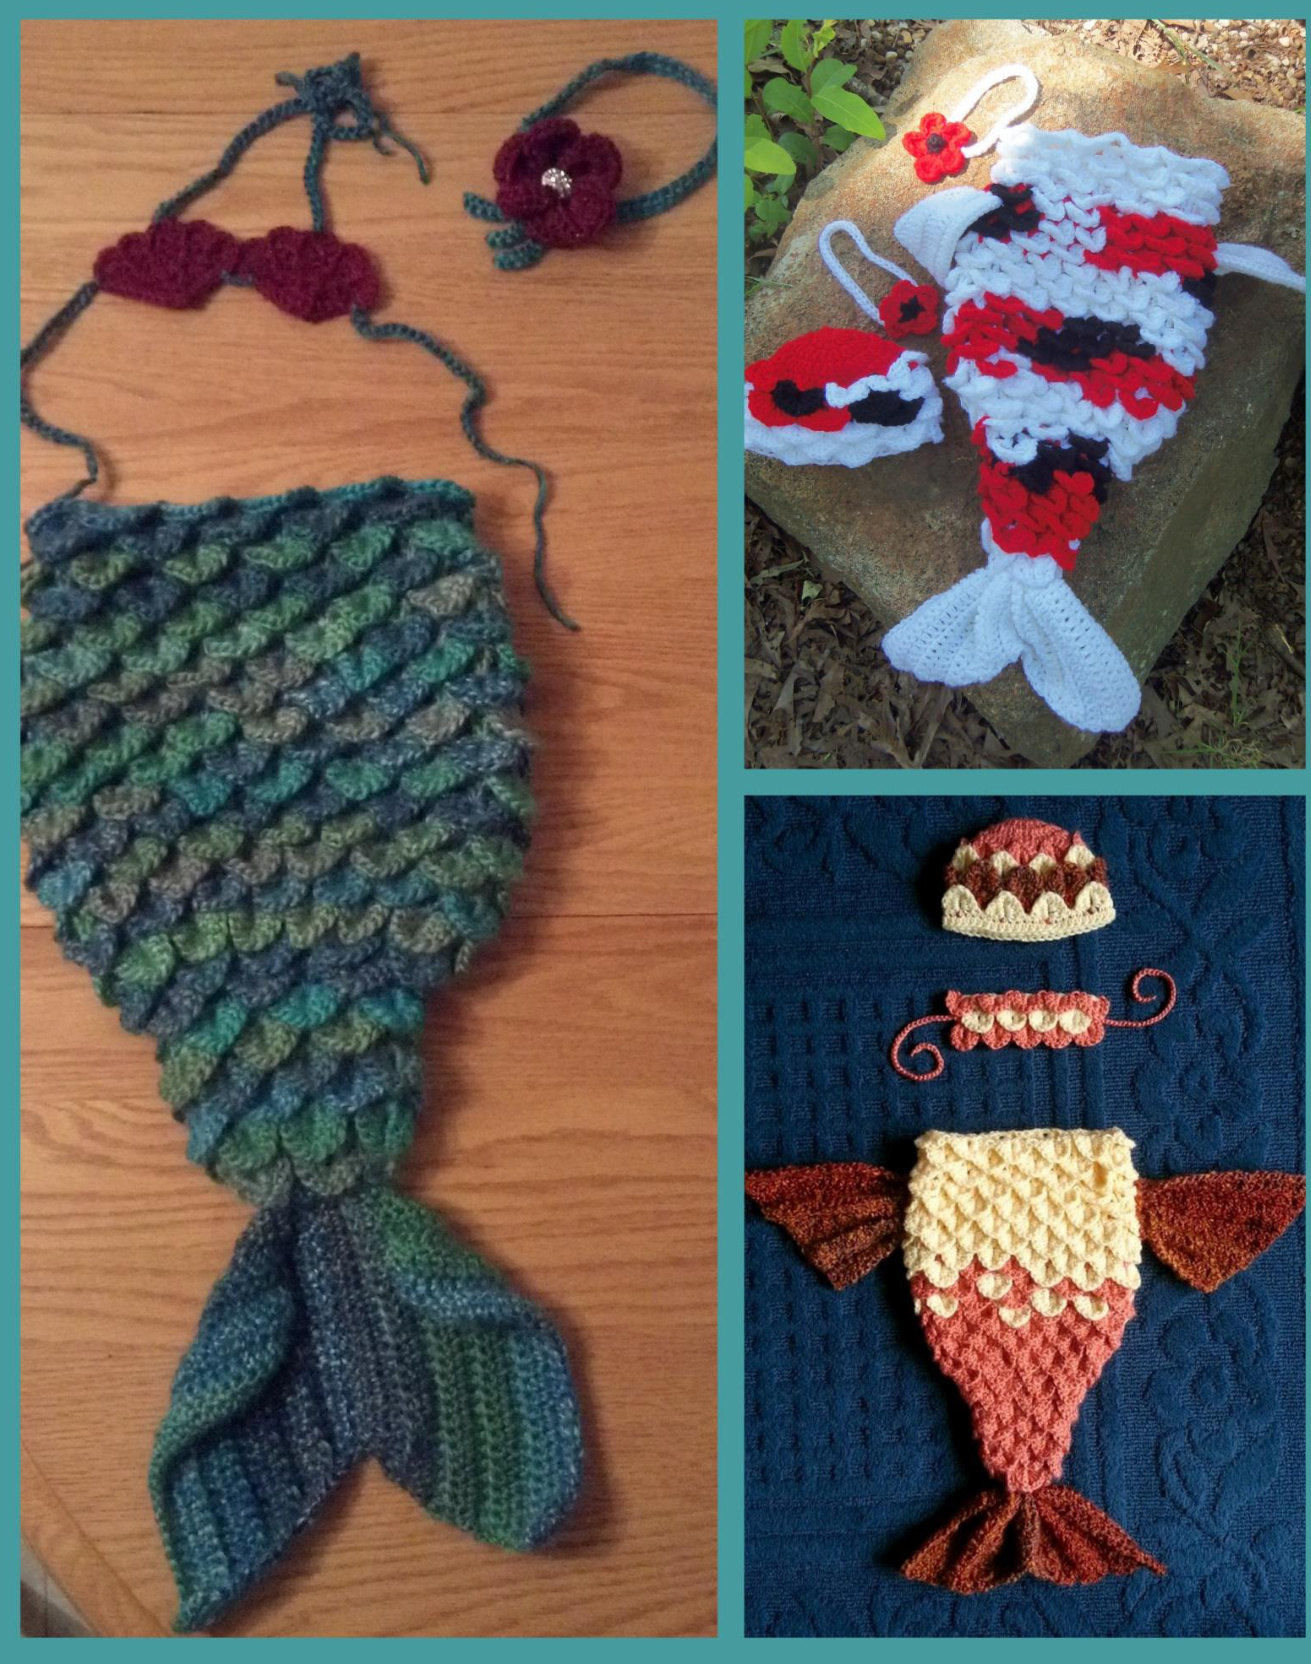
A Crochet Pattern from The Hookeraholic CrochetBy Shannon Kilmartin Pattern includes instructions for a Mermaid set, a Goldfish Set and a Japanese Koi Fish Set
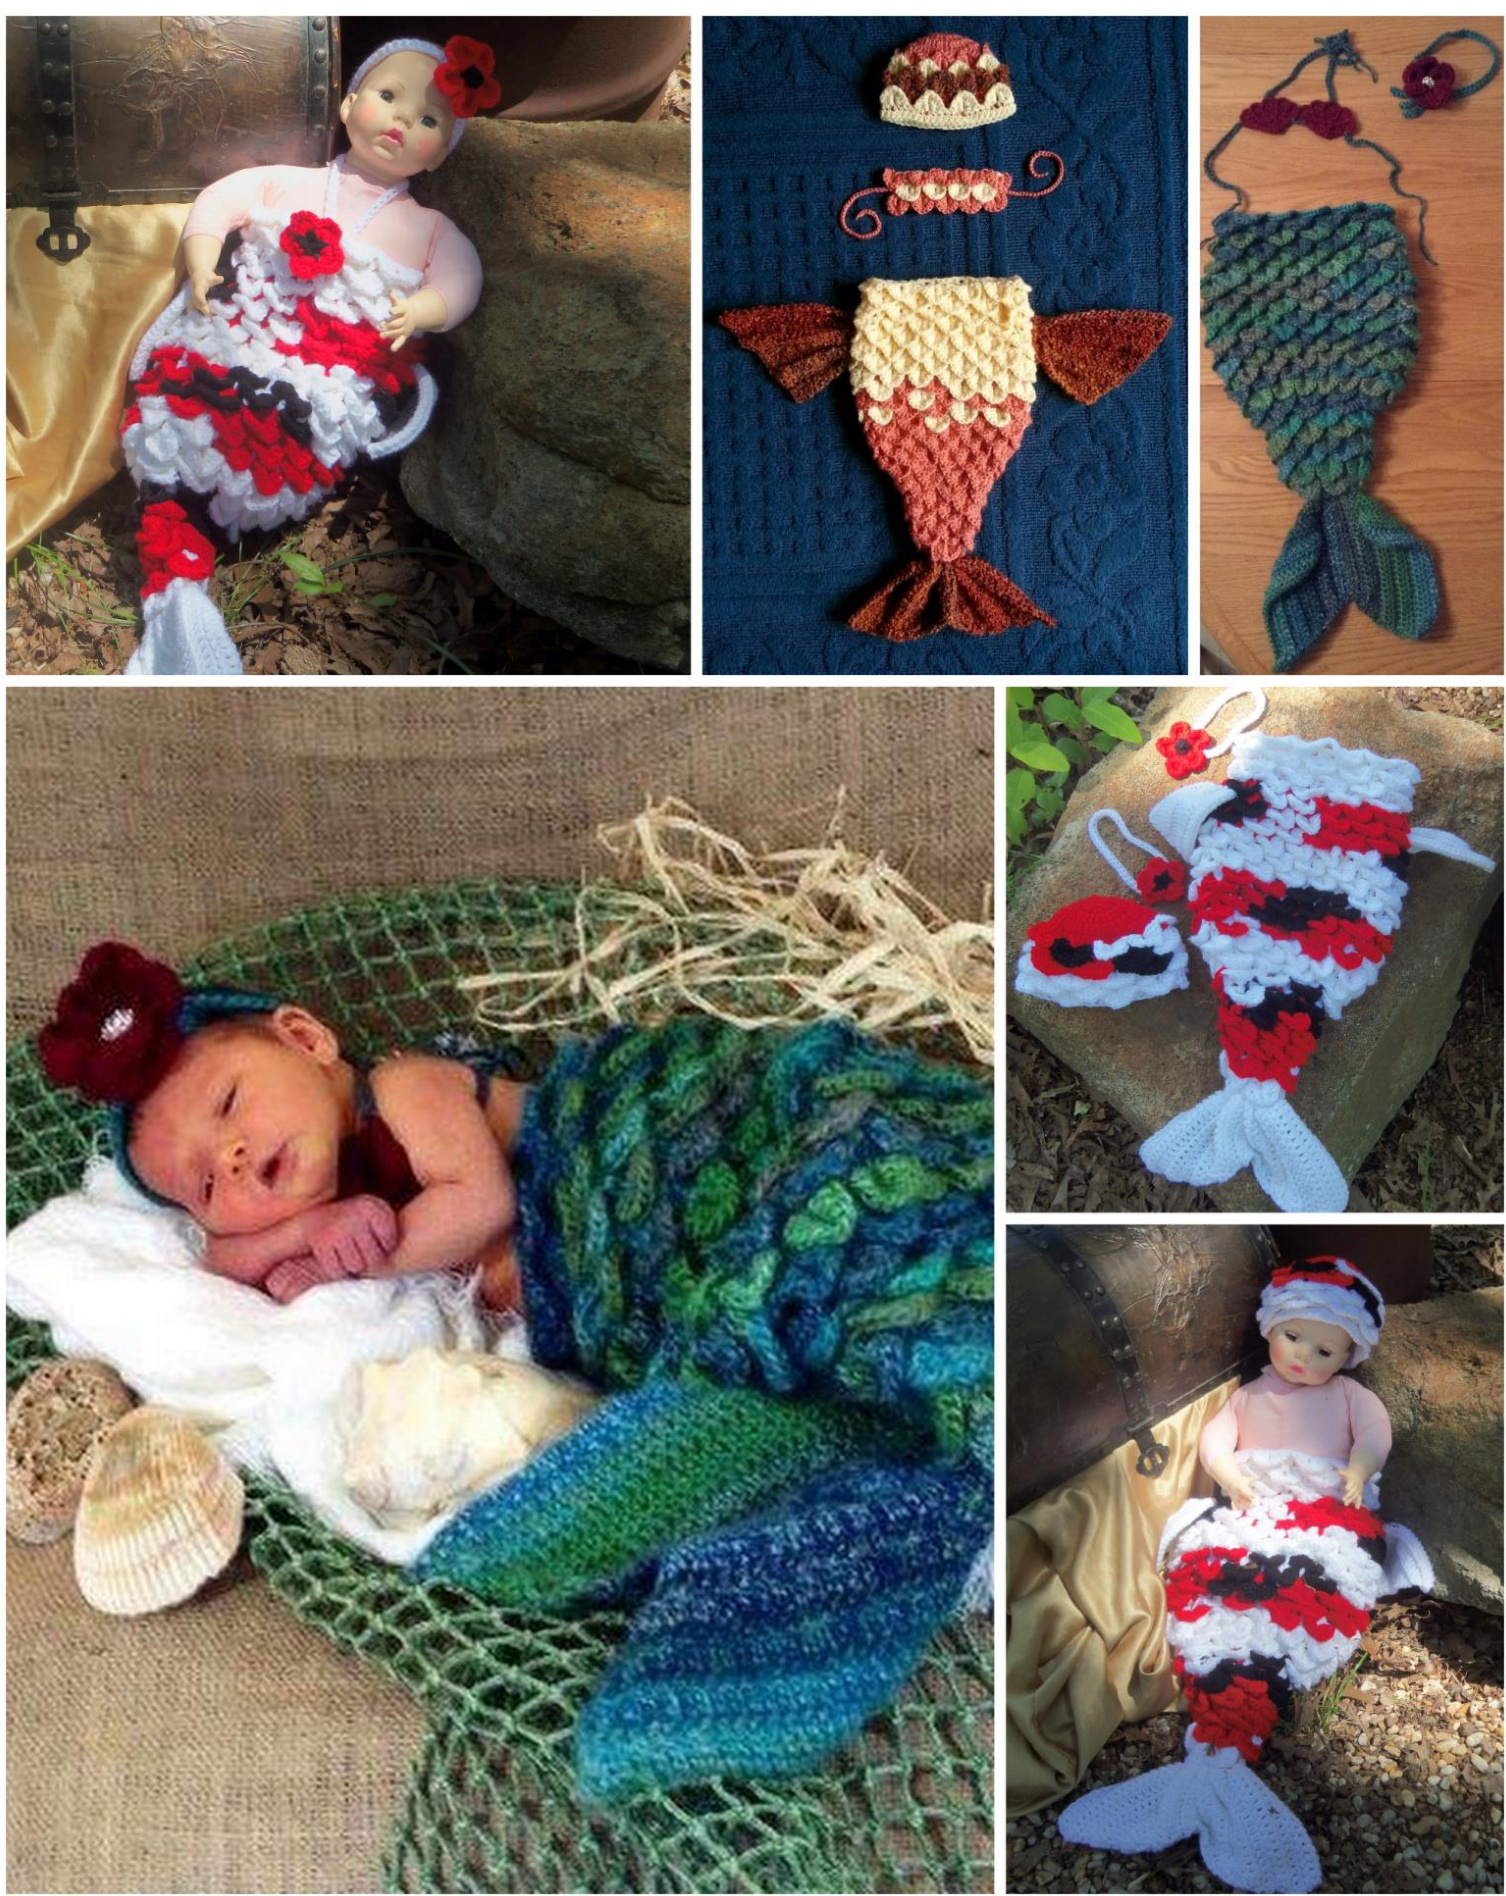
Table of Contents:
Photos of combination options for Set .Page 2 Notes, Notions, Materials, etc: ..Page 3 Fish Tail .Page 4-7 Tail Fin .Page 8 Mermaid Tail Attachment ..Page 9 Koi & Goldfish side fin and Tailfin attachment .Page 10 Mermaid Headband, Mermaid Flower .Page 11 Tiara ..Page 12 Crown .Page 13 Mermaid Shell Top and Straps .Page 14 Koi Flowers & Headband ..Page 15 Koi Hat .Page 16 Goldfish Headband, Goldfish Flower .Page 17 Goldfish Hat ..Page 18 Goldfish Bandeau .Page 19 Credits .Page 20
Materials:
Mermaid & Goldfish- 16 oz. Worsted Weight Yarn (Color changes optional), Size I & G hook, yarn needle, scissors, decorative button for headband (optional) Note: If you crochet tightly a J & H hook can be used depending on worsted weight yarn type Koi - 14 oz. Red Heart with Love White, 5 oz. Red Heart with Love Bright Red, 3 oz. Red Heart with Love Black, Size I hook, yarn needle, scissors, decorative button for headband (optional). Gauge: 4 Crocs across measured 5" wide, 7 rows high of FS/Croc combo measured 5" tall
Level of Difficulty: Intermediate
Abbreviations Used:
CH = Chain, SL ST = Slip Stitch, SC = Single Crochet, HDC = Half Double Crochet, DC = Double Crochet DC DEC = Double Crochet Decrease = Work a DC, but leave the last loop of the ST on hook so that you have 2 total loops, yarn over, insert hook into next ST, pull up loop, yarn over, pull through 2 loops on hook, yarn over, pull through final 3 loops on hook TC = Treble Crochet, BLO = Back Loop Only, FLO = Front Loop only PICOT = Chain 3, Slip Stitch in 3"d Chain from hook. FS = Foundation sections: 2 DC in a st - the foundation for your crocodile stitch. Note: The croc ST is worked around the posts of the foundation section CROC = Crocodile Stitch = Work 5 DC around the ist DC post by rotating piece 9o degrees, and inserting hook i between the 2 DC, CH 1, rotate piece 18o degrees and work 5 DC around 2nd DC post (See Photo) PICOT CROC = 5 DC on first side of FS, PICOT (ch-3 picot), 5 DC on second side of FS.
Notes:
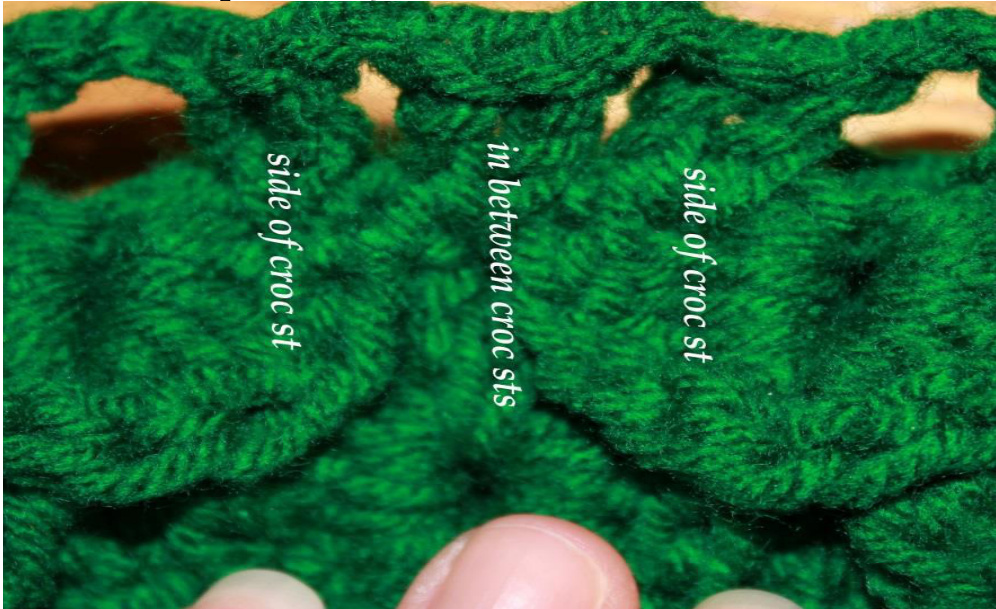
1) CH 3 when starting a CROC counts as 1 DC. 2) Stagger CROCs so they are offset from the centers of the previous row of crocodile stitches. Therefore, when increasing or decreasing you make the FS (foundation section) on the sides of your previous crocodile stitches 3) When working the FS (foundation sections) that are in between the CROCs of the previous row, you willinsert the hook in the middle of the FS from 2 rows prior, and also through 1 row prior at the join of the CROC.
Fish Tail - Make 1 with I hook for Mermaid, Goldfish or Koi
Notes: 1) Beginning CH 3 ALWAYS counts as a DC; 2) SIDES of CROC STS are to be worked in the top bar of the CROC from previous round, see page 4 for photo on increase FS. 3) for Koi you will change colors randomly Rd 1: CH 24, join with SL ST in ist CH, careful not to twist ch. CH 3, DC in same st, \*CH 2, skip 2 ST, 2 DC in next ST, rep from \*, to last 2 ST, CH 2, join with SL ST into top of CH 3. (8 FS, 32ST) Rd 2: CH 3, finish CROC, skip next FS, \*CROC in next FS, skip next FS, rep from \* SL ST in 1st side of 1st CROC. (4 CROC, 44 ST) See Photo How to work a Crocodile Stitch (CROC)
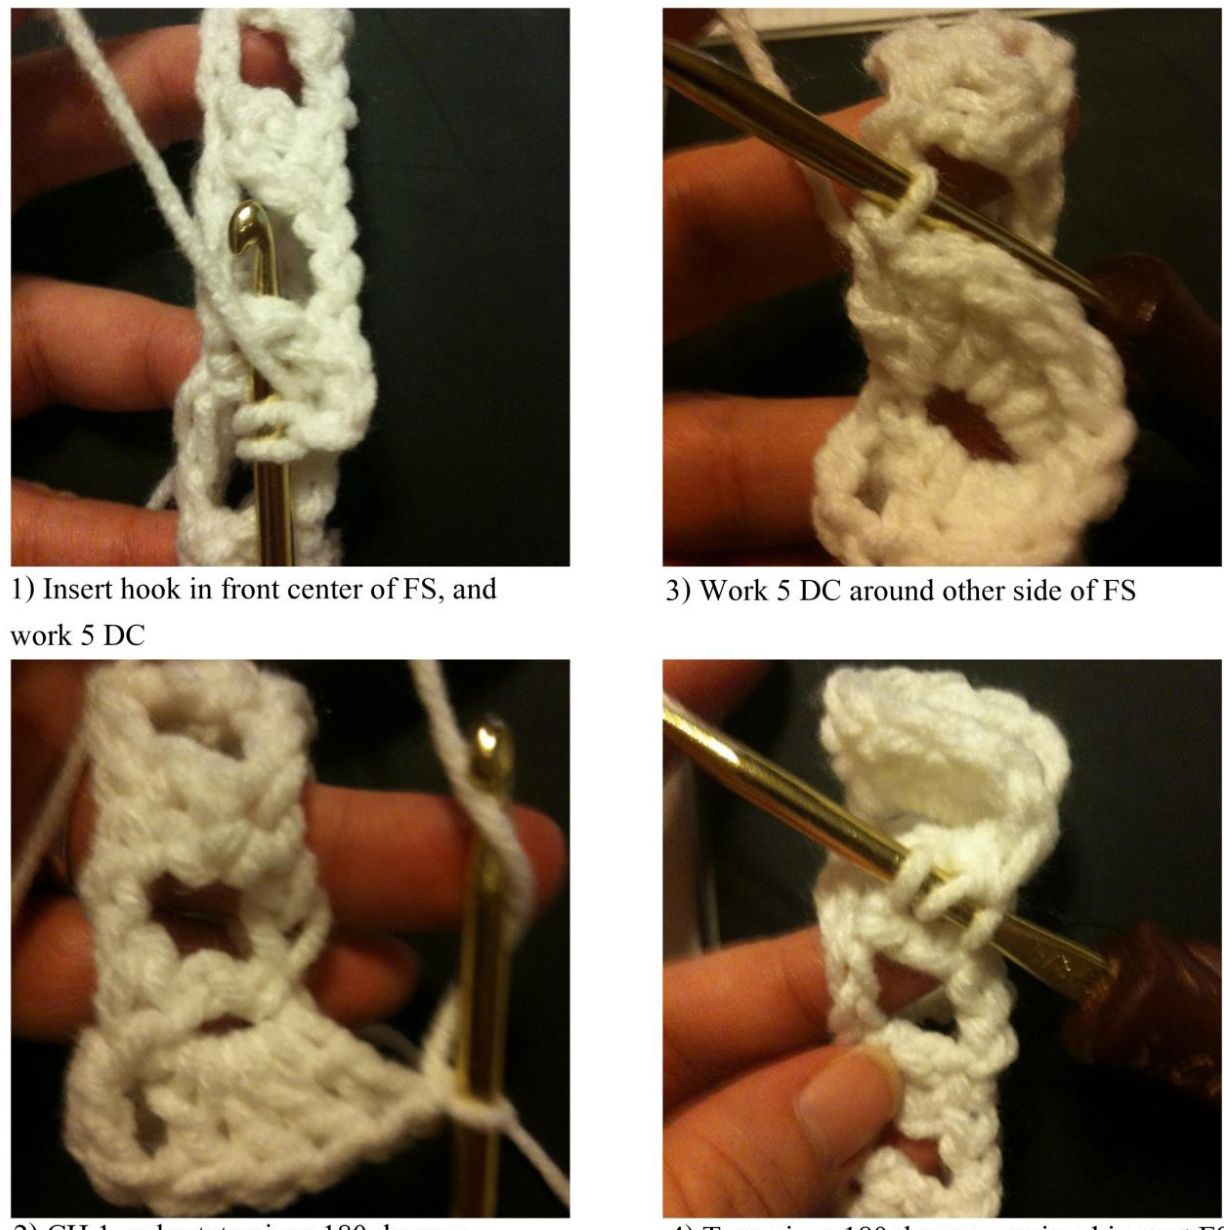
2) CH 1 and rotate piece 180 degrees, or turn it upside down 4)Turn piece 180 degrees again, skip next FS, andwork5DCaround1stpostofnextFS Rd 3(increase row): CH 3, DC in same sp, CH 2, FS in center of CROC, CH 2, FS in 2"d side of same CROC, CH 2, \*FS in 1t side of next CROC, CH 2, FS in center of CROC, CH 2, FS in 2"d side of same CROC, CH 2, rep from \*, SL ST in 1ST CH 3 to join. (12 FS, 46 ST) See photo below for explanation

Rd 4: CH 3, finish CROC, skip next FS, \*CROC in next FS, skip next FS, rep from \* around, join with SL ST in side of beg CROC. (6 CROC, 66 ST) Rd 5: SL ST in center of ist CROC, CH 3, DC in same ST, CH 2, FS in between CROCS, CH 2, \*FS in center of next CROC, CH 2, FS in between CROCS, CH 2, rep from \* around, join with SL ST in top of CH 3. (12 FS, 46 ST)
Rd 6: SL ST in next DC, SL ST in next 2 CHs, SL ST in next DC, CH 3, finish CROC, skip next FS, \*CROC in next FS, skip next FS, rep from \* around, join with SL ST in side of beg CROC. (6 CROC, 66 ST) Rd 7 - Rd 12: Repeat Rd 5 and Rd 6 alternating Rd 13 (inc): CH 3, DC in same ST, CH 2, FS in 2nd side of same CROC, CH 2, FS in ist side of next CROC, CH 2, FS in 2nd side of same CROC, CH 2, FS in between CROC, CH 2, FS in ist side of next CROC, CH 2, FS in 2nd side of same CROC, CH 2, FS in between CROC, CH 2, FS in ist side of next CROC, CH 2, FS in 2nd side of same CROC, CH 2, FS in ist side of next CROC, CH 2, FS in 2nd side of same CROC, CH 2, FS in between CROC, CH 2, FS in ist side of next CROC, CH 2, FS in 2nd side of same CROC, CH 2, FS in between CROC, CH 2, join with SL ST in top of CH 3. (16 FS,62ST) Rd 14: CH 3, finish CROC,\*skip next FS, CROC in next FS, rep from \* around, join with SL ST in side of ist CROC made. (8 CROC, 88 ST). Rd 15 (inc): CH 3, DC in same ST, CH 2, FS in 2nd side of same CROC, CH 2, FS in ist side of next CROC, CH 2, FS in 2nd side of same CROC, CH 2, FS in between CROC, CH 2, \*(FS in ist side of next CROC, CH 2, FS in 2nd side of same CROC, CH 2), repeat from \* 4 times, FS in between CROC, CH 2, repeat from \*( to ) 2 more times, join with SL ST in top of CH 3. (18 FS, 7o ST) Rd 16: CH 3, finish CROC, \*skip next FS, CROC in next FS, rep from \* around, join with SL ST in side of ist CROC. (9 CROC, 99 ST) Rd 17 (inc): CH 3, DC in same ST, CH 2, FS in other side of same CROC, CH 2, \*FS in between CROC, CH 2, FS in side of next CROC, CH 2, FS in other side of same CROC, CH 2, repeat from \* around skipping the last FS in between CROCs , join with SL ST in top of CH 3. (26 FS, 102 ST) Rd 18: CH 3, finish CROC, skip next FS, CROC in next FS, rep from \* around, join with SL ST in the side of ist CROC. (13 CROC, 143 ST) Rd 19: SL ST in center of ist CROC, CH 3, DC in same ST, CH 2, \*FS in between CROC, CH 2, FS in center of next CROC, CH 2, rep from \* around, join with SL ST to CH 3. (26 FS, 102 ST) Rd 2o: SL ST in next DC, SL ST in next 2 CH, SL ST in next DC, CH 3, finish CROC, skip next FS, \*CROC in next FS, skip next FS, rep from \* around, join with SL ST in side of 1st CROC. (13 CROC, 143 ST) Rd 21-40: Repeat R19 and R20 alternating Rd 41 (decrease): CH 3, DC in same st, CH 2, FS in 2nd side of CROC, CH 2, skip center of next CROC, FS in 2nd side of same CROC, CH 2, skip in between CROC, FS in ist side of next CROC, CH 2, FS in next in between CROC, CH 2, FS in 2nd side of next CROC, CH 2, FS in ist side of next CROC, CH 2, FS in between CROC, CH 2, FS in 2nd side of next CROC, CH 2, FS in ist side of next CROC, CH 2, FS in between CROC, CH 2, FS in 2nd side of next CROC, CH 2, FS in ist side of next CROC, CH 2, FS in between CROC, CH 2, FS in 2nd side of next CROC, CH 2, FS in ist side of next CROC, CH 2, FS in between CROC, CH 2, FS in 2nd side of next CROC, CH 2, FS in ist side of next CROC, CH 2, FS in 2nd side of same CROC, CH 2, join with SL ST in top of beg CH 3. (2o FS, 78 ST) Rd 42: CH 3, finish CROC, \*skip next FS, CROC in next FS, repeat from \* around, join with SL ST in side of ist CROC. (1o CROC, 1o ST) Rd 43: SL ST in center of ist CROC, CH 3, DC in same ST, CH 2, \*FS in between CROC, CH 2, FS in center of next CROC, repeat from \* around, join with SL ST to top of CH 3. (20 FS, 78 ST) Rd 44: SL ST in next DC, SL ST in next 2 CH, SL ST in next DC, CH 3, finish CROC, \*skip next FS, CROC in next FS, rep from \* around, join with SL ST in side of ist CROC. (10 CROC, 110 ST) Rd 45-48: Repeat R43 and R44 alternating, If making Mermaid or Goldfish Finish Off. NOTE: For Koi Tail, option with no bandeau top do NOT finish off, continue with: Rd 49-56: Repeat R43 and R44 alternating Finish off.
Tail Fin - Using I Hook
MAKE 1 of fin #1, and 1 of fin #2, for Mermaid MAKE 2 of fin #1, and 2 of fin #2, for Goldfish or Koi
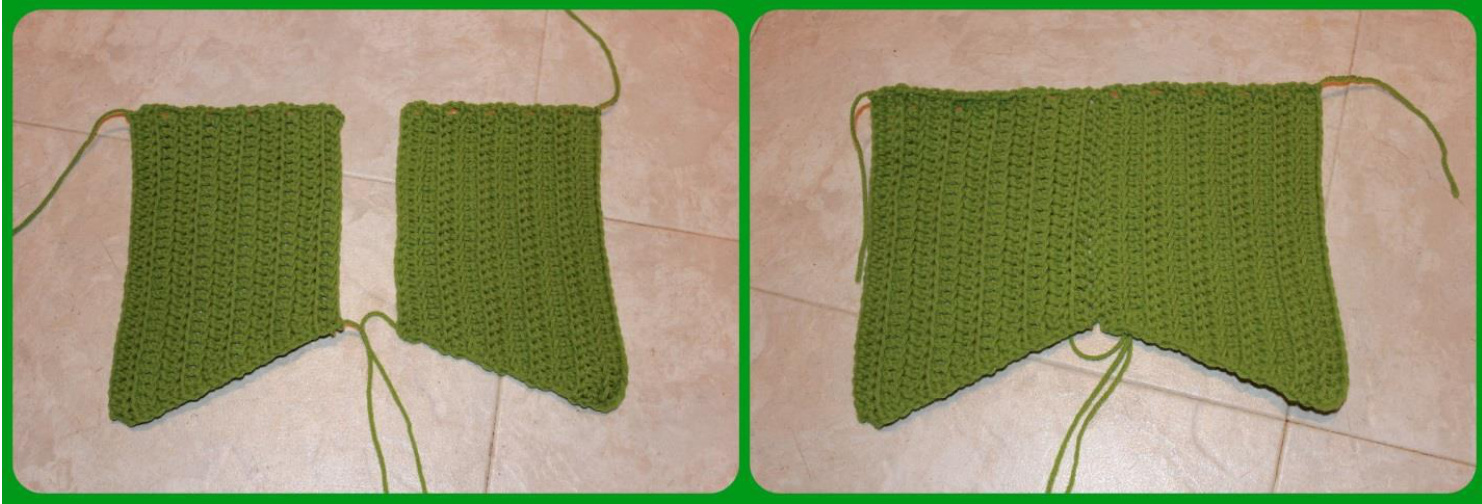
Fin #1
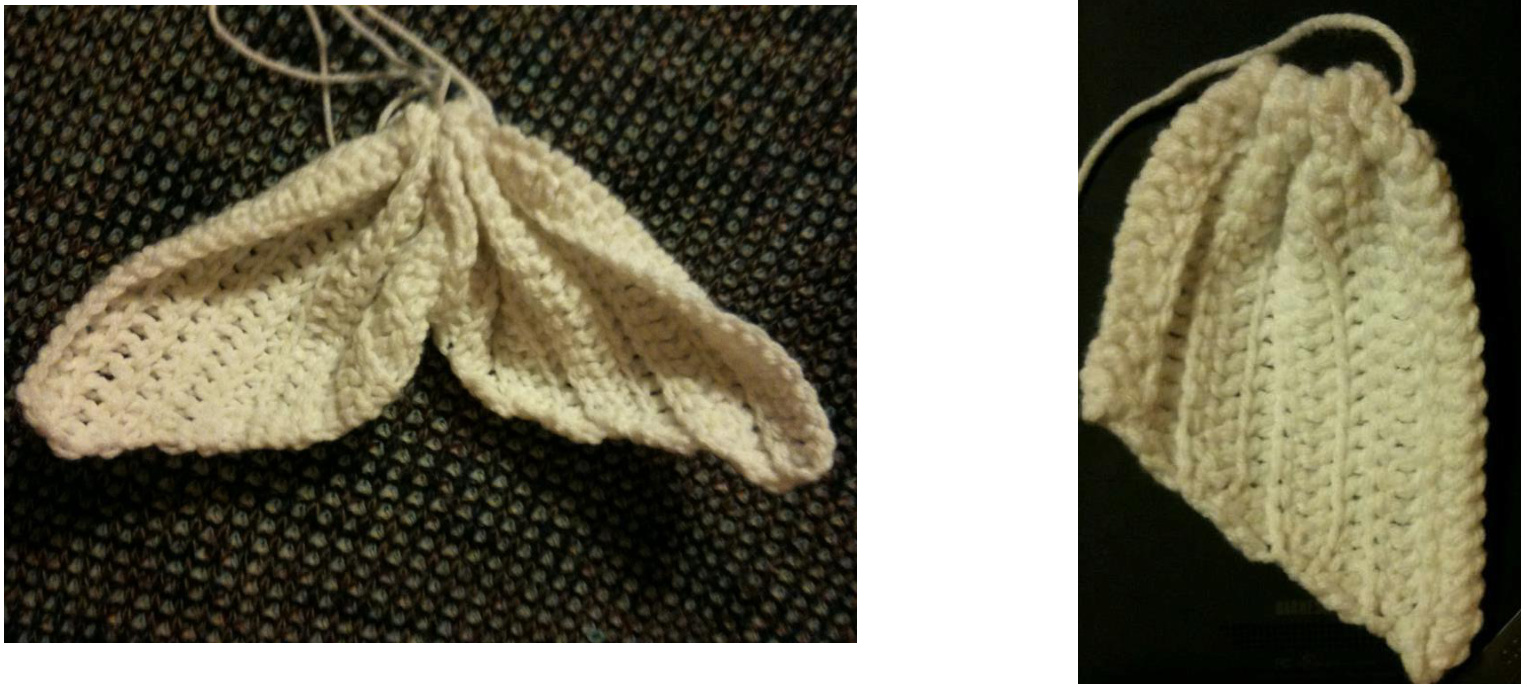
Leave about a 3-4" tail for tacking, R1: (WS): CH 24, DC in 4th CH from hook, DC in each CH across, CH 3, turn. (22 ST) DC across to last 2 ST, DC DEC in last 2 ST, CH 3, turn. (21 S R3: In FLO DC DEC, DC in each ST to end, CH 3, turn. (2o ST) R4-10: Alternate R2 & R3 Leave long tail for sewing, (Finish with 13 ST) Fin #2 Leave about a 3-4" tail for tacking, R1: (WS): CH 24, DC in 4th CH from hook, DC in each CH across, CH 3, turn. (22 ST) R2: (RS): In FLO DC across to last 2 ST, DC DEC in last 2 ST, CH 3, turn. (21 ST) R3: In BLO DC DEC, DC in each ST to end, CH 3, turn. (2o ST) R4-10: Alternate R2 & R3 Leave long tail for sewing, (Finish with 13 ST) Take one of Fin #1 and one of Fin #2. You will sew the short sides together with a whip st on the wrong side. (see photo for more detail).
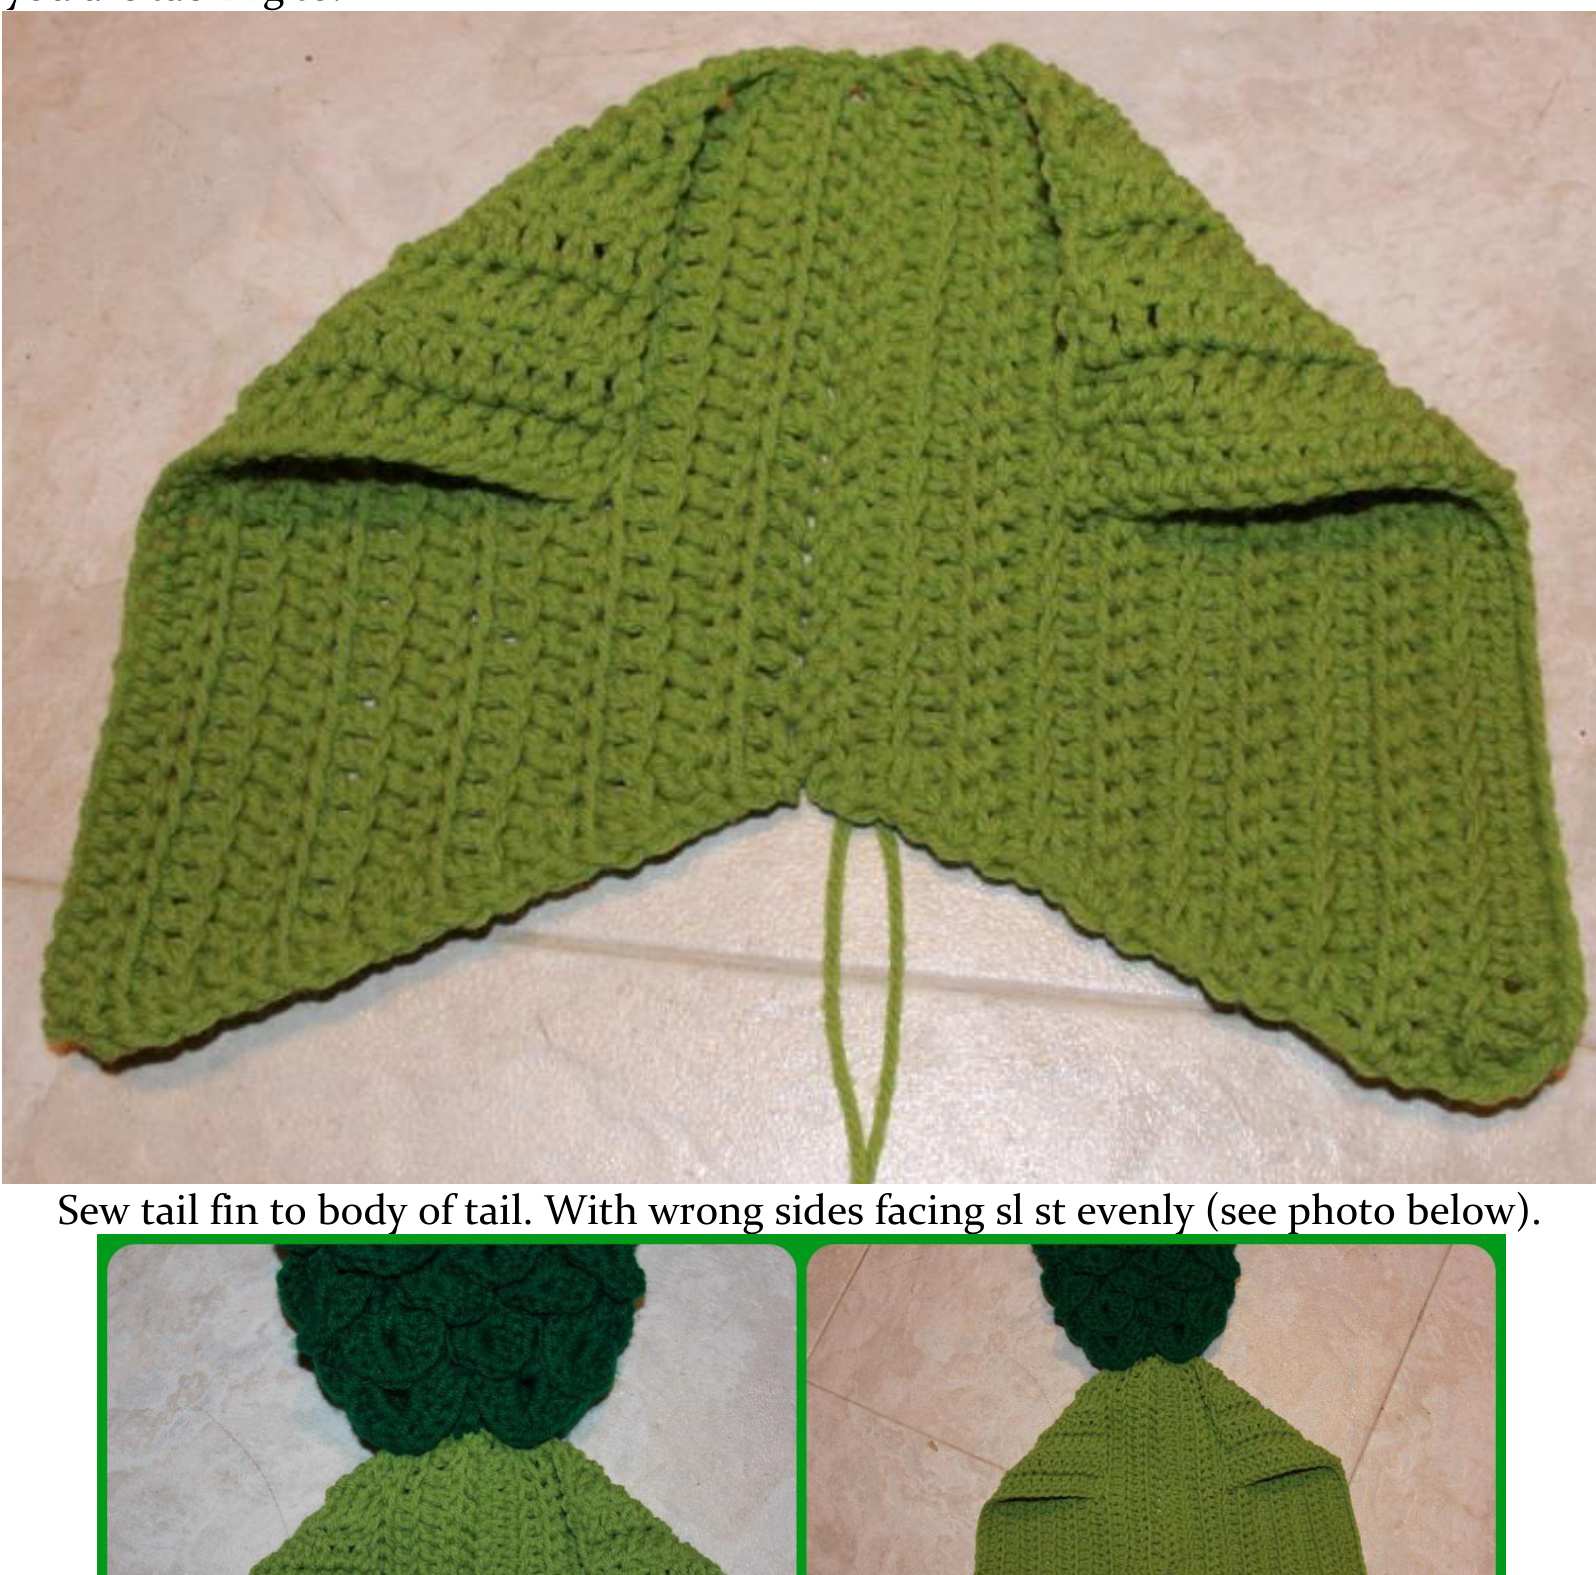
For Mermaid Tail Fin Attachment: Once the fins are put together you have to make the ^curls' on the sides of the fin. You will count in 7 rows to tack down the curl on both sides (see photo for more detail). Notice they are only tacked about half way down the row you tack each side to, you do NOT want to tack the corners all the way to the bottom of the row you are tacking to.
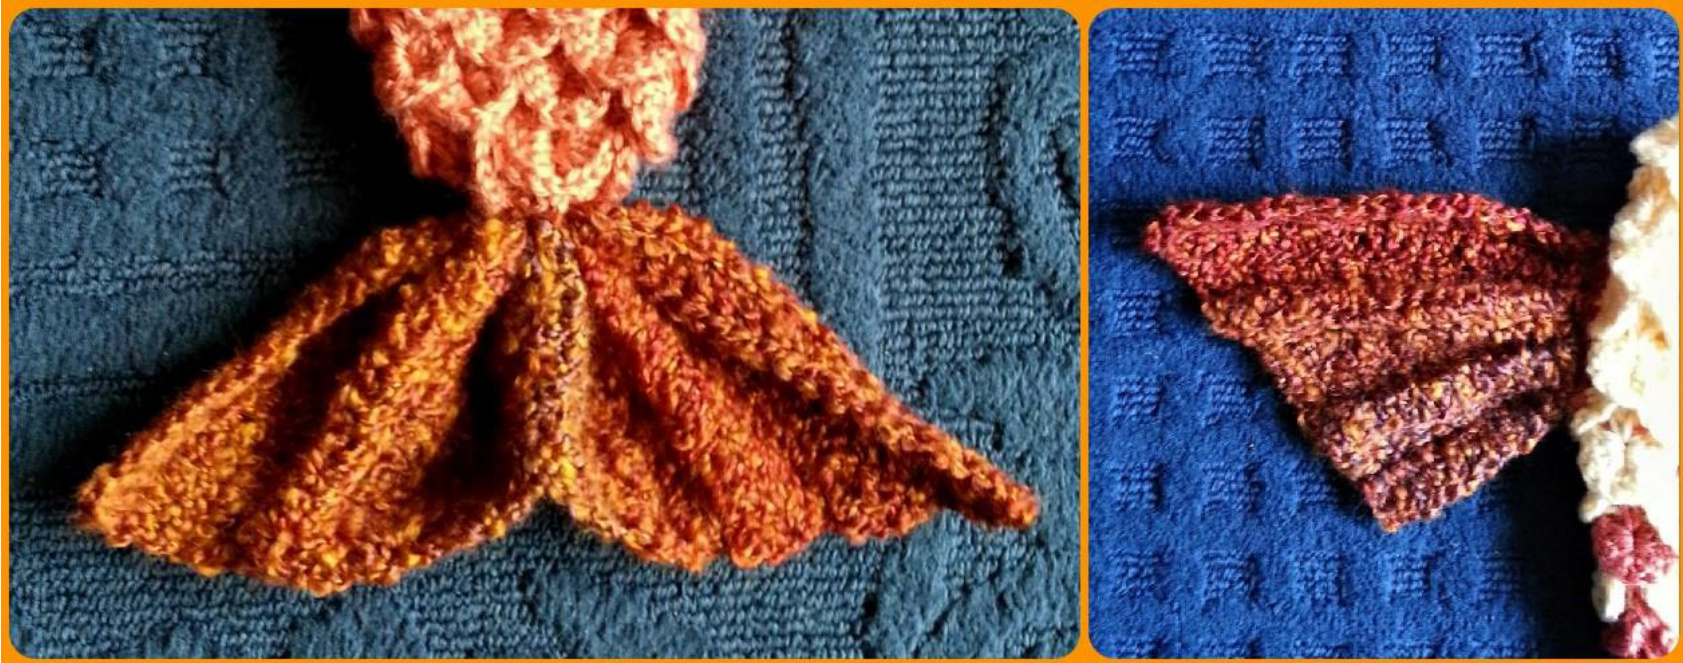
For Koi or Goldfish Tail/Fin attachment: Once the tail fins are put together you will be gathering the straight side of the big tail fin (SEE PHOTO FOR MORE DETAIL)
For Koi or Goldfish Side Fin Attachment: With other 2 fins you will gather the short edge and attach them on either side of the body of the tail between CROC rows 42 and 40.
If making Koi Prop skip to Page 15 now. If making Goldfish Prop skip to page 17 now. Headband: Make 1 headband or 1 hat with I Hook CH 45, SL ST in ist CH careful not to twist ch. Finish off.
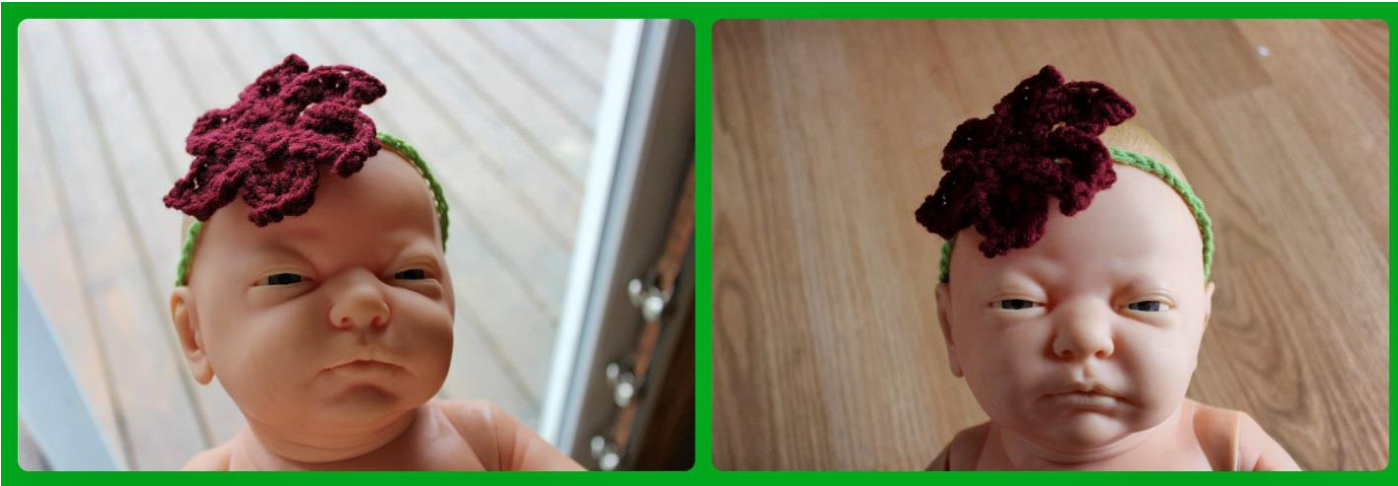
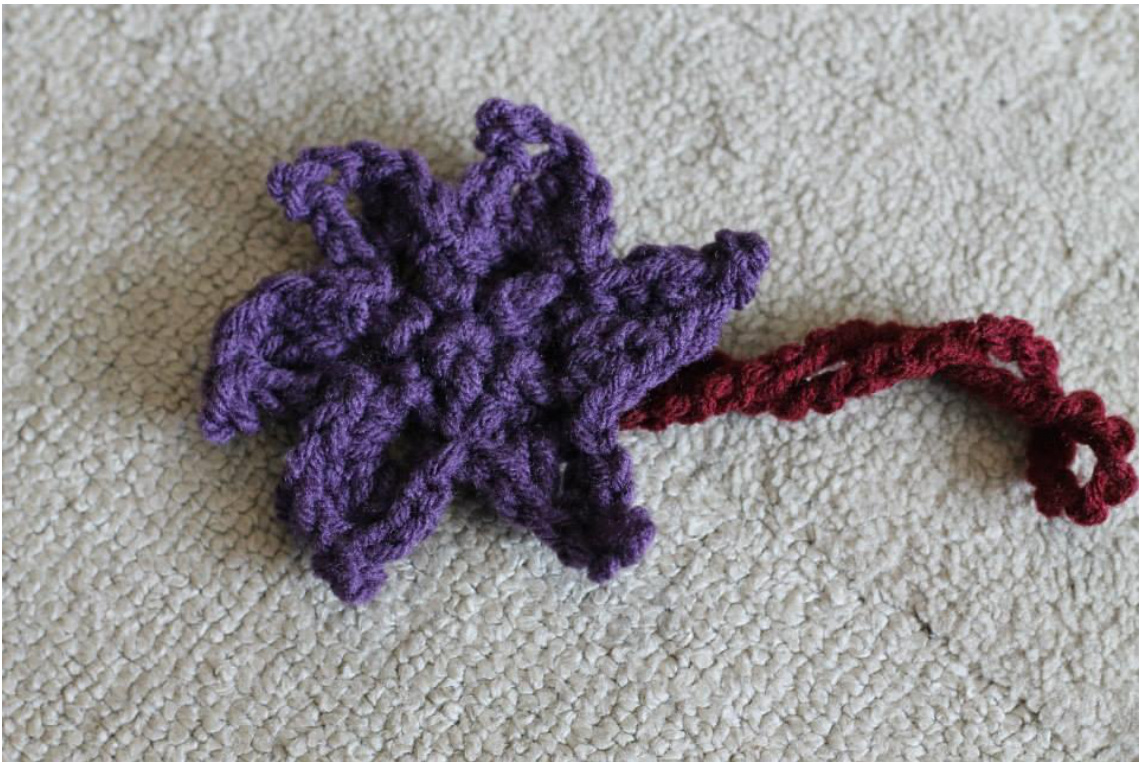
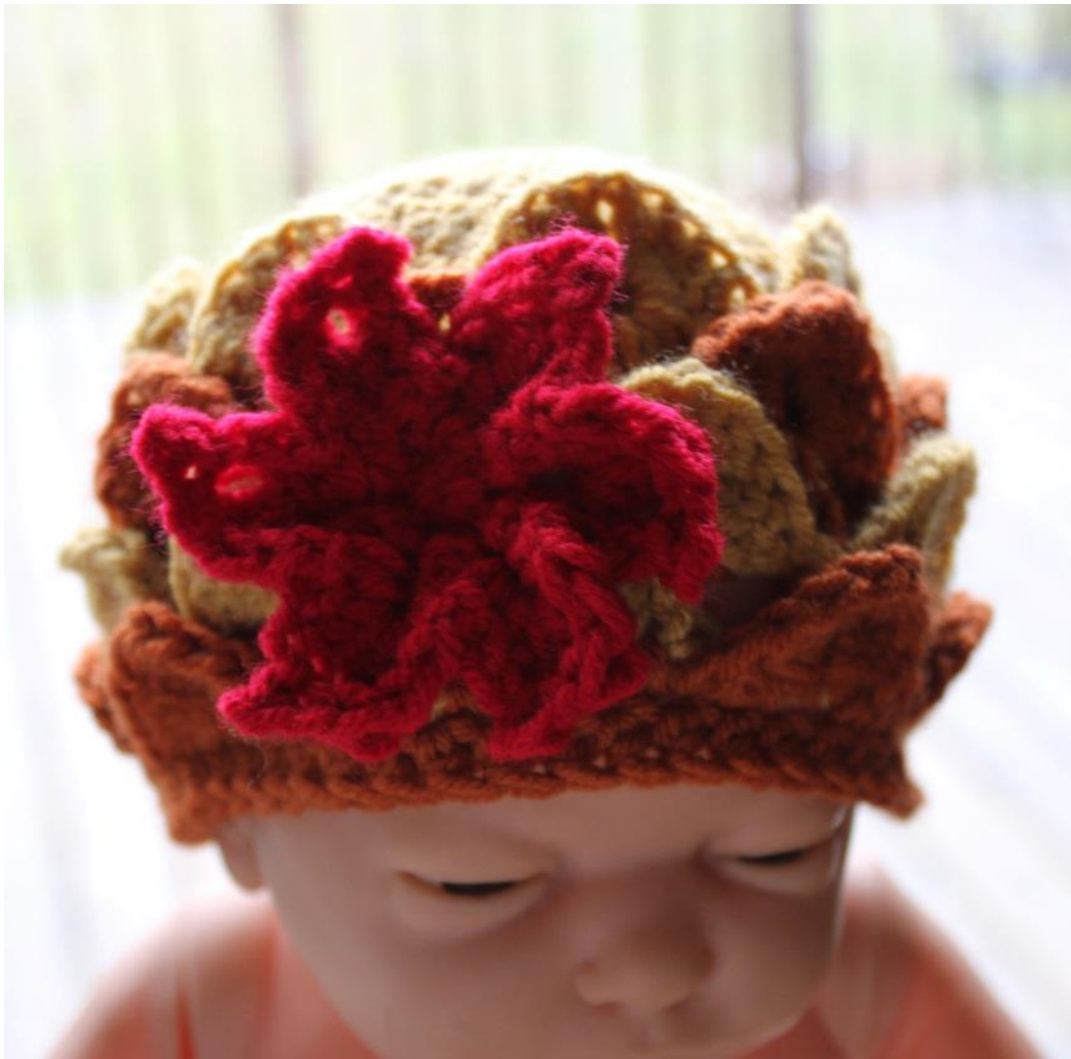
Flower for headband With I Hook
Magic Circle Rd 1: CH 1 (Do NOT count CH 1 as a ST), 6 SC, SL ST in ist SC. (6 ST) Rd 2: CH 4, SL ST in same ST as joining, \*SL ST in next ST, CH 4, SL ST in same ST, rep from \* to end. (You are creating 6 loops for the petals) Rd 3: (SC, HDC, DC, TC, PICOT, DC, HDC, SC) in each loop around, SL ST in ist SC to join. Finish off.
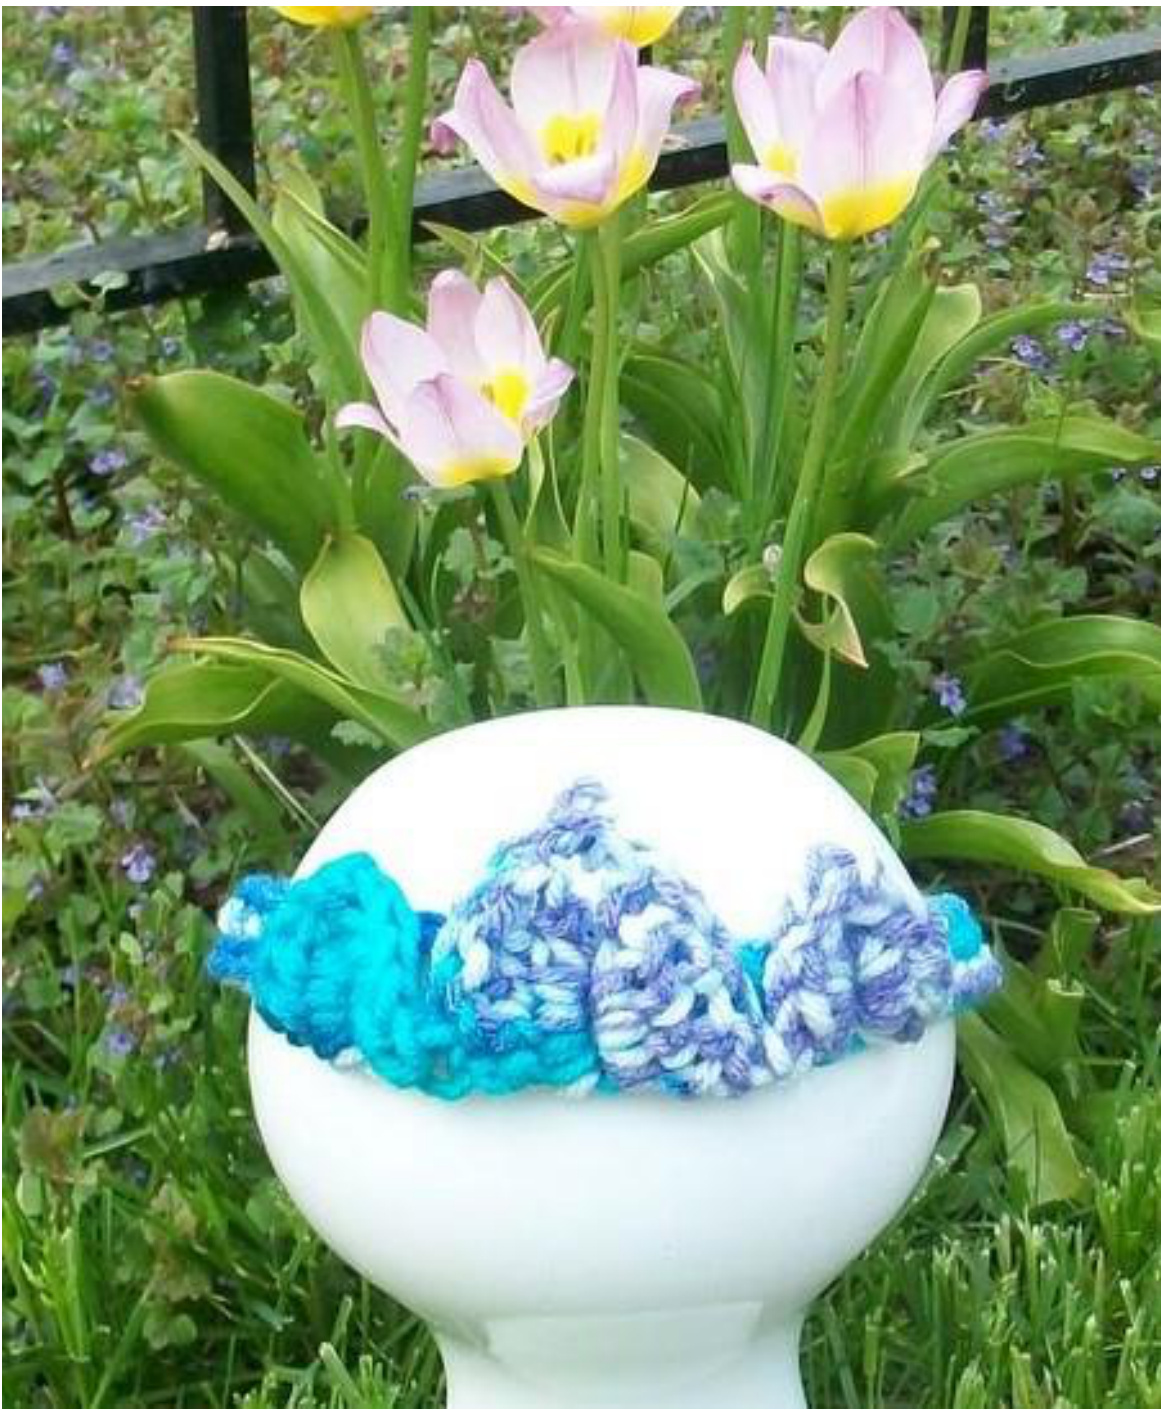
Tiara: Make 1 W/I Hook (17 %“ Circ.) or G Hook (15" Circ)
Rd 1: CH 46. Join. (careful to not twist ch), CH 1, SC in same ST and next 17 ST, CH 1, \*(FS, CH 1, skip 1 ST) repeat from \* 4 times, FS, CH 1, 18 sc join Rd 2: Do not turn. SL ST to ist FS, work HDC CROC with CH 1 picot in center, Skip FS, TC CROC with CH 3 picot, Skip FS, HDC CROC with CH 1 picot, SI ST back to beginning join, finish off. Use ends to stitch crocs flat into place if desired.
CrOWn - Make 1 with I Hook (14" Circ)
Notes 1) CH 3 counts as st; 2) CH 2 counts as st; 3) CH 1 does not count as st. 4) NEW ST - PICOT CROC = 5 DC on first side of FS, PICOT (ch-3 picot), 5 DC on second side of FS. CH 45 - careful not to twist CH, join with SL ST in 1"t CH. Round 1: CH 3, DC in same ST (FS), \*CH 2, SK 2 CHs, FS in next CH, rep from \* to end, SL ST in top of begCH 3. Round 2: CH 3, finish PICOT CROC, SK next FS, PICOT CROC in next, rep to last 2 FS, CH 3, SL ST in side of beg PICOT CROC. Round 3: CH 2, HDC in same ST, HDC in center of PICOT CROC, 2 HDC in 2"d side of CROC, \*HDC in between PICOT CROC, 2 HDC in 1\*t side of next CROC, HDC in center of PICOT CROC, 2HDC in 2"d side of PICOT CROC, rep from \* to CH-3 sp, HDC in between FS from Round 1, 2 HDC in between FSs, HDC in between FS, SL in top of beg CH 2 Round 4: CH 1, SC in same ST, SC in each ST around, SL ST in first SC. Finish off and weave in ends. Optional: Add flower from pattern to crown.

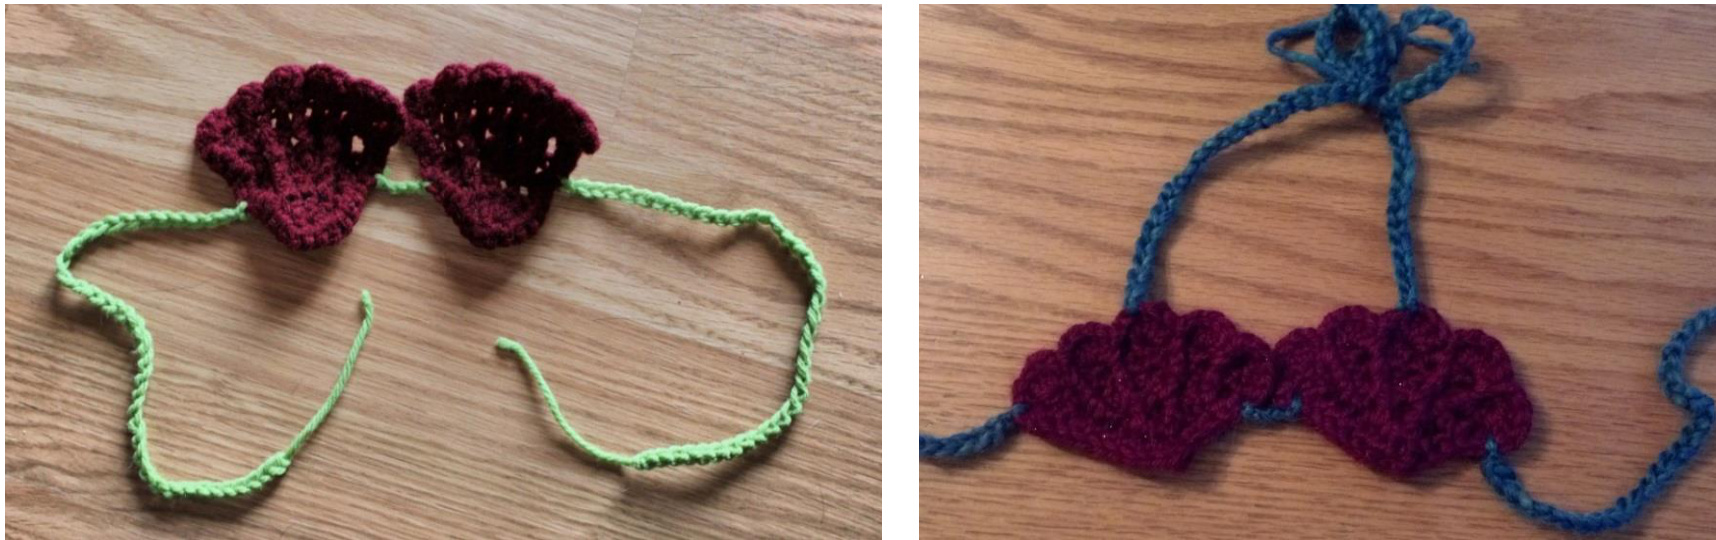
Mermaid Shell Top - With G Hook, make 2
Notes 1) CH 1 does not count as a ST R1: CH 4, 4 DC in 4th CH from hook, CH 3, turn. (5 DC) R2: DC in next 4 ST, CH 3, turn. (5 DC) R3 (RS): DC in same ST, FPDC, 3 DC in next, FPDC, 2 DC in last ST, CH 3, turn. (9 ST) R5: DC in same ST, DC, FPDC, DC, FPDC, DC, FPDC, DC, 2DC in last ST, CH 1, turn. (n ST) R6: SC in same ST, \*3 DC in next ST, SC in next ST, rep from \* to end (21 ST) R7: SC around sides and bottom of shell 9 SC on each side, 2 SC in corners of bottom with 1 SC in flat part of bottom shell. At end you will SL ST in 1\*t ST of last Rd 5. Finish off.
Straps of Shell Top - With I Hook
Lay shells out right side facing. Join main color to 3"d row of the inside of the shells, CH 4, join in 3'd row of the other shell (see photo for detail). Join main color to 3'd row of the outside of one shell, CH 4o. Repeat for other side. (see photo for detail) top: Join yarn to top of first shell, ch 4o, repeat on other shell
Koi Large Flower: Make i W/I Hook
Magic Circle Rd 1: CH 1 (Do NOT count CH 1 as a ST), 5 SC, SL ST in ist SC. (5 ST) Rd 2: CH 4, SL ST in same ST as joining, \*SL ST in next ST, CH 4, SL ST in same ST, rep from \* to end. (You are creating 5 loops for the petals), CH 3, join with SL ST across back t opposite side (You are making a loop to feed the headband through), finish off Black leaving 4 inch tail for shaping center of flower later.. Rd 3: Join red to left side of any loop, CH1, SC, [in next CH 4 loop (SC, HDC, 3 DC, HDC, SC)] 4 times, in next loop SC, HDC, 3 DC, HDC, join to ist SC with SI ST (28 ST) Rd4: \*(SL ST in next ST, SC, HDC, 3 HDC in same ST, HDC, SC SL ST), repeat from \* 5 Times. Finish off. (45 ST) Use tail from R4 to weave through back of R3 petals all the way around and pull tight, use end of hook to "push" center of flower out. If desired use tail from R2 in black to wrap around center top to create "puffed" effect.
Koi Small Flower: Make i With I Hook
Magic Circle Rd 1: CH 1 (Do NOT count CH 1 as a ST), 5 SC, SL ST in ist SC. (5 ST) Rd 2: CH 4, SL ST in same ST as joining, \*SL ST in next ST, CH 4, SL ST in same ST, rep from \* to end. (You are creating 5 loops for the petals), CH 3, join with SL ST across back t opposite side (You are making a loop to feed the headband through), finish off Black. Rd 3: Join red to left side of any loop, CH1, SC, [in next CH 4 loop (SC, HDC, 3 DC, HDC, SC)] 4 times, in next loop SC, HDC, 3 DC, HDC, join to ist SC with Sl ST. Finish off. (28 ST) Use tail from R3 to weave through back of R3 petals all the way around and pull tight, use end of hook to "push" center of flower inwards to create "Star center" effect. Koi Headband: Make 2 with I hook for adding to covert to girl Koi. Make SC Foundation CH of 45, feed beginning end through loop you made on back of flower, SL ST to beginning end of foundation CH being careful not to twist ch. Finish off. Slide flower around to cover join.
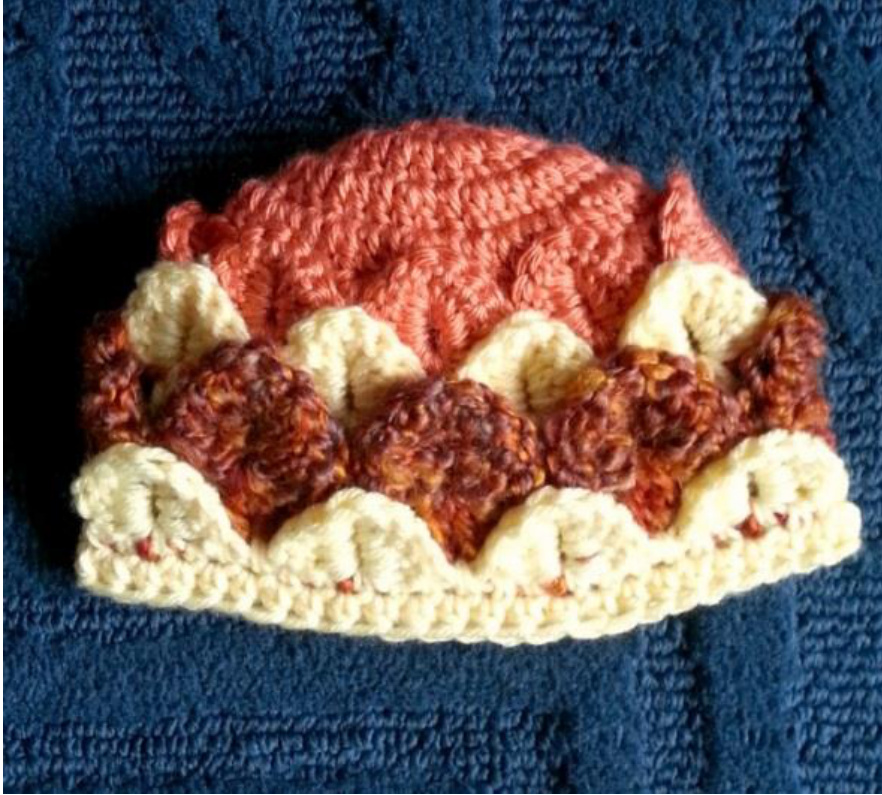
Koi Hat - With I Hook
lors is randomly done; 2) The CROCS are worked upside dow Rdi: CH 3 (CH 3 DOES count as a ST), 11 DC in magic circle, join with SL ST in top of CH 3. (12 ST) Rd2: CH 3, DC in same ST, 2 DC in each st around, SL ST in top of CH 3. (24 ST) Rd3: CH 3, 2 DC in next ST, \*DC in next, 2 DC in next, rep from \* to end, SL ST in top of CH 3. (36ST) Rd4: CH 3, Dc in next ST, 2 DC in next ST, \*DC in next 2 ST, 2 DC in next, rep from \* to end, SL ST in top of CH 3. (48 ST) Rd 5: CH3, DC in same ST, \*CH 2, skip 2 ST, FS in next ST, rep from \* to end, SL ST in top of CH 3. (16 FS, 62 ST) Rd 6: CH 2, SL ST in ist CH of CH 3 from last rnd, turn work 18o°, CH 3, Finish CROC, sk FS, turn work, CROC in next FS, sk FS, rep from \* to end, SL ST in top of beg CH 3 AND DC after last FS from row below. (SEE PHOTO) Rd7: SL ST behind first CROC in center of FS from two rows below, CH 3, DC in same ST, CH 2, \*FS in between CROC, CH 2, FS behind center of next CROC, CH 2, rep from \* SL ST in top of beg CH 3. Rd8: SL ST in next DC, SL ST in next 2 CHs, SL ST in next DC, CH 2, SL ST in bottom of same DC, turn work, CH 3, finish CROC, sk FS, turn work, CROC in next FS, sk FS, rep from \* to end, SL ST in top of beg CH 3 AND DC after last FS from row below. Rd9 - Rd15: Repeat 7 & 8 alternating. Rd 16: CH 2, \*2 HDC in CH 2 from two rows below, HDC in between CROC, 2 HDC in CH 2 from two rows below, HDC in center of CROC, rep from \* SL ST into top of beg CH 2. Rdi7: CH 1, SC in same ST, SC in each ST around. Finish Off. Goldfish Headband: Make 1 headband or hat with I Hook CH 45, SL ST in ist CH careful not to twist CH. Finish off.
Goldfish Flower for headband and/or hat with
Hook Rd 1: Magic Circle, CH 1 (Do NOT count CH 1 as a ST), 6 SC, SL ST in ist SC. (6 ST) Rd 2: CH 4, SL ST in same ST as joining, \*SL ST in next ST, CH 4, SL ST in same ST, rep from \* to end. (You are creating 6 loops for the petals) Rd 3: (SC, HDC, DC, TC, Picot, DC, HDC, SC) in each loop around, SL ST in ist SC to join. Finish off.
Goldfish Hat - with I Hook
INote: Cnanging coiors is opuonal. Magic circle beginning with Color A Rdi: CH 3 (CH 3 DOES count as a ST), 11 DC in magic circle, join with SL ST in top of CH 3. (12 ST) Rd2: CH 3, DC in same ST, 2 DC in each st around, SL ST in top of CH 3. (24 ST) Rd3: CH 3, 2 DC in next ST, \*DC in next, 2 DC in next, rep from \* to end, SL ST in top of CH 3. (36ST) Rd4: CH 3, Dc in next ST, 2 DC in next ST, \*DC in next 2 ST, 2 DC in next, rep from \* to end, SL ST in top of CH 3. (48 ST) Rd 5: CH 3, DC in same ST, \*CH 2, skip 2 ST, FS in next ST, rep from \* to end, SL ST in top o1 CH 3. (16 FS, 62 ST) Rd 6: CH 3, finish CROC (see notes on Page 2), skip next FS, CROC in next FS, rep from \* to end, SL ST in ist side of ist CROC. (8 CROC, 88 ST) Rd 7: SL ST in center of ist CROC, CH 3, DC in same st, \*CH 2, FS in between CROC, CH 2, FS in center of next CROC, rep from \* to end, SL ST in top of CH 3. (16 FS, 62 ST) Rd8: SL ST in next DC, SL ST in next 2 CH, SL ST in next DC, CH 3, finish CROC, skip next FS, CROC in next FS, rep from \* to end, sl st in 1t side of 1st CROC (8 CROC, 88 ST) Rd g-12: Rep Rd 7 & Rd 8 alternating Rd 13: SL ST to center of ist CROC, CH 1, SC in same ST, \*2 SC in side of CROC, SC in betwee CROC, 2 SC in side of CROC, SC in center of CROC, rep from \* to end, SL ST in ist SC. (48 ST) Rd 14: CH 2, HDC in each ST around, SL ST in top of CH 2. (48 ST) Finish off.
Goldfish Bandeau - with I Hook
Note: Changing colors is optional. Ch 28 Row 1: With A, DC in 4th CH from hook, \*CH 2, skip 2 ST, 2 DC in next ST, rep from \* to end. (9 FS) Row 2: CH 3, turn, finish CROC in ist FS (see notes on Page 2), \*skip next FS, CROC in next FS, rep from \* to end. (5 CROC) Row 3: sl st in center of last CROC, CH 3, turn, DC in center of ist CROC (CH 3 & DC counts as 1 FS), \*CH 2, FS in between CROC, CH 2, FS in center of next CROC, rep from \* to end, switch to color B. (9 FS) Row 4: CH 1, turn, SL ST in next DC, SL ST in next 2 CH, SL ST in next DC, CH 3, finish CROC, \*skip next FS, CROC in next ST, rep from \* to last CH 2 and FS, SL ST in 2 CH, SL ST in next 2 DC. (4 CROC) Row 5: CH 3, turn, DC in center of same FS, \*CH 2, FS in center of next CROC, CH 2, FS in between CROC, rep from \* to end. Change to color A. (9 FS) Row 6: CH 3, turn, finish CROC, \*skip next FS, CROC in next FS, rep from \* to end. (5 CROC) Finish Off.
Ties for Bandeau
Join yarn in second CROC row, CH 4o, Repeat on second side You can sell all finished products made from my patterns. Please give credit where credit is due. I work hard on writing my patterns. When selling a finished product online or offline using one of my patterns please link back to my facebook page and give me (Shannon Kilmartin/The Hookeraholic Crochet) credit. This is all I ask when selling products you made from my patterns.

Facebook: https://www.facebook.com/TheHookeraholilcCrochet This pattern was created, designed and written by Shannon Kilmartin/The Hookeraholic Crochet. This pattern is not to be distributed in whole or part or altered in any way shape or form. Please do not give out this pattern to others, even for personal use. If you have any questions or concerns please contact me. Pattern formatting provided by SICK 'LIL MONKEYS. Need help getting your idea from draft to published stage? Contact us to help you get your idea translated into a publishable word and PDF document. SICK 'LIL MONKEYSor contact us at kelli.wohlgemuth@gmail.com Photo Credits: Kelli Wohlgemuth from SICK 'LIL MONKEYS Laura McGarvey at https://www.facebook.com/WearableArtHuggableFriends Lisa Jelle at https:/ /www.facebook.com/KaleidoscopeArtnGifts Faith Schellenberg at https://www.facebook.com/CrochetedGoodies.ByFaith A HUGE THANK YOU TO ALL MY TESTERS!


