Tam Shan
Irish Knitting Prayer May your yarn be plentiful, your needles be swift, and may your gauge be correct on your very first click!
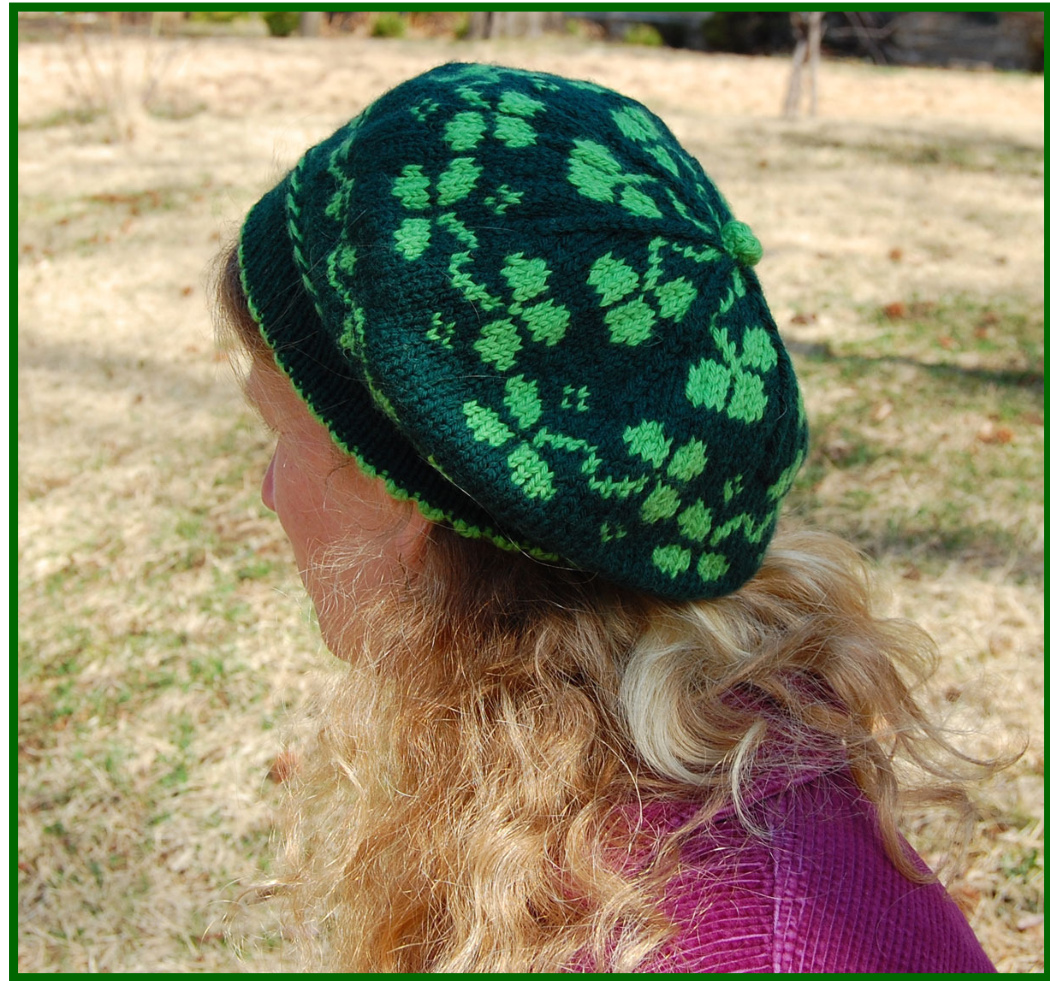
Finished Size 19.5" band (blocked) Yarn Worsted Weight Background Color: 175 yards(160 meters) Pattern Color: 98 yarns (90 meters) Sample shown in Ella Rae Classic Skill Intermediate Needles and Notions $\left(3.5\,\mathrm{mm}\right)$ and set of, US 6 $\mathrm{{(4\;mm)}}$ double pointed needles Or size to obtain gauge. Tapestry needle, Stitch markers, Waste yarn & crochet hook Gauge 5.25 sts and 7 rows per inch (Unblocked gauge in st st on US 6).
Let's get started .
Facing Hem & Hat Band
Chain On Provisional Cast On: 88 sts Using Crochet Hook and waste yarn, place 88 loops on US 4, 16" circular needle. Rnds 1 - 16: Using Color B, knit 1 stitch in each loop. Join and continue working in rounds of st st 15 more rounds. Rnd 17: Picot Folding Edge: \*K2tog, YO, rep from \* to end. Rnd 18: Knit Rnds 19 - 31: Switch to US 6, ${\bf16^{\,\circ}}$ circulars. Work 12 rounds using Color A (or until top edges of the folded hem meet). Weave in ends that will be folded inside the headband. Joining Facing to Hat Band: Make sure the two pieces are the same height. If you need more rows on the inside hem, add them after you place the hem stitches on your spare need. Place stitches held by crochet chain on smaller size circular needle. Pull out and discard waste yarn chain. This can be done by inserting tip of spare needle through a live stitch, removing chain and repeating until end of chain. You will need to add one extra stitch (m1) for a total of 88 live stitches on the hem needle. Fold along picot edge with wrong sides together. Using Color A only, join hem edge & outer band by knitting together one stitch from facing and one stitch from hat band stitches.
Twined Herringbone Border
Using both Colors A & B Rnd 1: Attach Color B. Bring both yarns to the front of your work, $\bf{\Psi}^{*}\bf{p}\bf{1}\,\bf{B}$ , set yarn just worked down to the left and bring Color A over Color B, p1 $\mathbf{A}^{*}$ , rep from \* to \* to end of round. The working yarn will become very twisted after working this round; it will be untwisted as you work next round. Rnd 2: $\ast\mathbf{P1}$ B, P1 A, setting yarn just worked to the right and bringing the yarn to be worked under it\* , rep from \* to \* to end of round. Rnd 3: Knit 1 round in A
Body of Hat
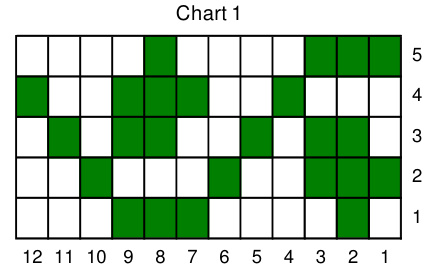
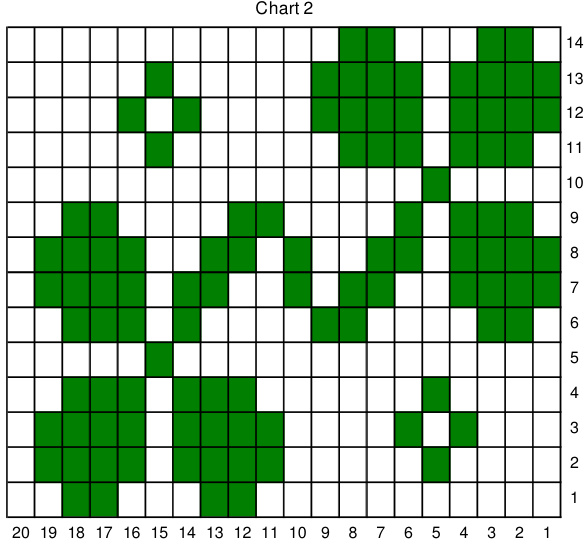
See “Increases” at right for Right Lifted Increase (RLinc) Rnd 1: Using Color A, \* knit 2, RLinc , rep from \* to end of round - 132 sts Rnd 2: Knit ( Color A) Switch to $24^{\circ}$ US 6 circular needle or dpns when needed. Rnd 3: (Color A) $\ast111$ , RLinc, rep from \* to end of round - 144 sts Rnds 4-7: (Color A) Knit Rnds 8-12: Join Color B and work Chart 1 Rnds 13-17: (Color A) knit 5 rounds even. Rnd 18: (A) Decrease; (K34, K2tog) 4 times - 140 sts Rnds 19-32: Using A & B work rows 1-14 of Chart 2 Rnd 33-34: (A) Knit
Chained On Provisional Cast On
You'll need a crochet hook in an appropriate size for your working yarn and needles, and a length of waste yarn in a color that contrasts with your working yarn. Start by making a slip knot loop on the crochet hook with the waste yarn (This loop does not become a stitch.) Hold the knitting needle and yarn in the left hand, and the crochet hook with the slipknot in the right hand as though crocheting. Place the knitting needle on top of the yarn held in the left hand. Holding the hook over (in front of) the needle. Crochet a chain stitch over the top of the knitting needle. One chain stitch is crocheted by placing the yarn over the crochet hook, grabbing the yarn with the hook facing downward and pulling the yarn through the loop that is already on the crochet hook. In the case of this provisional cast on, your chain is now wrapped around your knitting needle. You have cast on one stitch. Move the working yarn back behind the needle and repeat this process until you have the desired number of stitches cast on. Cut the yarn, enlarge the loop from the crochet hook and secure it so the tail will not pull through. This is the end from which you will unravel the chain to recapture stitches. When you are ready to recapture the live stitches at the cast on edge, gently pull out the chain, placing each stitch on a needle.
Right Lifted Increase
RLinc $=$ Right Lifted Increase: We will be lifting the stitch in the row directly below the stitch on the left hand needle. Use right hand needle to lift right side of this stitch and place it on the left hand needle, inserting tip of lhn from front to back. Knit through the back loop to close the hole.
Shape Crown
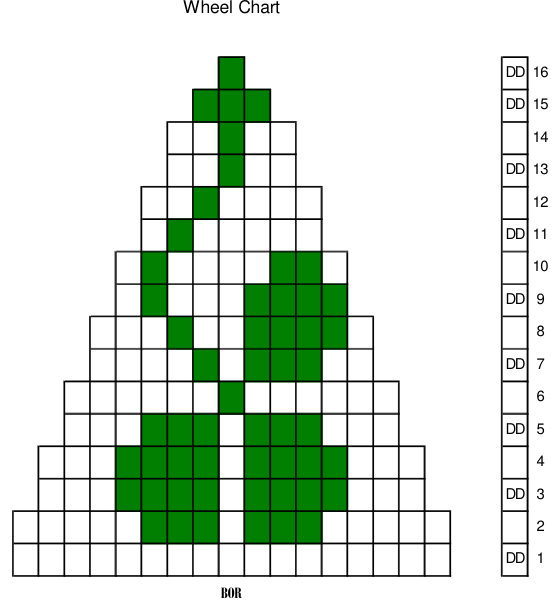
Crown decreases are indicated by DD on the Wheel Chart. The decrease is a Double Decrease performed as follows: DD $=$ slip 2 stitches knitwise at the same time (as if to work a k2tog, but slip without working), knit the next stitch, then pass the two slipped stitches together over the knit stitch. Beginning of Round on Wheel Chart is the marked center stitch, “BOR". Read from the center stitch to the left until you have reached the left end of the chart. Then work from the far right of the same row (the single stitch where you will find the DD) to the left, up to and including the stitch before the center stitch. Now move up one line on the chart to the next center stitch and read from there in the same direction. Switch to ${\bf16^{\,\circ}}$ circular and double pointed needles as needed. (DDA) Double Decrease is worked in Color A throughout Wheel Chart Work Wheel Chart (it repeats 7 times within one round) Rnd1: \*K9A, DDA, K8A; rep from $^{*}-126$ sts Rnd2: \*K1A, K3B, K11B, K3A; rep from \* Rnd3: \*K1A, K4B, K3A, DDA, K3A; rep from \* - 112 sts Rnd4: \*K1A, K4B, K7A, K4B; rep from \* Rnd5: \*K1A, K3B, K3A, DDA, K3A, K3B; rep from \* - 98 sts Rnd6: \*K1B, K13A; rep from \* Rnd7: \*K1A, K1B, K4A, DDA, K2A, K3B; rep from $^{*}-84$ sts Rnd8: \*K2A, K1B, K5A, K4B; rep from \* Rnd9: \*K3A, K1B, K1A, DDA, K4B; rep from \* - 70 sts Rnd10: \*K3A, K1B, K3A, K2B, K1A; rep from \* Rnd11: \*K2A, K1B, K1A, DDA, K3A; rep from $^\ast-56$ sts Rnd12: \*K1A, K1B, K6A; rep from \* Rnd13: \*K1B, K2A, DDA, K2A; rep from \* - 42 sts Rnd14: $\bf{\nabla}\approx\bf{K}1B$ , K5A; rep from \* Rnd15: $\bf{\tilde{\pi}}\bf{K}\bf{2B}$ , DDA, K1B; rep from \* - 28 sts Rnd16: $\bf{\nabla}\approx\bf{K}1B$ , DDA; rep from \* - 14 sts Uncharted rounds: Rnd 17: \*K2togB; rep from \* - 7 sts Rnd18: (K2togB) 3 times, k1 - 4 sts Place all stitches on one needle. Color B: P2tog, p2 - 3 sts Using Color B, make 2 $\eta_{2}$ "' i-cord with these three stitches. Cut $6^{\circ}$ tail, thread onto a tapestry needle. Arrange I-cord into a knot and tack down with yarn. Weave in all ends. Block on a dinner plate.
Holding Your Yarns
If you look at the strands as they travel across the back of your work, you will see that one color travels above the other color. The yarn carried ABOVE will make the background stitches in your pattern. The strand that travels BELOW is the design or pattern stitch portion ol your pattern. Experiment with tension holds that are comfortable for you and then continue to carry these strands in this manner. Two-Handed Method: Pattern Color in left hand over index finger. Background Color in right hand ove index finger. Pick pattern color/Throw Background Color. One ball on right, one on left to avoid twisting. Right Handed, Throwing the Yarn: Background color over index finger and Pattern Color over middle finger. Lift index finger to wrap background color around the needle, then lift middle finger to wrap pattern color over the needle. Left Handed, Continental: both yarns in left hand. Background color over index finger and Pattern color over middle finger. Pick up desired color while knitting taking care to allow pattern color to consistently travel below the background color.
Floats & Weaving
'Floats: theunused strand of colorthat is carried along the back of your work as you knit with the other color. Weave the floats when you have a pattern that callsformore than three stitches of the same color in the rowyou are working.Weaving is the prcesof traping” the unused strand with the opposite color so it is secured at the back of your knitting. This shortens the length of the float. For Righthand &Lethand carry: If you are carrying the strands in yourright hand only orlft hand only, you willstopand twist th strands before knitting the catching stitch. Be sure to continue carrying the pattern stith strand belowthe background strand after performing this twist.
For Two-handed carry:
$\clubsuit$ Insert the right needl into the next stitch on left needle knitwise. $\clubsuit$ Wrap floating yarn on right index finger around right needle (\*as if" you were going to knit with it,but don't pullit through). Next, place tip of needle under the left strand (from right to left) and wrap it around the needle as if to knit, but before drawing this yarn through to create the stitch, take the right hand yarn back round the needle so you do not pull it through. $\clubsuit$ Now pull the yarn through that you are knitting with (left strand). $\clubsuit$ Complete the “catch" of the float by knitting the next stitch $\clubsuit$ in thaloft hond vorn in tha ueual woy Knitting with right hand yarn/weaving left strand float: $\clubsuit$ Insert needle knitwise into 1st st on left hand needle and, at $\clubsuit$ the same time, under the yarn that is on your left index finger. (Working needle in under both strands of yarn at this point). $\clubsuit$ Bring the right hand yarn around the tip to knit as usual AND hold the left hand strand tight and bring only the right hand stitch through. You have have lifted the lft hand color over the right. Knit the next right hand stitch in the usual manner For both strands, the weave must alternate: knit, weave, knit.
Wet blocking is an important step in the color stranding process. Knitting tension can be more uneven with color stranded knitting. Even it you think the finished item looks decent, blocking can almost always improve the appearance of your knitting and adjust the size.
Blocking involves wetting your knitting and then manipulating it into shape. Immerse your work in a basin of tepid water. Give it a couple of gentle squeezes and pats to get the wool to absorb the water. Allow it to sit for about 10 minutes. Remove knitting and allow excess water to drip out (avoid rough handling) and Wrap it up in a thick, absorbent towel. Gently press the water out of the knitting with the towel. Remove the knitting from the towel and lay it flat. Arrange your knitting on your blocking surface (table top or padded surface free of dyes). Manually arrange the knitting into the desired shape and size. Use pins or blocking wires to straighten edges. Allow knitting to dry. Avoid direct sunlight and heat.
Abbreviations
beg - beginning BO - bind off CO - cast on dec - decrease DD - double decrease dpn - double pointed needle(s) Inc - increase k2tog - knit 2 stitches together k or K - knit LH - left hand LLinc $=$ left lifted increase M1 - make one increase ndl - needle p or P-purl patt - pattern pm - place marker rem - remain, remaining rep - repeat RH - right hand RLinc - right lifted increase rnd -round RS - right side sl - slip st purlwise sl1-k1-psso: slip 1 sts knitwise, knit next st, pass slipped st over ssk - slip 1 st knitwise, slip next st knitwise,knit through back lop st st - stockinette stitch st(s) - stitch(es) WS - wrong side [] repeat instructions within brackets number of times stated () repeat instructions inside parentheses number of times stated For more fun with Karendipity Knitwear Patterns, visit www.karendipity.etsy.com or contact Karen at karendipitydoo@gmail.com


