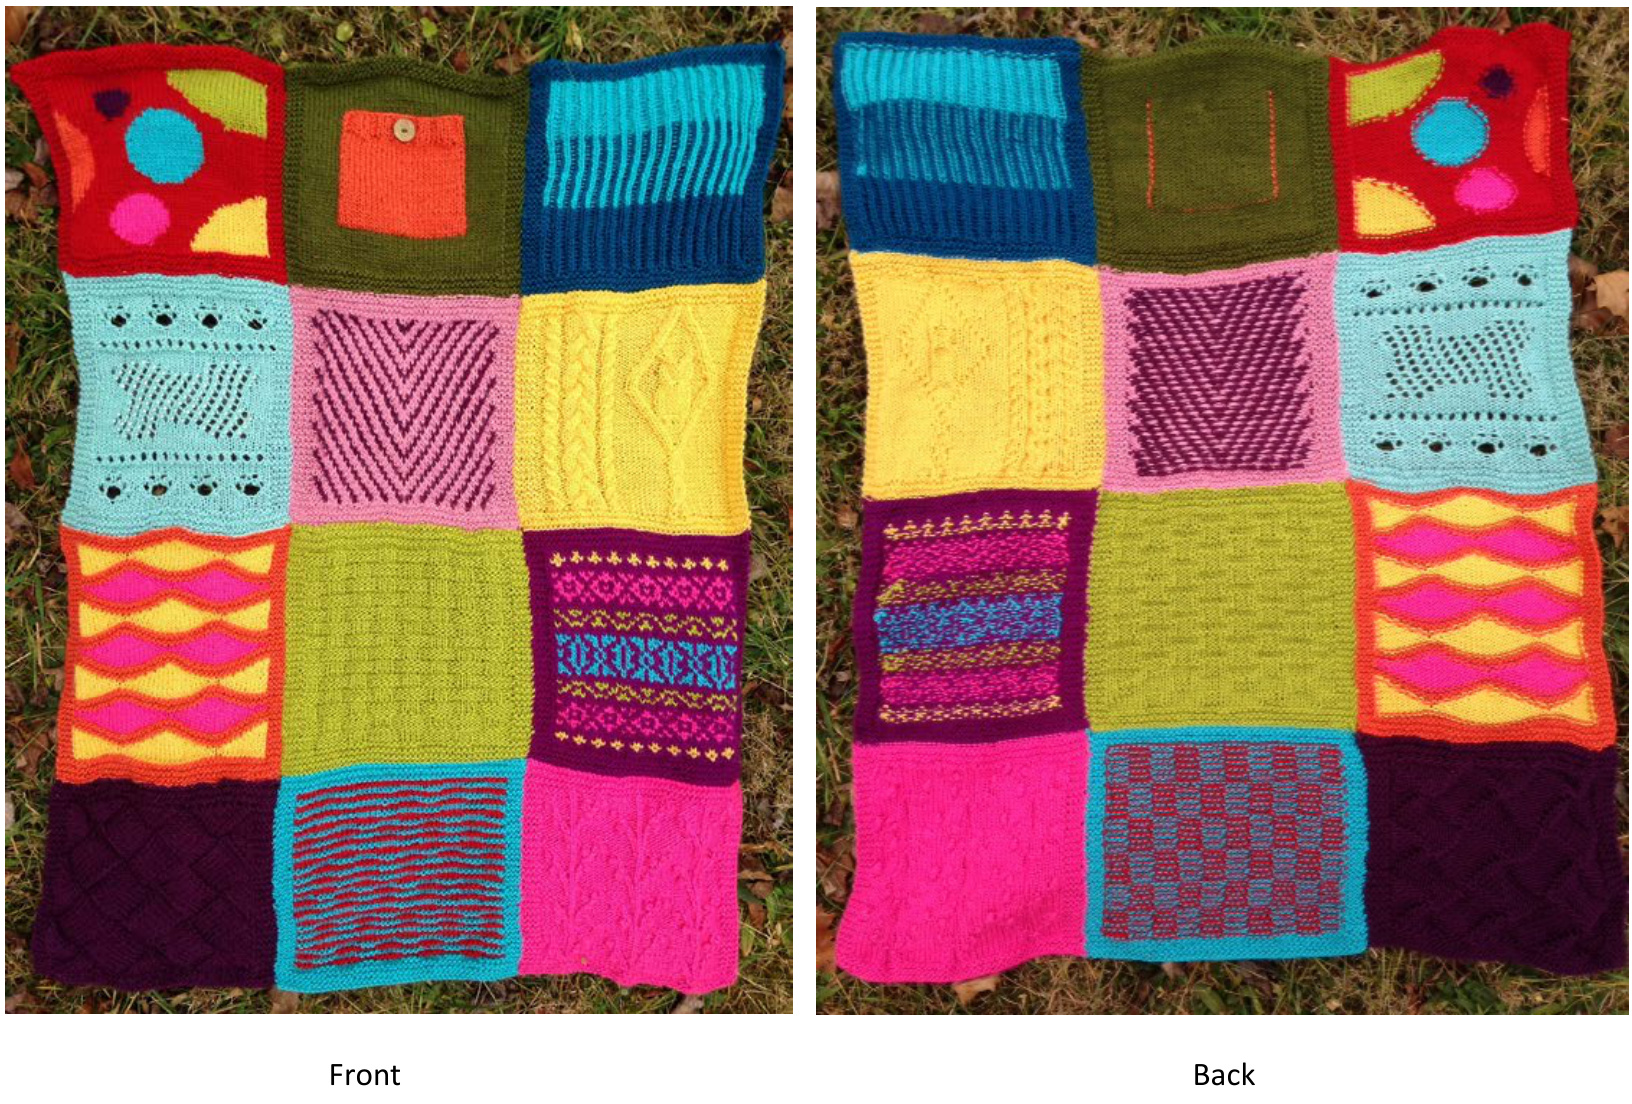
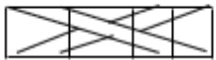
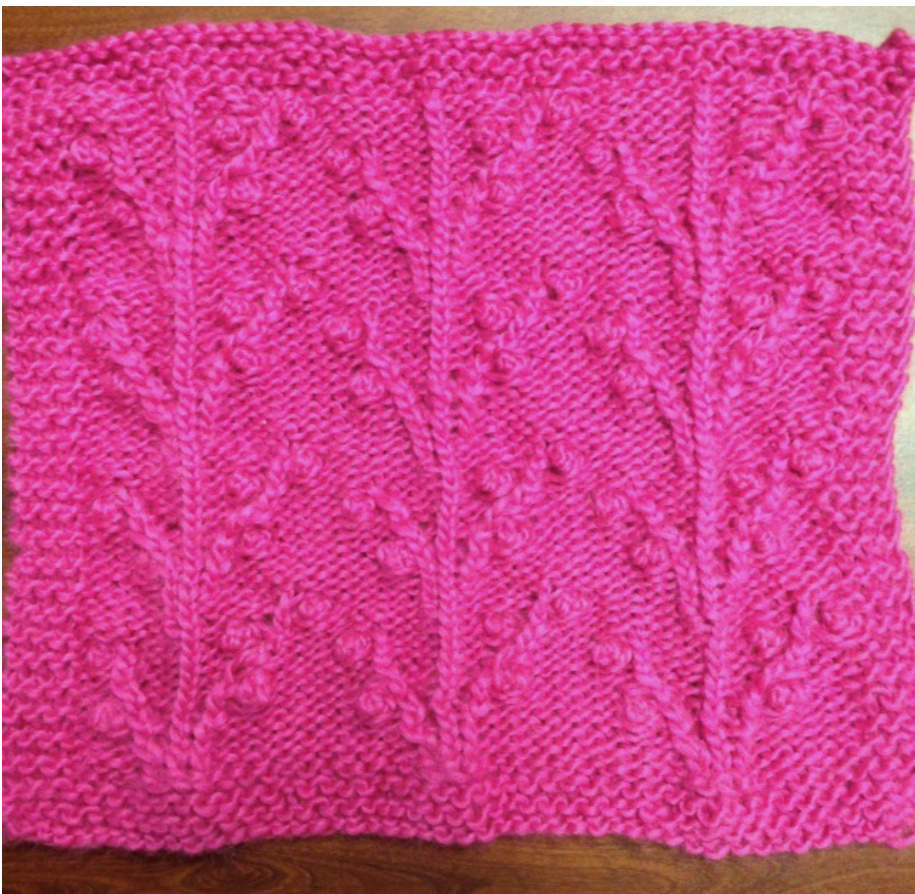
Skill Sampler Afghan
By Brynn Riordan (ItsBrynn) Patternisavailable asafreeRavelry download at http://www.ravelry.com/patterns/library/skill-sampler-afghan This 12-square afghan was designed as a knit along project for the K.O.M. Rivers Knitting Guild to learn new knitting methods. Each square was released at our monthly meeting and supported throughout the month at our weekly gatherings. The techniques were suggested by members to build their knitting repertoire. This pattern assumes knitters are at an Advanced-Beginner or greater skill level. All blocks begin, end, and are edged by a garter-stitch border. Block 1: Knits and Purls, reading a written pattern Block 2: Entrelac, short rows, increase and decrease, picking up stitches Block 3: Cables, reading charts, cabling without an extra needle Block 4: Twisted Stitches/Bobbles, repetitive charts, knitting backward Block 5: Lace/Beads, lifelines, design modification Block 6: Short Rows/Color changes Block 7: Double knit/Buttonholes Block 8: Brioche Block 9: Intarsia Block 10: Mosaic Block 11: Fair Isle, woven floats Block 12: llusion, blocking, assembly
Each block measures approximately 12" x 12" and a finished afghan will measure approximately 36"x 48". Yarn: Worsted weight. 1400 - 1700 yards for entire blanket. The fewer colors you use, the less yarn you'll need. Each square uses approximately 120-140 yards. Gauge: While gauge is not important for this blanket, it is imperative that you make your blocks as similar as possible. Please avoid changing yarn types or needles between blocks. The gauge for my blocks is 4 stiches and 6 rows over 1" in garterstitch. Needles: US Size 10/6mm straights or 20"-24" circulars Other notions: Stitch markers, Cable needle, Row Counter
Block One: Knits and Purls Creating Texture with Simple Stitches!
This first square will help you explore the kind of texture that can be created with those two basic stitches: knit and purl. It will also refresh your pattern-reading skills!
CO 48 sts using the Long Tail method.
Bottom border: Knit in garter stitch for 6 rows and last 4 sts in each row. Center pattern below DOES NOT contain border stitches. Center pattern (3-stitchBasket Weave): Row 1: \*p7, k3\* (Rpt \* 3 more times for a total of 40 sts) Row 2: \*p3, k7\* 4 times Row 3: Repeat Row 1 Row 4: Purl all sts Row 5: \*p2, k3, p5\* 4 times Row 6: \*k5, p3, k2\* 4 times Row 7: Repeat Row 5 Row 8: Purl all sts Repeat rows 1-8 until center measures appx. 10", finishing after row 4 ( Abbreviations: CO = Cast on P = Purl K = Knit Rpt = Repeat Sts = Stitches \*..\*= Top Border: Knit in garter stitch for 5 rows, bind off loosely.
Resources:http://www.wikihow.com/Knit-the-Basketweave-Stitch soarees.metp.//www.wiknow.con/kmmt-tne-basketweave-Strtcn
Block Two: EntrelaC (Slip stitch version) Increase, decreases, and selvages, Oh my!
Entrelac can be a challenge to get started. The pattern doesn't really begin to make sense until you're about 2 or 3 rows into it. Rather than do a standard Entrelac, I've substituted a slip-stitch version that gives a loose and very easy-to-read selvage edge to help new knitters identify EXACTLY which stitches to pick up and knit. For this Square, we will include the border stitches in each row count because of the unusual nature of the stitch pattern. Do not add the border stitches except where indicated in the pattern. CO 48 sts using the Long Tail method. Bottom border: Knit in garter stitch for 5 rows Sixth Row Setup Row: k4, pm, \*k2tog, k1, k2tog\* 8x, pm, k4 = 32 sts.
Abbreviations:
k2tog = Knit two stitches together p2tog = Purl two stitches together x = times pm = Place marker slm = Slip marker sl = Slip (as if to purl) kfb = Knit into the front and back loops of the same stitch (increase) wyf = With yarn in front ssk = Slip (as if to knit), Slip (as if to knit), Knit both sts together through the back loops Round 2: (right side) Right edge triangle Row 1 (rs): K4, slm, k2, turn Row 2 (ws): sl1, p1, slm, k4, turn Row 3: K4, slm, kfb, ssk, turn Row 4: sl1, p2, slm, k4, turn Row 5: K4, slm, kfb, k1, ssk, turn Row 6: sl1, p3, slm, k4, turn Row 7: K4, slm, kfb, k2, ssk, turn Row 8: sl1, p4, slm, k4, turn Row 9: K4, slm, kfb, k3, ssk, turn Row 10: sl1, p5, slm, k4, turn Row 11: K4, slm, kfb, k4, ssk, turn Row 12: sl1, p6, slm, k4, turn Row 13: K4, slm, kfb, k5, ssk, slm End of right edge triangle. Pick up and knit Slip-Stitch Selvage edges:
Round 2: (right side) continued Right side Diamond Row 1: Pick up and knit 8 stsfrom selvage of triangle below,turn Row 2: sl1, p7, turn Row 3: sl1, k6, ssk turn. Rpt Rows 2 and 3 until all sts on lower triangle have been used (do not purl back). Slm Rpt Diamond 1 more time. Left edge triangle Row 1: Pick up and knit 8 sts, pm, k4, turn Row 2: K4, slm, P8, turn Row 3: Sl1, k5, ssk, slm, k4, turn Row 4: K4, slm, p7, turn Row 5: Sl1, k4, ssk, slm, k4, turn Row 6: K4, slm, p6, turn Row 7: Sl1, k3, ssk, slm, k4, turn Row 8: K4, slm, p5, turn Row 9: Sl1, k2, ssk, slm, k4, turn Row 10: K4, slm, p4, turn Row 11: Sl1, k1, ssk, slm, k4, turn Row 12: K4, slm, p3, turn Row 13: Sl1, ssk, slm, k4, turn Row 14: k4, slm, p2, turn Row 15: ssk, slm, k4, turn Row 16: k4, remove marker, (one st remains) End of Round 2
Round 3:Wrong side Diamond
e times, picking up 8 sts from selvage edge below on Row 1. Slm, k4.End of Round 3 Repeat Round 2. Repeat Round 3. Repeat Round 2. Row 1: Sl1, pick up & purl 8 more sts from the selvage edge of the triangle below, turn (9sts total) Row 2: Sl1, k7, sl1, turn Row 3: P2tog, p6, p2tog,turn Row 4: Sl1, k6, sl1, turn Row 5: P2tog, p5, p2tog,turn Row 6: Sl1, k5, sl1, turn Row 7: P2tog, p4, p2tog,turn Row 8: Sl1, k4, sl1, turn Row 9: P2tog, p3, p2tog,turn Row 10: Sl1, k3, sl1, turn Row 11: P2tog, p2, p2tog, turn Row 12: Sl1, k2, sl1,turn Row 13: P2tog, p1, p2tog, turn Row 14: Sl1, k1, sl1, turn Row 156: P2tog, p3tog, turn Row 16: Sl2, turn Row 17: P2tog (one st remains) Rpt 2 more times, k4 End of round. You should have only the one active st and the 4 left and 4 right side border sts left ( To finish the top border, we will need to pick up stitches from our cast-off triangle edge to create the first row of border stitches.
\*\*\*OTE: Here wewillpick up the FRONTlop of the lipped sts for a cleanerlk\*\*\*
We will also be doing our increases back to the 48 stitches on this row. With the left needle, pick up a total of 23 stitches across the FRONT loops of the selvage edge. You should have a total of 32 live sts: 4 on each edge and 24 in the center (one is your slst from the row before), k4, turn. K4, \*kfb, k1, kfb.\* Rpt to end of finished edge, k4. 48 sts. Turn. K all sts, turn. Rpt 3 more times. Bind off loosely.
Block Three: Cables
C'mon baby, let's do the twist! Cables can be confusing. Confusing charts, confusing needle positions, and confusing stitches. But the gorgeous results are SO worth the effort of learning and mastering this versatile and (with a little practice) surprisingly easy skill. You'll wonder why you didn't give it a try earlier! Charts are quite intimidating the first time you try to work one. You're not sure where to start or what the symbols mean, and it's hard to see how the final design willook. Hopefully, this will de-mystify things a bit.
Chart rules:
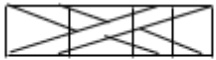
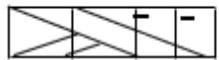
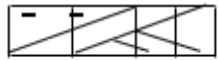
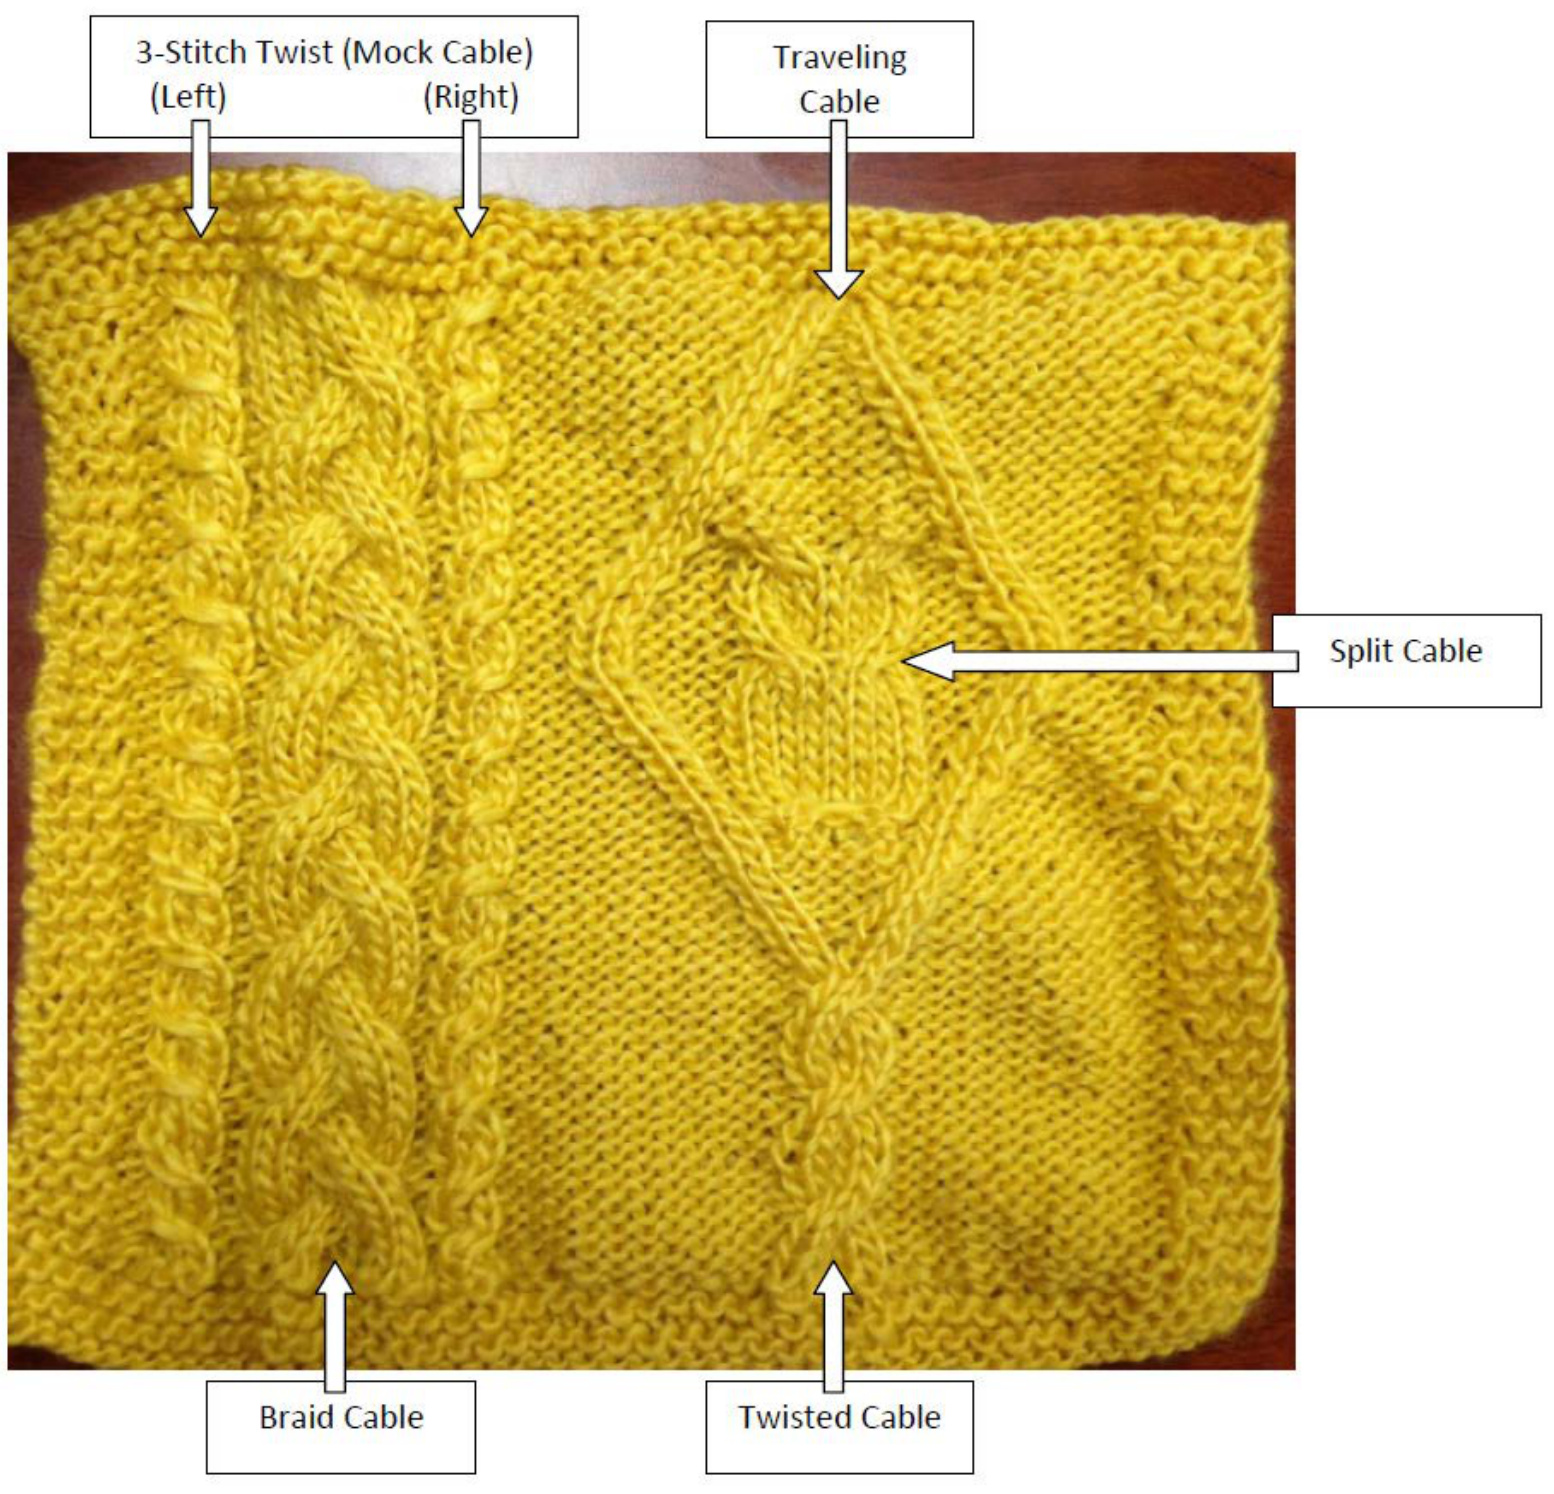
1. Always read the instructions! Although there are standards that most pattern makers follow, you never know when a "creative" pattern maker willthrow in a non-standard stitch or symbol. The KEY or LEGEND is an important part of any chart. Embrace it! 2. Charts start at the bottom right and move across and up, just like your knitting does. Odd numbered rows are worked on the front, even numbered rows are worked on the back. Like many cable charts, this one has the even rows simply mirroring the odd row below each of them. 3. Even row symbols are the OPPOsITE of their odd row counterparts. Yes, this is confusing, so what's new? Basically, a KNIT symbol on an even row means you should PURL it. A PURL symbol on an even row means you should KNIT it. Basically all symbols are written for the FRONT of your work, regardless of which side you are workingon. 4. Tools are your friends! Charts are excellent opportunities to use all those fancy gadgets you bought but don't know what to do with. Highlighter tape, row counters, stitch markers, cable needles, or humble Post-lt Notes al come in handy when you're getting your feet wet. 5. Don't get overwhelmed. Just take one stitch, one row, one cable at a time. Don't focus on what's ahead, just focus on getting the NEXT stitch right and before you know it, you'll be halfway through the chart like a BOSS! This chart presents 4 different types of Cable stitches: The Twisted Cable, the Traveling Cable, the Split Cable, and the Braid cable. I've also added a Mock Cable: The 3-Stitch Twist, both left and right versions. Let's talk about each of these. · Twisted cable: This is the most standard cable stitch and mine includes a "middle" stitch that helps set off the vertical parts. Traveling cable: this 2 stitch cable makes an obvious "outline" and is easily moved around patterns to make intricate designs such as Celtic knots or frames (like in this pattern). · Split Cable: this stitch really moves your stitches around! We use it to create texture for our owl. Braid Cable: I've used the classic three stranded braid cable. 3-Stitch Twist: This one isn't technically a cable since no live stitches actually leave the needle, but it mimics a cable closely enough that it creates interest and texture. Cabling without a needle can really speed up your work. While it sounds intimidating to remove live stitches from one needle and transfer them to another, with care, practice and patience, it can be done. The trick is to avoid jostling your work in the middle of a stitch and have a firm grip on the stitches below the live stitches while completing the transfer. An excellent video on CABLES WITHOUT A CABLE NEEDLE can be found at KnitPurlHunter.com, or you can try this variation that I use from KnittingHelp.com. My instructions are written for cabling without a needle.
Legend of Stitches Used in Chart
Purl on right side, Knit on wrong side Place bead (optional)
Skip first 2 sts. Slip tip of right needle into BACK of third st. Pinch and hold base of all three sts and slide off left needle.Pick up 2 right (loose) sts in the FRONT with left needle. Move st from right needle to left needle.Purl first st,knit next 2 sts.
Skip first st. Slip tip of right needle into FRONT of second 2 sts. Pinch and hold base of allthree sts and slide off left needle.Pick up right (loose) stitch in the BACK with left needle.Move 2 sts from right needle to left needle.Knit first 2 sts,Purl last st.
Skip first 2 sts. Slip tip of right needle into BACK of second 2 sts. Pinch and hold base of all four sts and slide off left needle. Pick up 2 right (loose) sts in the FRONT with left needle. Move 2 stsfromright needle to left needle.Knit all sts.
Skip first 2 sts. Slip tip of right needle into FRONT of second 2 sts. Pinch and hold base of all four sts and slide off left needle. Pick up 2 right (loose) sts in the BACK with left needle. Move 2 stsfrom right needle toleft needle.Knit all sts.
Skip first 2 sts. Slip tip of right needle into BACK of second 2 sts.Pinch and hold base of all foursts and slide off left needle.Pickup 2 right (loose)sts intheFRONT with left needle. Move 2 stsfrom right needle toleft needle.Purl first 2 sts,Knit second 2 sts.
Skip first 2 sts. Slip tip of right needle into FRONT of second 2 sts. Pinch and hold base of all four sts and slide off left needle. Pick up 2 right (loose) sts in the BACK with left needle. Move 2 sts from right needle to left needle.Knit first 2 sts,Purl second 2 sts.

Skip first 3 sts. Slip tip of right needle into BACK of second 3 sts.Pinch and hold base of all six sts and slide off left needle. Pick up 3 right (loose) sts in the FRONT with left needle.Move 3 stsfrom right needle to left needle.Knit all sts.

Skip first 3 sts. Slip tip of right needle into FRONT of second 3 sts.Pinch and hold base of all six sts and slide off left needle. Pick up 3 right (loose) sts in the BACK with left needle.Move 3 sts from right needle toleft needle.Knit all sts.
1F 2F 3F
Skip first 2 sts. Knit into the FRONT of the third st (1F), but don't remove from left needle. Knit intotheFRONTof thesecond st(2F),but don't remove from theleft needle.Knit into theFRONT of thefirstst(3F),and remove all threestsfrom theleft needle. Skip first 2 sts.Knit into the BACK of the third st(1B),but don't remove from left needle.Knit into the BACK of the second st (2B), but don't remove from the left needle.Knit into the BACK ofthefirstst(3B),andremoveallthreestsfromtheleftneedle
| 58 | |||||||||||||||||||||||||||||||
| 1B 1B 2B 1B 2B 1B 2B 1B 2B 1B 2B 1B 2B 3B 1B 2B 1B 2B 8 1B 2B 3B 6 5 3 1B2B 3B 48 47 464544434241403938373 | 1B | 2B | 3B | 2F | 3F | ||||||||||||||||||||||||||
| 1B 2B | 88 | 2F | 3F | ||||||||||||||||||||||||||||
| 1B | 2B | 3B | 3F | ||||||||||||||||||||||||||||
| 2B | 1F 2F | 3F | |||||||||||||||||||||||||||||
| 2F LF 2F 1F 2F 2F 2F | 3F 3F 3F 3F 3F 3F 3F 3635343332313029 28 | .272 | 26252 | 2423 | 7 | 16 | 12 | ||||||||||||||||||||||||
| 3B 3B 3B 3B |
CO 48 sts using the Long Tail method.
Bottom border: Knit in garter stitch for 5 rows. Sixth Row set up: (k4 border) \*P3, kfb\* 9x, P4 (k4 border) (49 center sts +8 sidests.) sorder: Knit first and last 4 sts in each row. Chart DOES NOT contain border stitches Work chart plus border stitches for next 58 rows. Decrease round: (k4 border) \*K3, k2tog\* 9x, k4 (k4 border) (40 center sts + 8 side sts.) Top border: Knit in garter stitch for 5 rows. Bind off loosely.
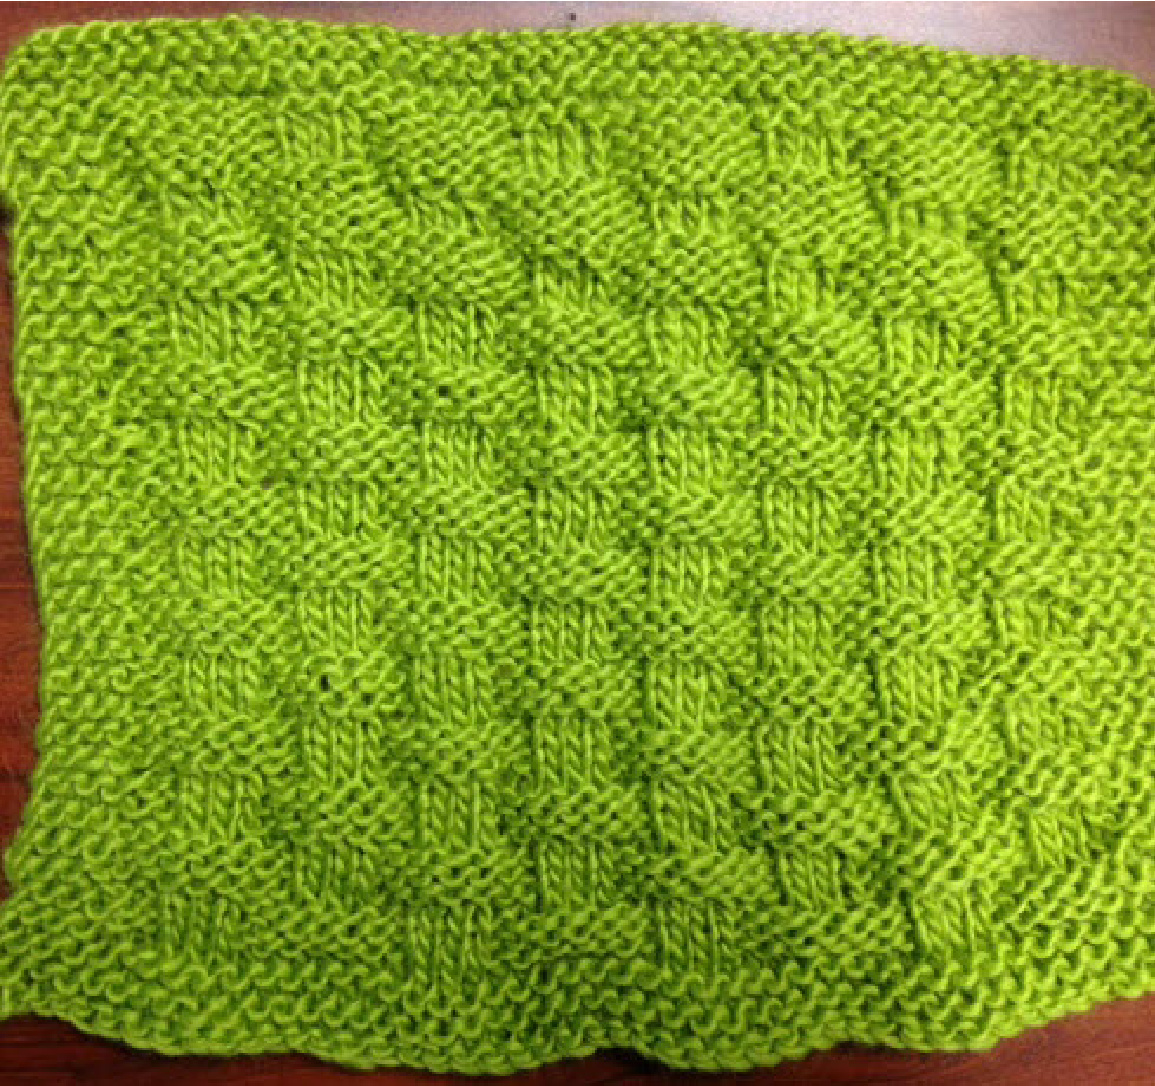
Block Four: Twists and Bobbles
Otherwise known as "Stitches designed to slow you down"..tee hee Twists and Bobbles take a little bit of attention to master, but once learned, they are terrific tools to keep in your knitting arsenal. Twisted stitches aren't much different than regular knits and purls, but simply working the back leg of a stitch causes the stitch to twist and this helps it pop out more from the background of other stitches. Bobbles, too, are all about the popping out! There are many versions of bobbles out there, and I've chosen a 3x4 for us on this square. That's 3 stitches wide by 4 rows high. You'll learn more about that later. Another thing we'll focus on this month is repeating charts. These are used when the overall piece will have a repeating pattern. Rather than charting out the entire piece, a designer will give you the basic chart and instruct you how many repeats to do. For instance, in this design we will do 3 horizontal and 4 vertical repeats of the chart. So you'll knit Row 1 (Sts 1-14), then keep going with another Row 1 (sts 1-14) and yet another Row 1 (sts 1-14). Turn your work and knit Row 2 three times. Turn and knit Row 3 three times, etc. After you complete all 14 rows, start with Row 1 again. You'll see the pattern begin to develop. Note that unlike our cable charts, the even numbered rows are NoT mirrors of the rows below them. You'll need to PAY ATTENTION to the charts for correct stitches! The last technique I'd like to introduce is knitting backward. This is a way to work the back side of your piece without actually turning your work over. It's quite handy when making bobbles and especially knitting short rows (which we'll tackle soon). Start practicing now and see how good you can get! CO 48 sts using the Long Tail method. Bottom border: Knit in garter stitch for 5 rows (the 6th row will be our set up round) Side border: Knit first and last 4 sts in each row. Chart DOES NOT contain border stitches. Set up round: (k4 border) Kfb, knit to last centerst, kfb (k4 border) (42 center sts + 8 side sts.) ork 3 horizontal and 4 vertical repeats of chart plus border stitches for next 56 rov nd: (k4 border) K2tog, k to last center st, k2tog (k4 border) (40 center sts + 8 side st Top border: Knit in garter stitch for 5 rows. Bind off loosely.
Purl on Right side, knit on Wrong side

3x4 Bobble: Kfbf in same st. Turn work and purl 3 back into new sts (or Knit Backward - see below). Turn work and k3. Turn work and p3tog.

Twisted Stitch: ktb on the Right side, ptb on the Wrong side
Left Leaning Twisted Stitch: Sk 1stst.ktb of 2ndst. Without removingsts from needle, ktb of 1tst. Rem both sts from Right Leaning Twisted Stitch: Sk 1s'st.K 2ndst. Without removingsts from needle, ktb of 1"'st. Rem both sts from
I chose this design because here in Ohio in early spring, when we start seeing beautiful soft pussywillow branches, we know warmer weather is on its way. 2013-2014 has been an especially brutal winter in our area, so we are looking forward to all the pussywillows we can get! So now that you've seen the chart, let's go over the new special stitches: Bobbles: A Kfbf is where you knit into the front leg of a stitch, then in the back legof the same stitch, then back again into the front of that same stitch all while keeping the sts on the left needle. When you're done with the 3, then remove the left needle. This is a 1 to 3 stitch increase. (Some bobbles use a 1 to 5 increase which is Kfbfbf) We will work these same 3 stitches over a total of 4 rows. Be sure to snug up the sts on either side of bobble both before you knit it and after you finish it to keep the holes at a minimum. It also helps to snug up the surrounding sts on the next row as well. You may have to "pop" your bobble out too, if it looks inverted. Just put your finger in the back of it and turn it right side Out. Twisted Stiches: Knitting (ktb) or purling (ptb) through the BACK leg of a stitch will twist that stitch. When moving a twisted stitch to the left or right, be sure to twist the correct stitch. It is nearly impossible to twist the knit stitch on a Right Leaning Twist, so I twisted it before I knit it. When ktb, insert the right needle into the back leg of the next stitch from right to left (as if to purl). When ptb, insert the right needle into the back leg from left to right (as if to knit). It's a bit confusing, but you'll see the stitch works out correctly. Knit Backwards: Try practicing this on your bobbles. After your Kfbf, DO NOT TURN your work. With yarn in back, insert the tip of the LEFT needle from left to right through the BACK loop of the 1'tst on the right needle. Wrap your yarn over the top of the needle from left to right and complete the stitch. Repeat on the next two sts. That's all there is to it! Now you have 3 knit sts on the left needle, all ready to be knit again normally. Knit those sts. For the last row, insert the left needle into all three sts at once from left to right and draw the wrap through, creating a 3 to 1 decrease. Don't forget to snug up your stitch to help reduce holes!
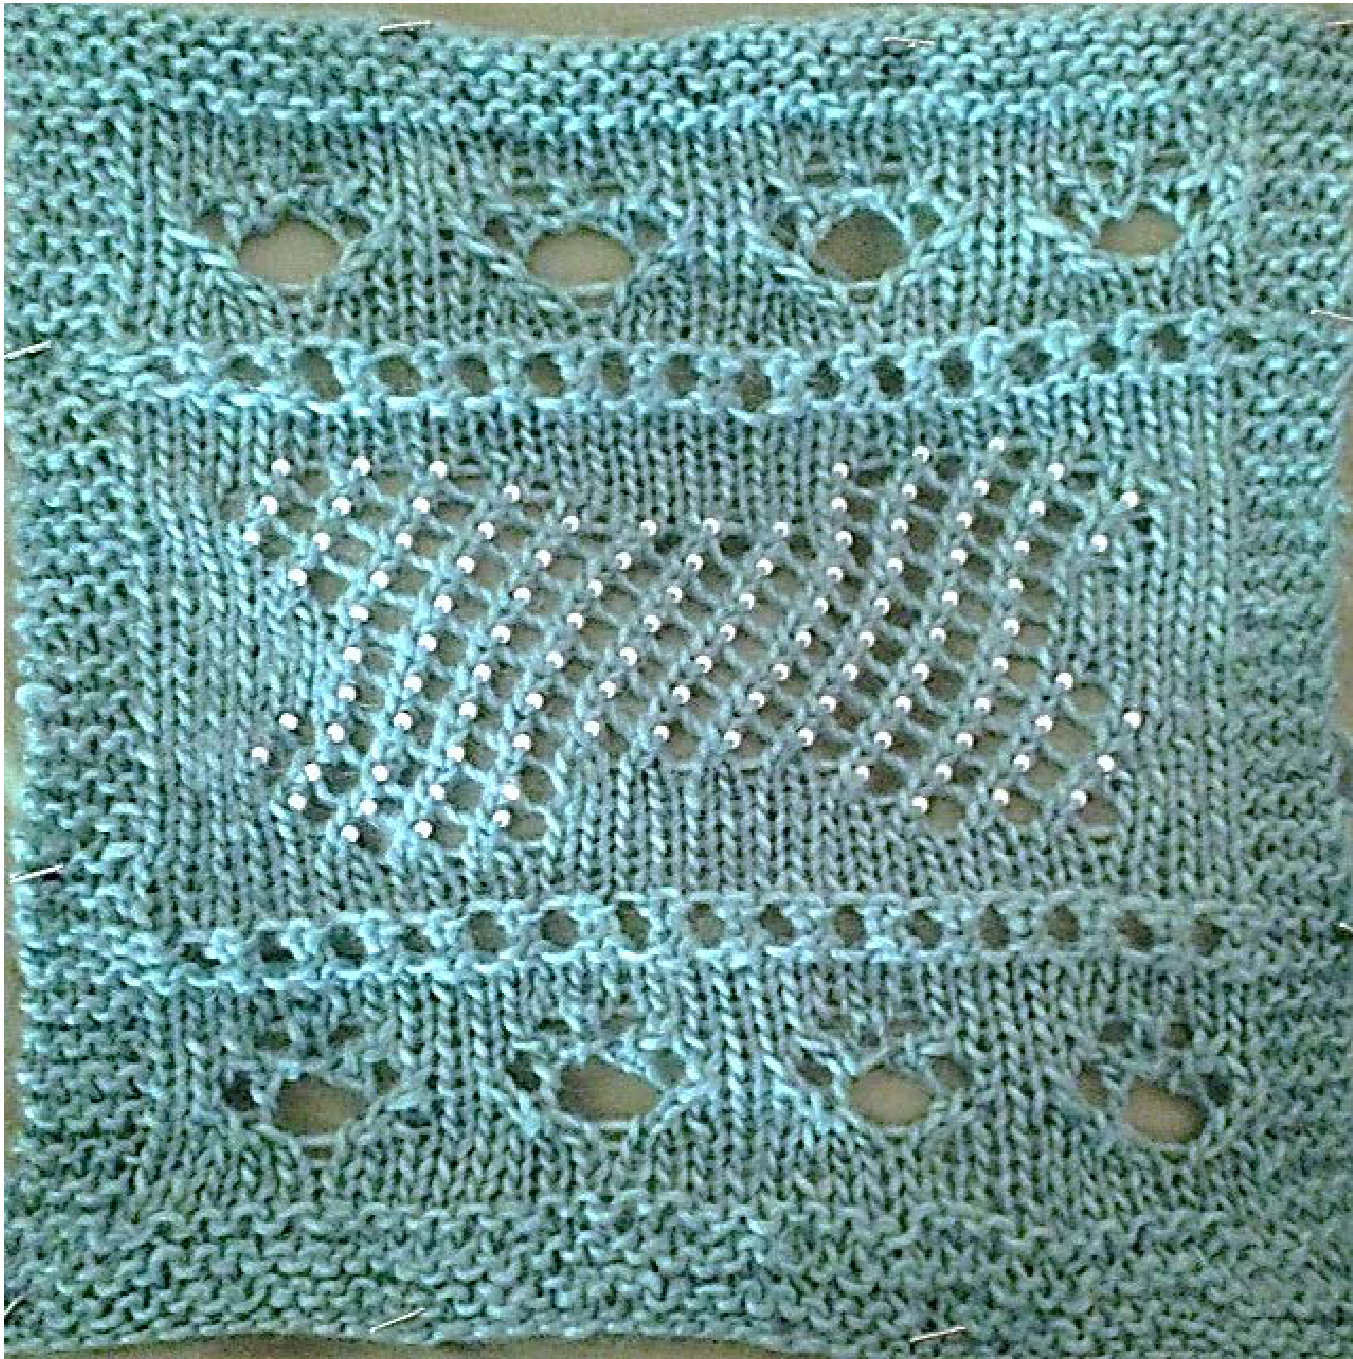
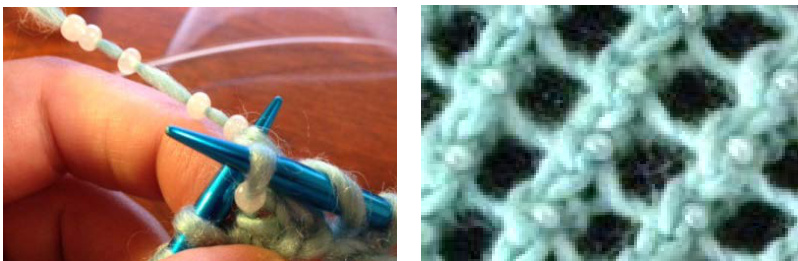
Block Five: Lace and Beads
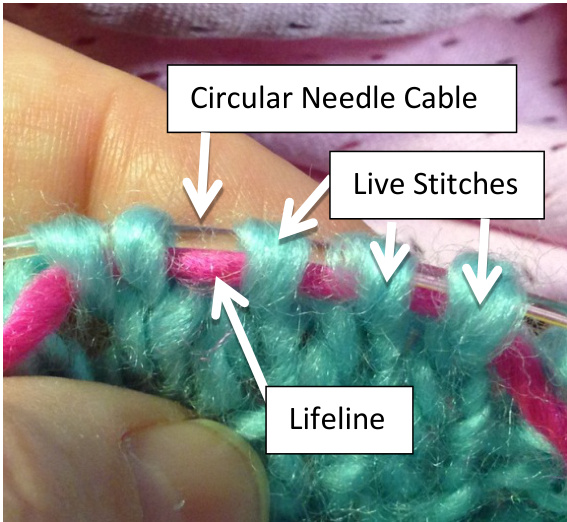
This is where we BEDAZZLE our knitting - - Bling it up, Baby! I think people avoid lace because it looks really hard. In truth, it can actually be really simple. Lace is made when you combine increases and decreases close together. The preferred lace increase is a Yarn Over (yo) and decreases are made by a variety of sts, most often used are k2togorssk.where lace becomes challenging is when we drop a stitch or lose count of where you are. You can recover from this, but for new lace knitters, it is often easier to rip back than try to read your stitches. For this reason, LIFELINES are absolute necessities. To place a lifeline, simply thread a light yarn or heavy thread through a darning needle and draw through all live stitches on your knitting needle (don't remove your stitches from the needle). Make sure your thread is long enough to extend at least 6" on either side. Now if you need to rip back your work, the lifeline will act as a stopper and will preserve the work below it from being unraveled. To show you how much fun lace can be, I've designed a whimsical pattern to practice your skills. I've also given you the option to PLAY DESIGNER! You can choose to make your block with a puppy or kitty theme by selecting which center panel you want to try: Beaded Bone or Beaded Fish. We are also going to try our hand at beading. There are 2 methods for working beads: 1) Add all your beads at the beginning of your work or 2) Add the beads one at a time when needed. Bead selection is important. You need a bead that is appropriate for your yarn. Since our blocks are being worked in worsted weight, I would recommend a bead NO SMALLER THAN 6/0 OR "E" SIZE. Standard plastic pony beads are probably going to be too large for this application, so choose wisely. The most important thing to remember about beads is that THE HOLE needs to be big enough for a sewing needle (Method 1) or small crochet hook (Method 2) to go through.
CO 48 sts using the Long Tail method. (If using Beading Method 1 - string 120 beads on before casting on) Bottom border: Knit in garter stitch for 6 rows. and last 4 sts in each row. Center pattern below DOES NOT contain border stitches.
Center pattern:
Rows 1-12: Work Paw Print Lace Rows 1a-12, place lifeline Row 13-14: Work Chain Lace Rows 1-2 Rows 15-38: Work Bone or Fish lace panel Rows 1-24, placelifeline Row 39-40: Chain Lace Rows 1-2 Rows 1-42: Work Paw Print Lace Rows 12-11 (reverse order) Rows 43-50: Work Paw Print Lace Rows 5-10 Rows 51-54: Work Paw Print Lace Rows 4-1b(reverse order) Top border: Knit in garter stitch for 5 rows. Bind off loosely. Remove lifelines.
Abbreviations:
k2tog = Knit two stitches together yo = Wrap your working yarn around the right needle by bringing yarn under the needle toward you and up over the top yo x3 = wrap yarn around needle 3 times, knit next stitch. When you purl back, you will purl the first wrapped st, knit the second wrapped st, and purl the third wrapped st. sssk = Slip (as if to knit), Slip (as if to knit), Slip (as if to knit), knit all threeststogether through the back loops ssk = Slip (as if to knit), Slip (as if to knit), Knit both sts together through the back loops
Pawprint Lace:
Row 1a: Decrease set up round: \*K2tog, k3\*, rpt to end, 32 sts. Row 1b: Increase set up round: \*Kfb, k3\*, rpt to end, 40 sts. Row 2: Purl Row 3: Knit Row 4: Purl Row 5: \*k1, k2tog, yo x3, sssk, k2\* 4 times Row 6: \*p4, k1, p3\* 4 times Row 7: \*k2tog, yo, k3, yo, ssk, k1\* 4 times Row 8: Purl Row 9: \*k1, k2tog, yo, k1, yo, ssk, k2\* 4 times Row 10: Purl Row 11: Knit Row 12: Knit(place lifeline) Chain Lace: Row 1: \*K2tog, yo\* to end of round Row 2: Knit
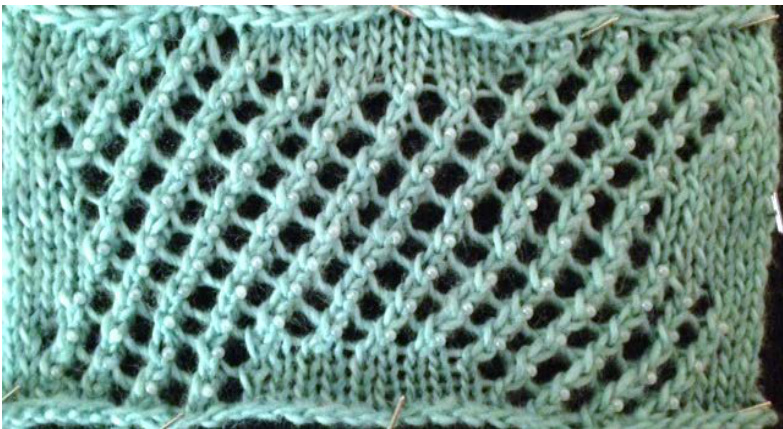
Bone Panel: 118 beads (add a few more to be safe)
Row 1: Knit Row 2 (and all future even rows): Purl Row 3: K5, \*k2tog, yo\* x3, k10, \*yo, k2tog\* x3, K5 Row 5: K4, \*k2tog, yo\* x4, k9, \*yo, k2tog\* x4, k3 Row 7: K3, \*k2tog, yo\* x13, k3 Row 9: K4, \*yo, k2t0g\* x12, k4 Row 11: K6,\*k2tog, yo\* x10, k6 Row 13: K7, \*yo, k2tog\* x10, k5 Row 15: K7, \*k2tog, yo\* x10, k5 Row 17: K4, \*k2tog, yo\* x12, k4 Row 19: K3, \*k2tog, yo \* x13, k3 Row 21: K4, \*k2tog, yo\* x4, k8, \*yo, k2tog\* x4, k4 Row 23: K5, \*k2tog, yo\* x3, k11, \*yo, k2tog\* x3, K5
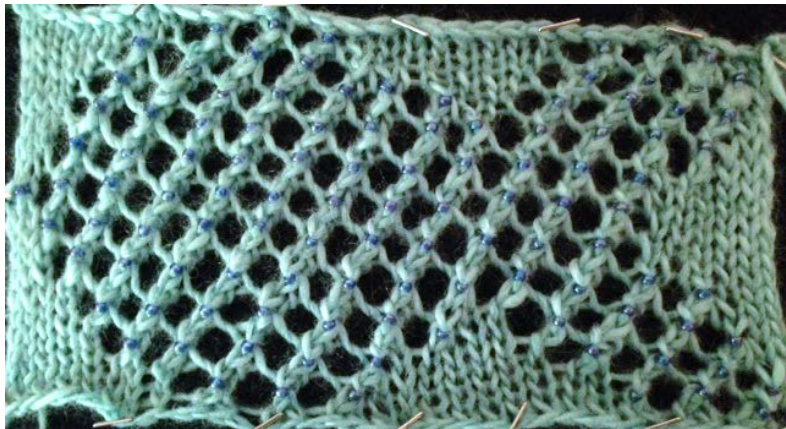
Fish Panel: 118 beads (you'll need a few more to be safe)
Row 1: Knit Row 2 (and all future even rows): Purl Row 3: K2, \*yo, k2tog\* x3, k9, \*k2tog, yo\* x3, k9 Row 5: K2, \*k2tog, yo\* x4, k6, \*k2tog, yo\* x5, k6 Row 7: K3, \*k2tog, yo\* 4x k2, \*k2tog, yo\* 7x, k5 Row 9: K4 \*k2tog, yo\* x12, k4 Row 11: K7, \*yo, k2t0g\* x11, k3 Row 13: K7,\*yo, k2tog\* x12, k1 Row 15: K7 \*k2tog, yo\* x11, k3 Row 17: K4 \*k2tog, yo\* x12, k4 Row 19: K3, \*k2tog, yo\* 4x k2, \*k2tog, yo\* 7x, k5 Row 21: K2, \*k2tog, yo\* x4, k6, \*k2tog, yo\* x5, k6 Row 23: K3, \*k2tog, yo\* x3, k8, \*k2tog, yo\* x3, k9
Beading:
Method 1:Pre-string beads using a darning needle or dental floss threader. Add all beads to the yarn and slide them down and away from your working area. Bring each bead up the yarn as you draw through the k2tog st. If you place the bead just below the right needle before you draw it through, the bead will come through in the correct place.
Method 1 results in beads on a single width of yarn, offset. Method 2: Add beads one at a time with a crochet hook small enough the fit through the hole in the bead. After you complete the k2tog, remove the finished stitch from the right needle. Put the bead on the hook first, hook the finished st and slide the bead onto it. Put the st back on the right needle and continue knitting.
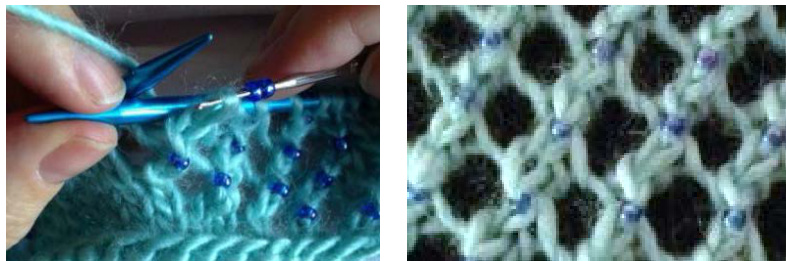
Method 2 results in beads over both widths of yarn, centered.
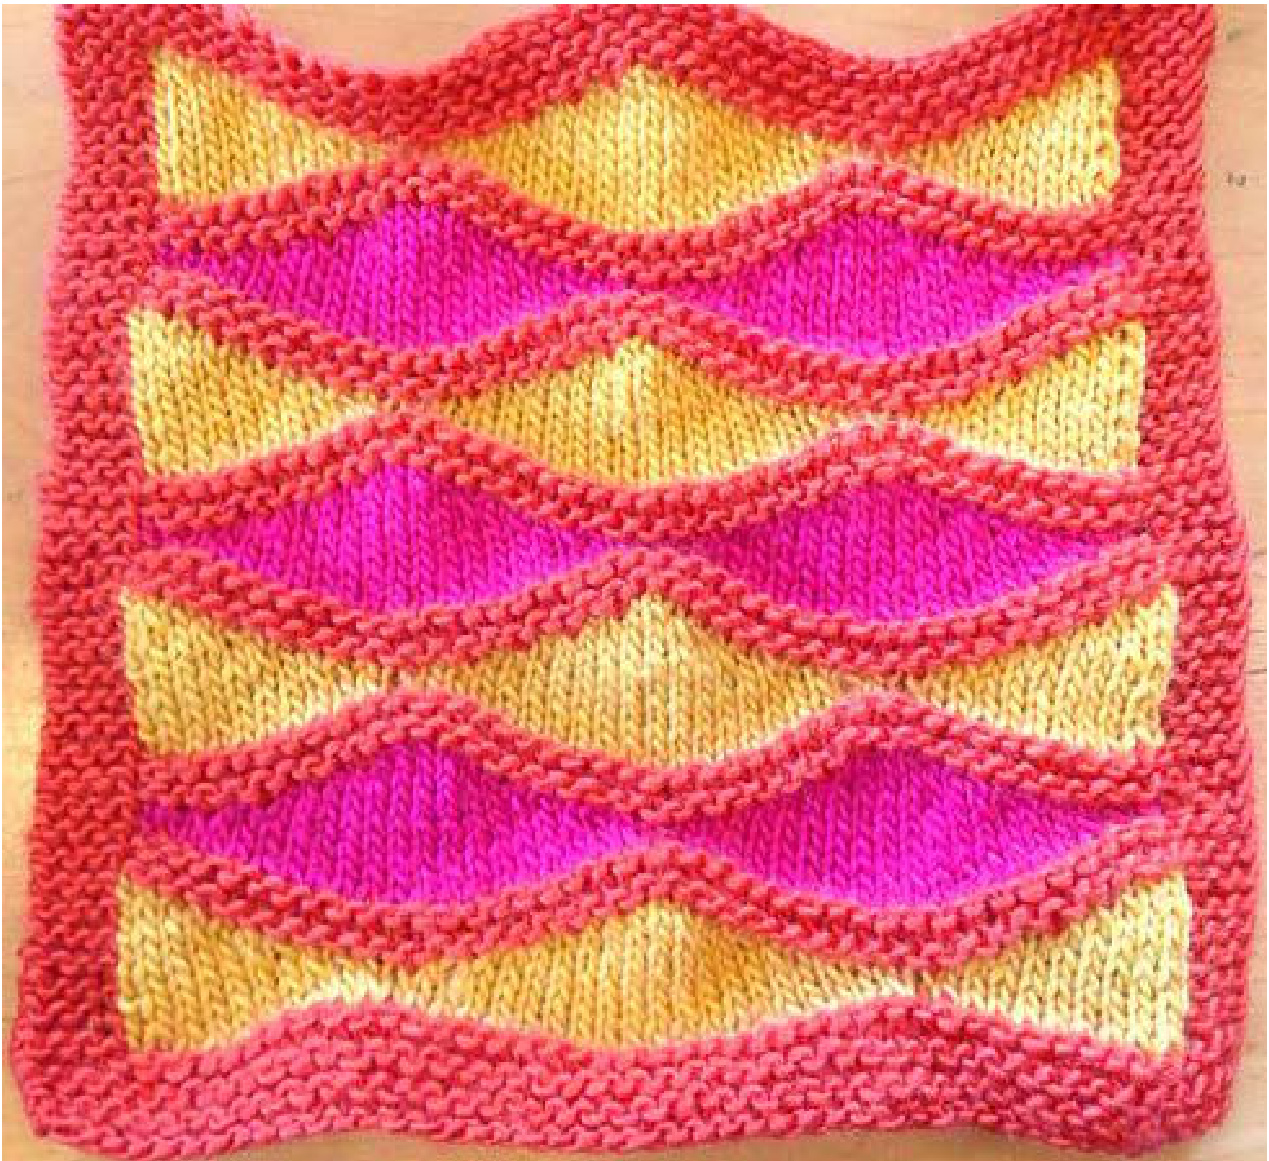
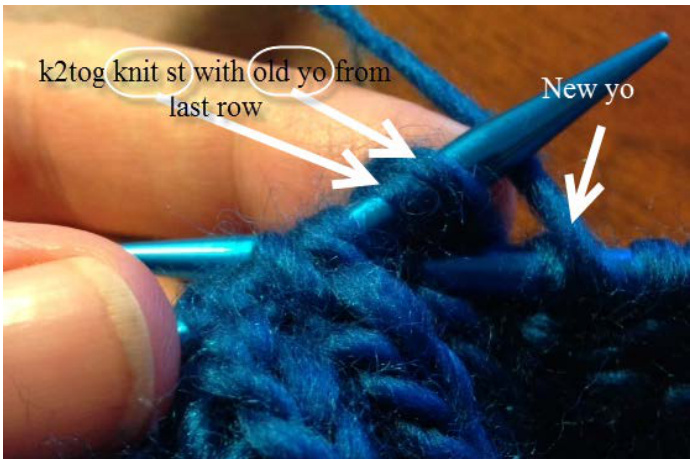
Block Six: Short Rows and Color Changes Working with color is GROOOOOVY, baby!
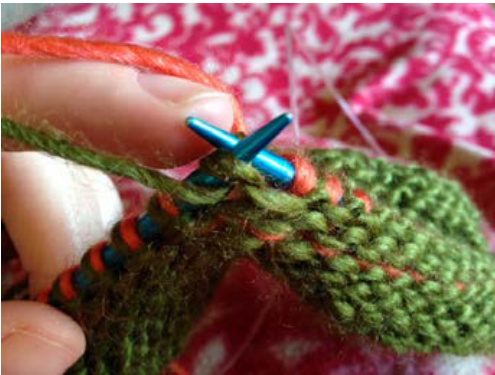
So we've played around with a variety of special techniques, all the while staying in our single-color comfort zone. It's now time to stretch a wee bit more and give colorwork a try. I'll start us off with a pretty easy technique where we change colors one at a time, in large sections. We will revisit short rows again, this time using them to create shapes and flow in our work. This pattern is based on the Lizard Ridge concept and you can customize it using as many (or as few) colors as you like. The borders and garter ridge rows will be worked in our Main Color (MC), and the stockinette waves are worked in Coordinating Colors (CC1 and CC2 in my example). I'll show you how to have neat color changes and when to use bobbins as we delve deeper into short row shaping. Changing Colors: The right border sts are knit with one end of your MC skein of yarn and the left border sts are knit with the other end of your MC skein. If your yarn is in a ball, before you begin knitting, place approximately 20 yards from your skein onto a bobbin to use on the left border. You will connect the center pattern to the appropriate border every time the stitches meet. To do this, you will wrap the two colors of yarn at each join. This will close up your holes and "“lock" your stitches into place. A clean transition is achieved by laying the current color down and to the left, and bringing up the new color from underneath before knitting or purling it. Be sure to snug up your sts as you switch between colors.
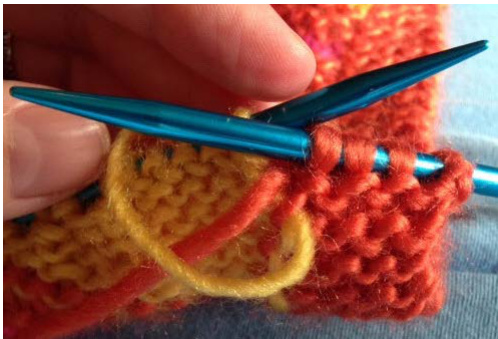
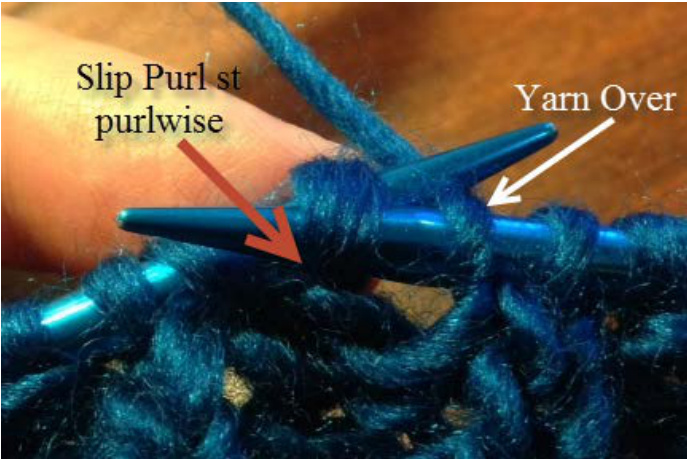
In this example, the orange is the old color, so the yellow is drawn up under before beginning to purl. Short Row Basics: WTs (Wraps and Turns) and PUs (Pick Ups): We learned a little about short rows in our Entrelac block, but here we are taking that to the next level and using short rows to create different shapes in our work. Because we are combining short rows with color changes, this can often result in holes in our work, so we use Wraps and Turns and Pick Ups to help eliminate them. The methods can be a little awkward at first, but are easily learned. (Seriously, who comes up with this stuff?!?) Some of the WT stitches will not be PU until after the next color change, so don't worry if it looks like we are leaving some stitches behind. The rule is: PUK or PUP a WT st every time you come to one. WTK (Knit): With yarn in back, slip next stitch from left needle to right needle as if to purl. Bring yarn to front. Turn. Sl st will now be on left needle and yarn will be in back. Put the slipped st back on the right needle and bring the yarn to the front. Ready to begin purling. One st wrapped. WTP (Purl): With yarn in front, slip next stitch from left needle to right needle as if to purl. Bring yarn to back. Turn. Sl st will now be on left needle and yarn will be in front Put the slipped st back on the right needle and put the yarn to the back. Ready to begin knitting. One st wrapped. PUK (Knit): Insert tip of right needle in the front leg of the wrapped st and place on the left needle in front of the slipped st. Knit both sts together through the back loop. (This will twist the sl st.) PUP (Purl): Insert tip of right needle in the back leg of the wrapped st and place on the left needle in front of the slipped st. Purl both sts together normally.

Here is an example of picking up the back leg of a wrapped stitch. For this square you will need at least two different colors of yarn. Your dominant color will be your MC (mine is orange), my CC1 is yellow and my CC2 is pink. Using MC, CO 48 sts using the Long Tail method. Bottom border: (MC) Knit in garter stitch for 6 rows. Side border: Knit first and last 4 sts in each row in Mc. The bottom, right, and top borders are knit with one skein, and the left border is knit from your bobbin or the other end of your skein. Center pattern below DOES NOT contain border stitches.
Center pattern:
Row 1: (RS) Knit all sts in CC1 Row 2: (WS) P9, WTP, k9, [border] p7, WTP, k7, [border], p5, WTP, k5, [border], p3. WTP, k3, [border] p1, WTP, k1 [border] p29 - PUP as you come to them, WTP Row 3: (RS) K18, WTK, p16, WTP, k14, WTK, p12, WTP, k10, WTK, p8, WTP, k6, WTK, p4, WTP, k2, WTK, Row 4: (WS) P21 - PUP as you come to them [border], k9, WTK, p9, [border], k7, WTK, p7, [border], k5, WTK, p5, [border], k3, WTK, p3, [border], k1, WTK, p1, [border] Row 5-8: Knit all sts (garter st) in MC, PUK sts as you come to them. Continue to knit left border sts with bobbin. Row 9: (RS) Knit all sts in CC2 Row 10: (WS) P19, WTP, k16, WTK, p14, WTP, k12, WTK, p10, WTP, k8, WTK, p6, WTP, k4, WTK, p31 - PUP as you come to them, [border], k16, WTK, p14, WTP, k12, WTK, p10, WTP, k8, WTK, p6, WTP, k4, WTK, p13 - PUP as yol come to them, [border] Row 11-14: Knit all sts (garter st) in MC, PUK sts as you come to them. Continue to knit left border sts with bobbin. Repeat Rows 1-14 TwO more times. Repeat Rows 1-4 ONE more time. Top border: Using MC, knit in garter st for 5 rows. Knit left border sts without bobbin. Bind off loosely.
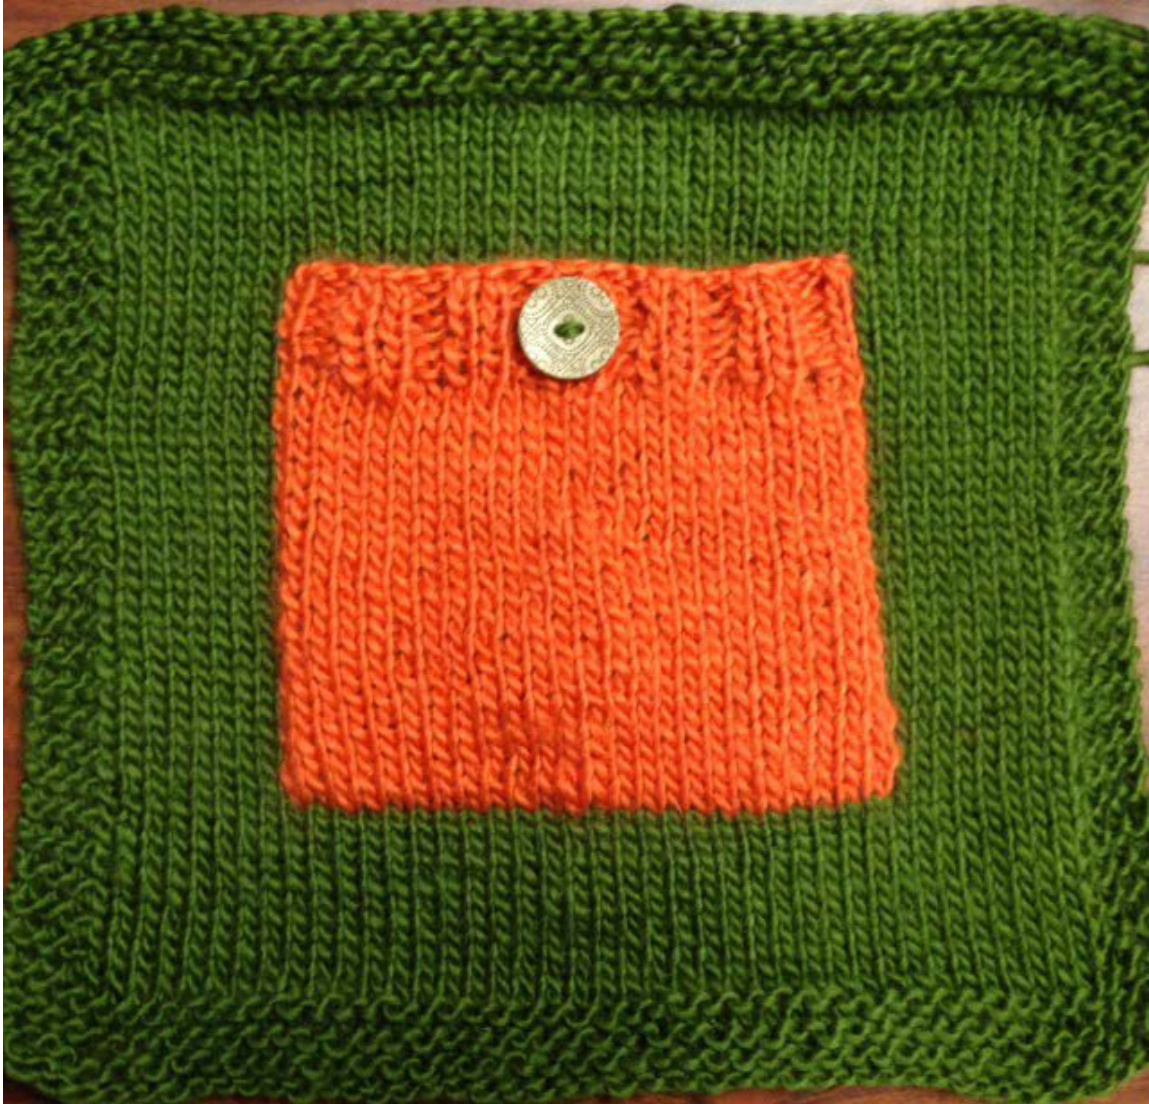
Block Seven: Double Knitting
Houston, we have a pocket. Double knitting is where we knit two layers of fabric at the same time, using one set of needles. We are going to do a "light" version of double knitting by creating a pocket that is attached to the front of our square. This will get you familiar with working two yarns at once and also introduce you to making nifty buttonholes. To cast on a new color in an existing piece, simply carry the new color along with your Mc for the specified number of sts. Be sure that your CC st stays on the same side (to the right or left) of your MC during the CO. Knitting the two colors can be a little tricky, but if you keep in mind that the colors don't mix, you should be fine. It will be very easy to tell when you've knit the wrong st or carried the yarn in the wrong position. Basically, you'll alternate between the two colors, moving your carrying yarn into or out of position as needed. For instance, if you're knitting the MC, you'll need to keep the CC working yarn to the front and out of the way of the MC stitch. Here you can see that the MC (green) is being purled, so I'm holding the CC (orange) to the back and out of the way of the working st. On the next (CC) st, I'll move both yarns to the front, (but keeping the CC behind the MC) and only purl the CC without letting it cross the MC.
To anchor the sides, we are again going to use the wrap method we learned in the previous square. This will lock our sides and close our pocket as we knit. Whichever yarn we are changing FROM, we will place down and to the left, bringing up our new yarn from underneath before we begin to work it. For the buttonhole, we'll need to work the CC sts by themselves, so you may find it easier to place several MC sts on a double pointed needle (DPN) to get it out of the way. We'll put them back on when we're done with the buttonhole. We'll also need a DPN for our pocket bind off.
Abbreviations:
CO 48 sts using the Long Tail method. Bottom border: Knit in garter stitch for 6 rows MC = Main Color CC = Coordinating Color CCO-P = With yarn in front, purl into first st on left needle but do not remove the st. Instead, add the new st back onto the left needle immediately to the right of the st you just purled into. BOiP: To bind off in pattern, you will knit Side border: Knit first and last 4 sts in each row. Center pattern below DOES NOT contain border stitches.
Center pattern:
Row 1: (MC) K all sts the knit sts and purl the purl sts as you Row 2: (MC) P all sts come to them before they are bound off. Row 3-12: Repeat Rows 1-2 Row 13: K8 in MC, join CC and k24 st with both colors, drop CC and k8 in MC Row 14: P8 in MC, wrap to lock colors, p MC and CC alternately for next 48 st, wrap to lock colors, p8 in MC Row 15: k8 in MC, wrap to lock colors, k MC and CC alternately for next 48 st, wrap to lock colors, k8 in MC Row 16-37: Repeat Rows 14-15 Row 38: Repeat Row 14 Row 39: k8 in MC, wrap to lock colors, k1 MC, k1 CC, \*k1 MC, p1 CC, k1 MC, p1 CC, k1 MC, k1 CC, k1 MC, k1 CC\* 5x, k1 MC, p1 CC, k1 MC, p1 CC, k1 MC, k1 CC, wrap to lock colors, k8 in MC Row 40: p8 in MC, wrap to lock colors, p1 CC, p1 MC, \*k1 CC, p1 MC, k1 CC, p1 MC, p1 CC, p1 MC, p1 CC, p1 MC, \* 5x, k1 CC, p1 MC, k1 CC, p1 MC, p1 CC, p1 MC, wrap to lock colors, p8 in MC Row 41: k8 in MC, wrap to lock colors, k1 MC, k1 CC, \*k1 MC, p1 CC, k1 MC, p1 CC, k1 MC, k1 CC, k1 MC, k1 CC\* 2x, k1 MC, p1 CC. Slip next 4 MC sts onto a DPN and hold to the back while slipping next 4 CC sts onto right needle. K4 MC sts while still keeping them in back. (We will rejoin them to the working needles on the next row.) Put 4 sl CC sts back on left needle. Work buttonhole over next 4 CC sts. p1 CC, \*k1 MC, k1 CC, k1 MC, k1 CC, p1 CC, k1 MC, p1 CC\* x2, k1 MC, k1 CC, wrap to lock colors, k8 in MC. Row 42: Repeat Row 40 Row 43:RepeatRow39 Row 44: P8 in MC, wrap to lock colors, separate sts so that CC sts are on one DPN and MC sts are on the working needle. Using a second DPN, Bind Off CC sts in Pattern (BOiP). Go back to MC sts and purl sts all in MC. Row 45-54: Repeat Rows 1-2 Top Border: Knit in garter stitch for 5 rows, bind off loosely.
Buttonhole:
Step 1: Bring yarn forward and slip the first stitch on the left needle purlwise. Step 2: Bring the yarn to the back. Step 3: Slip the next stitch on the left needle purlwise to the right needle. Step 4: Pass the second slipped stitch on the right needle over the first stitch (as if to bind off). Repeat Steps 3 and 4 TwO more times. Step 5: Slip the last bound-off stitch to the left needle. Step 6: Turn the work and use the Cable Cast-On purlwise (CCO-P) method to cast on FOUR sts. Step 7: Turn the work. Step 8: Slip the first stitch on the left needle to the right needle and pass the last cast-on stitch over the slipped stitch. Work the remaining stitches on the needle. The photo above shows the horizontal buttonhole.
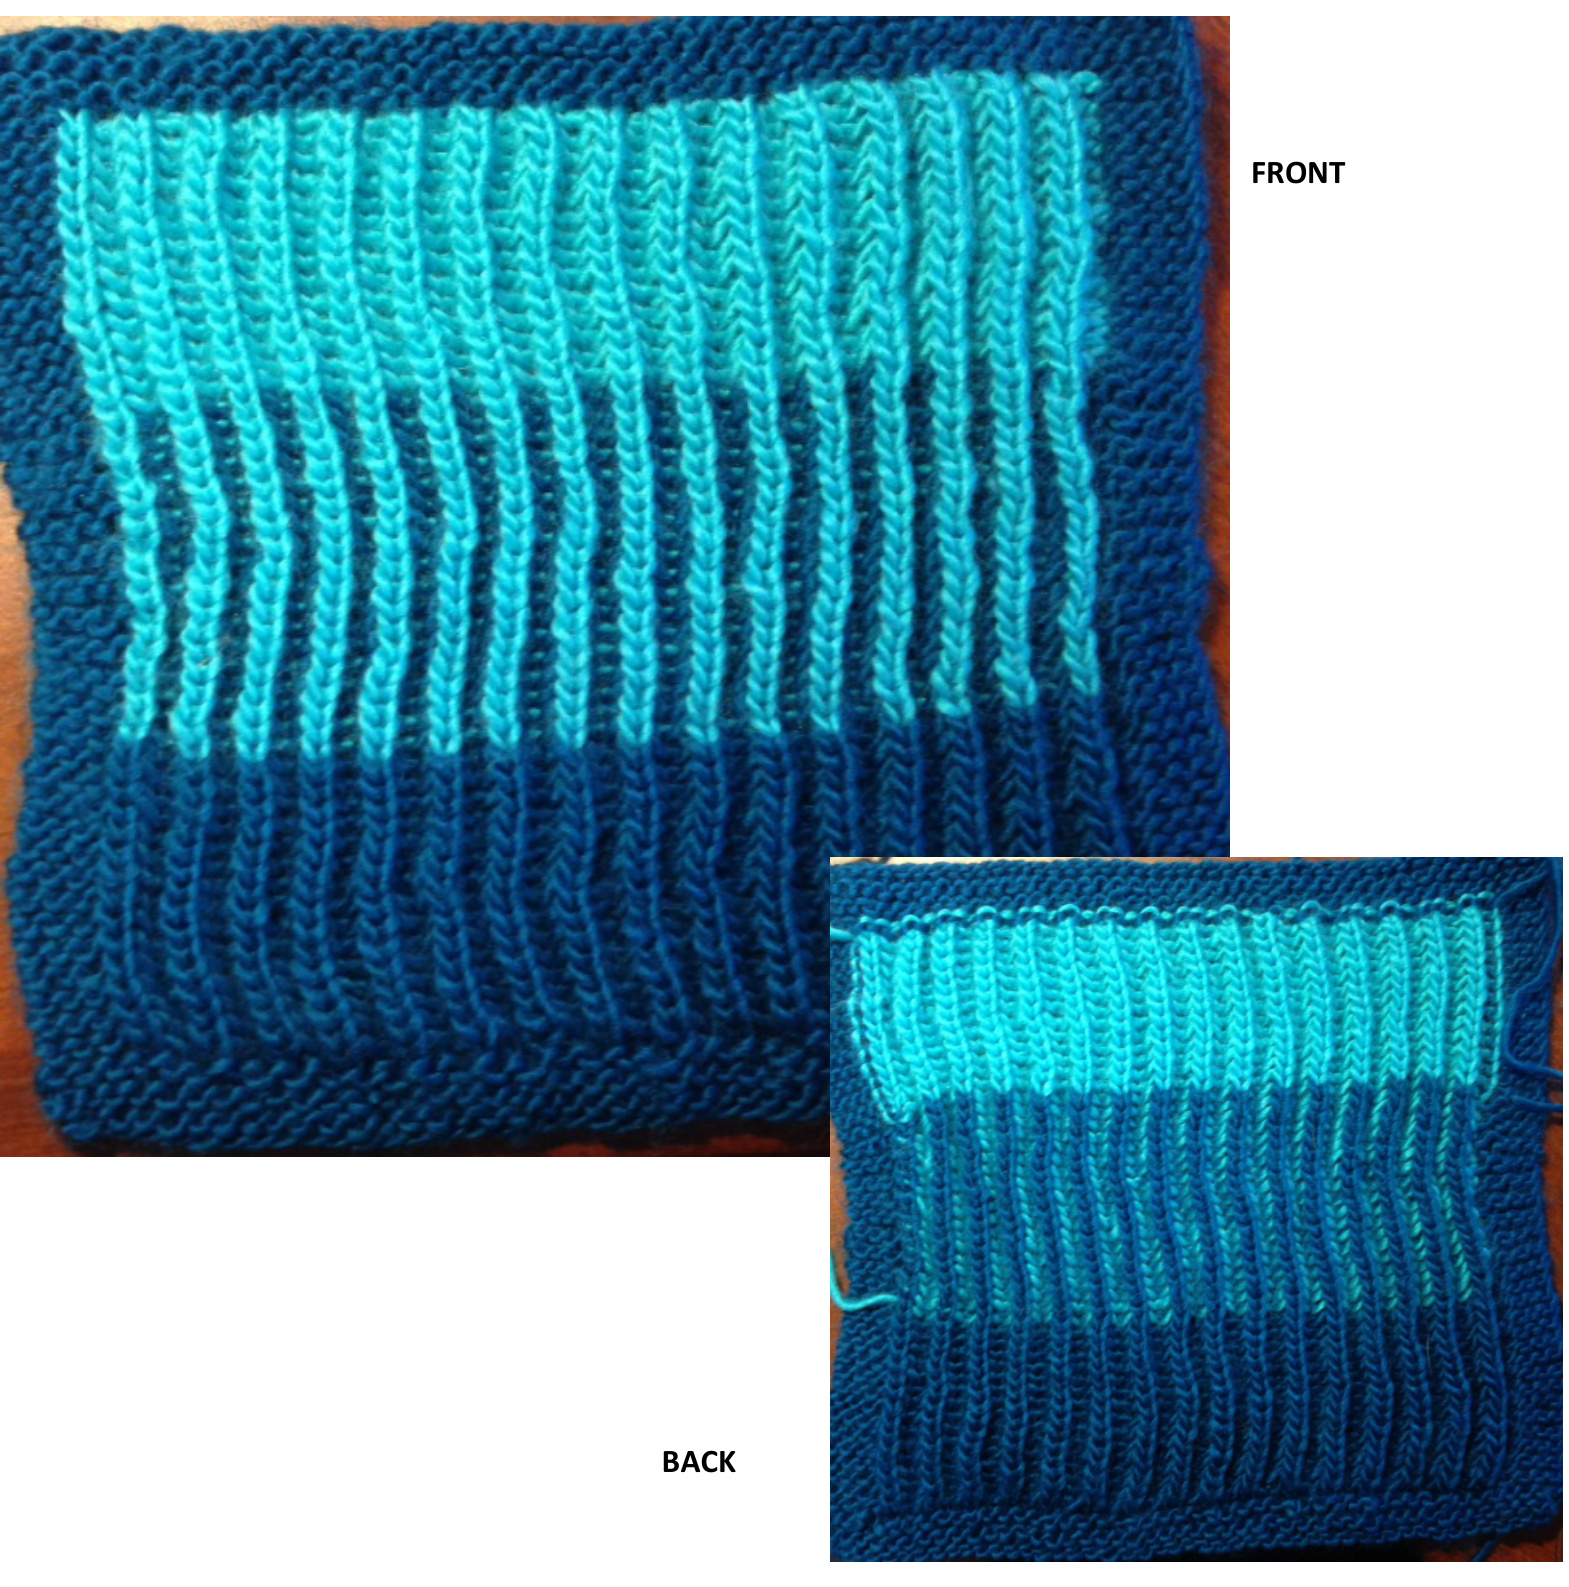
Block Eight: Brioche
We have nothing to fear, but fear itself. Moment of truth here: I've been avoiding this block. My daughter bought me a book on Brioche a year ago and after my initial excited reading, I slowly closed it and backed away in fear and confusion. Not Gonna Happen. Ever. Or so I thought. After several of my friends insisted they wanted a Brioche block for our Skills afghan, I had no choice but to buckle down and figure it out. To my great surprise, it is HARDER TO EXPLAIN than it is to actually DO IT!! After watching a bajillion YouTube videos and reading even more written instructions, the light bulb popped on and I know you, too, will not believe you've been avoiding THIS for so long. We will start out doing one color just so you get the hang of the stitch itself, then move on to two color, then switch back to one color so we don't fry our poor brains. This will make a cool 2-color transitional stripe across our work that will look much more complicated than it is. The thing to remember is that with Brioche (much like double knitting) you are only working one side of the fabric at a time. Throw in some yarn overs and k2togs, and that's all there is to it. The main downside is that across and back are only ONE row, so this block will take a little longer and use a little more yarn. So let's DO THIS!
\*\*USE A CIRCULAR NEEDLE\*\*
Bottom border: Knit in garter stitch for 5 rows. 6th row setup: border,\*k3, k2tog\* 8 times, border.(Total 40 sts. - 32 body + 8border) Side border: Knit first and last 4 sts in each row.
Center pattern:
Knit in Single-Color Brioche (MC) for 3" (14 rows), knitting borders normally (There won't be any bk2tog's on the first row. Just knit the single stitches individually.) Knit in Double-Color Brioche for 4" (18 rows), knitting borders as specified in instructions below Knit in single-Color Brioche (CC) for 3" (14 rows), knitting borders in MC (locking color changes like in Block 6) (Do not the the yo's on the last row before the border, just sl and bk2tog.) Top Border: (MC) 1st row setup\* kfb, k3\* 8 times, border. (Total 48 sts.- 40 body + 8 border) Knit in garter stitch for 5 rows, bind offloosely.
Single-Color Brioche Rules
1. Yarn over before every Purl st. These are NoT counted as sts in the stitch count. 2. Purled sts are always slipped purlwise. The yo and slip stitch is called YOS 3. Brioche knit sts are always knit together (bk2tog) with the yo from the previous row. 4.Two lineS = ONE ROW COMPLETED.
Single-Color rows go like this: (border) YOs, bk2tog, repeat to end (border) (Line 1), turn, repeat (Line 2).
Okay, so we've done a few rows of Single-Color Brioche and you're kinda geting the hang of it, right? Let's step up our game and try adding in a second color. It's going to get a little tricky, but once you figure out what is going on, you'll find it fairly easy going. (I hope!)
Two-Color Brioche Rules
1. Use a circular or double pointed needle! 2. Carry one color of yarn at a time. 3. Basic sts are the same as Single-Brioche (Yos, bk2tog) 3. Only knit or purl the sts of the color you are using. If the st is a different color, just YOs. 4. Work one color across (Line 1), without turning, slide your sts back to the other end of the circ, work the other color across (Line 2), TURN, repeat (Lines 3 & 4). Four lines =TWO ROWS COMPLETED
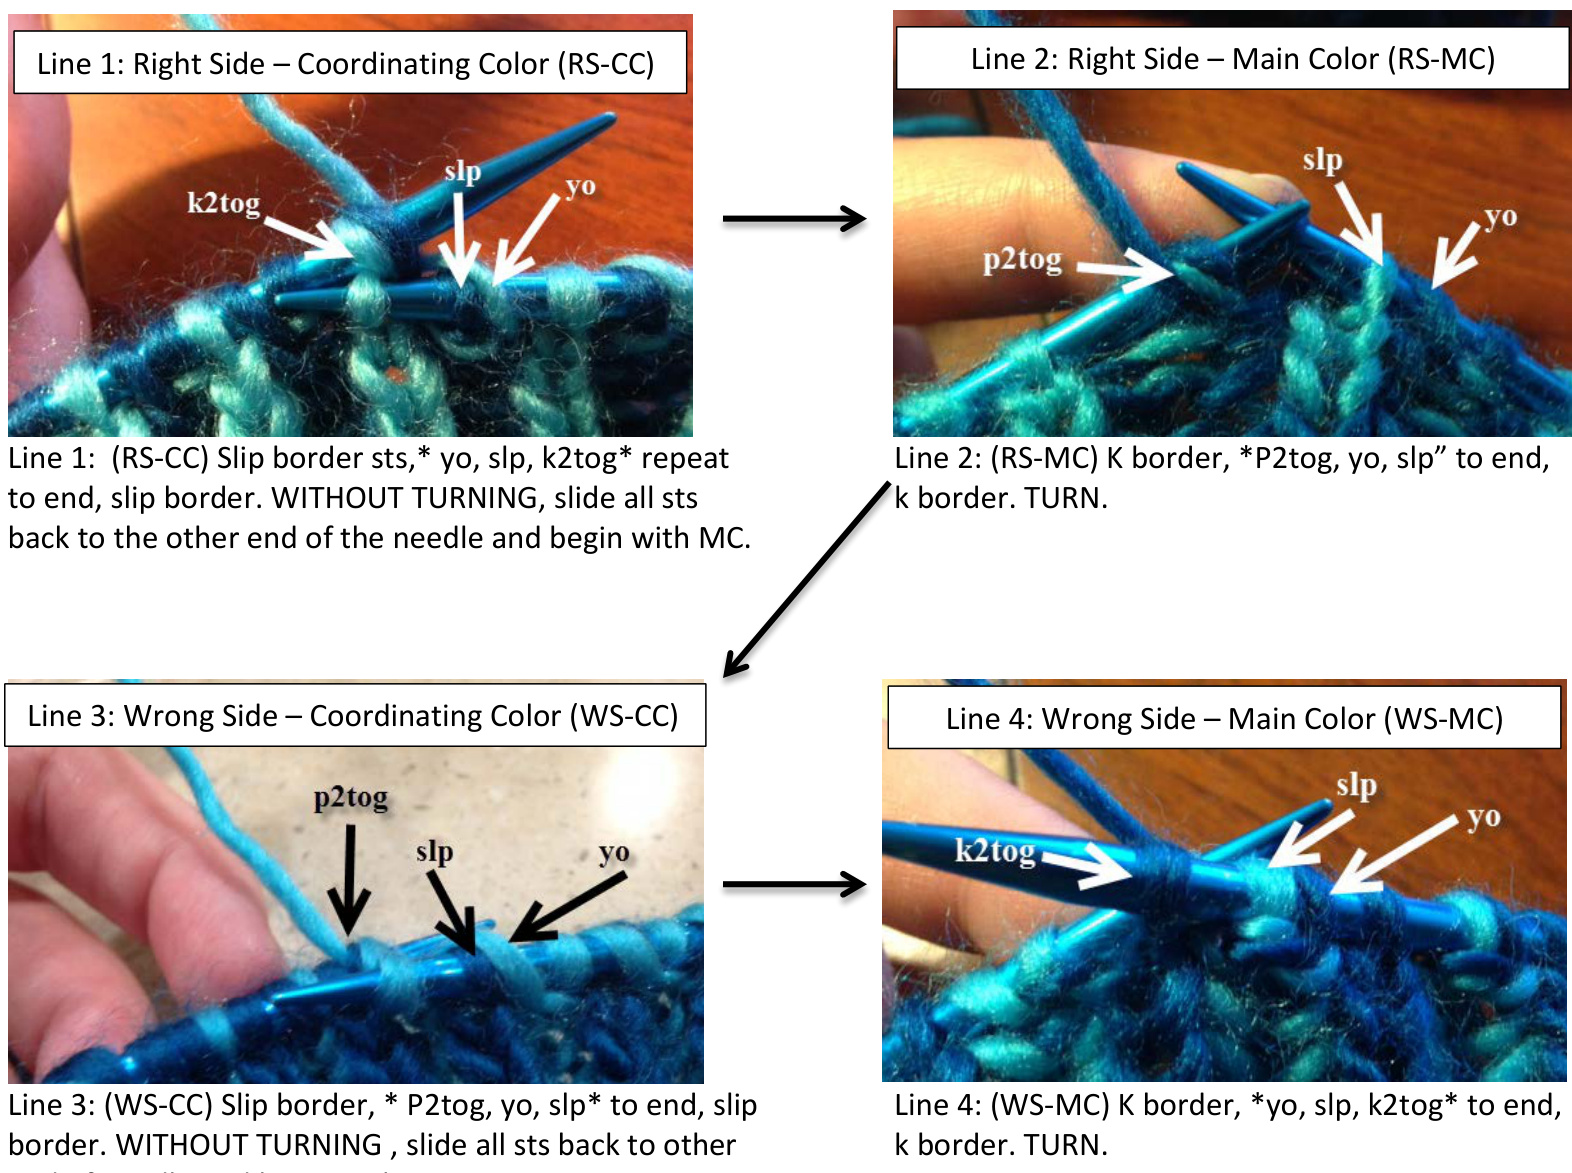
end of needle and begin with CC.
Resources:
Nice clear instructions and photos: http://www.purlbee.com/knitting-tutorials-decorative/2013/9/23/briochestitch.html
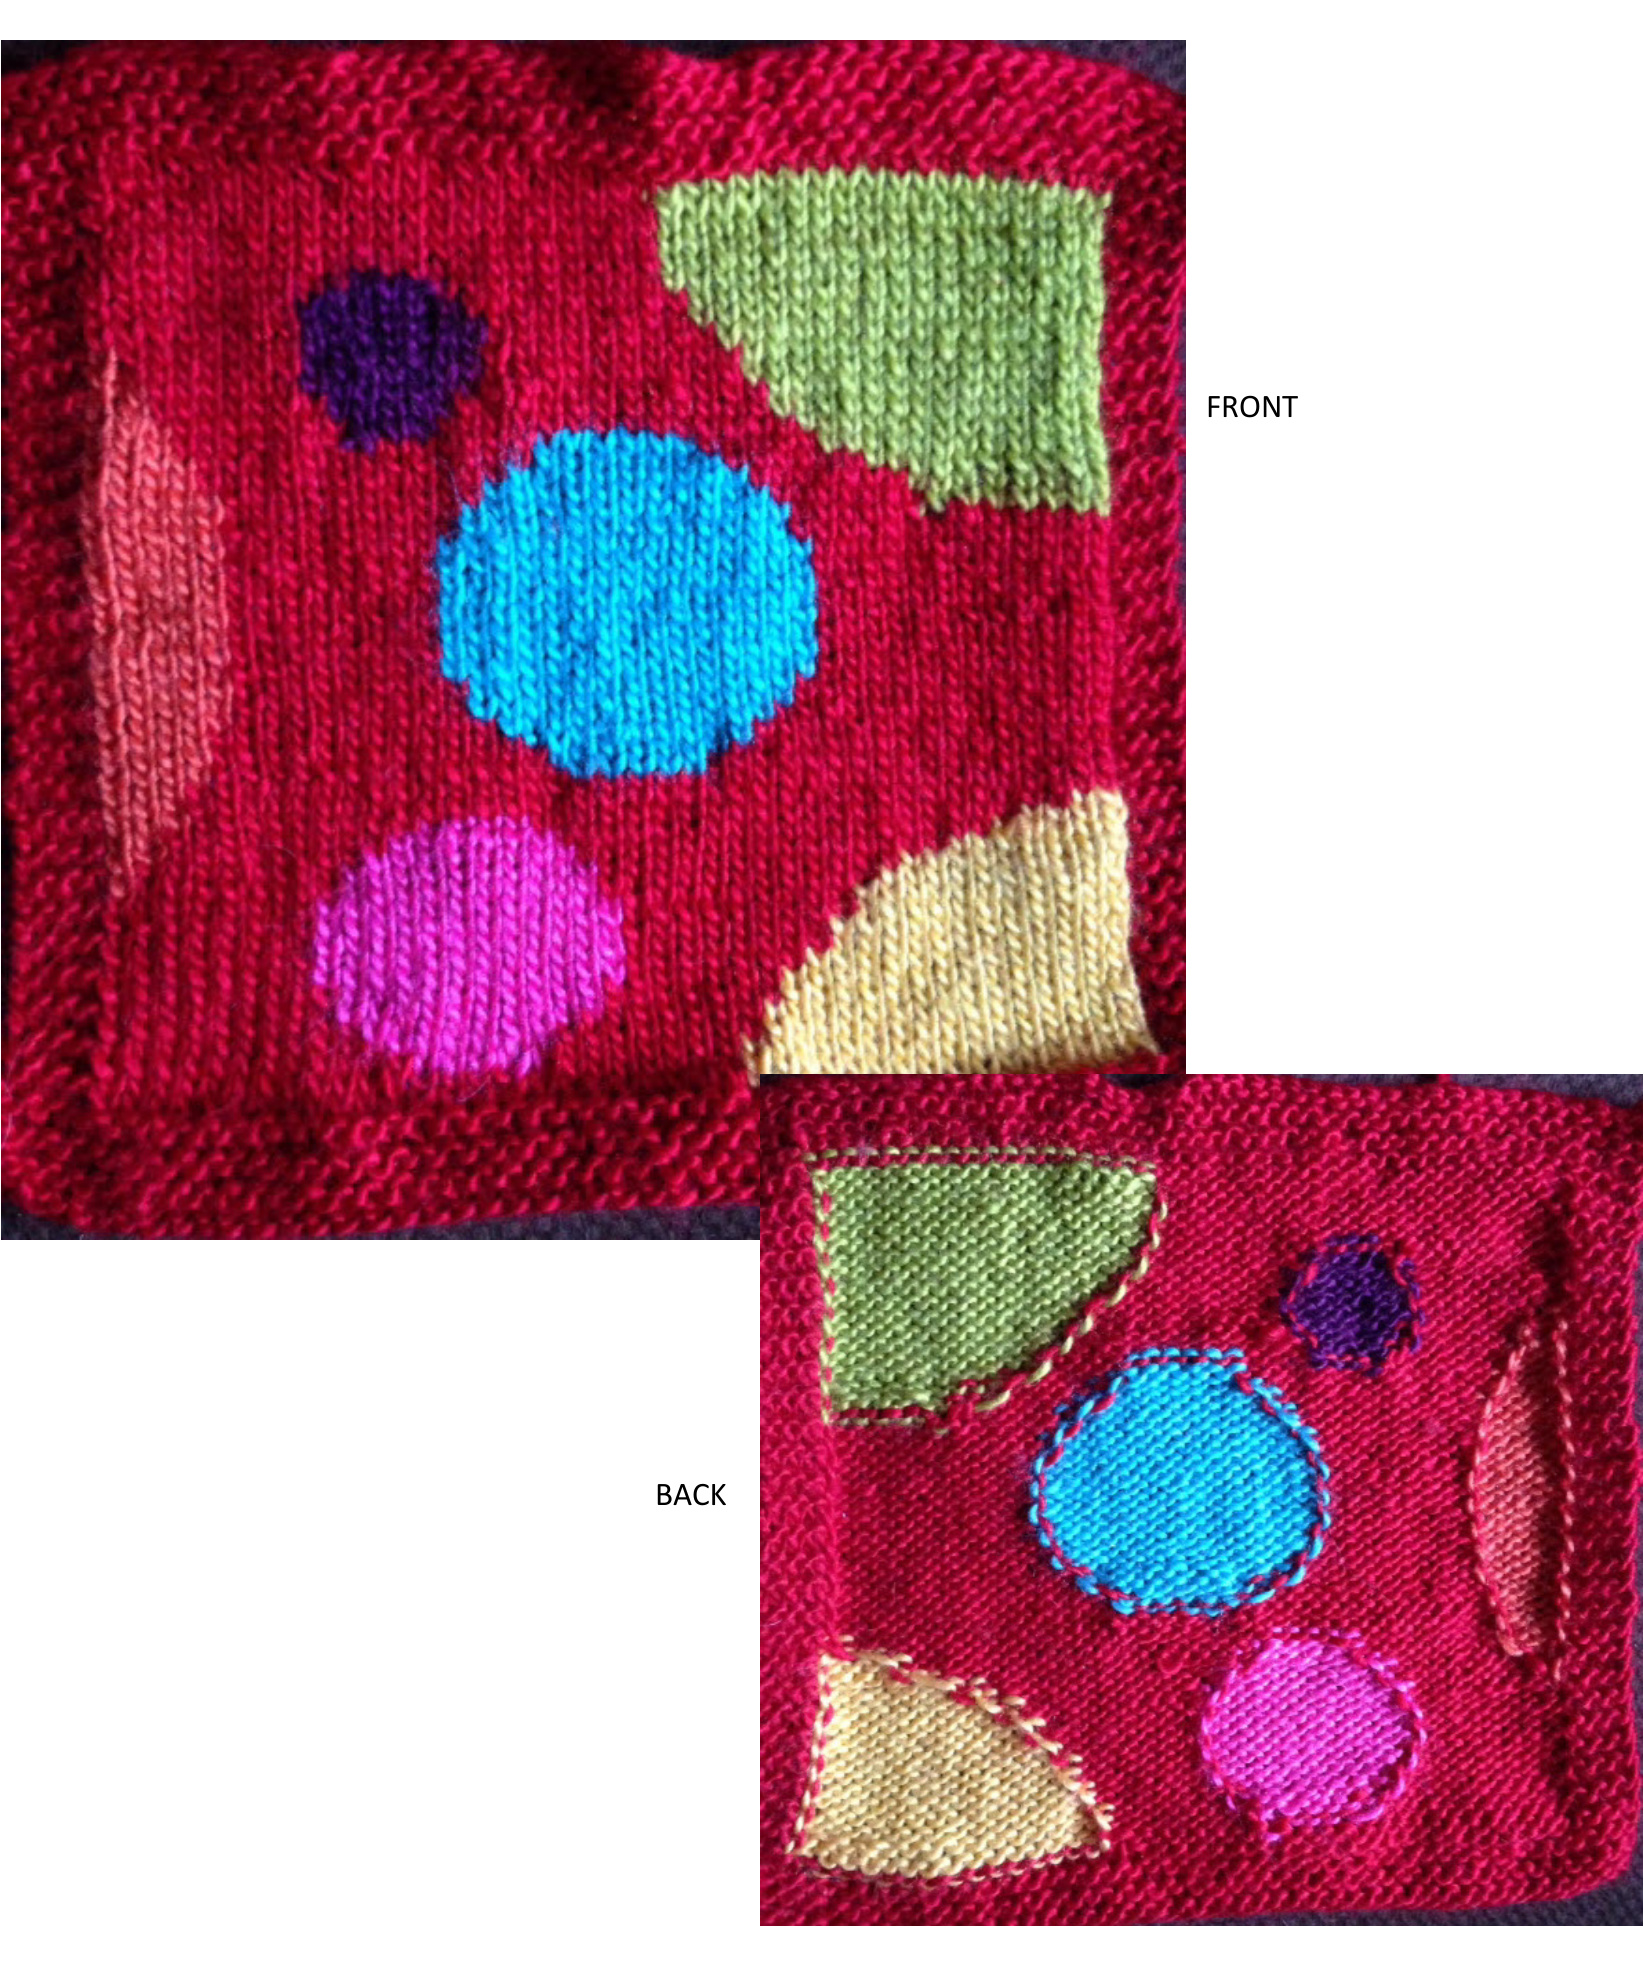
Block Nine: Intarsia
Ooooh! Look at all the pretty colors! Basically, Intarsia is a way to "paint with yarn". It's a great way to create simple pictures, geometric designs, and color blocks. This square will allow you to design your own colorwork chart and give you some pointers to make it a success. Rules for Intarsia: 1. Each color requires at least one spool of yarn. Put these on a spool or yarn holder for ease of use, or use a center-pull butterfly wrap (see below). 2. Knit a test swatch that is about 2"x2" in the yarn you will be using. Count how many stitches are in that swatch. Pull out the swatch and measure how much yarn you used. Now you can calculate how much yarn you will need for each of your spools. Length of yarn in swatch ÷ Number of stitches in swatch = Length of yarn per stitch Number of stitches on chart x Length of yarn per stitch = Length of yarn for spool Example: My swatch used 84" of yarn and contained 70 sts. Therefore, each stich requires 1.2" yarn (84 ÷ 70 = 1.2). So since CC1 has 198 sts, I multiplied 198 x 1.2 to get my yardage for the spool: 237.6" long (about 6.6 yards - Always round UP). Don'tcha just LOVE math?!? 3. Wrap and lock color changes to avoid holes. 4. Stitches are WIDER than they are TALLER, so if using regular graph paper to plan out a design, you will want to make the design is a lot longer than you think it should be. I have adjusted the size of the grid in the templates below so yot will get a truer scale of how your finished design will look. 5. Use row indicators (such as highlighter tape or magnets) to help keep your place. 6. Know that you will have A LOT of ends to weave in when you're done! ed 10 spools: 4 of m
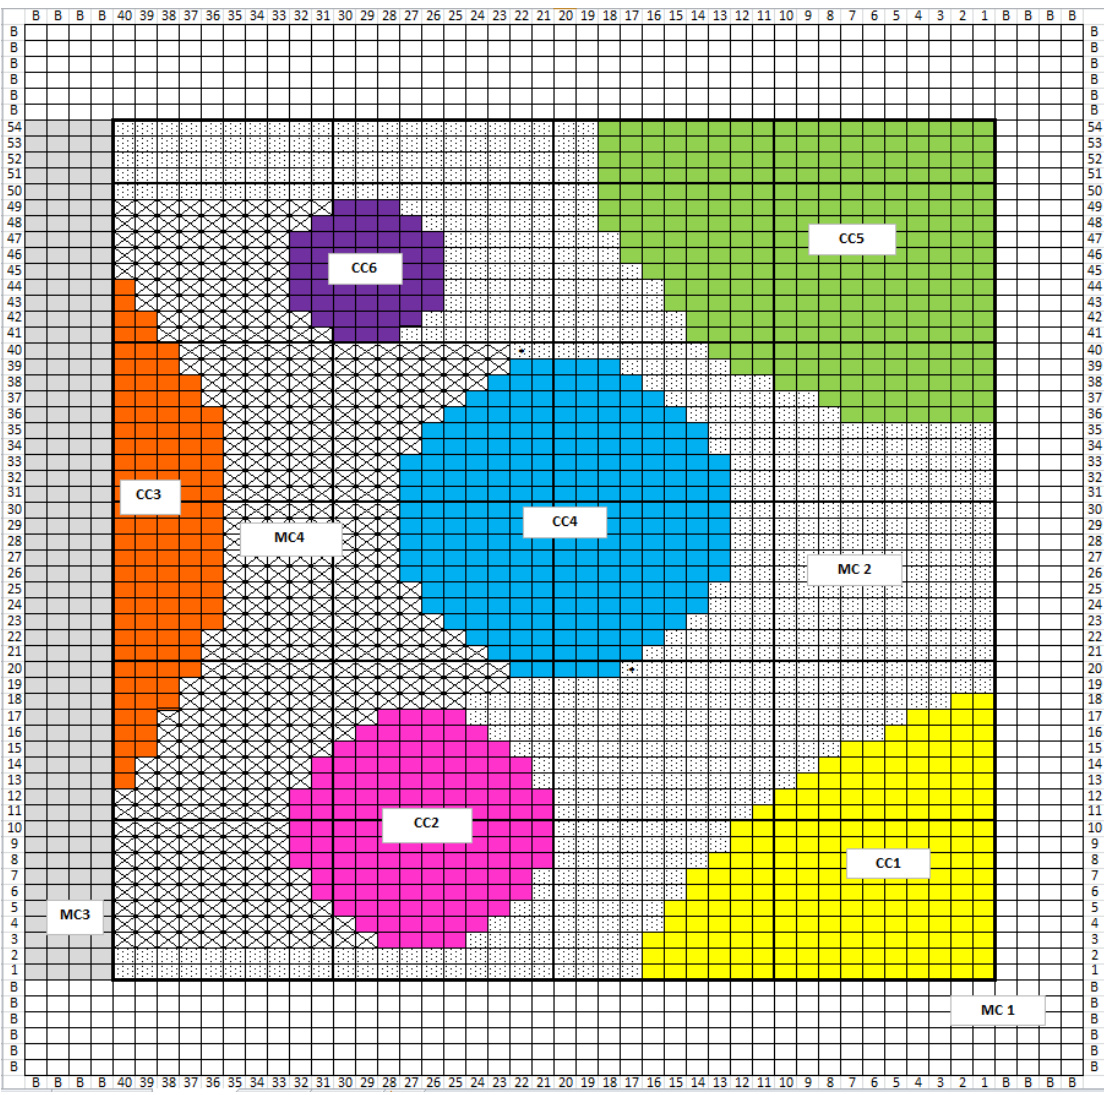
Here's how it will go: CO 48 sts MC1. Knit 6 rows MC1 for bottom border Row 1: k4 (border) MC1, k16 CC1, k24 MC2, k4 MC3 (border), turn. Row 2: k4 MC3, p24 MC2, p16 CC1, k4 MC1, turn. Row 3: k4 MC1, k16 CC1, k8 MC2, k4 CC2, k12 MC4, k4 MC3, turn. Row 4: k4 MC3, p11 MC4, p6 CC2, p8 MC2, p15 CC1, k4 MC1, turn. Row 5: k4 MC1, k15 CC1, k7 MC2, k8 CC2, k10 MC4, k4 MC3, turn. Row 6: k4 MC3, p9 MC4, p10 CC2, p7 MC2, p14 CC1, k4 MC1, turn. Continue in like manner for the duration of your chart. \* Rows 20 and 40 each have a starred (\*) stitch in them. This is to note the place where the yarn from the new row is more than just a stitch or two away from where it left off on the previous row. We have 2 options: 1) Cut the yarn from the previous row and start new at the star, or 2) Carry the yarn as a "float". To make a Center-pull Butterfly Wrap: After determining the length of yarn you will need, tie one end loosely around your index finger. Wrap yarn in a figure 8 pattern around the thumb and forefinger of your hand until you have about 12" left. Remove the yarn from your fingers and wrap the tail around the center crossed section and secure snuggly, but not too tight. The loop that was tied to your finger will now be your center-pull. Use your tails to close up any holes that might exist where your color changes meet.
| 4 3 52 55 50 49 48 47 46 45 4 4: 2 4 40 39 28 7 365 15 4 3 2 3 30 29 28 27 26 25 24 23 2 1 20 19 18: 17 16 15 14 13 12 1 10 9 8: 76:5:4:3:2 1 | |||||||||||||||||||||||||||||||||||||
| 乙ε女G986π亿钇&E器幼G |
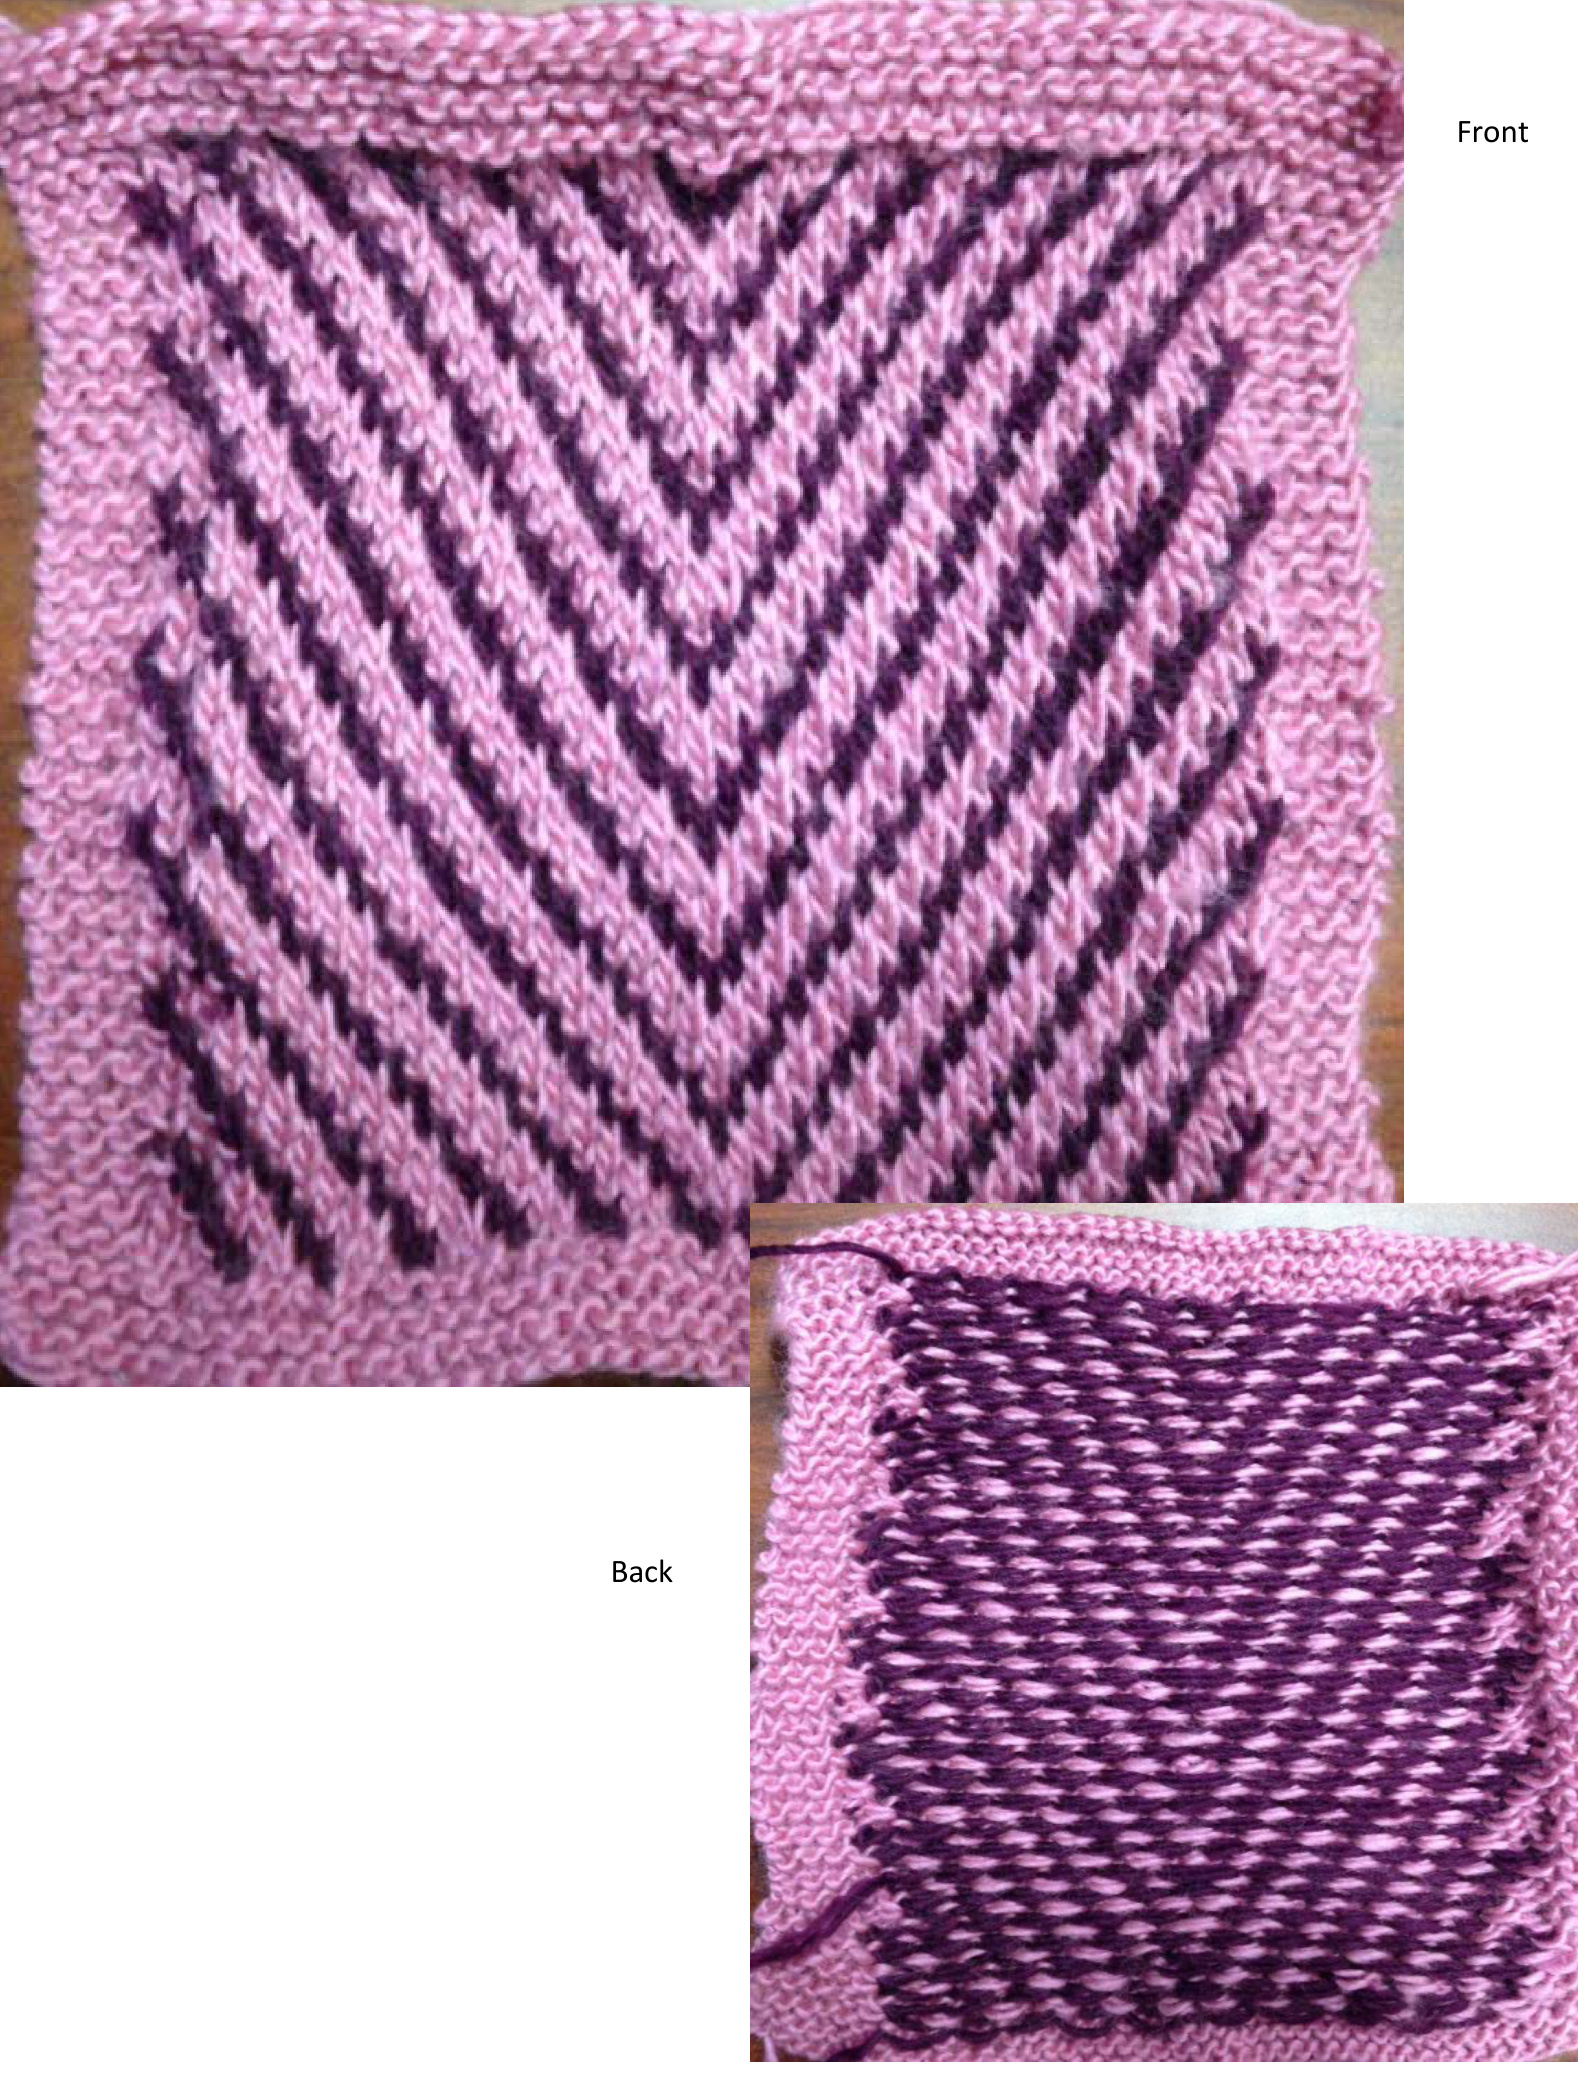
Block Ten: Mosaic
Trust the Pattern, Luke. Mosaic knitting requires a leap of faith. It's hard to see what your work is going to look like while you're knitting it, so you really have to trust the pattern. It's usually easier than Fair Isle (which we'll tackle next month) in that you are only working with one color of yarn at a time. It will probably remind you a little of Brioche, too, with all the slipping of stitches. So here's how it works: 1. Knit every odd row and purl every even row. Even rows are NOT SHowN on Mosaic charts as they follow the patterning of the odd rows exactly. 2. MAIN cOLOR: Knit (or purl) every marked (X) space on the chart. SLIP all unmarked spaces AS IF TO PURL. 3. COORDINATING COLOR: Knit (or purl) every un-marked space on the chart. SLIP all marked spaces AS IF TO PURL. 4.Work floats VERY LOOSELY as Mosiac tends to draw in.
The chart for this pattern looks like this:
| 87 | 654 | 43 | 321 | |||||||||||||||||||||||||
| 17 | X | X | X | X | X | X | X | X | X | X | X | X | X X | X | X | X | X | X | X | X | X | |||||||
| 15 | X | X X | X | X X | X | X X | X X | X | X | X | X | X | X | X X | X X | X | X | X | X | X X | X | X | X X | X X X | X X | 17 | ||
| 13 | X X | X X | X X | X | X X | X | X X X | X | X | X X | X | X | X X | X | X | X X | 15 13 | |||||||||||
| 11 | X | X X | X | X X | X | X X | X | X X X X | X | X X | X X | X X | X | X | X X | X X | X | X | X X | X X | X | X | X X | X 11 | ||||
| 6 | X | X | X | X | X | X | X | X X | X X | X | X X | X | X | X X | X | X | X | X | X | X | X | 6 | ||||||
| 5 | X X | X | X X | X | X X | X | X X | X X | X | X X | X | X | X X | X X | X | X | X X | X X | X | X | X X | X | X | X | X X | |||
| 3 | X X | X X | X X | X X | X | X | X | X | X | X | X | X | X | X X | X | X | X | X | X | 5 X | ||||||||
| X | X X | X | X | X X X | X | X X | X | X X | X | X X | X | X | X | X | X | X | X | X | X | 3 | ||||||||
| 1 X | X | X | X | 494847464544434241403938373635343332313029282726252423222120191817161514131211109 | X | X | X | X | 987654321 | X | X X | 1 |
CO 48 sts using the Long Tail method.
Bottom border: Knit in garter stitch for 5 rows. Sixth row setup round: k border, \*K3, kfb\* 9x, k4, knit border. 49 body sts + 8 border sts = 57 sts Side border: Knit first and last 4 sts in each row. Center pattern below contains border stitches.
Center pattern:
Row 1: CC -sl border sts, \*sl3, k1\* 6x, sl1, k1, \*sl3, k1\* 5x, turn Row 2: CC - p1, \*sl3, p1\* 5x, sl1, \*p1, sl3\* 6x, sl border, turn Row 3: MC - k border, \*k2, sl2\* 6x, k1, \*sl2, k2\* 6x, k border, turn Row 4: MC-k border, \*p2, sl2\* 6x, p1, \*sl2, p2\* 6x, k border, turn Row 5: CC - sl border, sl2, \*k1, sl3\* 11x, k1, turn Row 6: CC - p1, \*sl3, p1\*11x, sl2, sl border, turn Row 7: MC -k border, k1, \*sl2, k2\* 5x, sl2, k3, sl2, \*k2, sl2\* 5x, k1, k border, turn Row 8: MC-k border, p1, \*sl2, p2\* 5x, sl2, p3, sl2, \*p2, sl2\* 5x, p1, k border, turn Row 9: CC - sl border, sl 1, \*k1, sl3\* 5x, k1, sl5, \*k1, sl3\*5x, k1, turn Row 10: CC - p1, \*sl3, p1\* 5x, sl5, \*p1, sl3\* 5x, p1, sl1, sl border, turr Row 11: MC-k border, \*sl2, k2\* 6x, sl1, \*k2, sl2\* 6x, k border, turn Row 12: MC -k border, \*sl2, p2\* 6x, sl1, \*p2, sl2\* 6x, k border, turn Row 13: CC- sl border, k1, \*sl3, k1\* 12x Row 14: CC- p1, \*sl3, p1\* 12x, sl border, turn Row 15: MC -k border, sl1, k2, \*sl2, k2\* 5x, sl3, \*k2, sl2\* 5x, k2, sl1, k border
Abbreviations:
k2tog = Knit two stitches together yo = Wrap your working yarn around the right needle by bringing yarn under the needle toward you and up over the top yo x3 = wrap yarn around needle 3 times, knit next stitch. When you purl back, you will purl the first wrapped st, knit the second wrapped st, and purl the third wrapped st. sssk = Slip (as if to knit), Slip (as if to knit), Slip (as if to knit), knit all threeststogether through the back loops ssk = Slip (as if to knit), Slip (as if to knit), Knit both sts together through the back loops Row 16: MC -k border, sl1, p2, \*sl2, p2\* 5x, sl3, \*p2, sl2\* 5x, p2, sl1, k border Repeat Rows 1-16 until body measures 10 inches. This will be about 7 repeats. End after a CC even row. p round: K border, \*k3, k2tog\* 9x, k4, k border, turn. Knit 5 rows and bind off loosel
Block Eleven: Fair lsle
A new way to try an old technique. Fair Isle, or stranded knitting, has been around for centuries. The basics are easy: carry 2 strands of yarn per row and alternate the strands based on what color the chart requires. There are a few rules to this that can help you achieve optimal results. Fair Isle Rules: 1. Each row is only worked with 2 colors. 2. When working in the round, the color carried on the "bottom" or with the left hand will be the dominant color and it will "pop" more out of your work. Usually this is the Coordinating Color. 3. When working flat, Rule 2 applies to the FRONT of the piece. When working the BACK of the piece, make sure your dominant color is on the "top" or in the right hand. 4. Fair Isle can be worked one handed or two-handed. 5. Any floats more than 3 stitches across should be "anchored" by twisting the two yarns together to keep them from snagging later on. 6. Tension is always challenging when working with floats. Make sure you give yourself plenty of gap to minimize puckering in your finished piece. If you are already somewhat experienced with Fair Isle, why not try something new this time? Give a go at wrapping your floats, as this creates an interesting back to your work. There is a new method that is rapidly growing in popularity called the Philosopher's Method. Basically it involves tucking in the carried yarn (rather than twisting) on the second stitch of the working yarn. This method is extremely difficult to write instructions for, so I HIGHLY recommend you watch the videos linked below to perfect your form. My square was knitted in this fashion.
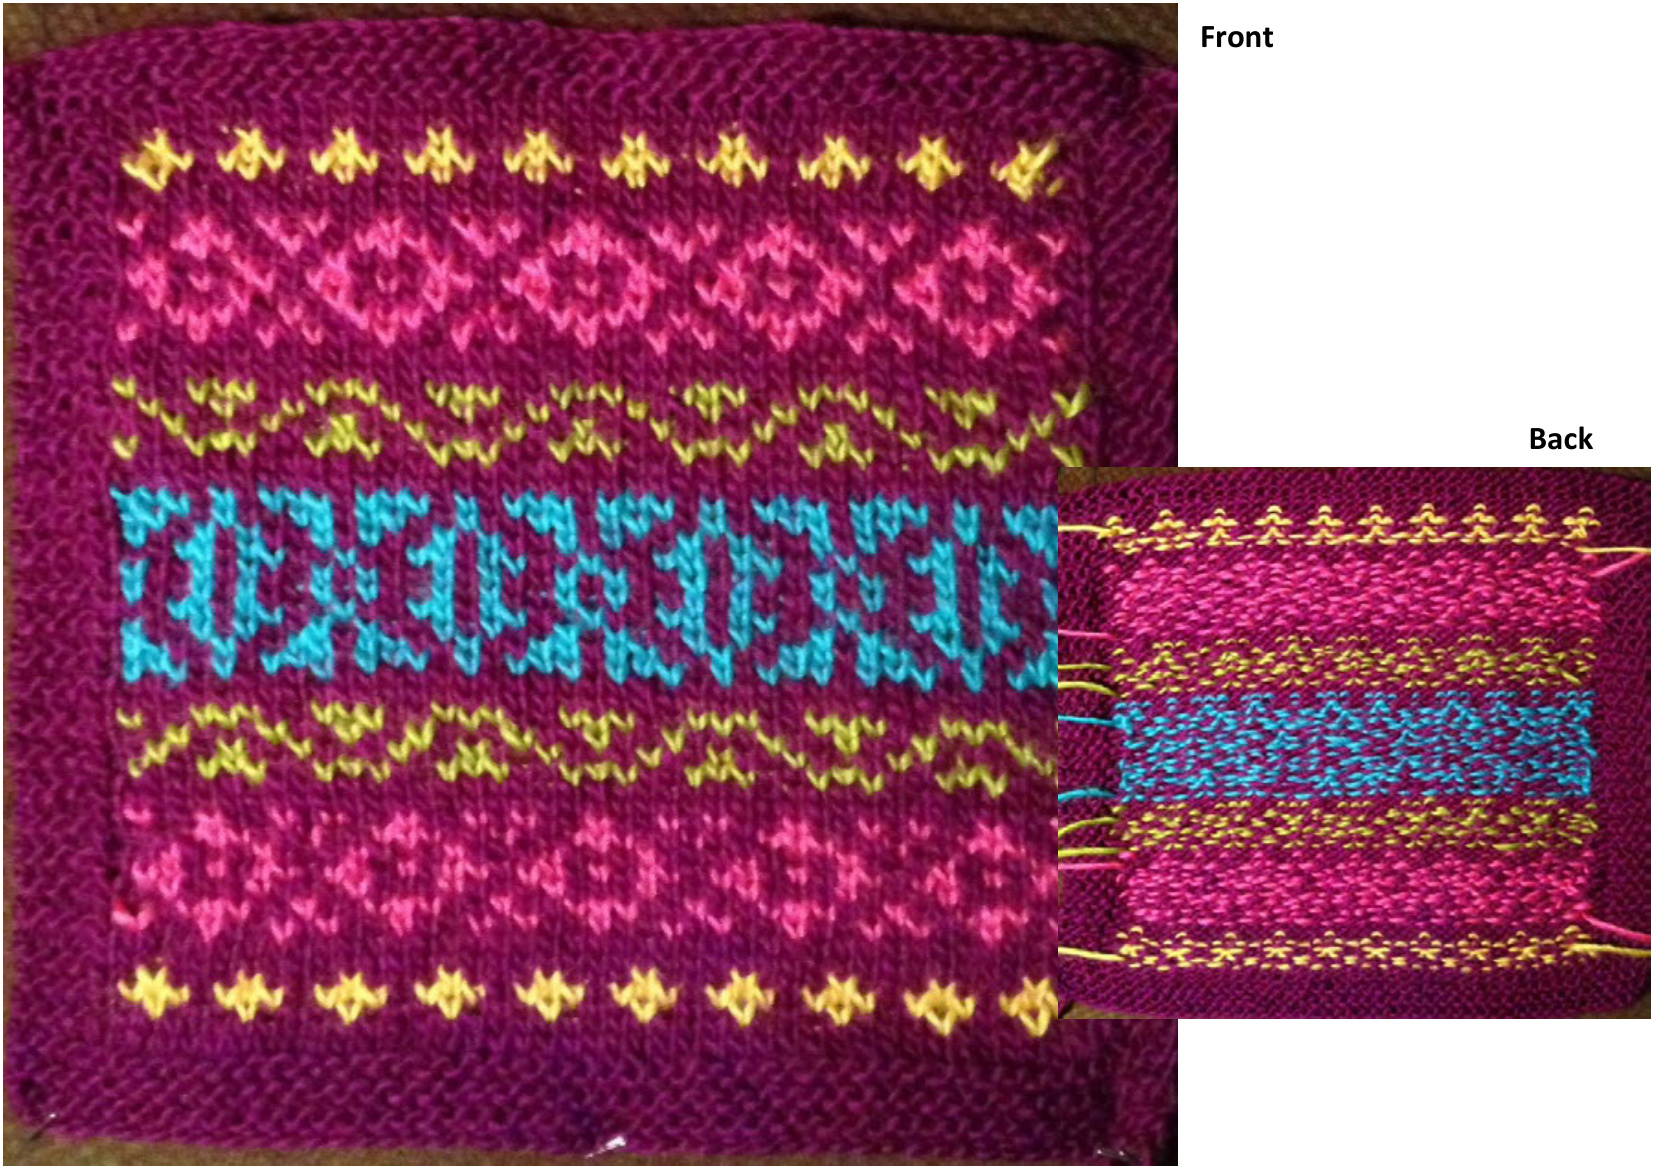
Cast on48sts. Knit 5 rows. Sixth row setup round: k border, kfb, knit across, knit border. 49 sts Follow the chart below, knitting 4 sts on each border (not shown in chart) Top Border: Decrease set up round: K border, k2tog, knit across, k border. Knit 5 rows and bind off loosely. Weaving Floats in the Round: https://www.philosopherswool.com/Pages/Twohandedvideo.htm Weaving Floats Knitting Flat: https://www.youtube.com/watch?v=fWHr3PH0RHg
| ? | 0 | 0 | Q | 0 | 0 | O Q | Q | 0 | ? | 0 | Q | 0 | ||||||||||||||||||||||
| 0 | 0 | 0 | 0 | 0 | 0 | |||||||||||||||||||||||||||||
| X | X | X | X | X | X | |||||||||||||||||||||||||||||
| X | ||||||||||||||||||||||||||||||||||
| X X | X | X | X | X X X | X | X X | X X | X | X | X | ||||||||||||||||||||||||
| X | X | XX | X | XXX | X X | X | X | X | XX | X | X | X X | ||||||||||||||||||||||
| X | X | X | X | X | X | + + | X + + + XX X | + X X Q 0 | X + X 0 | + + | X + + + X | X 0 | X X XX XxX X | + X | X + + X X | X X X | + 十 X X | X + X X xx X | X | X X X X X 0 0 | ||||||||||||||
| 乙ε986叽π亿钇忆&E叻幼G凹G | X X X | X | + X X 0 | + + X XX X X | + + + 二 X X 0 | + X X | + + X X | X X | X X X | + + + X X X X | + | + + X X X X 0 ? |
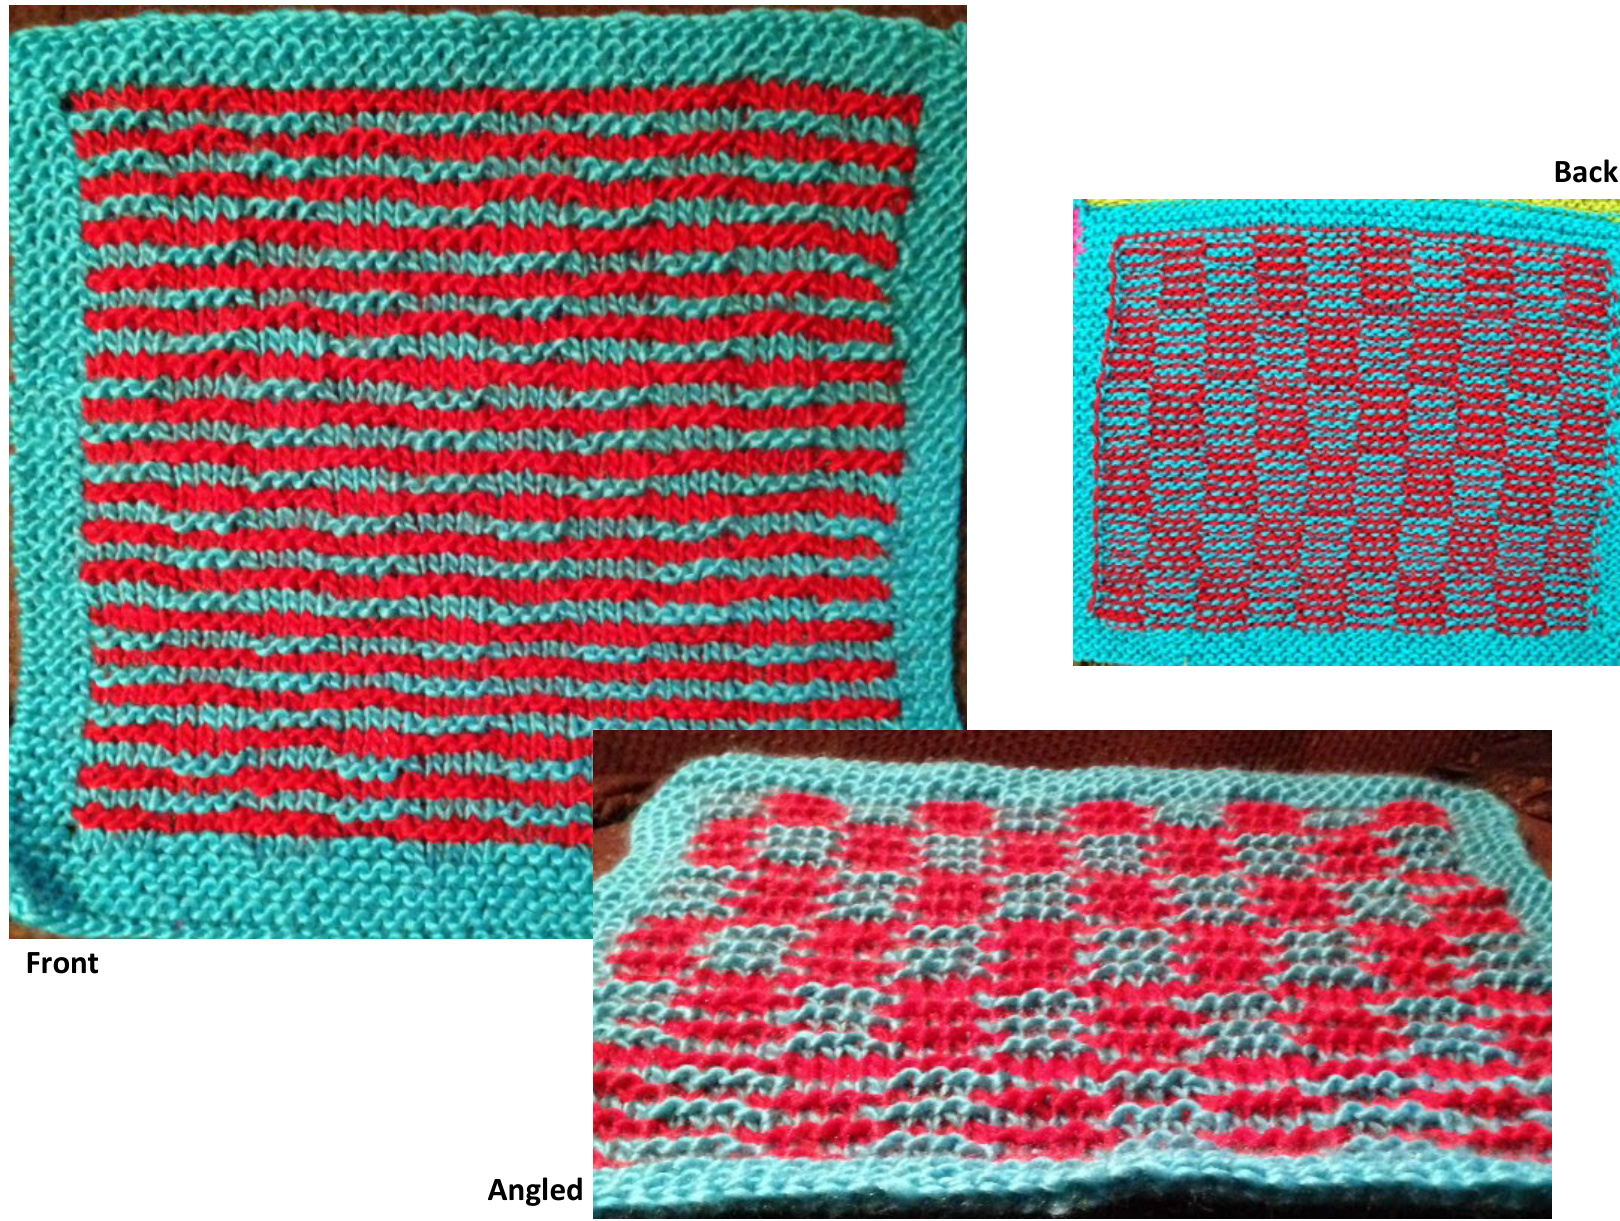
Block Twelve: Illusion
It's all in how you look at it. Ilusion knitting is a way to create pictures or patterns in your work that can be seen when viewed from different angles. A piece that appears like a striped hodgepodge when viewed straight on can come alive when the knitting is tilted. The artist Steve Plummer has created some AMAzING portraits using this method and you really should check out his work on Ravelry for inspiration. His mastery of this technique is unbelievable and most of his patterns are available for sale. We are going to work a very simple checkerboard to introduce you to the concept. As before, knit all border sts. (They will not be included below.) You will need an extra bobbin of your MC to knit the left side border. Remember to wrap your CC at each border to lock your stitches. Cast on 48 sts. Knit 6 rows. Place a safety pin to indicate which is the front of your work. Section 1: Row 1: MC knit all sts Row 2: MC \*p4, k4\* 5x Row 3: CC knit all sts Row 4: CC \*k4, p4\* 5x Rpt Rows 1-4 TWO more times Section 2: Row 5: MC knit all sts Row 6: MC \*k4,p4\* 5x Row 7: CC knit all sts Row 8: CC \*p4,k4\* 5x Rpt Rows 1-4 TWO more times Repeat Section 1; Repeat Section 2; Repeat Section 1. Top Border: Knit 5 rows and bind off loosely.
Blocking and Assembly
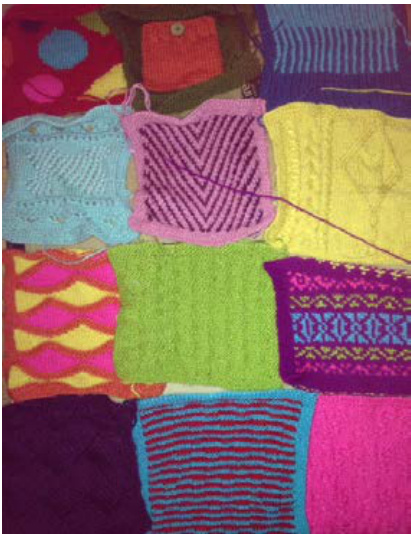
Behold the loveliness! Now that all your blocks are complete, it's time to put them all together and enjoy your new afghan! I recommend that you block each of your squares to a uniform size - approximately 12" x 12". This can be done by wetting down your block, squeezing out the excess water and laying it flat to dry. You can use pins or wires to keep the edgesstraight. Once all your blocks are dry, lay them out onto a flat surface and arrange them as you like with the right sides up. TAKE A PICTURE! (You'll thank me later.) Starting with the left column, pin the upper left block to the second block down on the left. Then pin the third block down to the second block and the fourth block down to the third block. Column finished.
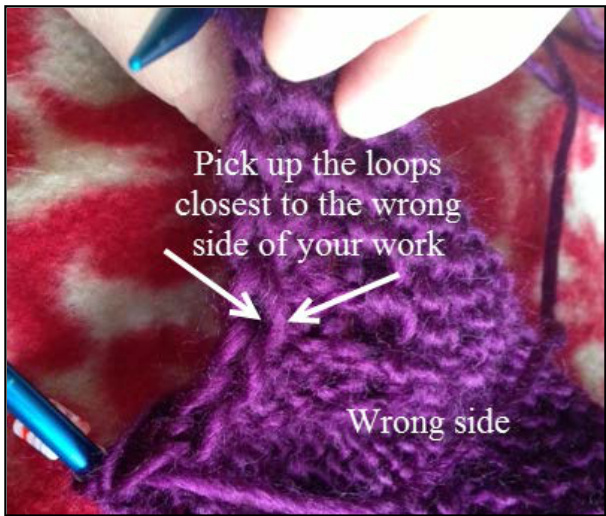
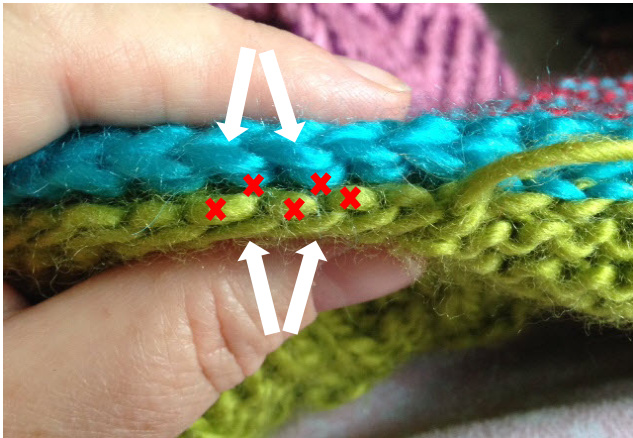
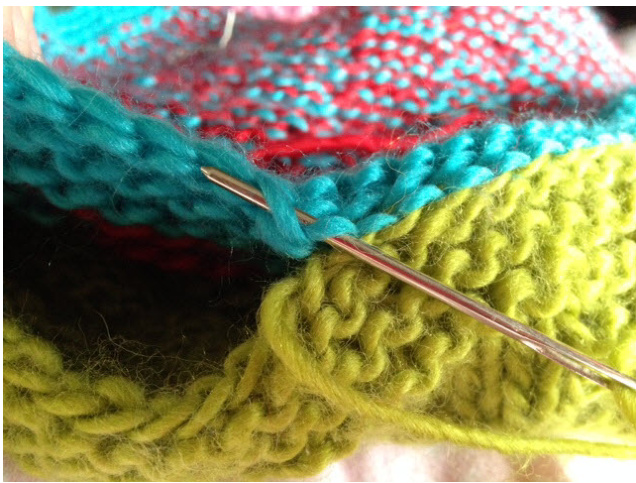
Repeat for the other two columns, but do not pin the columns to each other. Each column will be worked separately and then attached to the other columns when finished. Set up: With right sides together and the edge to be sewn facing toward you, place a safety pin or locking stitch marker through both corners of the two squares and one in the center of the area to be seemed. This will help keep your stitches evenly matched. Feel free to pin more, but I wouldn't use any fewer than 3 pins. To seam, use a piece of yarn the same color as one of the blocks and at least 3x the length of the block. Sew together with right sides facing each other as shown in photographsbelow. We are basically going to join using a Kitchener-type stitch on the back side of our squares. This will give a garter stitch look to the back and an invisible join to the front. Take care which stitches you are picking up. This may take a little bit of practice to get right! Pick up the ones marked with a white arrow. You DO NOT want the ones with theREDX!
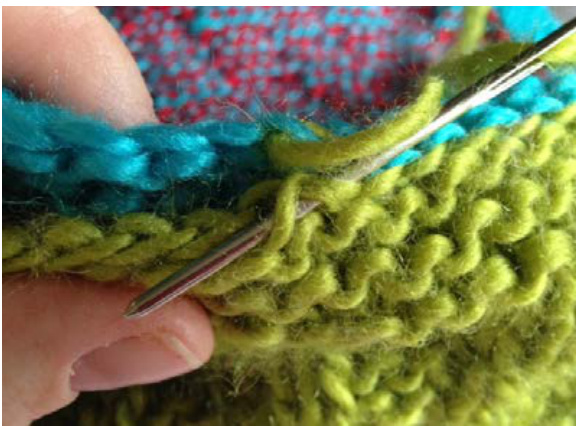
Then move to the top stitches by inserting needle from the bottom to the top in the first stitch and top to bottom on second stitch.
Go into the two bottom stitches as shown: Insert darning needle from top to bottom on first stitch then bottom to top on second stitch.
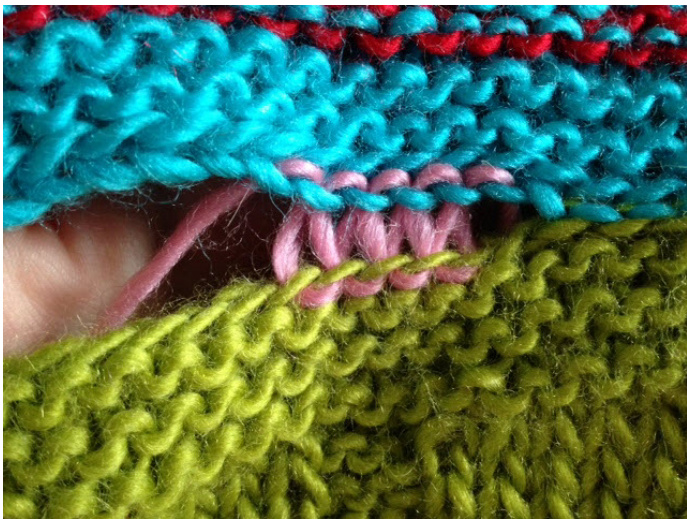
Move back to the bottom stitches, but this time your first stitch will be the second stitch from the last time you were on the bottom row. Basically each stitch will have and entry and an exit yarn in it. See the example at left where I have used pink yarn to illustrate our seaming yarn. This is how the joining will look from the back side. You will need to snug up your stitches more than my example. Here is what the seaming will look like from the front of your afghan. After all three columns are completed, assemble them together using a mattress or whip stitch.Every 15 stitches or soI like to go back over the stitch I just did to lock it in. I also do this at every corner join. Make sure you don't pull your seaming yarn too tight or you will draw in your edges.

Once it is complete, you can choose to add a border around it or simply enjoy it as it is! Thank you for knitting along with me and I hope you learned a new skill or two. I know I sure did!