| C | a | p | 1 | t | a | 1 |
| K | N | T | T | S |
Magic Ball MusingS
Unleash your inner artist to create your own beautiful, customised yarns for one-of-a-kind fibre creations
Contents
Background.. Introduction. 3 Yarn Weight... 3 Yarn Composition. .. 5 Yarn Colour.... The totally random approach 6 The curated approach. Finding colour inspiration. 9 Yarn Lengths 9 Yarn Joining Options 9 Overhand Knot. 9 Weaver's Knot. 10 Square Knot. .11 Fisherman's Knot. .11 Double Fisherman's Knot .11 To Tail or Not to Tail .12 Sourcing your Yarns.... 12 Creating and Using your Magic Ball. 13 Capturing the vital attributes of your magic ball .14 Choosing the right stitch pattern. .14 Swatch, swatch, swatch .15 Thank You! 15 References . 16 Identifying the fibre content of an unknown yarn .. ..16 Colour theory...... ..16 Knots .... ..16 Dying your Own Yarn... .17 Contact... 17 Photo Credits 17 Copyright..... 17 My Magic Ball Vital Attributes. 18
Background
The concept of magic ball knitting has been around for a long time. The earliest references that I could find on the Internet were from around 2002, when Kaffe Fassett popularised the use of short lengths of yarn in multiple colours to build up his rich, tapestry-like, colour work knitted fabrics. I've always been a fan of Kaffe Fasset's designs and over the years I have built up quite a collection of itty-bitty strands of yarn to use in Kaffe Fassett inspired projects. However, my strand collection had been sitting untouched for quite a few years. Magic ball knitting was mysolution. I stumbled across magic ball knitting after completing a fabulous Craftsy class called Stashbusting with Clara Parkes. This class inspired me to explore ways that I could use magic balls to make a dent in the itty-bitty strands of yarn in my stash. On my journey through magic ball knitting I've done some experimentation, some reading and research and, most excitingly, some designing. Magic Ball Musings is the distillation of what I have learned. I hope you find it useful and that it inspires you to go on your own journey of discovery.
Introduction
One of the key things that will ensure that you enjoy success with your magic ball knitting is to take some time to do some planning before you start cutting lengths of yarn and joining them together. The first thing you need to decide is whether or not you are putting your magic ball together for a specific pattern. If you are, then some of the requirements of the pattern will dictate your approach to creating your magic ball. As I go through each of the decision points about what sort of magic ball you will create and how you will create it, I will also include some comments about the impact of these decisions on pattern selection. Even if you don't have a specific pattern in mind, some of the options discussed below will give you more flexibility in the pattern choices you make in the future.
Yarn Weight
After looking at dozens of finished projects on Ravelry and loads of images online, it is clear to me that you can create a beautiful magic ball in any weight of yarn. Magic balls made with finer gauges of yarn allow you to play with small windows of colour and to build up complex stranded designs. Those made with heavier, chunkier yarns pop with colour and texture. All yarn weights of magic balls come alive when they are also paired with a solid colour. For ease of knitting and better predictability of gauge (important when you are aiming for a particular size in your finished project), the best approach in my view is to construct your magic ball with yarns of similar weight that, if knitted alone, would produce a knitted fabric with a similar gauge. Using yarns of a similar weight also makes it easier to select the appropriate needle/crochet hook size. For example, you might wish to construct your magic ball with yarns that all knit up as double knit/8 ply/light worsted. Yarns in this weight range generally knit to a gauge of 21-24 stitches per 10 centimetres/4 inches on 3.75-4.5 mm/US size 5-7 needles. Of course, creating a magic ball of yarns of a similar weight assumes that you actually know the weight of each stash yarn that you want to use in your magic ball. If you're like me, most of the Fiona Oliver 2015 ball/hank labels are long gone (?) and estimating yarn weight by feel can be a bit hit and miss, especially with fluffy yarns. This is where using the wraps per inch (wpi) technique can be very helpful in estimating the weight of a particular stash yarn. All you need is a pencil, a ruler and the handy table below. 1. Gently wrap your yarn around the pencil until you have covered 1 % to 2 inches of the pencil. Ensure that you don't wrap your yarn too tightly. The goal is to get the strands lining up next to each other without overlapping and without being stretched. 2. Lay your ruler next to your wrapped pencil and count the number of strands visible over one inch. If your yarn is particularly fluffy or irregular in weight then count the number of strands over several inches and then divide your result by the number of inches that you used. This will give you an average wpi measurement. 3. Compare your results to Table 1 (below) and decide whether or not to include the yarn in your magic ball. Table 1: Wraps per Inch for Estimating Yarn Weight
| Yarn Weight | Wraps per Inch (wpi) | Wraps per Inch (wpi) |
| Source | Ravelry Standard Yarn | Craftsy.com |
| Weights | ||
| Lace/2 ply | > 35 wpi | |
| Light fingering/3 ply | 20-30 wpi | |
| Fingering/4 ply | 14 wpi | 19-22 wpi |
| Sport 5 ply | 12 wpi | 15-18 wpi |
| Double knit/8 ply | 11 wpi | 12-14 wpi |
| Worsted/10 or 12 ply | 1dM6 | 9-11 wpi |
| Aran/10 ply | 8 wpi | |
| Bulky/Chunky/12 ply | 7 wpi | 7-8 wpi |
| Super bulky | 5-6 wpi | <6 wpi |
Of course, having a consistent yarn weight in your magic ball is only appropriate if this is what you need for a specific project. If you are trying to achieve an effect that involves lighter and heavier yarns together then ignore everything I've just said! However, if you are mixing up your yarn weights, you may need to experiment a bit more with needle/crochet hook size to get the effect you are seeking.
Note: There doesn't seem to be a standard set of measures for wpi so I've compiled this table from two different sources. The key thing is not so much geting a perfect measure of your own yarn, but ensuring a similar wpi result for all your selected magic ball yarns. If you are creating a magic ball without a particular pattern in mind then matching yarn weights in your magic ball will ensure that you have plenty of options available to you when you do start looking around for a good pattern. Fiona Oliver 2015
Yarn Composition
How lucky we are to be living in a time when we have so many choices of yarn for our creative endeavours. We can go down the fully natural route with a range of animal and plant fibres on offer, or step into the modern era and choose from an exotic array of man made fibres, or even take a bet each way and play with blended fibres. If you have a specific project in mind then this should guide you in your fibre selection. For example, if you are knitting a light weight summer shawl then selecting from plant fibres like cotton, bamboo and soy, or blends containing these fibres may be perfect for you. If you are crocheting a snug baby's blanket then you'll probably be looking at machine washable animal fibres or blends containing animal fibres and man made fibres. If you do have a specific pattern in mind, there are a couple of other criteria you might want to consider as you select your yarns: The purpose of the finished item—for example, will it be worn close to the skin? You probably won't want to pick scratchy fibres if this is the case. The care regime for the finished item—does it need to be something that you can toss into the washing machine? You'll probably want to select easy care natural fibres and/or man made fibres in this situation. Alternatively, if the finished item is something that won't be washed regularly then a blend of yarn types plus a hand washing care regime will be fine. The type of stitch pattern you are likely to use—for example, if you are planning on a pattern that uses intricate stranded colour work then incorporating too many fuzzy or bouclé yarns could obscure your beautiful stitch work. Similarly, if you are planning on a project that has plenty of texture details then using a variety of yarn finishes ranging from smooth to fluffy to nubby could add some lovely additional effects to your project. The finishing requirements of the item—for example, if you are making a lace shawl that will need to be stretched and blocked, you may not want to include too many man made fibres as these don't block particularly well. No particular project in mind? No worries, this is the perfect situation where you can create a magic ball that is an exciting blend of fibre types and then once you are finished you can let the ball's unique beauty and features guide you in your project selection.
Oops, what should you do when you don't know the fibre content of your yarn? Yes, the missing label problem strikes again! There are two main techniques that you can use to figure out the fibre content of your mystery yarns: 1. The burn test—this test involves burning a strand of yarn and observing how it burns, how the flame is extinguished, the smell as the yarn burns and the end product after burning. It is very important that you do the burn test in a well-ventilated area and that you hold the yarn being tested with tweezers. You should also perform the test over a tough surface (e.g. stainless steel bench top) and have a bowl of water handy so that you can quickly extinguish any yarns that flame and burn very quickly. An apron, gloves and eye protection are a good safety precaution when doing these tests. 2. The bleach testthis test involves immersing your mystery yarn in pure bleach and leaving it there for several hours. Natural animal fibres will dissolve completely whereas plant fibres and artificial fibres will degrade but not be destroyed. Once again it is important that you perform this test in a well-ventilated area. As above, an apron, gloves and eye protection are also a good idea. When the test is finished you should dispose of the remaining pure bleach carefully. Please check out the References Section for further links to resources about these two tests.
Yarn Colour
"There are no lines in nature, only areas of colour, one against another." (Edouard Manet) Never were truer words spoken and I think the chance to play with colour is one of the reasons why I like magic ball knitting so much. There are two schools of thought on colour schemes for magic ball kniting: The totally random approach—just use whatever colours you have and blend them together in a random rainbow of colours. The curated approach—start with a colour scheme in mind, curate your yarn stash and only use those yarns that fit in with your colour scheme. My personal preference is to curate my magic ball colour scheme so that I can be fairly confident that my finished product will match my expectations. However, I've seen some gorgeous random colour scheme projects online. One thing I've noticed with random colour scheme projects is that the most successful ones have teamed their random colours with a good neutral solid colour, which helps to tie everything together.
The totally random approach
OK, so let's be honest here. We all have our favourite colours and there is a good chance that our stash and oddment balls will reflect this. So "totally random" in this situation may not be as random as we think. Similarly, even if we have a nice colourful bag of yarn to draw upon, we are probably going to be tempted to select our next yarn to join in because we think it will go nicely with the previous strand. This is not a problem; in fact this approach will still produce a lovely magic ball. However, if you want to go totally random then you need to take four simple steps. 1. Start with a good blend of coloursif your own stash is a bit colour blind in a couple of areas you might want to hold a magic ball party with some friends and access some of their stash colours. More on magic ball parties later. 2. Cut your yarns to your desired lengths-more on yarn lengths later. Pop your yarn strands into a big bag. I like to use zip lock bags to keep the bugs out. 3. Close your eyes and select a strand—yep, take a leap of faith and fasten whatever you have chosen to the previous strand. 4. Repeat step 3 until your magic ball is finished. If you are planning on using a solid neutral colour to tie your random colours together, you might want to wait until you have finished your magic ball before choosing your matching neutral colour. Neutral colours are generally black, grey, white, beige and brown.
The curated approach
If you decide to take the curated approach to your magic ball colours then you will need to think about two dimensions of your colour scheme: The overall colour scheme you plan to use; and How you will blend your different colours Selecting an overall colour scheme can be a lot of fun. If you already have a good sense of colour you can take the intuitive approach and just move your source yarns around, holding different colours together until you come up with a blend of colours that is pleasing to your eye.
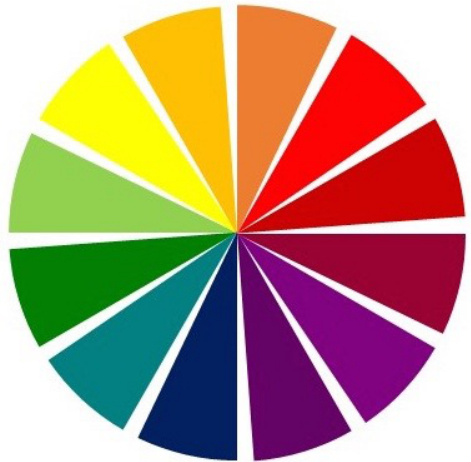
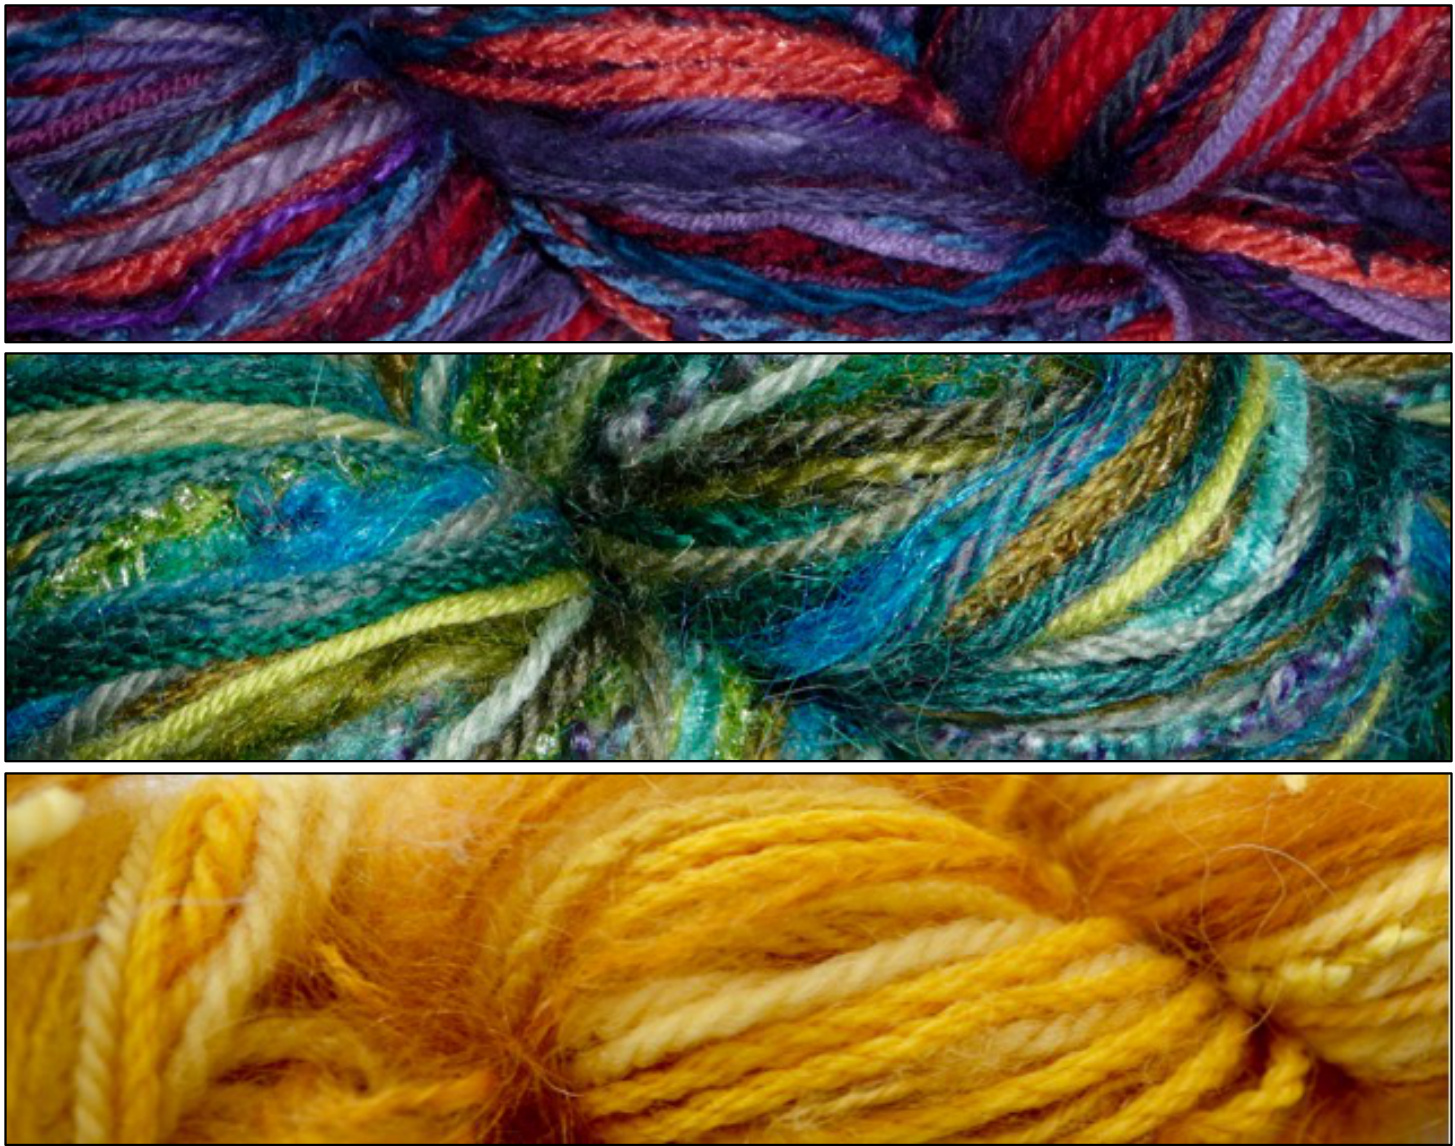
If you want to take a more scientific approach, you can draw on colour theory to help you pull together a pleasing colour palette for your project. I've included a link in the References Section to a good summary about colour theory. Using your colour wheel as your starting point, you can build some gorgeous colour palettes. Monochromatic Colour Palettes-this palette is made up of lots of different shades of the same colour. For example, a yellow colour palette.

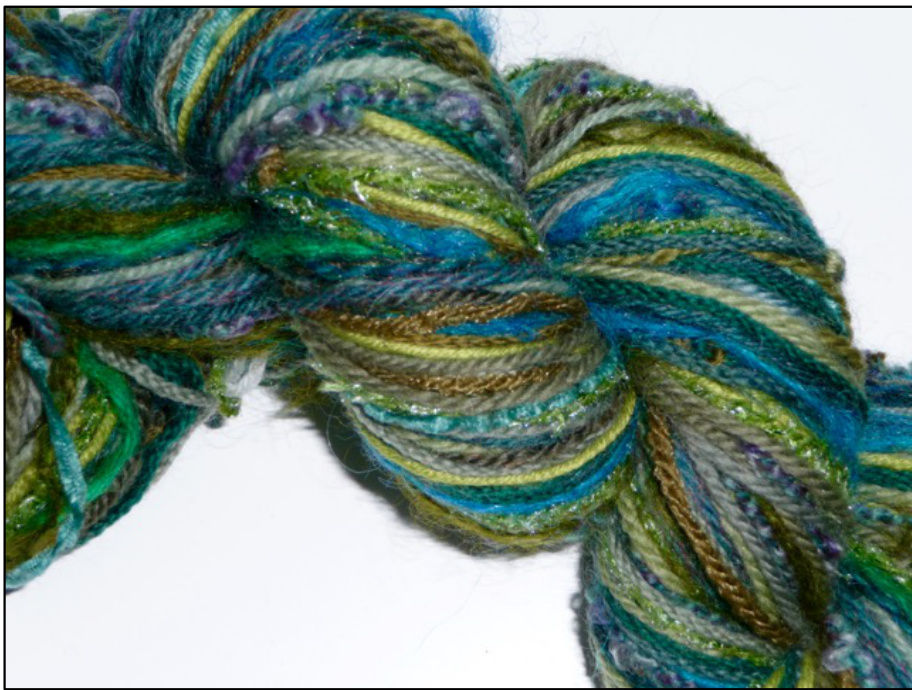
Analogous Colour Palettes-this palette is made up of three or more colours that sit next to each other on the colour wheel. For example, a yellow-green, yellow, orange-yellow colour palette.

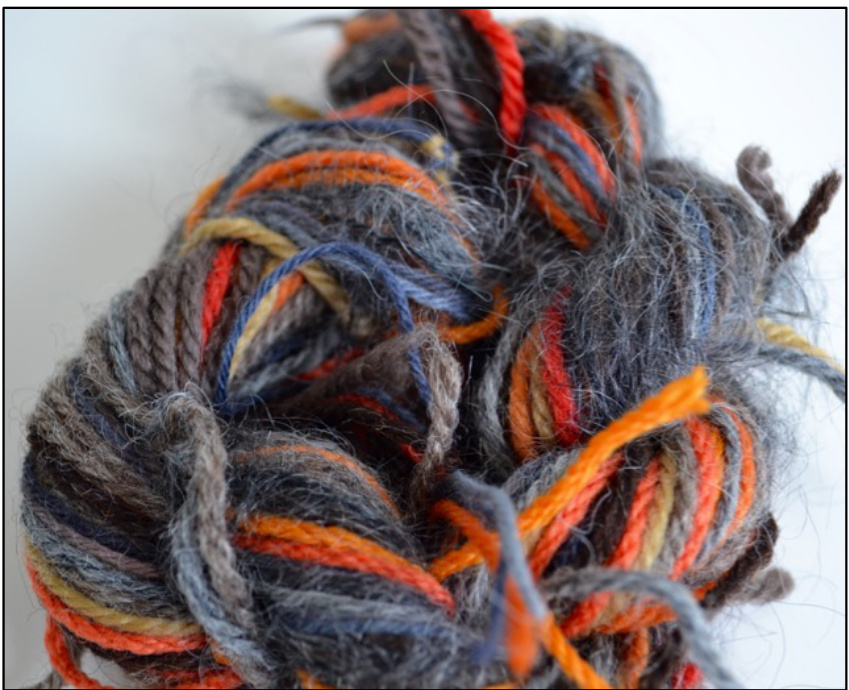
Complementary Colour Palettes-this palette is made up of shades of two colours that are opposite each other on the colour wheel. For example, a blue and orange colour palette.

Split Complementary Colour Palettes-this palette is similar to a complementary palette but instead of using the opposite colour on the colour wheel, you use the two colours either side of the opposite colour. For example, a red, blue-green and yellow-green palette.

Triadic Colour Palettes-this palette is made up of three colours that are equidistant on the colour wheel. For example, violet, orange and green.

Tetrad Colour Palettesthis palette is made up of four colours comprising two pairs of complementary colours. For example, red, green, orange-yellow and blue-violet.

Of course, you might just want to keep things simple and opt for either a cool colours or a warm colours palette. Cool colours range from yellow-green to violet and warm colours range from yellow to red-violet on the colour wheel. You can add extra colour to your magic ball by including yarns that are lighter (tints), dustier (tones) or darker (shades) to the colours that are in your palette. You might also decide to have a magic ball that is made up of mostly light, dusty or shaded colours. Pairing this sort of magic ball with a brighter or darker contrasting solid colour will give your project an extra zing.
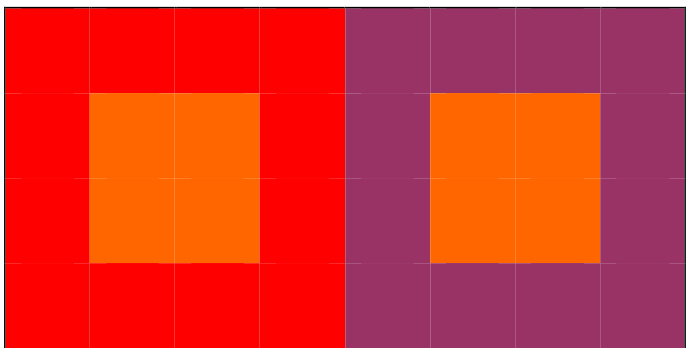
The way that you blend your colours (colour context) will help add visual colour variety to your magic ball and your finished project because our eyes always interpret colour in context. In the colour squares above, the central orange sections are actually the same colour. However, because of the different colour context, the orange square on the left appears paler and duller than the one on the right. From a magic ball perspective, colour context will give you extra bang for your buck even though you may not have a lot of colours to play with. Just by mixing up the colour contexts you'll be visually adding new and subtle shades to your magic ball.

Finding colour inspiration
If your inner artist is feeling a little rusty, you may want to seek external inspiration for your colour scheme. In my experience, you can't beat a gorgeous photo as a great place to start. And what's more, there are some terrific online resources to help you design a colour palette from your photo. I've included links to a couple of sites I like to use in the References Section. For example, I've generated a colour palette from my photo of a beautiful display of flowers and an interesting stone wall. Hmm, not sure if your stash can work with your preferred palette? More on expanding your yarn options later on.
Yarn Lengths
When people ask me about the best yarn lengths for a magic ball, my answer is always "It depends ..."'. Some of the variables that you need to consider when thinking about yarn lengths include: The requirements of the project, assuming you are building your magic ball for a specific project. For example, if the project requires wide stripes in multiple colours then you will need longer yarn lengths for each colour. If you are aiming for a more blended, multi-dye style then your yarn lengths will be shorter and more variable. The number of colours and yarns that you have available. For example, if you don't have many colours available, you might want to work with shorter lengths so that you can mix things up a bit more. Your boredom threshold when it comes to doing lots of yarn joins. Let's face it, tying lots of knots in shorter lengths of yarns might just be too tedious for you, in which case opt for longer yarn lengths. The colour palette you have chosen. For example, if you are building a magic ball tha1 is primarily shades of blue with the odd pop of orange, you might want to use longer yarn lengths for the blue shades and short lengths for the orange shades. This will ensure that the orange stitches will really pop. Not sure what you are going to use your magic ball for? In this case I would suggest that you mix up your yarn lengths, with lengths ranging from 50 centimetres/20 inches to 1.5 metres/59 inches. This will give you a very versatile magic ball that you can use on a variety of different projects.
Yarn Joining Options
There are many different options for joining the yarn in your magic ball, and once again, your preferred method will depend on what you want to do with your magic ball. Based on my research, these are the common ways that yarn is joined for a magic ball. I've experimented with all these knots to identify their various advantages and disadvantages. Resources showing you how to create each of these knots are included in the References Section.
Overhand Knot
This knot can be used as a temporary or a permanent knot. As a temporary knot, it should be tied loosely so that it can be undone and the ends of the joined pieces of yarn can be woven in after a colour change has been made. This is the method that Kaffe Fassett uses for his complex stranded colour work. As a permanent knot, it needs to be tied tightly and works best with tails. This knot has a tendency to undo if the tails are trimmed off. Advantages as a temporary knot: Easy to tie quickly. Easy to undo. No knots in the finished fabric. Disadvantages as a temporary knot: Extra handling of the yarn when you undo the knot. Tails need to be woven in and neatened. Advantages as a permanent knot: Easy to tie quickly. The knot is quite small and is hard to see in textured patterns. Disadvantages as a permanent knot: Likely to unravel if tails are trimmed too closely to the knot. You can feel the knot in the finished fabric. Depending on the project, tails may need to be woven in and neatened.
Weaver's Knot
This knot is also known as a Sheet Bend and is used as a permanent knot. This knot is used to join two strands of unequal size, a common situation when crafting a magic ball. You can either leave the tails on your knot or you can trim them off close to the knot. This knot is very strong under tension, whether or not it has tails. However, it can easily unravel when not under tension if you have trimmed off the tails very closely. I have found that this knot works better with natural, slightly fuzzy fibres, especially if the tails are trimmed quite short (0.5 centimetres/% inch). With slippery man made fibres or natural fibres like silk or bamboo, you really need to leave a longer tail (1 centimetre/%2 inch) otherwise the knot may still unravel.
Advantages:
Easy to tie once you know how. Good for joining strands of unequal size. Strong under tension. The knot is quite small and will generally be difficult to see.
Disadvantages:
Fiddly to tie if you are using nubby or textured yarns. Likely to unravel if tails are trimmed too closely to the knot. You can feel the knot in the finished fabric. Easy to get wrong if you tighten the knot incorrectly. Depending on the project, tails may need to be woven in and neatened. Fiona Oliver 2015
Square Knot
This knot is also known as a Reef Knot and is used as a permanent knot. Most crafters are familiar with this knot because it is used in macramé. However, it can also be used to join two strands together. This knot is not very strong under tension compared to the other knots and will readily unravel if you trim off the tails too closely.
Advantages:
Easy to tie once you know how. Good for joining strands of unequal size. The knot is quite small and will generally be difficult to see.
Disadvantages:
Likely to unravel if you have trimmed off the tails too closely. You can feel the knot in the finished fabric. Depending on the project, tails may need to be woven in and neatened.
Fisherman's Knot
This knot also has a couple of other names and it is used as a permanent knot. It is also known as the Angler's Knot, English Knot and Halibut Knot. Whatever its name, this is the knot that is commonly cited as the preferred knot for magic ball construction. This knot is very strong under tension but works best with tails, even if they are only short tails. I have found that this knot, when the tails have been completely removed, can unravel once the knitted fabric is completed, presumably due to the backwards and forwards movement of a knitted fabric. It is very disheartening to discover a hole in your project caused by an unreliable knot so I would generally only use this knot with tails.
Advantages:
Easy to tie once you know how. Good for joining strands of unequal size. Strong under tension. The knot is quite small and will generally be difficult to see.
Disadvantages:
Likely to unravel if you have trimmed off the tails too closely. ? Fiddly to tie if you are using nubby or textured yarns. You can feel the knot in the finished fabric. Depending on the project, tails may need to be woven in and neatened.
Double Fisherman's Knot
I have found this permanent knot to be the most reliable knot when the tails are trimmed off right up to the knot. I have not yet managed to unravel this knot; no matter how much wiggling I do to it! This makes it ideal for projects where the knitted fabric is in a garment or an accessory and therefore the yarn strands move around a lot against each other. However, it does produce a bigger knot that is easier to see, which means that it is not really suitable for stocking/stockinette stitch projects. It is marvellous for textured patterns and you can use it with or without tails.
Advantages:
Easy to tie once you know how. Good for joining strands of unequal size. Strong under tension. The knot will never unravel.
Disadvantages:
The knot is larger than any of the others. Fiddly to tie if you are using nubby or textured yarns. You can feel the knot in the finished fabric. Not really suitable for stocking/stockinette stitch patterns. Depending on the project, tails may need to be woven in and neatened.
To Tail or Not to Tail
The decision about whether or not to leave tails on your knots is ... a knotty one (). If your project is going to have a right side (i.e. visible in public) and a wrong side (i.e. not visible in public) then there is no reason for you not to leave tails on your knots and then trim the tails to the desired length once your project is finished, or, if you wish, weave in the ends of your tails as you go or when you are finished. Any of the knots described above would be suitable for this type of use. Another lovely feature of leaving your tails on is that it makes it easier for you to bump your knots through to the wrong side. Also, if your fibre choice is primarily proteinbased fibres, then over time your knot tails will lightly felt into the wrong side of your fabric and beless obvious. If both sides of your project are going to be visible in public (e.g. a Mobius cowl) then unless tails are part of the design aesthetic, you'll probably want to choose a knot with no tails. For reliability and durability, my pick in this situation would be the Double Fisherman's Knot, although the slightly larger size of the knot will influence your stitch pattern choices.
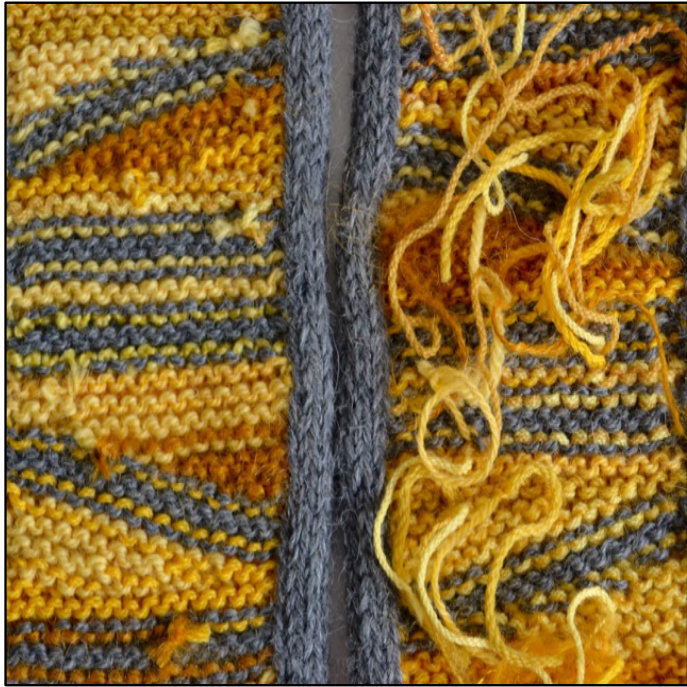
If tails are part of the design aesthetic (e.g. part of a shaggy stripe in a scarf or stole) then experiment with your knots and select the one that produces tails lying in the direction that you prefer. All the knots, except the Overhand Knot, produce tails that tend to lie parallel to the main yarn strands. With the Overhand Knot, the tails lie at right angles to the main yarn strands and produce a tuftier effect. Don't have a project in mind yet but you still want to make a magic ball? My suggestion would be to use the Double Fisherman's Knot and leave the tails on. That way you have a few more options in future project choices. Just trim off those tails as you go if you decide to choose for the tailless knot option.
Sourcing your Yarns
If you've been knitting as long as I have then you'll have no problem in laying your hands on all sorts of leftover bits and bobs that you can use for your magic ball. However, you might also find that your stash can't quite deliver the mix of colours, fibre types or yarn weights that you Fiona Oliver 2015 would like, particularly if you have a particular project in mind. There are a several ways that you can remedy any deficiencies in your stash. 1. Hold a magic ball party and invite all your knitting buddies. Everyone brings a selection of oddball yarns and everyone gets to cut lengths off everybody else's stash. This will greatly expand your colour, fibre type and yarn weight options plus you have the added fun factor of the social aspect of the party. Other than supplying the refreshments this is a no-cost approach to improve your magic ball options. 2. Check out your local charity shops. Charity shops can be sources of magic ball yarn in two ways. If you're feeling super keen you can purchase used hand knitted garments and deconstruct them so that you can repurpose the yarn. Since your objective in making a magic ball is to use lengths of yarn, you can be quite brutal in cutting up and unravelling old garments for this use. You'll probably need to gently wash and dry your repurposed yarn to get the kinks out. The second alternative is to see what actual yarn you can find at your local charity shop. I've struck gold from time to time when someone has donated bags of yarn that they found gathering dust at the back of a cupboard. 3. Go oddball diving at your local yarn store. Most yarn stores have oddment bins where you can pick up balls that are the end of a dye lot or are a discontinued yarn. I must confess that oddball souvenirs form an important part of my holidays. If I don't come back with a couple of oddballs and a skein of sock yarn, then I've not been trying hardenough. 4. Dye your own yarn. I enjoy experimenting with dying my own yarn using food colouring and jelly crystals. There are plenty of resources online for how to do this. I've included some links in the References Section.
Creating and Using your Magic Ball
Phew! It's taken a while but we're finally at the point of constructing a magic ball. You've chosen your yarn, you've cut your lengths, you've selected your knot so what happens next? Grab a pair of scissors and your bags/piles of yarn; pull up a comfy chair and start knotting. If you have opted for tails, keep them at about 7 centimetres/2 % inches so that you've got enough yarn to play with if you are weaving in ends. As your knotted yarn gets longer, you might decide to start rolling it into a ball. My suggestion is that you don't because this will make it harder to estimate the length of yarn in your magic ball. Instead you can wind your yarn around a measured length (e.g. the back of a chair) or a niddy noddy and then when you are finished, count the number of strands and multiply this by your known length. Et voila! You now know how much yarn you have in your magic ball. 1 picked up this tip from Clara Parkes in her Craftsy.com course called Stashbusting and I think it's a brilliant idea.
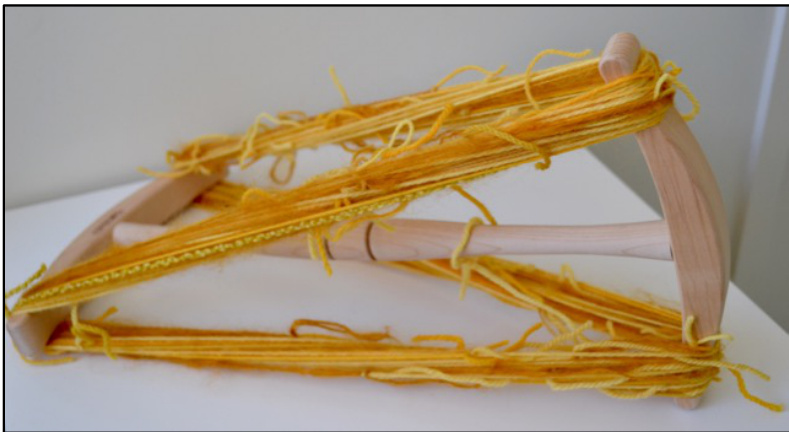
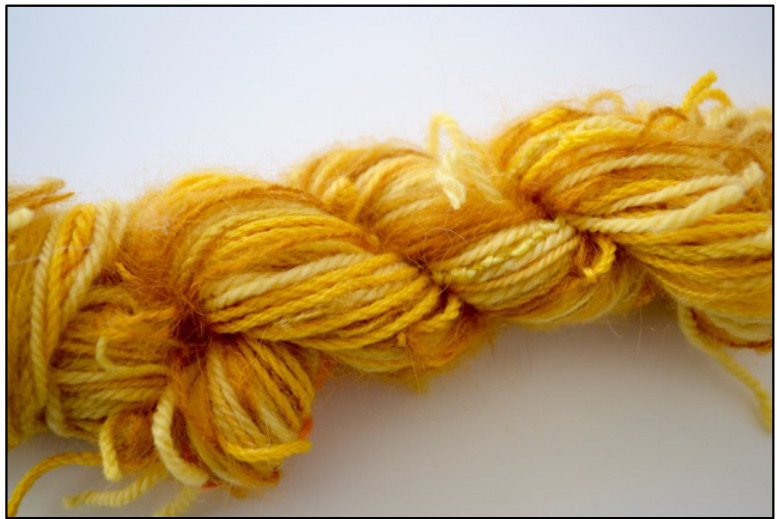
This picture shows my shades of yellow magic ball on my niddy noddy. One wrap on my niddy noddy equals 1.8 metres/l yard so once I've counted my strands, some simple multiplication with give me an estimate of my length. I also like to weigh my magic ball (either in a skein or a ball) so that I can estimate the average length per gram. The other thing that I love about using my niddy noddy is that I can see how my colour palette is developing and I can manipulate my strand choices if I think one colour is dominating too much. And of course, once I'm satisfied that I've got roughly the right length, I can take my hank off the niddy noddy and twist it into a beautiful skein.
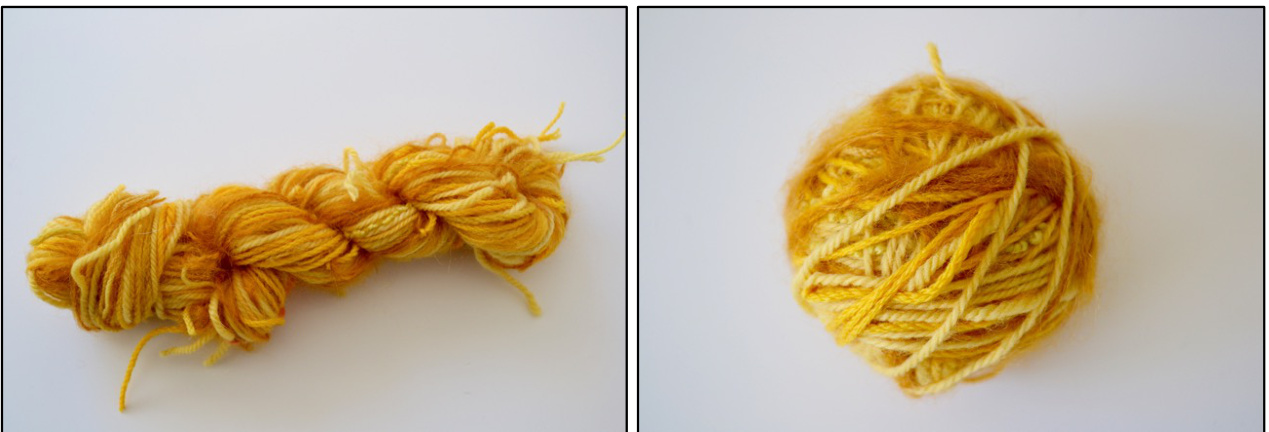
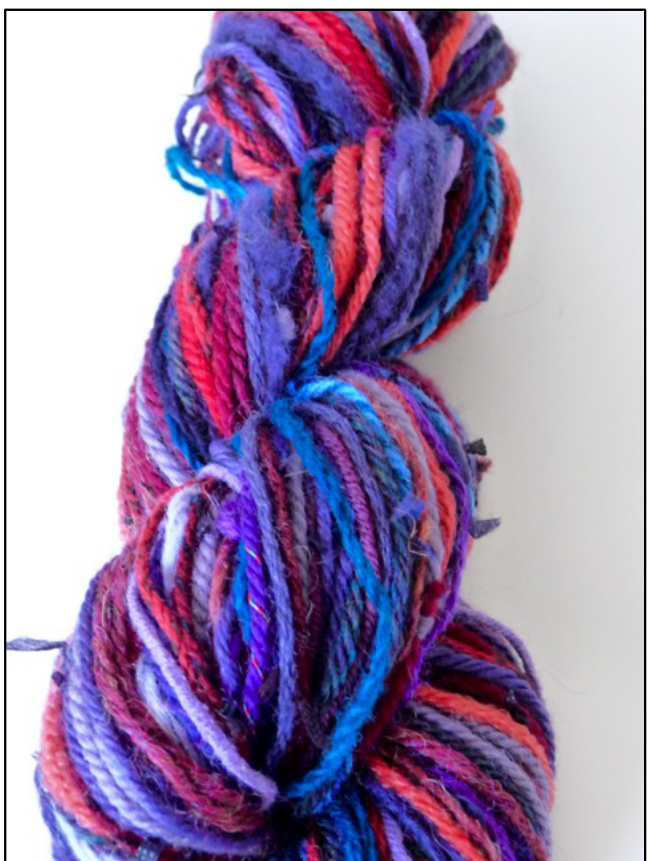
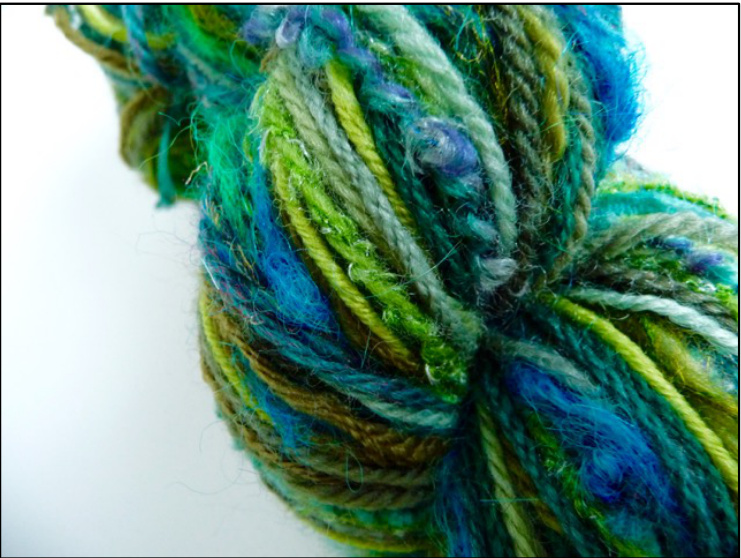
I prefer to store my magic balls as skeins as this gives me a better view of the colours and yarns that I have chosen. In a ball, you only get to see the outer layers. This picture shows a hand wound magic ball, but it is very easy to wind your magic ball on a ball winder, provided that you don't have long tails. From my experience, it's better to wind your magic ball a little slower than usual, just in case those tails get tangled.
Capturing the vital attributes of your magic ball
Unless you are going to use your magic ball straight away, there is real benefit in capturing the vital attributes of your magic ball and storing this information together with your gorgeous creation. I like to capture the following information: 1. Date of creation-this will help me know how long I've been hoarding my magic balls. 2. Choice of knotthis will help me with stitch pattern choice and also with project choice. 3. Colour palette—this is important if I've wound my skein into a ball and I can't see what the interior colours might be. It is also helpful if I want to pair my magic ball with a neutral colour. 4. Yarn composition—I like to keep this fairly simple; all natural, all man made, blended. I also include some care suggestions here as well. 5. Strand lengths—generally I'll just include information about average strand length unless I've tied a magic ball that has a particular strand length sequence. 6. Estimated length—I capture this in both metres and yards. 7. Weight-I capture this in grams so that if I need to I can estimate metres per gram. I've included a one-page vital statistics template at the end of this document that you can photocopy/print and use for your own magic balls.
Choosing the right stitch pattern
Now the fun really begins! There are so many options for what you can create with your magic ball. I'm mostly a knitter so that is what drives my choices. However, magic balls work just as well for crocheting and weaving. Don't let me cramp your style, but as a knitter these are the things that I think about when I'm choosing a project and thinking about stitch patterns. I've made passing reference to some of these things earlier in the document. Smooth versus textured stitch patterns—I really love textured stitch patterns so I tend to lean in that direction, partly because you can easily hide a knot in a textured pattern. I also really like slipped stitch patterns as these help the colours in a magic ball really pop. Many of the knots are less suitable for smooth stitch patterns, but with the right knot, a stocking/stockinette based stitch pattern will also blossom. Incorporating a solid colour—the solid colour can either be a contrasting colour or a coordinating neutral colour. Both work really well and I've successfully used both approaches. Incorporating a solid colour can help tie your magic ball together and works particularly well with stripes and stranded colour work. Seaming options— if your project is going to include seams and your magic ball is a bit variable in yarn weight, you might want to consider grafting seams rather than stitching them, using three needle bind-offs, or making the seam a part of the design by putting it on the outside rather than the inside. Edging options-if your project is going to have a visible selvedge, then consider some edge-finishing options that will smooth out any variability in yarn weight. I'm a big fan of rolled i-cord edges and these are a great way to conceal any bumpiness on a selvedge. I also like slipping the last stitch in a row with the yarn in front.
Swatch, swatch, swatch
Not sure how your magic ball will look in your project? Then just knit/crochet a swatch, wash and block it and honestly review the result. Happy with the result? Excellent, make a start now! Not happy with the result? You might need to tinker with a few things until you are happy to proceed. For example: Go up or down a needle size if the fabric feels too floppy or too stiff. Use a different solid colour if your magic ball isn't singing. Change your stitch pattern. Pick a different project that better matches the fabric that you have produced. Swatching is also important if your finished project needs to match some specific finished dimensions.
Thank You!
Thank you for reading my little thesis on creating magic balls. I hope that you have enjoyed exploring the process with me and that you now feel confident to create your own magic balls in order to create beautiful things for yourself, your family and friends. And most importantly, make a big dent in your stash! Happy knotting .
References
Identifying the fibre content of an unknown yarn
This is an excellent video by Cheryl Brunette where she works through a three-stage process for determining the fibre content of a range of yarns. She performs the burn test and the bleach test on her sample of yarns. https://www.youtube.com/watch?v=xXaOP30K8EM This page from the Vintage Fashion Guild also provides an excellent description of the burn test and includes a handy fibre burn chart to help you identify the content of your mystery fibre. http://vintagefashionguild.org/determining-fiber/
Colour theory
There are lots of colour theory and colour palette resources available online. Colormatters.com has some good information about colour theory. http://www.colormatters.com/color-and-design/basic-color-theory There are also some terrific online resources that you can use to generate colour palettes for yourself. I like and use the following colour palette generators: www.degraeve.com-—The colour palette generator on this site generates a colour palette when you add a link to an image on the Internet. It offers two palette optionsdull and bright. www.pictaculous.com—The colour palette generator on this site generates a colour palette from one of your own images/photos.
Knots
The Internet has numerous "how to" knot-tying resources. I've found www.animatedknots.com to be a very comprehensive resource that includes stills and video instructions. Wikipedia also includes simple, straightforward instructions as well as some interesting related facts and history.
Overhand Knot
http://www.animatedknots.com/overhand/index.php?LogoImage=LogoGrog.jpg&Web site=www.animatedknots.com https://en.wikipedia.org/wiki/Overhand_knot
Weaver's Knot
http://www.animatedknots.com/sheetbend/index.php?LogoImage=LogoGrog.jpg&We bsite=www.animatedknots.com https://en.wikipedia.org/wiki/Sheet_bend
Square Knot
http://www.animatedknots.com/reef/index.php?Logolmage=LogoGrog.jpg&Website= www.animatedknots.com https://en.wikipedia.org/wiki/Reef_knot
Fisherman's Knot
https://en.wikipedia.org/wiki/Fisherman%27s_knot
Double Fisherman's Knot
http://www.animatedknots.com/doublefishermans/index.php?Logolmage=LogoGrog.j pg&Website=www.animatedknots.com https://en.wikipedia.org/wiki/Double_fisherman%27s_knot
Dying your Own Yarn
Rebecca Brown from Chemknits.com has the best set of "how to" videos for dying yarn using food colouring and KoolAid that I have found online. http://www.chemknits.com/search/label/Dyeing%20Recipes
Contact
capitalKNITS@icloud.com
Photo Credits
Fiona Oliver 2015. Please respect my copyright. Please do not distribute these images for commercial purposes without my permission.
Copyright
Fiona Oliver 2015. Please respect my copyright. Please do not distribute this pattern or use it, or items made with it, for commercial purposes without my permission. My Magic Ball Vital Attributes
| Creation Date | |
| Knot | |
| Colour Palette | |
| Yarn Composition | |
| Strand Lengths | |
| Estimated Length | |
| Measured Weight |
My Magic Ball Vital Attributes
| Creation Date | |
| Knot | |
| Colour Palette | |
| Yarn Composition | |
| Strand Lengths | |
| Estimated Length | |
| Measured Weight |


