Neville's sweater
I know this is a cardigan but I am going to continue calling it a sweater through this entire pattern. The pattern is on pgs 3-5 and either 6 or 7. Pages 1 and 2 are babbly notes you don't have to print.
To steek or not to steek...
The first thing I considered in the plan is whether or not I should steek this sweater. I made a little mini sweater to practice steeking (and also a hood, which I'd never done before; more on that later). On the sleeves, I did a machine sewn steek and on the front I did a crochet steek . There are a few rows on my chart that use three colors (more on that later). With a crochet steek, the third color isn't picked up so when it came time for cutting, there was one color that was cut without being secured. Sewing with my sewing machine on the armholes made the fabric bunch up and was difficult to get even. Neither one looked very good when cut. In the end, I decided to knit the cardigan flat and forget steeking altogether. I was a little relieved that I didn't have to invest so much time and yarn into a sweater only to find that cutting it didn't work. Also, it's easier to try on the sweater when it's knit flat. If you are comfortable with steeking, by all means give it a go! I just wanted to relate my experience in case you were on the fence about it.
Where did the chart come from?
At the time I started, there were only 2 official photos of Neville - the first is clearly a promotional photo where the sweater is crisp and predominately black and white; the second is during the final battle and is torn, ragged, and predominately grey and white. I found the biggest .jpeg of both those photos online and viewed them on my computer at 500% so I could count stitches. This was more fun than it sounds. I went back and forth between the two photos trying to get a sense of which colors to use. It's so hard to tell sometimes - grey and white; black and white; grey, black and white? After a while, I felt I was just going to drive myself crazy trying to get it right and left the chart as it was. Consequently, there are 6 rows that carry all 3 colors. I realize this is not standard practice in Fair Isle but it's what I decided to settle on anyway. I wanted a nice balance between all three colors and feel I achieved that. If you think it should be different, don't feel bad about changing the chart.
Why are there two charts?
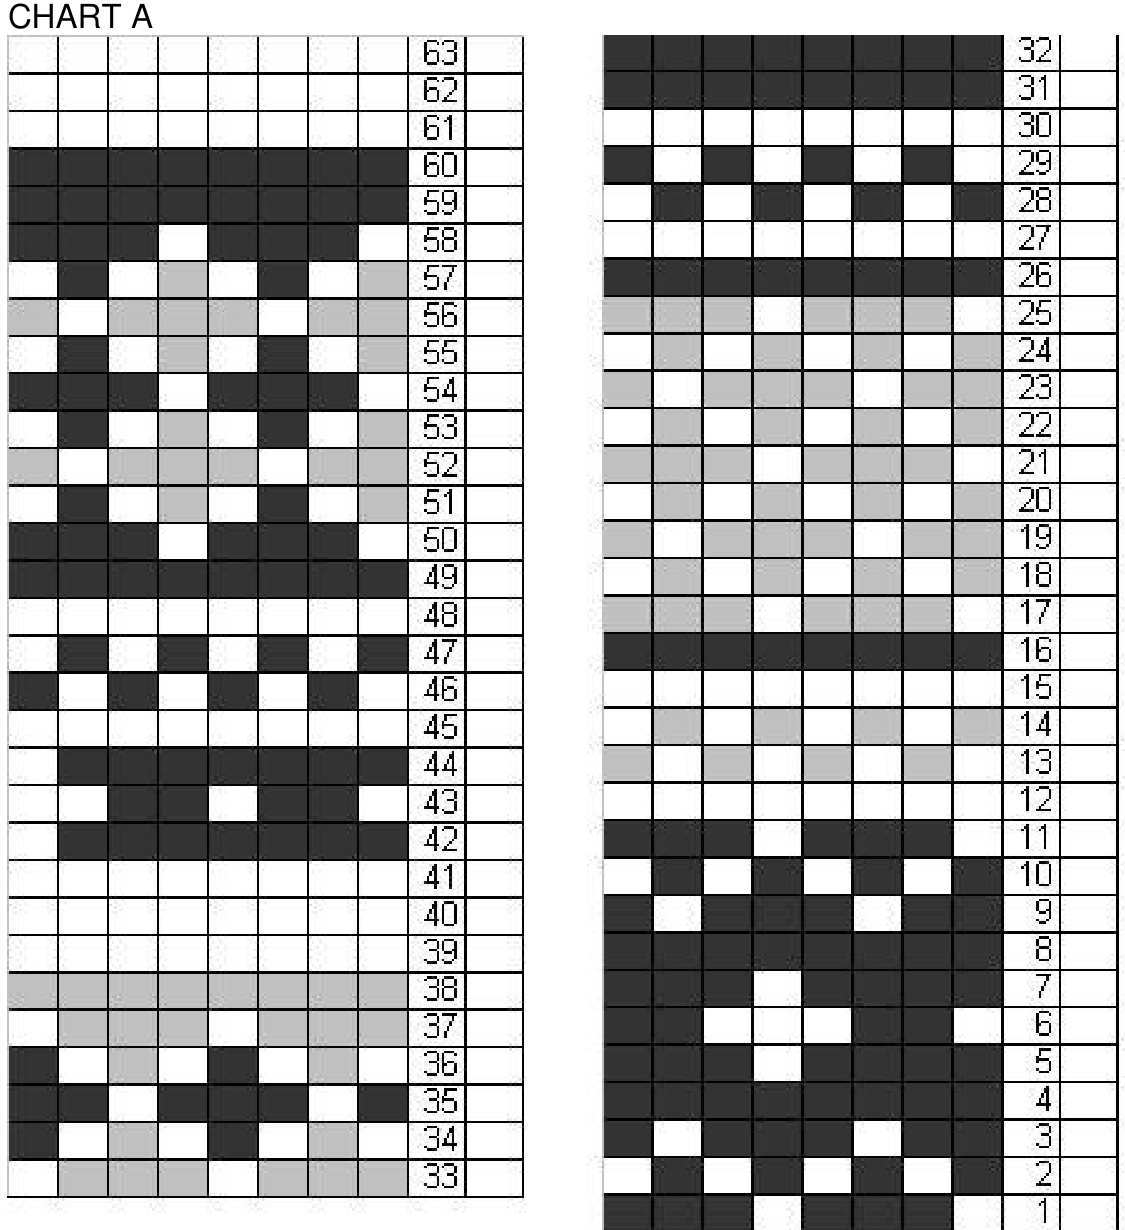
In the movie sweater, each block of color is two stitches wide and two rows tall. When I was copying it down, I found it faster to count and color each block of color in one square on my graph paper. Then when I saw the whole chart, I liked the smaller pattern better. The floats are not as long and the patterns are easier to memorize. My swatch should have clued me in but it wasn't until I was at the top of the sleeve (moving from knitting in the round to knitting flat) that I realized that knitting each row only once meant that I had to cut and restart yarns several times because sometimes you had to leave one color behind and now it's on the wrong edge. This means a lot of weaving in of ends (all told, I had nearly 300)! Also, if you knit each row of the chart twice, then there's no chart reading on the wrong side of your kniting - only repeating what's already on the needle (purl the whites with white, purl the blacks with black). So there are two charts - the smaller chart (Chart A) is the chart I actually knitted. Then, in case you didn't want to remember to double it on your own, I made a larger chart (Chart B) that is more like the movie sweater. Both charts have an empty column so that you can mark your increases. It'll help you match the second sleeve to the first, and the left front with the right front.
Where did you get your stitch counts?
I used the Knitter's Handy Book of Sweater Patterns by Ann Budd to get my numbers for casting on, decreasing, fronts, sleeves, and so on for this pattern. I am sometimes an idiot so I didn't think to consult the book until I was having trouble getting the sleeve cap right. And as it turns out, I stopped increasing too soon (so I had fewer stitches than the book called for) which made my upper arm a little snug. Luckily it still fit so I didn't have to re-do it but just know that the numbers I've written in the pattern are the numbers from the book (not my mistaken numbers) and so your finished sleeve will be a bit different - a little looser up top. The rest of the sweater uses those numbers and it turned out fine. Don't be afraid to add or remove length in sleeves or body to get a better fit!
How do I make a pocket?
First, make a pocket lining: Cast on 28 sts and knit for 36 rows (or roughly 5 inches, it's hard to measure because it curls so much) in stockinette. Transfer to a stitch holder and knit a second one (also putting it on a stitch holder). Leave a tail that is really long so you can use it to sew the pocket lining to the sweater when the time comes. As far as placing the pockets on the sweater, I chose to put them about 3 inches from each front edge. You can, of course, move your pockets closer or further from the edge. Just remember that you will be knitting a button band and that will add an additional inch or so to the fronts. If you would like a deeper pocket, you can knit more rows of your lining. When you've finished kniting the ribbing on the body, start knitting the chart. If you knit 36 rows for the pocket lining, then you'll be adding the pocket to the body on row 36 of the chart. If you made your lining 40 rows, then add the pocket on row 40. From the right side, knit 3 inches (18 sts) of the body. Move the next 28 sts to a stitch holder. Knit the 28 sts of the pocket lining (RS facing) and continue knitting the body. Count your stitches and place the other pocket lining on the left front to match. This will be a little awkward to knit. After about 6 or 8 rows, you can go ahead and sew the lining to the sweater. You can also pick up the 28 sts on the stitch holder and knit 2 x 2 ribbing for 5 or 6 rows. Then sew that little flap to the sweater and your pocket is done. You can, of course, wait until the sweater is done to finish the pocket. Finishing it sooner means you don't have stitch holders in the way and the sweater won't sag open where the pockets go.
A little bit about the hood.
This was my very first hood. Originally I wanted to double knit it so the lining would be done in one piece but I found the weight of the sweater distorted the stitches and it didn't look good. So there's a separate lining for the hood. When you pick up stitches for the button band, you'll insert your needle through both the hood and the lining and that will attach the two together. I made my lining the same number of rows as my hood when really I should have gone by measurement - the plain stockinette lining has a smaller gauge than the looser Fair Isle hood. But I wasn't going to knit any more so I stretched it to make it fit. I think it turned out fine. To make the hood, I left all of the center back sts live. I picked up sts on the right front, knit across the back, then picked up sts on the left front. A few rows later, I was on a solid colored row in the pattern and I used that opportunity to increase a bunch of sts to make the hood looser. It's easier to increase in a solid row rather than a pattern row. Then I just knit the hood straight up until it was tall enough and, with right sides together, worked a 3 needle bind-off. For the lining, I cast on the same number as for the hood. I knit it until it was long enough and did the same 3 needle bind-off.
How much yarn do I need?
I'm sorry to say that I don't really know. I made a size 44" sweater for my 6'3" husband. I used Cascade 220 super wash - 7 skeins of black (color 815), 4 skeins of cream (color 817), and 2 skeins of grey (color 900). I used about 2700 yards, leaving most of the last ball of black. There was very litle grey and cream left. This includes my tiny swatch and the random bits I had to pull out and throw away after frogging. I'm sorry I can't be more specific than that for the different sizes! I tried to write as many notes as possible here. If you have any questions, or suggestions to make the pattern better, please let me know. Sometimes I'm slow about answering but I'll do my best to help!
Directions
Gauge - 6 sts/inch, 7 rows/inch with size US 6 needles. See notes about yarn amounts. Finished bust size 36 (40, 44, 48) at 6 sts/inch. If your finished size is bigger or smaller than this, PM me on Ravelry and I'll send you the appropriate numbers. You'll also need 5 black %4" buttons Pocket lining - CO 28 sts and knit in stockinette for 36 rows. Move sts to stitch holder and knit a second lining. Set both linings aside for later. Leave long tails for sewing the lining to the sweater. Sleeves - With black, CO 56 (60, 60, 66). Place marker and join to knit in the round. Knit 2x2 ribbing for 18 rows. Begin working chart A on row 54, chart B on row 107 and at the same time: Increase 1 st on each side of the beginning of round marker every 4 rows 9 (18, 24, 23) times. Increase 1 st on each side of the beginning of round marker every 6 rows 10 (5, 2, 3) times. There will be 94 (106, 112, 118) sts. Work even until piece measures 16" (16.75", 17.5", 18.25"). Make note of what row you're on (to match the second sleeve). Shape cap - Working back and forth, BO 6 (6, 6, 7) sts at the beginning of the next 2 rows. At beginning of next 2 rows, BO 4 sts (all sizes). Decrease 1 st at each end of needle every RS row 4 (6, 6, 8) times. There will remain 66, 74, 80, 80 sts. 48" size only - decrease 1 st at each end of needle every for rows 4 times All sizes - decrease 1 st at each end of needle every RS row 10 (9, 9, 2) times. BO 2 sts at beginning of next 6 (10, 12, 2) rows. BO 3 sts at beginning of next 4 (4, 4, 12) rows. There will remain 22 (24, 26, 28) sts. BO all remaining sts. Body - With black, CO 216 (240, 264, 288), This is 54 (60, 66, 72) for each front and 108 (120, 132, 144) for the back. Place st markers to make shaping the armholes easier later on. Work 2 x 2 rib for 12 rows. Begin both charts on row 1 and work until piece measures 13" (13.5", 15", 15.5"). Don't forget to add your pocket lining on row 36. End with a wrong side row. Make note of what row you're on Divide for fronts and back - Front (right and left, knit separately) - Shape armholes AND v-neck (When it came time for these decreases, I put stitch markers in where I would stop decreasing as a reminder to stop.) At armhole edge of next RS row, BO 6 (6, 6, 7) sts. At armhole edge of next RS row BO 4 sts (all sizes). Decrease 1 st at armhole edge every RS row 4 (6, 6, 8) times.
AT THE SAME TIME
Decrease 1 st at neck edge every RS row 18 (18, 19, 24) times. Then decrease 1 st at neck edge every 4 rows 1 (2, 2, 0) times. There will remain 21 (24, 29, 29) sts. Work even until armhole measures 8.5" (9.5", 10", 10.5"). Make note of what row you're on Shape Shoulders At beginning of next 2 rows B0 7 (8, 10, 10) sts. At beginning of next 2 rows BO 7 (8, 10, 10) sts. At beginning of next 2 rows BO 7 (8, 9, 10) sts. At beginning of next 2 rows, BO 6 (6, 6, 7) sts At beginning of next 2 rows, BO 4 sts (all sizes). Decrease 1 st at each on of needle every RS row 4 (6, 6, 8) times. There remains 80 (88, 100, 106) sts. Continue even until armholes measure 8.5" (9.5", 10", 10.5"). Make sure you're on the same row as shaping for the fronts ShapeShoulders At beginning of next 2 rows BO 7 (8, 10, 10) sts. At beginning of next 2 rows BO 7 (8, 10, 10) sts. At beginning of next 2 rows B0 7 (8, 9, 10) sts. Move remaining sts (neck) 38 (40, 42, 48) to a stitch holder for the hood. At this point, I went ahead and seamed the shoulders and sleeves so the sweater could be tried on. If something doesn't fit, it's easier to fix now, before knitting the hood. On the other hand, the sweater is big and the sleeves sort of get in the way while knitting the hood. So you can make the decision to sew in the sleeves before or after doing the hood. Hood - Beginning on the right front (and continuing to work in pattern), pick up sts beginning 3 inches from the live neck sts. Knit those 3 inches, across the neck sts, and then pick up and knit 3 more inches. When you're at a good time for increasing, \*k4, M1\* across the row. Now just knit until your hood is tall enough. I know that's really vague but I've never made a hood before and don't really have a lot of guidelines. I measured my husband from shoulder to the center of the top of his head and used that as a rough estimate. It worked rather well. When your hood is tall enough, turn right sides together and work a 3 needle bind-off. Once you've done the increase round (and know how many sts you need), you can cast on the hood lining. I found that the sweater wasn't very portable at this point and having the lining to work on while out and about was really great. Knit the lining in stockinette to the same measurements as the hood. When it's long enough, turn right sides together and work a 3 needle bind-off. million ends. Some light blocking will make picking up the button band easie Button band - with black, from the RS, pick up sts along the right front, hood, and left front. When you pick up sts for the hood, pin the lining inside (wrong sides together) and pick up sts by inserting your needle through both the hood and the lining. When you've picked up all the sts, purl back. Knit one row, purl one row, knit one row, purl one row. On the next row (RS), you'll need to mark your buttonholes. It's left front for boys, right front for girls. Put a safety pin on the needle about 1.5 inches from the bottom, a second pin where the v-neck starts, a third pin in the middle, a fourth pin between pins 1 and 3, and a fifth pin between pins 2 and 3. Count your sts between pins and adjust them so that they are evenly spaced. Knit to the safety pin and yo, k2tog to make a buttonhole. Exchange the safety pin for a st marker. Purl one row, knit one row, purl one row, knit one row. Knit one row on the wrong side for a turning row. Knit one row, purl one row, knit one row, purl one row. Work another buttonhole round - yo, k2tog where your st markers are. Purl one row, knit one row, purl one row, knit one row, purl one row, loosely bind off. Fold the button band in half and loosely sew it to the sweater. When you get to the hood, pullit a litle so it covers the row where you picked up sts. I didn't do that b/c I wasn't thinking and now Ill have to go back and fix it one day. When you get to a button hole, use your yarn to reinforce it and sew the 2 layers together. Weave in those last ends and block. hope everything went well and if you have problems, feel free to contact me