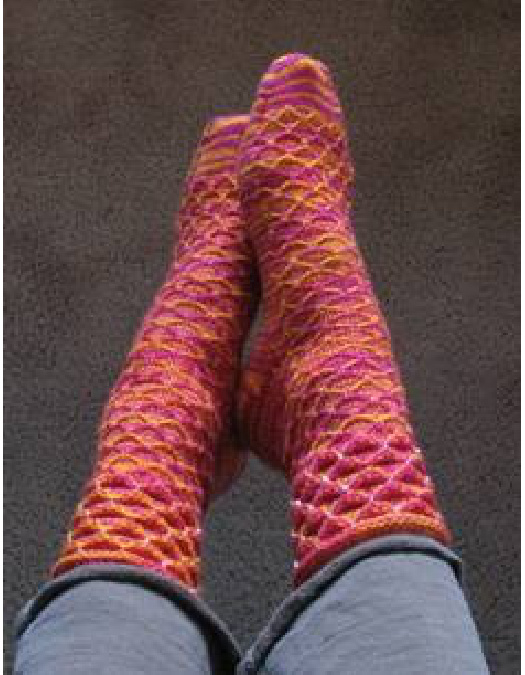
Dimpled Diamonds Socks
-- Or “Slip, Dip, Gather & Tuck”’ -- By Deborah Swift, Mountain Mom Designs ForSockMadness2009 $@2009$
Materials
100 grams fingering-weight sock yarn, esp. well-suited for a variegated yarn (I used Lorna's Laces \*Shepherd Sock" Sassy Stripes; $80\%$ superwash wool, $20\%$ nylon; approx 215 yds; 50 grams; 2 skeins). Two $24^{\circ}$ (or longer) circular needle(s) in $2.5\;\mathrm{mm}$ (US size $1\ \%$ AND two $24^{\circ}$ (or longer) circs in $2.0\;\mathrm{mm}$ (US size 0) Choose needle sizes that get you stitch & row GAUGE!
Gauge
8.5 stitches and 11 rounds per inch in stockinette on larger ndl; a snug 8.75 sts & 13 rds per inch on smaller ndl. ROW GAUGE is important in this pattern.
Size
Ladies medium/wide - 8 1/4" sock fits foot to $9\,1/2^{\circ}$ (narrow/medium - 7 1/2” sock fits foot to $8\,1/2^{\circ}$ [Photos are of narrow with added beads in cuff, on size $7~\%\,\mathrm{A/B}$ foot.]
Overview
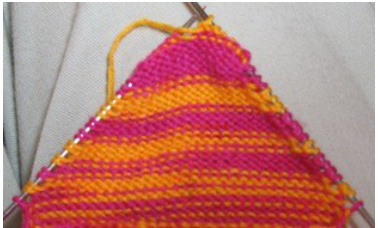
This sock is worked toe-up, with a flat? toe and short-row heel of the Priscilla Gibson-Roberts type. The 2 pattern stitches used both involve decorative slip stitches, the strands from which are picked up several rounds later, forming scallops. A second set of scallops, offset from the first, produces the diamonds. Instructions are written for $^{\ast2}$ cires\*, because you need 2 different sizes simultaneously, one $1/4\mathrm{~-~}\%\mathrm{~mm}$ smaller than the other, for much of the sock. Why? In the slip-stitch pattern you'll be using on the instep, one out of every 4 rds consists mostly of slipped sts, making the instep quite a bit shorter than the sole; tighter row-gauge on sole can compensate fo this. Tip for nice fabric: Don't pull your slipped-stitch strands tight; leave them loose like the floats on the back of stranded color-work. Stretch your slipped stitches out on the right needle when you're about to knit the anchoring stitch between slips, to keep the strand across the front loose but neat.
Abbreviations
Circ $=$ circular needle ${\mathrm{Dpn}}(\mathrm{s})=$ double-pointed needle(s) ${\mathrm{Ndl}}({\mathrm{s}})=$ needle(s) Dec $=$ decrease Inc $=$ increase $\mathrm{K}=\mathrm{knit}$ $\ensuremath{\mathrm{P}}=\ensuremath{\mathrm{purl}}$ eor $=$ end of round $\operatorname{Rd}(\mathbf{s})=$ round(s) $\operatorname{St}(\mathbf{s})=$ stitch(es) $\mathrm{LN}=$ left hand ndl $\mathrm{RN}=$ right hand ndl $\mathrm{RS}=$ right side $\mathrm{WS=}$ wrong side $\mathrm{K}2\mathrm{tog}=1$ knit two together $\mathrm{k}3\mathrm{tog}=$ knit three together tbl $=$ through the back loop of the st ${\mathrm{Kfb}}={\mathrm{knit}}$ intothe front and then the hack ofthe next st Ret $=$ return a stitch from RN back to the LN, without twisting it ${\mathrm{Ret}}({\mathrm{tw}})=$ return a st to LN twisted, by inserting LN's tip into the front of the RN's st from right to left and pulling the st off RN (actually we will be doing this to untwist a stitch that is backwards on the needle) $\operatorname{Sl}(\mathbf{k})=$ slip next st from LN to RN as if to knit, without working the st. This twists the st. $\operatorname{Sl}({\mathfrak{p}})=$ slip next st from LN to RN as if to purl, without working the st. St is not twisted. $\mathrm{SSK=Sl(k)}$ , sl(k), insert LN tip into fronts of these 2 sts from L to R and k2tog $\mathrm{SSSK=}$ same as above, but slipping 3 sts individually instead of 2 $\mathrm{SSP=Sl(k)}$ , $\mathrm{sl}(\mathbf{k})$ , ret 2 one-at-a-time, p2tog by taking the RN tip behind, entering the back of the 2 loops from L to R, and purling them together from that position $\mathrm{SSSP=}$ same procedure as SSP, but with 3 sts instead of2 wyif $=$ with yarn in front $\mathrm{YO}=$ yarn over, bringing yarn between needle tips and over RN from front to back $\mathrm{{bYO=}}$ backward YO, bringing yarn over RN from back to front
Special Techniques / References
Judy's Magic Cast-on http://www.knitty.com/ISSUEspring06/FEATmagiccaston.html Short-row Heel with YO's, a la Priscilla Gibson-Roberts, from Simple Socks: Plain & Fancy, pp. 39-42. My own, 3-part demonstration of this technique may be viewed on YouTube: Part 1: http://www.youtube.com/watch?v=-cZ8xLm0As4 (starting & turning) Part 2: http:/www.youtube.com/watch?v=16AcRDka rE (midle, more turning) Part 3: http://www.youtube.com/watch?v=veFX-hyCDp4 (completing) http:/knity.com/ISSUEwinter02/FEATtiptoptoes.html http://nonaknits.typepad.com/nonaknits/2005/04/yarn_over_short.html Sewn Casting-off: Elizabeth Zimmermann, Knitting Without Tears, (Fireside, 1995), p. 23. Quilted Lattice: Barbara G. Walker, A Treasury of Knitting Patterns, (Schoolhouse Press, 1998), p. 102 Dimple Stitch: Barbara Walker, A Second Treasury of Knitting Patterns (Schoolhouse Press, 1998), p. 25. Commentary and Notes are in contrasting color, to separate them from instructions.
Instructions
Holding your smaller-size ndl above your larger one, cast on 22 sts using Judy's Magic Cast-On (11 sts on each ndl tip). Yarn tail marks the beginning of the round, so pull it to RS after rd 1 or 2. Note: Casting on withJudy's method, as described in the knity article, yields “backwards”loops on the top (or sole) ndl. Therefore, we'll need to treat them a bit differently - see Toe Rd I, below.
Toe
Inc at 4 points \*every\* round, begining with the very first round, 3 times total, in this manner: iu1. 1U, 」v mowp 11U1, uu 1 Rd2: [k1, kfb, k to last 3 sts on ndl, kfb, k2],repeat on $2^{\mathrm{nd}}$ ndl. Rd 3: repeat rd 2. -- You should now have 34 stitches. Rd 4: knit even. Inc at 4 points \*every other\* round, alternating Rds 2 & 4above, eight (six)times, until 66 (58) sts.
Foot
- 33 sts on instep ndl, 3 sts on smaller sole ndl. Set up “Quilted Lattice” slip-stitch pattern on instep as follows, sole sts knit plain throughout foot: Rd 1: K7 (5), sl(p)3 wyif,k 1,[sl(p)5 wyif, k] twice, s(p)3 wyif, k7 (5). Rd 2: Knit plain. Rd 3: K7 (5), [dip RN tip under loose strand and k next st, bringing new st out under strand, k5]x4, k2 (0). Rd 4: Knit plain. [Looks like --- / / /---, so I call these rds "W-set'.] The plain rds are very important! If you accidently skip them, your diamonds will be squat, not square, and this pattern is a bit tricky to unknit. [Guess how I know. ] Work another, but wider, W-set: Rd 5: K4 (2), sl(p)3 wyif, k1, [sl(p)5wyif, k1]x3, sl(p)3 wyif, k4 (2). Rd 6: knit plain. Rd 7: k4 (2),[dip & k next st under loose strand, k5]x4, dip-&-tuck 1, k4 (2). Rd 8: knit plain. [ --- /\ /< /< /---1 Notice that the “touch-down”"' sts of rd 5 are directly above the tuck sts from last set, and that your new tucks are just above last set's anchor sts, yielding nice, square diamonds. Now work an M-set. [will look like M's; allslip 5's] Rd 9: ± k5 (3), [sl(p)5 wyif, k1 Jx4, k4 (2). Rd 10: knit plain. Rd 11: k7 (5),[dip & k next st under loose strand, k5]x4, k2 (0) more. Rd 12: knit plain. [ ---/\/\/\/\----] For the rest of the foot, repeat Rds 5 - 12, alternating W- and M-sets, until the sole measures final footlength - 2". Note that sole will be longer than instep; it's the sole-length that matters here. AT THE SAME TIME, add some arch-shaping thusly:
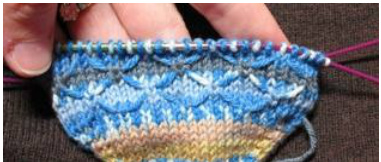
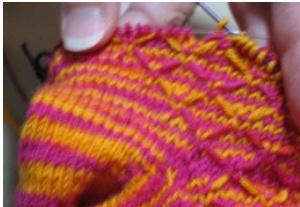
Atabout $5^{\circ}-5~\%^{\circ}$ long, inc 2 sts on the sole ndl, each positioned 2 in from an edge as in the toe, by kfb or another inc method of your choice. Repeat twice more, 4 rds apart. $33(29)+39(35)=72$ (64) sts. When you have reached required length, stop after completing the instep of a Rd 7 or Rd 1l (a tuck rd). Work a Short-row heel with YO's (instructional videos available on YouTube), on the 39 (35) sts of the sole, continuing to use the smaller-size ndl. Add in reinforcing nylon if you wish. 1.Knit acro allbut th last st onthe sole ndl; i., k38 (34). Leave the last st unworked. Tum hre. 2. Purl-side (WS)facing, bYO [that's a \*backward yarn-over"] and p37(33), stopping one st before the end of the ndl. Turn. 3. RS facing, YO and k36(32), one st fewer than before, stopping when you get to the paired $\mathrm{st/YO}$ of the previous row. [Recognizing this point is pretty crucial. You can see some “stitch-YO pairs" at the outer edges of ndls in the small inset photo, right.] Turn.
4.Continue this proces: YO (or bYO if on WS) at the beginning of each row; end row by working one st fewer than before, stopping at the paired st- YO of the previous row. 5. The back of the heel is complete when $\bf{\ast15}$ (13)\* plain sts remain between the YOs, including those in the newest pairs at the ends. The last turn should bring the RS facing. YO and work up to the first available YO at the far side. Adjust the stitch mount of the YO by $\mathrm{Sl}({\mathfrak{p}})$ and then ret(tw) [that's slip and then "“return twisted” - insert LN tip into slipped st from right to left, moving the stitch's front loop to the back as you return st to LN]. Then k2tog, joining the reoriented YO with the next st on the LN. This will divide that next st/YO pair, leaving a YO as the next st on the LN. Turn. 6.WSfaing,badul to thefirst availaleYn thefr sieofthe slJnthisYiththext on LN with an SSP. [That's slip $({\bf k}){\bf x}2$ , one at a time; return each slipped st to LN in this new orientation, take RH ndl behind LN and insert it from left to right through backs of $2^{\mathrm{nd}}$ st and then $1^{\mathrm{st}}$ st, purl tog from this position.] Turn. 7.RS facing, YO and knit to the first available YO on the far side. The next 2 loops on LN are both YOs. $\mathrm{Sl}({\mathfrak{p}})\mathrm{x}2$ ret(tw)x2 [i.e., “return twisted" 2 sts, one st at a time], k3tog, joining the 2 reoriented YOs with the next st on LN. Turn. 8.WS facing, bYO and purl to the first available YO on the far side. The next 2 loops on LN are YOs. Join these with the next st on LN with an SSSP [just like SSP, above, but with 3 sts instead of 2]. Turn. 9. Continue in this maner util the YOs of the hl-back have ben consumed in the decsof the heel-base. When you're about done there should be a single YO at each end of the heel ndl(s). On the last turn, the RS will be facing you. YO and knit across the heel nd(s) to the YO ending the far side. Sl(p) this st. Drop the heel ndl and pick up the instep ndl. With its tip, pick up a stitch in the gap between instep and heel ndls, placing the new st on the instep ndl. Move the just-slipped YO from the heel ndl to the instep ndl. Now k3tog to join the YO with the picked-up st and the first instep st. Work across the rest of the instep ndl in pattern (this will be a plain Rd 8 or Rd 12 - check where you left off), pausing before the last instep st. Sl(p) this last instep st. With RN, pick up a st in the gap between instep and heel ndls, placing the new st on the instep ndl. Look to the heel ndl and move the YO that's ahead of you at the end of the heel ndl onto the instep ndl. Join the final instep st with the picked-up st and this YO by SSSK. Heel is now complete, and we're back to working in the round on 72 (64) sts. You're positioned at trailing end of instep ndl. Ankle Where are you in the Quilted Lattice pattern? If you're on a rd 8, knit 19 (17) on sole and pause. Or, if you're on a rd 12, go on to work another W-set, rds 5 - 8, kniting 19(17) on sole of last rd. Pause. Place marker here: this is now the end-of-round (eor). Next st is now st #1 of each rd. Next, you'llbe working only W's for several sets, as you extend the pattern gradually around the entire circumference of the sock as follows: Rd 1: k21(17), sl(p)3 wyif, k1,[sl(p)5 wyif, k1]x4, sl(p)3 wyif, k to new eor at center-back. [Make sure your touch-down sts are lining up vertically with the tucks of your previous set - here and each time you expand the stitch-pattern. Tink back and correct your alignment, if needed. Medium size should touch-down at 5th st on instep ndl; narrow at $3^{\mathrm{rd}}$ st on instep.] Rd 2: Knit plain. Rd 3: Instep: k21(17), [dip $\&$ -tuck, k5]x5, dip-&-tuck, k to eor. Rd 4: Knit plain. \*\*Switch now toallager-gauge ndls\*
Ankle Options:
Slim: Work numbers in $\{\}$ after your size's usual numbers. Average: Work your size's numbers, medium or (narrow), switching to smaller-gauge ndls for cuff. Wider: Work your size's numbers and continue to use larger-gauge ndls throughout leg and cuff. I recommend you read through this next section marking your chosen numbers ahead of time. Expand the Quilted Lattice pattern again, and begin adjusting stitch-count on plain rds: Rd 5: K 18(14), sl(p)3 wyif, [k1, sl(p)5 wyif]x5, kl, sl(p)3 wyif; k to eor. Rd 6: Knit plain. Rd 7: K 18(14), [dip-&-tuck, k5]x6, dip-&-tuck, k to eor. Rd 8: Knit plain {K2, k2tog, k to last 4 sts, ssk, k2}; (K1, kfb, k to last 3 sts, kfb,k2. {Knit plain.)med: $72\{70\}$ : narrow: (66 {64) sts Continue expanding the pattern st, including 3 more sts at each end of pattern-area and making 1 more scallop with each set. All new touch-down sts must align with previous set's tucks!
Rd 9: K 15{14} (12{10}), sl(p)3 wyif, [k1, sl(p)5wyif]x6, k1, sl(p)3wyif, kto eor Rd 12: Knit plain {K2, k2tog, k to last 4 sts, ssk, k2}. (Narrow same as med.) 72{68}, (66{62}) sts Rd 13: K 12{10} (96}), sl(p)3 wyif, etc. Rd 16: Knit plain {K2, k2tog, k to last 4 sts, ssk, k2}. (Narrow same as med.) 72{66}, (66{60}) sts Rd 17: K 9(6} (6{3}), sl(p)3 etc. Rd 21: K 6{3} (3{see \*\* below}), sl(p)3 etc. Rd 25: K 3 (see \*\* for all other sizes and ankle options}, etc. . until you get to plain rd 28 {24 (24 {20) \*\*The final expansion rd should go like this: [He we allow the eor to “float' by 2 sts, w/o physiclly shifting marker. ] As you come near to eor on plain Rd 28 {24} (24 {201), you should see ahead of you a tuck then 2 sts, just before eor marker. Knit to those last 2 sts. Sl(p) 2 wyif. When you begin Rd 29 {25} (25 {213), sl(p) the first 3 sts wyif (five sts slipped total), then k 1. Continue this rd as an M-set, always slipping groups of 5 sts. When you come back around to the end, you won't need to slip the last 2 sts again - you've laid down that strand already. Just knit those last sts. (See recap of this in Rd 1, below.) All-around Quilted Lattice slip-st pattern (multiple of 6 sts) Rd 1 (slip-rd) - Begin 2 sts before eor on this rd only. [Sl(p)5 wyif, k1] around, end k2 more. Rd 2 - Knit. Rd 3 (tuck-rd)- [dip-&-tuck, k5] around. Rd 4 - Knit. Rd 5 (slip-rd)- [K1, sl(p)5 wyif around. Rd 6 - Knit. Rd 7 (tuck-rd) - K3, [dip-&-tuck, k5] around, end dip-&-tuck, k2. Rd 8 - Knit. Once you have the pattern going all the way around the ankle, continue in “All-around Quilted Lattice" pattern for 28 rds $3~\%$ full reps or $1\;^{3}\!/\!_{4}\!\!\!\;^{\,\bullet}$ from joining-up point), ending after having completed all but the final stitch of a plain Rd 4. You should have 3 complete diamonds going up the center-back of the ankle.
Cuff
$^{**}$ Yumayhits Begin Modified Dimple Stitch. (multiple of 6 sts) $=-\,72\,\{66\}$ or $(66\{60\})$ sts Note that in this section, your slips are surrounded by purls, rather than knits! And, since the motifs overlap, our eor will again be effectively floating 1 or 2 sts to the right on the slip-rds. Your tucks should still line up. You have just completed a plain knit rd. Rds 1, 2, & 3: Begin 1 st before eor on these 3 rds only. [P3, sl(p)3wyif] around. End rd 3 with p1 to eor. Rds 4, 5, & 6: Knit. Rd 7: K3, [dip, gather & tuck all 3 loose strands into next st, k5] around, end with tuck, k2. Rd 8: Knit. Rds 9, 10, & 11: Begin 2 sts before eor on these 3 rds only. pl, then [sl(p)3wyif, p3] around. End rd 11 with pl, k1 to get to eor. Rds 12, 13, & 14: Knit. Rd 15: [dip, gather & tuck all 3 loose strands into next st, k5] around. Rd 16: Knit.
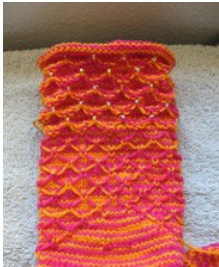
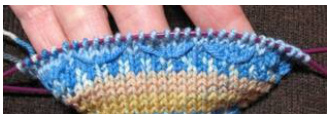
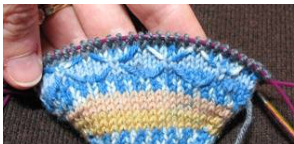
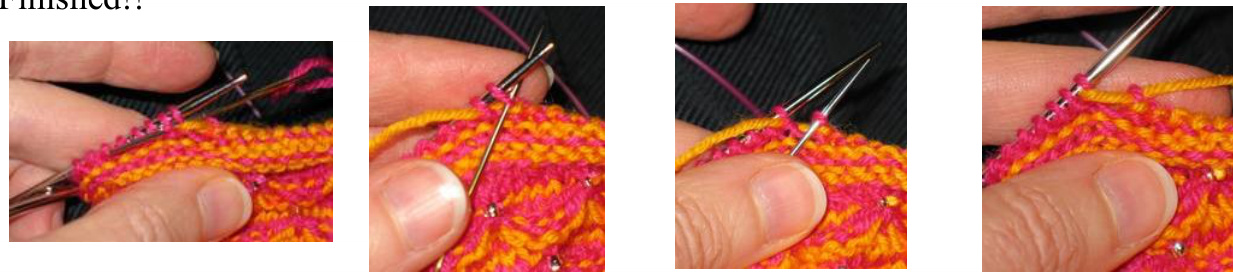
Work Rds 1 - 16 twice, and then rds 1 - 8 once more. [You may ad more reps here, if desired.] This is the rhythm: 3 rds of slips, 3 rds plain, 1 tuck rd, 1 plain rd in each tier; then repeat with offset. [On the plain rds 8 and 16, you $^{*}\mathrm{may}^{*}$ slipsize $8/0$ or $3\mathrm{mm}$ beads onto the tuck-sts with a tiny size 14 crochet hook before knitting them.] After completing your last Rd 8 [or 16], work a $10\%$ -dec rd: K6, (dec 1, k8) around. You may use SSK or k2tog for your decs; knitter's choice. I recommend that, if your dec will include a st from a tuck-column, you choose a dec that will put that st on top (i.e., SSK if tuck-st is rightmost; k2tog if tuck-st is leftmost). Purl 3 rds. [You will want to use a smaller ndl than heretofore, if you purl loosely.] Bind off with EZ's Sewn Bind-Off - not too tight, now! [I try to get the little bumps that show on the front side to be about the size of the purl bumps around them.] Here's how: Cut your yarn, leaving 2 - 3 feet of tail. Thread tail in blunt yarm needle. Work RS facing. \*Put the yarn ndl through the first 2 sts on your LN, from R to L Photo #1), and pullthrough. Put the yarn ndl back through the first st (the one at the knitting ndl tip, photo #2), from L to R; lift that stitch off the knitting ndl (photo #3) and pull the yarn on through it - snug, but not tight (#4). Repeat from \* to the last st. Stitch R to L through last st and the old "first st’ that's already bound off, then back through last st L to R. Done! $[\mathrm{I}$ also call this the $^{\bullet\bullet}2$ steps forward, 1 step back" bind-off.] Secure all ends.
$\mathbb{C}2008$ This pattern is intended for personal, non-commercial use only. Permission to forward, resell or redistribute in any form, or to modify and redistribute, or to sell items made from this pattern must be obtained in advance from the designer, Deborah Swift, at MountainMomDesigns@gmail.com .


