Marvin the Martian Amigurumi Pattern
Materials Required:
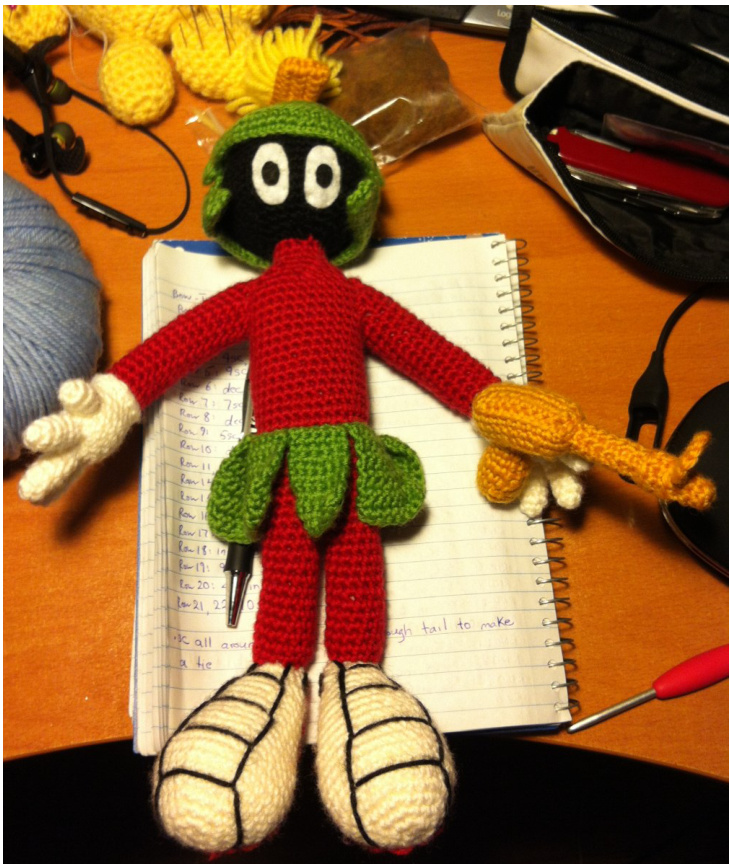
This pattern came about when one of my friend's co-workers requested Marvin the Martian. I was a little apprehensive about making him because Marvin is an iconic figure. I just hope that I've done him justice. Unless otherwise stated, work in continuous rounds. Also, I assume that you have basic knowledge in crochet. If not there are many tutorials on YouTube. Black, red, white, gold, yellow and green coloured yarn Fibrefill White, black, and red felt Black embroidery thread (can substitute black yarn) 3.5mm (E) hook Yarnneedle Sewing needle and thread
Marvin the Martian Amigurumi Pattern
Head:
Using Black Rnd 1: 6 sc into magic circle (6) Rnd 2: 6inc (12) Rnd 3: \*sc, inc\* x 6 (18) Rnd 4: \*2sc, inc\* x 6 (24) Rnd 5: \*3sc, inc\* x 6 (30) Rnd 6: \*4sc, inc\* x 6 (36) Rnd 7: \*5sc, inc\* x 6 (42) Rnd 8: \*6sc, inc\* x6 (48) Rnd 9-15: 48sc Begin stuffing the head. Continue stuffing as you work on the piece. Rnd 16: \*6sc, dec\* x 6 (42) Rnd 17: \*5sc, dec\* x 6 (36) Rnd 18: \*4sc, dec\* x 6 (30) Rnd 19: \*3sc, dec\* x 6 (24) Rnd 20: \*2sc, dec\* x 6 (18) Rnd 21: \*sc, dec\* x 6 (12) Rnd 22: 6dec (6) F/O and leave a long tail for sewing closed the 6st opening.
Marvin the Martian Amigurumi Pattern
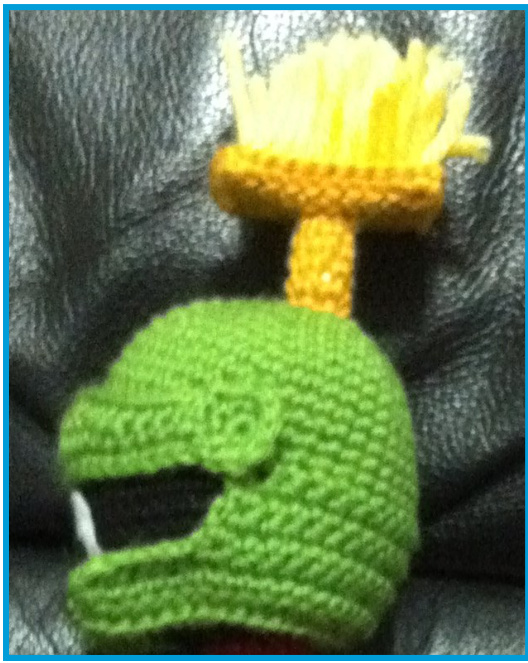
Helmet: Using Green Rnd 1: 6 sc into magic circle (6) Rnd 2: 6inc (12) Rnd 3: \*sc, inc\* x 6 (18) Rnd 4: \*2sc, inc\* x 6 (24) Rnd 5: \*3sc, inc\* x 6 (30) Rnd 6: \*4sc, inc\* x 6 (36) Rnd 7: \*5sc, inc\* x 6 (42) Rnd 8-12: 42sc Start working in rows to form the back and neck portion of the hat. Row 1-2: 22sc, ch1, turn (22) Row 3: inc, 20sc, inc, ch1, turn (24) Row 4: 24sc, ch1 turn (24) Row 5: inc, 22sc, inc, ch1, turn (26) Row 6: 26sc, ch7 (26) Row 7: sc in the 2nd chain from the hook, 31sc, ch7 (32) Row 8: sc in the 2nd chain from the hook, 37sc, ch1, turn (38) Row 9: 38sc sS around the entire piece to give it a finished edge. Weave in any remaining tails. The faceguard on the helmet requires making several separate pieces. Faceguard Rivets: (Make 2) Using Green Rnd 1: 6sc in magic circle, ss into 1st st, ch1 (6) Rnd 2: \*sc, inc\* x 2, ss into 1st st F/O one but leave yarn attached to the other.
Marvin the Martian Amigurumi Pattern
Faceguard Band:
Use the yarn that is still attached to second rivet Row 1: ch22, ss into 1st st of Rnd 2 on 1st rivet, ss into 2nd st of Rnd 2 on 1st rivet. Row 2: 22sc along the chain, ss into 1st st of Rnd 2 on 2nd rivet, ss into 2nd st of Rnd 2 on 2nd rivet. Row 3: 4sc, 3hdc, 8dc, 3hdc, 4sc, ss into 3rd st of Rnd 2 on 1st rivet, ss into 4th st of Rnd 2 on 1st rivet. Row 4: 22sc across, ss into 3rd st of Rnd 2 on 2nd rive F/O and position the faceguard so that the rivets are in the corners of the opening for the face. Attached the faceguard to the helmet through the centre of the rivets. This will allow the faceguard to move.
Helmet Bristle Base: (Make 2) Using Gold Row 1: ch11 Row 2: sc into 2nd ch from hook, 9sc, ch1, turn (10) Row 3-5: 10sc F/O one but leave yarn attached to the other. Stack the 2 pieces together. With the attached yarn, sc around to join the 2 pieces. Helmet Bristle Connection: Using Gold Rnd 1: 6sc in magic circle (6) Leave a long tail to attach to bristle base. Rnd 2-5: 6sc F/O and leave a long tail to attach to helmet. Stuff connection firmly. Page 4
Marvin the Martian Amigurumi Pattern
Rnd 5: \*3sc, inc\* x 6 (30) Rnd 6-10: 30sc Rnd 11: \*8sc, dec\* x 3 (27) Rnd 12: 27sc Rnd 13: \*7sc, dec\* x3 (24) Rnd 14: 24sc Rnd 15: \*6sc, dec\* x 3 (21) Rnd 16: 21sc Rnd 17: \*5sc, dec\* x3 (18) Rnd 18: 18sc Rnd 19: \*4sc, dec\* x3 (15) Rnd 20: 15sc Rnd 21: \*3sc, dec\* x 3 (12) Rnd 22: 12sc Rnd 23: \*2sc, dec\* x 3 (9) Shoe: (Make 2) Using White Rnd 1: 6 sc into magic circle (6) Rnd 2: 6inc (12) Rnd 3: \*sc, inc\* x 6 (18) Rnd 4: \*2sc, inc\* x 6 (24)
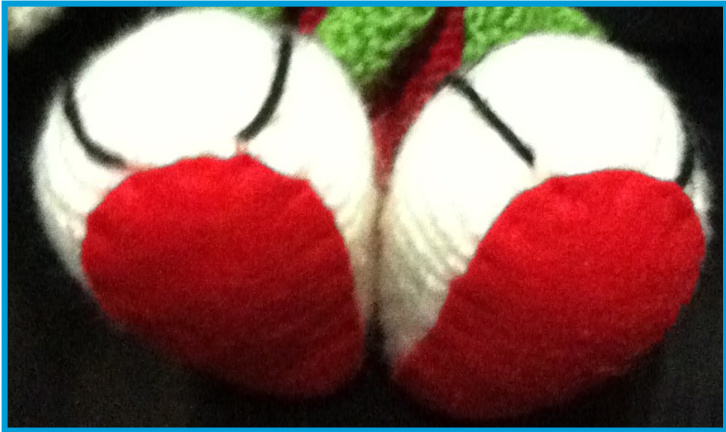
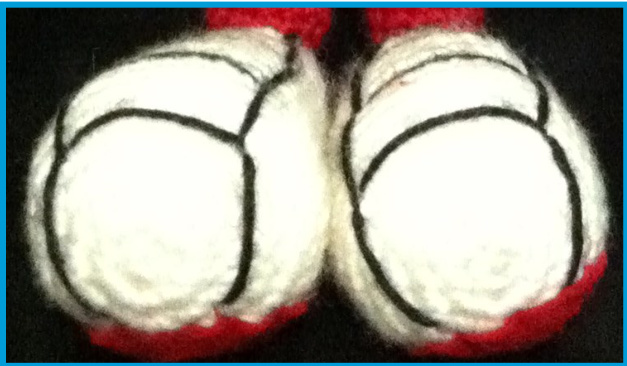
F/O and weave in the tail. Using black embroidery thread, create the lines on the shoe. Using red felt, cut out the soles and sew it to the bottom of the shoes. Using black felt, create the black dot on the side of the shoe.
Marvin the Martian Amigurumi Pattern
Legs/Body:
Using Red Rnd 1: 6sc in magic circle (6) Ensure to leave a long enough tail at the beginning to sew pieces together. Rnd 2: 6inc Rnd 3: 12sc in back loops only (12) Rnd 4-18: 12sc F/O one but leave yarn attached to the other. Sew the legs together by weaving the yarn tail of the first leg through 2 stitches on each leg. Stuff the legs firmly and start making the body with the attached yarn. Rnd 19-23: 24 sc (sc in the 2stitches that were used to sew the legs together as well). Rnd 24: \*3sc, inc\* x 6 (30) Begin stuffing the body firmly. Continue stuffing the piece. Rnd 25-39: 30sc Rnd 40: \*3sc, dec\* x 6 (24) Rnd 41: \*2sc, dec\* x 6 (18) Rnd 42: \*sc, dec\* x 6 (12) Rnd 43-45: 12sc F/o and leave a long tail to sew the body to the head.
Marvin the Martian Amigurumi Pattern
Hand/Arm/Shoulder: (Make 2) Thumb: Using White Rnd 1: 4sc in magic circle (4) Rnd 2: \*sc, inc\* x 2 (6) Rnd 3-4: 6sc F/O and leave a long enough tail to attach to hand. Stuff the thumb firmly. Fingers: (Make 3) Using White Rnd 1: 4sc in magic circle (4) Rnd 2: \*sc, inc\* x 2 (6) Rnd 3-6: 6sc F/O two of the fingers and leave a yarn tail. Leave the yarn attached to the 3rd finger. Sew the fingers together by taking the yarn tail from the first finger and weaving it through 2 stitches on both first and second finger. Ensure that the yarn tail of the second finger is on the opposite side of this. Take the yarn tail of the second finger and weave it through 2 stitches on both the second and third finger. Ensure that the point where the yarn is attached is opposite to this. Stuff all three of the fingers firmly. Use the connected yarn to continue forming the hand. Rnd 7-9:18sc Rnd 10: \*4sc, dec\* x 3 (15) Rnd 11: \*3sc, dec\* x 3 (12) Rnd 12a: 12sc in the front loop only Attach red yarn to the back loop of Rnd 12. Rnd 12b: 12sc in back loop only. Begin stuffing the hand. Continue stuffing as the piece is created.
Marvin the Martian Amigurumi Pattern
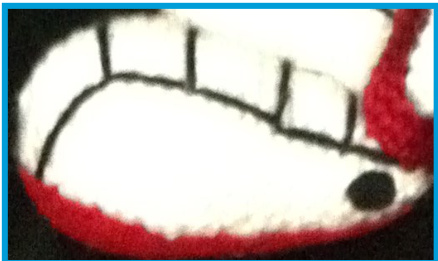
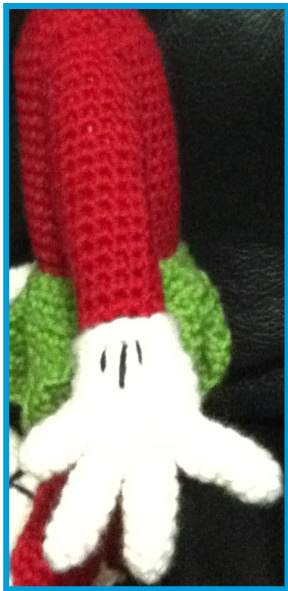
Rnd 13-28: 12sC Start working in rows to form shoulder. Row 1: 8sc, ch1, turn (8) Row 2: dec, 4sc, dec, ch1, turn (6) Row 3: dec, 2sc, dec, ch1, turn (4) Row 4: 2dec F/O and leave a long enough yarn tail. Using black embroidery thread, create the glove detail pictured above. Kilt: (Make 6) Using Green Row 1: ch 6 Row 2-4: sc into 2nd chain from hook, 4sc, ch1, turn (5) Rnd 5: 2sc, inc, 2sc, ch1, turn (6) Rnd 6-8: 6sc, ch1, turn Rnd 9: 2sc, 2inc, 2sc, ch1, turn (8) Rnd 10-12: 8sc, ch1, turn F/O and leave a long enough tail to attached pieces around the waist.
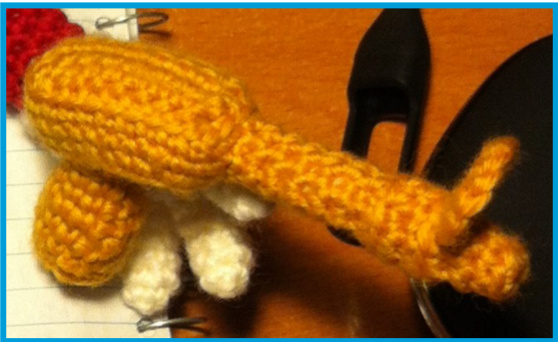
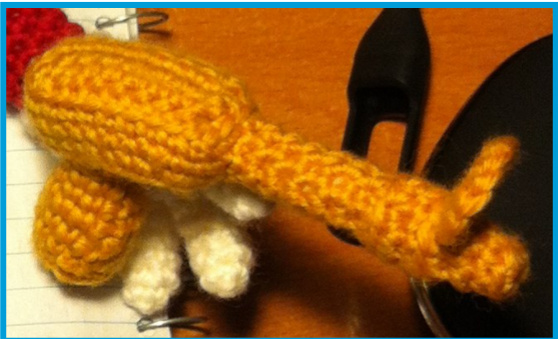
Ray Gun:
Creating the Ray Gun requires making 4 separate pieces and sewing them together. Gun Body: Using Gold Row 1: ch9
Marvin the Martian Amigurumi Pattern
Row 2: sc in 2nd ch from hook, 7sc, ch1, turn (8) Row 3-4: 8sc, ch1, turn (8) Row 5: 8sc Start working in rounds to form the body of the gun. Rnd 1:sc around the entire edge of the square piece. Put 2sc in each corner of the square. (26) Rnd 2: 26sc in back loop only. Rnd 3-5: 26sc Start stuffing the gun body firmly. Rnd 6: In back loops only 2dec, sc, sc3tog, sc, 2dec, sc, sc3tog, sc, ss into 1st st, ch1 (10) Rnd 7: 2dec, sc3tog, 2dec, sc3tog, ss into 1st st (6) F/O and leave a long enough tail to sew the opening closed. Gun Shaft: Using Gold Rnd 1: 6 sc into magic circle (6) Rnd 2: 6sc in back loops only (6) Rnd 3: 6sc Rnd 4: \*2sc, inc\* x 2 in front loops only (8) Rnd 5: 8sc in back loops only (8) Rnd 6: 8sc Begin stuffing the shaft. Continue stuffing as the piece is worked Rnd 7: \*2sc, dec\* x 2 in back loops only (6) Rnd 8: 6sc in back front loops only (6) Rnd 9-12: 6sc F/O and leave a long enough yarn tail to sew pieces together.
Marvin the Martian Amigurumi Pattern
Gun Handle: Using Gold Rnd 1: 6 sc into magic circle (6) Rnd 2: 6inc (12) Rnd 3: 12sc in back loops only (12) Rnd 4: 12sc Rnd 5: \*4sc, dec\* x 2 (10) Rnd 6: 10sc Rnd 7: \*3sc, dec\* x 2 (8) Rnd 8: 8sc F/O and leave a long enough tail to sew pieces together. Stuff the handle firmly. Target: Using Gold Rnd 1: 6 sc into magic circle, ss into 1st st, ch1 (6) Rnd 2: 6inc, ss into 1st st F/O and leave a long enough tail to sew pieces together.
Marvin the Martian Amigurumi Pattern
Assembly:
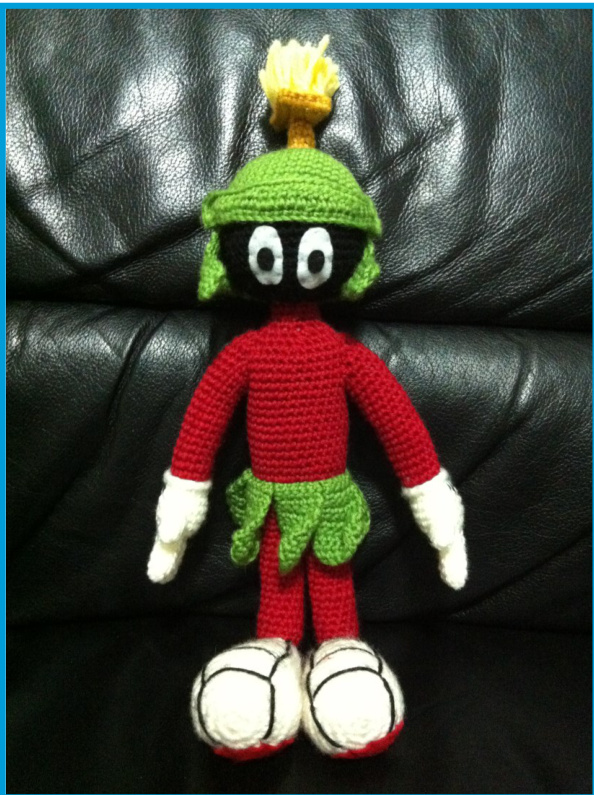
1)Attach the head to the body with the tail from the body. I just weaved in and out of each piece with the tail. Ensure the neck is in the bottom centre of the head. Firmly stuff the neck before completely sewing openings close to ensure it can support the weight of the head.
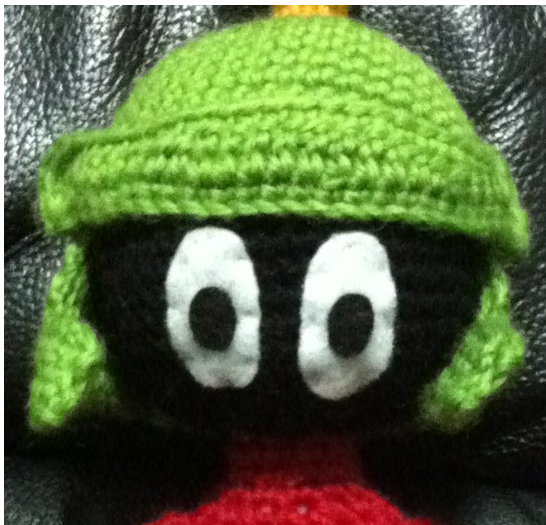
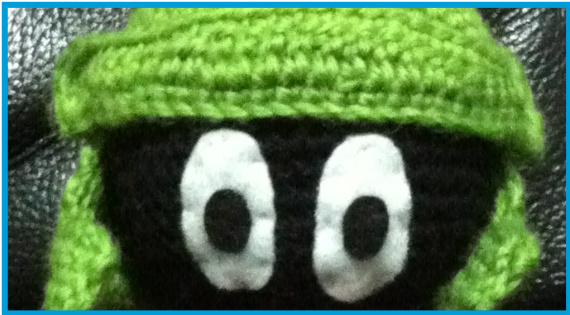
3)Using white and black felt create the eyes. I cut out a white oval for the whites of the eyes, and smaller black ovals for the pupil. 4) Position the eyes are appears on the photo above. It should sit right in the middle of the head. You may want to put the helmet onto the head to get the most accurate placement. Sew the eyes to the head. 5) Attach the arms to the body with the tails from each piece. I used a whip stitch again. Pin all the limbs in the desired position before attaching. Ensure the decorative lines on the gloves are facing away from body. Add extra stuffing to the arms while attaching to create the shoulder pieces.
6) Attach the thumb to the hand. Ensure the thumbs are pointing forward in comparison to the body and slightly lower than all the other fingers.
Marvin the Martian Amigurumi Pattern
7) Attach the 6 pleats of the kilt to the waist. The pleats may need some blocking to keep them from curling. There are 30 stitches around the waist and each pleat has 5 stitches at the top so position them evenly around. Ensure the right side is facing out. Use a simple whip stitch again to attach.
8) To assemble the helmet bristles, first attach the bristle base to the bristle connector. Ensure to stuff the connector firmly to add support. Next, cut several 2 inch pieces of yarn. Fold your yarn in half. Grasp your hook, insert it under the stitch you want the yarn to attach to and up through the other side, hook your yarn where it's folded in half and pull it through just enough that you have a small loop. Keeping the loop on your hook grab the two strings left on the other side of the stitch and pull them through the loop. Pull the strings tight. Sew this entire piece to the top of the helmet. You may want to position everything on Marvin's head before sewing it together. 9) To assemble the Ray Gun, sew the handle to the base. Ensure to off centre the handle on the base to make it look like a gun. This will help to designate the "back" and "front" of the gun. Sew the shaft
front side of the body furthest away from the handle.
Marvin the Martian Amigurumi Pattern
Sew the target 3 rows back from the end of the shaft. It will be tricky to get the target to stand up. I ended up sewing through 4 stitches to hold it in place. I used a whip stitch to sew all the parts together. I then attached a loop of yarn on the handle so I could slip the ray gun over Marvin's hand. This will hold it in place. Notes: I didn't sew the helmet onto Marvin's head. The tension should hold it in place. If it is not secure enough, attach the helmet to the head. Also remember to weave in all lose tails to finish up the project. Now it's complete! And just in case for legal reasons.... Marvin the Martian is a copyright of Warner Brothers. This crochet pattern is an original pattern by Edward Yong (June 2014). Please do not claim this pattern as your own. If you wish to share this pattern, you may link to this pattern but please do not reprint it on your site. You may keep a copy for your own personal use but you may not sell or distribute it, or sell items made from this pattern