How to Knit a Sock
Contents
·Introduction ·How to Knit a Sock -Fear: Optional Anatomy Lesson ·Top Down/Toe Up ·Basic Structure ·Fear Not the Maths ·Basic Measurements ·Casting on Arranging the Stitches ·First Round's on Me Just Say No toLadders ·Cuff to Leg ·Easy Peasy ·Don't Be a Heel ·Flappers have more fun Turn, Turn, Turn ToEvery Heel Thereisa Turn Fudge Never Hurt Anyone Don't Drink and Purl ·Mind the Gap Join Me Up! ·Gusseting Pick up Lines Round and Round ·Nothing Wrong With Mindless Knitting ·No Decrease in Pleasure All'sWell ThatEndsWell NoWonder HeHad Medals
A Cheat Sheet
This eBook assumes you know how to knit and purl and cast-on using the longtail method. By the time we get to decreasing you should be fearless enough that if it's something you need to learn, you'll have no trouble. Any links you see in this book take you to explanatory pages and/or video tutorials. The book explains everything, the links are included just in case.
Introduction How to Knit a Sock
Knitting socks is really only intimidating because they require smallish—and more than twoneedles. (Sometimes.) Really—you have nothing to fear. After all, someone over a thousand years ago was able to do it, so why not you?
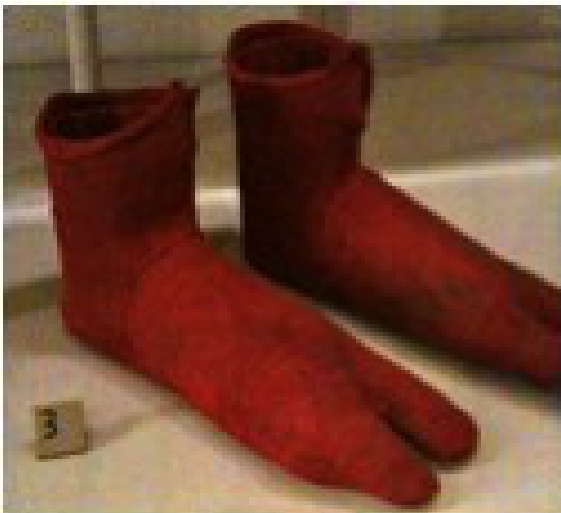
V&AMUSEUM
Fear: optional
Don't let a fear of multiple needles stop you. If knitting in the round with four or five needles unnerves you, consider knitting the sock using two flexible, circular needles. Sock constructionregardless the toolsis the same, but two flexible needles aren't quite as unwieldy at first as trying to hold many double-pointed needles. Once you know what you're doing, you'll have an easy time using any needle you want.
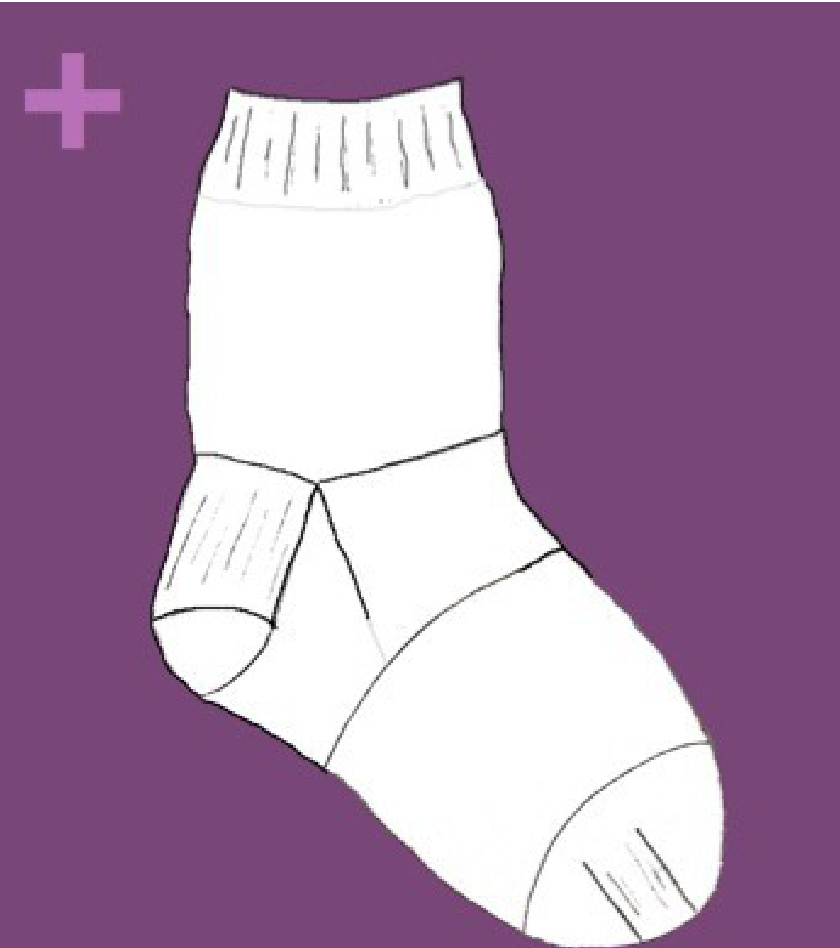
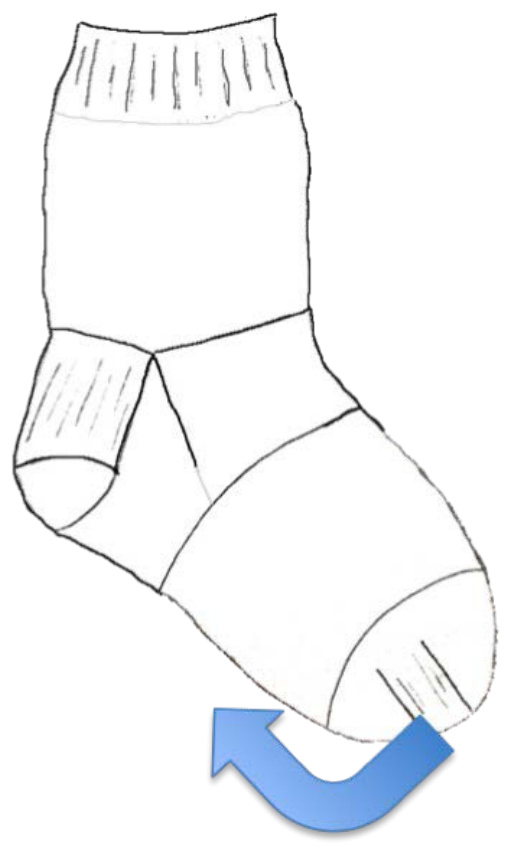
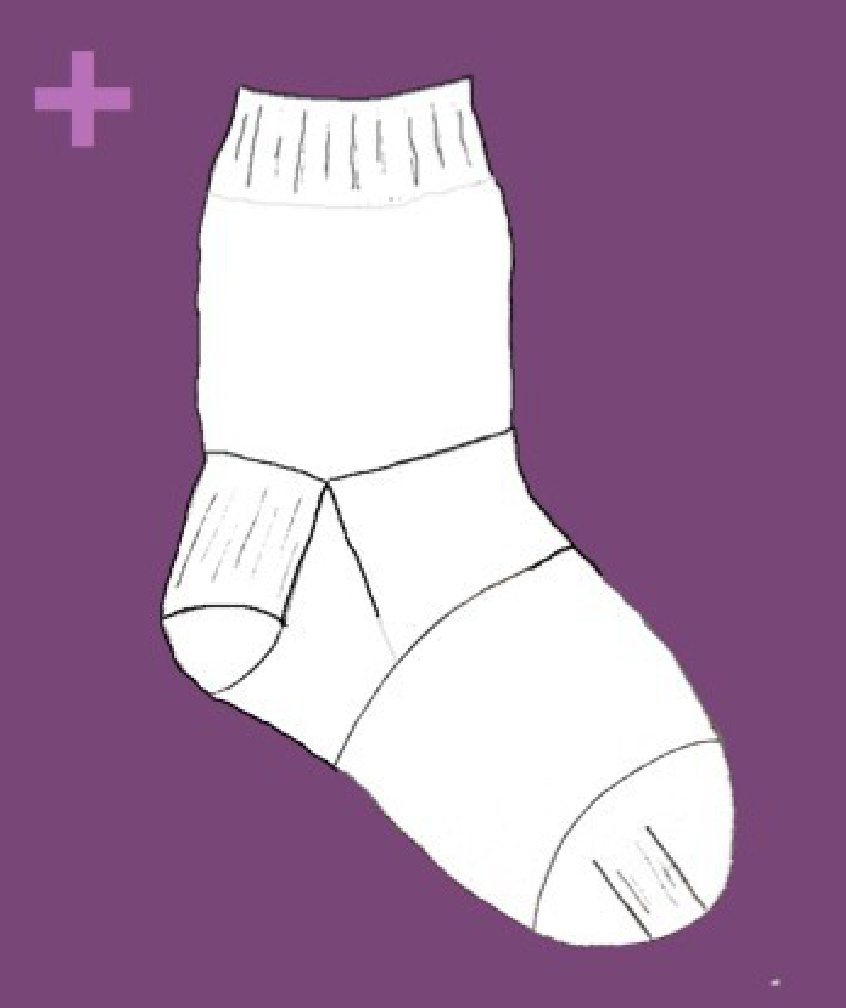
Anatomy Lesson
There are two ways to construct a sock. From the cuff (top) down, or from the toe up. Both are easy enough to learn, if you know the basic parts of a sock.
Anatomy Lesson: cuff
There's the cuff. Usually it's knit as a 2x2 rib (k2, p2) but some fancy (though occasionally less stretchy) cuffs are out there.
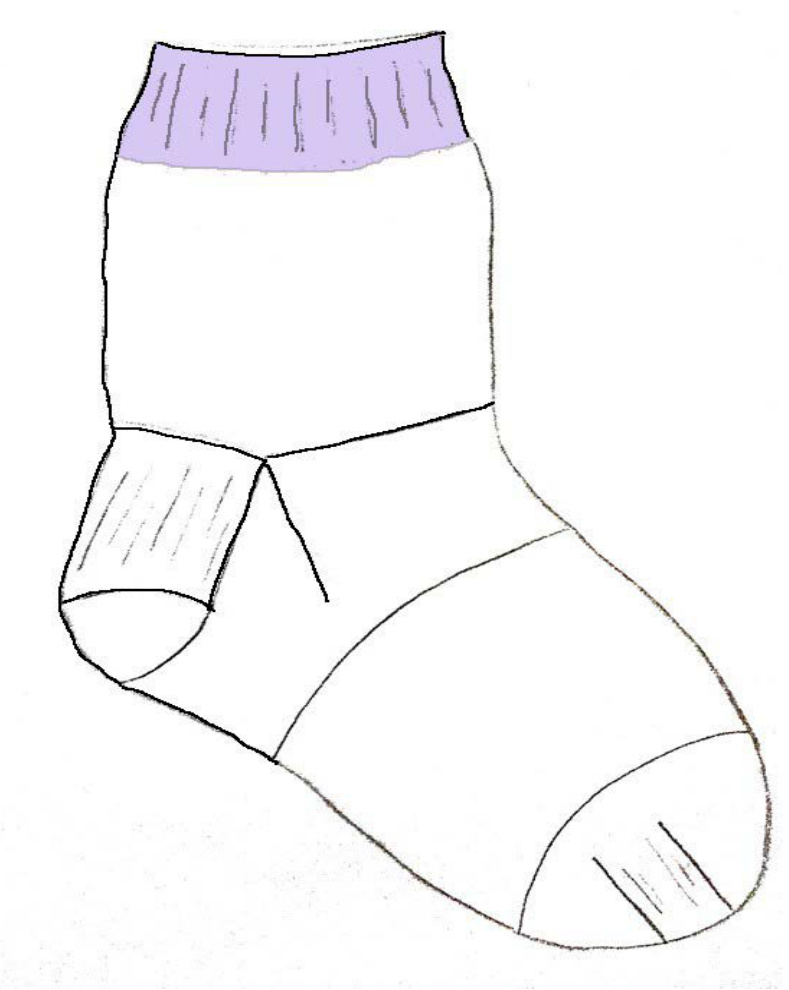
Some decorative cuffs are truly nifty. Keep track of your favorites so you can substitute genius at will.
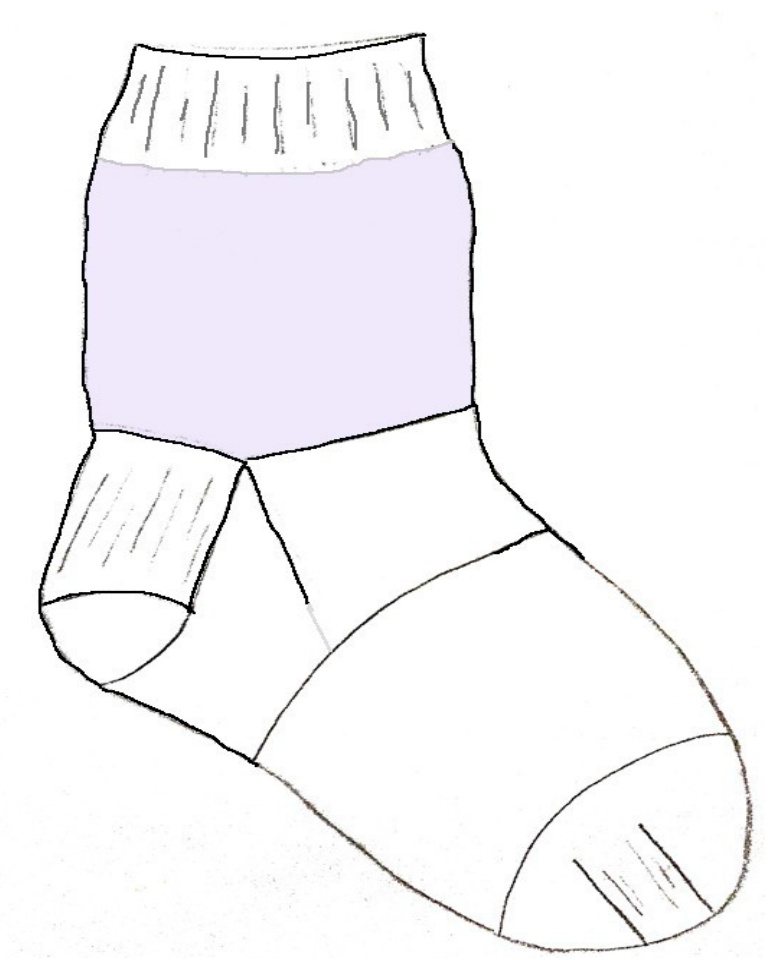
Anatomy Lesson: leg
There's the leg. There is where most of the patterning happens. You can easily just knit around and around without adding any pattern, or you can keep your k2p2 rib throughout the whole sock. It will be quite stretchy that way, and will snug up against your leg... or the leg of anyone lucky enough to receive one of your socks.
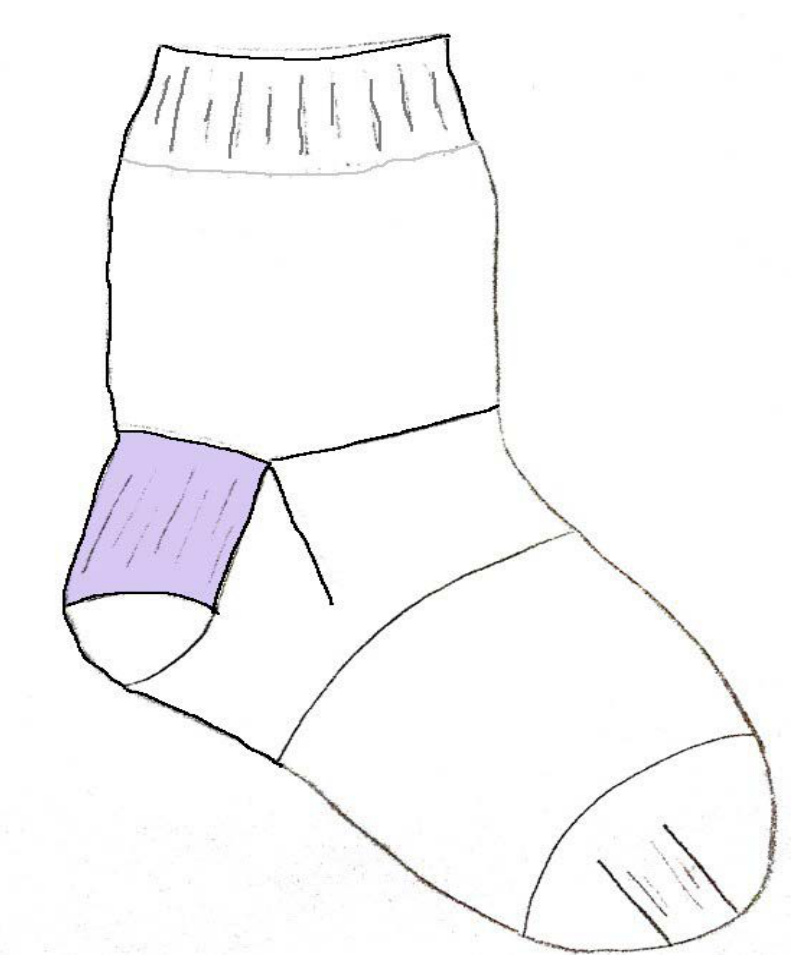
Anatomy Lesson: heel flap
There's the heel flap (more on that in a bit). When you start the flap, you generally stop everything on the front of the sock. Flaps are knit back and forth, so unless you create a garter stitch heel, you'll wind up purling on the wrong side.
Anatomy Lesson: heel turn
There's the heel turn. This can be tricky to wrap your brain around. After all, getting a flat piece of fabric to turn into a cup is... odd. If you've ever sewn darts or knitted a bonnet or hat, then no worries. You will have no trouble.
If this is all new, don't break a sweat, it will all make sense soon.
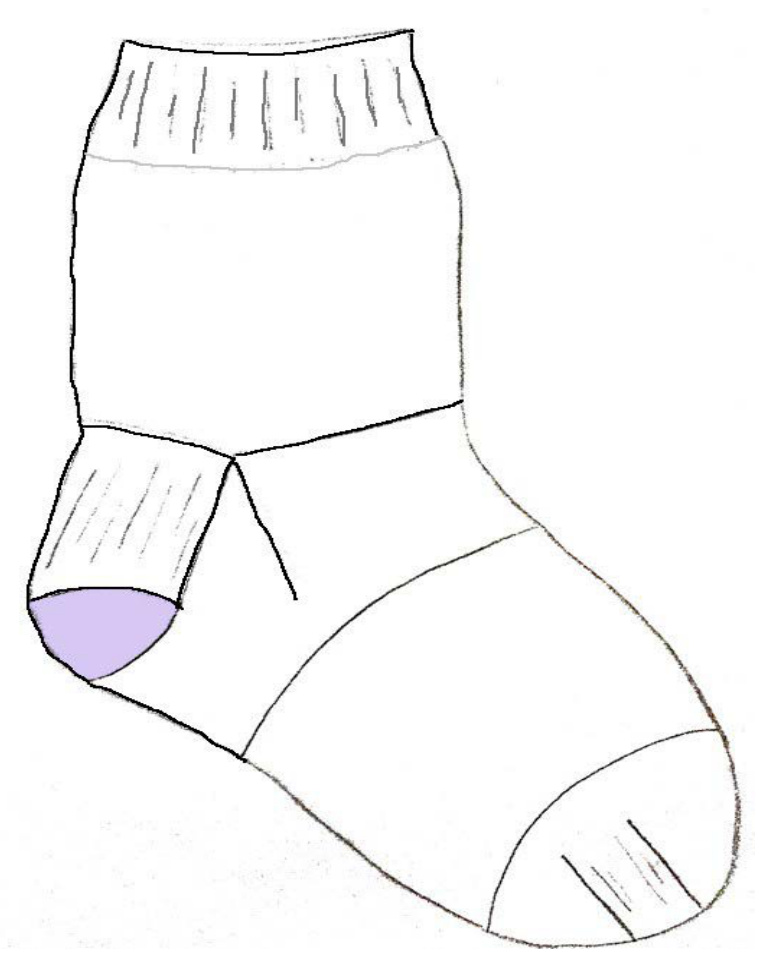
Anatomy Lesson: gusset
There's the gusset. This is where you get rid of all the "extra" stitches you created when you made the heel flap by decreasing every other row until you return to the number of stitches you cast-on back at the cuff. The gusset is knit at the same time you recommence with the instep stitches.
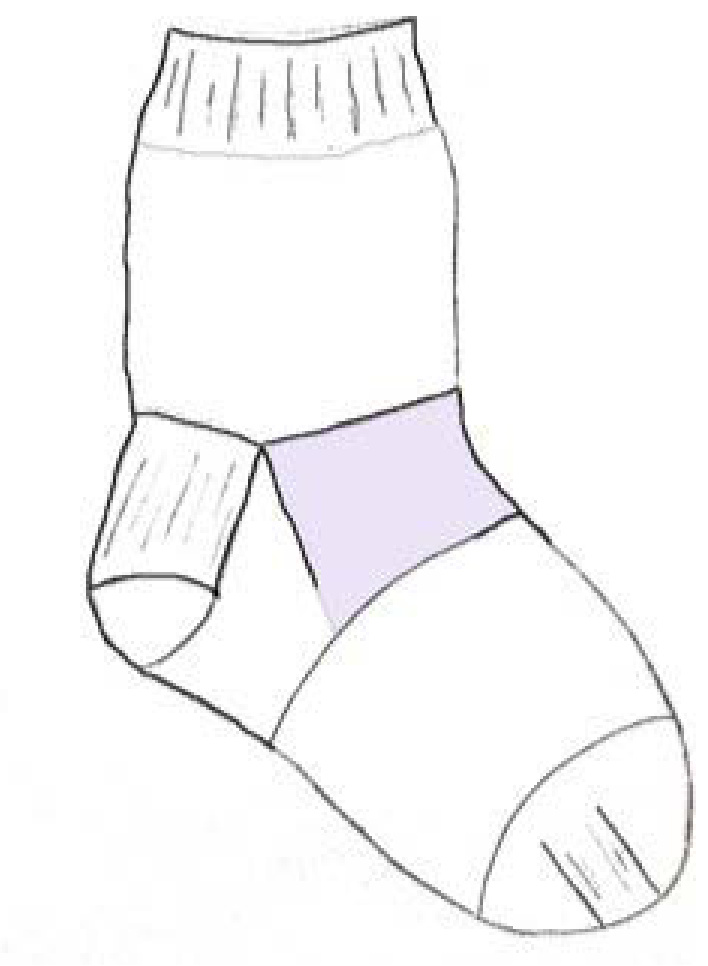
Anatomy Lesson: instep
There's the instep. Now you get to use the stitches you ignored when you were busy with the heel flap. Often patterns that began with the leg continue on these stitches. Usually patterning does not extend past the gusset decreases and onto the bottom of the foot.
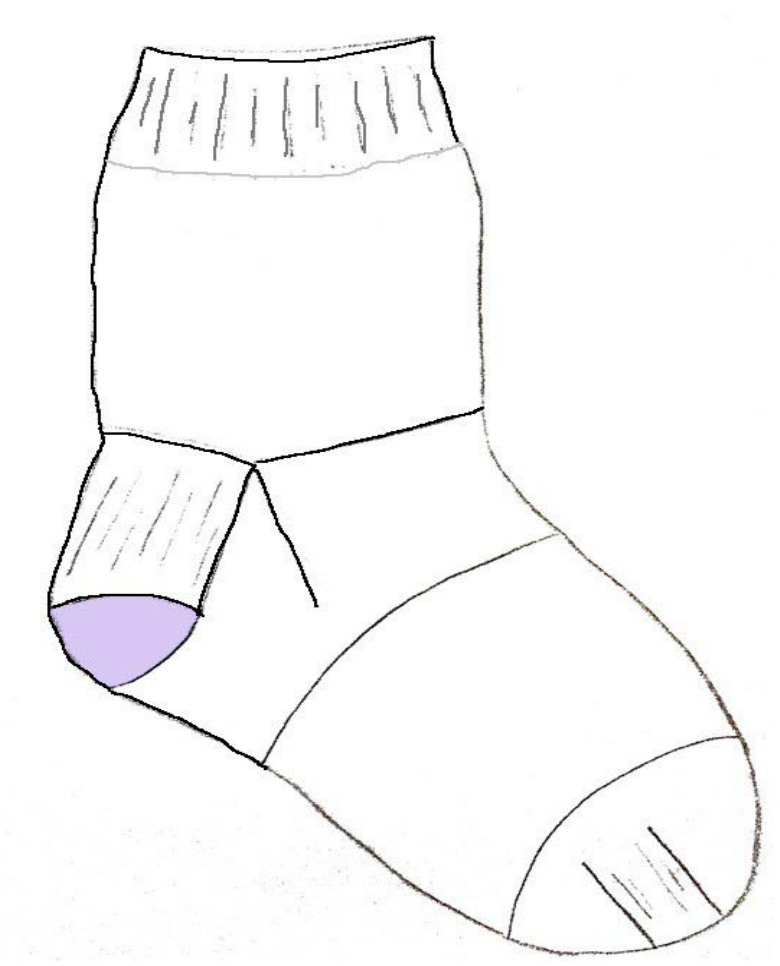
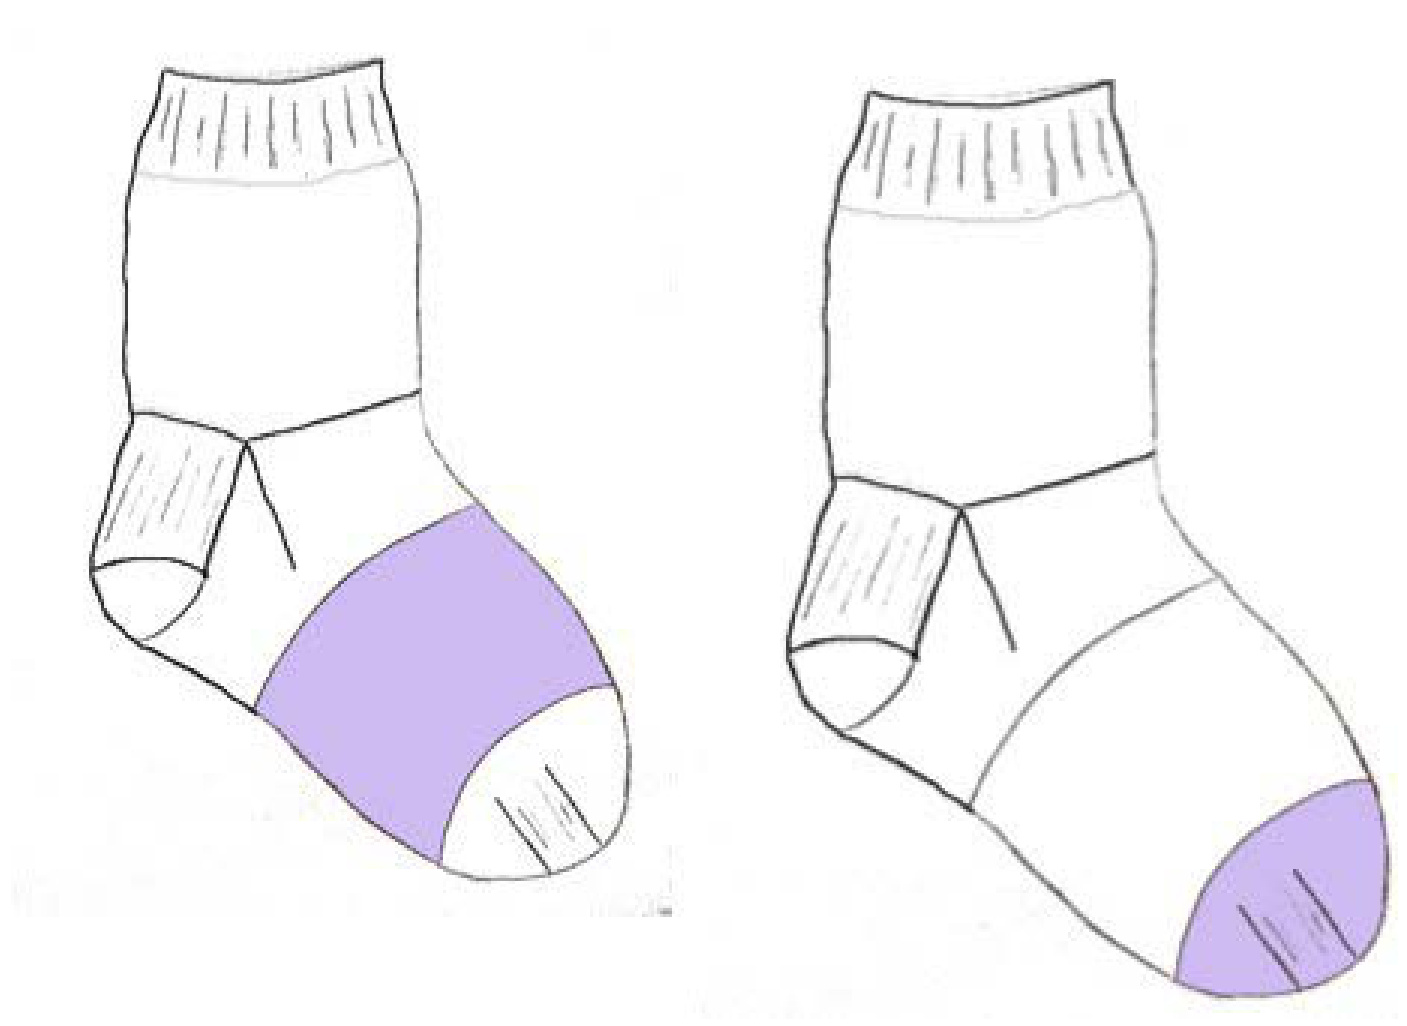
Anatomy Lesson: foot and toe
There's the foot and the toe. Rawther selfexplanatory.
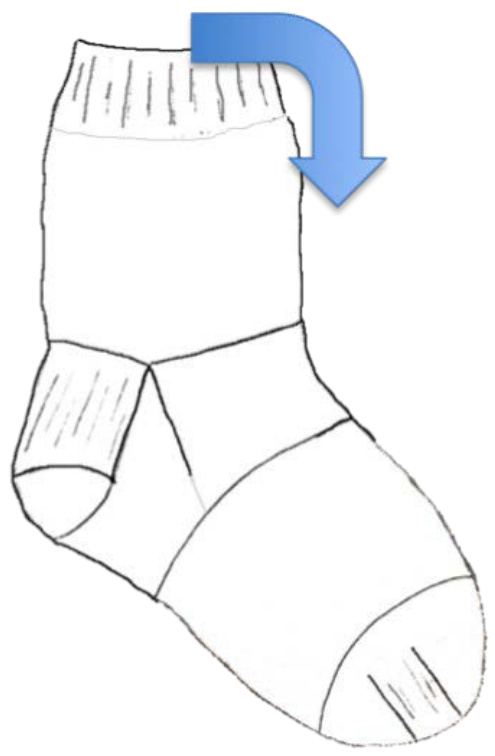
● For this eBook, we're going to work topdown. Not that it's easier, but that it seems to be more intuitive for most knitters. If it's not working for you, switch to the toeup construction eBook (available now at MamaOKnits.com and from MamaOKnits on Ravelry).
MamaOKnits.com
MamaOKnits on Ravelry
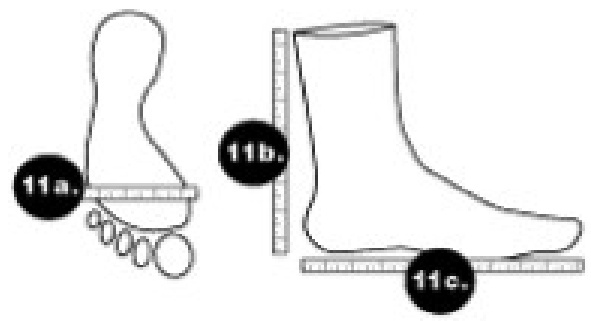
1la.Foot Circumference:To determine the foot circumference,measure around the widestpart of your foot. 1lb.SockHeight: To determine the height of the sock,measure from where you start to turn for the heel shaping to the top of the sock. 1lc.Total Foot Length:To measure the total length of your foot,place a ruler or tape measure on the floor.Position the back of yourheel at thebeginning of the tape and the measure to your longest toe. http://www.craftyarncouncil.com/sizing.html
Fear Not the Maths: basic measurements--i
Cast-on Measurements: First, you need to measure around your calf at about the height you want the top of the cuf. If you don't have a tape measure, an average-ish measurement for a sock with a 4-6" cuff is about 8' around. Next you need to know what your gauge is. That means, once you have your yarn and your needles, how many stitches do you knit per inch. Again, ballparking here for argument's sake, we'll just say we're using US 1 (2.25mm) needles with sock yarn that would give us eight stitches per inch. 8 stitches x 8 inches 64 stitches needed
Subtract 10%
64 x .10 (decimal form of 10%) 6.4 stitches
Fear Not the Maths: basic measurements--ii
Now some simple math (hear the wheels of the mind grinding). By multiplying 8 stitches per inch by 8 inches of calf, we will get 64 stitches. That's the number of stitches we need to cast-on in order to fit our imaginary foot. While this number is a good guestimate, if you want the sock to fit snugly instead of sliding all over your foot inside your shoe, you'll need to subtract 10% (no, really. Some prefer to subtract 15-20%!) 64 x .10 = 6.4 64 -6_ (rounded down) 58 64 - 6.4 = approximately 58 stitches (we rounded down to 6 when subtracting)
Fear Not the Maths: casting on
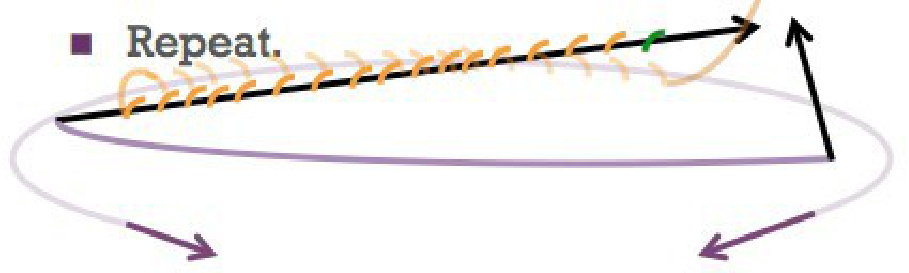
There's nothing worse than a sock that looks like it fits...then you find that you can't put your foot in because the cast-on row is too tight. \*No, I'm not bitter. Why do you ask? Time to take up your needlesin this example I'm going toshow you how to work on two circular needles-and hold them together. o You'll be happier if you do this while reading this section. It'll make more sense than reading without doing (if you're a visual learner). You're going to cast-on over two needles to ensure that you have a stretchy cuff. A long-tail cast-on works well as does this very stretchy caston. OCOMMENCE THECASTINGON! Once you've cast on your 58 stitches you'll need to put half of your stitches on one needle, and half on the other.
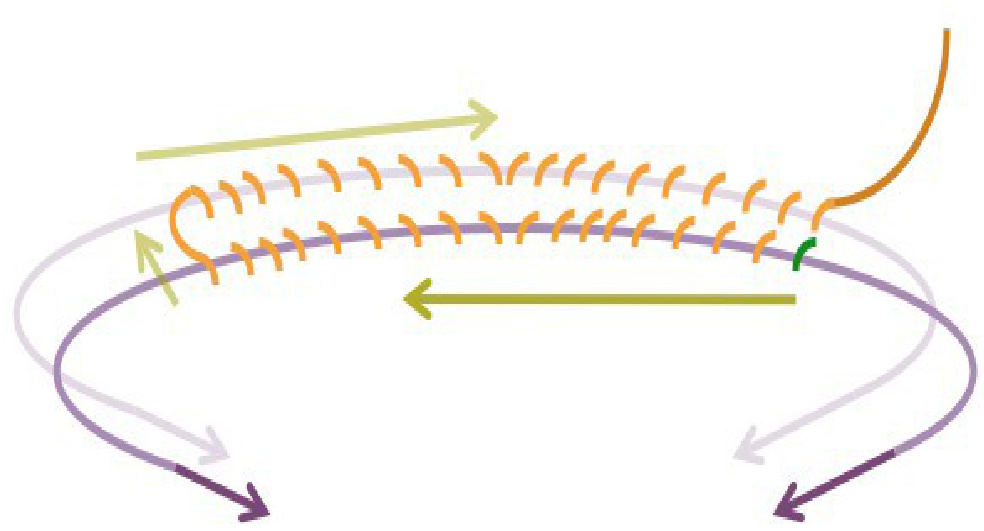
green indicates start of cast-on arrowindicates direction ofcast-on
Fear Not the Maths: arranging the stitches
To do this easily, slide one of your needles out of 29 of the stitches (that's half). Now, stop. You should now have 29 stitches hanging onto two needles and and the other half of the stitches only wrapped around one needle. It doesn't matter which one is where as long as the stitches are divided. Adjust so that half of the stitches are on one needle and half are on the other. This will look and feel pretty floppy and unnerving. It won't last.
First Round's on Me
How to Make a Circle...
Now,you're going to start knitting in acircle. Youmightbe wondering how you can make a circle out of two straight needles. Thekeyisin theflexibilityof the centerofeach needle,the cable. Whileyou'reknittingwith one needle (using the hard tips, in black belowright)therear,non-workingneedle willbeadjustedsothatonlyitscable is touching the yarn.That flexibility is what makes this process possible.
...Out of Two Sticks
Theneedlecarryingthe stitchesyou're notworkingwithshouldbeadjusted so thatONLY THECABLEistouching the stitches(see light purplebelow). Theother29 stitches-closesttoyou whichyou'llstartknittingintoin asec shouldbeadjustedwiththeneedle through them(horizontal black linebelow), ready to knit. Thecablejoining theblacktips (indarker purple,below) shouldn't have any stitches on it.
First Round's on Me
How to Make a Circle..
Arrange the stitches so they aren't twisted.I like toput everythingflatonatableand make sure the cast-on "bumps' are allon the"inside"between the twoneedles.
..Out of Two Sticks
Thiswill feelveryodd.This isone place where the yideo tutorial really will help. Whenyouhaveknitacrossthefirst needle,slideitsoonlythecableis touching thestitchesyou justknit. Pulling the yarn from the back needle (the light purple one in the diagram)towardsthefrontneedle (theblackworkingneedleinthe diagram) knit and snug your first stitch. Knit across the first needle. Turn your work. Pickup the other cable and adjust it as per thediagrambelow.
First Round's on Me: a note
Just Say No to Ladders
Click to add text
Ifyou'rethekind ofpersonwho sees problems before they happen, you'll notice thatthere'sbound tobe gappingbetween theneedlesas you knit (in red to the right). This istrue.If those stitches are too loosetheywilllooklikeladders runningup thesideofthesock.

Easy to avoid!Just be sure yourfirst stitchesoneachside arepulleda little tighter than the rest, once you gettoyouthirdorfourthround. That's all thatisneeded toavoid the dreaded"ladders'andistrue for doublepointed sockknittingaswell.
Cuff to Leg easypeasy o Our cuff will be simple.
Knit 2,purl 2 around and around and around. Instructions will tell you to place a marker to indicate the beginning of the round.That would mean you'd have a marker at the end of a needle ... and that marker would fall off. Instead, use your tail from your cast-on to indicate the start of the round. · If you are the kind of person who might just knit with that long tail and wreak havoc\*, allow me to suggest using a bread bag tab to hold your tail. \* Ask me how I know this can happen...
Make the cuff as long as you want (you can make the whole leg k2p2 if you like) but keep it at least an inch long. More is better if you want the socks to stay up. Proceed to the leg. Knit around and around and around (until you're sick of it) or k2p2 around, or use a pretty pattern you found somewhere-just get the leg of the sock to be the length you want. (You may want to make anklet socks this time just to get on with it.)
Heel Flap flappers have more fun
Some people have very strong opinions regarding heel flaps and short row heels-but I don't. We'll do a short row heel in the toe-up book (it doesn't matter which direction you start from with a short-row heeltoe up or top down, it's the same). Heel flaps-first you need to conceptualize the following: a heel flap is knit on half of your total stitches. If you've never knit a sock before this may seem a bit extreme, but a sock heel really surrounds your heel and that means it wraps around towards the front more than you'd think. So, here's the easy part: half of your sock's stitches are already located on one circular needle. Knit back and forth—-knit on right side, purl on wrong side—across just one side. That side will hold your heel flap. Unless you have a fancy pattern, which needle you choose does not matter. The Rules: Slip the first stitch every row (knit or purl, doesn't matter). This is important. Knit as many rows as there are stitches (29 stitches? Knit/purl 29 rows). If you want to make a more durable heel, slip 1, knit 1 across on the right side, ending with a knit 1 (you may have to fudge that, but don't let that worry you). Purl back, slipping the first stitch as usual. This creates a texture that makes for a longer-wearing heel.
# o Do this with me for a moment:
Heel Turn
toeveryturn thereisaheel Get a piece of scrap paper. Place a staple right in the middle. Pinch a little to the right of the staple and staple or tape that pinch together. Do that on the other side. SEE how it's already starting to curve the paper? Do it again. - This is how you turn a flat piece of fabric (the bottom edge of your heel flap) into a cup that fits your heel. o We will do a standard Dutch Heel for this sock which works just like the paper.
Heel Turn
fudge never hurt anyone o To start the turn, take your heel flap in hand and get to a right side row (if this means you're knitting 28 or 30 rows instead of the prescribed 29 that is fine. Someday you'll care more about that number if you find that your heel is long or short. For now, we're fine with fudging the numbers). o Using a couple of split ring stitch markers or safety pins or paper clips, mark both sides of the stitch at the center of the heel. ■ With 29 stitches, the center stitch will be the 15th stitch— 14 stitches on each side of it. It helps to see where the middle is the first couple of times you knit a heel. o Slip the first stitch and knit across to and then also knit the center stitch. o Now, take a look at your own actual heel. Is it wider than an inch and a half? Add 2 to our next set of instructions. Narrower? Subtract 2.
# Heel Turn
don't drink and purl o Right side row: Knit four stitches past the center stitch. o Slip slip knit (ssk—knit 2 through back loop (TBL) also works), knit l more stitch. Turn your work. Wrong side row: Slip the first stitch. o Purl across to the center stitch then purl 4 more stitches (1 slipped stitch and 9 purled stitches). o Purl 2 together (p2tog), then purl 1 more stitch. Turn your work. o You have just completed the set up to turning your heel. o Pat yourself on the back, but do not indulge in any libations yet. You still need your wits about you.
o Right side row: Slip your first stitch then knit across, past (and including) the center stitch and across the next three stitches.
o See the gap?
0 That's the gap that was formed from turning your work after you SSK'd. o Close that gap! To do that, ssk again then knit one more stitch. mind the gap o Turn your work (are you starting to see a pattern?). o Wrong side row: slip your first stitch, purl to the stitch before the gap. o Close the gap by purling two together, pl more. o Continue in this pattern until you have no more gaps to close. End on a RS row.
+
o Examine your heel: As the Yarn Harlot encourages, you may want to jump up on a chair and show everyone the miraculous feat you just perpetrated. Join Me Up! gusseting But now you've created a problem. There are two long stretches of unattached stitches that separate your little heel turn from your instep stitches. o In order to rectify the situation, we'll need to pick up stitches along the side of the heel flap (easier than you think) and systematically decrease until we get back to having 58 stitches on our needles. Join Me Up! pick up lines o You may want to get a smallish crochet hook if you have one around. Don't worry if you don't. o Remember how you slipped the stitches as you started each row of your heel flap? Well this step is why. Please examine the edges of your flap closely. See the "v" stitches running down the sides? Longer than the regular stitches but not ridiculously long. Those are the slipped stitches. If you knit and purled 29 rows then you should have somewhere around 14 or 15 Vs running down the sides. Those V's are your pick-ups. o Place a marker at the end of your heel turn to indicate SoR (start of round). Then, inserting the tip of your needle or a crochet hook into/under the first V, you are going to pull a stitch through—creating a knit stitch. Put/keep that stitch on your right needle.
Join Me Up! pickuplinesii
Pick up stitches through the next 13 or 14 Vs. If you notice that you only have one V left, place a marker before you pick up that last V. 0 You just completed picking up gusset stitches for the left side of your sock/foot. o Instep! O You're back to the instep stitches. Drop the heel needle after sliding it to cable position. o Pick up your instep needle and knit across the stitches normally or in your pattern. o Now you're at the right side of the heel flap. Pick up one stitch as you did on the left side. 0 Place a marker, pick up the next 13 or 14 Vs. Knit to your SoR marker. o You should have MANY more stitches on the heel needle than on the instep needle.
nothing wrong with mindless knitting
Round and Round
o Round l: Starting at the SoR marker, knit until 3 stitches before the end of the needle, or—if you managed to place a marker in front of the last stitch on the heel needle—knit to 2 stitches before the marker. o Knit 2 together (K2tog). o Drop heel needle, turn work and knit across instep with other needle (knit instep in pattern if appropriate). o Drop instep needle, pick up heel needle, knit one then slip, slip, knit (ssk) the two stitches after the marker. Knit to SoR marker. o Round 2: Knit around (knit instep in pattern if appropriate). o Repeat rounds 1 and 2 until you are back to 29 stitches on each needle again.
# Round and Round
nothing wrong with mindless knitting o Once the gussets are done decreasing back to your starting numbers, you just knit around until the sock is about at the beginning of your pinky toe, or two inches shy of the tip of your big toe. This is another reason why 2 circs are nice to knit socks with—-you can try your sock on without having to move it off of the DPNs and onto waste yarn. o Once you reach the length noted above, you will begin your toe decreases.
No Decrease in Pleasure
all's well that ends well Toe decreases are quite a bit like the gussets. o First, you'll need to change your SoR (start of round) marker. > Round 1: Knit the first stitch on one needleit doesn't matter which, instep or sole, either is fine. Place marker (SoR), ssk. o Knit across to three stitches before the end of the needle. K2tog. Drop needle and turn work. Pick up other needle, knit l, ssk. o Knit across to three stitches before the end of the needle. K2tog. Drop needle and turn work. o Round 2: Knit around. > Repeat rounds l and 2 until there are 8-10 stitches left on each needle.This will be the toe, so this is a good time to try the sock on. If it fits, great, if not, keep going to make longer or rip out a few rows to make shorter. Interlude ahelpful hint I use color-coded stitch markers for gussets and toes—-green for start of round or first decrease, a neutral color in one stitch from the next two edges to remind me where to ssk or k2tog, and a red marker for the last decrease. This is easy to accomplish with Scinci silicone rubber bands 一 cheap at any drugstore. Don't get the rubber ones. They stick to the needles and get under the stitches.
# Marching Home
no wonderhe got medals o The Kitchener Stitch —created by Field Marshal Kitchener of the Boer Warsis feared by some, but respected by all. It is an ingenious way to mimic knitting with a sewing needle and yarn. o Once you master this SO many other parts of knitting will make more sense. 。A video tutorial for this is highly recommended as watching it makes the most sense. There is also an excellent written tutorial on Knitty by Theresa Vinson Stenersen. 0 However, if you can't watch you can repeat the steps in your head—like a mantra—and that works pretty well. o Clip your yarn, leaving yourself about an 12" tail. Thread a yarn needle onto the tail. o You will use this as a knitting needle, entering stitches as though to knit or purl. (This WILL make sensepictures in the above-linked tutorial help.)
o Hold your needles in your non-sewing hand as though you're about to brush your front teeth with them (parallel to the floor).
o As you begin, it helps to think that the front needle is a KNIT knitting needle and the back needle is a PURL knitting needleindicating the stitches that face you on the needles in this position.
Marching Home
no wonder he got medals o Take your threaded needle, and boldly insert it into the first stitch on the front (knit) needle needle as if to purl. o I know. That sounds nuts. Trust me for a sec. o So, again, to set up your Kitchener Adventure, thread your yarn needle through the first stitch on the KNIT needle (the one closest to you) as if to purl. o We're going to ignore the front needle for a bit now, and work on the back needle.
# Marching Home
no wonderhe got medals o Alrighty, then. Now we're looking at the back needle, the PURL needle, the needle where the purl stitches are facing you. o This time you are going to insert your needle into the first stich as if to purl and you will REMOVE THAT STITCH. o No worries. You've threaded the yarn though. It won't unravel on you. Taking the yarn needle again, thread it through the second stitch on the PURL needle as if to knit. Leave it there after you pull the yarn through. o Perhaps at this point you might want to get yourself a celebratory drink because.. o You just completed the set-up to the Kitchener
Marching Home
no wonderhe gotmedals o See, that wasn't so bad, was it? o Moving on—remember the beginning of your mantra front needle is a KNIT needle and the back needle is a PURL needle? Front Knit Back Purl. Those never change. You never "'turn your work' while you're Kitchenering. o Now add to your mantraSame off, different Stay. ·Why? o Think back to the set up. o When you purled the first stitch on the front needlethe KNIT needleyou left the stitch there. (Purl on knit needle = different) o When you purled the first stitch on the back needlethe PURL needle—you removed the stitch. (Purl on purl needle= same = OFF!) ·Easy
o Back to the front needle:
o On the KNIT needle, "knit" first stitch with your yarn needle and remove it (same stitch as needle=off).
Marching Home
o Still on the KNIT needle, "'purl'" the second stitch with your yarn needle and leave it there (different=stay). no wonder he got medals o Pull the yarn to the right (if you're right handed), try not to pull the yarn over the top of the front needle, then begin working on the back, PURL, needle again. o On the rear PURL needle, "purl' first stitch with your yarn needle and remove it (same= off). Knit the next stitch and leave it (differentstay). o Go back to the front—-KNIT—needle and continue this front needle-to-back needle/same=off, different=stay pattern until you're out of stitches. o Tug and gently tighten your stitches one at a time, starting with your first stitches, moving the loose yarn to the end.
Marching Home
no wonderhe gotmedals o Weave in your end and you have yourself a sock with a super tidy toe. I want to extend my thanks to the many knitters and teachers who I reference in this free eBook. Please visit their sites and buy their books. So many desigmers and teachers give away their wisdom for freeit's good karma to support them when you can. And please do not hesitate to contact me with corrections, questions, or requests for clarification. I'll do my best by you.
Many thanks.
\* thanks also to Alissa Barton (KnittingFairy) for her sharp eyes!

http://craftlit.com http://wwmdfk.com http://mamaoknits.com http://crafting-a-life.com
Cheat Sheet
The Quick and Dirty List
1. Measure the ball of your foot (widest spot below your toes) 2. Multiply by your gauge. 3. Subtract 10% 4. Cast on that many stitches. 5. Usually start with 2x2 rib. 6. Knit as long as you want your cuff to be. 7. Begin heel flap on half of your total stitches. 8. Slip the first stitch for each row of the flap. 9. To make a stronger flap slip 1 knit 1 on the RS. 10. When you have as many rows as you have stitches... 11. Begin heel turn. 12. For a turn, you're best off following the actual directions. 13. Once the turn is complete, pick up the slipped stitches of the flap. 1. Knit across instep. 2. Pick up stitches down other side of flap. 3. Knit across heel. 14. Begin alternating decrease rounds with regular knit rounds. 15. Once you're back to your starting number of stitches continue knittir 16. Once you are 2" short of your foot (or hit the base of your pinky toe) 17. When you have about an inch of stitches left (wide across the top of your toe closed.
Spelled out links in case your PDF reader doesn't like external links. These appear here in the order they appear in this eBook.
http://crafting-a-life.com/mamaoknits http://www.craftyarncouncil.com/sizing.html Cast-on over two needles http://www.youtube.com/watch?v=RybPvCNfrT8 very stretchy cast-on http://www.youtube.com/watch?v=wf8cY djTRI need to put half of your stitches on one http://www.youtube.com/watch?v=rz11xJ241uk&feature=related Knit across the first needle http://www.youtube.com/watch?v=RybPvCNfrT8 Heel flaps http://www.youtube.com/watch?v=L oAkykTFUU short row heel http://www.youtube.com/watch?v=UfGpKiNfQmk Dutch Heel http://www.youtube.com/watch?v=pCpI2CL2vuo Ssk http://www.youtube.com/watch?v=RGwcYW3GG3M p2tog http://www.youtube.com/watch?v=SGsPUbLRQL4 Scinci silicone rubber bands http://mp.hairboutique.com/Scunci-Silicone-Rubber-Bands-250pc-Assorted-Bright Colors/P/117934 The Kitchener Stitch http://en.wikipedia.org/wiki/Herbert Kitchener, 1st Earl Kitchener Video tutorial http://www.youtube.com/watch?v=hx1A6nQSLR4 written tutorial on Knitty http://www.knitty.com/ISSUEsummer04/FEATtheresasum04.html
More from Crafting-a-Life Originals
Other Books from Heather Ordover
Julie rated it 5 of 5 stars · Recommends it for: knitters, lovers of classic lit
What Would Madame Defarge Knit?
5.0 out of 5 stars_· Beyond a Knitting Pattern Book · By Carrie S. Bradfield on September 26, 2011 Not since I picked up a copy of Elizabeth Zimmerman's Knitter's Almanac have I enjoyed reading a knitting book so much. This is not just a set of patterns with instructions. Each pattern is accompanied by a description of the inspiration for the project. I'm already adding books to my "to-read" list after seeing the inspired projects in this book. I like that this is a book I can sit down and read even if I don't have time to work on a project from it.
What (else) Would Madame Defarge Knit?
Iwas so excited when this book arrived in the mail the other day!I sat down and read through it right away, over an evening and the next afternoon. Theessaysareintrestingeentheoneswhosubjectbookhaventread(in factaddingafewof themtmytoread listasaresultlnd th patterns- the patterns!Seriously, there are so many good projects in here. And the Ravelry group is running a series of KALs for several of them. First up for me is probably Fosco's socks!
Grounded: The Seven, book 1
5.0 out of 5 stars · Not normally a YA fan but Iloved this!, November 2, 2013 · Vanessa Gulin
This review is from: Grounded (The Seven) (Kindle Edition) I'm not normally a fan of young adult fiction or any fiction with teenagers at its center (except for Harry Potter). But Heather has changed my mind. Finally an author who can write realistic children that, while believably flawed, don't make me want to run away screaming. Her men are fair minded, her women are strong. No one is a horrible caricature of their age or gender.


