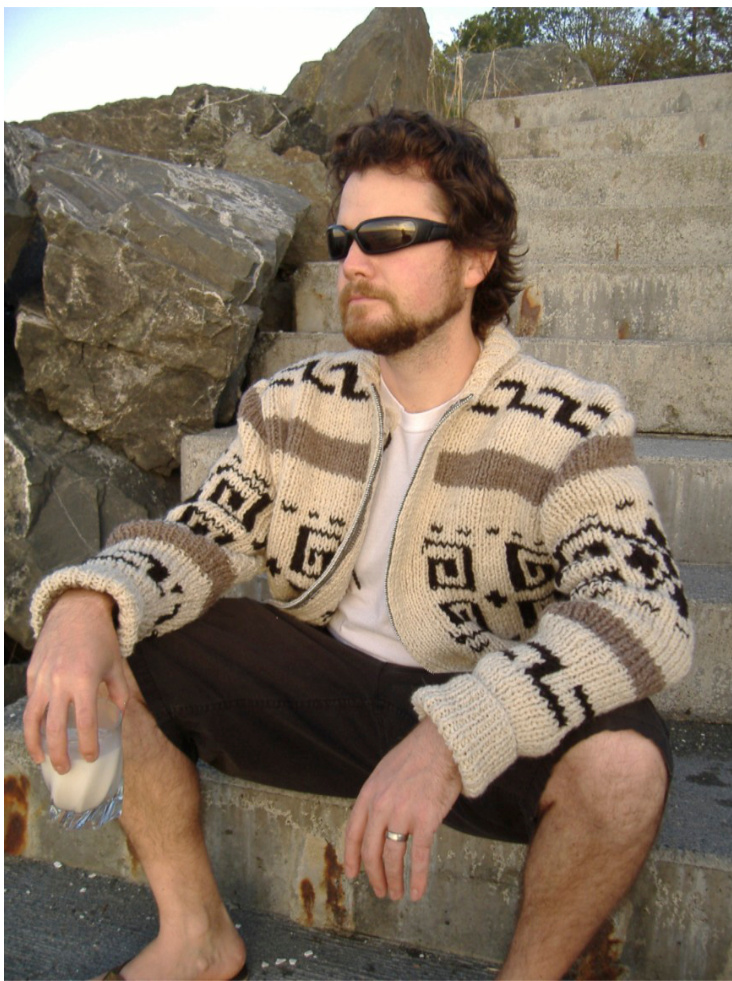
THE DUDE
BY ANDREA RANGEL SIZES S[M, L, 1X, 2X], shown in size M
MEASUREMENTS
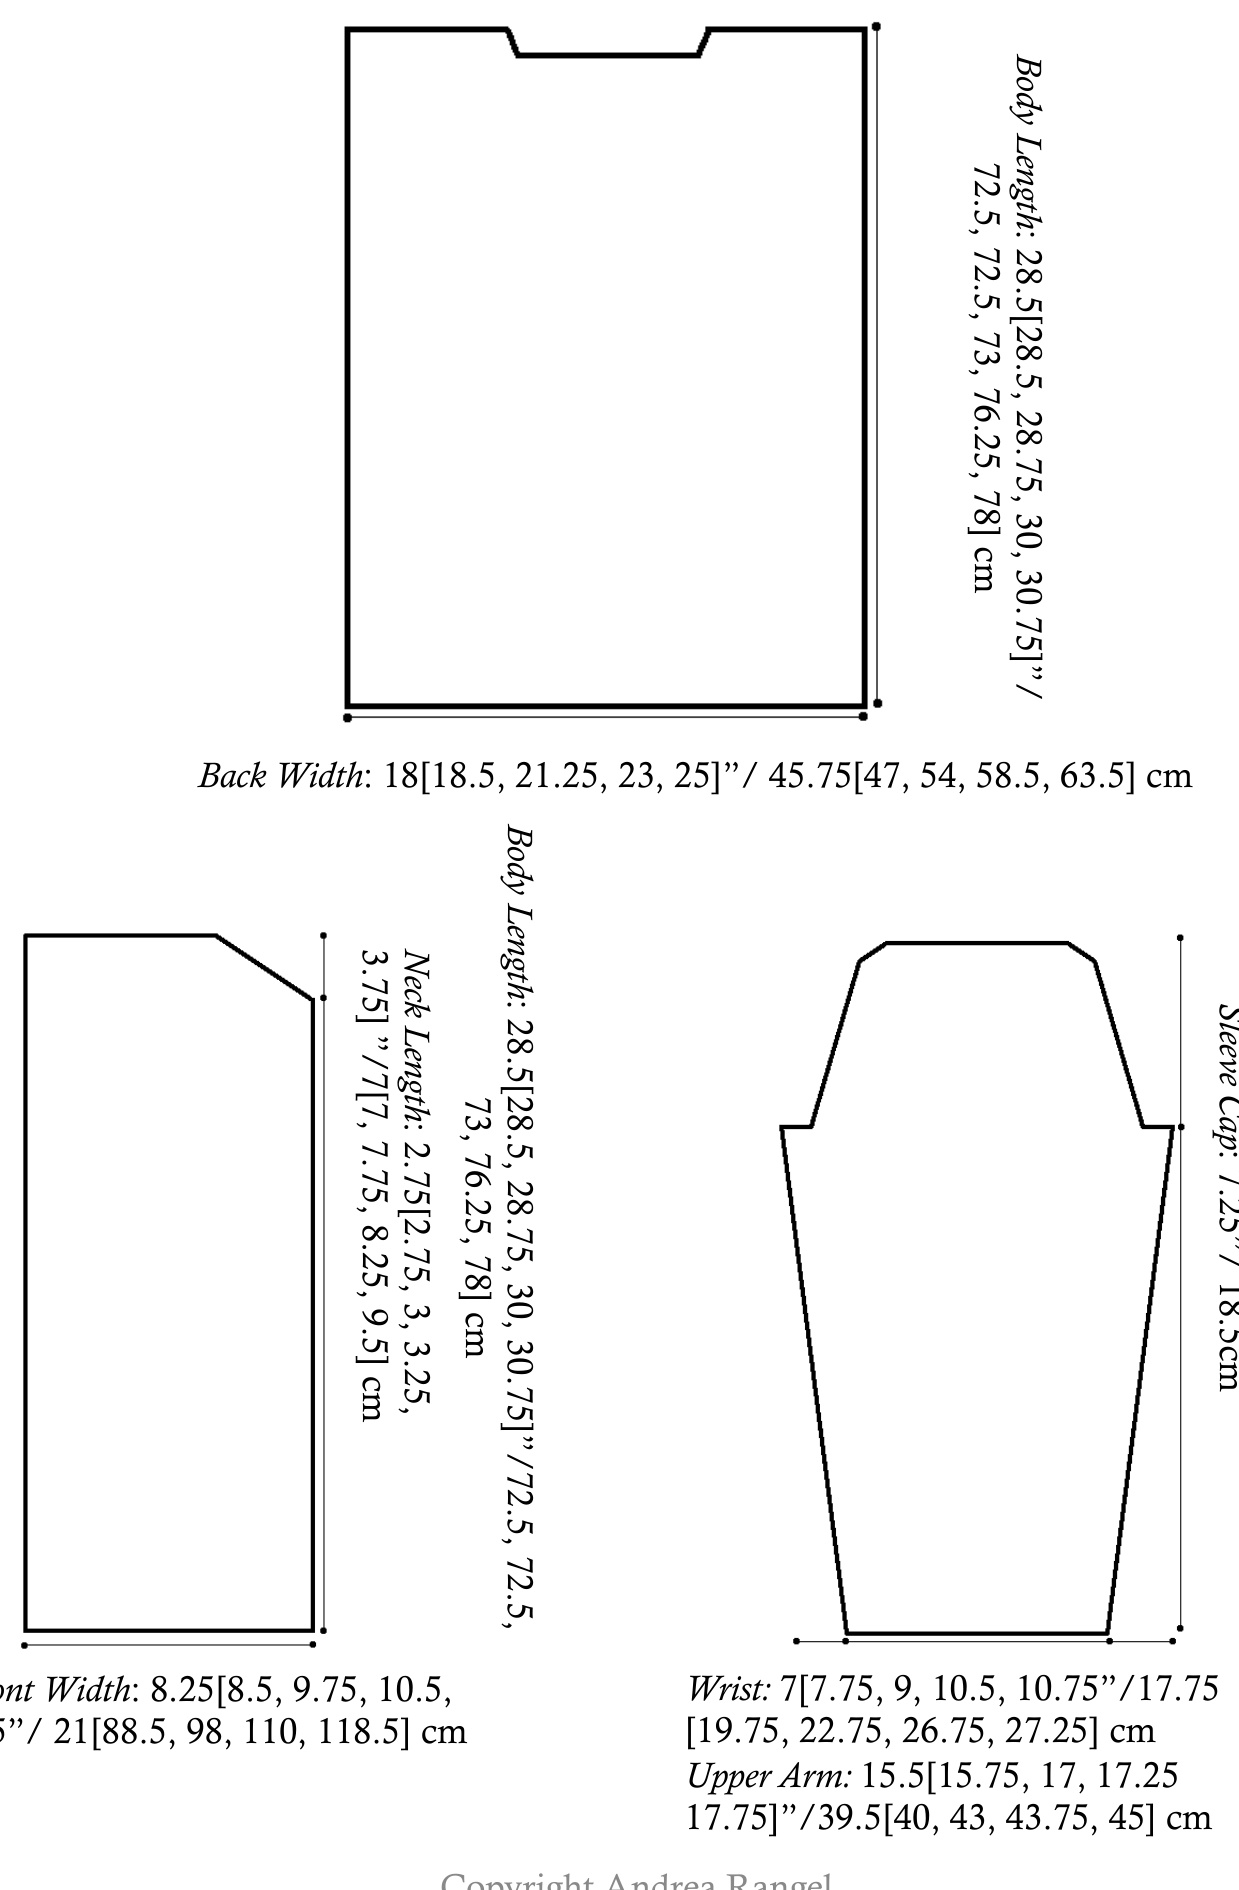
·Chest Circumference: 36 [38, 42, 46, 50]"/91.5[96.5, 106.75, 116.75, 127] cm ·Length Hem to Shoulder: 28.5[28.5, 28.75, 30, 30.75]"/72.5, 72.5, 73, 76.25, 78] cm ·Sleeve Length: 18[18, 18, 19, 19]"/ 45.75[45.75, 45.75, 48.25,48.25] cm

GAUGE
21 sts/21 rows = 4 inches in un- stretched 1x1 rib on US #10 needle
MATERIAL:
Cascade Yarns Ecological Wool [100% wool; 478yd/437m per 250g skein]; MC: Vanilla #8014; 3[3, 3,4, 4] skeins, CC1: Latte #8063; 1 [1, 1, 1, 1] skein; CC2: Ebony #8095 1[1, 1, 1, 1]; skein ·1 US #10/6.00mm 24" - 32" circular needle ·1 US #6/4.00mm 24" - 32" circular needle ·1 US #4/3.55mm 24" - 32" circular needle ·1 US #11/8.00mm 24" - 32” circular needle (optional - to maintain gauge over color charts) \*Note: I recommend using circular needles as opposed to straights because the project is quite heavy and circular needles will support this weight more effectively.
PATTERN NOTES
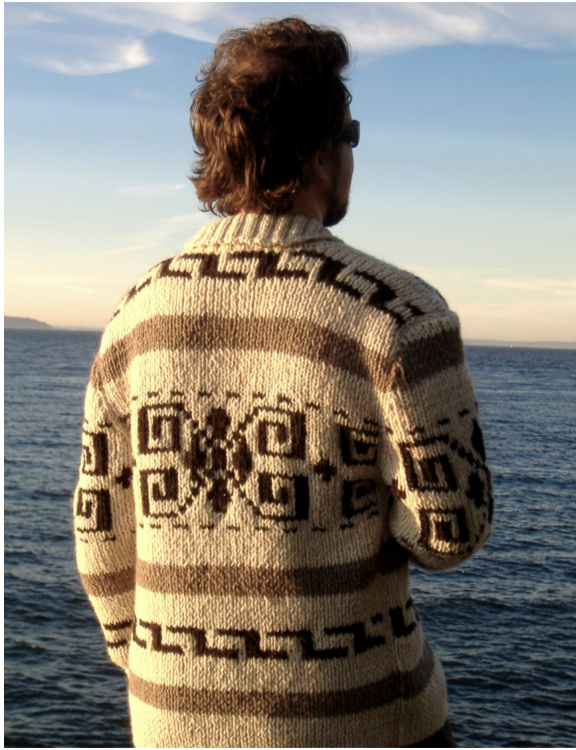
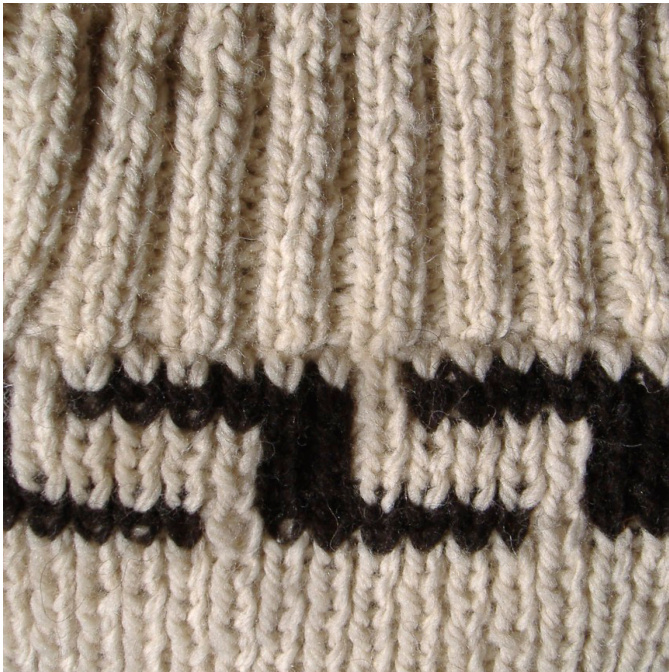
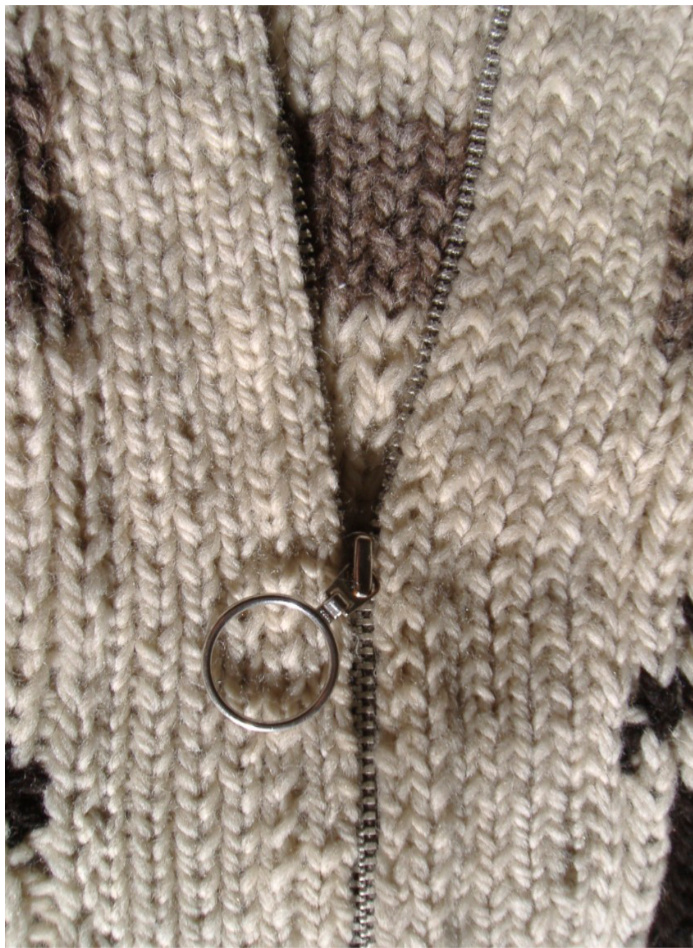
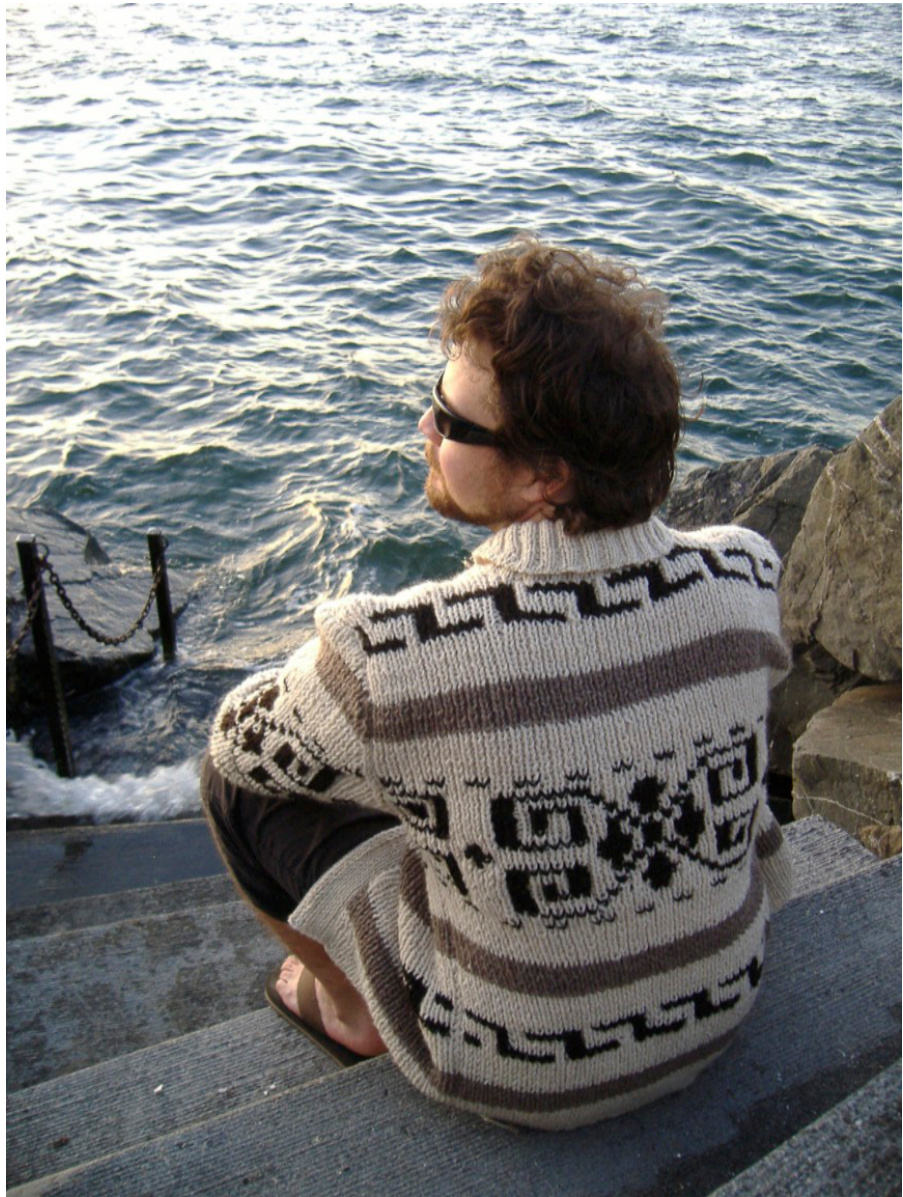
The Dude was inspired by the movie, The Big Lebowski. The original, as featured in the movie, is a Pendleton sweater made at Winona Knitting Mills (now closed down) during the sixties and seventies. This version is worked in 1x1 rib. It is designed to be loose fitting with a long body and long sleeves, which can be rolled up if necessary. It is a heavy, warm cardigan and features a zipper closure and short row shawl collar. This project is worked entirely in 1x1 rib, (except for the collar) including the color pattern charts. The cuffs and hem are worked with smaller needles for a tighter gauge for 12rows. I recommend working the color charts in a needle one size larger than for the main part of the project to maintain gauge. The charts are worked in faire isle, stranding the yarn not in use behind the work. You may wish to catch the floats because the color sections are quite long, but be aware that floats may show through if caught because of the black and white color contrast. On the charts the pattern looks wider than on the finished project; this is because the ribbing pulls the stitches together. All of the pieces follow the same color pattern by rows so that the color patterns line up, but the number of stitches varies depending on which piece is being worked. Read the directions on the chart pages before beginning.
ABBREVIATIONS
BO bind off MC main color CC contrast color Patt Pattern CO cast on P purl Dec decrease P2tog purl 2 together, 1 st Foll follows decreased K knit P2togtbl purl 2 together through the K2tog knit two together back loops, 1 st decreased M1 make 1 st; insert right needle PU pick up into bar between sts from Rem remain(ing) front to back; place this st on RS right side left needle, K into the back of Ssk slip 2 sts knitwise, knit these this st, twisting it, 1 st 2 stitches together, 1 st increased decreased M1pw make 1 st purl wise; insert St(s) stitch(es) right needle into bar between WS wrong side sts from back to front; place yo yarn over this st on left needle, P into the front of this st, twisting it, 1 st increased.
COLOR PATTERNS
Sizes S, M, and L Only: Rows 1-18: MC (18 rows) Rows 19-26: CC1 (8 rows) Rows 27-36: MC (10 rows) Rows 37-44: Chart 1 (8 rows) Rows 45-54: MC (10 rows) Rows 55-62: CC1 (8 rows) Rows 63-72: MC (10 rows) Rows 73-106: Chart 2 (34 rows) Rows 107-116: MC (10 rows) Rows 117-124: CC1 (8 rows) Rows 125-134 (fronts and back)/ 125 - END (sleeves): MC Rows 135-142 (fronts and back only): Chart 1 (8 rows) Rows 143 - END (fronts and back only): MC Sizes 1X and 2X Only: Rows 1-24: MC (24 rows) Rows 25-32: CC1 (8 rows) Rows 33-42: MC (10 rows) Rows 43-50: Chart 1 (8 rows) Rows 51-60: MC (10 rows) Rows 61-68: CC1 (8 rows) Rows 69-78: MC (10 rows) Rows 79-112: Chart 2 (34 rows) Rows 113-122: MC (10 rows) Rows 123-130: CC1 (8 rows) Rows 131-140(fronts and back)/ 125 - END (sleeves): MC Rows 135-142 (fronts and back only): Chart 1 (8 rows) Rows 143 - END (fronts and back only): MC
Copyright Andrea Rangel 2010 All Rights Reserved
BACK
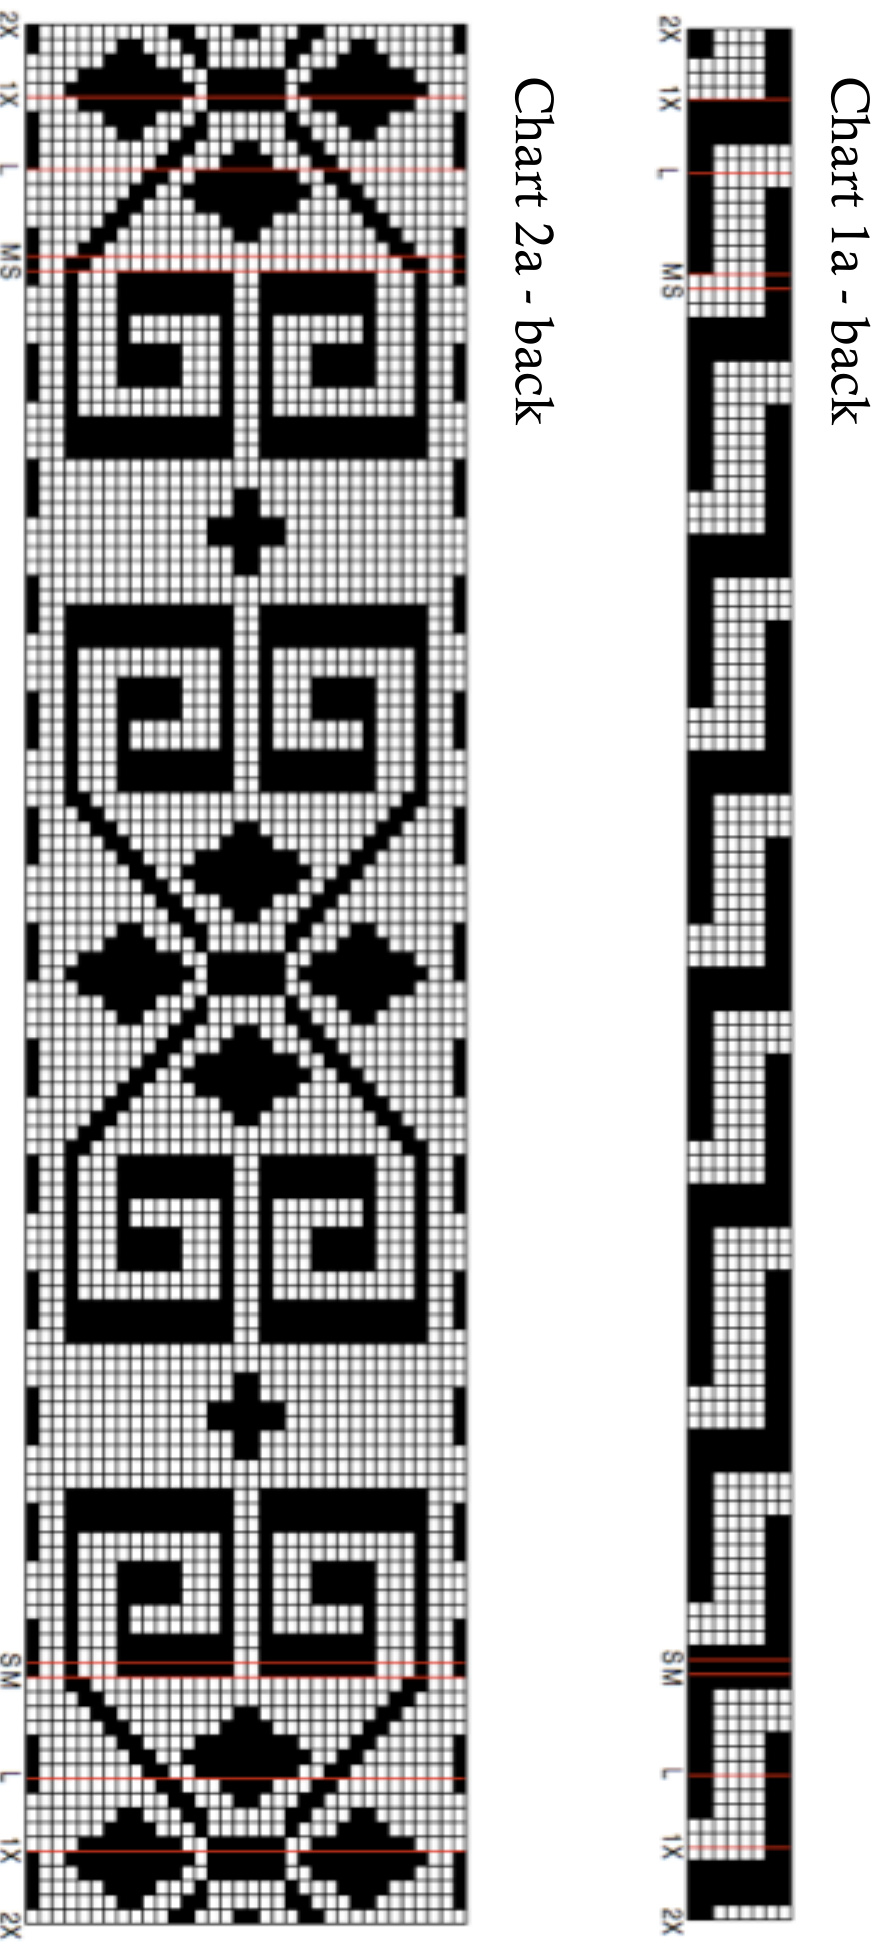
Work entirely in 1x1 rib, with selvedge sts at both sides. With second-smallest needle (US #6/4.00mm 24” - 32" circular needle) and MC, CO 95 [97, 111, 121, 131] sts. Row 1: k1, \*k1, pl; rep from \* to last 2 sts, k2. Row 2: p1, \*p1, k1; rep from \* to last 2 sts, p2. Repeat rows 1 and 2 throughout for 1x1 rib patt with selvedge sts. Work 12 [12, 12, 16, 16] rows in 1x1 rib. Switch to second largest needle (US #10/6.00mm 24"- 32" circular needle) and continue working according to color pattern, as above and using charts 1a and 1b (back charts), through row 143[143, 143, 149, 149]. You have already worked the first 12[12, 12, 16, 16] rows of the color pattern before switching to the larger needle.
Neck:
g in MC) Work 31[32. sts in 1x1rib.B 33[33, 37,41, 45]sts. Work both sides of neck separately, the right side first. You can place the sts for the left side of the neck on a holder if they're in your way. Dec for right side of neck: Rows 1 & 3(RS): Work to last 3 sts in 1x1 rib, k2tog, k1. Rows 2 & 4(WS): Work even in 1x1 rib. (29 [30, 35, 38, 41] sts rem for right side of neck.) Work 0[1, 2, 1, 4] more rows even in 1x1 rib. BO all sts in 1xl rib. Dec for left side of neck: Attach yarn at outside edge with WS facing. Rows 1 & 3 (WS): Work even in 1x1 rib. Rows 2 & 4(RS): k1, ssk, work to end in 1x1 rib. (29[30, 35, 38, 41] sts rem for left side of neck.) Work 0[1, 2, 1, 4] more rows even in 1x1 rib. BO all sts in 1xl rib.
Copyright Andrea Rangel 2010 All Rights Reserved
LEFT FRONT
Work entirely in 1x1 rib, with selvedge sts at both sides. With second-smallest needle and MC, CO 43[45, 51, 55, 61] sts. Row 1: K1, \*K1, P1; rep from \* to last 2 sts, K2. Row 2: P1, \*P1, K1; rep from \* to last 2 sts, P2. Repeat rows 1 and 2 throughout for 1x1 rib patt with selvedge sts. Work 12 [12, 12, 16, 16] rows in 1x1 rib. Switch to second largest needle (US #10/6.00mm 24" - 32" circular needle) and continue working according to color pattern, as above, through row 134[134, 134, 140, 140]. Dec for Neck edge every row 14[15, 16, 17, 20] times starting 0n row 135[135, 135, 141, 141] as foll: (RS): Work in 1x1 rib to last 3 sts, K2tog, K1. (WS): P1, P2togtbl, work even in 1x1 rib to end. 29[30, 35, 38, 41] sts rem after working all dec rows. Last dec row is row 149[150, 151, 158, 161] BO all sts in 1xl rib.
134rklasf1r4Left Front through row 134[134,
Dos for Nool odgo oyory roy 14[15 . 16. 1 Dec 1or Neck edge every row-14l13, 1o, 1', 20] times starting on row 135[135,135, 141, 141]as1011. (RS): K1, ssk, work in 1x1 rib to end. (WS): Work even in 1x1 rib to last 3 sts, P2tog, P1. 29[30, 35, 38, 41] sts rem after working all dec rows. Last dec row is row 149[150, 151, 158, 161] BO all sts in 1xl rib.
SLEEVES (MAKE 2)
Note on Sleeves: In the photos the sleeves are rolled up, but they still follow the same color pattern as the front and back pieces. If you prefer shorter sleeves, work fewer rows of MC before switching to CC1 in the color pattern. Read all of the instructions before beginning, including those on the sleeve charts. Shaping must be worked at the same time as working the color pattern. CO 37[41, 47, 55, 57] sts in MC with medium-sized needle. Row 1: K1, \*K1, P1; rep from \* to last 2 sts, K2. Row 2: P1, \*P1, K1; rep from \* to last 2 sts, P2. Repeat rows 1 and 2 throughout for 1x1 rib with selvedge sts. Work 12 [12, 12, 16, 16] rows in 1x1 rib. Stcb.to.n1ddlec1zedneedlecrtreworkingaccrngtocooroaliel.asaoveanousitigcnarrlsza2b0tronts)tbro11gbrow941949411o(11o11t6)c111oeS111oV>1L>1)>1)1oo) Read the directions for the color patterns before working color pattern charts. You have already worked the first 12[12, 12, 16, 16] rows of the color pattern before switching to the larger needle. At the same time, work shaping as foll: Starting on row 9, inc at each side every 4 rows 22[21, 21, 18, 18] times. 81[83, 89, 91, 93] sts (Every other increase should be a M1pw in order to keep the 1x1 rib pattern. So on row 9[9, 9, 15, 15], k2, M1, work to last 2 sts in 1x1 rib, M1, K2. Then on row 13[13, 13, 19, 19], K2, M1pw, work to last 2 sts in 1x1 rib, M1pw, K2. Continue this pattern throughout.) Continue working as established through row 94[94, 94, 100, 100]. Sleeve Cap Shaping: Note on Chart 2c: As you decrease, you will have less than 67 sts. Continue to work the chart as established across all the stitches you do have. Starting on Row 95[95, 95, 101, 101] BO 5 sts at the beg of next 2 rows. 71[73, 79, 81, 83] sts rem. Dec 1 st each side every row twice as foll: RS: K1, ssk, work even in 1xl rib to last 3 sts, K2tog, K1 WS: P1, P2tog, work even in 1x1 rib to last 3 sts, P2tog tbl, P1. 67[69, 75, 77, 79] sts rem. Dec 1 st each side every RS row 14 times as foll: RS: K1, ssk, work even in 1xl rib to last 3 sts, K2tog, K1. WS: work even in 1x1 rib. 39[41, 43, 45, 47] sts rem. Switch to MC, as per color pattern. Starting on the next RS, BO 5 sts at the beg of the next 4 rows, working all other sts even in 1x1 rib. 19[21, 23, 25, 27] sts rem. BO all rem sts in 1x1 rib.
FACING (MAKE 2)
With smallest needle, CO 13[13, 13, 15, 15] sts. Work 26[26, 26, 27, 27] inches in 1x1 rib as foll: RS rows: K2, \*P1, K1, rep from \* to last st, K1. WS rows: P2, \*K1, P1, rep from \* to last st, P1. BO all sts in established 1x1 rib.
FINISHING
Seaming:
Collar:
Sew seams carefully, being sure to line up color patterns as you go. First sew shoulder seams, then side and sleeve seams. Sew facings to front pieces; facings should be sewn so that the bottom edge lines up with the bottom edge of the front piece and the top edge lines up with the first neck edge dec. I recommend pinning the facings on carefully to properly line them up before seaming to make sure the color patterns on both front pieces line up with each other.
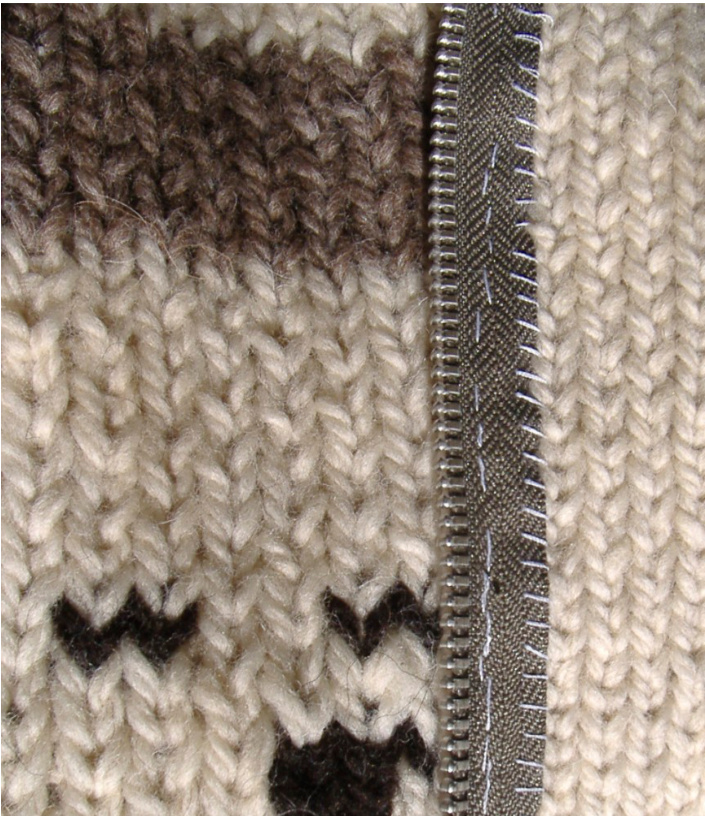
With MC, using smallest needle, with RS facing, PU and knit a 9[9, 9, 10, 10] sts from top of left side facing, 16[16, 16, 18, 18] sts at left side of collar, 40[40, 40, 48, 50] sts at the back of collar, 16[16, 16, 18, 18] sts at right side of collar , and 9[9, 9, 10, 10] sts from top of right side facing. 90[90, 90, 104, 106] sts. Row 1(WS): \*P2, K2, rep from \* to last 2 sts, P2. Work short rows to create a round shawl collar as follows: \*Work in 2x2 rib to last 2 sts. With yarn held in front, slip the next st to the right needle. Bring yarn to back and slip st back to left needle. Turn to work back the other direction. Repeat from \* once. \*Work in 2x2 rib to last 4 sts. With yarn held in front, slip the next st to the right needle. Bring yarn to back and slip st back to left needle. Turn to work back the other direction. Repeat from \* once. Continue working short rows by working 2 fewer stitches each right side row until you have worked to the last 28[28, 28, 30, 30] sts and wrapped your stitches on both RS and WS. After working to the last 28 sts, wrapping and turning on the last WS row, work in 2x2 rib to the end of the row, turn and work to the end of the WS in 2x2 rib. BO all sts. Zipper: Final Finishing: Carefully pin the zipper to the WS of the facing, one piece at a time. I recommend basting the zipper to the facing using a contrasting thread before sewing it on. First whip stitch the zipper to the WS of the facing, then, with RS facing, use back stitch to sew the zipper down a second time. Follow one vertical column of stitches to help you sew straight. This method of sewing on the zipper will hold it firmly in place and is important since the zipper may get a lot of strain. Weave in all ends. Steam or wet block after all the pieces have been sewn together to smooth out stitches. The collar must be blocked in order for it to fold over neatly as seen in the photos. Blocking also helps the zipper to lay flat. Repeat for the other zipper.
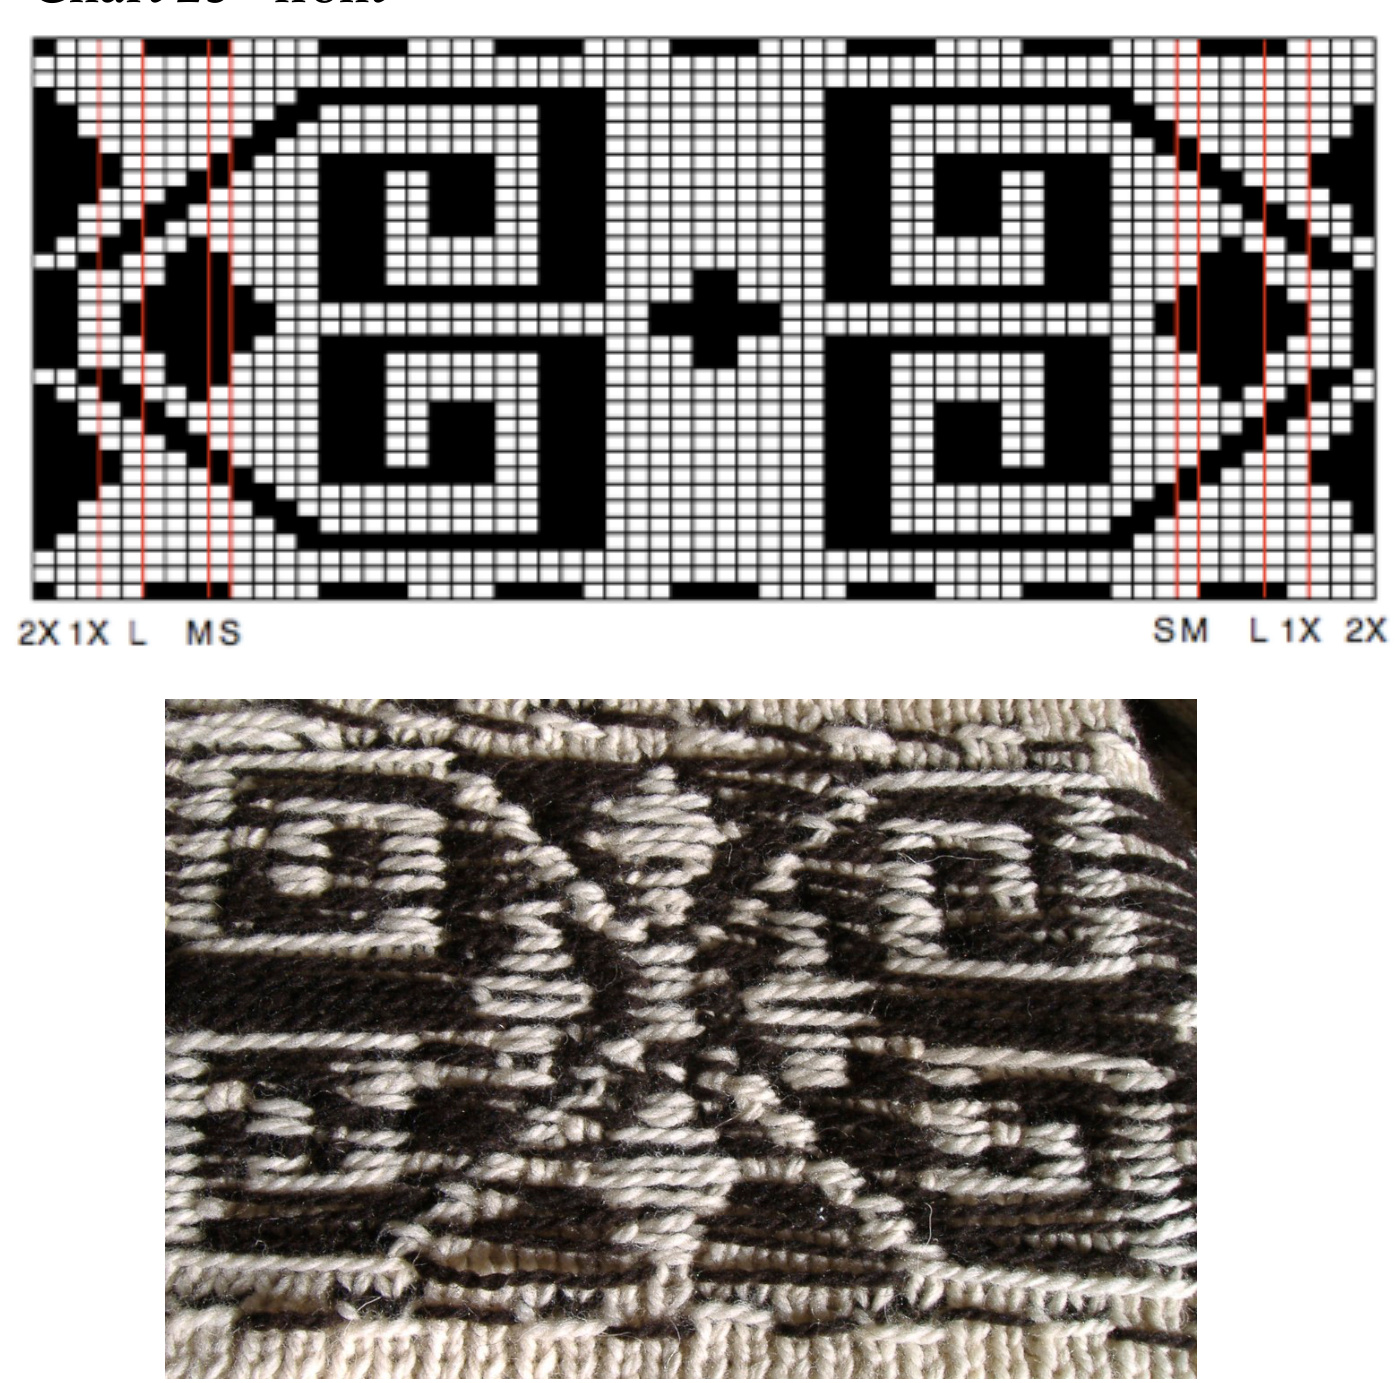
Charts: I recommend working 2 stitches at each edge of your work in MC, regardless of the chart in order to maintain a firm edge, but that is not shown on the charts. The color patterns do not line up from the front to the back.
Copyright Andrea Rangel 2010 All Rights Reserved Chart 1b - front

Chart 2b - front
Copyright Andrea Rangel 2010 All Rights Reserved
Sleeve Charts: IMPORTANT! Please read this before proceeding with the sleeves.
Chart 1c should be started at the right side of the chart and worked across as many stitches as you have. This number will vary because you will be increasing as you work the chart. Chart 2c should be worked across the center 67 stitches, regardless of how many stitches you have. You may wish to place markers to indicate where to begin and end the chart. No sizing is indicated for the sleeve charts. I recommend working 2 stitches at each edge of your work in MC, regardless of the chart in order to maintain a firm edge, but that is not shown on the charts. The color pattern in chart 1c will not line up when sewn together.

Copyright Andrea Rangel 2010 All Rights Reserved

ABOUT THE DESIGNER

See more of my designs on my website at www.andreaknits.com or visit me on Ravelry. My user name is andreakr. This pattern and knitted design are subject to copyright, and are only for personal, non-commercial use. You may not distribute or sell this pattern or any items created using the directions in this pattern.


