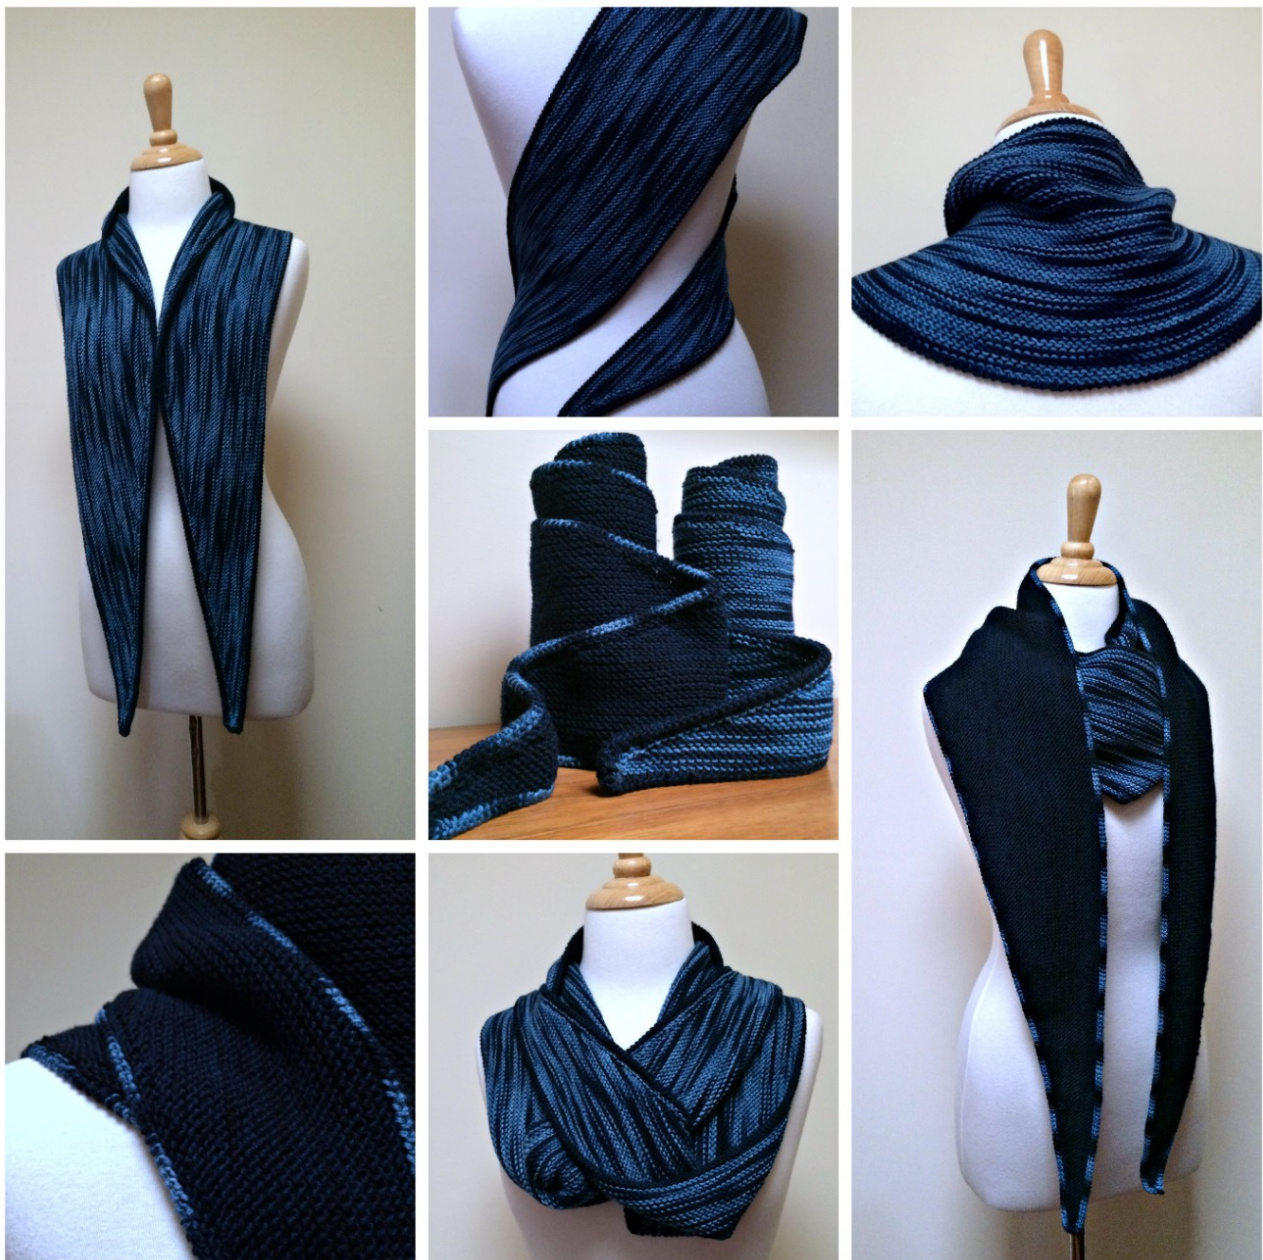
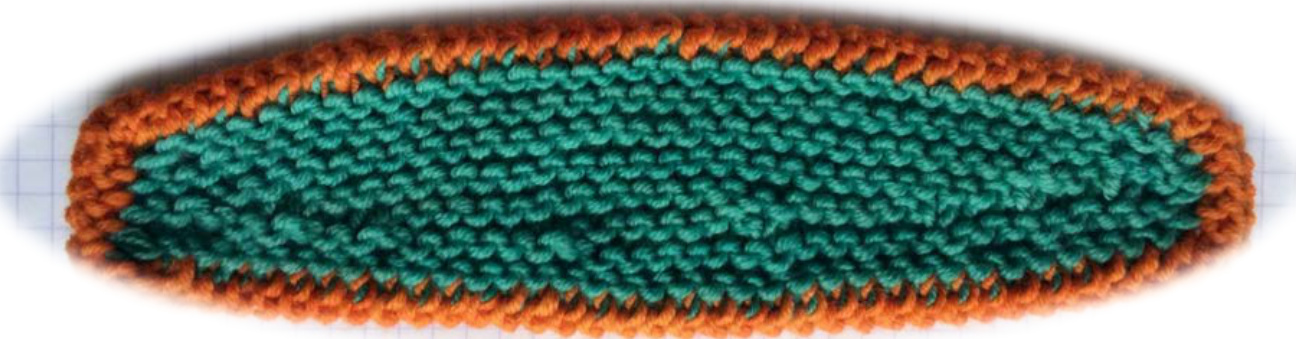
Fandangle Shawl
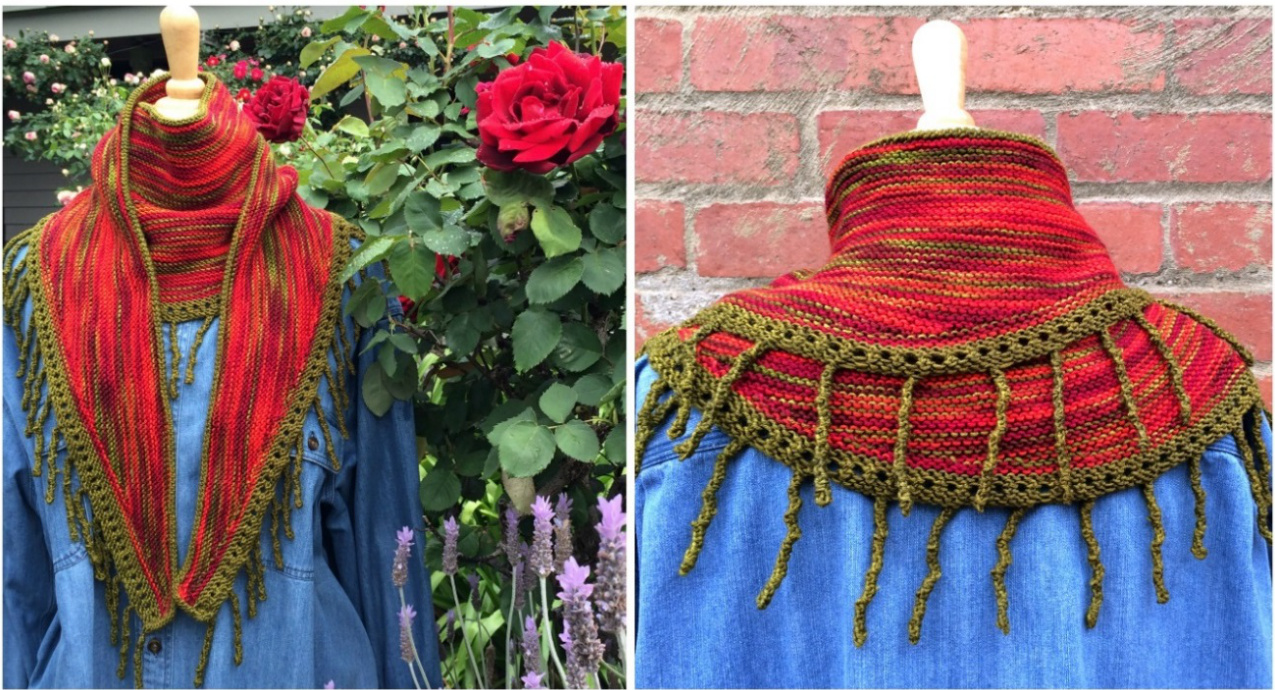
A quick and simple crescent shawl worked sideways in garter stitch and shaped with short rows. Finish with icord for a classic tailored look or add icord fringe or simple fringe for a little extra kick!
Yarn for iCord Fringe orSimple Fringe version:
(MC) Main Colour: 180g Wollmeise DK "Gazpacho" [or any DK yarn approx. 214m per 100gm] (CC) Contrast Colour: 100g Wollmeise DK "Schwefel"
Yarn for plain iCord version (no fringe):
(MC) MainColour: 180g Wollmeise DK "Admiral" [or any DK yarn approx. 214m per 100gm] (CC) Contrast Colour: 25g Wollmeise DK "Admiral in den Wolken" Note: You may be pushing it, but there should be just enough of both yarns to squeeze out a second shawl if you start with one full skein of MC and one full skein of CC!
Needles & Notions:
4.00mm circular needle - 80cm+ recommended as shawl is worked lengthways 5.00mm crochet hook for provisional cast on Waste yarn for provisional cast on 4.00mm double point needles for iCord Tapestry needle Gauge: Approx. 20sts 10cm/4" on 4.0mm. Gauge is not critical and shawl is very stretchy
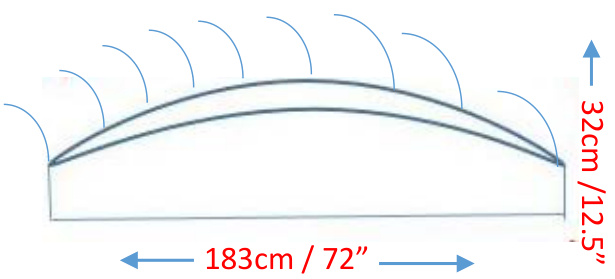
Measurements:
with fringe: 183cm x 32cm / [72"x 12.5"] without fringe: 183cm x 23cm / [72" x 9"]
Instructions: Wrap and turn short row method
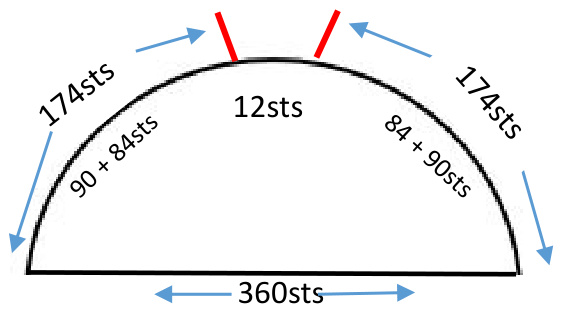
Using waste yarn, provisionally cast on 360sts. See p3 for crochet provisional cast on tutorial. Change to main colour and 4.00mm needle R1)- R3) Knit all stitches R4) (RS) Knit to last three stitches, w&t R5) (Ws) Knit to last three stitches, w&t R6) Knit to 3 sts before last wrap and turn, work w&t Repeat R6 until 180 sts remain unwrapped and there are 90 sts in each section of wrapped stitches (You willhave worked 62 rows & there will be 31 garter st ridges.)
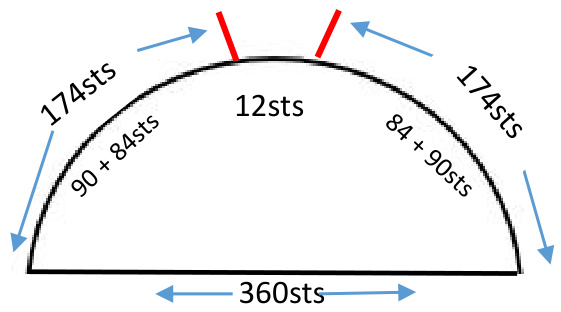
R7): Knit to last 6 sts before last wrap and turn, work w&t Repeat last row until 12 sts remain unwrapped, and there are 174 sts in each section of wrapped stitches. (Total of 94 rows worked from cast on - 47 garter stitch ridges). Turn work to right side. R8) (Rs) Knit across next 186sts, to end of row. Note: You do not need to pick up the wraps R9) (WS) Knit across all 360sts Work 2 rows knit all stitches. Break off main colour, join in contrast yarn and work edging 1, 2
Instructions: German short row method
Using waste yarn, provisionally cast on 360sts. See p3 for crochet provisional cast on tutorial. Change to main colour and 4.o0mm needle
R1) - R3) Knit all stitches R4) (RS) Knit to last two sts, turn work R5) (WS) slip 1st stitch from LHN to RHN and work double st, knit to last two sts, turn work R6) (RS) slip 1st stitch from LHN to RHN and work double st, knit to 2 sts before previous double stitch,turnwork Repeat R6 until you have 180 sts in the centre without double stitches and 90 sts in each section with double stitches (You will have worked 62 rows & there will be 31 garter st ridges.) R7) Knit to last 5 sts before previous double stitch, turn, work double stitch Repeat R7 until 13 sts remain unwrapped, turn work to right side, work double stitch Total of 94 rows worked from cast on - 47 garter stitch ridges. R7) (Rs) K next 186sts, knitting all double stitches (as you come to them) as single stitches, turn work R8) (Ws) Knit across all 360sts, knitting all double stitches (as you come to them) as single stitches. Work 2 rows knit all stitches. Break off main colour, join in contrast yarn and work edging 1, 2 or 3.
Crochet Chain Provisional Cast On
a) Use a crochet hook one or two sizes larger than the knitting needle you are using and smooth yarn to use as waste yarn (nothing too fuzzy, it could get caught in the cast on edge). b) Work a crochet chain a few chains longer than the number of stitches you need to cast on. )Pull the tail through the last st of the chain to fasten off.
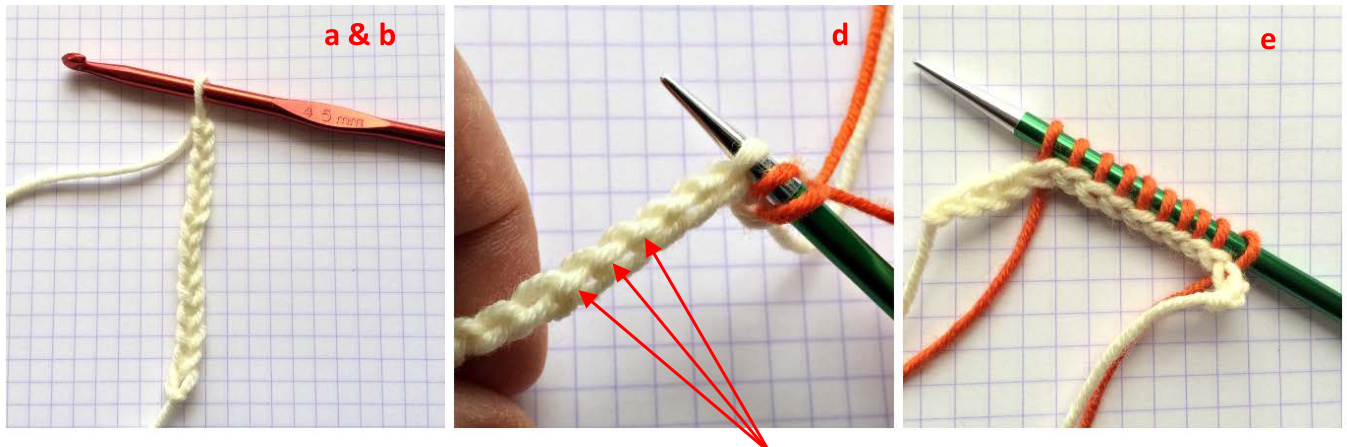
Back of chain has purl bumps d) Insert your needle into the bumps on the back of chain, pick up and knit st with working yarn e) Repeat until you have the number of sts you need for the cast on f) When you need to use the stitches, unzip the waste yarn chain carefully! g)Place live stitches on a needle
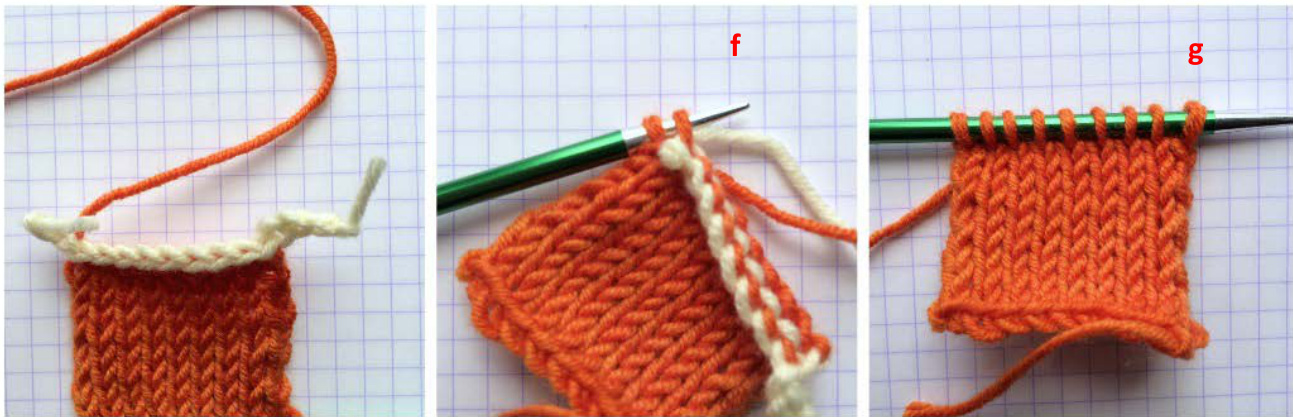
Short Rows - Wrap and Turn Method (w&t)
1: Knit across row for the required number of stitches to the turning point: (i.e. to last 3 sts) 2: Slip the next stitch purlwise from the left needle to the right needle
3. Bring yarn between needles to the front of work & slip that same stitch back to left hand needle 4: Turn work so the other side of the knitting is facing you. You have one wrapped st and the yarn is now at the back of the needles in the correct position to begin the next knit row.
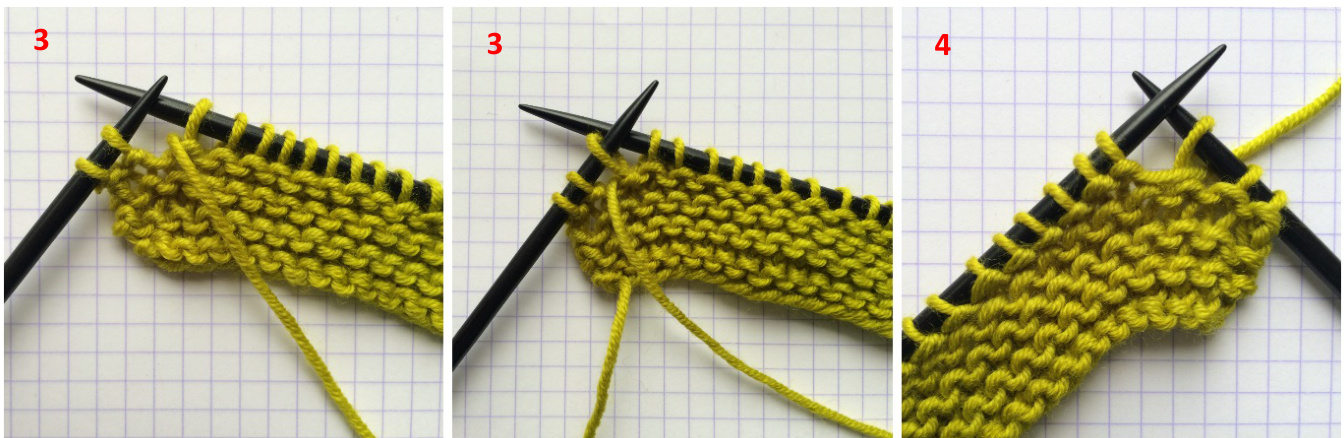
5. Knit across to 3 sts before end of row. Work w&t (wrap and turn).
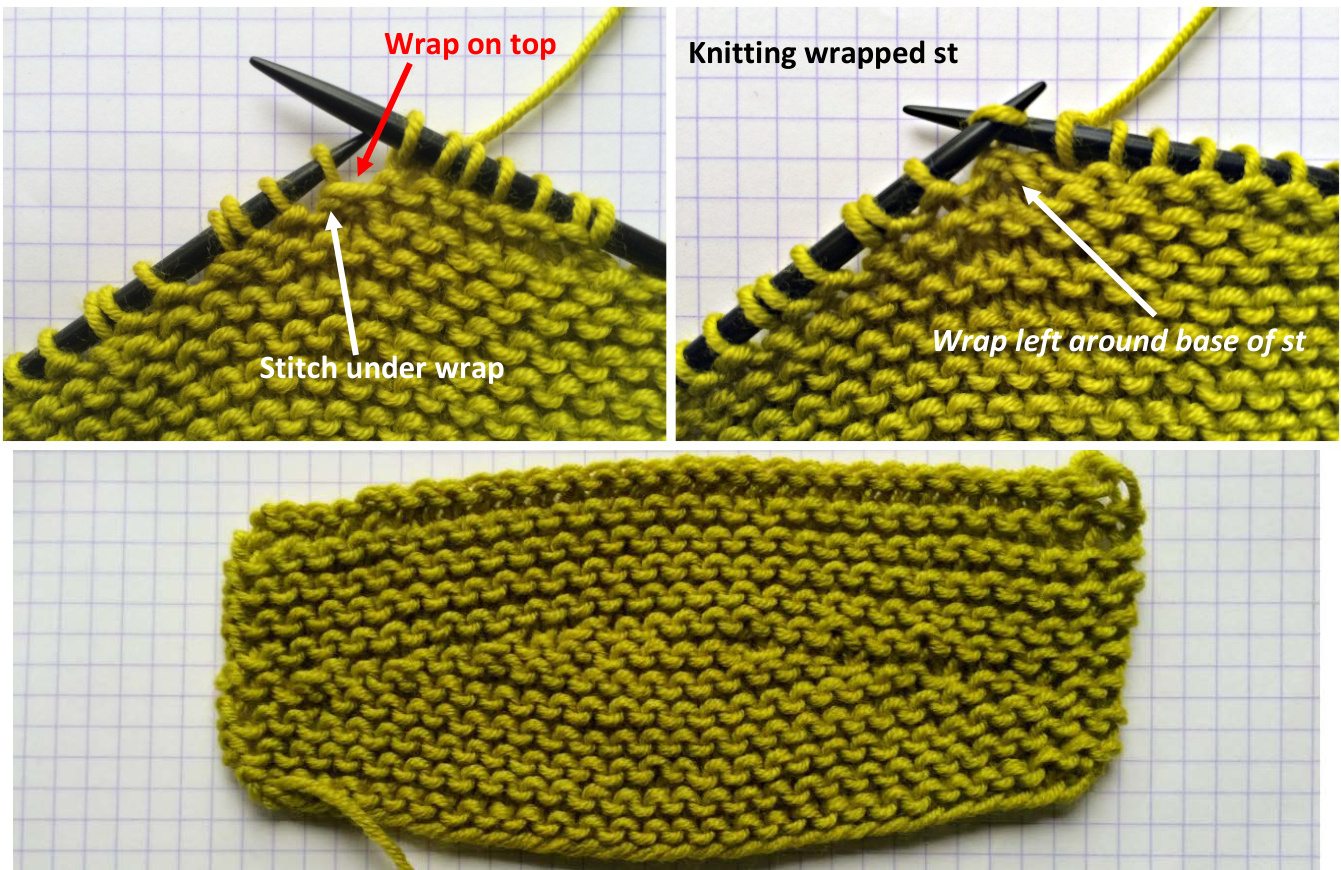
Picking up the wraps... or not!
When working short rows in stocking stitch, you would normally hide the wraps by picking them up and knitting them together with the stitch around which they are wrapped (when you return to working complete rows). However, wraps are quite well hidden in garter stitch so hiding them is not necessary. All you need to do is knit across the row as if they were all ordinary knit stitches - ignoring thewraps Once you have worked across all of the wrap and turn short rows you will have the original number of stitches that you cast on back on the needle (i.e. 360)
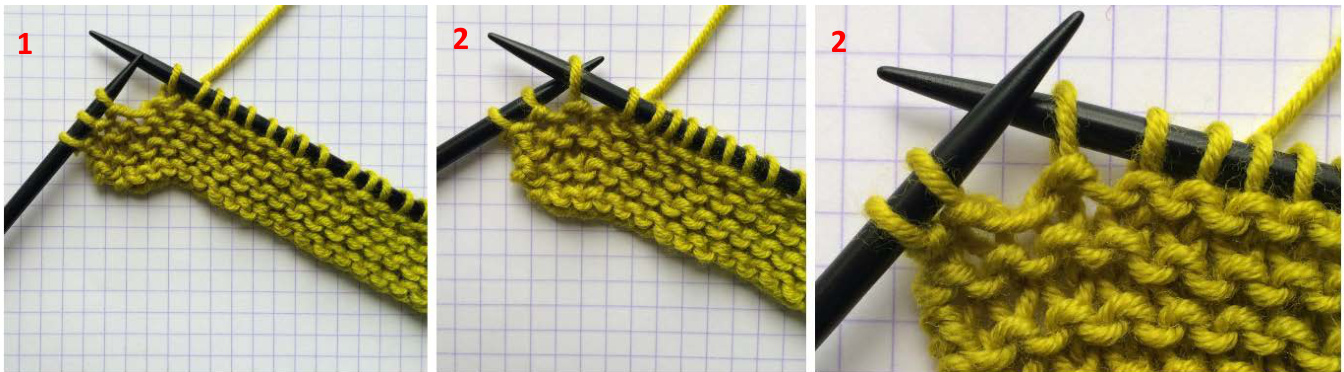
German Short Row Method
1. (RS): Knit to turning point, (i.e. 2 stitches from end of row), turn work Wrong side of work now facing you.
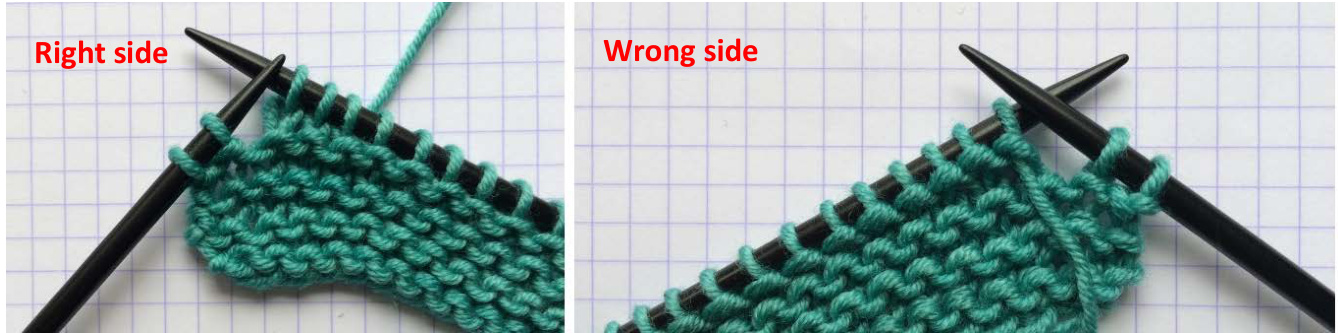
2. (Ws): a) Slip stitch from left hand needle to right hand needle purlwise with yarn in front, b) pull yarn over needle (creating a double stitch) c ) Knit across row to next turning point (2 sts from end of row), turn work.
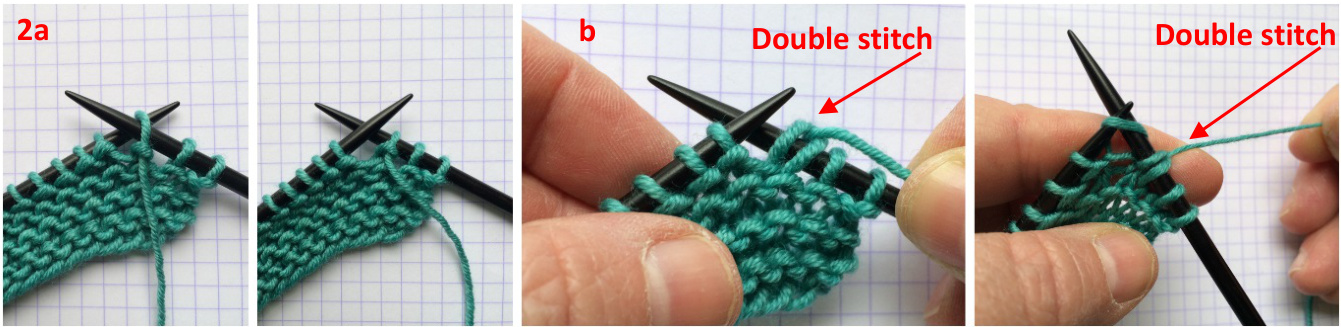
3. (RS): Slip stitch purlwise with yarn in front, pull yarn over needle, (creating a double stitch), Knit to next turning point (2 sts before double stitch), turn work. Repeat R3 until all short rows have been worked
To close the gaps:
1. (RS) Knit across row to first double st. 2. Double stitches are worked as single stitches; insert tip of RHN needle into centre of double st from left to right as for normal k st - this will knit both parts of the double stitch together. Continue working across stitches on left hand needle, working double stitches as before.
4. (Ws) Turn work. Knit across row, working double stitches as you come to them. All short rows worked and original number of stitches back on needle. (i.e. 360sts)
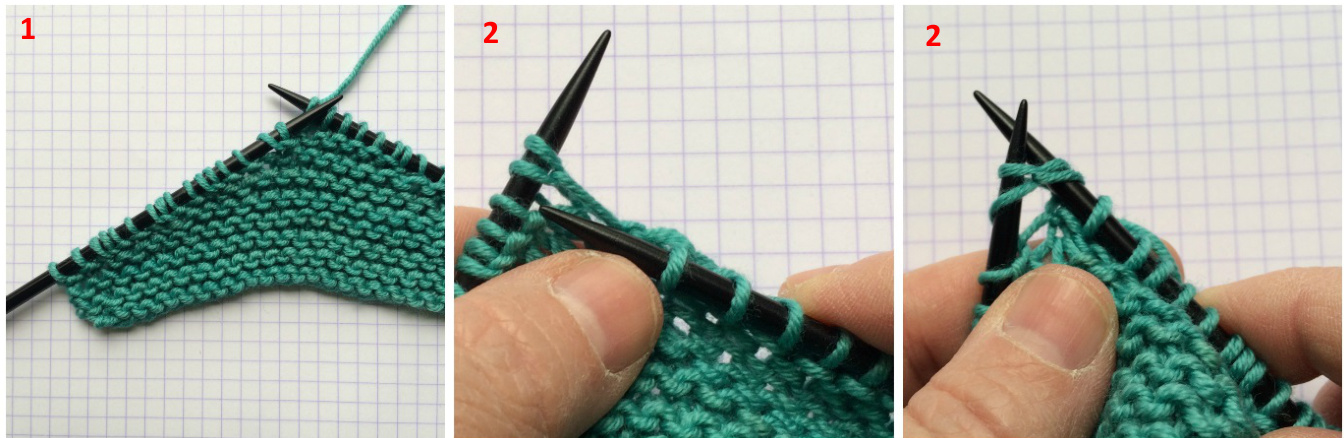
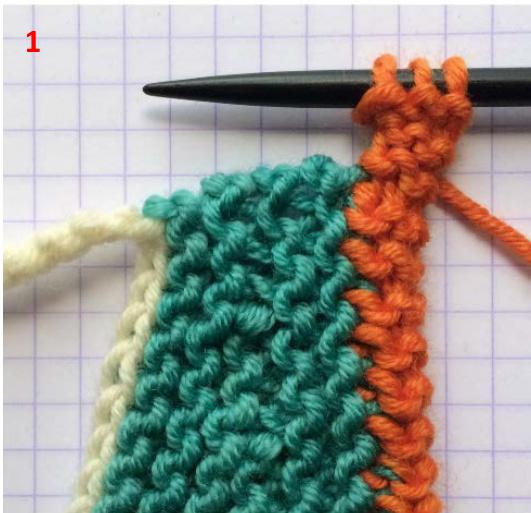
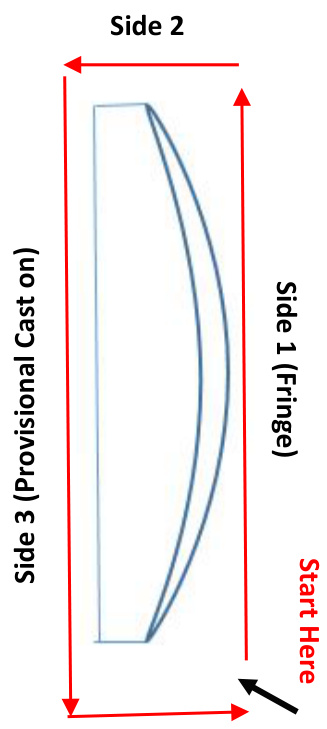
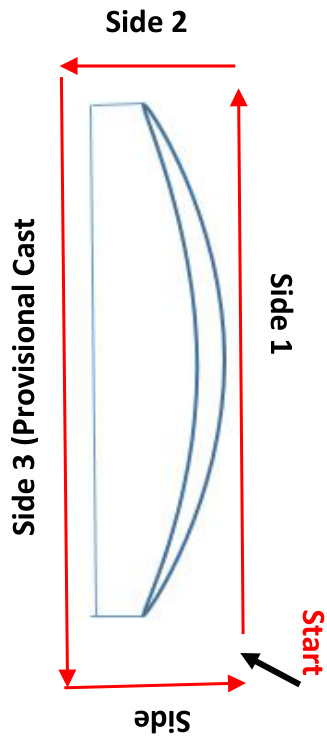
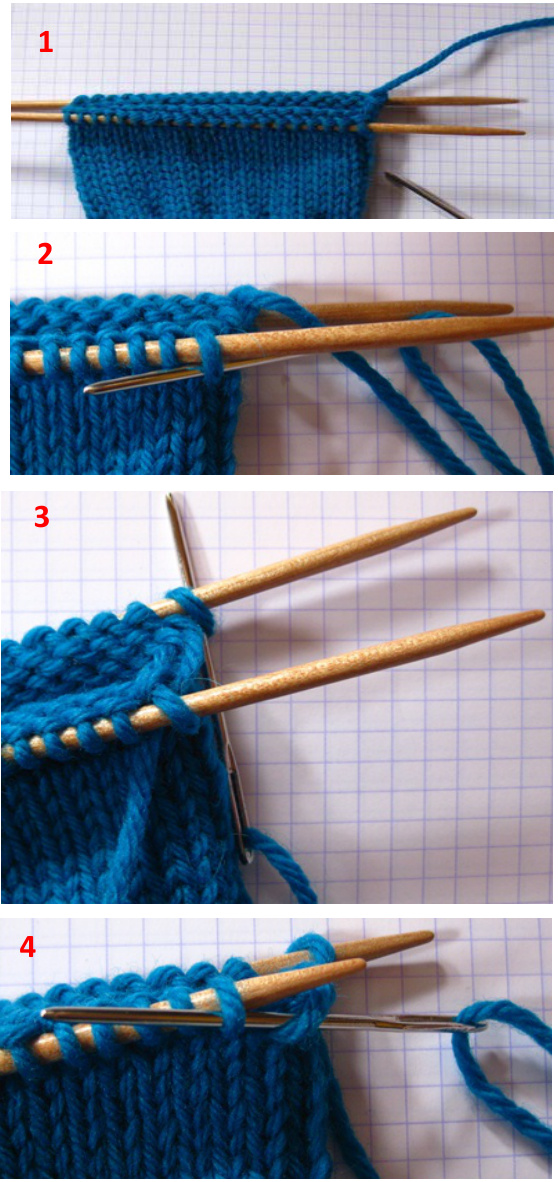
Edging #1: Plain iCord Edging
Side 1 (Long edge - live stitches) 1. Using CC cast on 3 sts on left needle
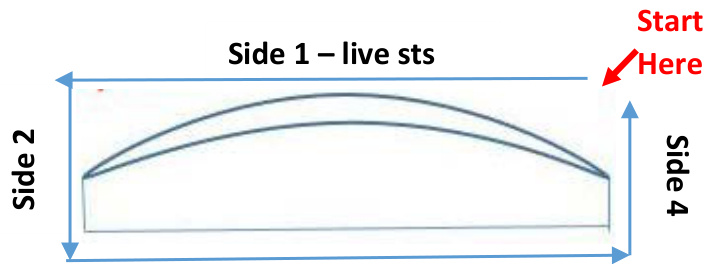
Side 3 - Provisional Cast On
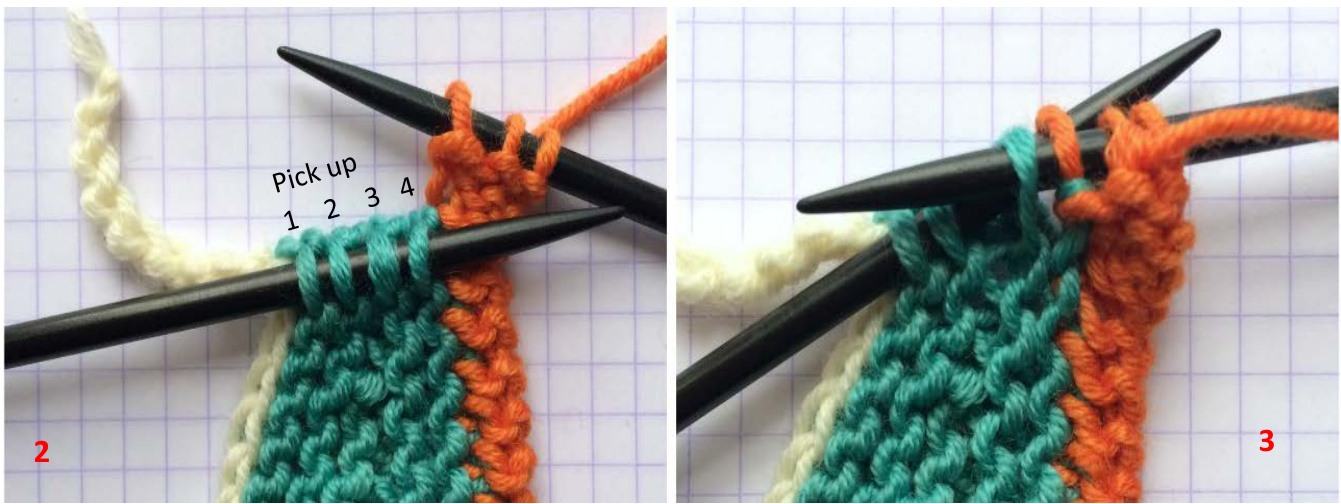
2. Pull yarn along back of 3 icord sts to right hand end of needle, purl 2 sts, p2tog - joining final stitch of three icord sts together with first live stitch from shawl 3. a) Take yarn to back of work between needles. b) Slip 3 sts from right hand needle back to left hand needle. The working yarn is attached to the left hand end of the icord stitches, but is pulled along the back of the work into the correct position to purl the first stitch of every row, causing the sts to roll and form the icord
4. Purl 2 sts, p2tog -joining final st of icord together with first live stitch from shawl (as in step 2)
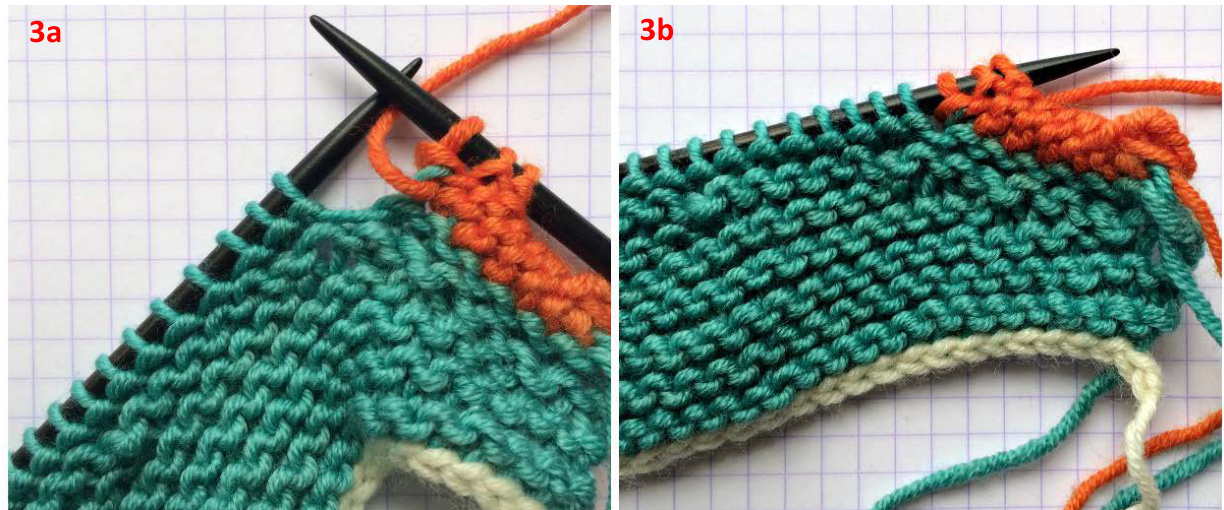
5. Repeat steps 3 & 4 until all sts from edge are worked and you have reached the first corner. 1. At the corner: Work 2 rows unattached iCord To work unattached iCord: Purl all sts without joining them to the edge of the shawl. This will ease the iCord around the corner.
2. Pick up 4 sts through garter stich bumps at edge ofshawl 3. Continue working 3 st attached purl iCord (as before) until you reach the next corner working p2togs through 3rd icord st together with stitches picked up from short edge of shawl
Side 3 (Provisional Cast on edge) 1. At the corner: Work 2 rows unattached iCord. Unzip provisional cast on and place stitches on circular needle 2. Work 3 st attached purl iCord until you reach the next corner

Side 4 (Short edge 2)
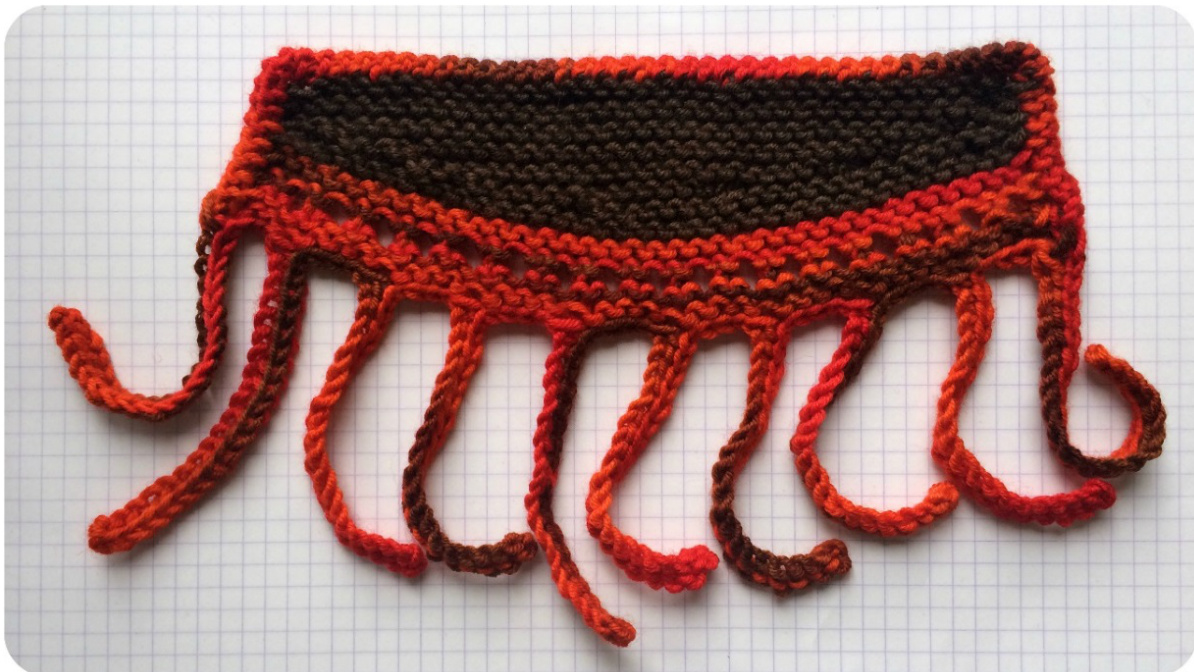
Edging #2: Dangly Purl iCord Fringe
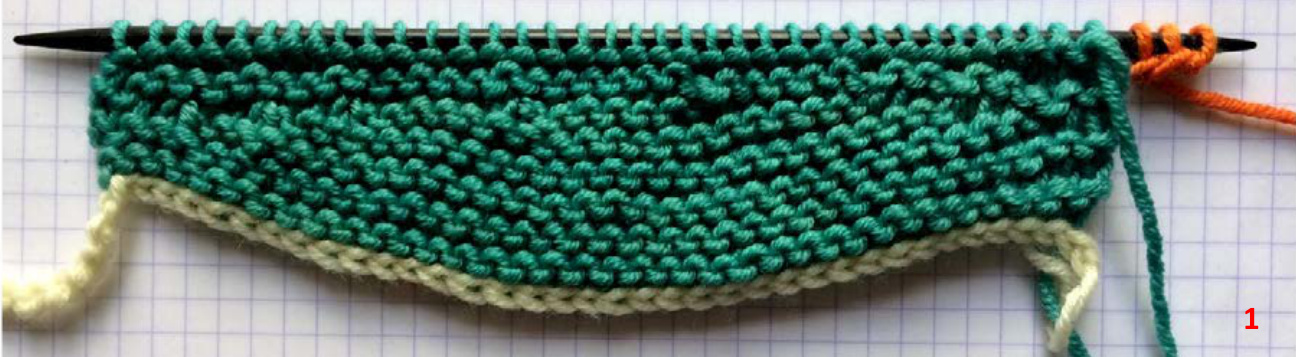
Side 1: Setup for Fringe row With 4.o0mm needle and contrast yarn: R1) (RS) Knit all sts [360sts] R2) (WS)Knit all sts Repeat rows 1 & 2 [total of 4 rows = 2 ridges of gt st ] R6)- R8) Knit all sts
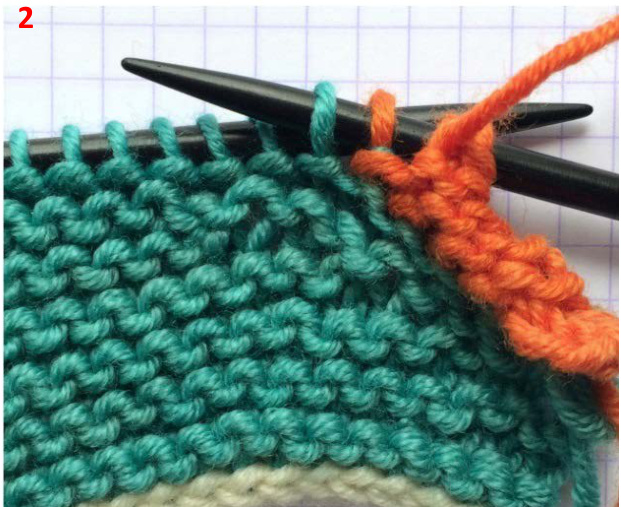
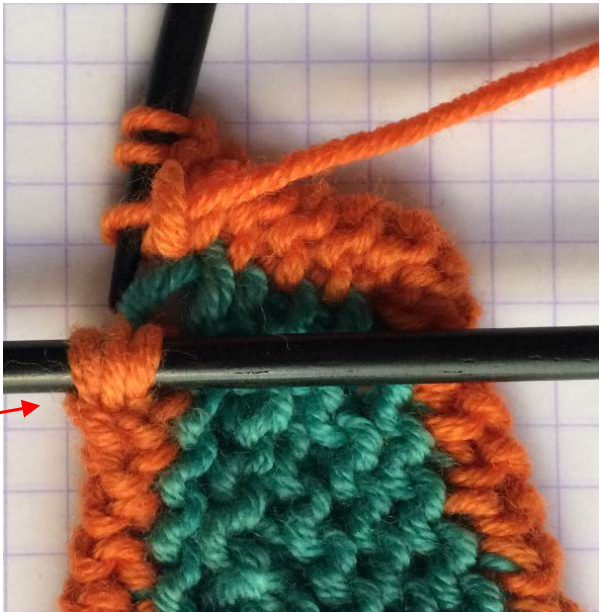
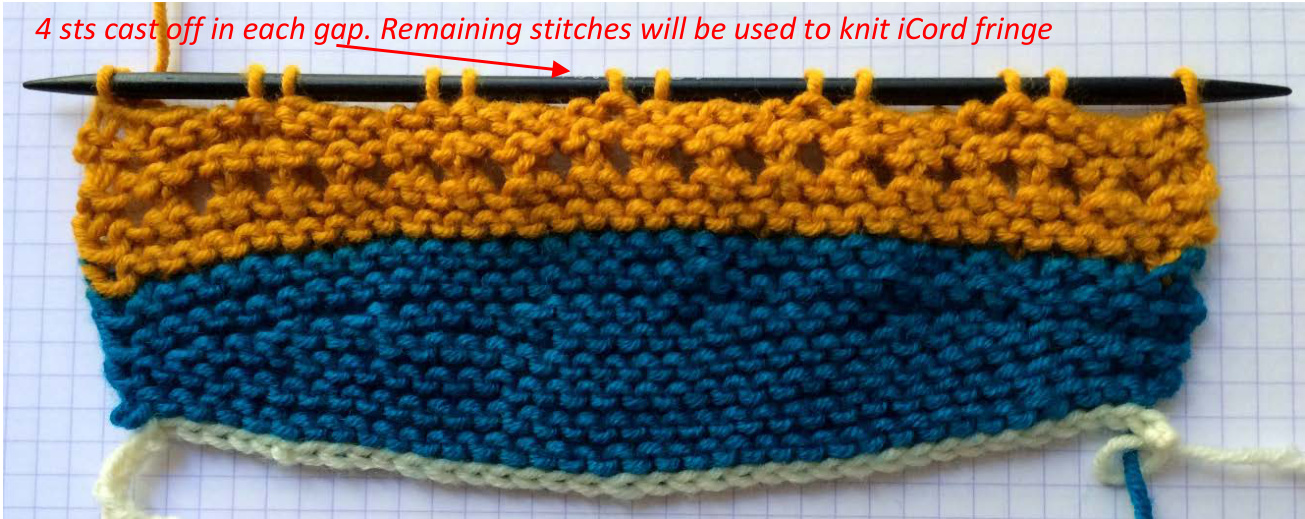
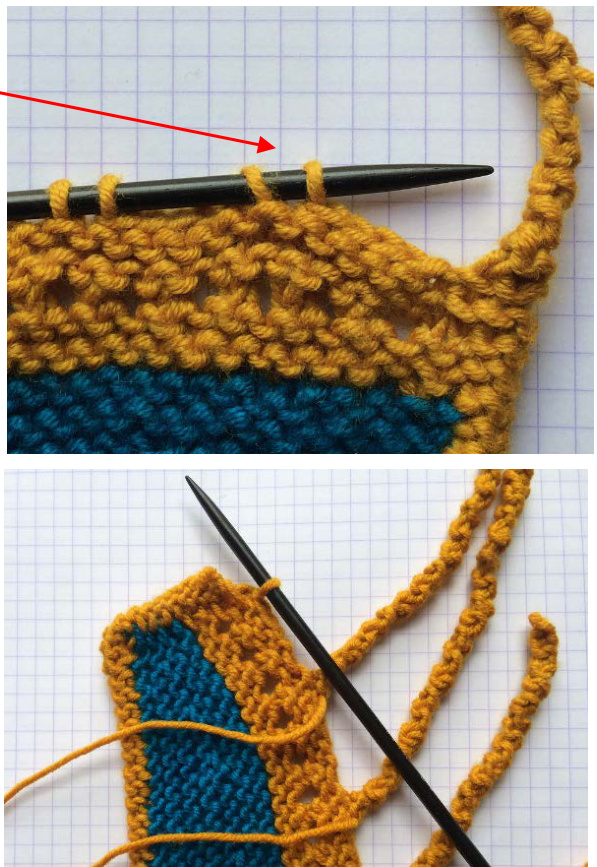
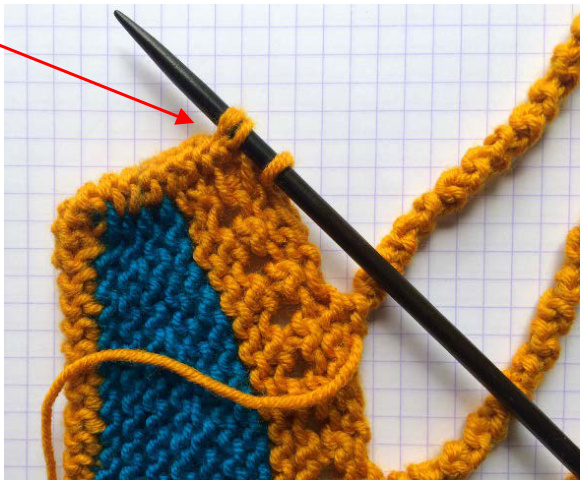
tapis R9) (Rs) k1\*cast off 4sts, k2; repeat from \* to last 4 sts, cast off 4 sts, leaving last stitch on the needles. Do not break yarn - you will return to these stitches after working the other 3 sides & use it tomaketheicorddangles.
Meanwhile, your row 9 should look like this - except of course you'll have more sts @:
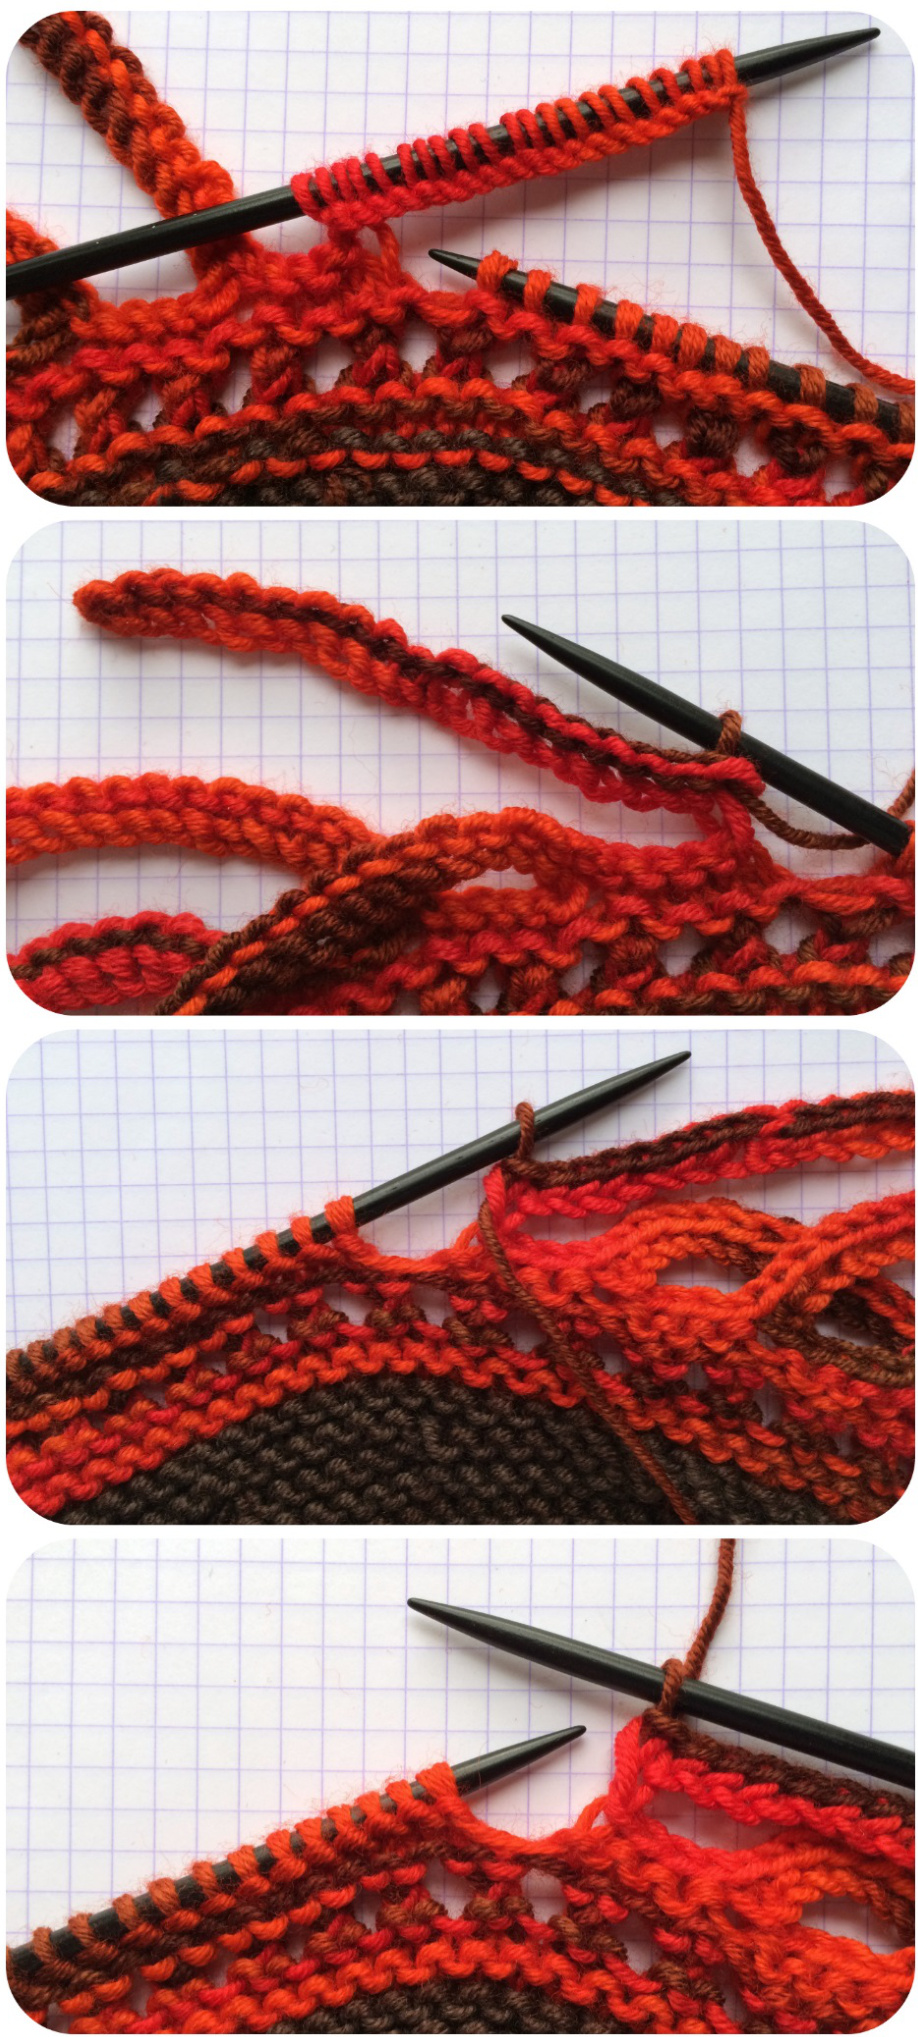
Sides 2, 3 and 4: (Short edges & Provisional cast on edge) Pick up 8 sts through garter stitch bumps on short edge. Cast on 3 sts for iCord. Work as for sides 2, 3 and 4 of plain iCord (starting at step 3 on side 2), and picking up 8 sts on both short edges. Return to Side 1 - working the iCord Dangles After completing sides 2, 3 & 4, you will be back at the start of side 1 You will have three iCord sts on the right hand needle plus stitches remaining from Side 1 cast off row onlefthandneedle
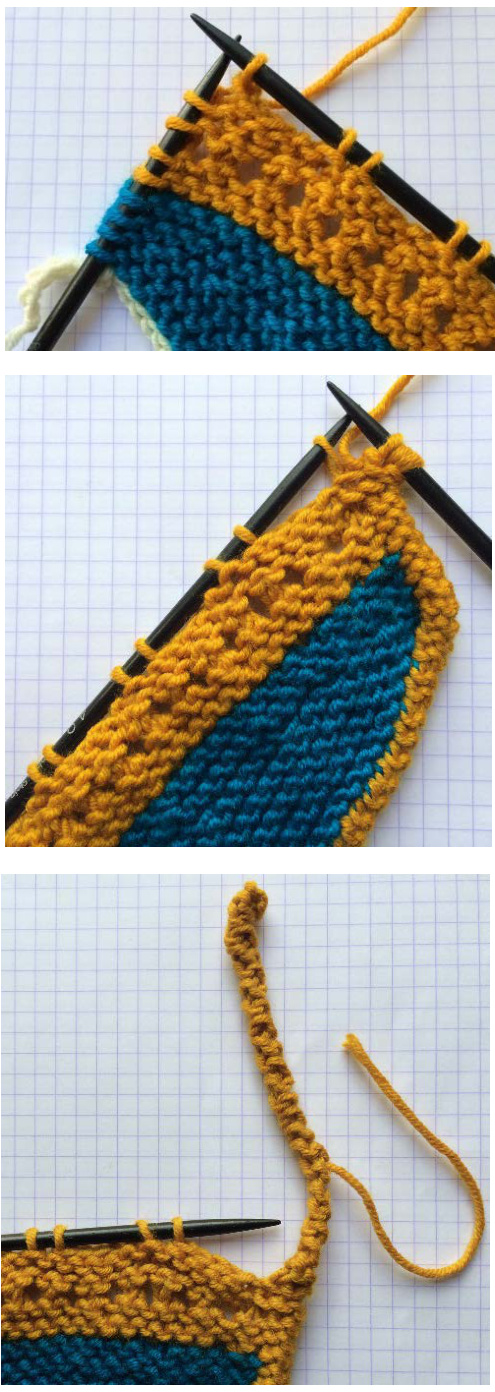
First iCord Dangle
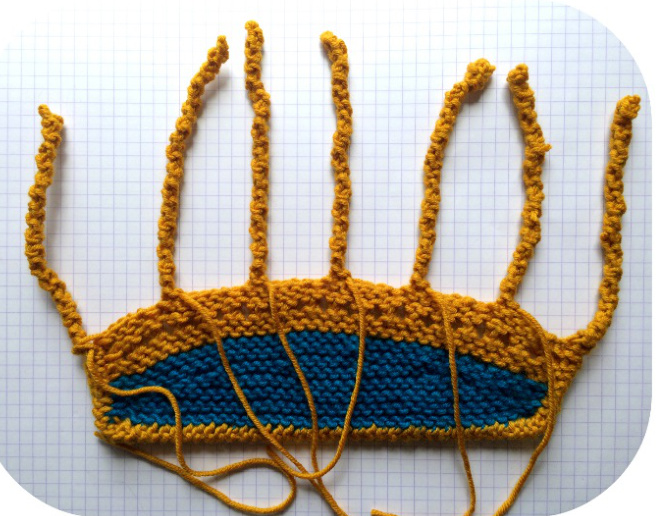
1) p2tog, p2tog- last st of iCord & 1st stitch from LHN [2sts] 2) Work 24 rows of unattached 2 stitch icord Approx. 10cm - or length desired 3) p2tog [1stitch remains] 4) Fasten off last stitch. Break yarn and thread through inside of icord. If you want to make the iCords curly, pull down gently on yarntail togather cord.
All other iCord Dangles (except the last!) 1) Join yarn to next two sts on LHN 2) Work 24 rows unattached icord 3) p2tog [1 stitch remains] 4) Fasten off last stitch. Break yarn and thread yarn tails down inside of icord. Work across row using remaining pairs of stitches to make iCords. Continue until one stitch remains on the left hand needle.
Last iCord Dangle
1) Pick up 2 sts from top of Short Edge iCord 2) Join in yarn 3) p2tog (last st from right hand needle and stitch from left hand needle), p1 [2sts] 3) Work 24 rows unattached icord. 4) p2tog [1 st stitch remains] 5) Fasten off last stitch. Break yarn and thread down inside icord. Weave ends back up into iCords. There will be a few of them
Edging #3: Simple Fringed Edging
Side 1 (Long edge - live stitches) With 4.00mm needle and contrast yarn: R1) Knit all sts [360sts] R2) Knit all sts Repeat rows 1 & 2 [2 ridges of garter st worked] R5): K2 \*YO, K2tog, repeat from \* to end [360sts] R6)- R8) Knit all sts R9) (RS) Cast off 2 sts; \*work Lambs Tail Stitch (LT) into st on RHN, cast off 4 sts; rep from\* to end. Do not fasten off last st leave it on needle (it will form part of the last iCord dangle)
Side 2 (Short edge #1)
6. Cast on 2 sts to RHN [total of 3sts 7. Pick up 8 sts through garter stich bumps at edge of shawl 8. Work attached purl iCord as for Plain iCord Edging until you reach the corner At the corner:Work 2 rows unattached iCord
Side 3 (Provisional Cast on)
9. Unzip provisional cast on and place on circular needle 10. Work attached purl iCord until you reach the next corner At thecorner:Work2rowsunattachediCord
Side 4 (Short edge #2)
11. Pick up 8 sts from garter stitch rows at short edge of shawl 12. Work attached purl iCord until you reach the last corner (3 iCord sts remaining) 13. Purl 3sts together [1 stitch remains] 14. Work LT into last st. Fasten off last stitch. 15. Pick up one stitch from iCord at other end of fringed border and work LT. Fasten off last stitch. 16. Weave end into fringed edge, closing gap between last Lambs Tail and edge. Block gently.
Lambs Tail Stitch
1. Turn work to wrong side. Cast on 20 sts into stitch on LHN [Total of 21sts] 2. Cast off 20 sts so only original stitch remains 3. Turn work to right side
4.. Slip st to RHN wyib taking yarn between needles into knit position ready to work next cast offs in Row 9
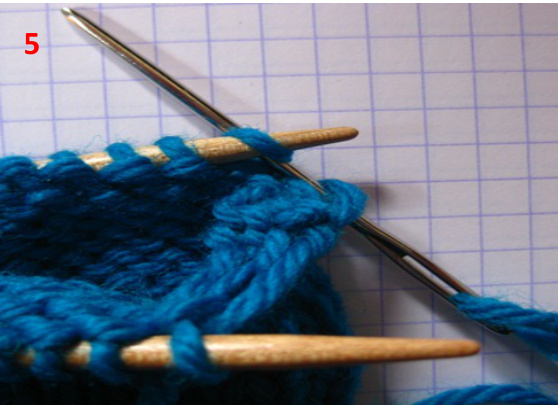
Grafting (Kitchener Stitch)
1. Place the stitches on two needles, an equal number of stitchesoneachneedle: The yarn tail should be positioned at right hand end of the back needle. Thread yarn through sewing needle. 2. Insert sewing needle purlwise into 1st st on "front" needle. Pull yarn through, leaving st on knitting needle 3. Insert sewing needle knitwise into 1st st on"back" needle. Pull yarn through leaving st on knitting needle
4a) Insert sewing needle into 1st st on front needle knitwise, and slip this st off knitting needle and then 4b) Insert sewing needle into next st on front needle purlwise, pull yarn through, but leave this stitch on the knitting needle 5a) Insert sewing needle into 1st st on back needle purlwise, and slip this st off knitting needle and then 5b) Insert sewing needle into next st on back needle knitwise, pull yarn through, but leave this stitch on the knitting needle
Repeat 4 & 5 until all sts are worked. Fasten off last stitch.
Abbreviations
CC contrast colour co cast on/cast off Dec decrease Gt st garter stitch Inc increase K knit k2tog knit 2 sts together single right leaning decrease LHN left hand needle LT Lamb's Tail Stitch MC Main colour P purl p2tog purl 2 sts together - single decrease Rem remain/remaining Rep repeat St(s): stitch (es) RHN right hand needle RS right side of work sl1 slip 1 st work all slips purlwise unless otherwise noted ssk slip 2 stitches as if to knit, knit those 2 sts together through back of loop (tbl) - single, left leaning decrease st(s) stitch (es) St st stocking stitch Tbl through back of loop Turn turn work and continue on other side wyib with yarn in back wyif with yarn in front WS wrong side of work W&T wrap and turn