The Vandalia Collection
by Steven Hicks

In 2005, l decided to knit a different scarf for everyone vacationing with my family. That led to an opportunity to teach knitting classes at Kanawha City Yarn Company in Charleston, wv. For each class, l'd design a scarf or prqject that would illustrate a new knitting skill, something that a knitter can use in future projects. Classes focused on lace knitting with heavier yarn and larger needles or cables without cable needles, or simple garter stitch shapes to modular knitting. The Vandalia Collection is inspired by these classes and the knitters I've met and friends I've made through teaching classes. Named after streets, landmarks or areas of charleston, each piece builds on a new skill, even the simplest pattern that highlights how easy it is to create an effective stitch pattern withjust a small change. I owe a lot to my group of friends that graciously offered to test knit the patterns for me-Pat Brison, Jana Cuervo, Zen Potter, Sarah Radow, Gloria Taggart, Marilyn wilson-and all of the knitters that knit my patterns, attended classes and helped inspire me to continue to design knitting patterns. A big thanks also goes to tech editor extraordinaire Eleanor Dixon, The TECHsorcist, who reviewed all of my patterns and fixed so many misspellings and math errors. Best stitches,
Truslow. Clendenin.. ZMarket Shawl. South Hills 13 MacCorkle. 15 Brawley 17 Ruffner. 21 Abbreviations. 27 Techniques... 29
Finished Measurements 24" x 5" (61 x 13 cm) cowl Gauge 4.5 stitches = 1 inch (2.5 cm) Aran or worsted weight scrap yarn for provisional cast-ons and for holding Needle 1: 24" (60cm) US 8 (5.0mm) circular needle Needle 2: Additional 24" (60cm) circular needle US 8 (5.0mm) or smaller Spare needle of similar size, any length for three-needle bind off
Directions
Piece1 Using Needle 1, waste yarn and crochet cast-on (see page 29), or other provisional method, cast on 90 stitches. With Color A: Round 1 - Knit to end, place marker, and join in the round, being careful not to twist. Round 2 - Purl all stitches. Rounds 3 to 33 - Knit all stitches. Place all stitches on a length of scrap yarn. Do not cut working yarn. Repeat Piece 1 directions with Color B. Using Needle 2, pick up all stitches from provisional cast-on of Piece 1. Be sure you're picking up stitches from the cast-on edge, not the live stitches held on scrap yarn. There should be 90 stitches on the needle. If not, pick up an extra stitch at the join to make the stitchcount 90. Place Piece 1 inside Piece 2 with wrong sides together and graft together using the threeneedle bind off. Place allive stitches of Piece 1 on Needle 1 (90 stitches). With Needle 2 pick up all stitches from provisional cast-on of Piece 2. There should be 90 stitches on the needle. If not, pick up an extra stitch at the join to make the stitch count 90. Flip the two pieces so that Piece 2 is inside Piece 1 with wrong sides together. Graft together using three-needle bind off.
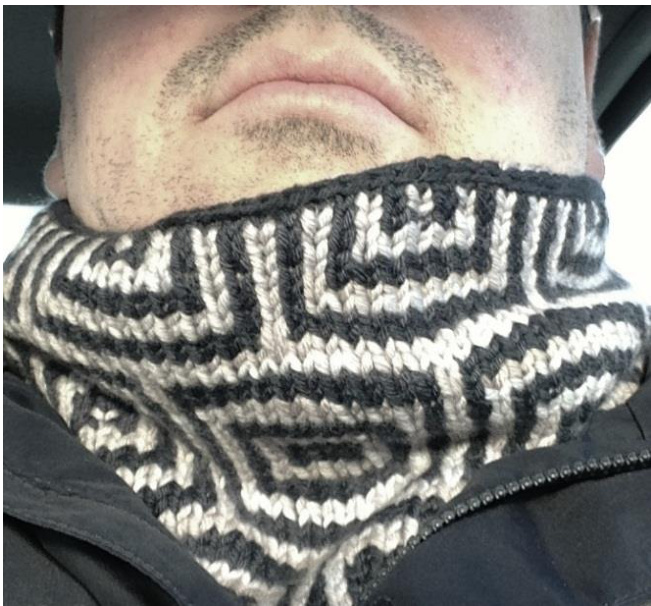
Finished Measurements 24" x 5" (61 x 13 cm) cowl Gauge 4.5 stitches = 1 inch (2.5 cm) Yarn and Needles Aran weight yarn in 2 colors (A & B), 130 yds (119m) each Aran or worsted weight scrap yarn for provisional cast-ons and for holding stitches (Note: It may be helpful to use different colors of scrap yarn to distinguish different edges.) Needle 1: 24" (60cm) US 8 (5.0mm) circular needle Needle 2: Additional 24" (60cm) circular needle US 8 (5.0mm) or smaller Spare needle of similar size, any length for three-needle bind off
Pattern Notes
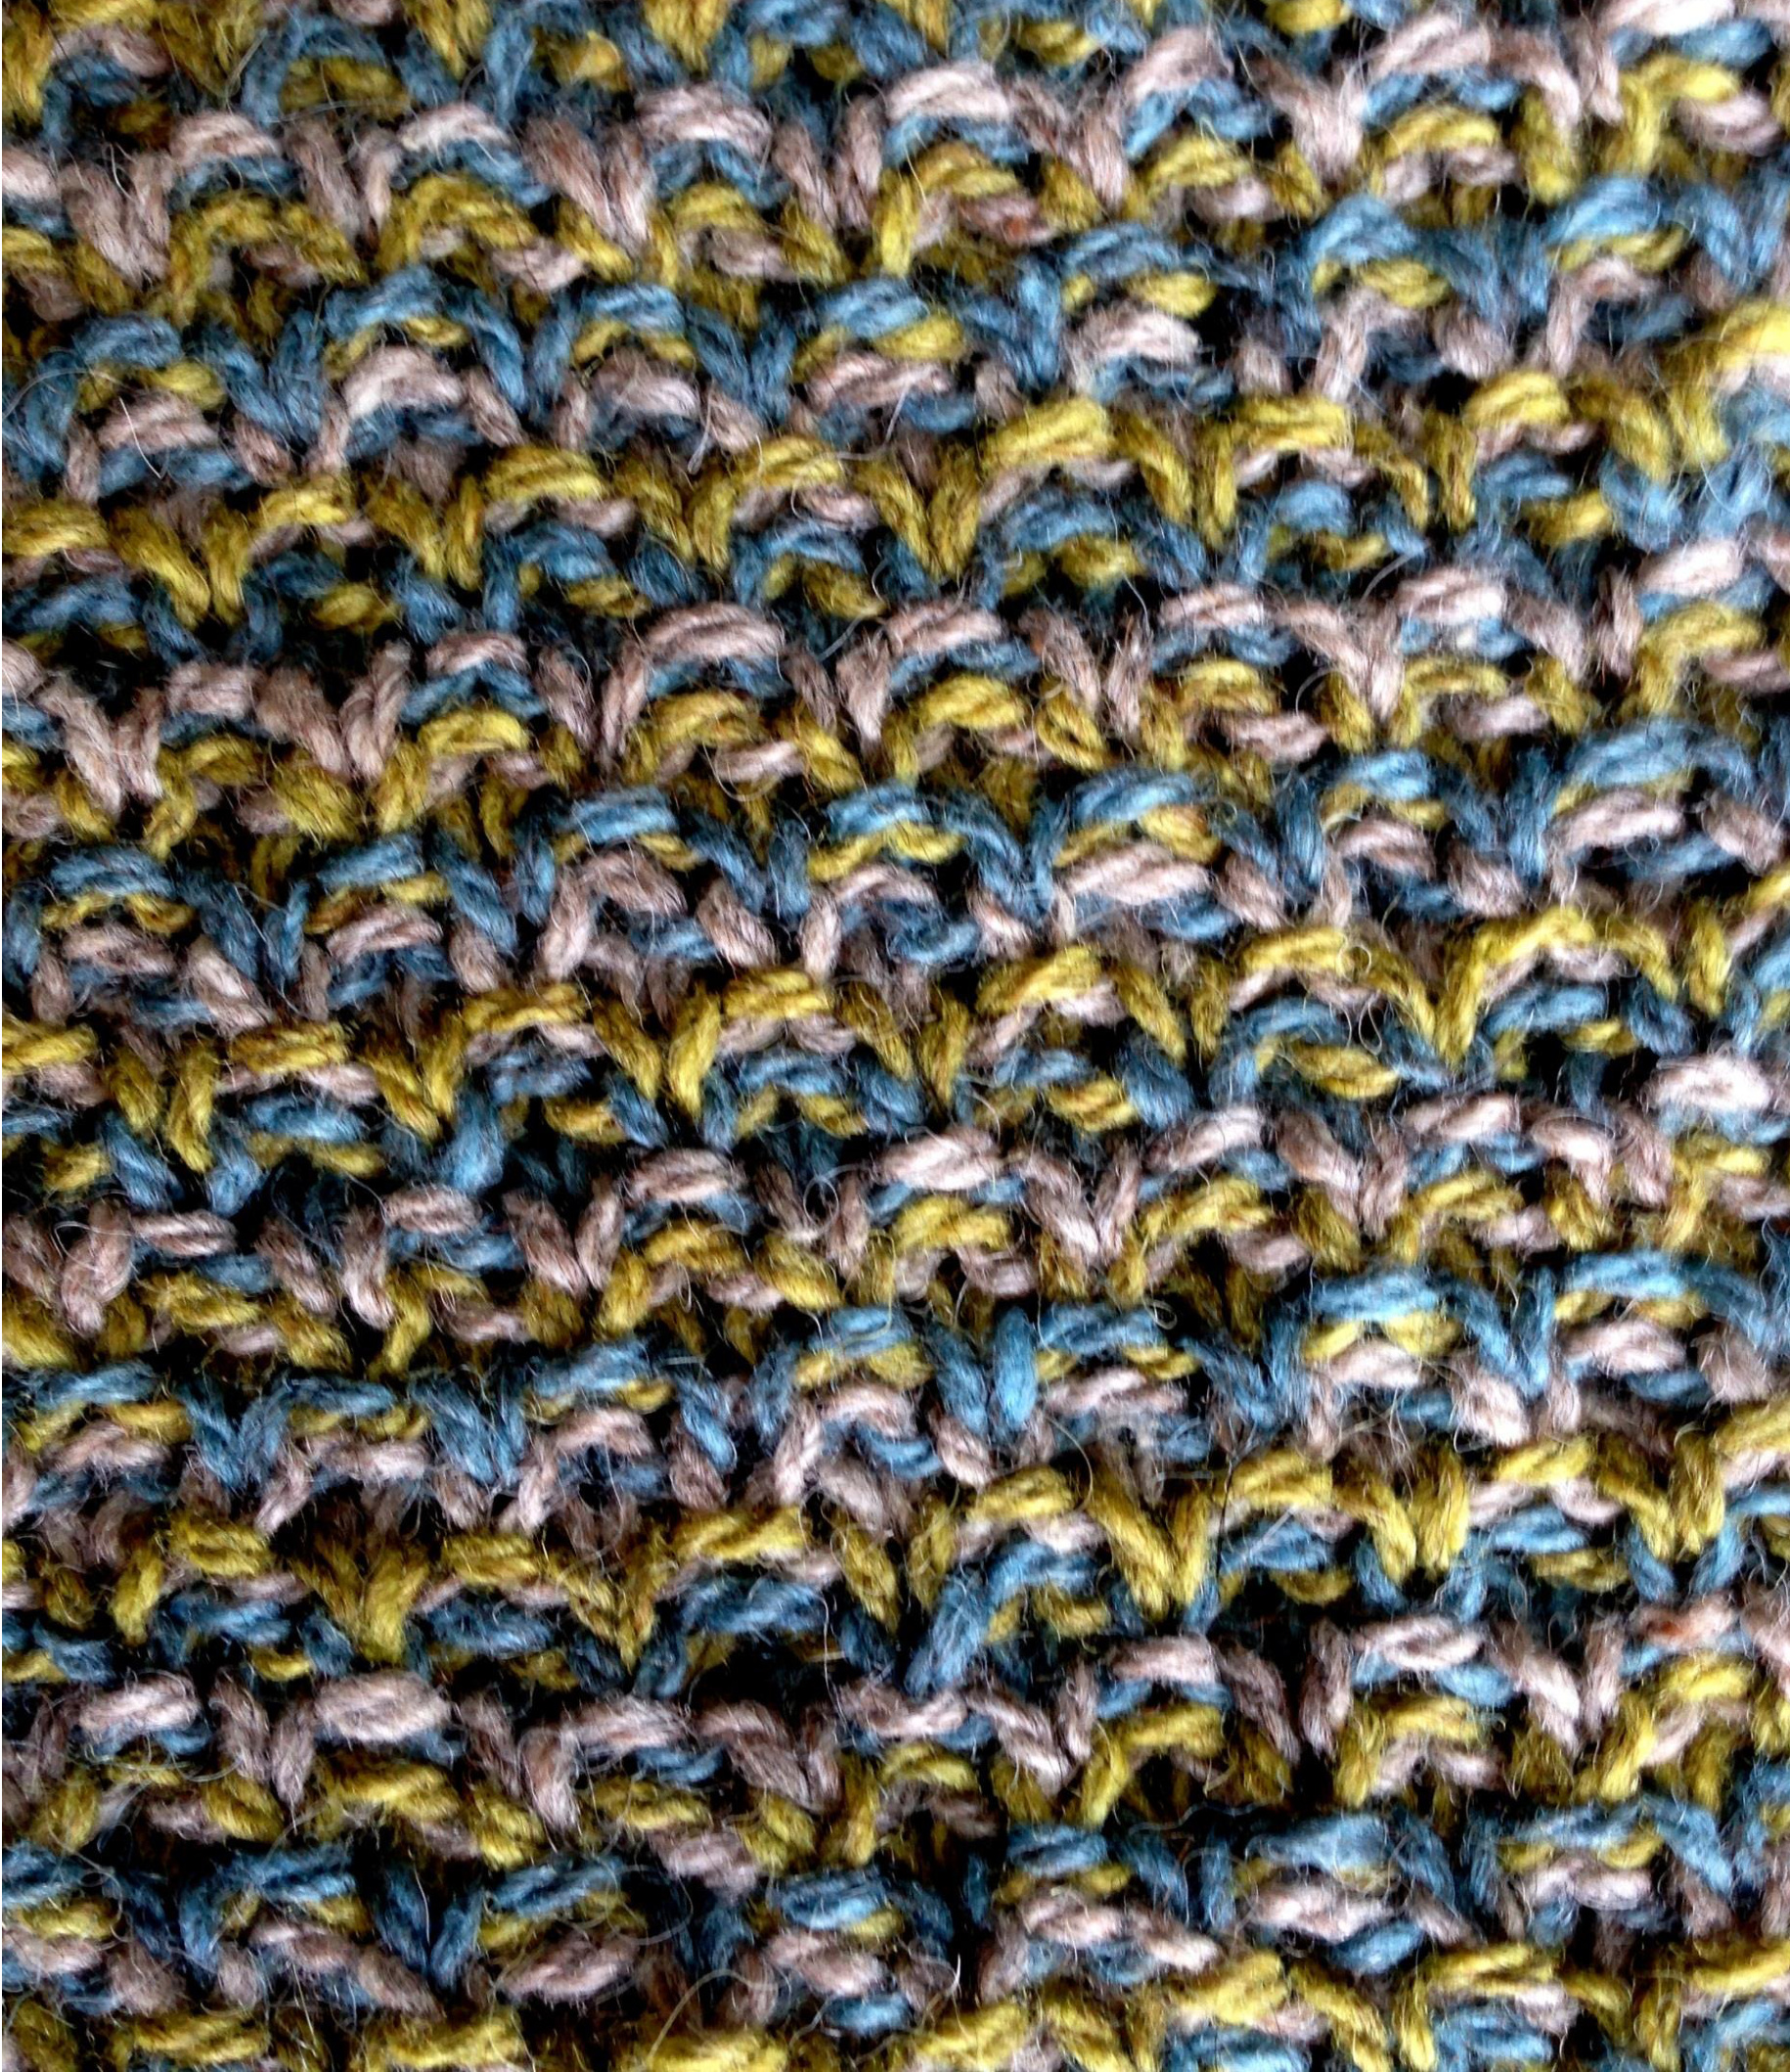
Piece 1 is knitted in a mosaic pattern. Do not cut the yarn when switching colors. To prevent puckering, do not pull too tightly on the working yarn when slipping stitches.
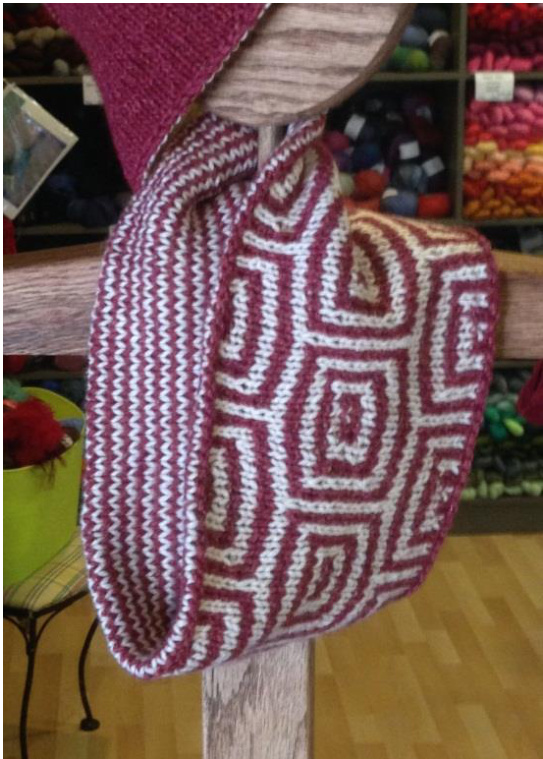
Piece 2 provides a contrasting pattern of single-row stripes. Again, do not cut yarns when switching colors. A variation would be to work Piece 2 in a single solid color. Directions Piece1 Using Needle 1, waste yarn and crochet cast-on (see page 29), or other provisional method, cast on 96 stitches. Round 1: With color A, knit to end, place marker, and join in the round, being careful not to twist. Round 2: Purl all stitches. Round 3: Knit all stitches. Round 4: With color B, \*k1, sl 1, repeat from \* around. Round 5: Repeat Round 4 . Round 6: With color A,\*(sl 1, k1) twice, sl 1, k3, (sl 1, k1) twice, repeat from \* a Round 7: Repeat Round 6. Round 8: With color B, \*(k1, sl 1) twice, k5, sl 1, k1, sl 1, repeat from \* around. Round 9: Repeat Round 8. Round 10: With color A, \*sl 1, k1, sl 1, k7, sl 1, k1, repeat from \* around Round 11: Repeat Round 10. Round 12: With color B, \*k1, sl 1, k9, sl 1, repeat from \* around. Round 13: Repeat Round 12. Round 14: With color A, \*sl 1, k11, repeat from \* around. Round 15: Repeat Round 14. Round 16: With color B, knit around. Round 17: Repeat Round 16. Round 18: With color A, \*k6, sl 1, k5, repeat from \* around. Round 19: Repeat Round 18. Round 20: With color B, \*k5, sl1, k1, sl 1, k4, repeat from \* around. Round 21: Repeat Round 20. Round 22: With color A, \*k4, (sl 1, k1) twice, sl 1, k3, repeat from \* around. Round 23: Repeat Round 22. Round 24: With color B, \*k3, (sl 1, k1) three times, sl 1, k2, repeat from \* aroun Round 25: Repeat Round 24. Round 26: With color A, \*k2, (sl 1, k1) five times, repeat from \* around. Round 27: Repeat Round 26. Round 28: With color B, \*k1, sl 1, repeat from \* around. Round 29: Repeat Round 28. Round 30: With color A, \*k2, (sl 1, k1) five times, repeat from \* around. Round 31: Repeat Round 30. Round 32: With color B, \*k3, (sl 1, k1) three times, sl 1, k2, repeat from \* around. Round 33: Repeat Round 32. Round 34: With color A,\*k4, (sl 1, k1) twice, sl 1, k3, repeat from \* around. Round 35: Repeat Round 34. Round 36: With color B, \*k5, sl1, k1, sl 1, k4, repeat from \* around. Round 37: Repeat Round 36. Round 38: With color A, \*k6, sl 1, k5, repeat from \* around. Round 39: Repeat Round 38. Round 40: With color B, knit around. Round 41: Repeat Round 40. Round 42: With color A, \*sl 1, k11, repeat from \* around. Round 43: Repeat Round 42. Round 44: With color B, \*k1, sl 1, k9, sl 1, repeat from \* around. Round 45: Repeat Round 44. Round 46: With color A, \*sl 1, k1, sl 1, k7, sl 1, k1, repeat from \* around. Round 47: Repeat Round 46, Round 48: With color B, \*(k1, sl 1) twice, k5, sl 1, k1, sl 1, repeat from \* around. Round 49: Repeat Round 48. Round 50: With color A, \*(sl 1, k1) twice, sl 1, k3, (sl 1, k1) twice, repeat from \* around. Round 51: Repeat Round 50. Round 52: With color B, \*k1, sl 1, repeat from \* around. Round 53: Repeat Round 52. Round 54: With color A, knit around. Place all stitches on a length of scrap yarn. Cut all yarn, leaving a 3 yard tail of color A for binding off later.
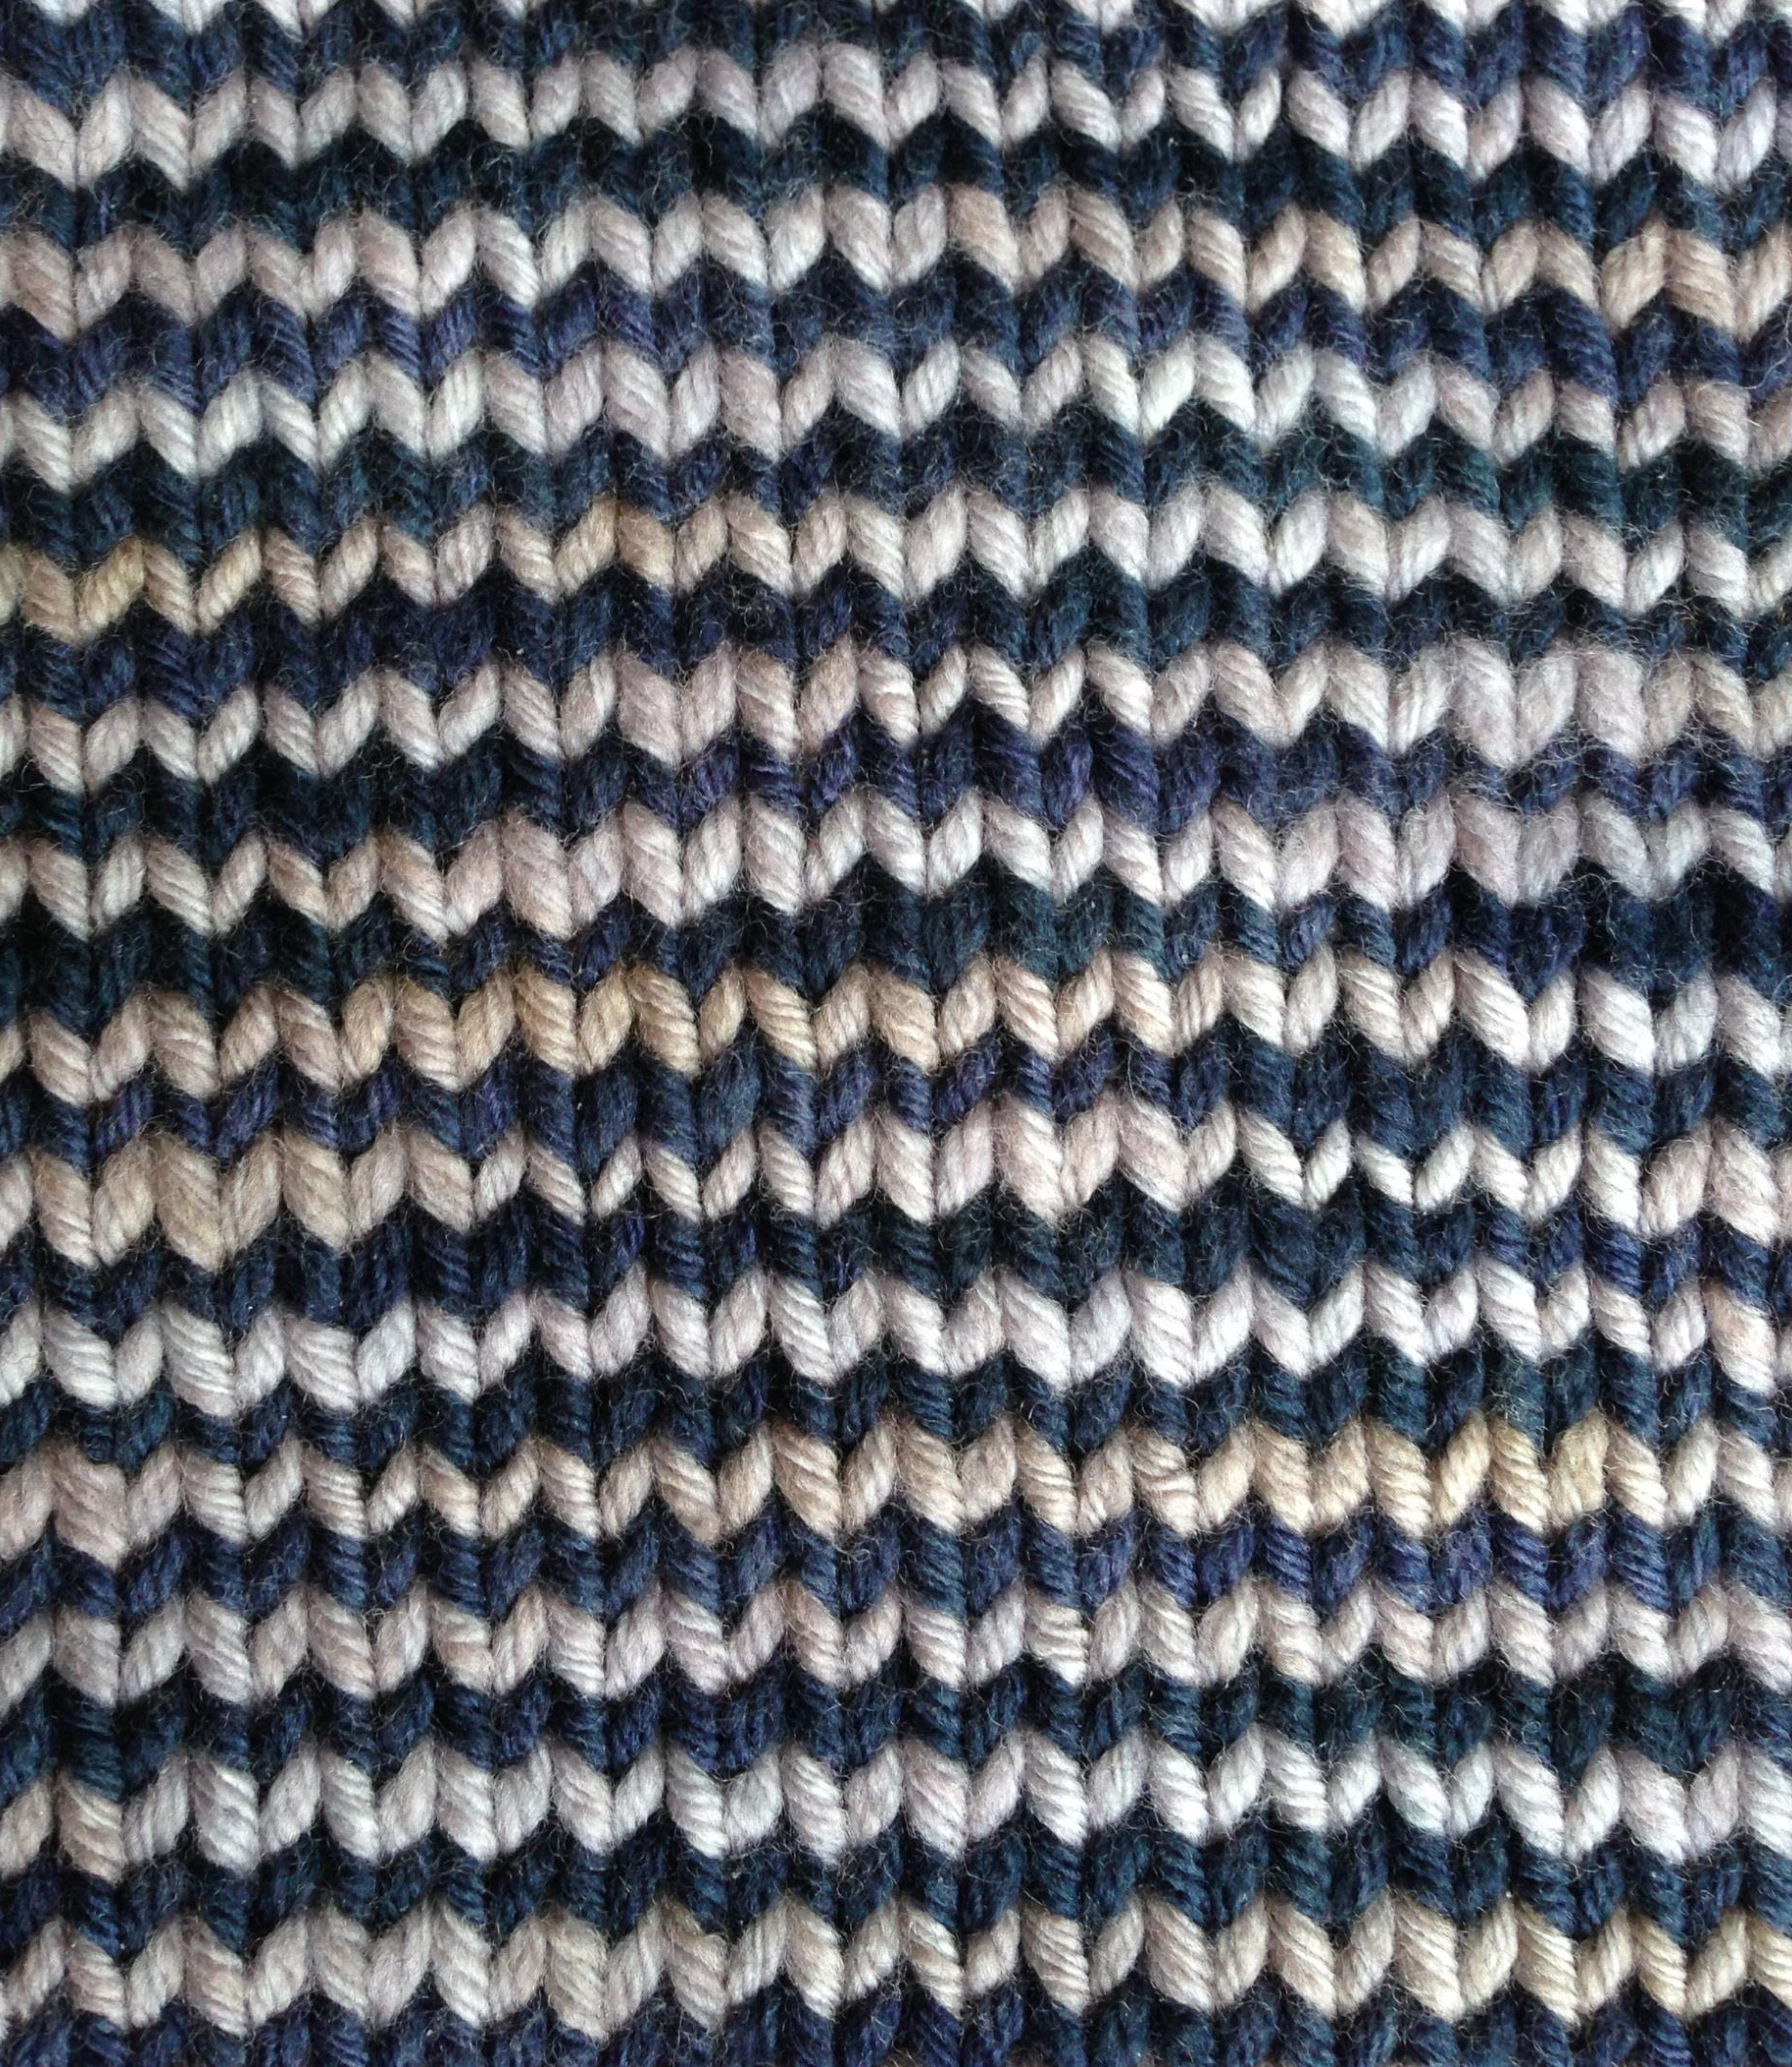
Piece 2
Using Needle 1, waste yarn and crochet cast-on (see page 29), or other provisional method, cast on 96 stitches. Round 1: With color B, knit to end, place marker, and join in the round, being careful not to twist. Round 2: Purl all stitches. Round 3: Knit all stitches. Round 4: With color A, knit around. Round 5: With color B, knit around. Repeat rounds 4 and 5 until Piece 2 measures the same length as Piece 1, ending after a color B round. Cut color A, but do not cut color B. Joiningtwopiecestogether Using Needle 2, pick up all stitches from provisional cast-on of Piece 1. Be sure you're picking up stitches from the cast-on edge, not the live stitches held on scrap yarn. There should be 96 stitches on the needle. If not, pick up an extra stitch at the join to make the stitchcount96. Place Piece 1 inside Piece 2 with wrong sides together and graft together using the threeneedlebind off. Place all live stitches of Piece 1 on Needle 1 (96 stitches). With Needle 2 pick up all stitches from provisional cast-on of Piece 2. There should be 96 stitches on the needle. If not, pick up an extra stitch at the join to make the stitch count 96. Flip the two pieces so that Piece 2 is inside Piece 1 with wrong sides together. Graft together using three-needle bind off. Weave in all ends.
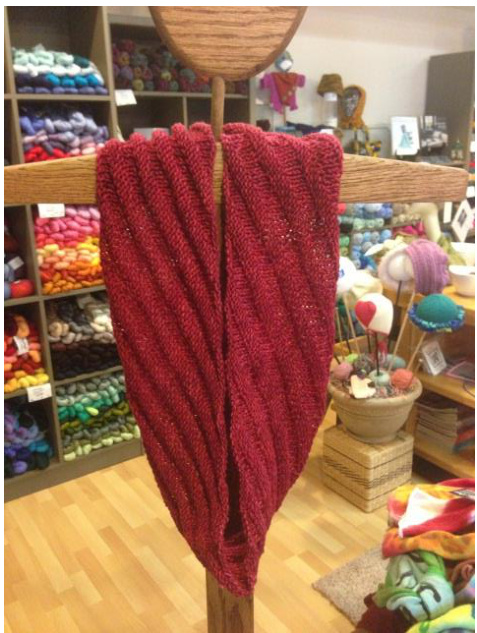
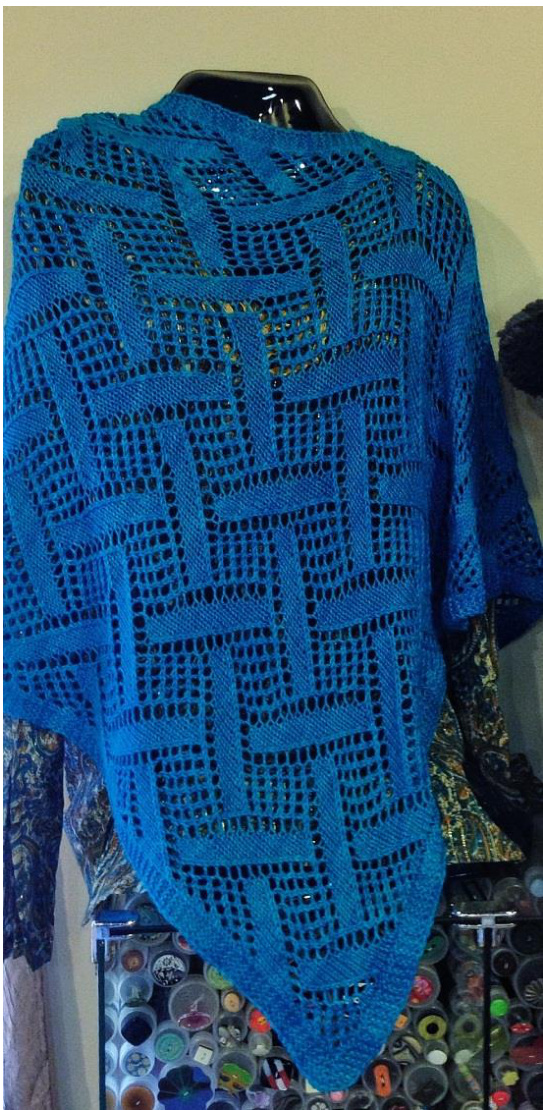
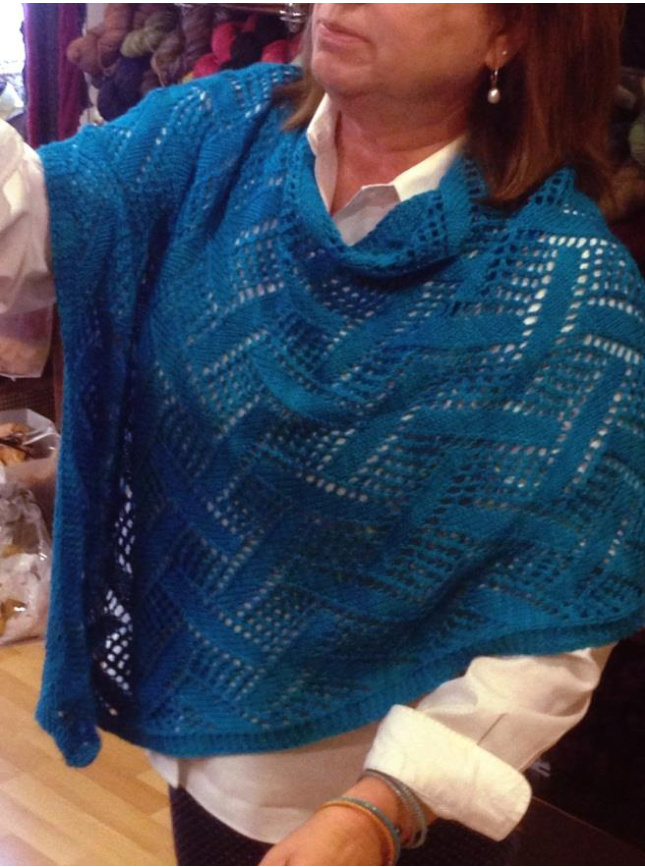
Finished Measurements Version 1: 60" x 18" [152.5cm x 46cm] Version 2: 44" x 16" [112cm x 41cm] Both versions are easily adaptable to desired dimensions. Gauge Version 1: 18 sts = 4" [10cm] in stockinette stitch (4.5 sts per inch [2.5cm]) Version 2: 22 sts = 4" [10cm] in stockinette stitch (5.5 sts per inch [2.5cm]) Yarn and Needles Version 1: 400 yards [366 m] DK weight yarn US #8 [5.0mm] 24" [60cm] circular needle Version 2: 450 yards [412 m] fingering weight yarn US #6 [4.0mm] 24" [60cm] circular needle
Pattern Notes
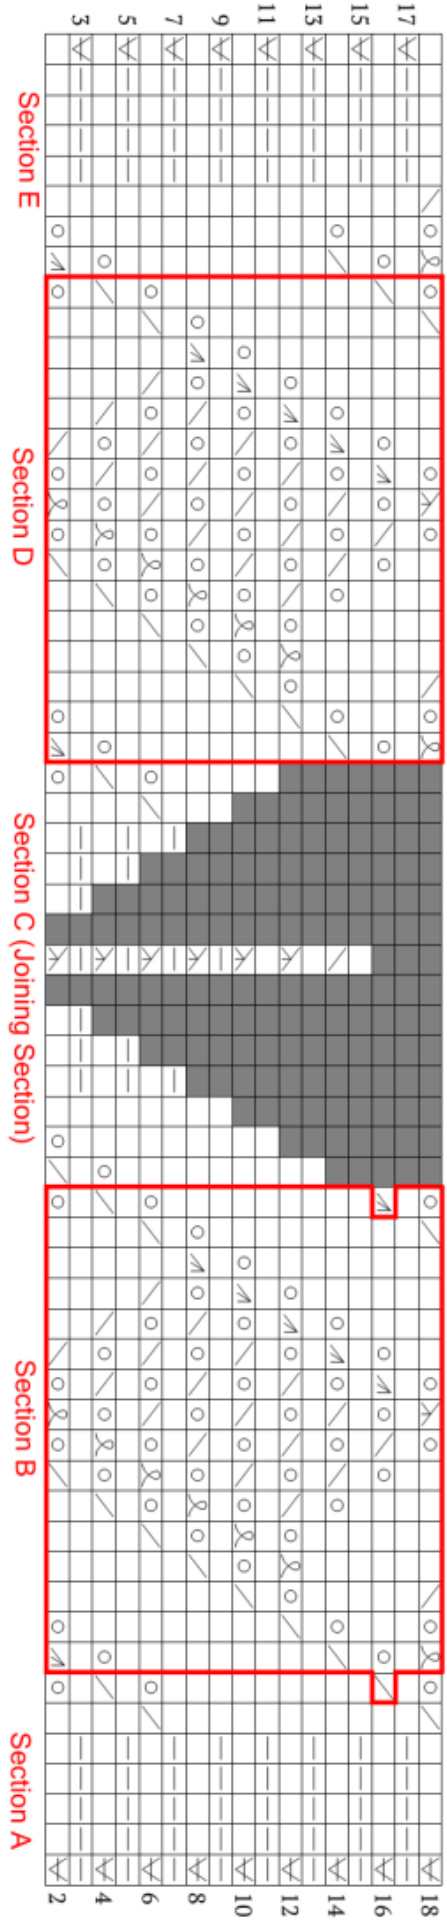
The Market Shawl is a classic triangular shaped shawl with a simple but graphic texture. Version 1 uses yarn overs to highlight the center spine and edges. Version 2 replaces the yarn over with a make one and adds a ruffled bind off. Any of these design elements can be mixed and matched according to personal preferences.
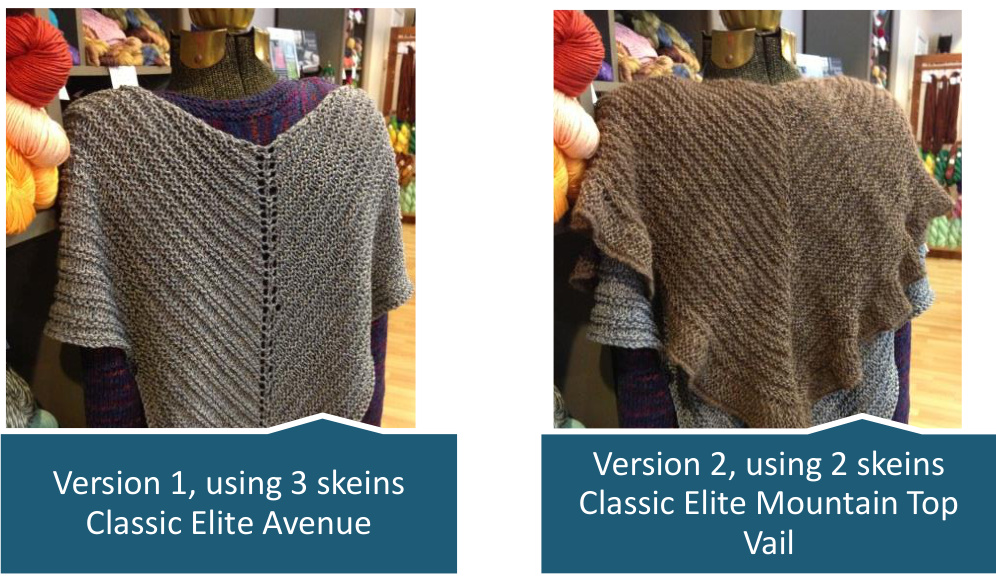
The finished size can easily be modified by adjusting the number of pattern repeats. If using the ruffled bind off with larger sizes, keep in mind that this decorative edging requires approximately 75% the amount of yarn used for the body of the shawl. Don't run out of yarn -planaccordingly.
Directions
Version 1 Cast on 7 sts. Set up: k4, place marker, k3 Row 1: k2, yo, k to marker, yo, slip marker, k1, yo, kto last two stitches, yo, k2 Row 2: k2, yo, k to last two stitches, yo, k2 Row 3: Repeat Row 1. Row 4: Repeat Row 2. Row 5: Repeat Row 1. Row 6: k2, yo, p to last 2 stitches, yo, k2 Repeat Rows 1 through 6 until shawl is desired size, then repeat Rows 1-3 once more. Bind off on the wrong side as follows: k1, \*k1, slip both stitches from right needle to le needle, k2togtbl, repeat from \* to end of the row. Fasten off and weave in ends. Block into shape. Version 2 Cast on 7 sts. Set up: k4, place marker, k3 Row 1: k2, m1L, k to marker, m1R, slip marker, k1, m1L, kto last two stitches, m1R, k2 Row 2: k2, m1L, k to last two stitches, m1R, k2 Row 3: Repeat Row 1. Row 4: Repeat Row 2. Row 5: Repeat Row 1. Row 6: k2, m1L, p to last 2 stitches, m1R, k2 Repeat Rows 1-6 until shawl is 1.5 to 2" [4 to 5cm] less than desired length, then work Rows 1-4 once more. Continue to the ruffled bind off. Ruffled bind off Using cable cast on, cast on 7 sts. (see page 29 for cable cast on tutorial) Repeat Rows 1 and 2 until there are 8 sts remaining. Next row: k6, turn, slip 1 wyif, k to end Fasten off yarn and weave in ends. Gently block into shape, keeping in mind that if you added the rufled edge, you should block the last row of the body of the shawl, not the outside edge of the ruffle.
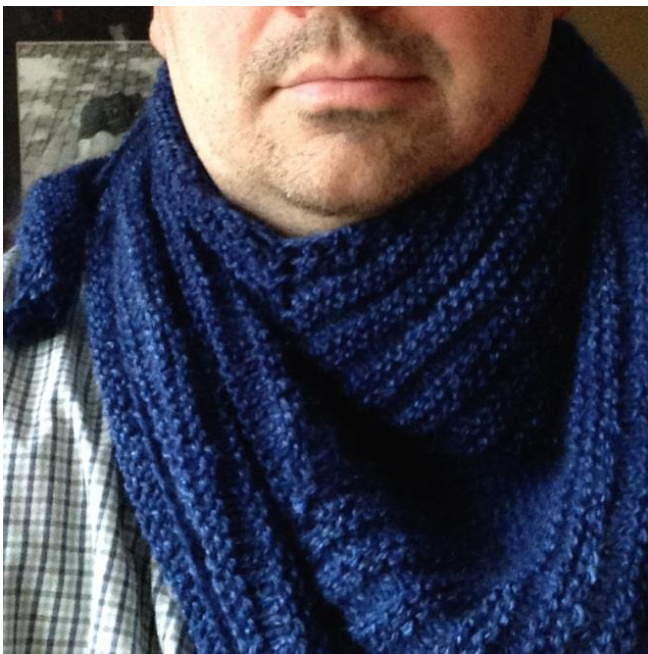
Finished Measurements Approximately 6" wide x 42" circumference (15 cm x 107 cm) Gauge Fingering weight: 6 stitches / inch (2.5 cm) Worsted weight: 4.25 stitches / inch (2.5 cm) Chunky weight: 3 stitches / inch (2.5 cm) Yarn and Needles Fingering weight: 400 yards (366 m) fingering weight yarn US #5 (3.75 mm) 24" (60 cm) circular needle Worsted weight: 225 yards (206 m) worsted weight yarn US #9 (5.5 mm) 24" (60 cm) circular needle Chunky weight: 150 yards (138 m) chunky weight yarn US #13 (9.0 mm) 24" (60 cm) circular needle
Pattern Notes
an be worked in practically any yarn weight - directions are included for thre
different versions, and appear as fingering (worsted, chunky) Directions Cast on 249 (179, 129) stitches and join in the round without twisting. \*k5, p5, repeat from \* until the scarf measures 6" (15 cm) from the cast on edge. Bind off in pattern. Weave in ends and block lightly.
Finished Measurements 7" x 60" (18 cm x 152.5 cm)
Gauge
8.5 stitches per inch (2.5 cm) in 1x1 ribbing Gauge is not crucial but will affect finished measurements and yardage requirements.
Yarn and Needles
Fingering weight yarn 200 yards (183 m) each Color A, B & C Suggested yarn: Crystal Palace Sausalito (80% Merino/20% Nylon; 198 yards (181 m)/50 g) US #6 (4.0 mm) needles Tapestry needle Size G crochet hook (if using Crochet Cast-On method) Tapestry needle
Pattern Notes
When changing colors, twist the old color over the new color, i.e. pick up the new yarn from below and bring it up around the old yarn in a counter-clockwise direction. This prevents holes from forming when
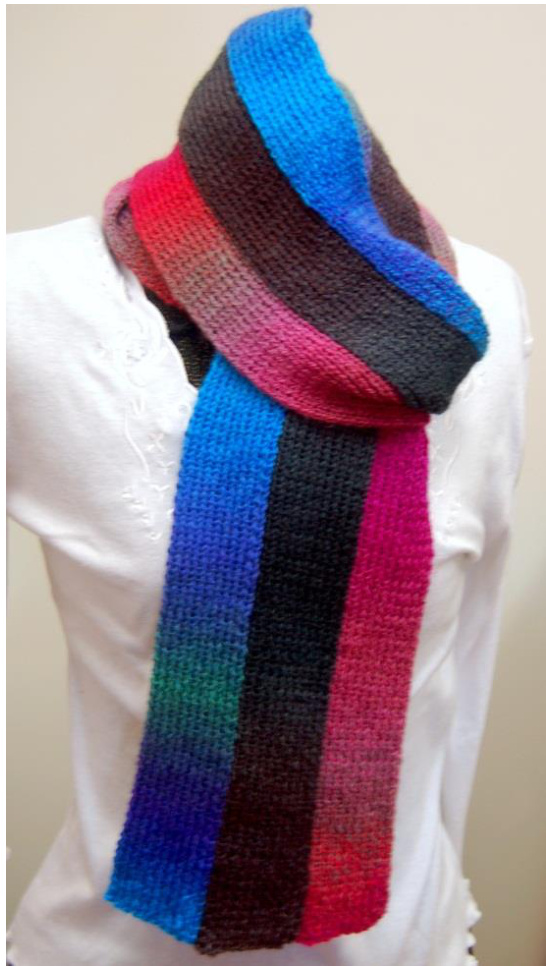
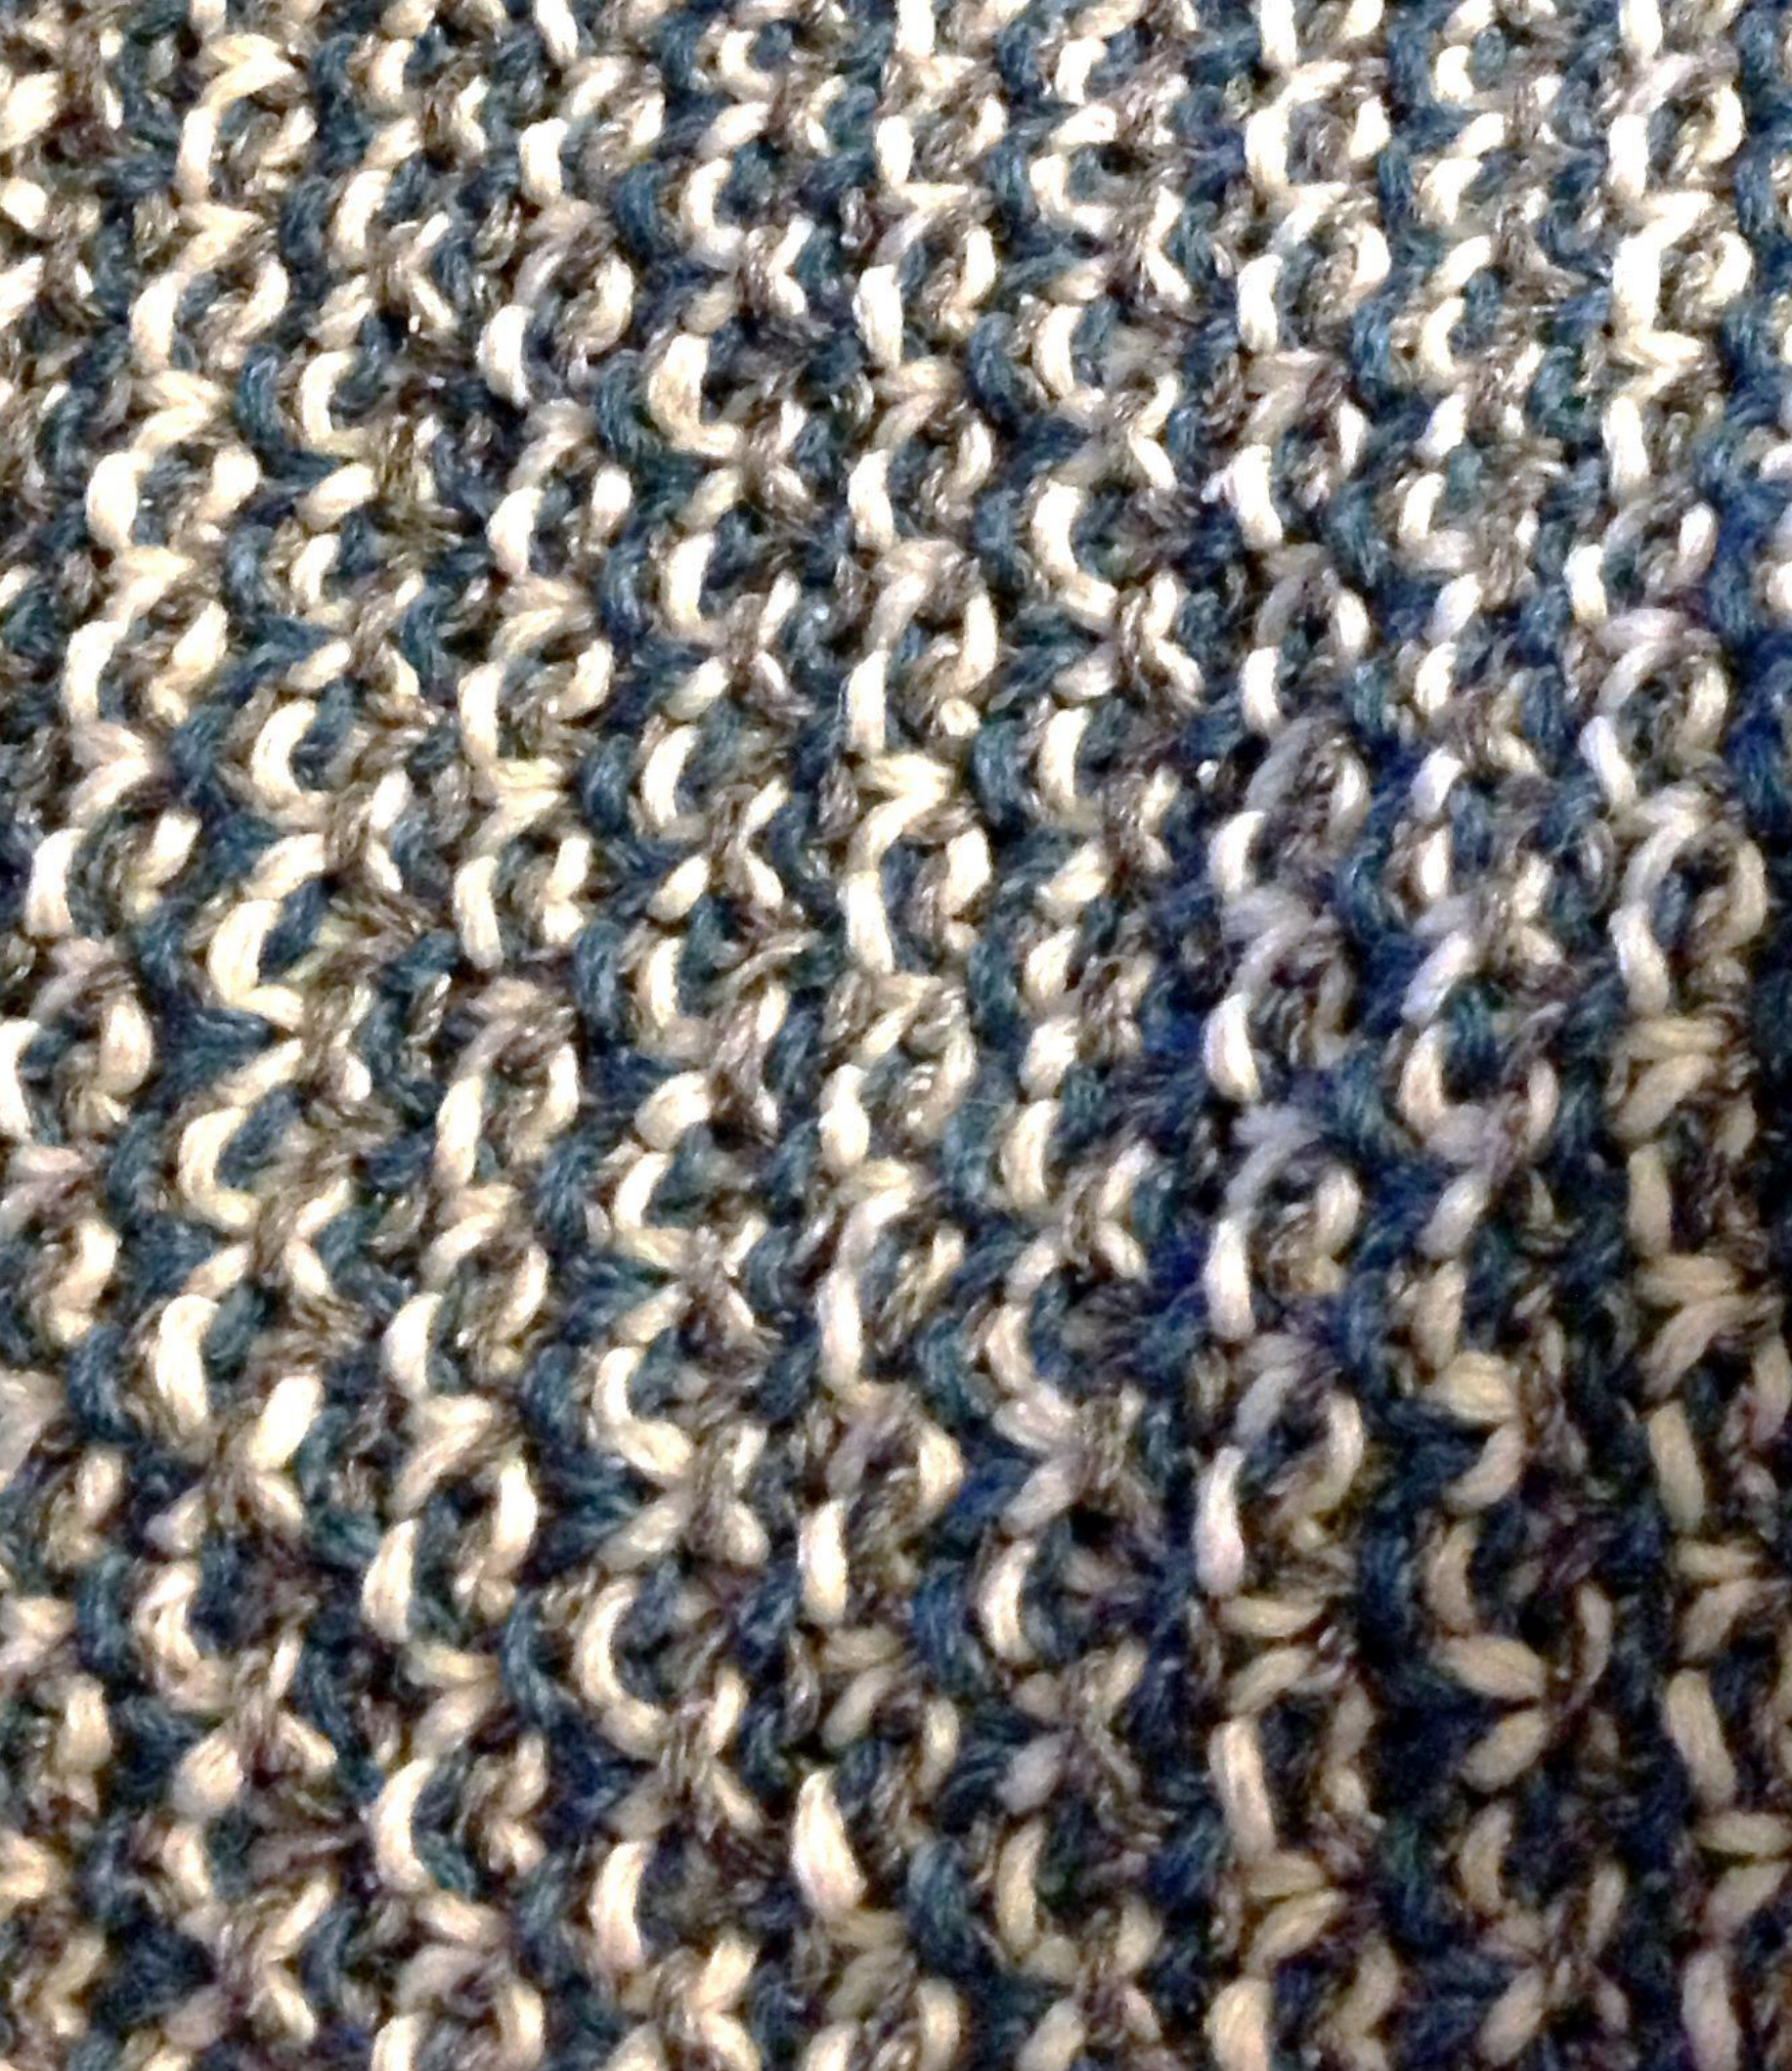
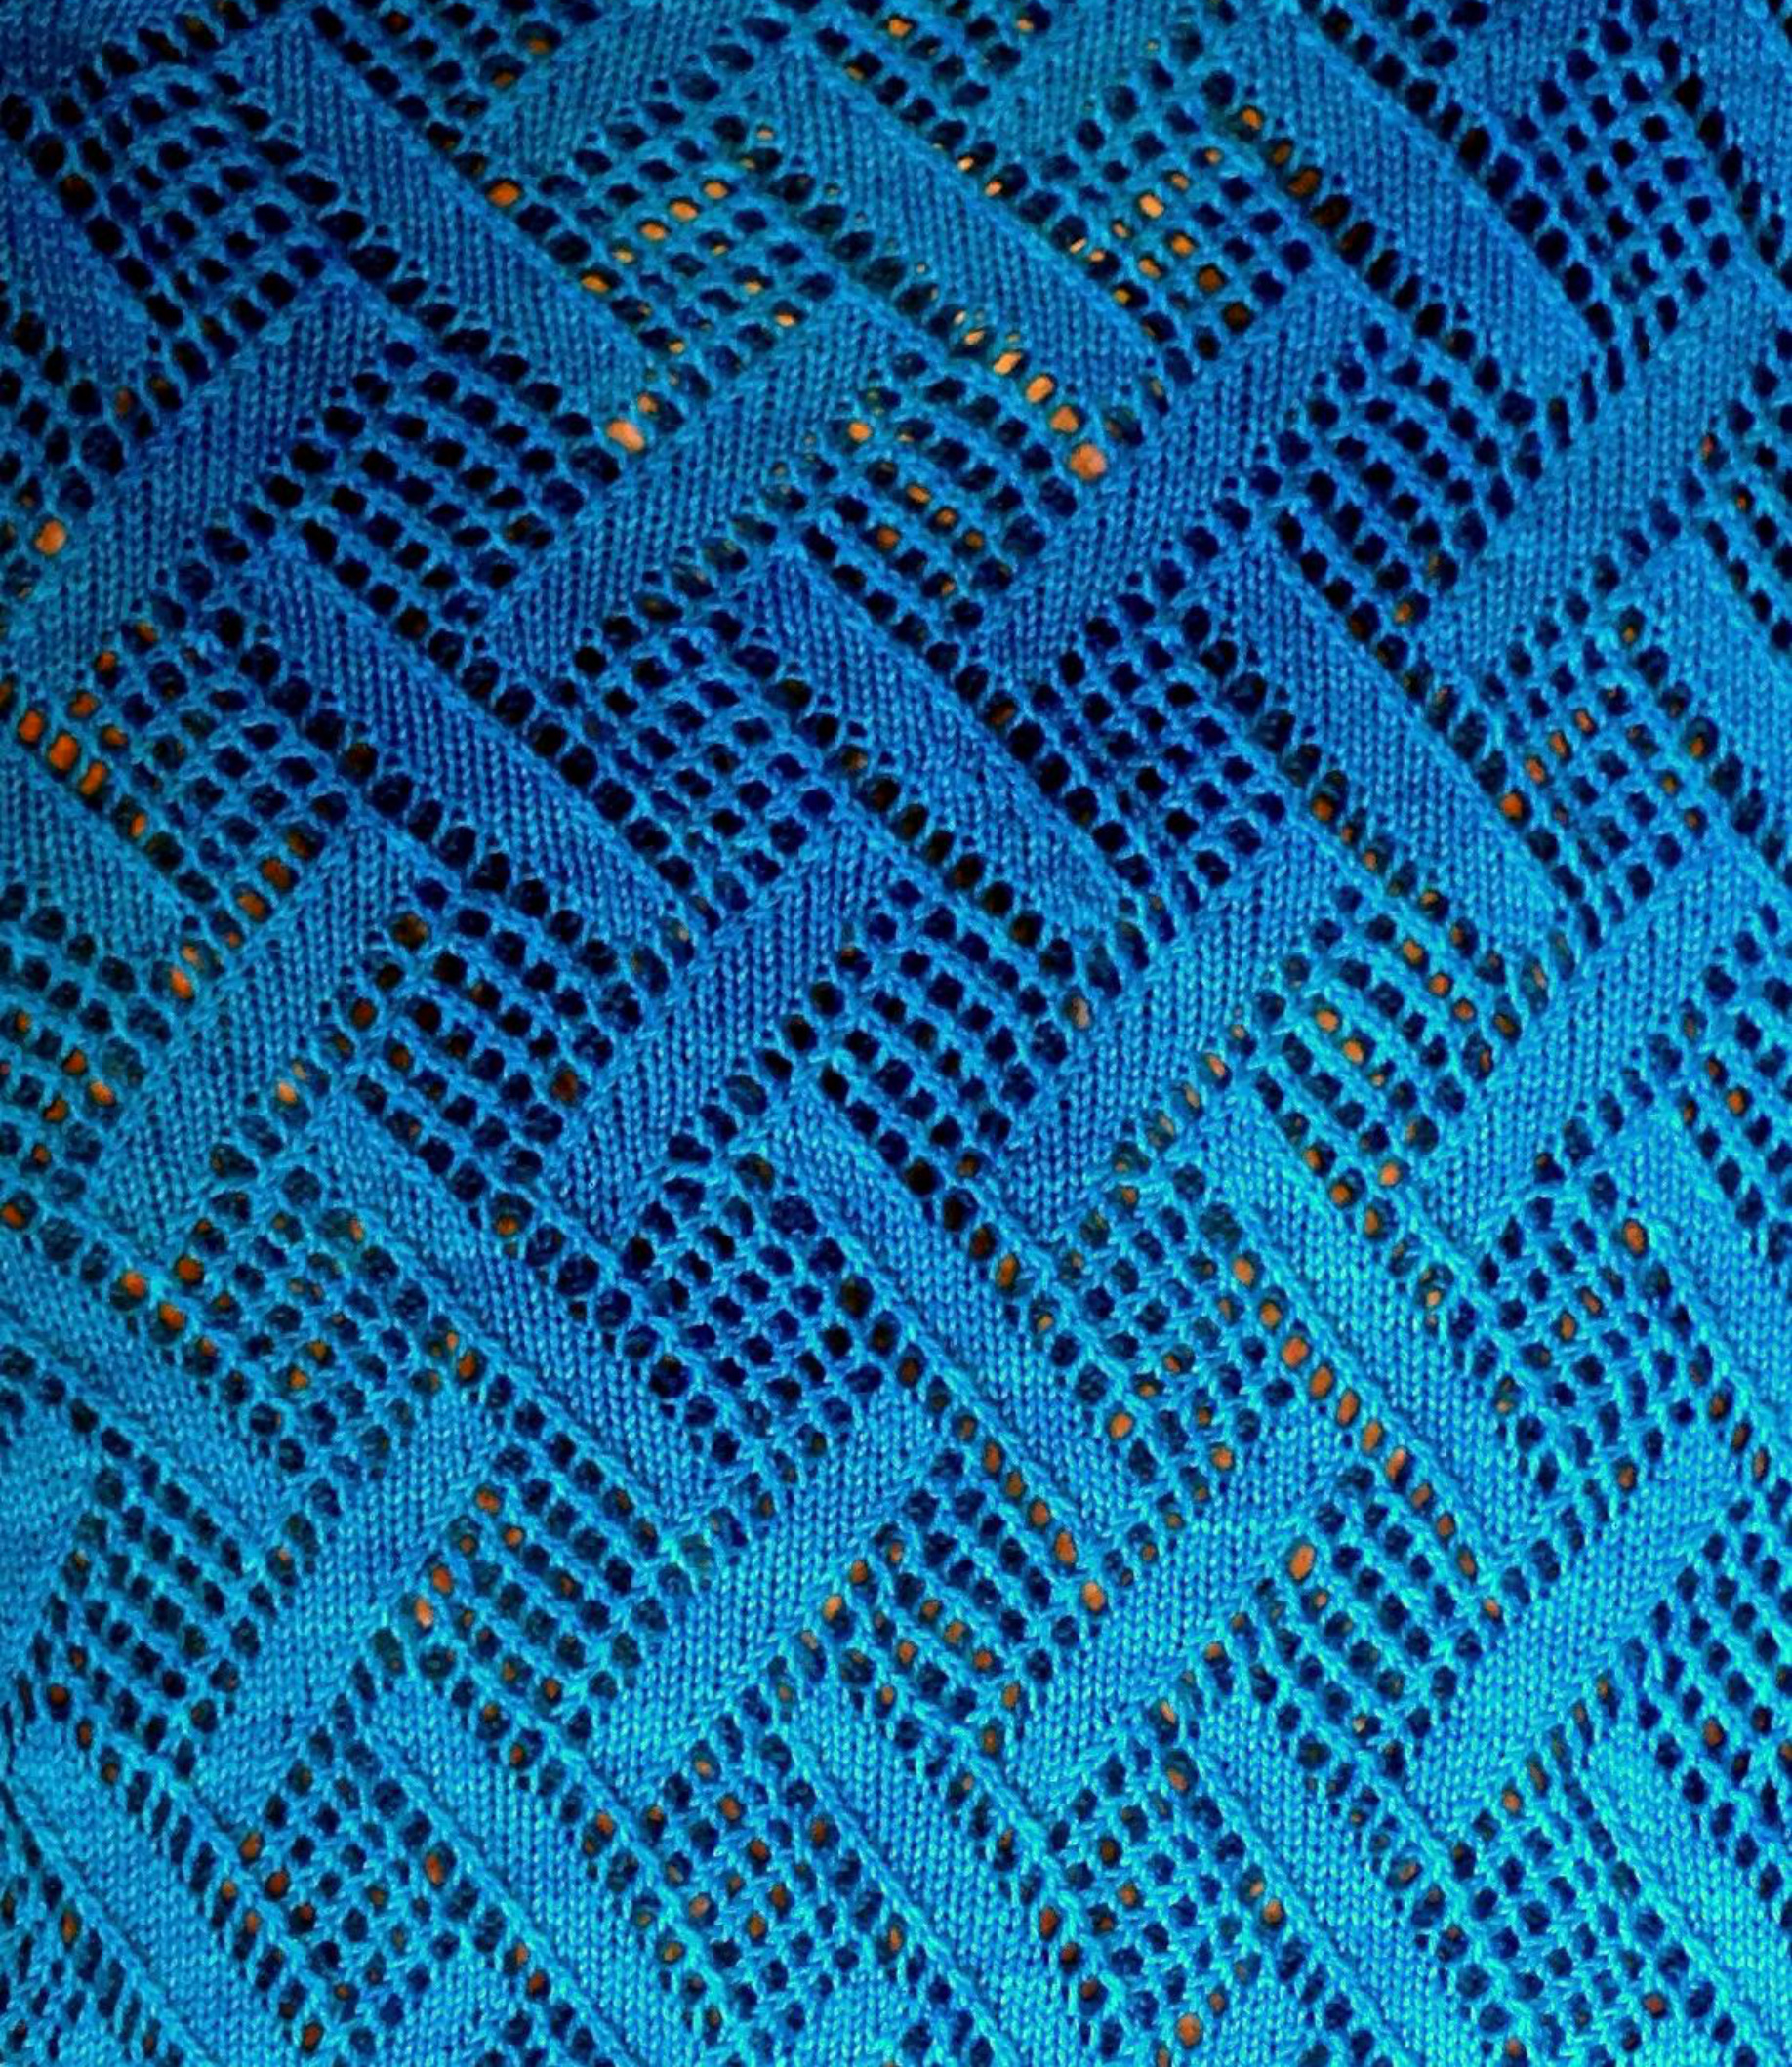
changing colors. If you should forget to twist yarns, do not panic. The hole can be closed later on by darning with a piece of matching yarn. MacCorkle can easily be knit with other weights of yarn by changing the needle size and number of stitches cast on. For example, with worsted weight yarn, use US #9 (5.5 mm) needles and cast on 13 stitches with each color. Directions With Color A, cast on 21. With Color B, cast on 21. With Color C, cast on 2 Row 1: With Color C, (k1, p1) 10 times, k1. Change to Color B, twisting old color over new color, (k1, p1) 10 times, k1. Change to Color A, twisting old color over new color, (k1, p1) 10 times, k1. Row 2: With Color A, (p1, k1) 10 times, p1. Change to Color B, twisting old color over new color, (p1, k1) 10 times, p1. Change to Color C, twisting old color over new color, (p1, k1) 10 times, p1. Repeat Row 1 and Row 2 for length of scarf. Bind off in pattern, maintaining color sequence. Weave in all ends. Finished Measurements 6" x 68" (15 x 173 cm) Gauge 4 stitches per inch (2.5 cm) in stockinette stitch Yarn and Needles Color A: 100 yards (92 m) aran weight yarn Color B: 100 yards (92 m) aran weight yarn Color C: 100 yards (92 m) aran weight yarn US 7 (4.5 mm) 32" (80 cm) circular needles US 9 (5.5 mm) 32" (80 cm) circular needles Size G (4 mm) crochet hook Scrap yarn for provisional cast on - less than 10 yards (9 m) Tapestry needle
Pattern Notes
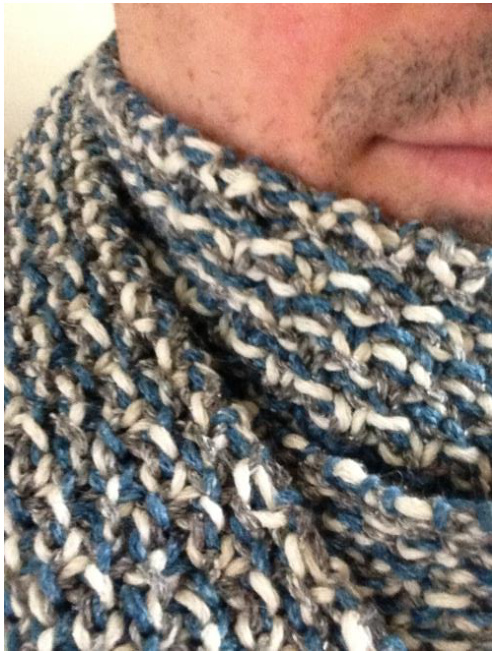
Worked longways, Brawley appears to be woven; actually it is basic Moss Stitch. And usually the trade-off for an intricate three-color design is lots of ends to weave in. Not this time - each color is carried along the edge in one continuous strand.
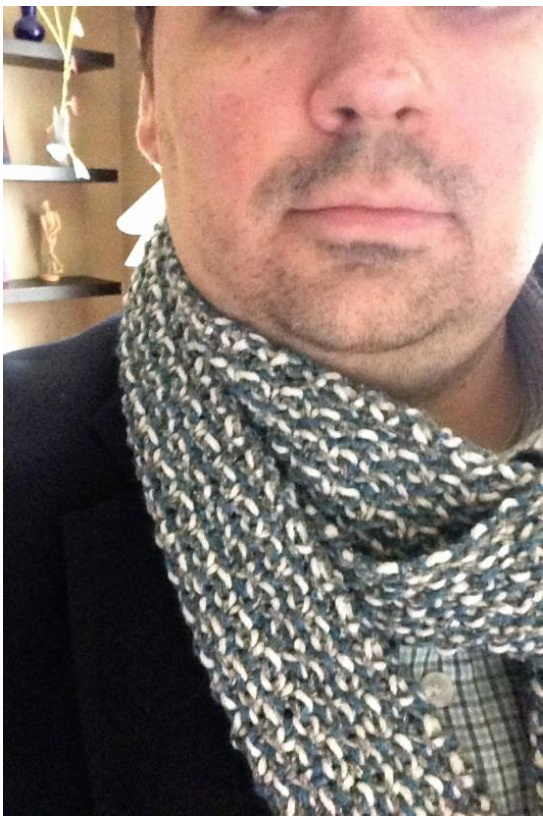
Stitch Pattern Rows 1 and 4: k1, \* p1, k1; rep from \* to end. Rows 2 and 3: p1,\* k1, p1; rep from \* to end. Directions With smaller needle and crochet hook, cast on 125 stitches using scrap yarn and the crochet cast-on (see page 29). Set-uprows Note: Turn at the end of each row, drop working yarn (do not cut) and join or pick up next color. Row 1: Using smaller needle, with Color A, k1,\* yo , k1, rep from \* to end. (249 stitches) Row 2: With Color B, k1, \*k1, sl 1 wyif, rep from \* to 2 before end, k2. Row 3: With Color C, k1, \*sl 1 wyif, k1, rep from \* to end. Row 4: With Color A, k1, \*k1, sl 1 wyif, rep from \* to 2 before end, k2. Row 5: Using larger needle, with Color B, k1, \*k1, p1, rep from \*to 2 before end, k2. Row 6: With Color C, k1,\* p1, k1, rep from \* to end.
MainPattern
Rows 7-34: Work four- row Moss Stitch Pattern seven times, continuing to alternate colors as established (ABCABC). Note: Because three colors are being worked over a four-row pattern stitch, each repeat will begin and end with a different color. For example, the first repeat will be ABCA, the second willbeBCAB, etc. Rows 35-36: Work first two rows of Moss Stitch Pattern once more, with Color B & C, respectively. Row 37: With Color A, sl 1 wyif, \*k1, sl 1 wyif, rep from \* to end. Row 38: With Color B,\*k1,\* sl 1 wyif, k1, rep from \* to end , cut B. Row 39: With Color C, sl 1 wyif, \*k1, sl 1 wyif, rep from \* to end, cut C. Using both the smaller needle and the free end of the larger needle, alternately slip the knit stitches to one needle and the purl stitches to the second needle. For example, slip knit stitch as if to purl to first needle, slip purl stitch to second needle and repeat for all stitches. Cut Color A, leaving a tail measuring roughly 4 yards. Thread yarn onto a tapestry needle.
Bind off
Using Color A, graft all stitches together using the Kitchener stitch as follows: (Visit youtube.com or knittinghelp.com for video demonstrations of the Kitchener stitch.) With knitting needles in left hand and tapestry needle in right hand, pass tapestry needle through first stich on front needle as if to purl, leaving stitch on needle, then pass needle through first stitch on back needle as if to knit, leaving stitch on needle. \*Pass needle through first stitch on front needle as if to knit and slip stitch off the needle. Pass needle through next stitch on the front needle as if to purl. Pass needle through first stitch on back needle as if to purl and slip stitch off needle. Pass needle through next stitch on the back needle as if to knit. Repeat from \* until all stitches have been bound off.
Finishing
Carefully remove the provisional cast on and weave in all ends.

Finished Measurements Version 1: 25" x 20" (63.5cm x 51cm) (folded to a rectangle) Version 2: 24" x 22" (61cm x 56cm) (folded to a rectangle) Gauge Version 1: 6 stitches per inch in stockinette Version 2: 4 stitches per inch in stockinette Yarn and Needles Version 1: 760 yards (695m) fingering weight or light sport weight yarn US #7 (4.5mm) 40" (100cm) circular needle, plus spare needle in similar size Version 2: 500 yards (457m) worsted weight yarn US #9 (5.5mm) 48" (120cm) circular needle, plus spare needle in similar size Both versions: Waste yarn or spare circular needle for provisional cast on Stitch markers Tapestry needle
Pattern Notes
Pattern includes directions for two different yarn weights - fingering (Version 1) or worsted (Version 2). Directions for fingering weight are shown first with worsted weight version in [brackets].
Directions
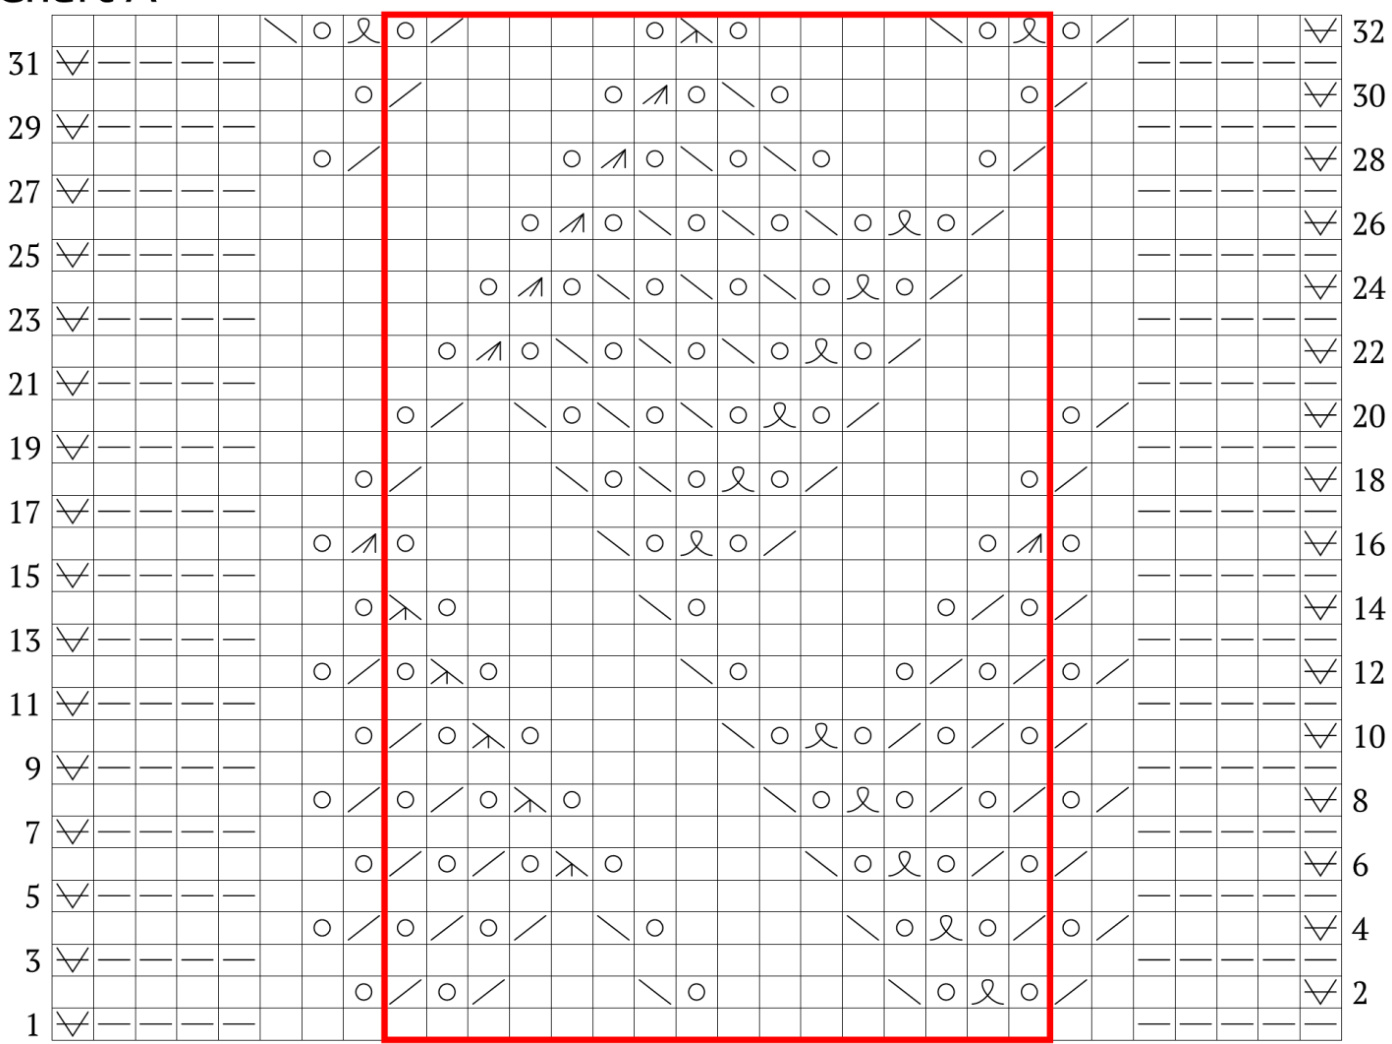
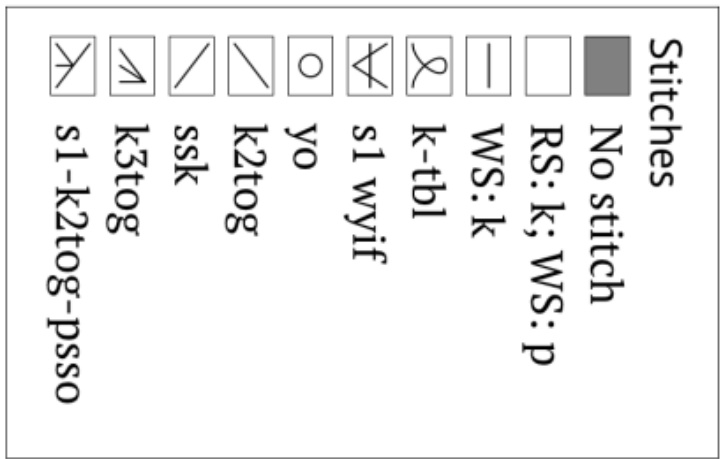
Using provisional cast on (see page 29), cast on 95 [79]. Begin Chart 1, repeating the section in red five [four] times per row. Work Rows 1-32 four [two] times, then work Rows 1 through 14 once more, ending after right side row 14. Do not break yarn. Using a spare needle, pick up the 94 [78] live stitches from provisional cast on (do not pick up slip knot). Work next wrong side row to join provisional cast on to original stitches as follows:
Note: Be sure not to twist the work when joining the provisional cast on at the end of the original stitches; you should be working the wrong side of all stitches. On original needle, slip one as if to purl with yarn in front, knit 4, purl 85 [69], knit 4, k2tog (last stitch from original needle and first from spare needle with provisional cast on), knit 4, purl 84 [68], knit 5. Work Chart 2 in its entirety once as follows: Beginning with right side Row 2, work Section A once, Section B five [four] times, Section C once, Section D five [four] times and Section E once. (Work same number of section repeats in reverse for wrong side (odd) rows.) Note: Chart ends with right side row. Next, work Chart 1 Rows 1-32 twice, then work Row 1 once more. (Ten [eight] section repeats per row.) For Version 2 only, continue to work Rows 2 through 15 once more. Work first corner as follows: Slip 1 as if to purl with yarn in front, knit 4, turn, knit 5, turn. Slip 1 as if to purl with yarn in front, knit 3, turn, knit 4, turn. Slip 1 as if to purl with yarn in front, knit 2, turn, knit 3, turn. Slip 1 as if to purl with yarn in front, knit 1, turn, knit 2, turn. Slip 1 as if to purl with yarn in front, knit 2, turn, knit 3, turn. Slip 1 as if to purl with yarn in front, knit 3, turn, knit 4, turn. Bind off as follows: \*Slip 1 as if to purl with yarn in front, knit 3, SSK, turn, knit 5, turn, repeat from \* until 10 stitches are left. Work corner instructions once more. Break yarn and graft border stitches together. Weave in ends and block to open lace.
Chart A
Pattern Repeat
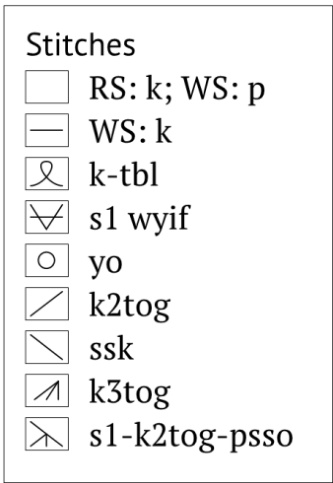
| k | knit |
| p | purl |
| yo | yarn over |
| SSK | slip two stitches one at a time, insert left needle into front of both |
| m1L | stitches and knit together |
| make one, left leaning increase: insert the left-hand needle, from | |
| front to back, under the strand of yarn which runs between the | |
| stitch just worked and the next stitch on the left-hand needle; | |
| knit this stitch through the back loop | |
| m1R | make one, right leaning increase: insert the left-hand needle, |
| from back to front, under the strand of yarn which runs between | |
| the stitch just worked and the next stitch on the left-hand needle; | |
| knit this stitch through the front loop | |
| sl | slip as if to purl |
| st(s) | stitch(es) |
| wyif | with yarn in front |
Crochet Cast-On
Make a slip knot in scrap yarn and place on crochet hook. Hold the knitting needle in your left hand and the crochet hook in your right, crossed in front of the knitting needle. With the working yarn behind the knitting needle, use crochet hook to pull a loop of working yarn around the knitting needle and through the loop on the hook. Move the working yarn counter clockwise back behind the knitting needle and repeat. Continue making slip stitches over the knitting needle in this manner for the number of stitches needed. When you have the required number of stitches on the needle, work a basic chain for several additional stitches. Break scrap yarn and pass through last stitch to secure. Trade the crochet hook for a knitting needle, join working yarn, and knit into cast-on stitches, according to pattern directions. (Visit youtube.com or knittinghelp.com for video demonstrations of the crochet cast-on.)
Cable Cast On
(from knittinghelp.com) \*Knit into gap between last two stitches on left needle. Place knitted stitch onto left needle by slipping it knit-wise. Repeat from \*. Note: you can also place the stitch on the needle purl-wise. The results are virtually identical.

Steven Hicks started knitting at seven years old. He's sometimes funny onTwitter @RodeoKnits,blogs occasionally at www.rodeoknits.com, reads a few books and knits incessantly.


