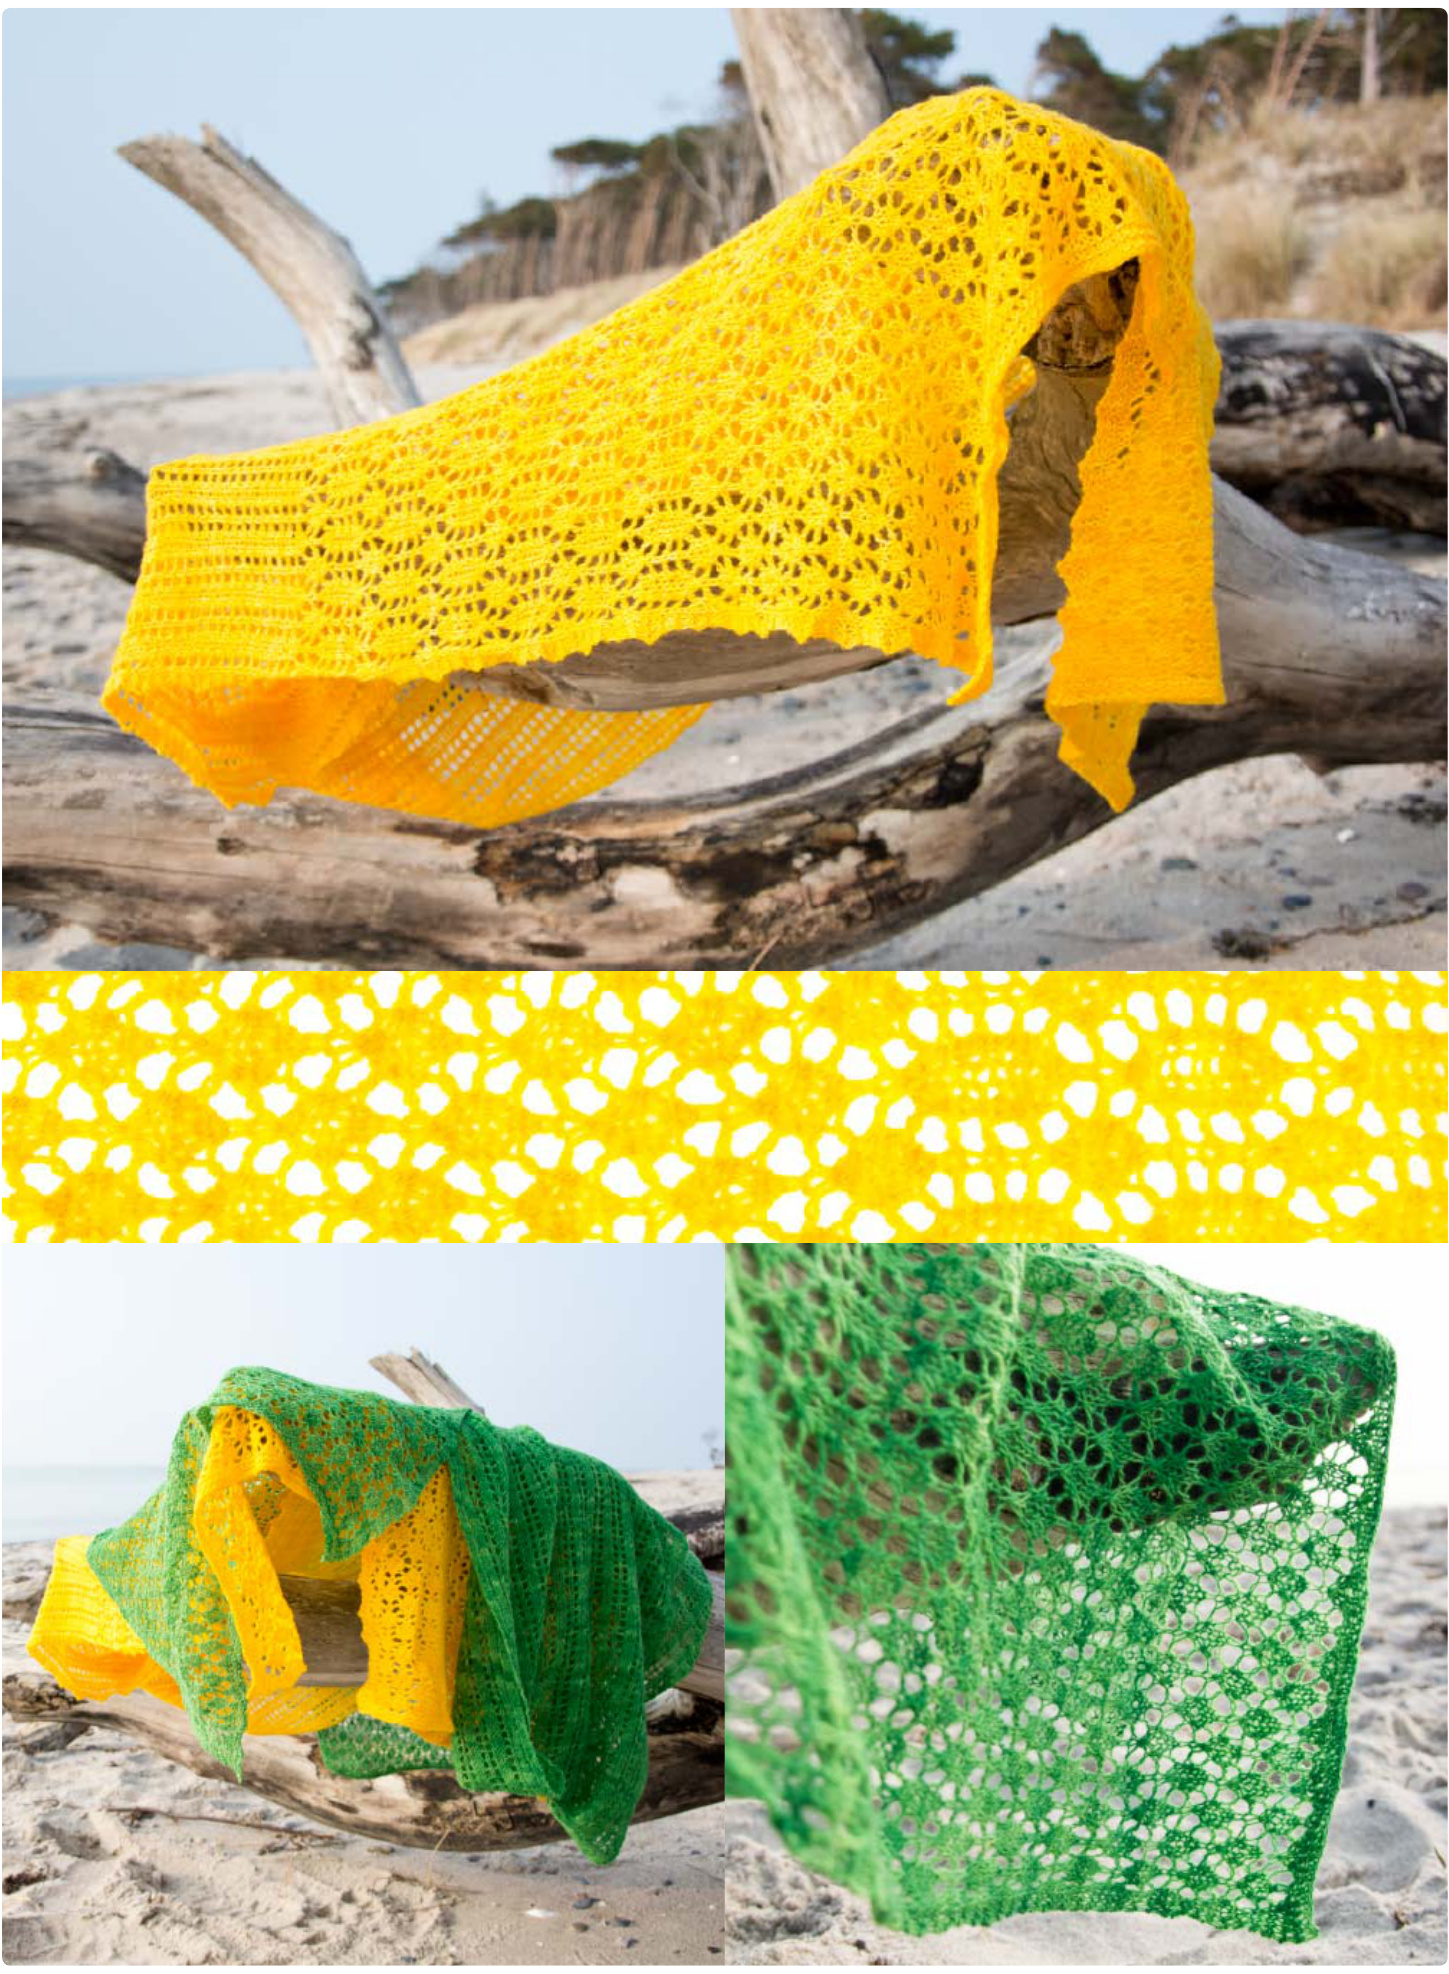
Design: Angelique den Brok
This shawl is designed with spring in mind; Lente is the Dutch word for spring and it sounds as light and cheerful as the season it represents. Angelique says:

I really wanted to chase away the grey days of winter with something light, airy and elegant, but not too ladylike. I often hear: "1 love those lace shawls, but when I wear them, I feel like my mom/ grandma/some posh lady that isn't me. I'm more of a T-shirt and jeans kinda girl ..." I hear you, that's me, except for the occasional wedding party. So I designed a shawl that can be dressed up or down. You can drape it over your shoulders and stride to the party on your elegant high heels, or you can just make a loop and pull the ends trough and brighten up your everyday outfit. Made in Malabrigo Lace, it's soft and warm enough to protect you from a cool evening breeze. Since I love the color of daffodils and dandelions, I chose the color 'Sauterne'. Carolin chose the color ... hm -- I'll give you a hint - did you ever receive a box of yarn from Lanade? This shawl is a nice beginners lace project, since it's quite straightforward. It consists of 3 different patterns and you can customize the size, so it's not too boring for the more experienced knitter.
Materials:
2 skeins of Malabrigo Lace in ^022 Sauterne' for Angeliques narrow yellow version or 3 skeins of Malabrigo Lace in ‘004 Sapphire Green? for Carolins wide green adaptation (values in parentheses in the Directions section refer to Carolins wide green adaptation) Alternative yarns: ·Malabrigo Silkpaca, 2 (3) skeins · Malabrigo Sock, 2 (3) skeins ·Malabrigo Finito, 5 (6) skeins Straight knitting needles, size 4.5 mm (US 7) Finished size: Angeliques narrow yellow version: 210×40 cm Carolins wide green adaptation: 200×50cm
Customizing the size of the shawl:
If you want to make the shawl longer or shorter measure your work after A+ B is done (for instance 42 cm). Determine the desired length (for instance 160 cm). Subtract A+ B from the desired length to get A+ B+ C (here 160-42= 118 cm) and work in pattern C until your work measures A+ B+ C (here 118 cm) and then continue with B again. If you want to make the shawl wider or narrower cast on a number of stitches that can be divided by 10, then add 9. For instance, 49, 89, 139, etc.
Gauge:
Gauge is not critical, but Malabrigo Lace is very stretchy, so use needles that are not too thin for a nice, lacy effect. The trick with lace is not the number of stitches per 10 cm, but the balance between the stitches and the holes. If the holes are too small, your shawl will be dense and not so lacy. If the stitches are too big, everything will look like holes. 4.5 mm may seem large for this yarn, but it's worth a try.
Directions:
To start: Cast on 79 (109) sts (make sure to cast on very loosely) K5 rows Pattern A is worked as follows: Right side rows: K3, A.1, repeat A.2 11 (16) times, A.3, k3 Wrong side rows: K3, purl until 3 sts remain, k3 Repeat these two rows until all 8 rows of pattern A have been worked 8 times. Now work row 1-4 once more. Continue with pattern B. Pattern B is worked as follows: Right side rows: K3, B.1, repeat B.2 11 (16) times, B.3, k3 Wrong side rows: K3, purl until 3 sts remain, k3 Repeat these two rows until all 12 rows of pattern B have been worked 6 times. Now continue with pattern C. Now measure your work and write down the height. Pattern C is worked as follows: Right side rows: K4, repeat C 12 (17) times, k3 Wrong side rows: K3, purl until 3 sts remain, k3 Repeat these two rows until your work measures 200 (190) cm minus A + B [as measured before] and continue in B as follows: Pattern B is worked as follows: Right side rows: K3, B.1, repeat B.2 11 (16) times, B.3, k3 Wrong side rows: K3, purl until 3 sts remain, k3 Repeat these two rows until all 12 rows of pattern B have been worked 6 times. Now continue with patternA. Pattern A is worked as follows: First, work row 5-8 of pattern A once. Then, repeat the two rows below until all 8 rows of pattern A have been worked 7 times, but omit the last (purl) row on the last repeat of A (the next row will now be the border in garter stitch, so that this end of the shawl will mirror the beginning of the shawl). Right side rows: K3, A.1, repeat A.2 11 (16) times, A.3, k3 Wrong side rows: K3, purl until 3 sts remain, k3 Finishing: K5 rows Bind off very loosely.
Blocking the shawl:
Make a bath with lukewarm water and let the shawl soak in it for 30 minutes. Move your shawl a little, so the water can penetrate the fibres, but don't rub or squeeze. The project only needs to become wet. Remove the shawl from the water and push out the water a little without wringing or squeezing. Lay it between two towels and press a little. Prepare you blocking surface. Use special blocking boards or tiles or do like I do, lay an old sheet on a mattress. Lay the shawl on the surface and stretch it in all directions. You will be amazed and perhaps a little worried at how big it gets. No worries. Block with pins. This might be a bit scary to do at first, but you can pull the thin yarn quite hard. First stretch the shawl and pin down the four corners. Then stretch the sides and put more pins in. Finally distribute more pins evenly 3-5 cm between each pin. Let the shawl dry for at least 12 hours and then remove the pins. There will be small tips along the sides of the shawl, but they will fade soon when you wear it. There are other methods for blocking, Carolin from Lanade used the Blocking Combs from KnitPro, for instance. You could also use blocking wires if you have them to get straight edges.
Legend:
口 Knit on the right side, purl on the wrong side 0 Yarn over Knit 2 sts together Slip two stitches to the right hand needle one by one as if you would knit them. Insert the left hand needle into the front of both stitches and knit them together Slip two stitches together as if you would knit them, knit one stitch, pass the slipped stitches together over the knitted stitch
Chart A
Chart B
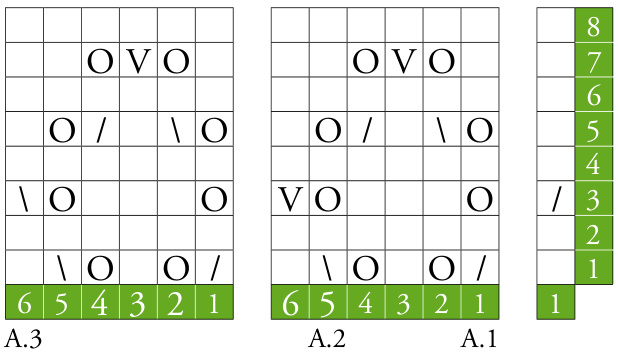
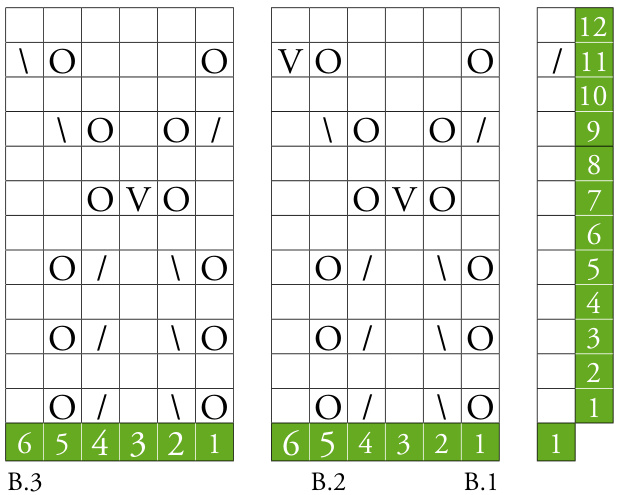
Chart C