Top-Down Mittens By Mary Arif
Materials: Noro Silk Garden or any worsted weight. 2 small bits of scrap yarn about 5-6 inches long Equipment: Double-pointed needles - Size 3 U.S. / 3.25 mm Small stitch holder or very large safety pin Darning needle Gauge: Not much of an issue, really, as you will make decisions on the comfort level as you go. These mittens will feel “firm', rather like a sock, due to the size of the wool and the size of the needles. Using two of your needles, commence with a figure-8 cast on: Wrap the yarn around the two needles in a.....wait for i.....figure-eight motion. Go up over the top needle from the back, between the two needles and down around the bottom needle from the back to the front, back through the two needles again and again until you have a total of 16 stitches -- 8 on each needle. 1Keep the stitches you cast on a bit loose or you will have a hard time knitting your first couple of rows. Now just pick up the working yarn and knit across the top row with a third needle. Flip your needles upside down -- same side facing you but the needle that you just knit across is on the bottom now. Now just knit across this needle. You wil most likely have a very loose looking center row (these are the stitches that you cast on -- the ones that I told you to keep loose). Knit each side once more and then tighten the stitches across the first row toward the loose end. (Just work your way across that row, tightening up each stitch as you go - rather like tightening a shoe lace -- until you get to the loose end. Then pull the end to tighten.) Spread your stitches evenly onto four needles. Increase 1 stitch on each needle (4 stitches every round) until you have 44 stitches. This will make a ladies' medium-sized mitten. Increase more if your hand is bigger or less if it is smaller. Knit until the piece is long enough to go over the top of your hand, sit comfortably in the valley of your thumb and leave a bit of room at the top for fingers to wiggle. (For me it was 33 rounds after I stopped increasing.)
PLACESFORTHETHUMBS.
These mittens will have right and left, which makes for a more comfortable fit. u will need to decide which needle means what in relation to your hane As seen from above:
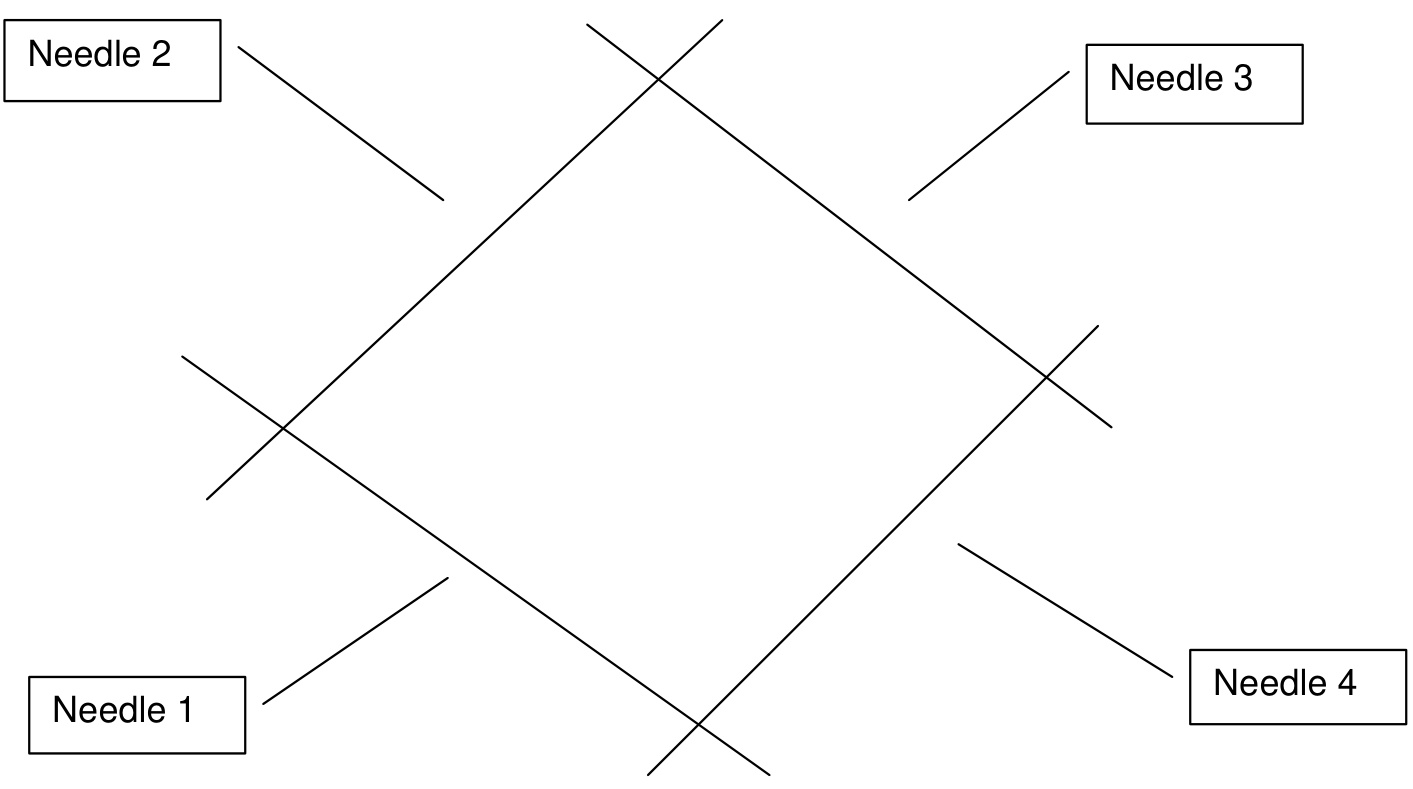
As shown in the diagram - Needle 2 and Needle 3 will be the back of your hand. Needle 1 and Needle 4 will be the palm of your hand. This will put the beginning of each round in the center of your palm. (This is where the tail from your cast-on is dangling.) So....for the left thumb, the work will occur at the end of Needle 1 and for the right thumb, the work will occur at the beginning of Needle 4
Left thumb:
Starting at that beginning of the round - knit on Needle 1 until you have 7 stitches left. Purl the next stitch. Place the next five stitches on a large safety pin or a small stitch holder. Now for the fiddly part - Take your little piece of waste yarn and cast on 8 stitches by looping backwards in front of the last lonely stitch on Needle 1. Knit those 8 stitches and purl the last stitch on the needle. You will notice that Needle 1 has 3 more stitches on it now than the other needles. Just leave it the way it is for now, the extras will be gone soon enough. Knit the knit stitches and purl the purled stitches for the next 2-3 rounds. The purled stitches will make for a nice dividing line for the thumb gusset and will also help in the shaping of the rest of the mitten. Somewhere in the next 3 inches of mitten or so, you will be decreasing the 3 extra stitches that you picked up on Needle 1. So, about every 4th round or so, decrease 1 stitch in the thumb gusset area. By now, you're at the wrist, or nearly so.
Right thumb:
Starting at that beginning of the round - knit around until you complete Needle 3. At the beginning of Needle 4, purl the first stitch. Place the next five stitches on a large safety pin or a small stitch holder. Now for the fiddly part - Take your little piece of waste yarn and cast on 8 stitches by looping backwards in front of the rest of the stitches on Needle 4. Knit those 8 stitches and purl the last next stitch and knit the rest of the stitches on Needle 4. You will notice that Needle 4 has 3 more stitches on it now than the other needles. Just leave it the way it is for now, the extras will be gone soon enough. Knit the knit stitches and purl the purled stitches for the next 2-3 rounds. The purled stitches will make for a nice dividing line for the thumb gusset and will also help in the shaping of the rest of the mitten. Somewhere in the next 3 inches of mitten or so, you will be decreasing the 3 extra stitches that you picked up on Needle 4. So, about every 4th round or so, decrease 1 stitch in the thumb gusset area. By now, you're at the wrist, or nearly so. Once you've got the mitten as long as you want it, decrease one stitch on each needle and knit one more round plain. Make sure that the number of stitches left is divisible by 4. Knit a 2x2 rib for as long as you wish - 2 - 2 12 inches is usually pretty good. Cast of loosely.
Now for the thumb...
1 Using 3 of your needles, carefully pick up the 8 stitches from your waste yarn, pick up a stitch over each of the purled stitches, pick up a stitch on the palm side just before and just after the 5 stitches from the holder to prevent holes. Rearrange the stitches on your 3 needles for comfort while you work and knit around (trying on occasionally) until the thumb is 1 round past the length of your thumb. · Knit two stitches together for the entire round. Close the thumb by puting the stitches on your darning needle and pulling snugly. 1 Pass the needle through the stitches at the tip of the thumb a couple of times for security and fasten securely. IWeave in ends. Voila - a custom-fit mitten.


