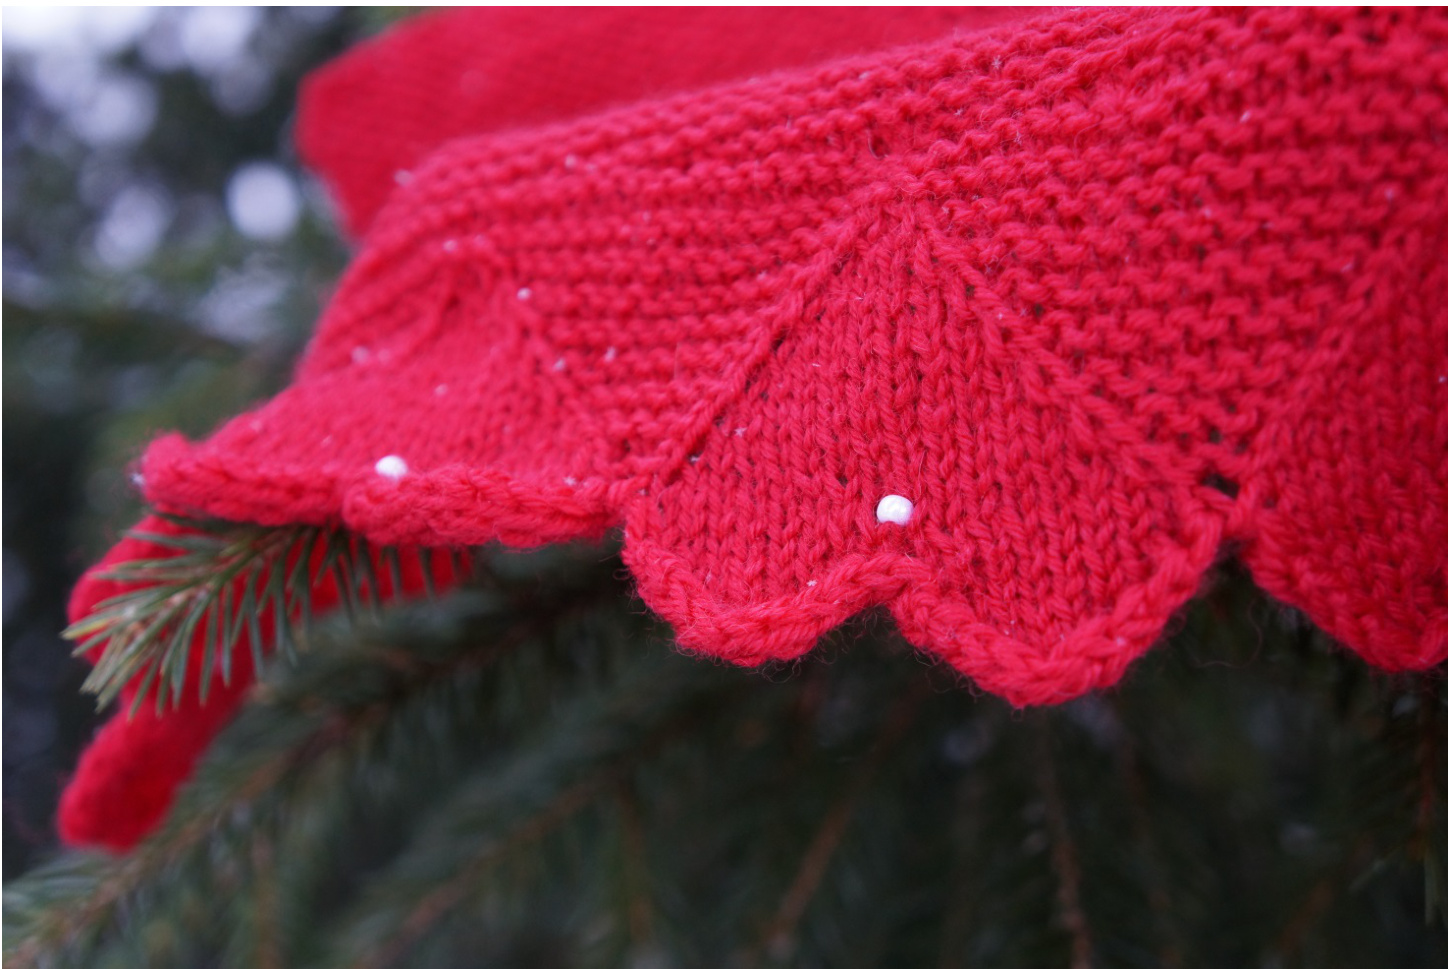
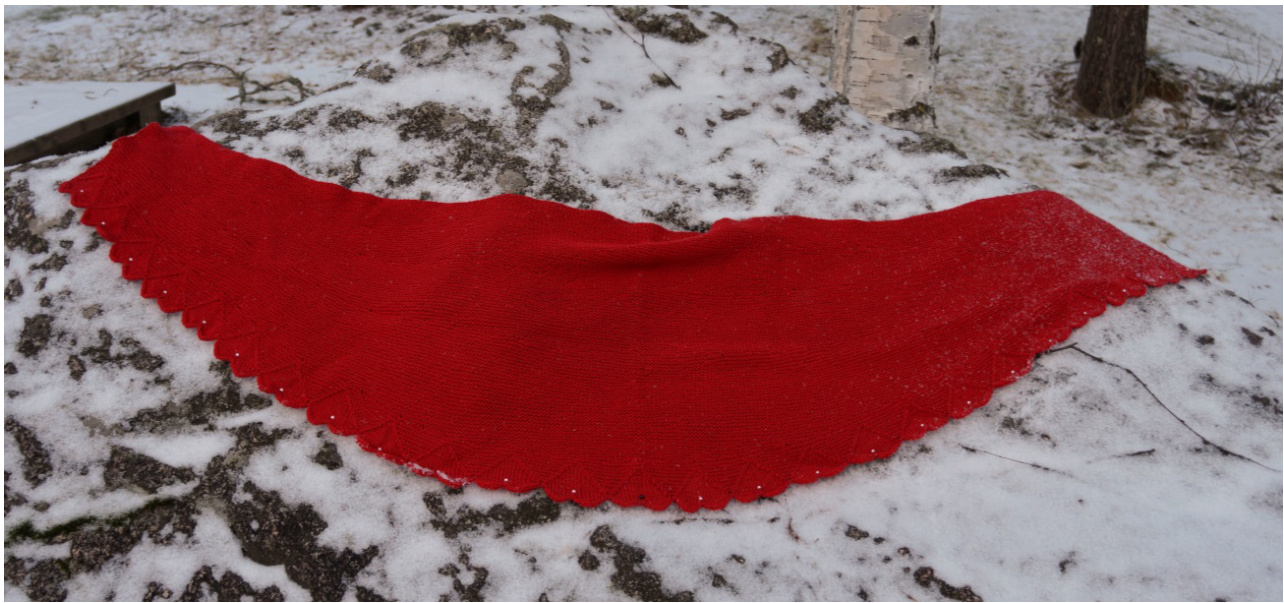
This shawl came to exist in a school project. We took part in Jyvaskyla Wedding exposition in January 2014. I designed and made this shawl for the exposition. My purpose was to sell it and market my own skills to potential customers. All did not work out according to plan. Other students felt that my shawl did not match with the dresses which were also featured, so I had to wear it myself. Because of that no one figured out that I am marketing myself as a knitter and textile designer, so the original plans went awry. The shawl is named Ilona according to the webzine Ulla's Rock theme. Ilona is a romantic rock song which is made by the Finnish rock band Apulanta. The stony opening of the shawl reminds me of that song. Also the heart pattern of the edge refers to the love song. In the past I listened a lot to Apulanta and lona has been my favorite song for a long time. Ilona shawl is generously sized to be used as shoulder warmer. It is also good on cold weather. Originally, I designed this shawl specifically for brides, to be worn with a wedding dress. However the shawl is quite versatile and it is suitable for many uses. The bind of edge of the shawl is made in a pretty special way, as well as the increasing of stitches to achieve the shape. Go ahead and try to knit this scarf!
Yarn:
Sandnes Garn Lanett Baby Ull, (100% superwash merino wool, 50 g = 182 to 195 m, you need 270g, color red (4128) You can also use any other fingering weight merino wool.
Gauge:
The gauge is not exact. In the shawl shown in the pictures 20 sts and 40 rows in garter stitch equals 10 cm/4 in.
Needles:
4 mm/US 6 circular needle with a long cable
Other accessories:
3 stitch markers 1 black pearl and 24 white a little bit smaller pearls(make sure that the double thread goes through the pearl hole) A really small crochet hook or a jewel cable to pull the yarn through the hole in the pearl A blocking base Pins for blocking
Size:
Width 155 cm /61 in Height of the middle of the shawl from the highest point is 46.5 cm /18 in
Technical explanation:
Garter stitch: Knit on the right and wrong side of the work. Wrap and turn (w&t): Slip the next stitch with yarn in front. Move yarn to back of the work, and slip the stitch back to the left needle. Turn the work and knit. Knit the wrapped loop separately: Knit to the wrapped stitch of the previous row. Knit the wrapped stitch. Lift the wrapped loop around the stitch onto left needle and knit it separately. Wrapped loop is knit to prevent a hole between the stitches. Doing that you increase one stitch per wrapped stitch. SSK: Slip, slip, knit. Visual guidance to Jeny ^s suprisingly STRECHY bind-off technique: http://knitty.com/ISSUEfall09/FEATjssbo.php
Abbrevations:
sts= stitch k= knit p= purl w&t= wrap and turn yo= yarn over
Pattern:
Cast on 291 sts. Knit in flat in garter stitch for 5 cm /2 inches. On the right side row set 3 stitch markers before 5 cm /2 inches. Place the first marker after you have knit 45 sts, k100, add the second stitch marker (this is the middle point of the shawl), k100, place the third marker, k46.
The first short rows:
On the next right side knit to one stitch before the last stitch marker, w&t. Repeat this on the next (wrong side) row. On the next right side row, knit until 14 sts remain before the wrapped stitch, knit also the wrapped sts, w&t. Knit similarly the next rows, until you have 6 wrapped stitches on both sides of the work and 12 wrapped stitches in total. Now you have 60 sts in the middle of the work, when you count in 2 most center wrapped stitches. Continue knitting all stitches and add one st by knitting the previous row wrapped loop separately (See technical explanation). Now you have 303 sts on work. Knit in garter sts until work measures 7,5 cm/3 inches at the edge of the work. The height is measured at edge of the work, which includes no short rows. Lay the work down and do not stretch the work while measuring. Second set of short rows begins on the next right side row: Knit to the last stitch marker slip the marker and k15, w&t. Repeat the same on the next wrong side row. On the next right side row, knit until 8 stitches remain before the wrapped stitch, knit also the wrapped sts, w&t. Knit similarly on the next rows, until you have 14 wrapped stitches on both sides of the work and 28 wrapped stitches total. Now you have 36 sts in the middle of the work, when you count in 2 most center wrapped stitches. Continue knitting all stitches and add one sts by knitting the previous row wrapped loop separately (See technical explanation). Now you have 331 sts on work. Knit in garter sts until work measures 11,5 cm/4,5 inches from the edge of the work. The measurement is taken from the point where there are no short rows , as before. Third set of short rows : Knit to the last stitch marker, slip the marker and k31, w&t. Repeat the same on the next wrong side row. On the next right side row, knit until there are 8 sts remaine before the wrapped stitch, knit also the wrapped sts, w&t. Knit similarly on the next rows, until you have 17 wrapped stitches on both sides of the work and 34 wrapped stitches total. Now you have 44 sts in the middle of the work, when you count in 2 most center wrapped stitches. Continue knitting all stitches and add one sts by knitting the previous row wrapped loop separately (See technical explanation). Now you have 365 sts on work. Knit in garter sts until work measures 15 cm/ 6 inches from the edge of the work. The measurement is taken from the point where there are no short rows , as before. The fourth and the last set of short rows are knit more frequently: Start on the right side row and knit until there are 7 sts remain, w&t. Knit the next row in the same way. On the next right side row, knit until 6 sts remain before the wrapped stitch, knit also the wrapped sts, w&t. Knit similarly on the next rows, until you have 30 wrapped stitches on both sides of the work and 60 wrapped stitches total. Now you have 5 sts in the middle of the work, when you count in 2 most center wrapped stitches. Continue knitting all stitches and add one sts by knitting the previous row wrapped loop separately (See technical explanation). Now you have 425 sts on work.
Knit 3 rows by using all stitches of the work.
On the next wrong side row start knitting the heart edge by using the chart on page 7. Note that the chart row 14 is the pearl adding row! In the middle of the work add the little bigger black pearl instead of a smaller white pearl. After row 14 you can remove all stitch markers. After finishing the chart the arcs of the hearts are worked individually by using short rows. At the same time you bind of all stitches arc by arc. Work the arcs of the hearts as follows: The first arc: Start on the right side row. K8, w&t. P7, w&t. K6, w&t. P5, w&t. K4, w&t. P3, w&t. K2, w&t. On the next (wrong side) row purl to the end of the row, lifting wrapped loops at the same time onto left needle and purling them together with stitches. The next right side row is the first bind- off row of the first arc. Bind off loosely by using for example the elastic Jeny ^s suprisingly strechy bind off- technique. Note! The stretchy bind of is very important! If the edge is too tight arcs roll easily. Binding off by using Jeny's suprisingly strechy bind off- technique (See technical explanations): Take a yo onto the right needle, knit the first stitch from the left needle (if there is wrap around the stitch, pick it up onto left needle and knit together with the stitch), pass the yo over the knit stitch. Make a new yarn over and repeat previous action. Now when you have two stitches with yarn over wraps on the right needle pass the right stitch over the left. Wrap the next stitch with a yarn over, as in the beginning. Pass stitch over, when you have 2 sts on the right needle. Repeat this until the middle stitch of the heart (identified easily by the pearl lower in the work). Pick the yarn loop wrap of the middle stitch and one stitch below the middle stitch onto the left needle and knit all 3 sts together. This prevents visible holes below the middle stitch. Bind off is halted for a moment and continues after working the second arc.
The second arc:
There is now the middle stitch on the right needle. K7, w&t. P7, w&t. K6, w&t. P5, w&t. K4, w&t. P3, w&t. K2, w&t. On the next (wrong side) row purl to the end of the row, lifting wrapped loops at the same time onto left needle and purling them together with stitches. Work wrong side row to the middle stitch. Lift the wrapped loop of middle stitch and the purl stitch loop (includes more yarns because of the first arc) below the previous row onto the left needle and purl those 3 stitches together When you work like this a big hole will not be formed in the middle of the heart. ng on the right side row and bind off stitches the same way like in the first arc Bind off stitches until you have the last stitch of the first heart on the right needle. Move this stitch onto the left needle and pick up one stitch below the first stitch of the second heart, knit these stitches together with the first stitch of the second heart (3 sts). When you work like this a big hole will not be formed at the border of the first and second heart. You have now first stitch of the next heart on the right needle. Continue working in the same way as in the first arc. On the first row k7 instead of 8 sts, because you already have one stitch on the right needle. Repeat the first arc and the second arc instructions until you have bound off all stitches. By doing this you bind off stitches in a little bit different way. Chart
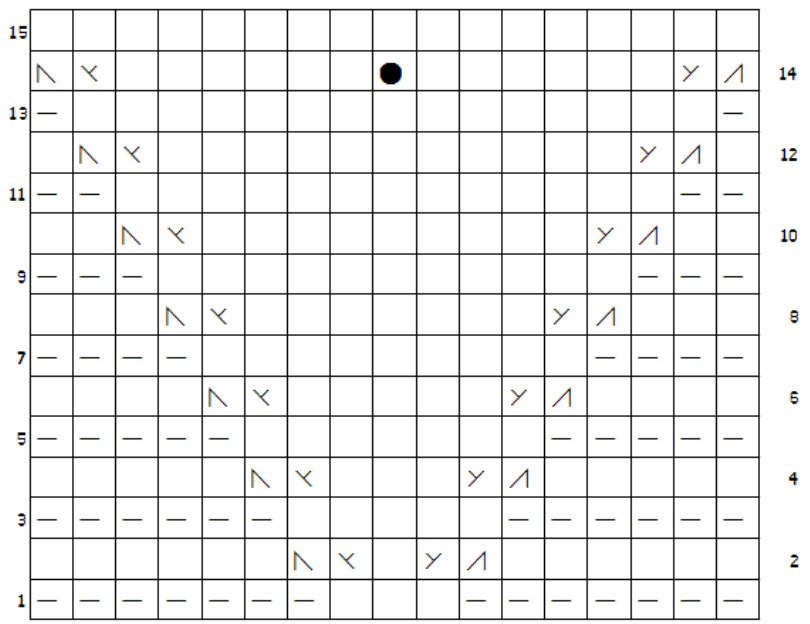
Symbols: Knit on the right side of the work and purl in the wrong side Purl on the right side of the work and knit in the wrong side Knit 2 together Add a pearl by pulling stitch from the previous row through the pearl and knit that stitch Make one by knitting the yarn between stitches through the back loop SSK Make one by knitting the yarn between stitches through the front loop
Assembly:
Cut yarn and pull through the last stitch. Weave in ends. Wet the work and dry it with a towel by gently pressing. Block the shawl to desired measures. Let dry thoroughly.
Attention!
All rights reserved by the designer Commercial use is forbidden. You may knit products with this pattern for yourself or for a gift, but not for sale. Do not publish, copy or sell this pattern without a written permission of the designer.
Photos
Niina Risulainen