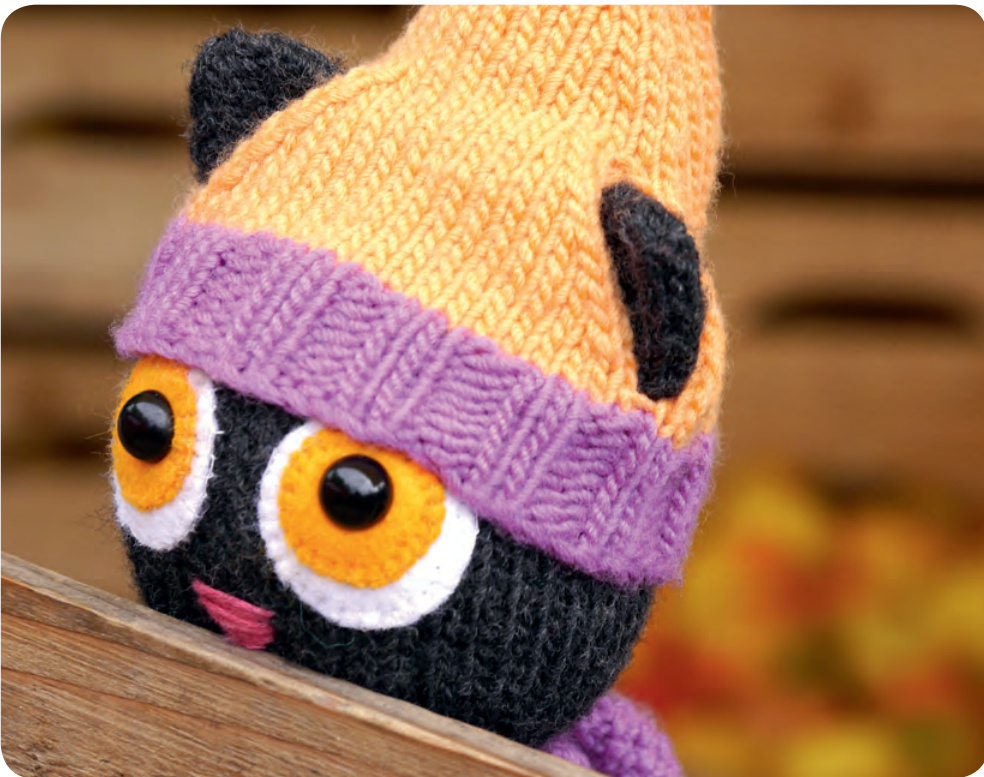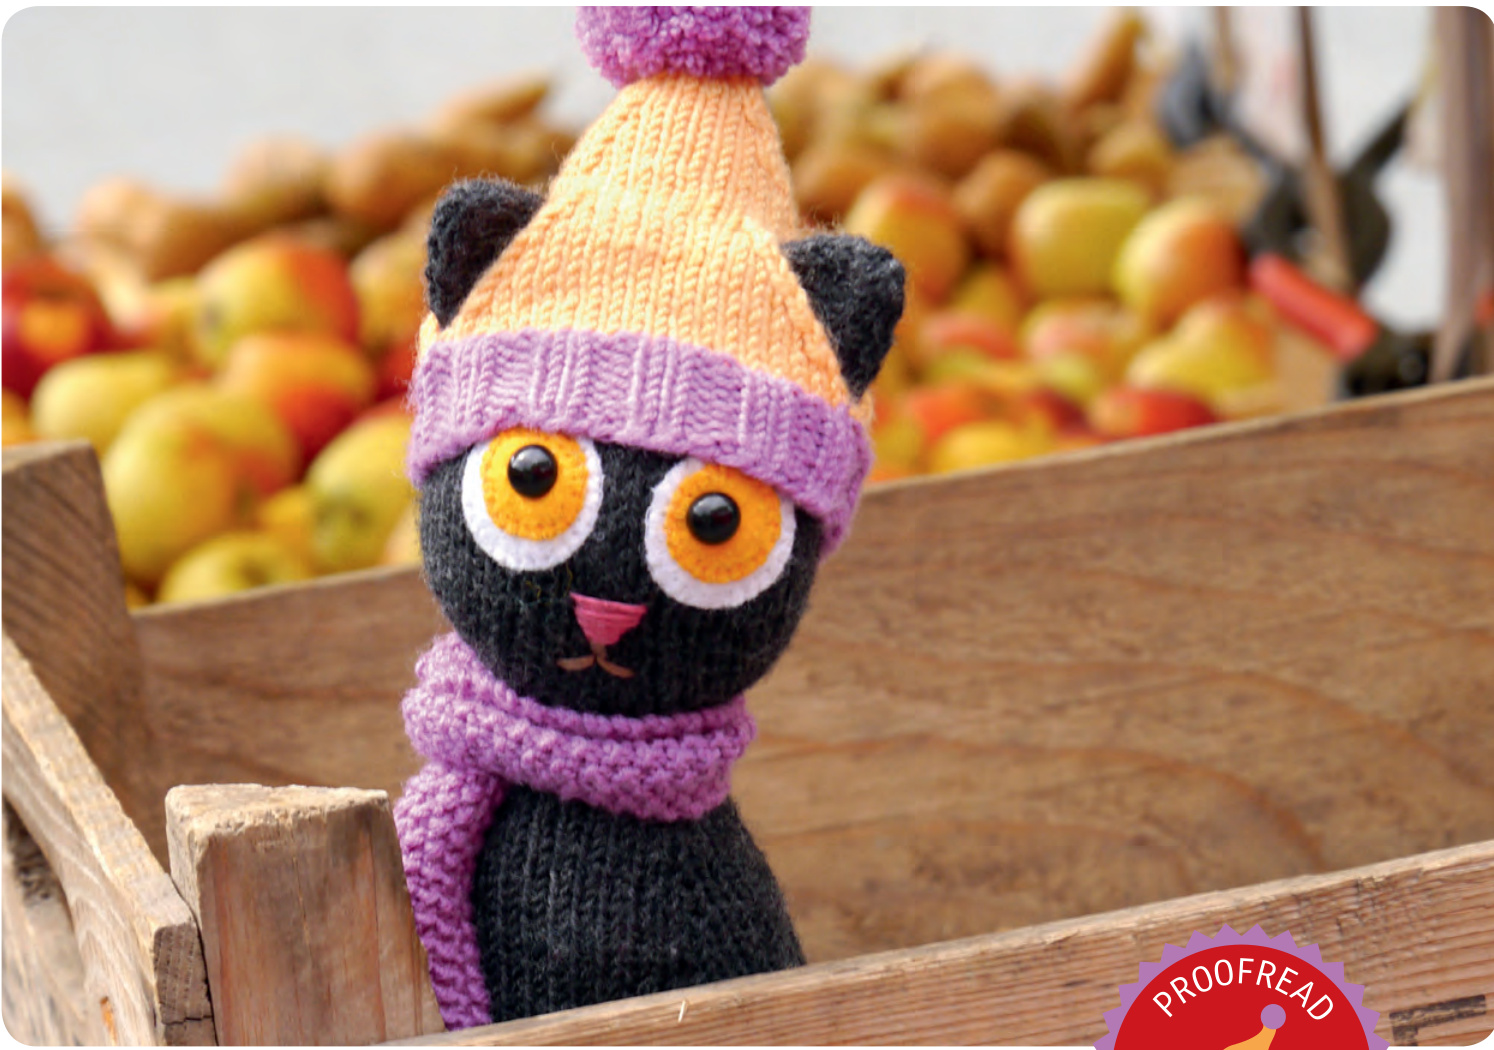
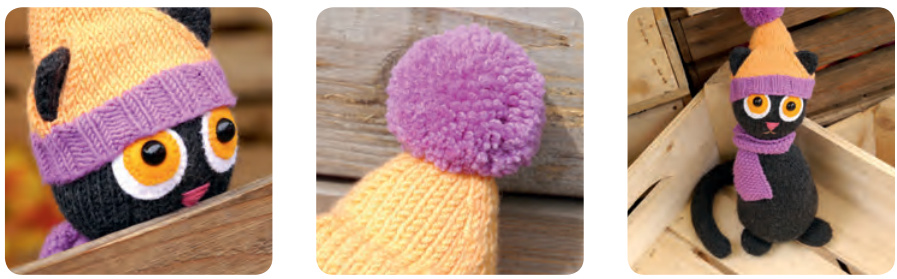
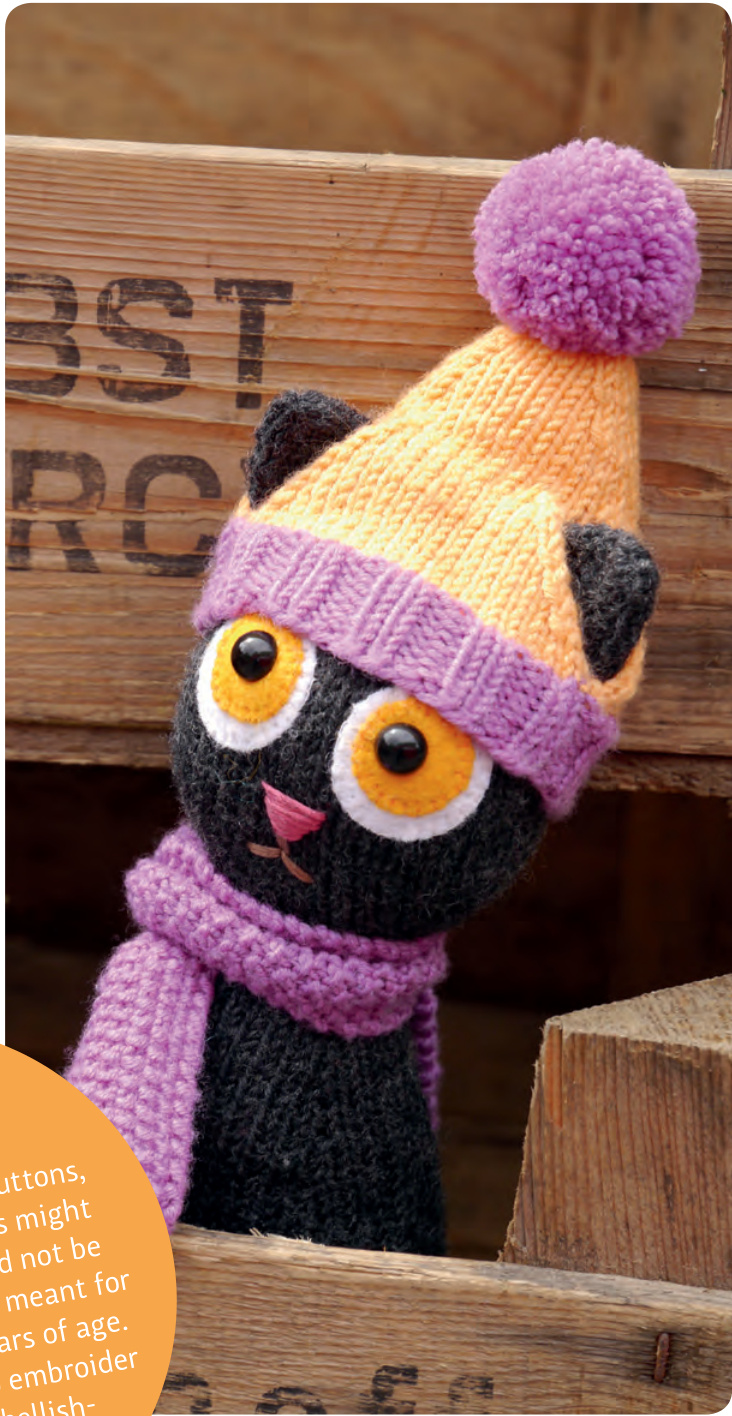
STEFFI THE CAT
When I first considered building my own knitting website, I already had the idea of designing a logo you can knit. Et voila - here comes the logo cat! It took me quite a while to find a name for the little cutie, and in the end it was my husband who said that, of course, it had to be christianed ,Steff". Okay, I might not be a cutie, but Steff the Cat and Steff the Designer have one thing in common: They love hats and shawls. Knitted, what else?
GAUGE
Knit as tight as possible, so the stuffing will not show. A good gauge with DK / light worstet yarn would be
27 stitches x 38 rows = 10 x 10 cm = 4 x 4 inches
Of course you can use any yarn you want (or you have left over). Steff will be bigger or smaller depending on the yarn. With the gauge shown above Steff measures approximateley 30 cm = 12 inches from head to toe. As English is not my native language, some explainations might be a bit complicated or misleading. Please don't hesitate to send me suggestions or point out mistakes. You'll reach me here: steffi@cats-and-hats.de
BEFORE YOU START
Inroundsorrowsnotmentioned allstitchesareknitted as theyshow-knit,when thestichin therowbelow shows as knitted, purl, when the stitch in the row below shoes as purled. More often than not you will knit stockinette stitch in the rounds, so every stitch is knitted, without any increases or decreases. For abbreviations and more elaborate techniques please go to the appendix. Some of the illustration photos are not shot especially for the cat but illustrate the concept.
LEGAL MATTERS
2015 ⊙ Steff Hochfellner (Steff Dobbertin). All rights reserved. This pattern is FOR PERSONAL USE ONLY! The pattern (or parts of it) may not be reproduced, distributed or resold, translated, published, altered, shared or posted (for sell or free) over the internet or offline! You can sell items made from this pattern, provided that they are handmade by yourself in a limited number and you give credit to the designer. Please add the following lines to your item description and any item you are selling: ,This toy is handmade by (your name) from a design and pattern by Steffi Hochfellner, www.cats-and-hats.de"
KNITTING PATTERN FOR STEFFI THE CAT
BODY (1)
The body is worked top down, starting with the ,neckfinger". This ,neckfinger" will later be shoved into the head to strengthen the neck and be well hidden.
CO 9 sts in BLACK, arrange onto 3 needles (3 sts per needle) and knit in stockinette stitch in the round.
Rnd 1: {k2, kfb} 3 times (= 12 sts). Rnd 2: {k2, kfb} 4 times (= 16 sts). Rnd 3 - 16: Knit all stitches (14 rounds), then rearrange the stitches on 4 needles (4 sts per needle). All rounds not mentioned are knitted without increases or decreases.
Rnd 18, 22 and 26:
1st and 3rd needle: Each time m1 right slanted before the 2nd to last st. 2nd and 4th needle: Each time m1 left slanted after the 2nd st from beginning of needle (= 7 sts per needle = 28 sts).
Rnd 30 and 34:
1st and 3rd needle: Each time m1 right slanted before the 3rd to last st. 2nd and 4th needle: Each time m1 left slanted after the 3rd st from beginning of needle (= 9 sts per needle = 36 sts).
Rnd 38 and 42:
1st and 3rd needle: Each time m1 right slanted before the 4th to last st. 2nd and 4th needle: Each time m1 left slanted after the 4th st from beginning of needle (= 11 sts per needle = 44 sts).
Rnd 46 and 50:
1st and 3rd needle: Each time m1 right slanted before the 5th to last st. 2nd and 4th needle: Each time m1 left slanted after the 5th st from beginning of needle (= 13 sts per needle = 52 sts).
Rnd 54 and 58:
1st and 3rd needle: Each time m1 right slanted before the 6th to last st. 2nd and 4th needle: Each time m1 left slanted after the 6th st from beginning of needle (= 15 sts per needle = 60 sts).
Rnd 59 to 78: Knit all sts.
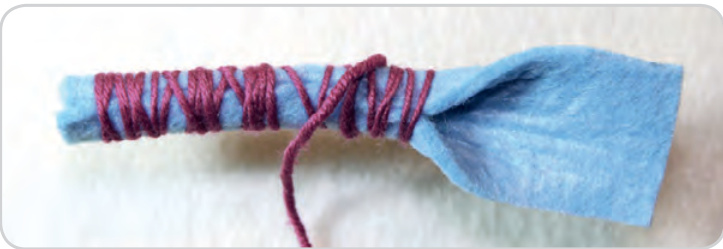
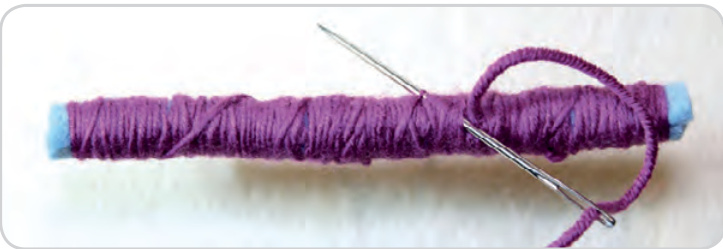
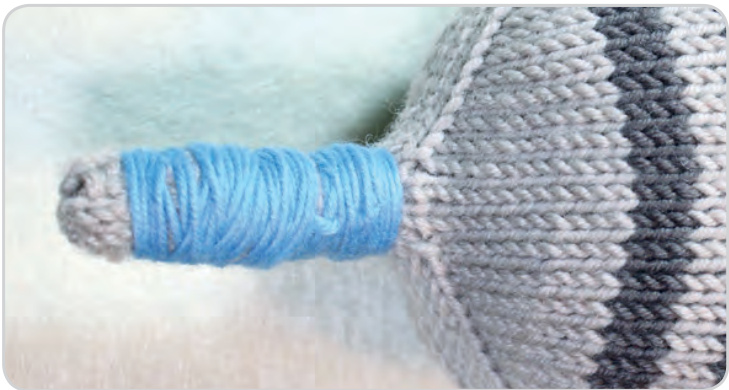
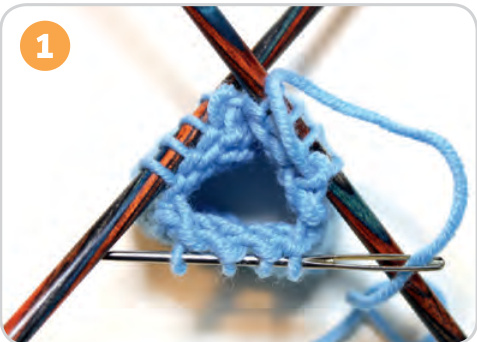
Rearrange the sts onto 3 needles (20 sts each). Rnd 79: {k5, k2tog, k5, k2tog, k6} 3 times (= 54 sts). Rnd 81: {k4, k2tog} 9 times (= 45 sts). Rnd 83: {k3, k2tog} 9 times (= 36 sts). Now is the right time to work the neck enforcement (,neck finger") and stuff the body. Prepare the neck enforcement as follows: Cut a rectangular piece from the strong felt ca. 5,5 x 11 cm (2,1 x 4,2 inches). Roll the piece and wrap it with yarn as shown on the pictures below. When the roll is stiff enough, secure the loose end. Shove the roll into the neck finger of the knitted body and wrap from the outside with many layers of yarn. Secure the loose end. Now stuff the body with polyester filling or else. Use only small amounts of stuffing at a time and place them around the neck enforcement. It is supposed to sit in the middle of the body. Continue next page
Do you like this pattern? Then you might consider sending a small donation to my paypal account: steffi@cats-and-hats.de I would be very happy, but then, hey, that is definitely not a must!
KNITTING PATTERN FOR STEFFI THE CAT
BODY (2)
You might add a beanie bag so your cat sits firmly onto its bum. Just fll some rice or polyester granules into a sock (fine fabric is preferable, like stockings). Make a knot in the opening, but make sure the rice or granule moves freely. Cut the leftover fabric approx 1 cm / 0.5 inch above the knot. Insert the beanie bag into the allready stuffed body with the knot pointing upwards. Continue knitting. Rnd 85: {k2, k2tog} 9 times (= 27 sts). Rnd 87: {k1, k2tog} 9 times (= 18 sts). Rnd 89: {k2tog} 9 times (= 9 sts). C0 20 sts in BLAcK, arrange onto 3 needles (1st needle = 6 sts, 2nd needle = 6 sts, 3rd needle = 8 sts) and knit in stockinette stitch in the round. Rnd 1 to 14: Knit all sts.
Rnd 15:
1st needle: k2tog the last two stitches. 2nd needle: ssk 1st and 2nd stitch. 3rd needle: k2, k2tog, ssk, k2 (= 16 sts).
Rnd 16:
1st needle: k2tog the last two stitches. 2nd needle: ssk 1st and 2nd stitch. 3rd needle: k1, k2tog, ssk, k1 (= 12 sts).
Rnd 17:
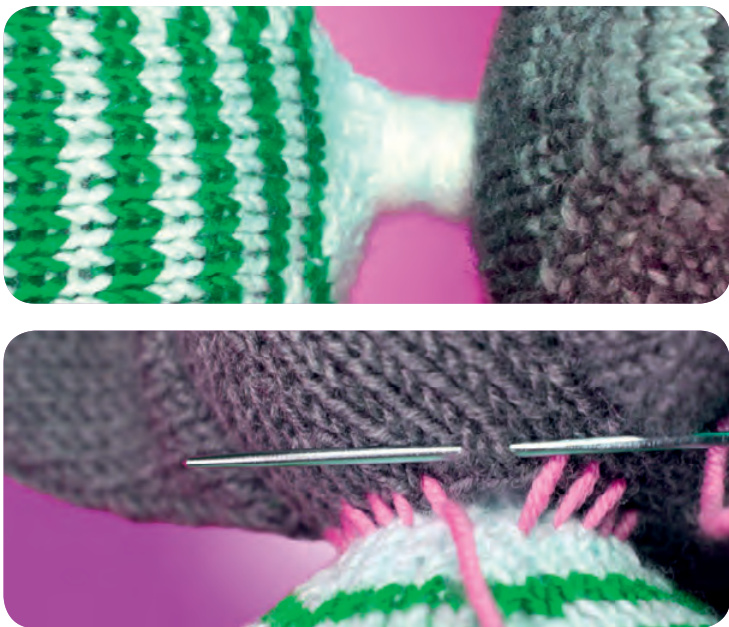
1st needle: k2tog the last two stitches. 2nd needle: ssk 1st and 2nd stitch. 3rd needle: k2tog, ssk (= 8 sts). After rnd 17, break yarn, thread it into darning needle and catch all stitches two times in the round while putting away the double pointed needles. Tighten the yarn, secure the loose end and weave it in on the wrong side. Stuff the leg, then attach it with mattress stitch like shown in the pictures below (example). -> After rnd 89, stuff the last bit, then break yarn, thread it into darning needle and catch all stitches two times in the round while putting away the double pointed needles. Tight the yarn, secure the loose end and insert the needle into the body. Exit the needle at any place and cut the yarn close to the fabric. The end will slip into the body.
TAIL
CO 16 sts in BLACK, arrange onto 3 needles (1st needle = 8 sts, 2nd needle = 4 sts, 3rd needle = 4 sts) and knit in stockinette stitch in the round. Rnd 1 to 14: Knit all sts. \* Now you work short rows (see appendix) over the 8 sts of the 1st needle: Row 1 (knit): k8, turn piece over (tpo). Row 2 (purl): Work a turning stitch (TSt), p7, tpo. Rnd 3 (!): Work a turning stitch (TSt), then knit a full round over all needles, working the TSt, that looks like a double sts, as one st (= 16 sts) \* Knit 5 rounds, then repeat short rows from \* to \* Knit 5 rounds, then repeat short rows from \* to \* Knit 5 rounds, then repeat short rows from \* to \* Knit 4 rounds, then repeat short rows from \* to \* Knit 4 rounds, then repeat short rows from \* to \* Knit 4 rounds, then repeat short rows from \* to \* Knit 4 rounds, then repeat short rows from \* to \* Knit 4 rounds, then repeat short rows from \* to \* Knit 4 rounds, then repeat short rows from \* to \* Knit another 4 rounds. In the next 2 rounds k2tog altogether 6 times in even distribution (= 10 sts). Pull together stitches like described in the instruction for the feet. Stuff tail lightly, then attach it bluntly to the body with mattress stitch. Make sure to place the tail so that the cat stands firmly upright.

KNITTING PATTERN FOR STEFFI THE CAT
HEAD AND FACE
C0 20 sts in BLACK, arrange onto 4 needles (5 sts per needle) and knit in stockinette stitch in the round.
Rnd 2, 4, 6, 8, 10, 12 and 14:
1st and 3rd needle: Each time m1 left slanted after the 3rd st from beginning of needle. 2nd and 4th needle: Each time m1 right slanted before the 2nd to last st (= 48 sts). Rnd 15 to 26: Knit all sts.
Rnd 27, 29, 31, 32, 33, 34, 35, 36 and 37:
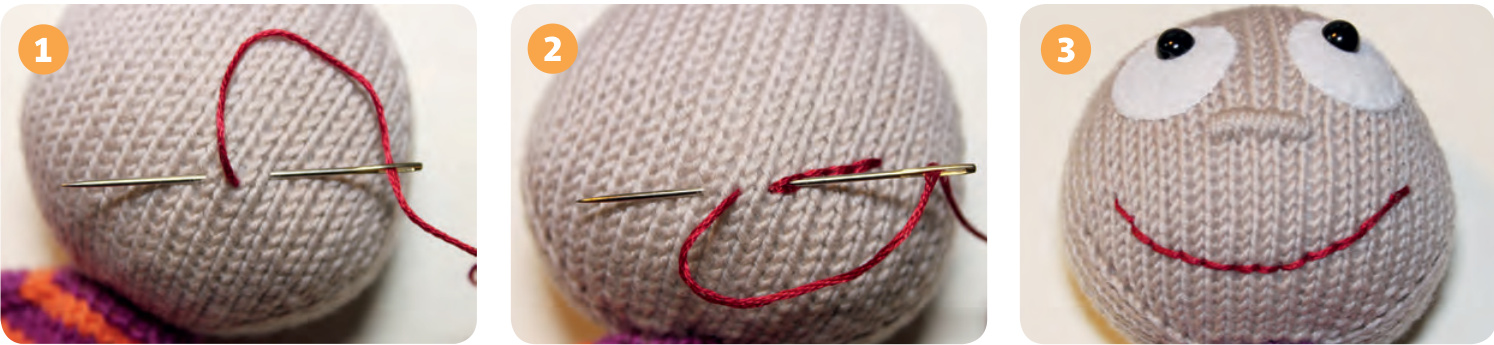
1st and 3rd needle: Each time ssk the 3rd and 4th st. 2nd and 4th needle: Each time k2tog the 3rd to last and the 2nd to last st (= 12 sts). After rnd 37, break yarn and finish the head like described in the instruction for the leg. Stuff the head firmly, but make sure to leave enough space for inserting the neckfinger of the body. Now insert the neckfinger of the body into the head and attach the head on the body with matress stitch like shown on the pictures.
Cut two circles from the white felt and two smaller circles from the yellow felt. Use sewing thread the same colours to applicate the eyes with button hole stitch (see appendix) onto tl head. Embroider the nose and mouth with embroidery thread. Use satin stitch for the nose, backstitch for the mouth.
EARS
CO 22 sts in BLACK, arrange onto 4 needles (1st needle = 6 sts, 2nd needle = 5 sts, 3rd needle = 5 sts, 4th needle = 6 sts) and knit in stockinette stitch in the round. Rnd 1 to 4: Knit all sts.
Rnd 5, 7, 9 and 11:
1st and 3rd needle: Each time ssk the 1st and 2nd st. 2nd and 4th needle: Each time k2tog the last two sts (= 6 sts). After rnd 11, break yarn and finish the head like described in the instruction for the leg. Attach the ears to the head with mattress stitch.
KNITTING PATTERN FOR STEFFI THE CAT
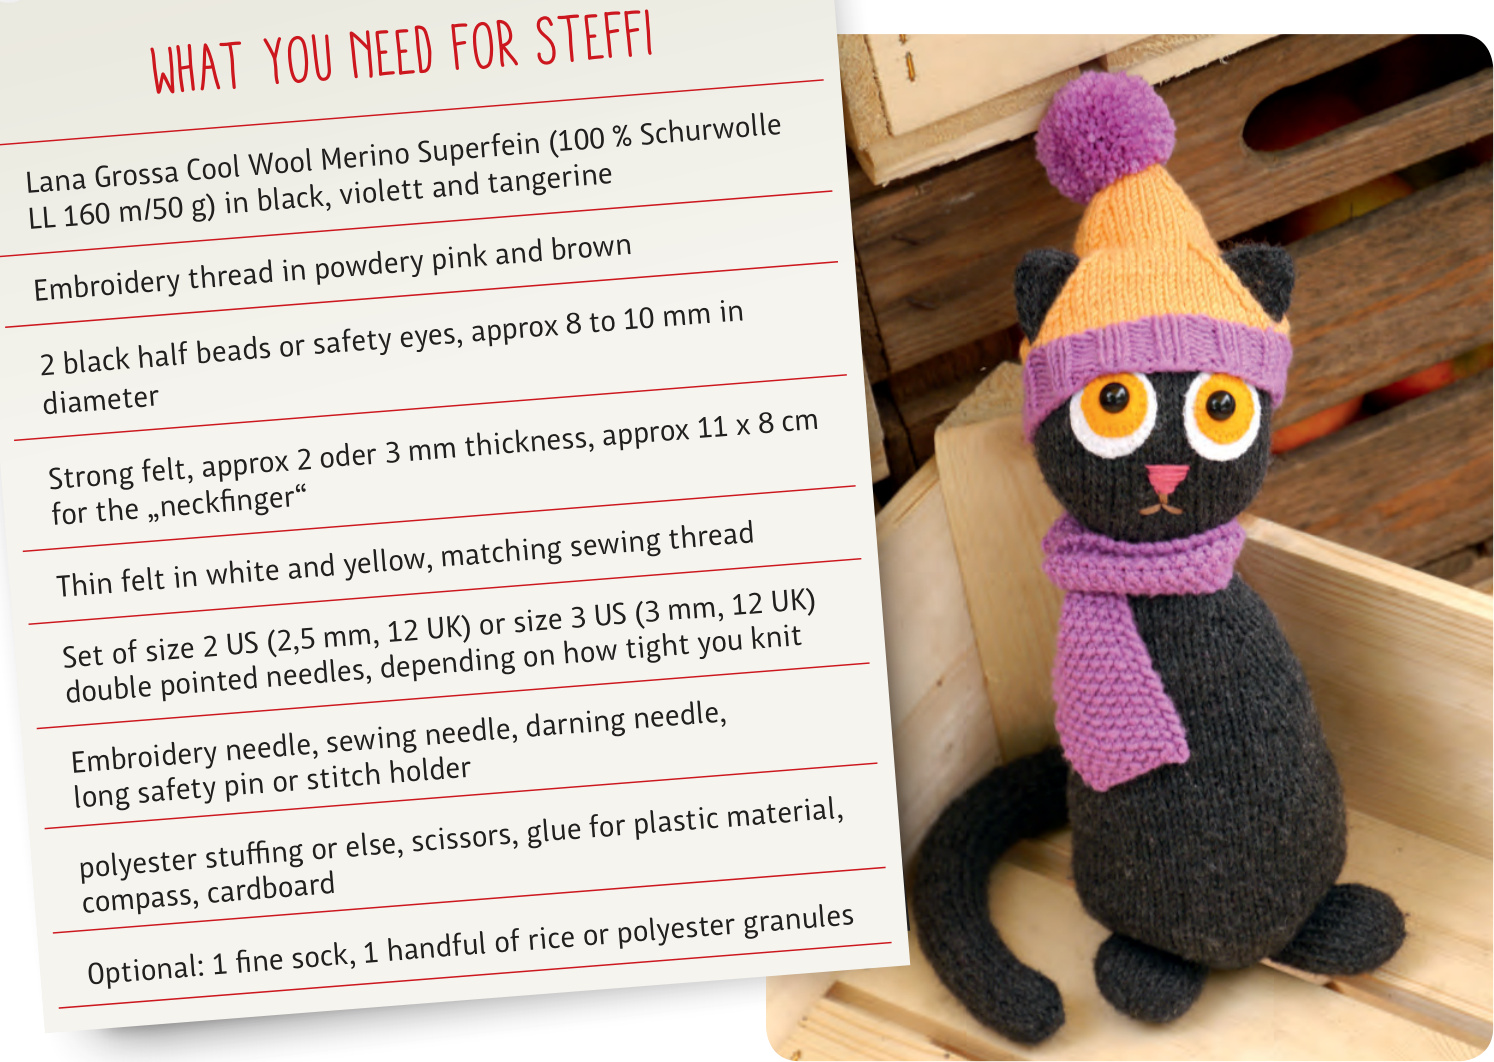
BOBBLE HAT
CO 52 sts in Vl0LETT, arrange onto 3 needles (1st needle = 20 sts, 2nd needle = 16 sts, 3rd needle = 16 sts) and knit in the round. Rnd 1 to 8 (VI0LETT): k2, p2 alternately (rib pattern). Rnd 9 and 10 (ORANGE): Knit all sts. Finish the hat in ORANGE. After 1oth round, slip the 32 stitches from 2nd and 3rd needle onto a long safety pin or stitch holder. Continue working over the 20 stitchs on 1st needle in stockinette stitch in rows (knit 1 row, purl 1 row alternately). The 1st row is a knitted row.
Rnd 3, 5, 7, 9 and 11 (knitted rows):
Each time ssk the 2nd and 3rd st and k2tog the 3rd to last and 2nd to last st (= 10 sts). Break yarn and slip sts onto safety pin or stitch holder. Slip back the 32 sts from the first safety pin on one dpn and continue knitting in stockinette stitch in rows. The 1st row is a knitted row.
Rnd 3, 5, 7, 9 and 11 (knitted rows):
Each time ssk the 2nd and 3rd st and k2tog the 3rd to last and 2nd to last st (= 22 sts). Now rearrange the 22 stitches onto 2 needles (11 sts each) and slip the remaining 10 sts from the safety pin back to a needle. Join into round and continue working over all 32 sts in stockinette stitch in rounds. Rnd 1 and 2: Knit all sts.
Rnd 3:
1st needle: Knit all sts. 2nd needle: Ssk 2nd and 3rd sts. 3rd needle: K2tog 3rd to last and 2nd to last sts (= 30 sts; 10 sts each needle). Rnd 5: K2tog the last 2 sts on each needle (= 27 sts). Rnd 7: Ssk the first 2 sts on ech needle (= 24 sts). Rnd 9: K2tog the last 2 sts on each needle (= 21 sts). Rnd 11: Ssk the frst 2 sts on ech needle (= 18 sts). Rnd 13: K2tog the last 2 sts on each needle (= 15 sts). Rnd 15: Ssk the first 2 sts on ech needle (= 12 sts). After rnd 15, break yarn and finish the bobble hat like described in the instruction for the leg.
POMPON
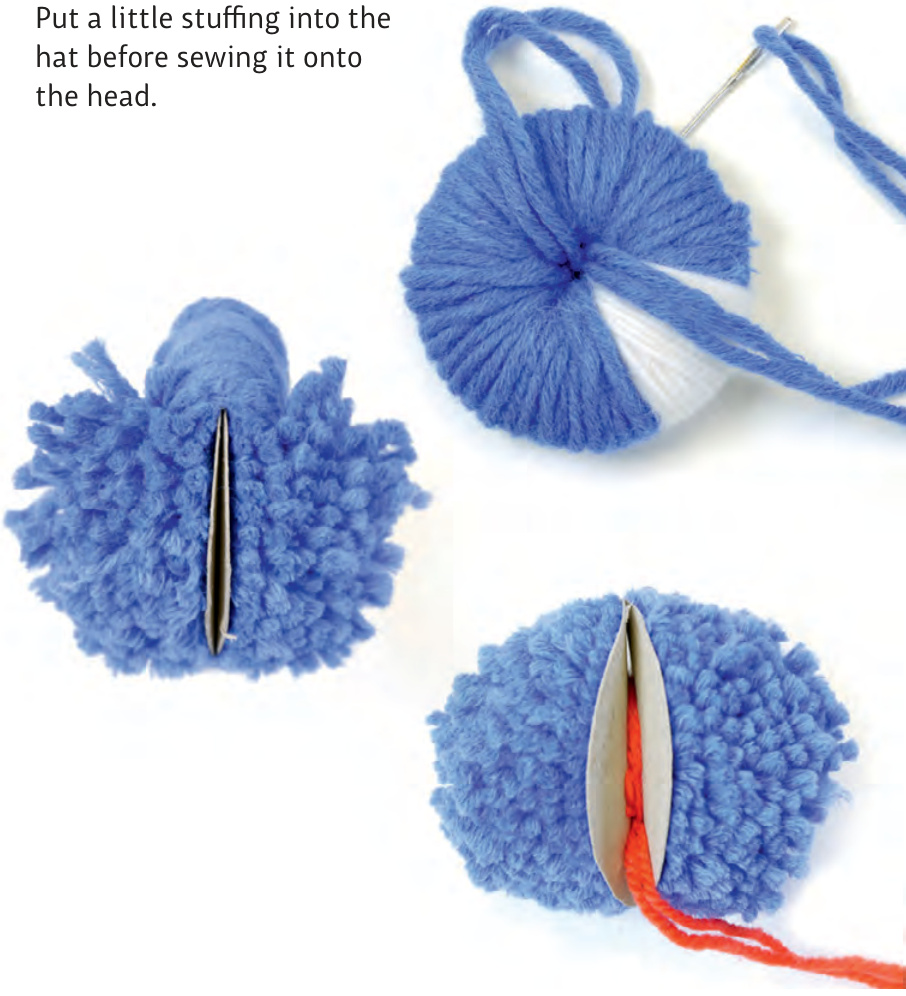
Cut 2 rings from the cardboard in the size of the graphik.

Put the two rings onto each other and wrap around both rings with yarn until the hole in the middle is nearly filled. Cut all layers of the yarn all around the extent, while doing so bring one blade of the siccors in between the cardbord rings. For securing the pompon, wrap a long thread of yarn several times in between the cardboard rings around the skein in the middle. Pull tightly and secure with several knots. Get rid of the cardboard and trim the pompon nicely, then attach it to the tip of the hat.
SHAWL
C0 12 sts in Vl0LETT and knit about 30 cm / 12 inches in seed stitch in rows.
Seed stitch: Every front row: k1, p1 alternately Every back row: p1, k1 alternately The selvedge stitches are counted as 1st st and are either knitted or purled.
TECHNIQUE : ABBREVIATIONS
All abbreviations marked with colour and more techniques are explained in detail on the following pages alt ...alternate(ly) approx ...aproximately beg .beginning bet . ..between BO... .bind off (= cast off) ..cast on, casting on sl2 tog, k1, psso...centered double decrease ch ..chain stitch cont ..continue dec. .(to) decrease(s) dpn ..double pointed needle EON ...end of needle EOR. .end of row gst ..garter stitch inc. .(to) increase(s) k. ..knit. kfb .knit in front and back k1, p1 ..k nit 1,purl 1 k2tog .knit 2 (stitches) together k tbl ..knit through back of loop kwise .nitwise leave rem ..leave remaining LH .left hand Ip(s) . .loop(s) M1, m1 ...make 1 m1l ..make 1 left slanting m1r ..make 1 right slanting po ...pass over pnso ...pass next stitch over psso ...pass slip stitch over pu... ..pick up stitches / loops / wraps pm.... ...place marker p. ..purl pwise ss, 2dc in next st, 1dc in next 2 sts, miss 1dc, 1dc in next st, 1dc in next 3 sts, ss in next st. p2tog .... ..purl (stit ches) together ptbl ..purl therough back of lop rem 3. 1 dc in next 4 sts (2dc in next st) twice, 1 dc in next 3 sts, ss into 1st dc rep .... ...repeat rev st st ...reverse stockinette stitch RH . 7. 2dc in next st, 1dc in next 2 sts, miss 1dc, 1dc in next st, 1dc in next 2 sts, 2dc in next st, miss RS .... .. ight side rnd(s) ...round(s) sl ssk 6. 2dc in next st, 1dc in next 2 sts, (miss 1dc, 1dc in next st) twice, 1dc in next 2 sts, 2dc in next st, miss 1dc, ss in next st(s) .. titch(es) M ...stitchmarker tbl . .through the back loop tog.... TSt ... ..turning stitch (see short rows) wyif ..with yarn in front wyib ..with yarn in back Ws ... ...wrong side yo .... ..yarn over (needle) yo2 ...yarn over twice yrn. ...yarn round needle 4. Miss 1dc, 1dc in next 2dc, (2dc in next st, 1dc in next 2 sts) twice, miss 1dc, ss into 1st st ...repeat the instruction in bracke x times
TECHNIQUE : DECREASING
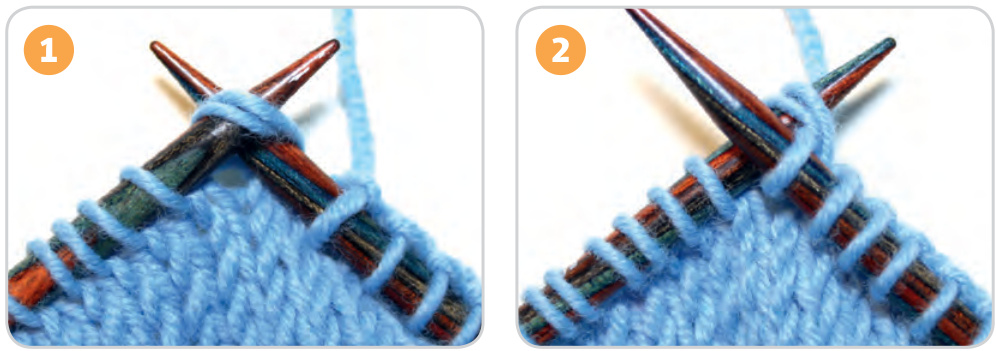
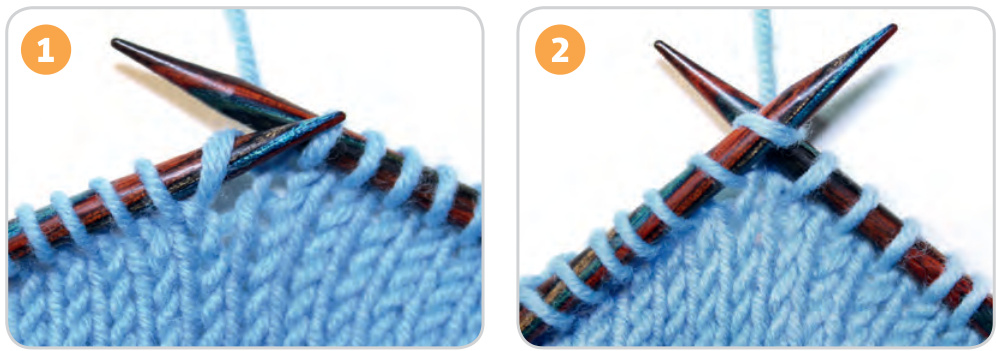
Knit 2 stitches together right-slanting (k2tog)
Insert the right needle knitwise (from the left side) first into the second, then into the first stitch on the left needle (1). Knit both stitches together as one (2). The decrease will show rightslanting.
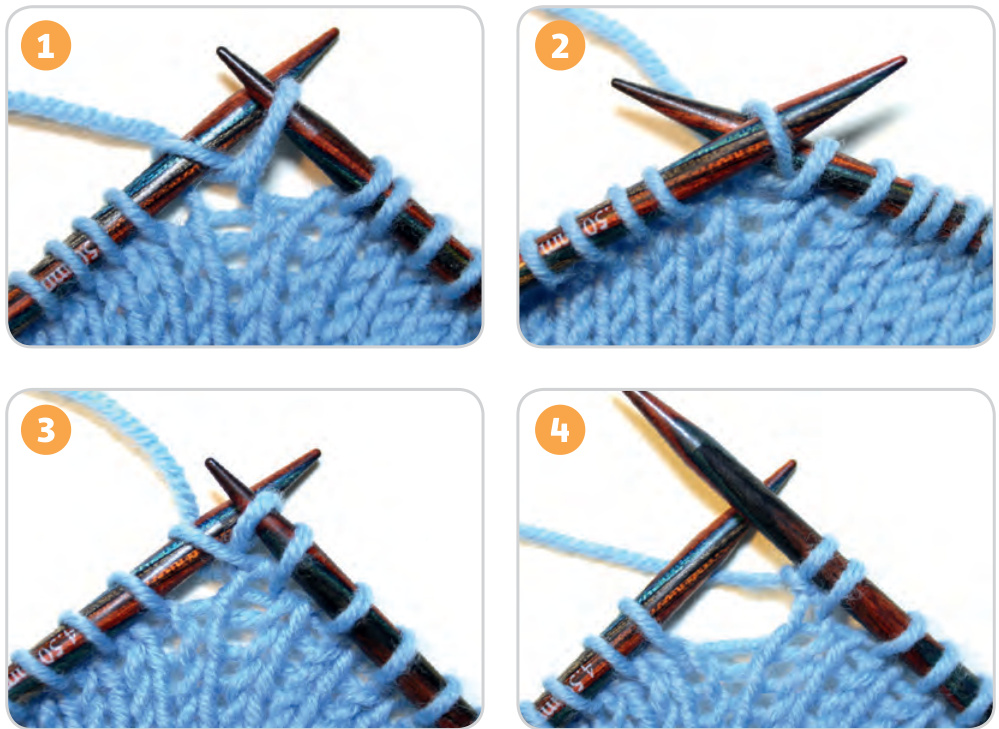
Knit 2 stitches together left-slanting (ssk = slip slip knit)
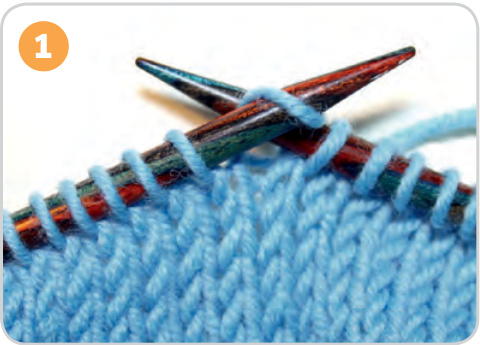
Insert the right needle into the first stitch on the left needle like you want to knit (knitwise) (1). Slip the stitch to the right needle. Repeat once.
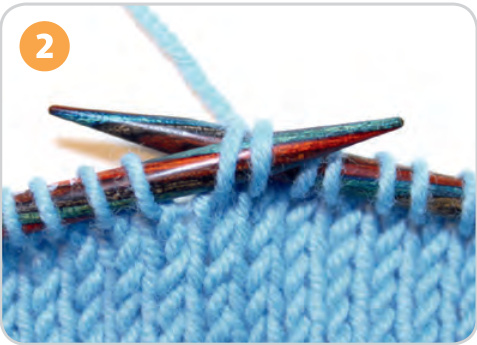
Now slip the two stitches back to the left needle without changing the orientation of the stitches. Now insert the right needle purlwise (from right to left) into the first two stitches on the left needle in one go (2) and knit the two stitches together (3).
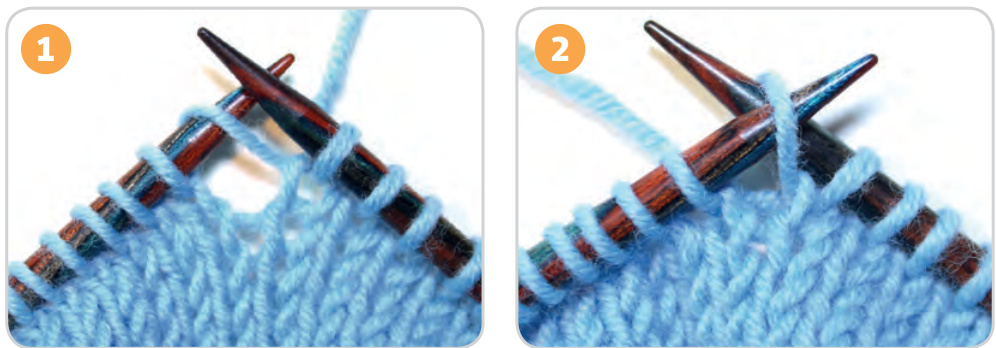
centered double decrease (sl2 tog, k1, psso)
With this symmetrical double decrease, the middle stitch lies on top, which makes it very attractive (1). Start with sl2 tog, which means slip 2 stitches together from the left to the right needle, but do it purlwise (2). The stitches now lie crossed over on the right needle (3). Now knit 1 stitch (k1), then insert the left needle into the two slipped stitches from left to right (4). Pass the sliped stitches over (psso) the knitted stitch in one go.

TECHNIQUE : INCREASING
Knit in front and back (kfb)
Knit one stitch (1), but leave the stitch, wherein you just inserted the right needle, on the left needle, while the new stitch lies on the right needle (1). Now insert the right needle purlwise again into the stitch on the left needle, this time into the back of the loop (2). Catch the yarn and bring it through the loop to the front (3). Only now let the stitch slip to the left needle (4).
Make one right-slanting (m1r)
You knit one additional stitch out of the running yarn between two stitches. Lift the running yarn with the tip of the left needle from behind (1). Knit the new loop knitwise, eg. by inserting the right needle into the loop from left to right in front of the needle (2).
Make one left-slanting (m1l)
Lift the running yarn with the tip of the left needle from the front (1). Insert the right needle into the new loop purlwise (from right to left) behind the needle (2), catch the working yarn and pull it through the loop.
TECHNIQUE : EMBROIDERING AND SEWING (1)
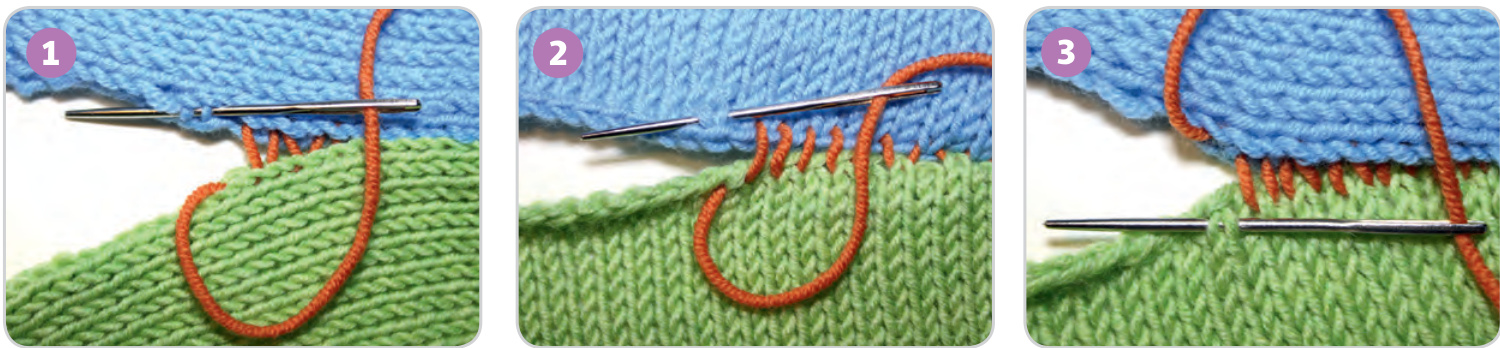
Mattress stitch / Seam stitch / Ladder stitch
To connect two knitted pieces with mattress stitch, the right side is always facing you. Of course, if you choose the purled side to be the right side, this one is facing you! For seams connecting two sides, put both pieces that shall be connec ted edge to edge. Now insert the darning needle from the top into the first stitch, lead it under two cross threads of the stitches and let it come out again (1). Repeat on the second piece on the opposite side. Use the matress stitch for connecting cast-ons and cast-offs (2) as well as for connecting cast-ons/castoffs with sides (3). The mattress stitch is also used for attaching arms, legs, ears and other pieces, be it flat or blunt. It is a bit tricky to find the right stitch length, but rule of thumb is the more stitches the better.
How to finish pieces knitted in the round without cast off
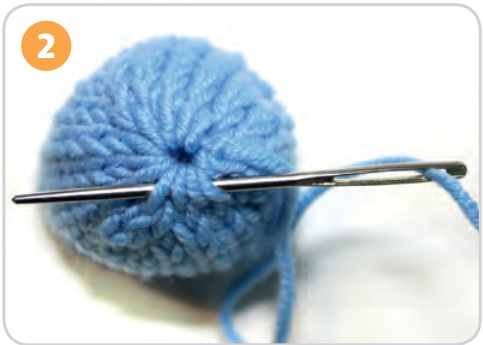
Many of the pieces you'll knit for my dolls and animals will not be cast off but you'll catch all open stitches and draw them tight. This is to avoid too much material at the tip of pointed forms - and it just looks great. Break the yarn, slip it into the darning needle and catch all stitches clockwise one-by-one with needle and yarn. Put aside the double pointed needles while doing so one after another (1). Now do another round with the darning needle, afterwards draw the yarn tight (2). If the knitted piece still has an opening (like ears or arms), push the needle through the center into the inside. Turn the piece to the wrong side, secure the yarn and weave in the end.
If the knitted piece is stuffed and closed after pulling together the stitches (like arms with hands, globes and other forms), secure the yarn from the right side as invisible as possible, then pass the needle completely through the stuffed piece. Cut the yarn with scissors closely (and carefully for not injuring the knitting) to the piece. The yarn will withdraw back into the form on its own doing.
TECHNIQUE : EMBROIDERING AND SEWING (2) -
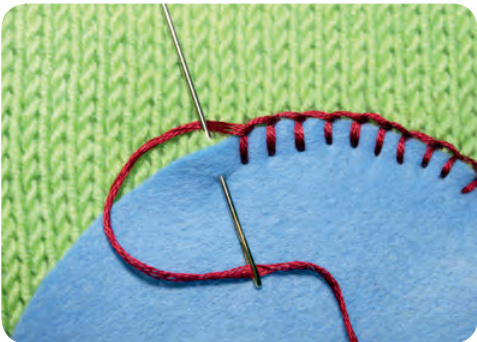
Feston stitch / Buttonhole stitch
You'll need this stitch to applicate eyes, cheeks, paws and so on.To show it more clearly on the picture I used embroidery thread, while for my toys I use sewing thread more often than not. I advice using a needle with pointed end. Insert the needle into the felt and catch the knitted material as well, then bring the needle out again very close to the felt. The thread has to lie under the needle to form the characteristic loop. Pull the thread only moderately tight, then go on with the next stitch.
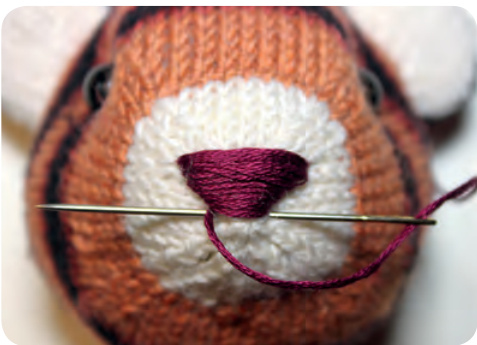
Satin stitch
The noses are mainly worked in satin stitch. I advice using a needle with pointed end. Push the needle from right to left through the alredy stuffed piece, then lead the thread over the piece from left to right.lnsert the needle again very closely to the stitch before. Work all stitches very close-packed so none of the material underneath shines through. Embroidering those noses ist a bit tricky and affords some practice. It might help you to know that I usually need at least two goes before I really like the nose. When unstitching a notso-nice nose, you might need small scissors and a very steady hand.
Backstitch
You'll need the backstitch for embroidering long lines like a mouth or snout. It is also usefull for connecting two pieces (it's done from the wrong side), but that's more the case for thinner fabrics. For connecting knitted material, the mattress stitch should be the one of your choice. You might use a trickmarker to draw a line first. Start with inserting the needle close to the neck or at another hidden point (for example behind the ears). Exit the needle tip (it should be a needle with sharp tip) approximately 5 mm (0.2 inches) left of the starting point of the mouth. Now insert the needle at the starting point of the mouth and exit it 5 mm left of the first entry point (1), draw moderately tight. Insert the needle again at the first exit point while piercing the thread (2), exit the needle 5 mm left of the last exit point, draw it tight and repeat (3).
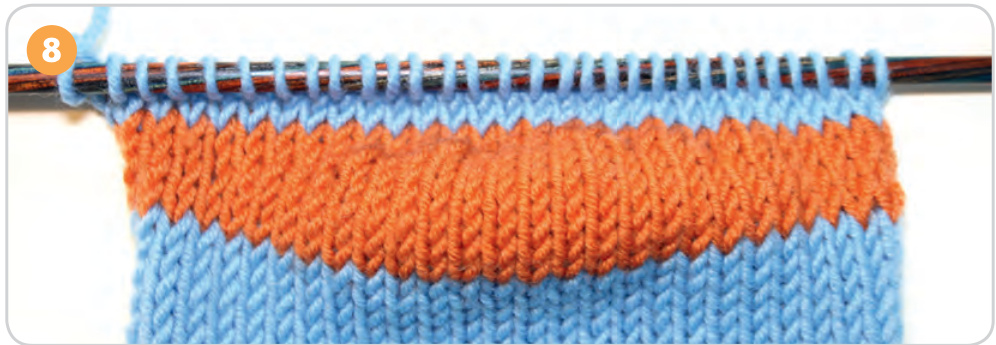
TECHNIQUE : SHORT ROWS (1)
Short rows with double stitches (German method)
Knitting a short row is meant to be taken literally: Bevor you finish knitting or purling all stitches in a row or round, you turn over the piece and start purling or knitting in the other direction (yes, it works in rounds as good as in rows!). To avoid holes at the turning point, the last eg. first stitch has to be treated differently from the other stitches. I call this particular stitch the ,turning stitch", TSt. There are at least five ways to treat these stitches, but I will only stick to the so-called german method with double stitches. It's pretty easy, and once you've mastered the technique, you will find endless possibilities to use it - not only for knitted friends, but hats, mittens, pullovers and, of course, sock heels...
How it works in a stockinette stitch piece
Start on the right side and knit the amount of stitches written down in the particular pattern. The last stitch I call ,turning stitch", TSt. Now you have a certain amount of stitches on the right needle (already knitted) and a certain amount on the left needle (not knitted) (1). Turn the piece (l use the abbreviation tpo = turn piece over) to see the wrong side. Slip the turning stitch (TSt) (now first stitch on the left needle) to the right needle (2). Pull the turning stitch tightly back with the working yarn, until it looks like a double stitch (which in fact it's not, it only looks like one) (3).
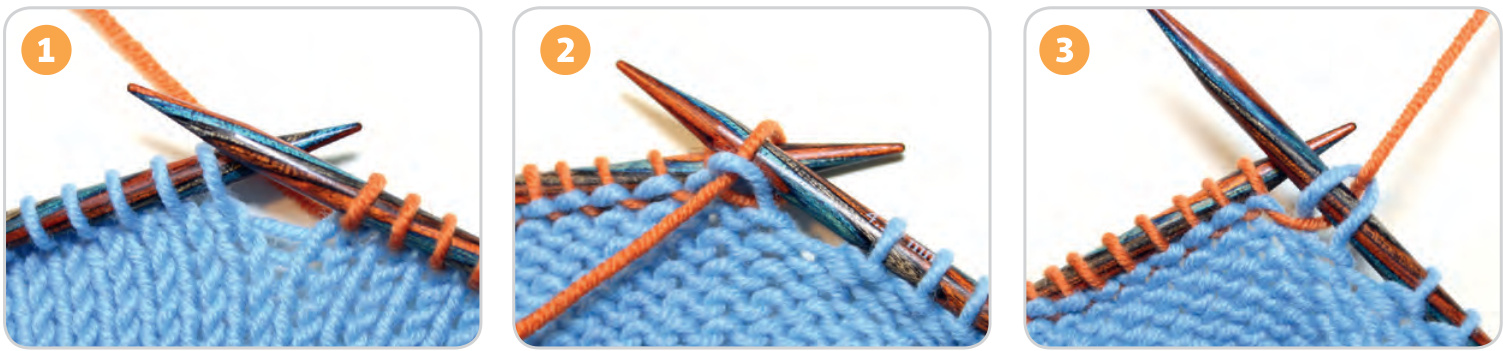
Direct the work yarn between the needle tips back to the front of your piece and start purling the amount of stitches listed in the pattern (4). These will usually be even less stitches than you knitted in the row before. Purl the first stitch very tight.
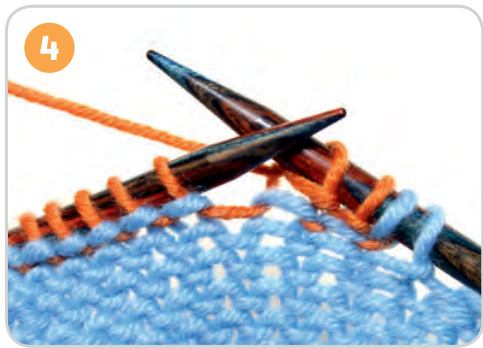
After purling the last stitch (TSt), turn piece (tpo) to the right side. The yarn lies in front. Lift the TSt in the orientation like you want to purl to the right needle (5). Pull the turning stitch tightly back with the work yarn, until it looks like a double stitch again (6).
TECHNIQUE : SHORT ROWS (2), CHAIN STITCH
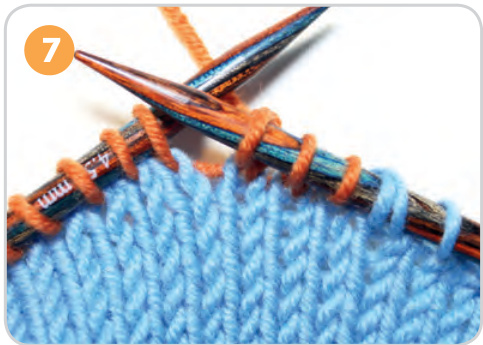
Knit knit the frst stitch after the turning stitch very tight, then knit on normaly (7). Depending on the pattern you might have to knit many short rows before knitting over the whole amount of stitches on the needles.
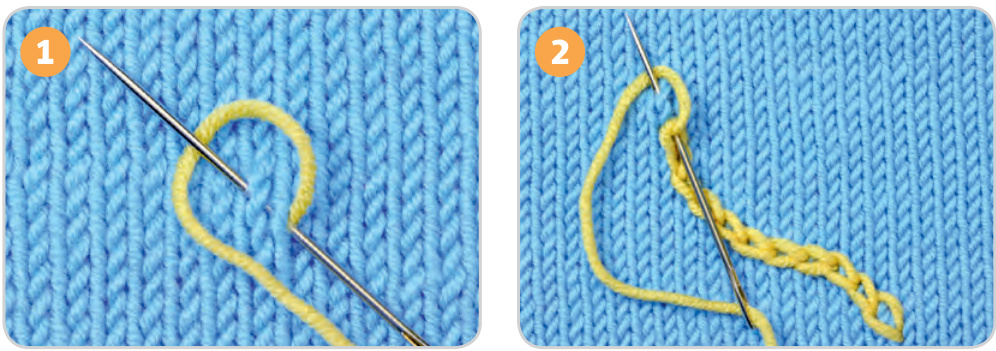
Chain stitch
With chain stitch you embroider free formed lines on any fabric, knitted, crocheted or woven, while the stitches resemble a knitted chain, hence the name. Use a needle with pointed tip. For the starting stitch, insert the needle from the backsite to the top and pull the thread until the loose end on the wrong side is only a few inches long. Form a loop like shown in picture (1). Now enter the needle exactly at the first exit point, but from top down. Exit the needle approximately one stitch-wide from the entry/exit point; the needle has to lie over the loop (1). Pull the thread moderately tight - here is the first chain. Repeat the steps: Enter the needle at the last exit poit, form a loop, exit a bit away, pull (2). After finishing the short row section, you knit (or purl, depending on the pattern) over all stitches. While doing so, knit or purl the turning stitches, that look like double stitches, as one stitch - after knitting or purling the whole row or round, you are supposed to have the same amount of stitches on the needles as you had before starting the short row(s). Picture 8 shows a short row section with it's characteristic bulge in orange colour.