Moorlands Shawl
Pattern Notes
This lovely shawl features short rows to create a crescent shape that rests perfectly on your shoulders. The leafy border and Irish Moss edging make this shawl an excellent choice for a walk on the moor— where sage-scented breezes whisper between the green land and gray mists.
Finished Measurements:
Abbreviations:
5 feet wide, 2 feet deep Estimated Yardage: 500—600 yards Recommended Yarns: K-knit P-purl YO-yarnover ssk—slip two stitches, knit together P2tog—purl two stitches together K2tog— knit two stitches together inc1-increase into a stitch s1, s2—slip given number of stitches w&t-wrap and turn rm-removemarker pm-placemarker stst—stockinettestitch p2sso, psso—slip two stitches, knit a stitch, and pass slipped stitches over knittedstitch Madeline Tosh Lace (1 skein, 950 yards) Madeline Tosh Prairie (1 skein, 840 yards) Lace-weight yarn of your choice
Needles:
US size 3 needles (for leaf border)US size 4 circular needle, 36 inches (for body)
Gauge:
Since this shawl can be easily modified to your chosen size, no gauge swatch is needed. However, my shawl's gauge was 26 stitches and 38 rows = 4 inches.
Notions:
Yarn needle Stitch markers

Directions and Charts:
Border: With size 3 needles, cast on 8 stitches. Before you begin the chart or written instructions, purl one row. Follow the chart or written instructions below to complete one leaf. After row 18, you will once again have 8 stitches. Begin the next leaf with row 1, and repeat the pattern until you have a total of 31 leaves. For the last leaf, follow the special written instructions below. When you have completed 32 leaves, cast off. Note: The special \* symbols in the chart represent a series of 5 sts that are bound off Pwise after the P2tog. Also, any increases (inc1 or symbol V in the chart) will be done Kwise.
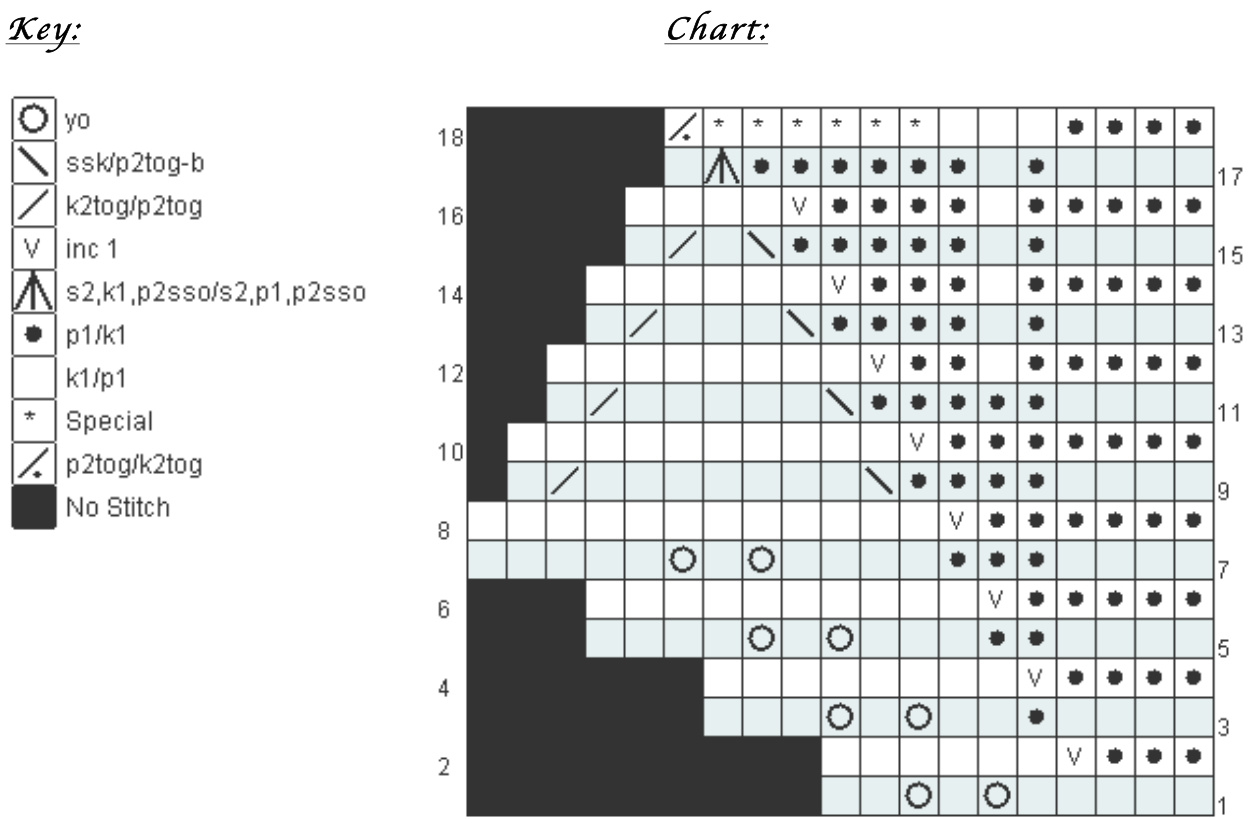
Written Instructions for Leaves 1—31: Row 1: K5, YO, K1, YO, K2 (10 sts) Row 2: P6, inc1, K3 (11 sts) Row 3: K4, P1, K2, YO, K1, YO, K3 (13 sts) Row 4: P8, inc1, K4 (14 sts) Row 5: K4, P2, K3, YO, K1, YO, K4 (16 sts) Row 6: P10, inc1, K5 (17 sts) Row 7: K4, P3, K4, YO, K1, YO, K5 (19 sts) Row 8: P12, inc1, K6 (20 sts) Row 9: K4, P4, ssk, K7, k2tog, K1 (18 sts) Row 10: P10, inc1, K7 (19 sts) Row 11: K4, P5, ssk, K5, K2tog, K1 (17 sts) Row 12: P8, inc1, K2, P1, K5 (18 sts) Row 13: K4, P1, K1, P4, ssk, K3, K2tog, K1 (16 sts) Row 14: P6, inc1, K3, P1, K5 (17 sts) Row 15: K4, P1, K1, P5, ssk, K1, K2tog, K1 (15 sts) Row 16: P4, inc1, K4, P1, K5 (16 sts) Row 17: K4, P1, K1, P6, s2, K1, p2sso, K1 (14 sts) Row 18: P2tog, cast off5 sts P-wise, P3, K4 (8 sts) Written Instructions for Leaf 32: Row 1: K5, YO, K1, YO, K2 (10 sts) Row 2: P6, inc1, K3 (11 sts) Row 3: K4, P1, K2, YO, K1, YO, K3 (13 sts) Row 4: P8, inc1, K4 (14 sts) Row 5: K4, P2, K3, YO, K1, YO, K4 (16 sts) Row 6: P10, inc1, K5 (17 sts) Row 7: K4, P3, K4, YO, K1, YO, K5 (19 sts) Row 8: P12, inc1, K6 (20 sts) Row 9: K4, P4, ssk, K7, k2tog, K1 (18 sts) Row 10: P10, inc1, K7 (19 sts) Row 11: K4, P5, ssk, K5, K2tog, K1 (17 sts) Row 12: P8, inc1, K8 (18 sts) Row 13: K4, P6, ssk, K3, K2tog, K1 (16 sts) Row 14: P6, inc1, K9 (17 sts) Row 15: K4, P7, ssk, K1, K2tog, K1 (15 sts) Row 16: P4, inc1, K10 (16 sts) Row 17: K4, P8, s2, K1, p2sso, K1 (14 sts) Row 18: P2tog, cast offP-wise to end Body: Now that the leaf edging has been completed, pick up 288 stitches (one for each garter row) along the straight edge with your US size 4 circular needle. Start from the cast-on end to the bind-off end, with the right side facing you. Work three rows in stst, purling your first row, knitting the second, and purling the third. You will now begin to incorporate the short rows for the crescent shaping. K 198 stitches, w&t, and pm. P 108 stitches, w&t, and pm. Next, K 110 stitches, rm as you reach the stitch marker, w&t, and pm. P 112 stitches, rm as you reach the stitch marker, w&t, and pm. Turn again, and knit 114 stitches, rm as you reach the stitch marker, w&t, and pm again. Continue in this pattern of working two more stitches on each side, wrapping and turning, and moving the marker to show the last new stitch you worked. After all the stitches have been completed, you may continue in stst until you reach your desired depth, or you may proceed to theedging.

Finishing: Before casting off you will work one inch ofIrishMoss.This stith pattern is given below. Rows 1 and 2: K1, P1; repeat to end Rows 3 and 4: P1, K1; repeat to end Repeat rows 1-4 until you have completed one inch of Irish Moss. Cast off loosely K-wise, and sew in the loose endswith the yarn needle.
Blocking:
After you have washed the shawl according to the yarn's instructions, stretch it out on a flat surface and pin the edges while it dries. It is recommended that you stretch and pin the leaf points especially to accentuate them. Enjoy wearing your new, elegant shawl!


