I was asked to design this sock for the Solid Socks group February 2012 Mystery KAL. Since 2012 is a Leap Year, I decided to use this as the theme for my design and went in search of some ideas. Wikepedia led me to an article in the Sonambulist online magazine about a campaign to make Leap Day, February 29, a holiday. The article opens by saying “Leap day is the single day we all think about our place in the universe, and how we know that place; it honors the earth we live on and our knowledge of the science of nature. This is why we propose to baptize the 29th of February 2012 ‘Galileo Day': a day of wonder about the beauty of the universe around us". This top-down sock design is my tribute to the universe as I see it: twinkling lights, star showers - all beautiful. SIZE Ladies' Small Medium & Large
MATERIALS
400 - 45om (370-415 yds) fingering weight/sock yarn. The original socks were knit with the Handwerks So-Soft Sock, sponsor of the Solid Socks February 2012 Mystery Sock, in the colourway Japanese Maple. 16 to 30 No 8 seed beads (optional) ·Cable needle (optional if you prefer cabling without a cable needle) ·0.75mm or 1.oomm crochet hook for beading ?Tapestry needle for grafting toe Stitch marker for keeping track of the beginning of the round (optional)
RECOMMENDED NEEDLES:
One or two circular 2.25mm needles, per your preference. Note 1: no matter what your choice in needle, always use the size that gives you the gauge listed below -- every knitter's gauge is unique, and can be different with different techniques. Note 2: I have written this pattern for knitting with one or two circular needles, however it can easily be adjusted to using five double-pointed needles (DPN's) - just divide the stitches of Needle 1evenly over DPNs 1 & 2, and the stitches of Needle 2 over DPNs 3 & 4. GAUGE : 8.5 to 9 sts = 2.5cm/1 inch in stockinette st
ABBREVIATIONS & CHART SYMBOLS
st = stitch K = Knit P = Purl st st = Stockinette Stitch = K all right-side rows, P all wrong-side rows Rev st st = Reverse Stockinette Stitch = P all right-side rows, K all wrong-side rows ssk = Slip, Slip Knit = Slip one stitch knitwise onto the right hand needle, slip a second stitch purlwise onto the right hand needle, then insert the left hand needle through the front of both stitches and knit them together. ssp = Slip, Slip Purl = Slip one stitch purlwise onto the right hand needle, slip a second stitch purlwise onto the right hand needle, then insert the left hand needle through the back of both stitches and purl them together. KTog = Knitwo together = insert the right hand needle into the next 2 sts on the lft hand needle and knit them together. P2Togtbl = Purl two together through the back loop = insert the right hand needle into back of the loops of the next 2 sts on the left hand needle and purl them together. β C2F = Cable 2 Forward - Place the next st onto a cable needle and hold to the front of the ork. Ki from the left hand needle then Ki from the cable needle.
C2B = Cable 2 Back - Place the next st onto a cable needle and hold to the back of the work. K1 from the left hand needle then Ki from the cable needle. thasti M= Maeke one =Inerting the tip ofthelft hand nedl fom ack to front,lifthe bar etwen the stitch just knit and the next one. Insert the right hand needle into the front of the lifted bar and knit, creating a new stitch. _No Stitch= No stitch - a decrease somewhere on the row being knit is not compensated by an increase, resulting in a net decrease in the number of stitches. When knitting from a chart, you need to ignore this stitch. Turn = Turn the knitted fabric around so that the other side is facing you and start working st st in the other direction. You do this at the end of every row when working a flat piece, but when turning a heel using short rows, this turn occurs before you reach the end of a row. SlWYF=Holding the yan to the font ofthework, slip one stitch purlwise onto th right hand needle SlWYI= Holding the yarn to the back ofthe work, slip one stitch purlwise onto the right hand needle MYO = Yarn Over = Bring yarn to front of work and then knit the next stitch by bringing the yan over the right hand needle before wrapping it around the stitch. _Place Bead = Place a bead at this stitch using the crochet hook method (see this youtube video for a demonstration). If you prefer, the bead can be replaced by either purling or making a small bobble at this stitch instead. To make a bobble, knit into the front, back, front, back and front of the stitch (5 sts). Turn work and purl all 5 sts. Turn work again and K2tog, K2tog, kl, pass 2 k2tog stitches over (1 st).) N1, N2 = Needle 1, Needle 2
NOTES BEFORE YOU START
If you are interested in learning how to cable without a cable needle, this youtube video is a great demonstration of the technique. You will find the charts for each clue at the end of the clue.
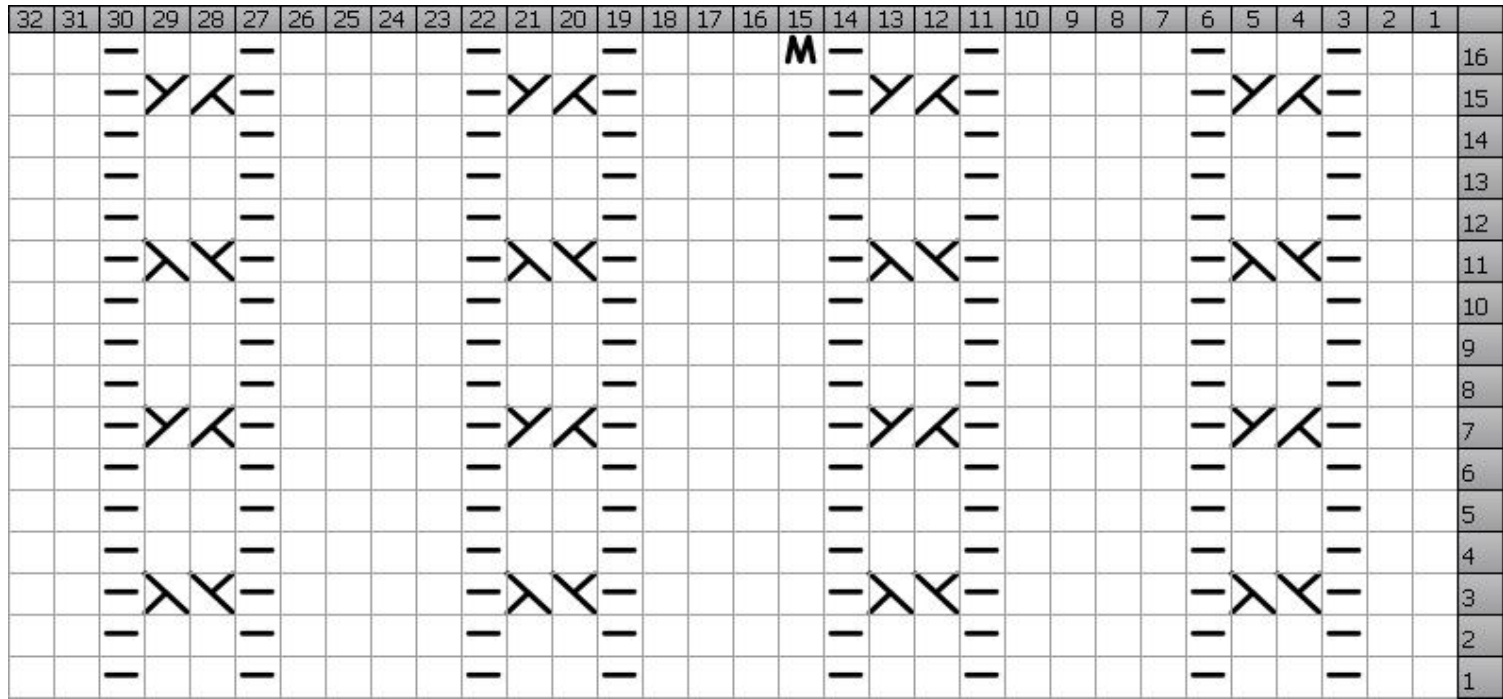
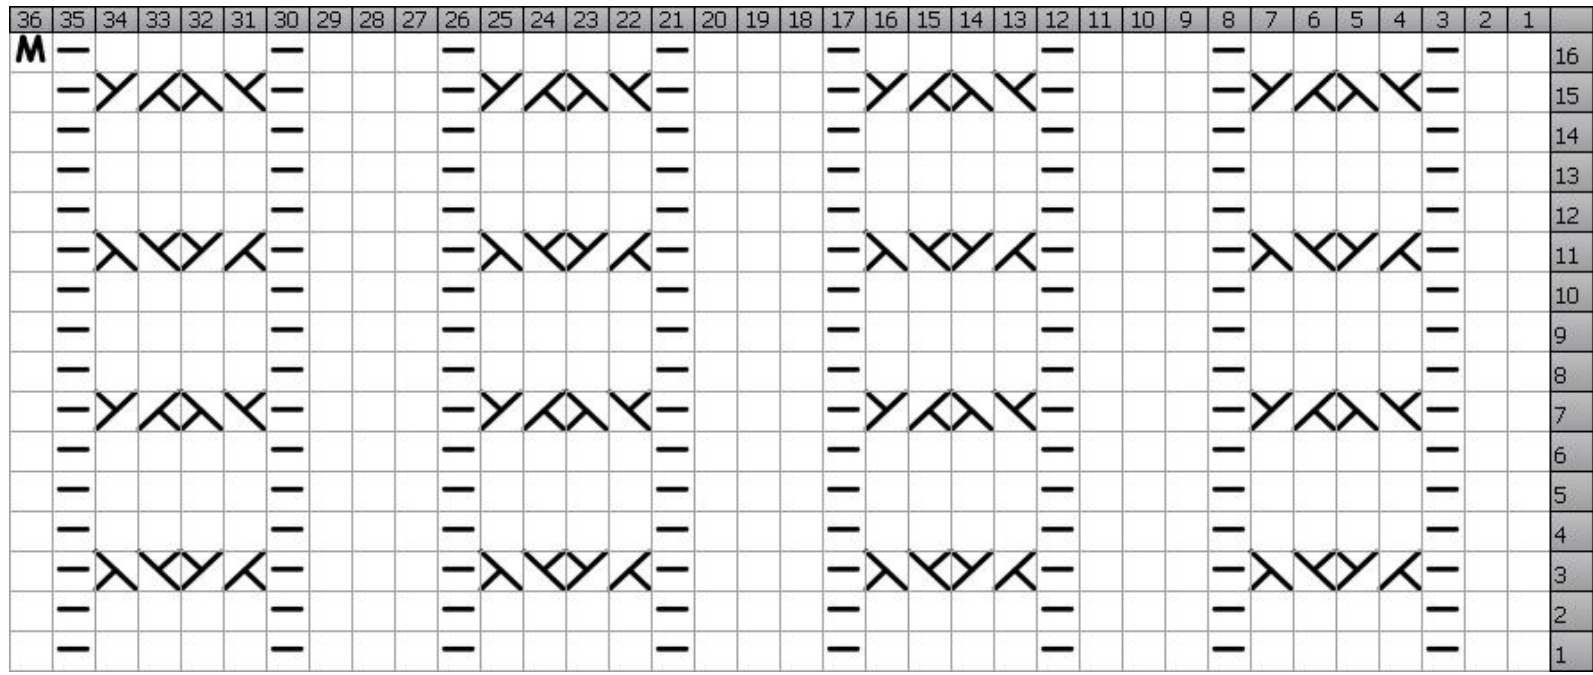
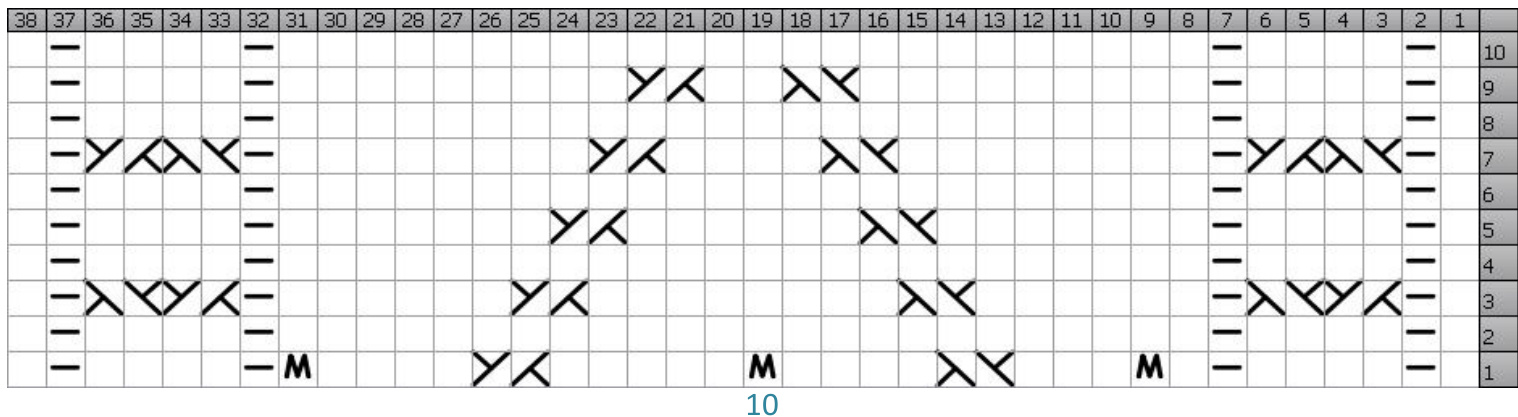
CLUE1: PHASES OF THE MOON- THE CUFF
are my favourites) and divide the stitches evenly across both needles => 32 (36, 40) sts per needle. Join all stitches in the round and knit all rows of the size-appropriate chart once across Ni and once across N2 (charts repeat once across each needle). Note: Pay close attention to the symbols on Row 16 of the chart - upon completion, your stitch count will have changed to 66 (74, 78) sts total - 33 (37, 39) sts on each needle.
End of Clue 1.
CLUE 1 CUFF CHARTS
Small:
CLUE 1 CUFF CHARTS cont'd
Medium:
Large:
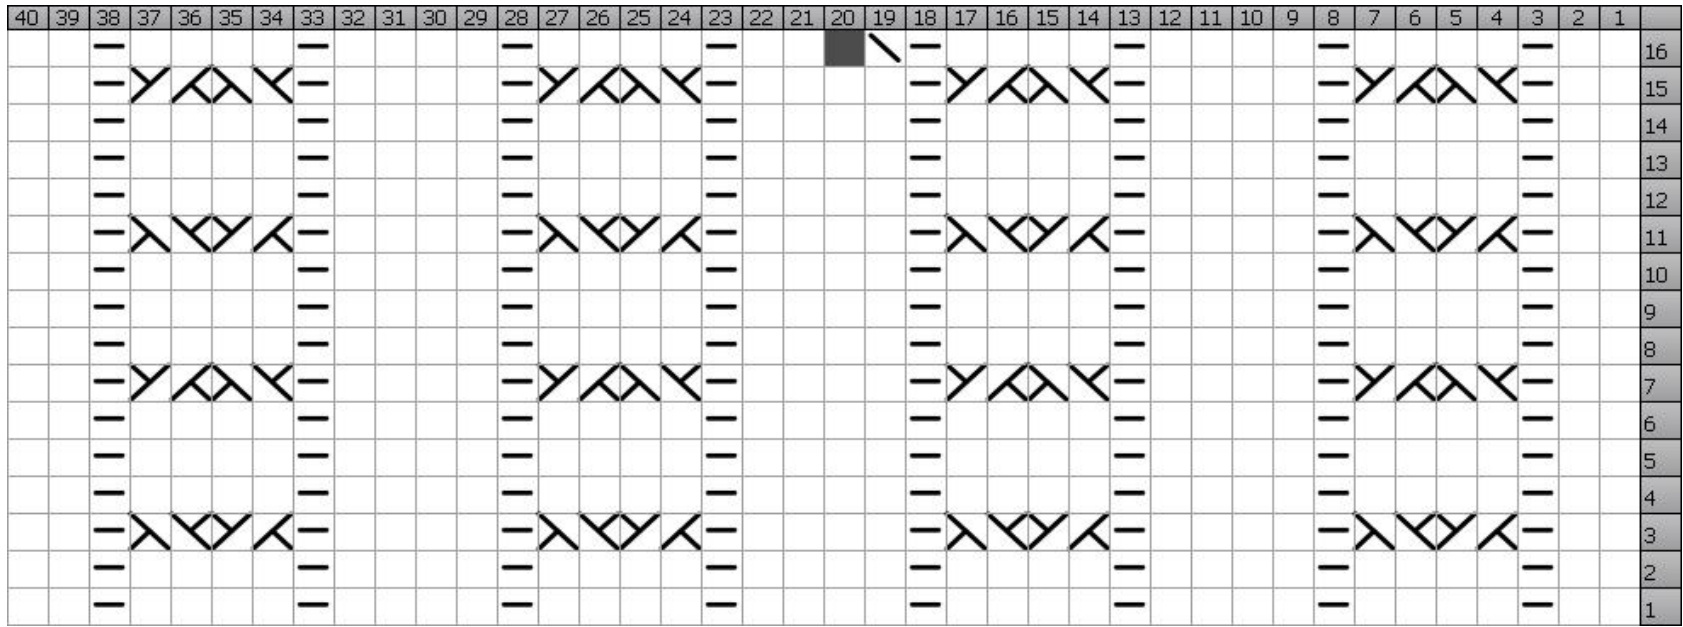
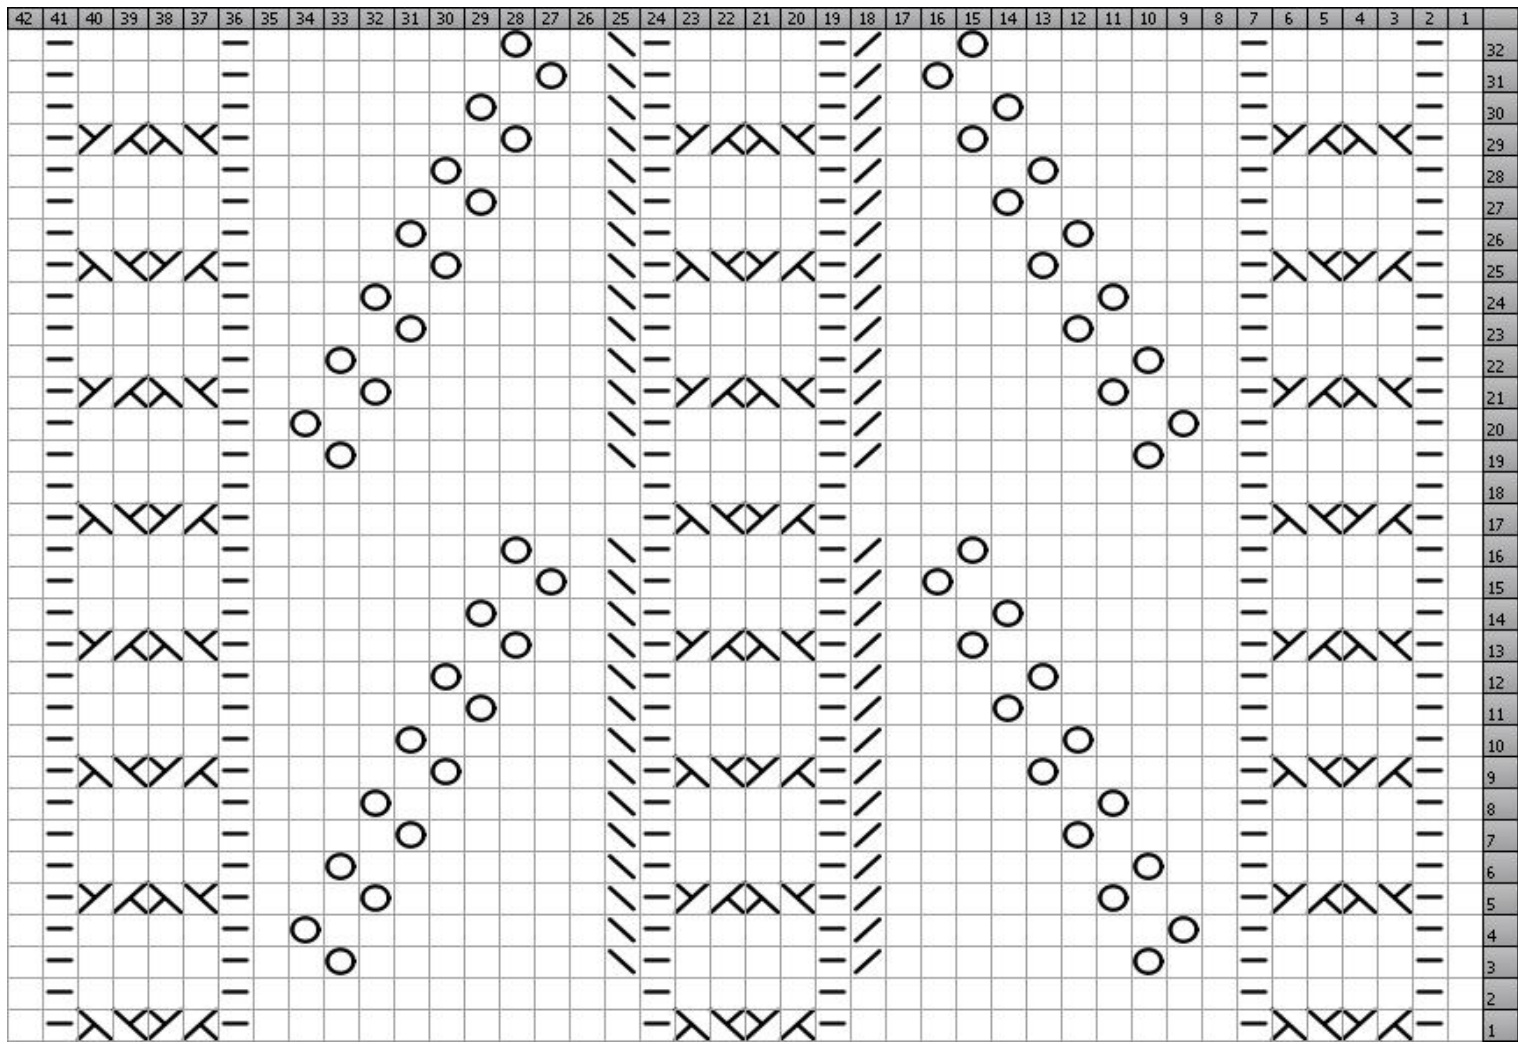
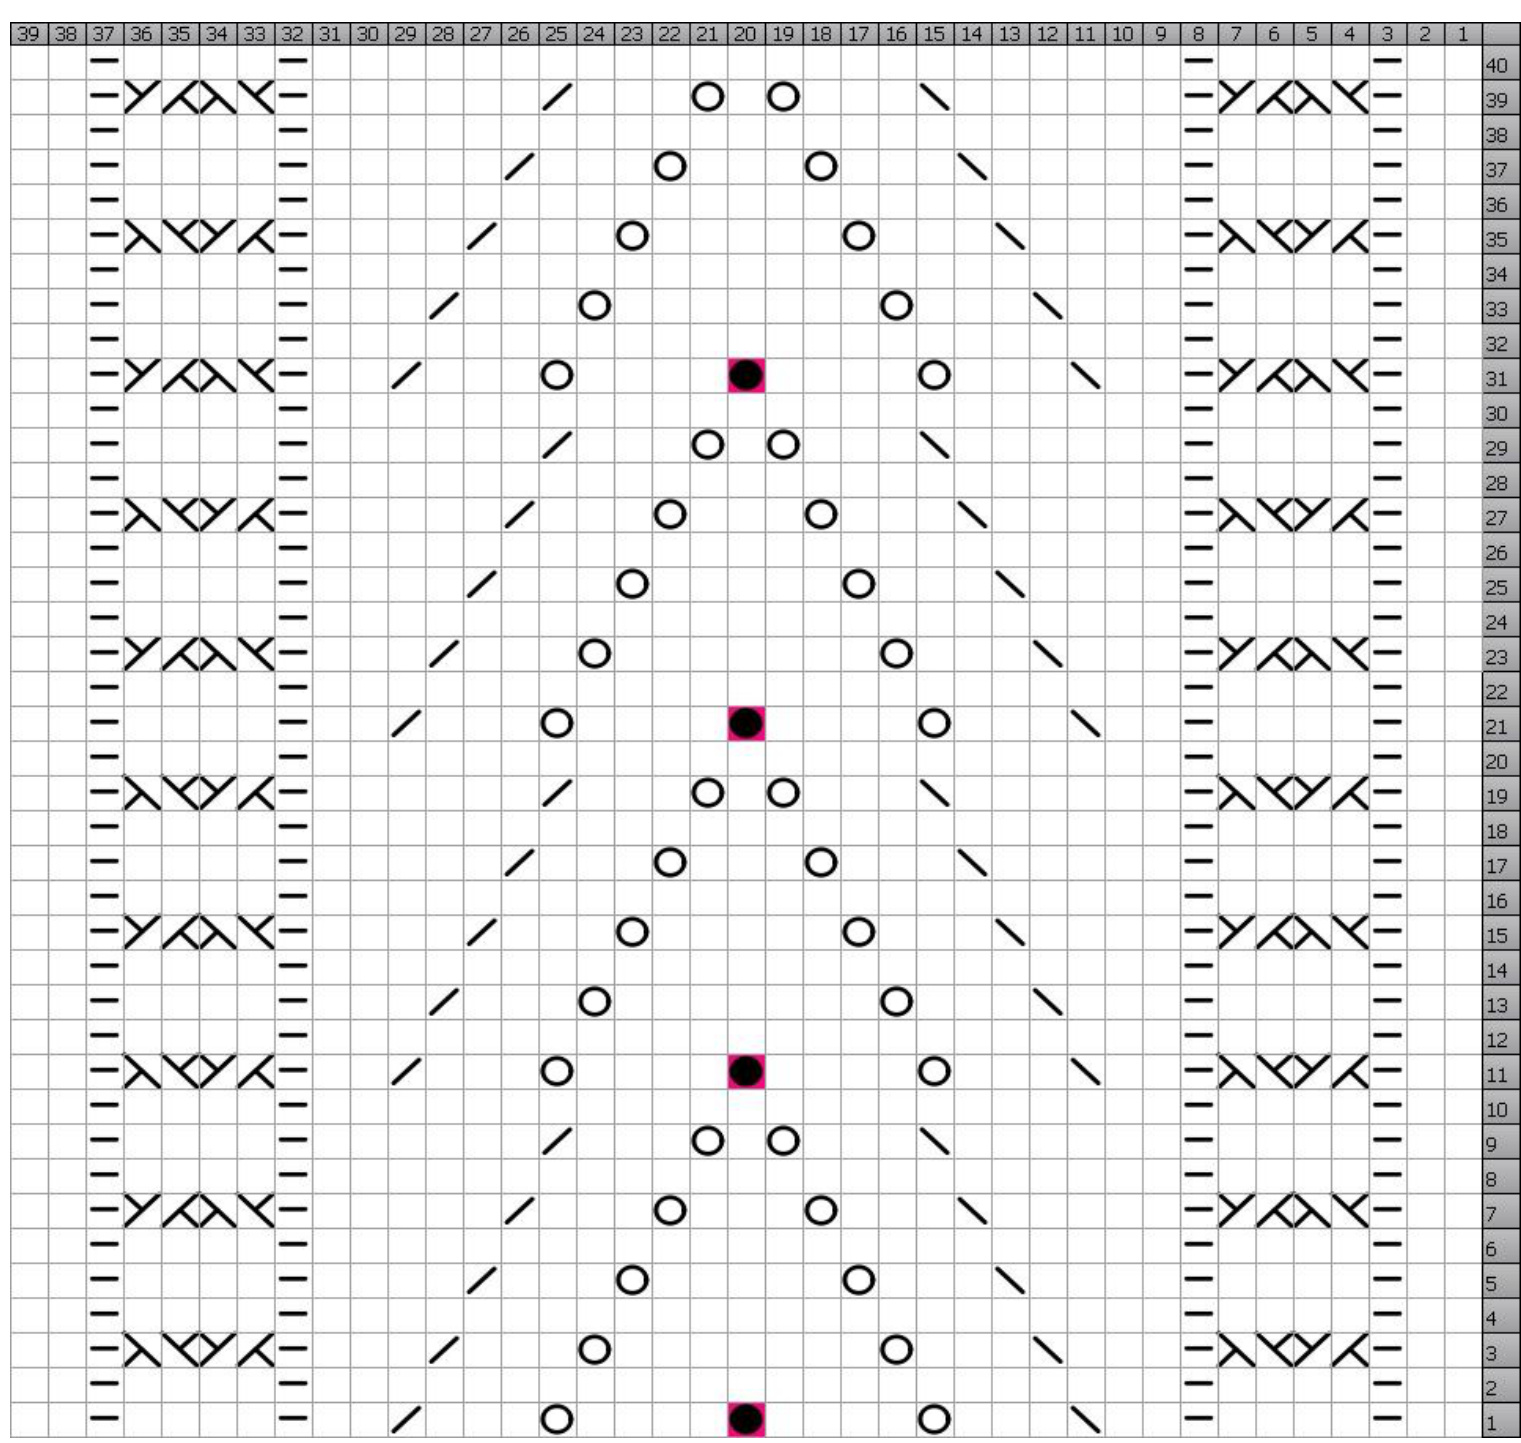
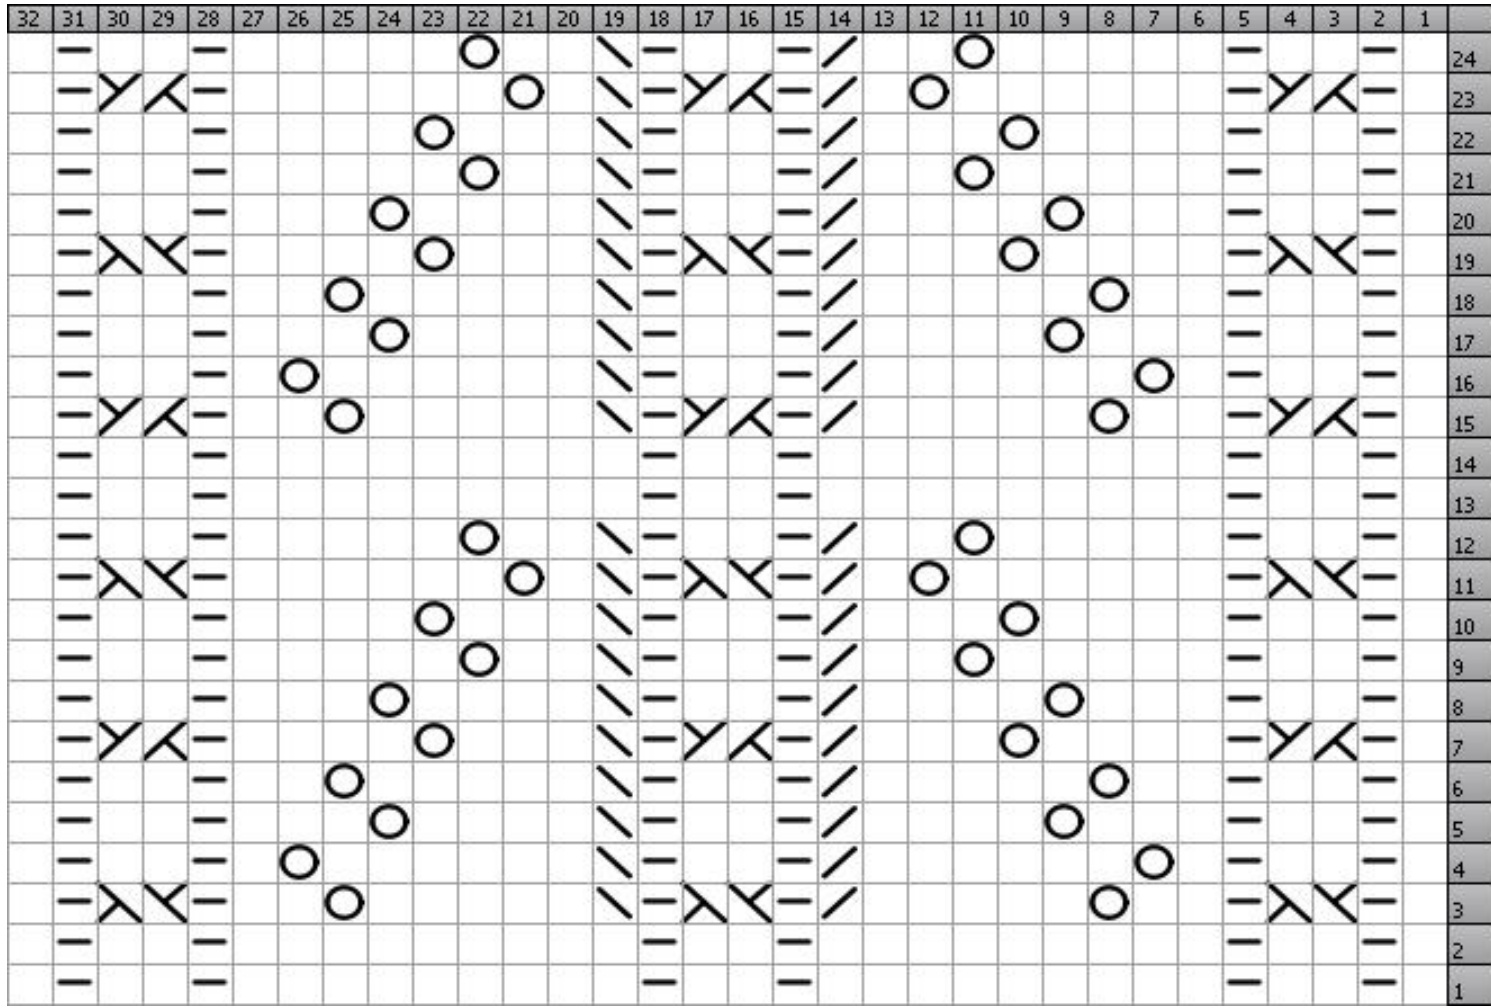
CLUE 2: TWINKLE, TWINKLE LITTLE STAR - THE LEG
Work the size-appropriate LEG Chart once across the sts on Ni and then again across the sts on N2 until the leg measures approximately 15cm/6" from the cast-on edge. Note: You can customize the length of your sock by knitting fewer or more repeats of the Leg Chart - just make sure that: a) you do the same number of repeats on sock # 2 (you'd be surprised by how many times I've forgotten to write down this information!) and b) that you end after a row 8 of the chart for sizes Small and Medium and after a row 40 for size Large

End of Clue 2
CLUE 2 LEG CHARTS
Small:
Medium:
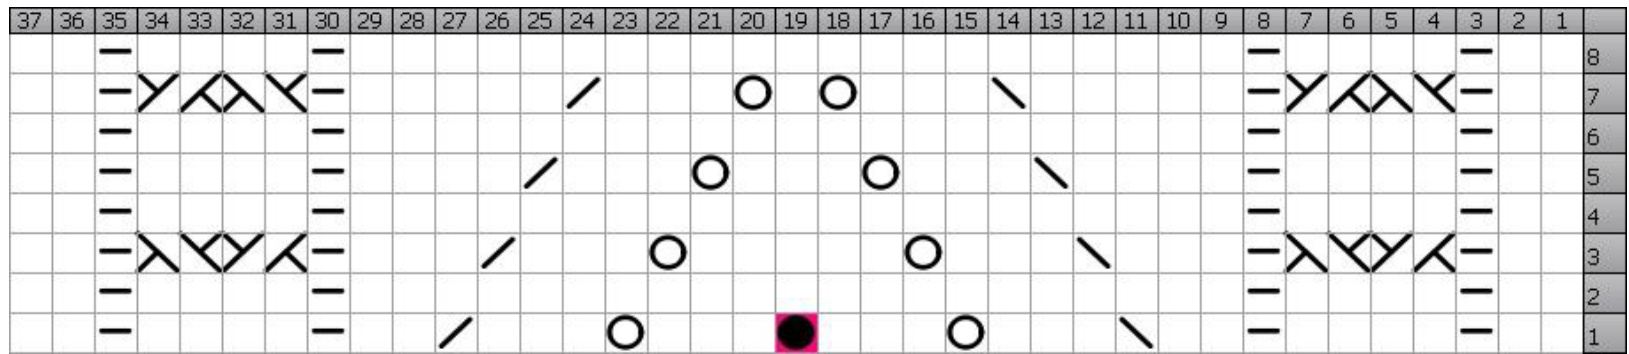
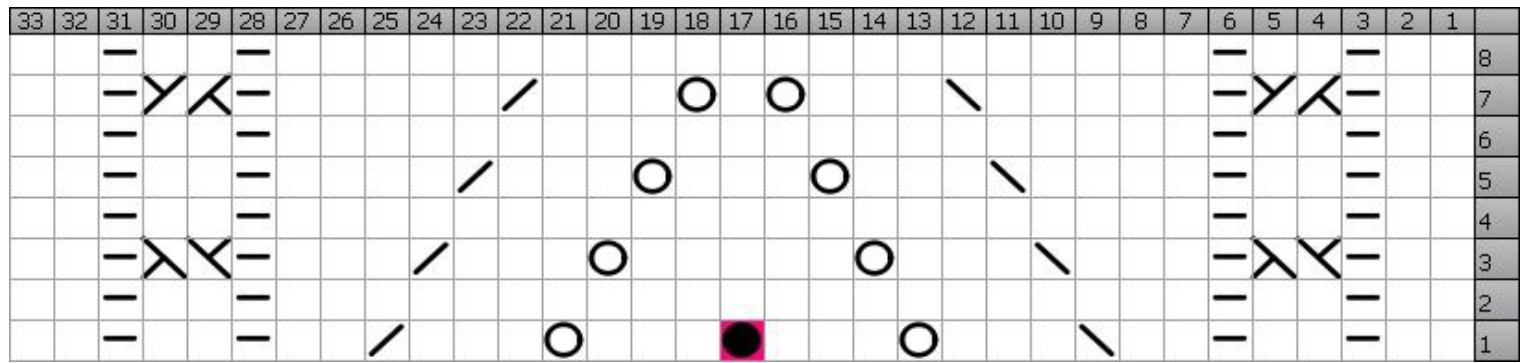
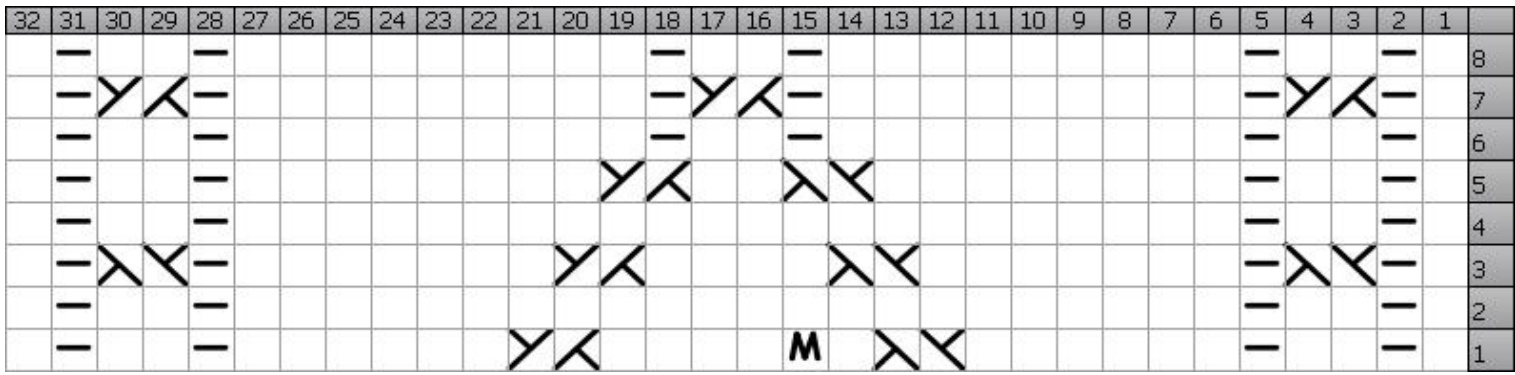
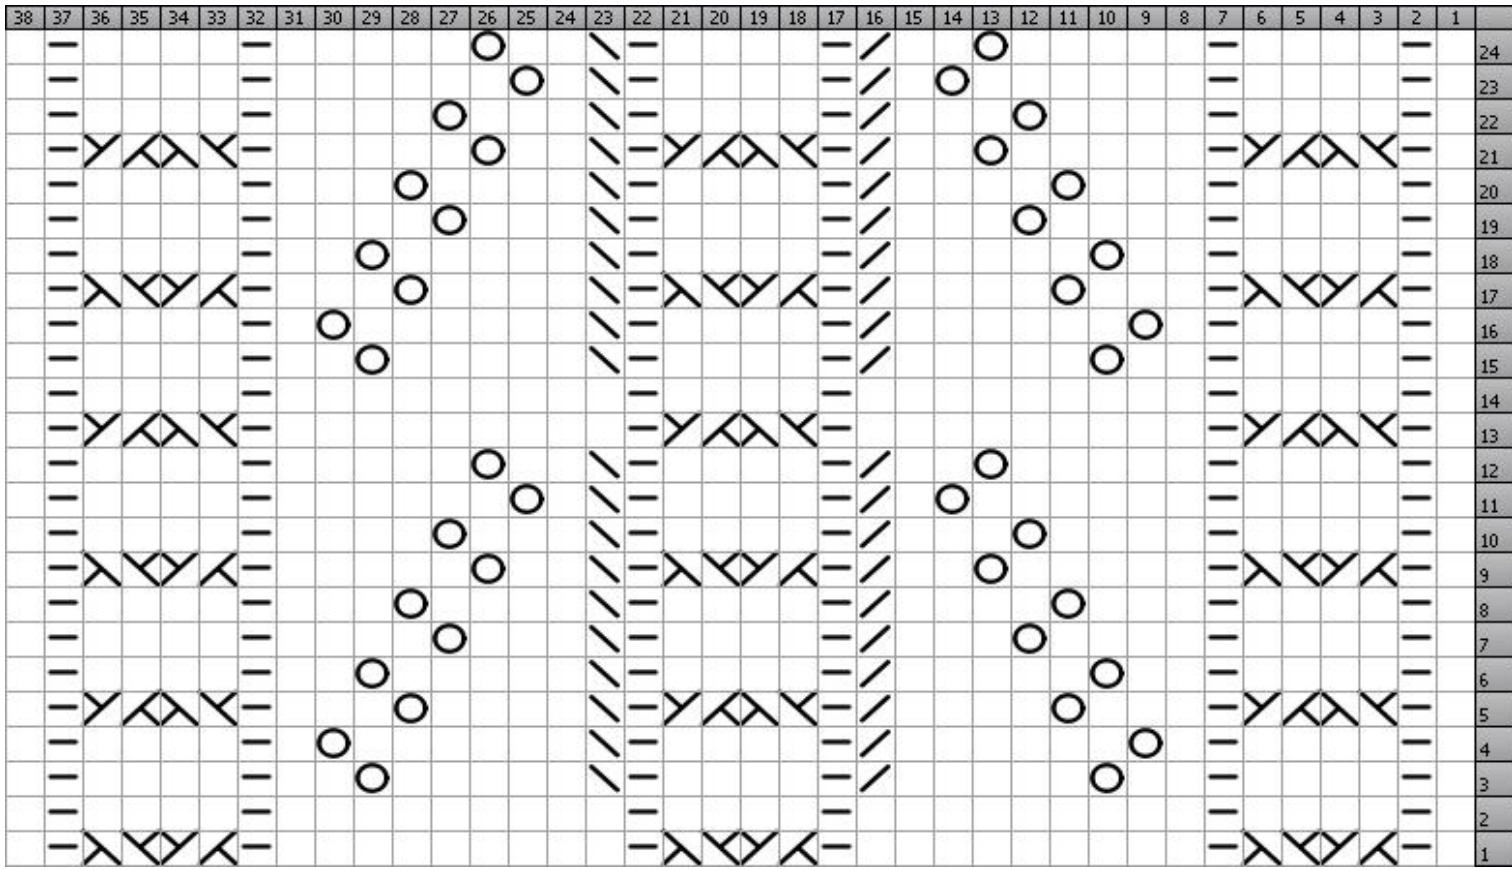
CLUE 3- FABRIC OF THE COSMOS - THE HEEL AND SETTING UP THE GUSSETS
Prepare for knitting the Heel:

All Sizes: Knit the first st on Ni and transfer to the end of N2. Transfer the last st on N1 to the beginning of N2 → you should now have 31 (35, 37) sts on N1 and 35 (39, 41) sts on N2. The sts on Ni will go on hold while you knit the heel flap on the sts on N2. Turn work so that the WRONG SIDE of N2 is facing you. Note: The Heel Flap is knit FLAT - that is back and forth across the sts of N2 ONLY. Because you are starting with the Wrong Side Facing you, the charts' row numbering also starts with a wrong side row - so make sure that you are reading the ODD rows from left to right as you knit and the EVEN rows from right to left. You can customize the length of your heel flap by knitting fewer or more rows of the pattern - I would suggest ending with a row that does NOT have any cables in it. Pay close attention to the symbols on Row 1 of the chart - upon completion, your stitch count will have changed to 31(35, 41) sts on N2. Knit all rows of the size-appropriate Heel Flap Chart. End with the right side of the work facing you.
Turn Heel:
Row 1 (Right Side): Sl1, K17 (19, 19) sts, ssk, K1, Turn work. Row 2 (Wrong Side): Sl1, P6 (6, 5) sts, P2tog P1, Turn work. Row 3 (Right Side): Sl1, K7 (7, 6) sts, ssk, K1 Turn work. Row 4 (Wrong Side): Sl1, P8 (8, 7) sts, P2tog P1, Turn work. Repeat Rows 3 and 4, increasing the number of sts between the decreases by one st each row until all sts are used up →i9 (21, 21) sts remain on the needle, ending after working a wrong side row. Turn work so that the RIGHT side is facing you.
PICK UP GUSSETS
Note:You areabout to start knitting thefoot of the sock.The front pattern willfollow the size-appropriate Foot for GUSSET Start Chart down the top of the foot, but the sole will switch to plain st st. Knit across all heel stitches, then continuing with N2, pick up and knit into each of the chain sts along the edge of the heel flap, plus one st in the space between the heel flap edge and the stitches being held On N1. = size-appropriate Foot for GUSSET Start Chart across the 31 (35, 37) sts on N Note: Pay close attention to the symbols on Row 1of the chart -upon completion, your stitch count will have changed to 32(38, 42) sts on N1. With N2, pick up one st in the space between Ni and the first slipped st of the heel edge, then pick up and knit the same number of chain sts as you did on the other side of the heel flap. You should now be at the start of the heel sts you worked. Continuing with N2, K across the heel sts and down the gusset sts until you reach the end of the sts on N2. Your sts should now be distributed such that the 32 (38, 42) FOOT sts are on N1, and the GUSSET AND SOLE sts are on N2. Note: The round now starts at the top of the foot -place a marker here to indicate this ifit helps.

GUSSET DECREASES
Round 1: Work row 2 of the size-appropriate FOOT for GUSSET Start Chart across all sts of N1. On N2, K1, ssk, K to last 3 sts, K2Tog, K1. Round 2 Work the next row of the size-appropriate FOOT for GUSSET Start Chart across all sts on N1, then K across all sts on N2. Round 3: Work the next row of the size-appropriate FOOT for GUSSET Start Chart across all sts of N1. On N2, K1, ssk, K to last 3 sts, K2Tog, K1. t Rounds 2 & 3 until all rows of the FOOT for GUSSET Start Chart are complet
End of Clue 3
CLUE 3: CHARTS SIZE SMALL
Heel Flap:
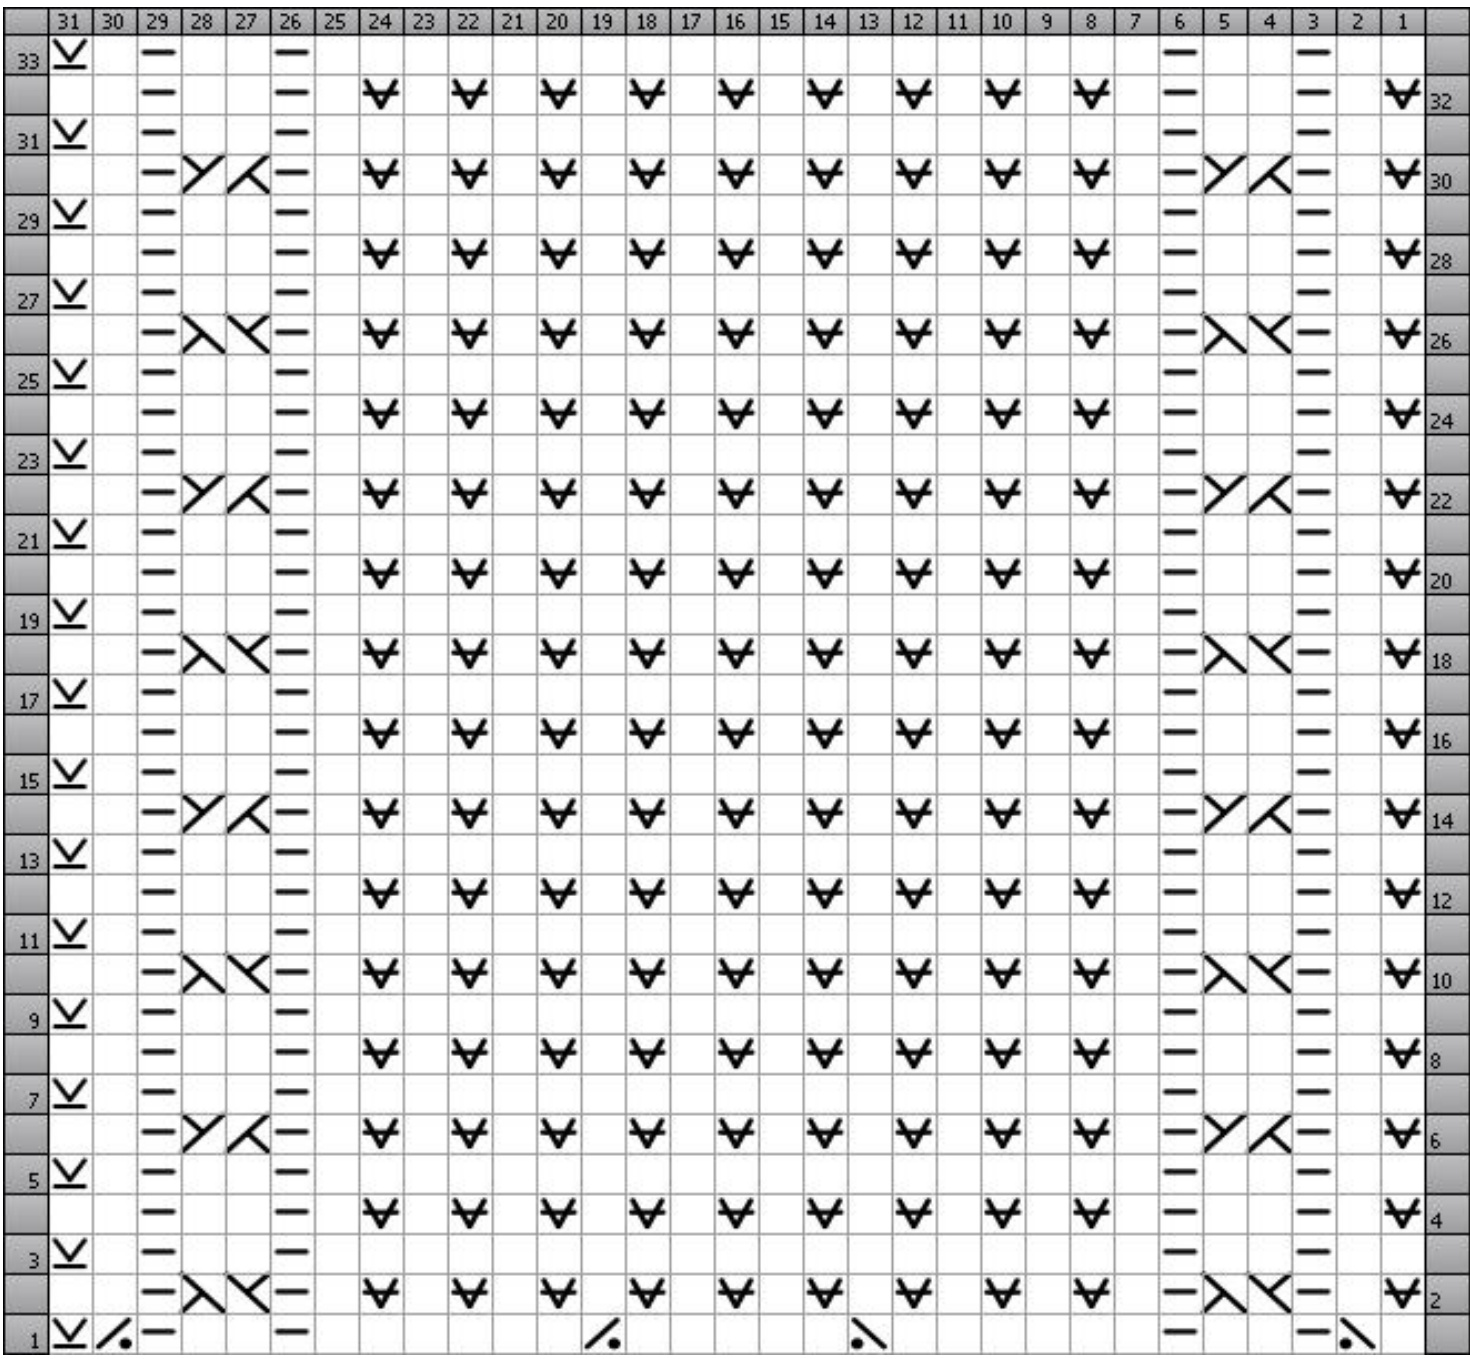
Foot for Gusset Start:
CLUE 3 CHARTS SIZE MEDIUM

Copyright 2012 Laura Jenkins. All rights reserved. For personal, non-commercial use only. Instructions and charts may be photocopied for personal use only.
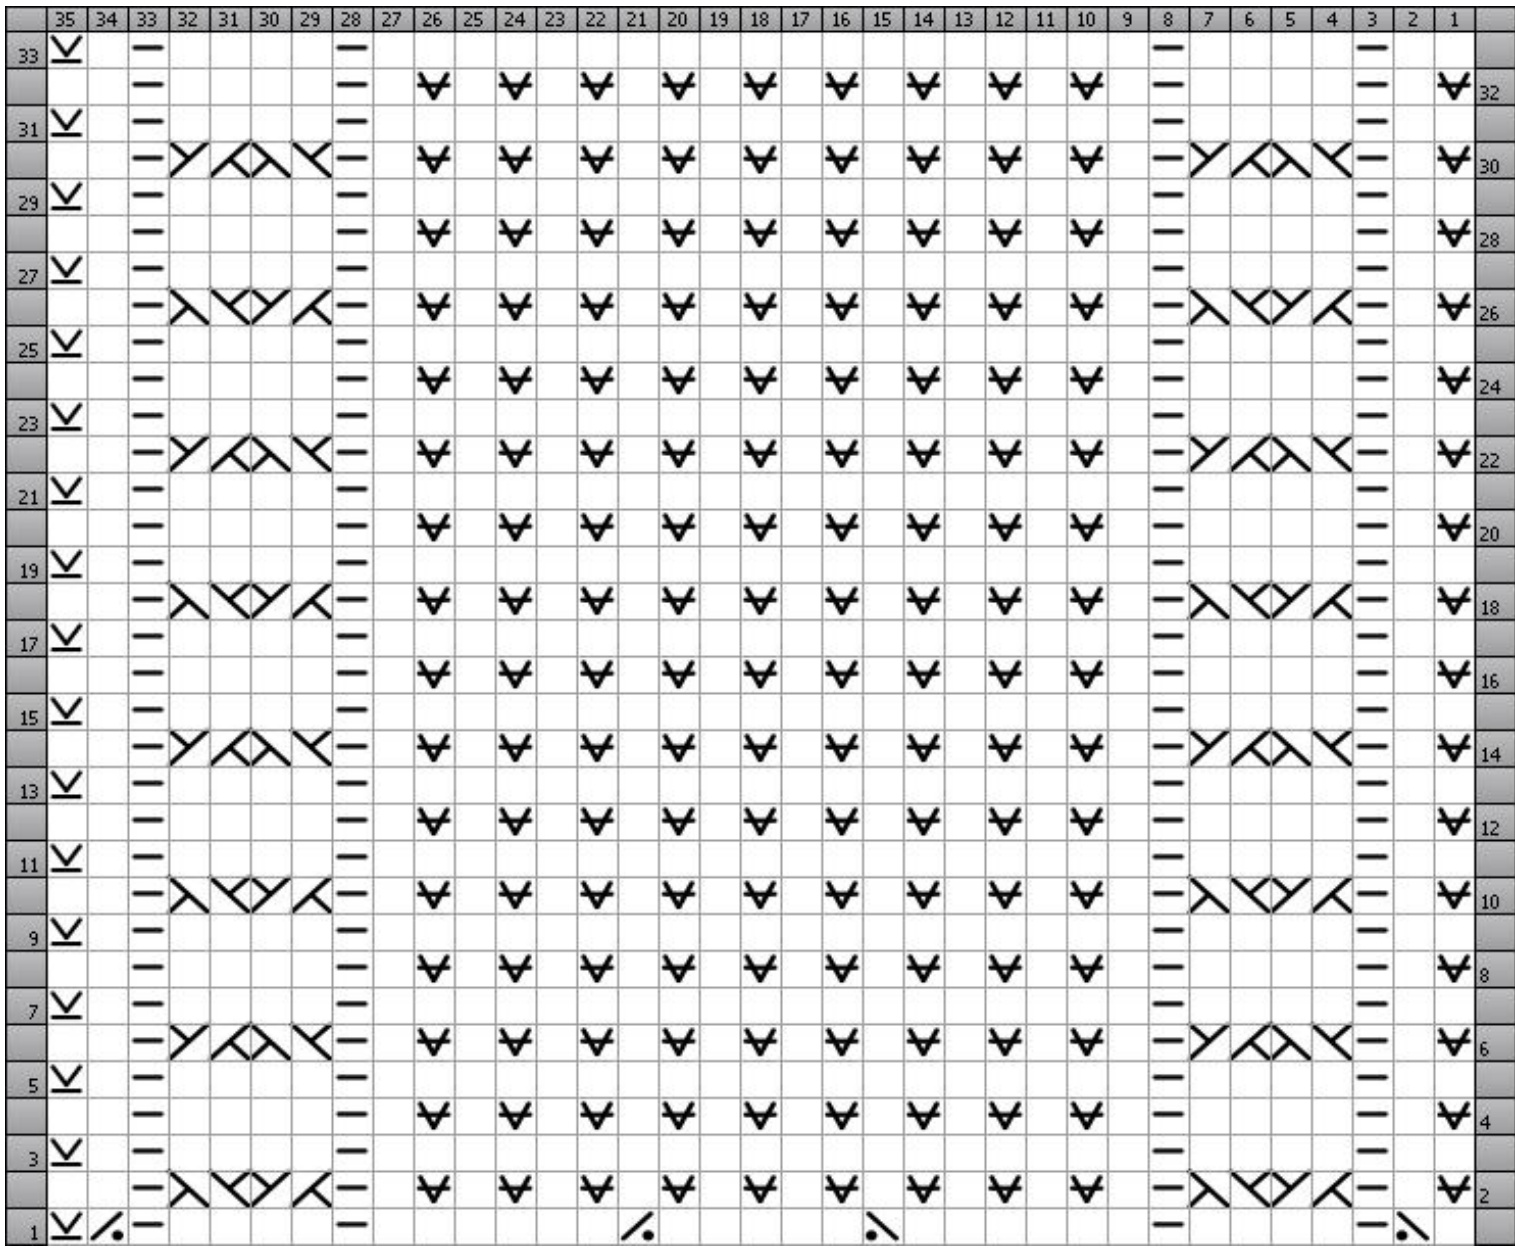
CLUE 3 CHARTS SIZE LARGE
Heel Flap:

Foot for Gusset Start:

Work the foot following the size-appropriate FOOT Chart across the sts on Ni and decreasing the gussets as set in Clue 3 across the sts on N2 until you have a total of 63 (73, 81) sts → 32 (38, 42) sts on N1 and 31, (35, 39) on N2. Continue following the FOOT Chart on Ni and knitting the sole sts across N2 until your work measures 5cm/2" less than the total desired foot length, ending ready to knit a cable row across the sts on N1. Note: The number of rows in the FOOT Charts varies for the different sizes, but in all cases a single repeat of the Chart is probably not enough to make the foot long enough - once you have worked all rows of the chart, return to the beginning of the chart and continue with as many repeats as necessary to reach the desiredlength.
TOE
Size Small ONLY:
Round 1: N1: K15, ssk, K15. N2: Knit all sts. → 62 sts total, 31 sts per needle Round 2: Ni: \*Ki, ssk, knit to last 3 sts on needle, Kztog, Ki\*. Repeat from \* to \* across the sts on N2. Round 3: K all sts across N1 and N2 Sizes Medium and Large: Round 1: N1: K1, P1, K2Tog, C2F, P1, K9 (11), P1, C2B, ssk, P1, K9 (1), P1, K2Tog, C2F, P1, K1. N2: Knit all sts. → 70 (78) sts total, 35 (39) sts per needle Round 2: N1: \*K1, ssk, knit to last 3 sts on needle, K2tog, K1\*. Repeat from \* to \* across the sts on N2. Round 3: K all sts across N1 and N2 ALL Sizes: Repeat Rounds 2 and 3 until 26 sts remain (13sts per needle).
FINISHING
Graft toe using Kitchener st, weave in ends. End of Clue 4 - Knit another sock to match the first!
Small:
Medium:
Copyright 2012 Laura Jenkins. All rights reserved. For personal, non-commercial use only. Instructions and charts may be photocopied for personal use only.