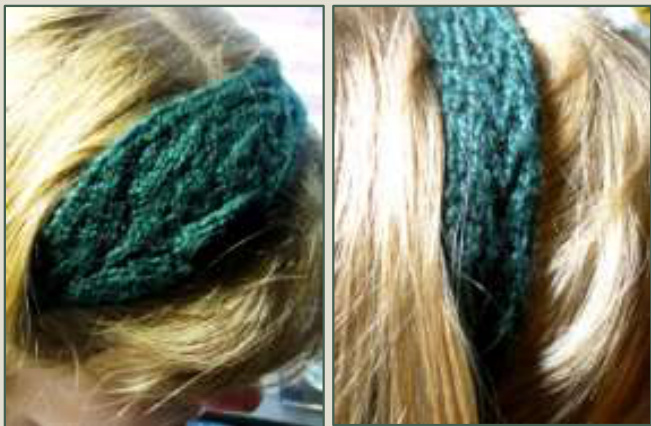
Rosie & Jag
Two headbands that sprang from thoughts about roses and thorns. The “Rosie" headband has a simple knitted motif decorated with a large lace rose, almost like a knitted fascinator. The “Jaq" headband plays off the same lace motif, used throughout. Either headband can be buttoned or provisionally cast on and kitchenered at the end. Materials: Knit Picks Galileo or sport weight yarn, approximately 45 yards (41 meters) U.S. 3 needles (3.25 mm) Wasteyarn Tapestry needle 3%" button (optional)
Abbreviations:
p = purl k= knit yo = yarn over sl = slip one knitwise Gauge: 6st/1" in either lace pattern (you can potentially use any gauge that looks good to you, and knit to your desired length) ssk = slip slip knit; slip two stitches knitwise to right needle; insert left needle into fronts of stitches and knit together sk2p = slip 1, knit two together, pass slipped stitch over
s2kp = slip 2, knit one, pass slipped stitches over k2tog = knit two together k3tog = knit three together M1L = left-leaning increase; insert left-hand needle from front to back into the strand of yarn between the stitch just worked and the next stitch; knit into the back M1R = right-learning increase; insert left-hand needle from back to front into the strand of yarn between the stitch just worked and the next stitch; knit into the front kfbf = knit into the front, back, and front of the next stitch (three stitches out of Oone)
Rosie Headband
Cast-on ten stitches. Use your favorite cast-on if you'd like to button your headband, or use a provisional cast-on if you'd like to kitchener your headband into a continuous loop. The first stitch of each row should be slipped knitwise. Row 1: sl, p1, k6, p1, k1 Row 2: sl, k1, p to two before end, k2 Begin Rosie lace pattern. Repeat lace pattern three times, ending after a wrong side row. Begin flower pattern, chart or written directions. End flower pattern with a wrong side row. Begin lace pattern again, starting with Row 3. Repeat lace pattern until headband is long enough to fit comfortably around the recipient's head. (This lace pattern will mostly grow width-wise, so try not to stretch it too much.) I did nine and a half additional lace repeats and kitchenered my headband together. If in doubt, go ahead and put your headband on waste yarn, pin it out, and steam block it! See finishing directions at the end of the pattern for either buttonhole or kitchener directions.
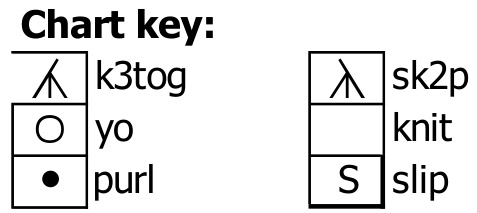
Rosie Lace Pattern - Chart
Wrong side rows: sli, ki, p to two before end, k2
| 不 | S | 7 | Chart key: | |||||||||||||
| S | 5 | 人 | k3tog | 入 | sk2p | |||||||||||
| 入 | S | 3 | O | knit | ||||||||||||
| O | O | S | 1 | yo und | S | slip |
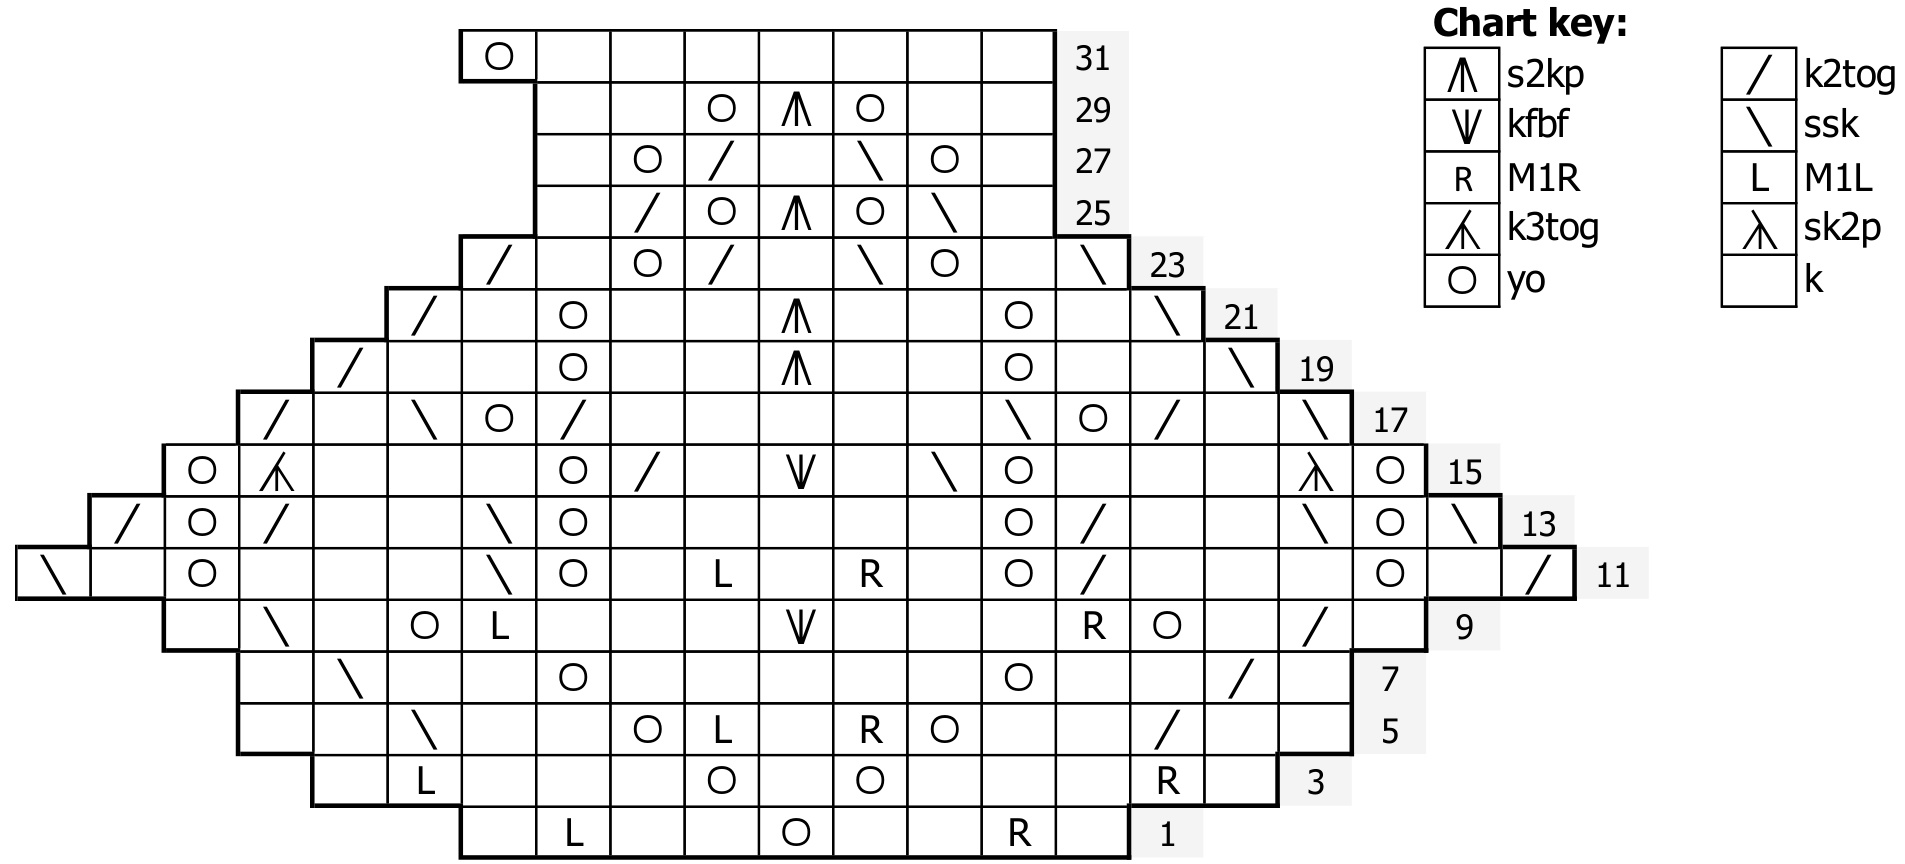
Flower Pattern - Chart
Right side rows: sli, p1, continue with flower pattern, p1, k1 Wrong side rows: sli, kl, purl to last two stitches, k2
Rosie Lace Pattern - Written Directions
Row 1: sl1, p1, k3, yo, k3, y0, p1, kl Row 2 and all wrong side rows: sl, kl, p to two before end, k2 Row 3: sl1, p1, k4, sk2p, kl, p1, k1 Row 5: sl1, p1, yo, k3, yo, k3, p1, k1 Row 7: sl1, P1, k1, k3tog, k4, P1, k1
Flower Pattern - Written Directions
Row 1: k1, M1R, k2, yo, k2, MiL, k1 Row 2 and all wrong side rows: sli, kl, purl to last two stitches, k2 Row 3: k1, M1R, k3, yo, kl, yo, k3, MiL, k1 Row 5: k2, k2tog, k2, yo, MiR, k1, MiL, yo, k2, ssk, k2 Row 7: k1, k2tog, k2, yo, k5, yo, k2, ssk, k1 Row 9: k1, k2tog, k1, yo, M1R, k3, kfbf, k3, MiL, yo, k1, ssk, k1 Row 11: k2tog, k1, yo, k3, k2tog, yo, k1, MiR, k1, M1L, k1, yo, ssk, k3, yo, k1, ssk Row 13: ssk, yo, ssk, k2, k2tog, yo, k5, y0, ssk, k2, k2tog, yo, k2tog Row 15: yo, sk2p, k3, y0, ssk, k1, kfbf, k1, k2tog, yo, k3, k3tog, yo Row 17: ssk, k1, k2tog, yo, ssk, k5, k2tog, yo, ssk, k1, k2tog Row 19: ssk, k2, yo, k2, s2kp, k2, yo, k2, k2tog Row 21: ssk, k1, yo, k2, s2kp, k2, yo, k1, k2tog Row 23: ssk, k1, yo, ssk, k1, k2tog, yo, k1, k2tog Row 25: k1, ssk, yo, s2kp, yo, k2tog, k1 Row 27: kl, y0, ssk, k1, k2tog, yo, k1 Row 29: k2, y0, s2kp, y0, k2 Row 31: k7, y0
Jag Headband
Cast-on twelve stitches. Use your favorite cast-on if you'd like to button your headband, or use a provisional cast-on if you'd like to kitchener your headband into a continuous loop. The first stitch of each row should be slipped knitwise. Row 1: sl1, p1, k8, p1, k1 Row 2: sli, kl, p to two before end, k2 Begin lace pattern. See finishing directions at the end of the pattern for either buttonhole or kitchener directions.
Jaq Lace Pattern - Chart
Wrong side rows: sli, kl, p to two before end, k2
| 入 | O | S | 7 5 | |||||||||
| 人 | O | . | S | |||||||||
| 人 | S | |||||||||||
| 入 | O | S | 3 1 |
Jaq Lace Pattern - Written Directions
Row 1: sl1, p1, k3, yo, k1, sk2p, k1, yo, k3, p1, k1 Rows 2 and all wrong side rows: sli, ki, p to two before end, k2 Row 3: sl1, p1, yo, k1, k3tog, k1, yo, k3, p1, k1 Row 5: sl1, p1, k3, yo, k1, k3tog, k1, yo, k3, p1, k1 Row 7: sl1, p1, yo, k1, sk2p, k1, yo, k3, p1, k1
Finishing Directions
Kitchener stitch:
Undo your provisional cast-on and place live stitches on your knitting needle. Thread your tapestry needle with yarn. Hold you1 two knitting needles together so the wrong sides of the fabric are together (make sure your headband isn't twisted!) Set-Up: Run the tapestry needle through the first stitch on the front needle purlwise and the first stitch on the back needle knitwise. Step 1: Run the tapestry needle through the first stitch on the front needle knitwise and slip it off Step 2: Run the tapestry needle through the new first stitch on the front needle purlwise Step 3: Run the tapestry needle through the first stitch on the back needle purlwise and slip it off Step 4: Run the tapestry needle through the new first stitch on the back needle knitwise p 2-4 until all stitches have been worked. Weave in your ends and block
Buttonhole:
After you've knit to the desired length, begin the buttonhole directions. Row 1: sl1, p1, ssk, k to four before end, k2tog, p1, k1 Row 2: sli, k1, p to two before end, k2 For Rosie headband, repeat rows 1 and 2 once more. For Jaq headband, repeat rows 1 and 2 twice more. Row 3: sl1, k2, y0, yo, k3 Row 4: sl1, ki, p1, drop yo's from needle, p1, k2 Row 5: sl1, ssk, k2tog, k1 Row 6: sl1, k3 Bind off all stitches. Sew a button to the opposite end of your headband. Weave in your ends and block!


