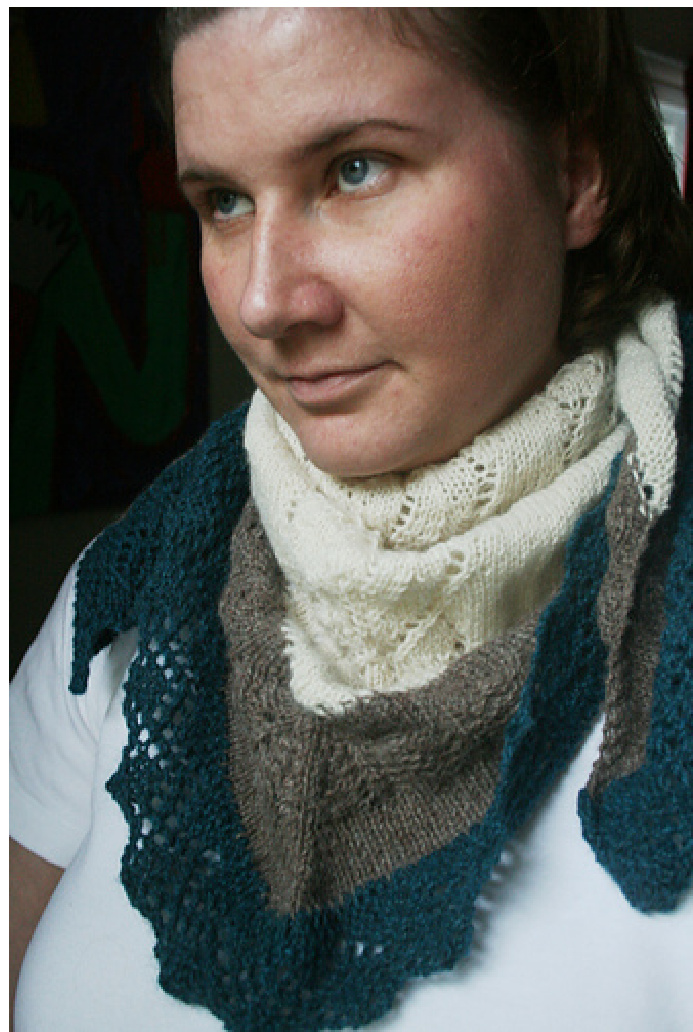
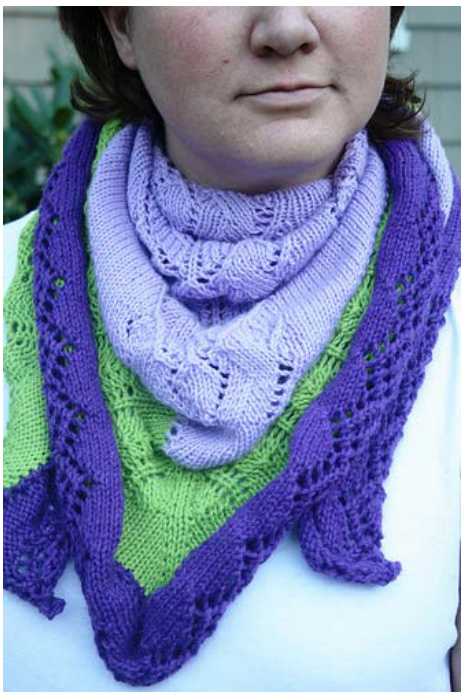
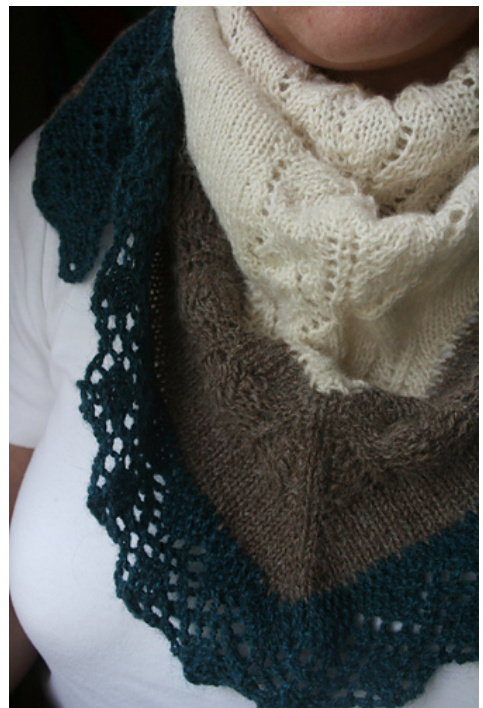
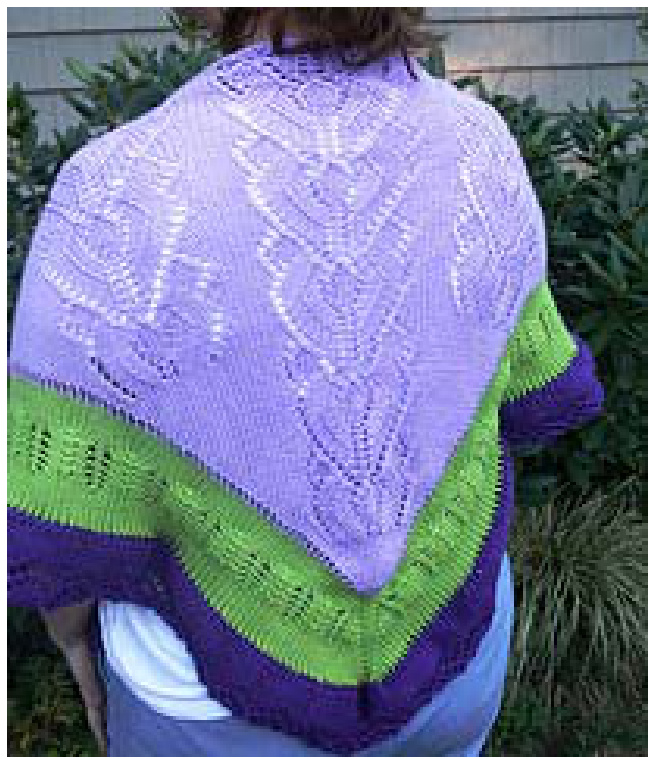
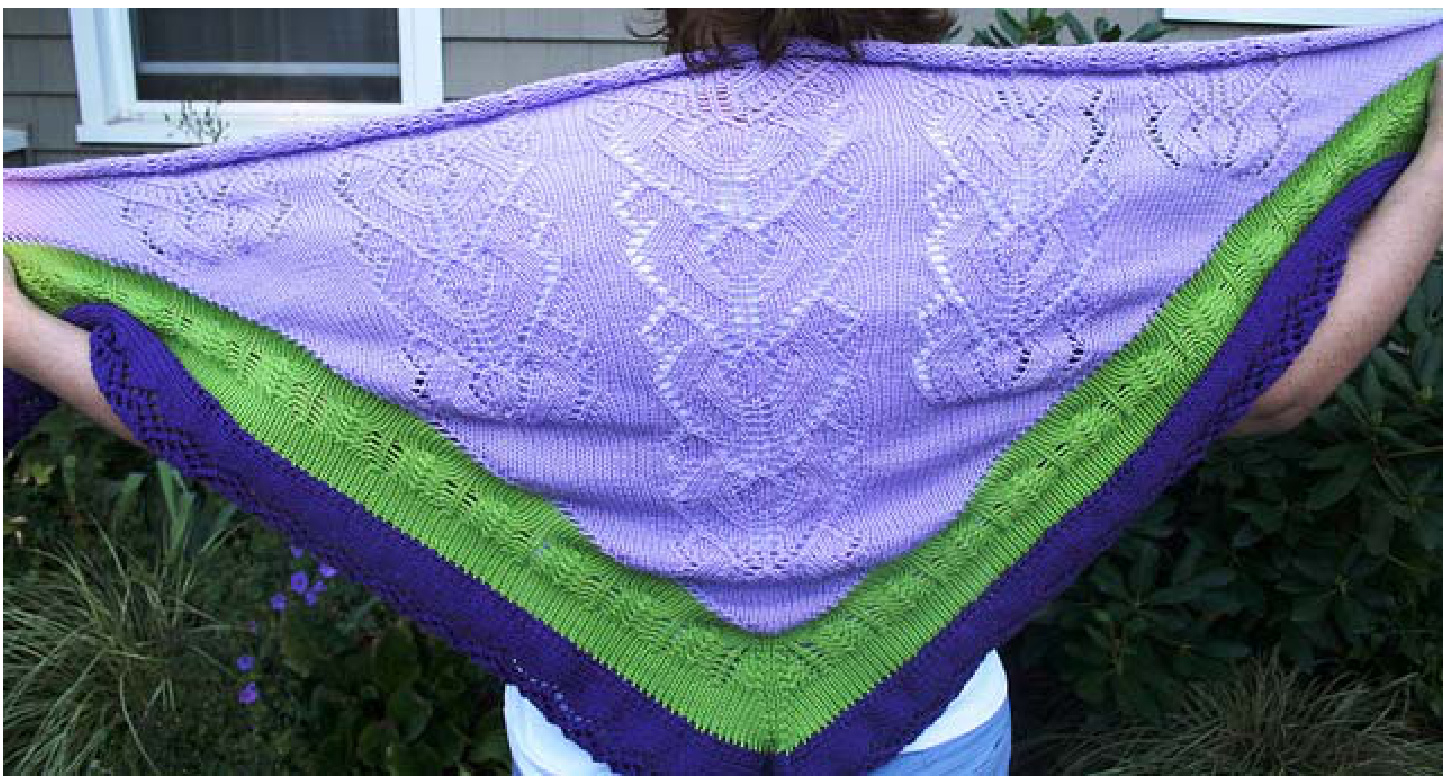
Dora is a versatile triangle shawl, suitable for all types of weather and can be made in a wide range of fibers. Both written and charted instructions are included for knitters of all levels. You will work from the point of the main section to the neck edge. Stitches/loops are then picked up and worked for the middle/"pinecone" section and outer edging is worked by casting on additional stitches and casting off center section as you go. Measurements: Smaller needle/yarn: $\sim\!26^{\,\"}$ from top edge to point, 52" across top Larger needle/yarn: ${\sim}31^{\,\cdot}$ from top edge to point, 62" across top Gauge: (this is a baseline guide...since shawls are not dependent on gauge) 24 sts $=4^{\circ}$ for smaller needle/yarn in st st $18\;\mathsf{s t s}=4^{\ast}$ for larger needle/yarn in st st Yarn: Smaller version: Frog Tree Alpaca Sportweight in Cream (2 skeins), Teal (1 skein), and Fawn (1 skein): 130 yds, $100\%$ alpaca,5 ply Larger version: Plymouth Dreambaby DK in Lilac (2 skeins; 183 yds, $50\%$ acrylic, $50\%$ nylon, 8 ply); AND Dark Horse Fantasy in Lettuce (1 skein) and Purple (1 skein): 205 yds, $50\%$ acrylic, $50\%$ nylon, 10 ply [Aran]
Abbreviations: k - knit p-purl st - stitch yo - yarn over pm - place marker sm - slip marker sl - slip stitch (as indicated) kf&b - knit into the front and back of the stitch k1tbl - k1 stitch through back of loop k2tog - knit two stitches together k3tog - knit three stitches together p2tog - purl two stitches together p3tog - purl three stitches together ssk - slip next two stitches, one at a time, knitwise, knit them together through the back psso - pass slipped stitch over
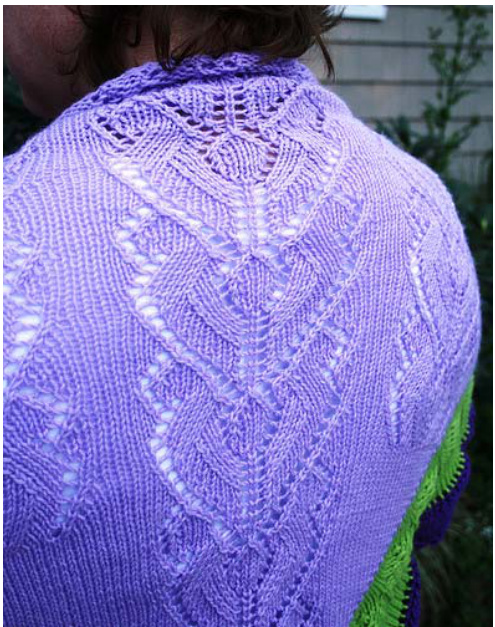
Section 1 - Lace Triangle
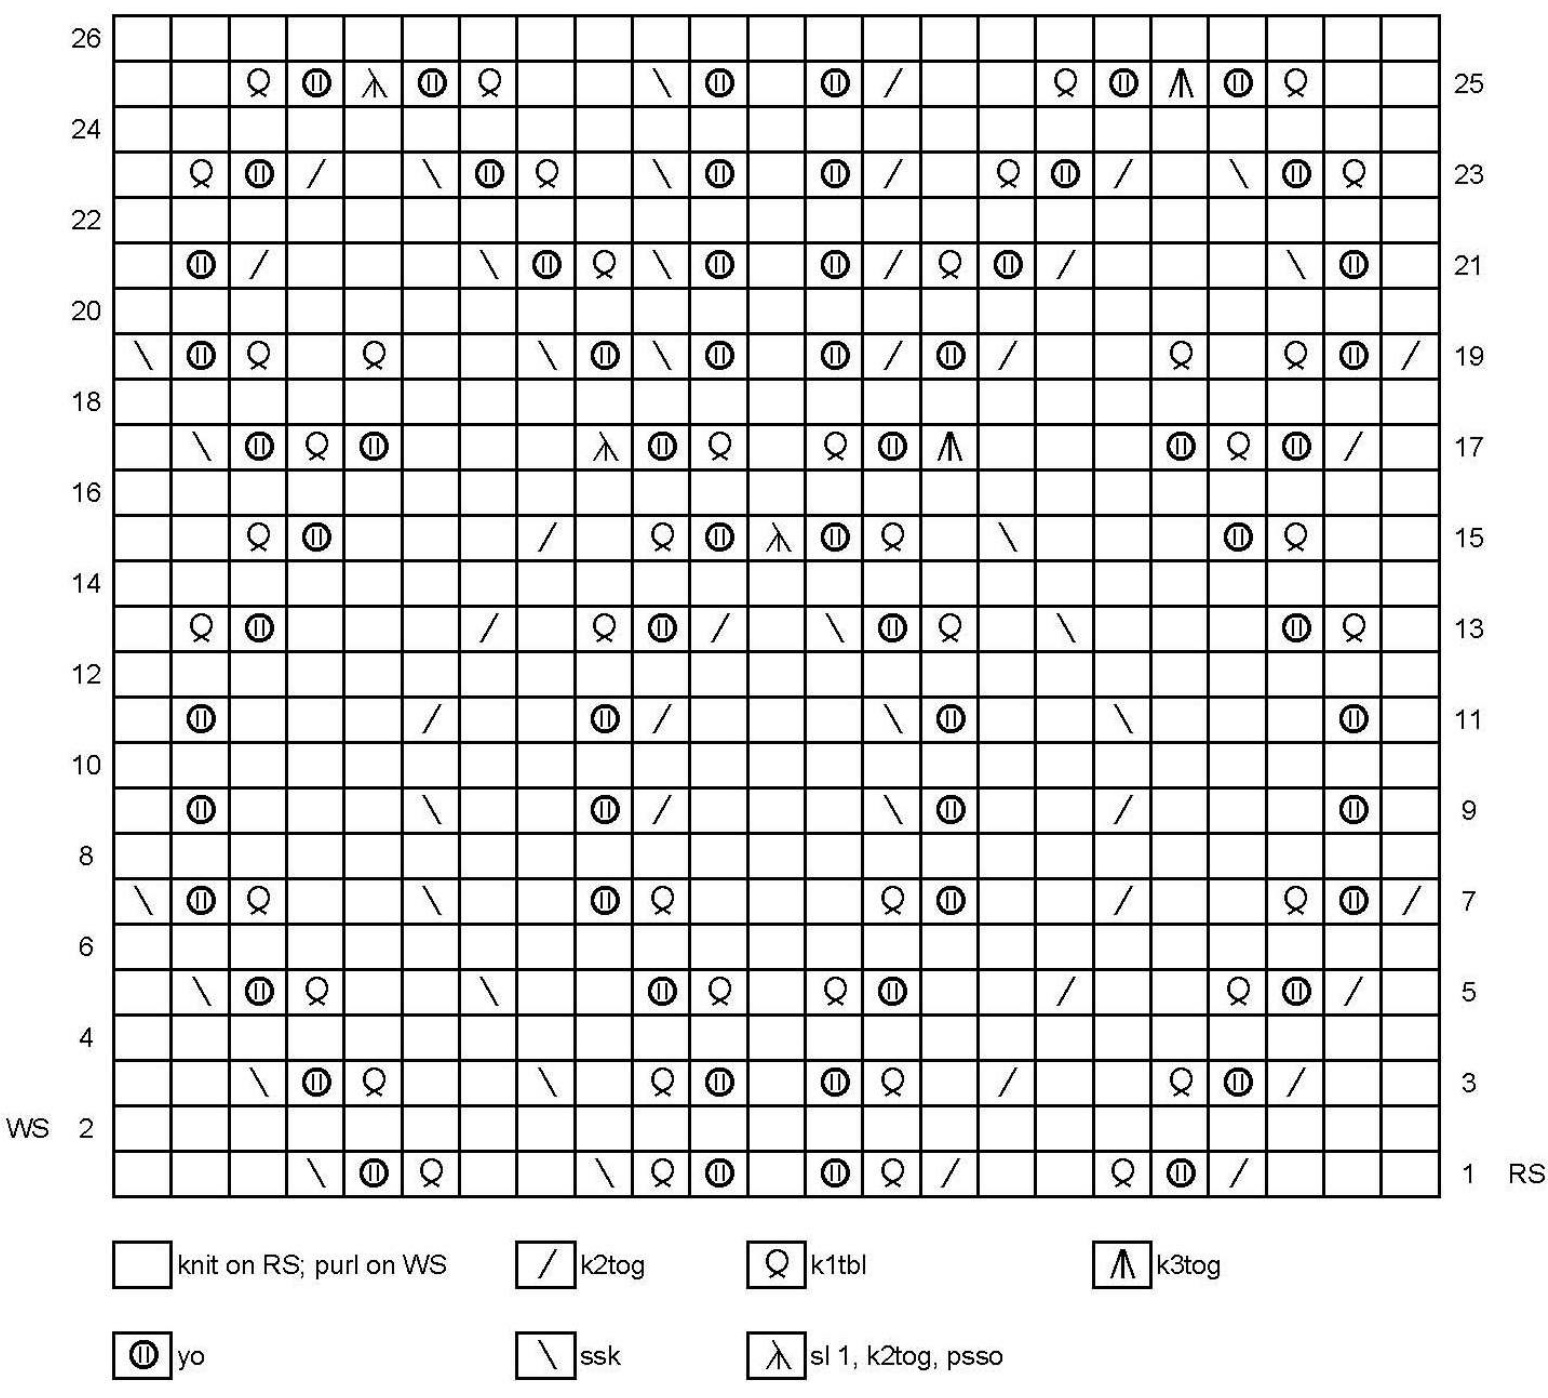
Lace Chart may be found on page 7; written instructions for chart on page 6 Cast on 1 stitch, move it to left needle. Insert right needle into stitch as if to knit. Bringing yarn around the bottom and over top of the right needle (YO), knit to end of row. This will create a series of loose loops at the beginning of each row which will be picked up in the second ("pinecone") section. You will start every subsequent row in this first section with [YO, k], even on the WSrows Row 1 (RS): YO, k to end Row 2 (WS): YO, k, p to end Work these two rows until there are 23 stitches Set up (RS): YO, begin Lace Chart Row 1 (WS): YO, k, purl to end Row 2 (RS): YO, k, pm, work 23 stitches of chart, k to end Continue working YO increases as for Rows 1 & 2, working additional stitches on either side of center 23 as knit on RS and purl on WS. Work through chart twice until 27 stitches are on either side of the markers (including YO for those rows) and end on a WS row (73 stitches total).
Row 1 (RS): YO, pm\*, work Lace Chart, pm, K4, work Lace Chart, sm, K4, pm, work Lace Chart (There will now be 3 sets of Lace Chart being worked) Row 2 (WS): YO, k, pm\* purl to end \*place markers to indicate new lace sections on rows 3 and 4 Continue working YO increases as for Rows 1 & 2, working additional stitches on either end as knit on RS and purl on WS. Work through chart twice until 26 stitches are on either side of the markers (including YO for those rows) and end on a WS row (129 stitches total). Row 1 (RS): YO, pm\*, work Lace Chart, pm, K3, [work Lace Chart, sm, K4] twice, work Lace Chart, pm, K3, work Lace Chart (there will now be 5 sets of Lace Chart being worked) Row 2 (WS): YO, k, pm\* purl to end \*place markers to indicate new lace sections on rows 3 and 4 Continue working YO increases as for Rows 1 & 2, working additional stitches on either end as knit on RS and purl on WS. Work through chart twice until 26 stitches are on either side of the markers (including YO for those rows) and end on a WS row (181 stitches total). LOOSELY bind off all stitches (this will become your neck edge and you don't want it to be too tight; using a larger size needle will help achieve this as well)
Section 2 - Pinecone
With RS facing, starting at corner where you just finished binding off with MC, pick up, front to back, 90 loops to the point of the triangle, and another 90 loops down the other side to neck edge [Note: you are just picking up the loops...no knitting!](180 sts) With RS facing, triangle point away from you, and second color, k9otbl, pm, pick up and knit one corner stitch, pm, k90tbl (181 sts) PartA: Row 1, 3, 5, 7, 9 (WS): k1, kfb, purl to last 2 stitches, kfb, k1 Row 2, 4, 6, 8 (RS): k1, kfb, k to last stitch before marker, kfb, sm, k1, sm, kfb, k to last 2 stitches, kfb, k1 (103 sts per side / 207 sts total) Part B: Pinecone Chart - written (chart on page 8): Row 1: k, kfb, (sl 1, k1, psso), yo, [k, yo, k2, (sl 1, k2tog, psso), k2, yo] 12 times, k, yo, k, kfb, sm, k [center st], sm, kfb, k, yo, k, [yo, k2. (sl 1, k2tog, psso), k2, yo, k] 12 times, yo, (sl 1, k1, psso), kfb, k
Row 2, 4, 6, 8, 10: k1, kfb, p to last 2 stitches, kfb, k1 Row 3: k, kfb, (sl 1, k1, psso), k2, yo, [k, yo, k2, (sl 1, k2tog, psso), k2, yo] 12 times, k, yo, k, k2tog, kfb, sm, k [center st], sm, kfb, (sl 1, k1, psso), k, yo, k, [yo, k2, (sl 1, k2tog, psso), k2, yo, k] 12 times, yo, k2, k2tog, kfb, k Row 5: k, kfb, k, (sl1, k2tog, psso), k2, yo, [k, yo, k2, (sl 1, k2tog, psso), k2, yo] 12 times, k, yo, k2, k2tog, kfb, sm, k [center st], sm, kfb, (sl 1, k1, psso), k2, yo, k, [yo, k2, (sl 1, k2tog, psso), k2, yo, k] 12 times, yo, k2, (sl1, k2tog, psso), k, kfb, k Row 7: k, kfb, yo, k2, (sl1, k2tog, psso), k2, yo, [k, yo, k2, (sl 1, k2tog, psso), k2, yo] 12 times, k, yo, k2, (sl 1, k2tog, psso), kfb, sm, k [center st], sm, kfb, (sl1, k2tog, psso), k2, yo, k, [yo, k2, (sl 1, k2tog, psso), k2, yo, k] 12 times, yo, k2, (sl1, k2tog, psso), k2, yo, kfb, k Row 9: k, kfb, k2, yo, k2, (sl1, k2tog, psso), k2, yo, [k, yo, k2, (sl1, k2tog, psso), k2, yo] 12 times, k, yo, k2, (sl 1, k2tog, psso), kfb, sm, k [center st], sm, kfb, (sl1, k2tog, psso), k2, yo, k, [yo, k2, (sl1, k2tog, psso), k2, yo, k] 12 times, yo, k2, (sl1, k2tog, psso), k2, yo, k2, kfb, k ( 116 sts per side / 233 sts total) Part C: Rows 1, 3, 5, 7, 9 (RS): k1, kfb, k to last st before marker, kfb, sm, k1, sm, kfb, k to last 2 sts, kfb, k1 Row 2, 4, 6, 8 (WS): k1, kfb, p to last 2 sts, kfb, k1 Row 10 (WS): k1, kfb, purl to 1 st before marker, pfb, sm, p1, sm, pfb, p to last 2 sts, kfb, k1 (132 sts per side / 265 sts total)
Section 3 - Lace Edging
Notes:
1. In this section you bind off the Pinecone sts as you knit the Lace Edging. 2. In the larger (purple/green) version I used the written instructions below. However, for the smaller version, I modified the edging to knit EVERY stitch (instead of knitting on RS; purling on WS). Knitting all stitches allows the edging to lay a little flatter without blocking. Use whichever method you prefer! 3.Chart on page 9 Using a knitted CO method, and starting with the first st of the last section and your next color, CO 13 sts.
Part A: Row 1: k12, knit last “new" stitch together with the first stitch from the pinecone section [going forward, this will be listed as k2tog] Row 2: p7, [p2tog, yo] twice, p, yo, p Row 3: k13, k2tog Row 4: p6, [p2tog, yo] twice, p3, yo, p Row 5: k14, k2tog Row 6: p5, [p2tog, yo] twice, p5, yo, p Row 7: k15, k2tog Row 8: p7, [yo, p2tog] twice, p, p2tog, yo, p2tog Row 9: k14, k2tog Row 10: p8, yo, p2tog, yo, p3tog, yo, p2tog Row 11: k13, k2tog Row 12: p9, yo, p3tog, yo, p2tog Repeat rows 1 - 12 20 more times; then rows 1 - 6. There will be 3 stitches remaining before marker. Corner turn: [all slipped stitches should be made purlwise] Row 1 (RS): k16 [do NOT k2tog] Row 2 (WS): sl 1, p6, [yo, p2tog] twice, p1, p2tog, yo, p2tog Row 3: k14, k2tog Row 4: sl 1, p7, yo, p2tog, yo, p3tog, yo, p2tog Row 5: k14 [do NOT k2tog] Row 6: sl 1, p8, yp, p3tog, yo, p2tog Row 7: k12, k2tog Row 8: sl 1, p6, [p2tog, yo] twice, p, yo, p Row 9: k13, k2tog [remove marker] Row 10: sl 1, p5, [p2tog, yo] twice, p3, yo, p Row 11: k14, k2tog [remove marker; center stitch] Row 12: p5, [p2tog, yo] twice, p5, yo, p Row 13: k15, k2tog Row 14: p7, [yo, p2tog] twice, p, p2tog, yo, p2tog Row 15: k14, k2tog Row 16: p8, yo, p2tog, yo, p3og, yo, p2tog Row 17: k14 Row 18: p9, yo, p3tog, yo, p2tog Row 19: k12, k2tog Resume edging with Row 2 of Part A instructions/chart. Repeat a total of 21 times. Rep rows 1 - 6 once more, ending with a WS row. On next RS row, bind off loosely and k2tog at last edging/body stitches. Block shawl, sew in ends and be fabulous!
Written Lace Chart for Section 1 (Rows 1 - 26)
Note: this does not include increases at beg or end of row...ONLY the chart section. Be sure to read through instructions to familiarize yourself with process. Row 1: k3, k2tog, yo, k1tbl, k2, k2tog, k1tbl, yo, k, yo, k1tbl, ssk, k2, k1tbl, yo, ssk, k3 Row 2 (and all even rows): Purl Row 3: k2, k2tog, yo, k1tbl, k2, k2tog, k, k1tbl, yo, k, yo, k1tbl, k, ssk, k2, k1tbl, yo, ssk, k2 Row 5: k, k2tog, yo, k1tbl, k2, k2tog, k2, yo, k1tbl, k, k1tbl, yo, k2, ssk, k2, k1tbl, yo, ssk, k Row 7: k2tog, yo, k1tbl, k2, k2tog, k2, yo, k1tbl, k3, k1tbl, yo, k2, ssk, k2, k1tbl, yo, ssk Row 9: k, yo, k3, k2tog, k2, yo, ssk, k3, k2tog, yo, k2, ssk, k3, yo, k Row 11: k, yo, k3, ssk, k2, yo, ssk, k3, k2tog, yo, k2, k2tog, k3, yo, k Row 13: k, k1tbl, yo, k3, ssk, k, k1tbl, yo, ssk, k, k2tog, yo, k1tbl, k, k2tog, k3, yo, k1tbl, k Row 15: k2, k1tbl, yo, k3, ssk, k, k1tbl, yo, (sl1, k2tog, psso), yo, k1tbl, k, k2tog, k3, yo, k1tbl, k2 Row 17: k, k2tog, yo, k1tbl, yo, k3, k3tog, yo, k1tbl, k, k1tbl, yo, (sl1, k2tog, psso), k3, yo, k1tbl, yo, ssk, k Row 19: k2tog, yo, k1tbl, k, k1tbl, k2, k2tog, yo, k2tog, yo, k, yo, ssk, yo, ssk, k2, k1tbl, k, k1tbl, yo, ssk Row 21: k, yo, ssk, k3, k2tog, yo, k1tbl, k2tog, yo, k, yo, ssk, k1tbl, yo, ssk, k3, k2tog, yo, k Row 23: k, k1tbl, yo, ssk, k, k2tog, yo, k1tbl, k, k2tog, yo, k, yo, ssk, k, k1tbl, yo, ssk, k, k2tog, yo, k1tbl, k Row 25: k2, k1tbl, yo, k3tog, yo, k1tbl, k2, k2tog, yo, k, yo, ssk, k2, k1tbl, yo, (sl1, k2tog, psso), yo, k1tbl, k2
Section One: Lace Chart
\*\* Note, for this chart ONLY, standard symbols were changed to differentiate between YO and k1tbl \*\*
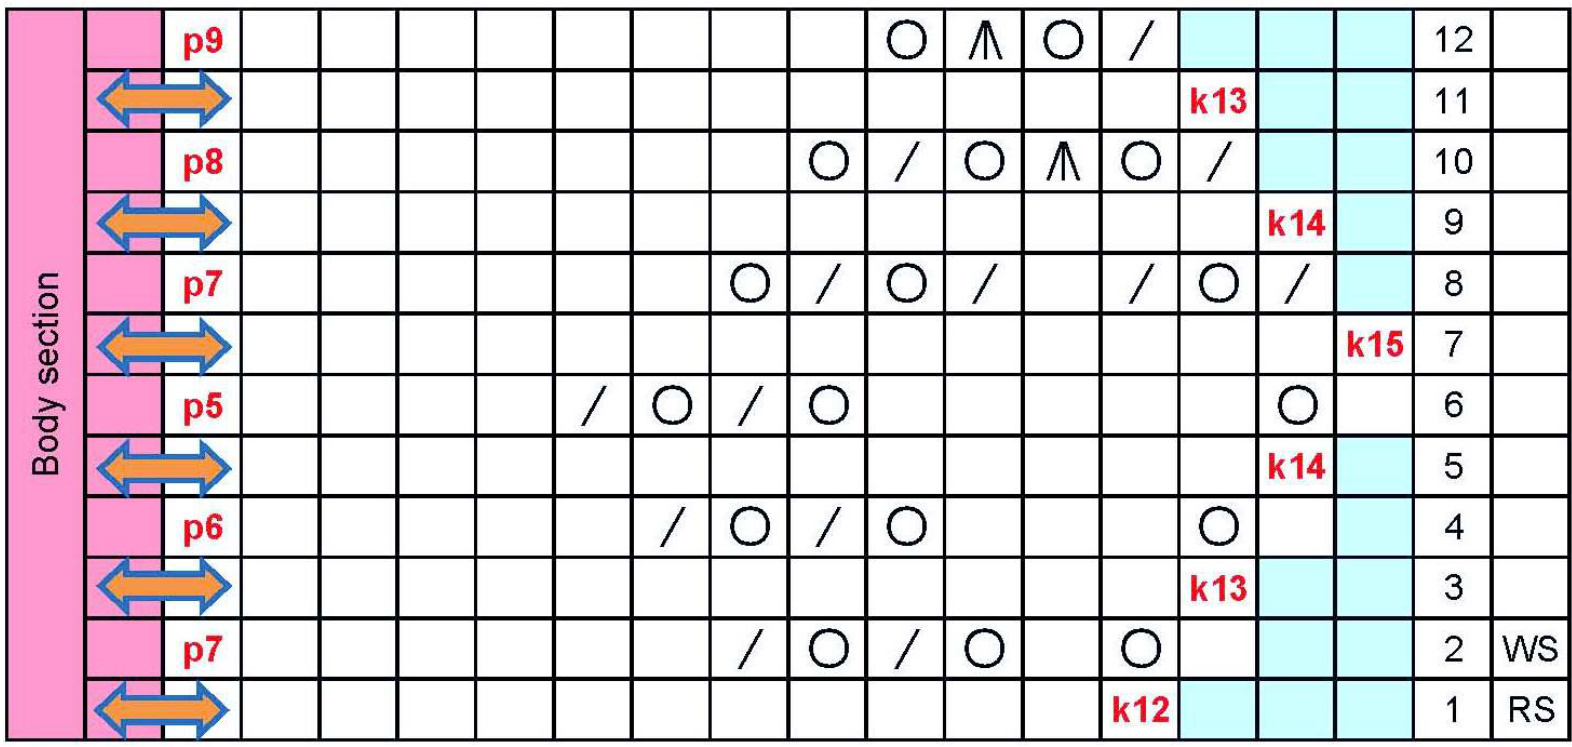
Section 2: Pinecone chart 8strep
EVERYrow isreadfrom righttoleft,onceyouknitcenter stitch,read backfrom left toright

knit center stitch;from this point,read chart back from left to right
Section 3: Lace Edging

instructions in red font are for ease of use...how many to knit or purl


