Dreaming at Delphi
Dreaming at Delphi is part of the Aegean series. This series was inspired by vacations in Greece. The pieces are intended to evoke the calm, sparkling waters, sandy beaches, and relaxing atmosphere of the Greek islands in the summertime (l know, Delphi is on the mainland, but there was an Oracle there!). I designed this series to be knit in cooler fabrics such as silk blends and cotton blends. You might need something light and airy to ward off a chill, but overall, the temperature is warm and pleasant. The Delphi piece is a smaller, scarf size. The model was knitted from one skein of Lichtfaden Pure Silk Lace. Any laceweight silk would be lovely, and there is no reason you couldn't use a heavier weight yarn such as fingering. Just make sure you have enough yardage. Because Delphi is knitted sideways, you can use yarn weight to determine when to stop increasing and when to begin decreasing. To do this, weigh your yarn before beginning to get the starting weight. While kniting the increase chart (or instructions), weigh your yarn regularly. When you've used 30% of the yarn, switch to the interim chart. When you've used another 20-25%, switch to the decrease chart. Note: This pattern uses twisted stitches and "bind off" in the edging chart. Make sure you read the instructions in the stitch glossary to ensure you understand how to work the stitches. Yarn: Lichtfaden Pure Silk Lace, 467 yards You can use any yarn you like. A laceweight yarn makes a light and airy piece, a heavier weight will make a more robust piece. Though this was designed as a summery accessory, there is no reason it wouldn't make a lovely neck-warming scarf in a heavier weight yarn. Needle size: US4, 3.5mm I use circular needles because I prefer them, but a 10" straight needle should work just fine for this piece. Adjust needle size for yarn weight if you use a heavier yarn than laceweight. Remember that you'll need more yardage as well. Gauge: Gauge for model is 6 stitches per inch, 7 rows per inch. Gauge is not overly important for this piece.
To Begin:
Cast on 28 stitches and begin the Increase chart. Repeat rows 19-30 until you have used approximately 30% of the yarn ball.
Increase Chart:
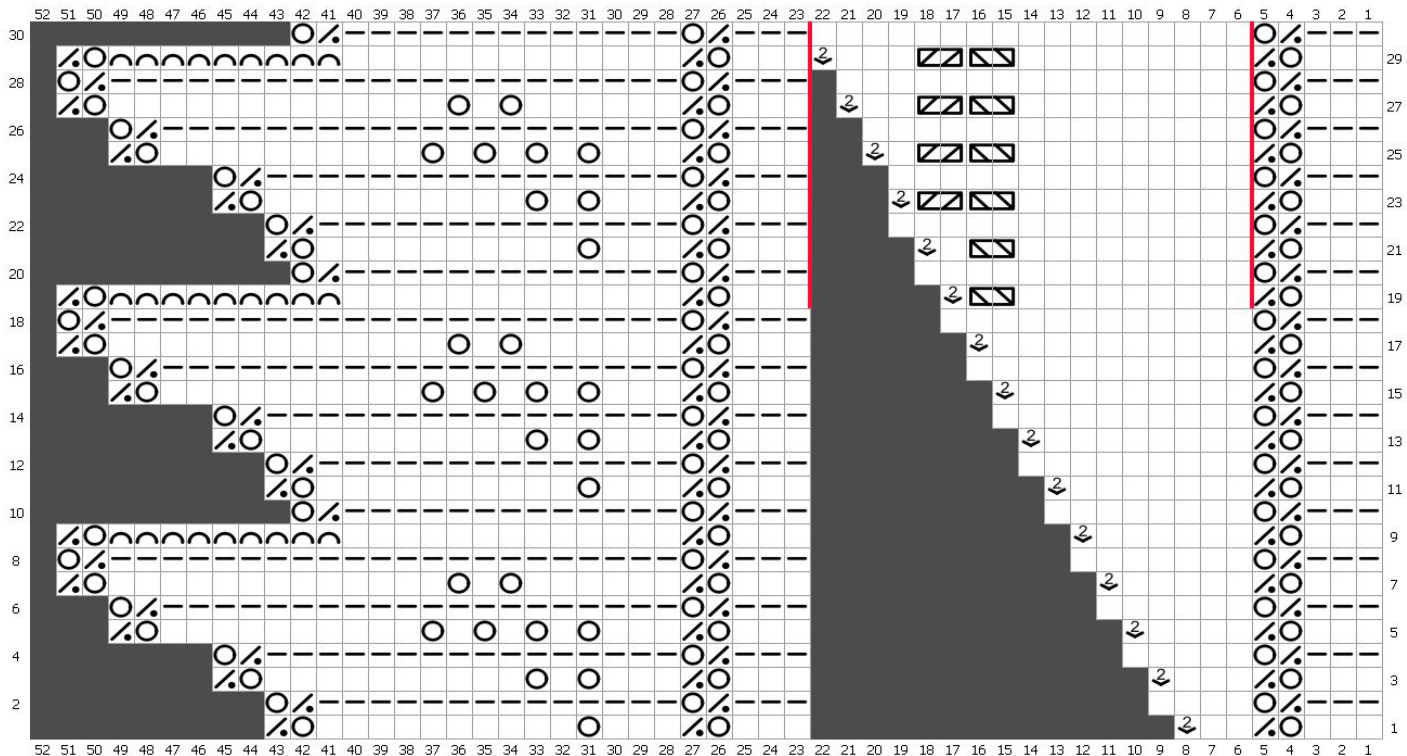
| Knit | |
| O | YO |
| 2 | KFB; I use the KFB as the increase in the increase chart. If you prefer M1L, you should use that. |
| Konwrongside | |
| 1 | P2tog on both WS and RS; When going from a knit stitch to a p2tog, you must first bring the yarn forward, thenwrapit.ItfeelslikeadoubleYO. |
| SLO: On this row, you will knit until you have 11 stitches remaining on the left needle. Pull the second stitch on the left needle over the first, then the next one, and so on until two stitches remain, the first one with 9 stitches pulled over it, and the last one. Then YO, purl two together. | |
| Twisted Left Stitch: Insert needle into back of second stitch on the left needle, make stitch, then insert into the front of the first stitch on the left needle wrapyarn, pull both stitches off the left needle. | |
| Twisted Right Stitch: Insert needle into the front of the second stitch on the left needle,make stitch, then insert into the front of the first stitch on the left needle, make stitch, pull both stitches from the left needle. | |
| Nostitch |
Interim Chart:
Repeat the stitches between the red lines as many times as they occur depending on the number of increases you made. Repeat the chart until you have approximately 30% of your yarn left.

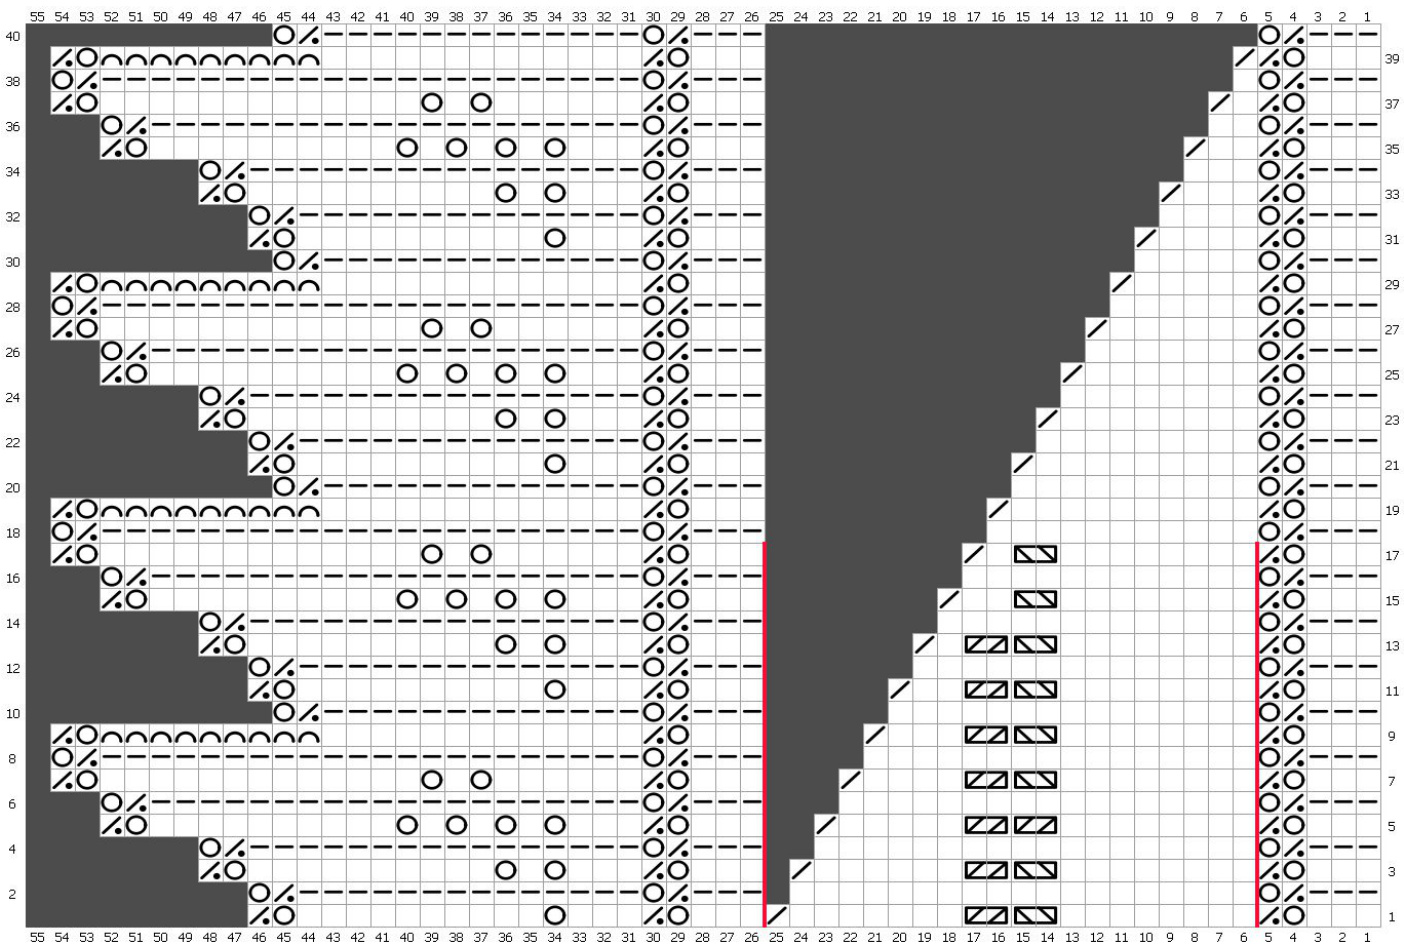
Decrease Chart:
Begin decreasing by p2tog on the right side rows right before the leaf edging. When you've decreased down to the final center stitch, knit two rows of garter (one right side and one wrong side), then bind off loosely. I bind off by doing: K1, K1, slip left needle into the front of both stitches on the right needle and knit together; knit the next stitch, slip left needle into the front of both stitches and knit together. Repeat until one stitch remains and tie off.
Written Instructions (Increase Section):
This scar is knit sideways so you can gauge how much of your yarn you're using as you go, maximizing yarn usage. Before starting, weigh your ball(s) of yarn to determine the total. As you knit the increase portion, weigh as you see fit, for example every three edging repeats), until you have used between 25-30% of the total yarn weight. When you've reached the magic number, move on to the Interim instructions. Review instructions for specific stitches in the legend for the chart where I've written out the instructions. To begin, CO 28 stitches using a loose cast on. I use the cable cast on or crochet cast on. 1. k3, yo, p2tog, k2, kfb, k3, yo, p2tog, k3, yo, k10, yo, p2tog, 2. yo, p2tog, k14, yo, p2tog, k3, p4, yo, p2tog, k3 3. k3, yo, p2tog, k3, kfb, k3, yo, p2tog, k3, yo, k1, yo, k10, yo, p2tog 4. yo, p2tog, k16, yo, p2tog, k3, p5, yo, p2tog, k3 5. k3, yo, p2tog, k4, kfb, k3, yo, p2tog, k3, \*yo, k1\* (3 times), yo, k10, yo, p2tog 6. yo, p2tog, k20, yo, p2tog, k3, p6, yo, p2tog, k3 7. k3, yo, p2tog, k5, kfb, k3, yo, p2tog, k6, yo, k1, yo, k13, yo, p2tog 8. yo, p2tog, k22, yo, p2tog, k3, p7, yo, p2tog, k3 9. k3, yo, p2tog, k6, kfb, k3, yo, p2tog, k13, SLO (see instructions in chart key; you reduce by 9 stitches here), yo, p2tog 10. yo, p2tog, k13, yo, p2tog, k3, p8, yo, p2tog, k3 11. k3, yo, p2tog, k7, kfb, k3, yo, p2tog, k3, yo, k10, yo, p2tog 12. yo, p2tog, k14, yo, p2tog, k3, p9, yo, p2tog, k3 13. k3, yo, p2tog, k8, kfb, k3, yo, p2tog, k3, yo, k1, yo, k10, yo, p2tog 14. yo, p2tog, k16, yo, p2tog, k3, p10, yo, p2tog, k3 15. k3, yo, p2tog, k9, kfb, k3, yo, p2tog, k3, yo, k1, yo, k1, yo, k1, yo, k10, yo, p2tog 16. yo, p2tog, k20, yo, p2tog, k3, p11, yo, p2tog, k3 17. k3, yo, p2tog, k10, kfb, k3, yo, p2tog, k6, yo, k1, yo, k13, yo, p2tog 18. yo, p2tog, k22, yo, p2tog, k3, x5, p12, yo, p2tog, k3 19. k3, yo, p2tog, k9, TWL (left twist stitch, see chart legend for instructions), kfb, k3, yo, p2tog, k13, SLO, yo, p2tog 20. yo, p2tog, k13, yo, p2tog, k3, p13, yo, p2tog, k3 21. k3, yo, p2tog, k9, TWL, k1, kfb, k3, yo, p2tog, k3, yo, k10, yo, p2tog 22. yo, p2tog, k14, yo, p2tog, k3, p14, yo, p2tog, k3 23. k3, yo, p2tog, k9, TWL, TWR (right twist stitch, see chart legend for instructions), kfb, k3, yo, p2tog, k3, yo, k1, yo, k10, yo, p2tog 24. yo, p2tog, k16, yo, p2tog, k3, p14, yo, p2tog, k3 25. k3, yo, p2tog, k9, TWL, TWR, k1, kfb, k3, yo, p2tog, k3, yo, k1, yo, k1, yo, k1, yo, k10, yo, p2tog 26. yo, p2tog, k20, yo, p2tog, k3, x2, p15, yo, p2tog, k3 27. k3, yo, p2tog, k9, TWL, TWR, k2, kfb, k3, yo, p2tog, k6, yo, k1, yo, k13, yo, p2tog 28. yo, p2tog, k22, yo, p2tog, k3, p16, yo, p2tog, k3 29. k3, yo, p2tog, k9, TWL, TWR, k3, kfb, k3, yo, p2tog, k13, SLO, yo, p2tog 30. yo, p2tog, k13, yo, p2tog, k3, p17, yo, p2tog, k3 Continue increasing in this manner. When you have ten new stockinette stitches in the body, make the last two a left twist stitch, then when increased to 12, make the last four stitches left twist and right twist stitches. The design is intended to look rope-like along the width of the shawlwhendone. When you have used between 25-30% of your yarn, move on to the next section.
Written Instructions (Interim Section):
1. k3, yo, p2tog, k9, twl, twr, k11, yo, p2tog, k3, yo, k10, yo, p2tog 2. yo, p2tog, k14, yo, p2tog, k3, p21, yo, p2tog, k3 3. k3, yo, p2tog, k9, twl, twr, k11, yo, p2tog, k3, yo, k1, yo, k10, yo, p2tog, 4. yo, p2tog, k16, yo, p2tog, k3, p21, yo, p2tog, k3 5. k3, yo, p2tog, k9, twl, twr, k11, yo, p2tog, k3, yo, k1, yo, k1, yo, k1, yo, k10, yo, p2tog 6. yo, p2tog, k20, yo, p2tog, k3, p21, yo, p2tog, k3 7. k3, yo, p2tog, k9, twl, twr, k11, yo, p2tog, k6, yo, k1, yo, k13, yo, p2tog 8. yo, p2tog, k22, yo, p2tog, k3, p21, yo, p2tog, k3 9. k3, yo, p2tog, k9, twl, twr, k11, yo, p2tog, k13, SLO, yo, p2tog 10. yo, p2tog, k13, yo, p2tog, k3, p21, yo, p2tog, k3 Repeat these rows until you have used another 25-30% of your yarn. Then begin the decrease section.
Written Instructions (Decrease Section):
In this section, you decrease down to 1 stitch in the body (center) section, then bind off all remaining stitches. Decrease happens on the right side before starting the k3 part of the edging. 1. k3, yo, p2tog, \*k8, twl, twr\* (repeat as many times as you increased to create the “rope" k7, k2tog, k3, yo, p2tog, k3, yo, k10, yo, p2tog 2. yo, p2tog, k14, yo, p2tog, k3, p19, yo, p2tog, k3 3. k3, yo, p2tog, \*k8, twl, twr\*, k6, p2tog, k3, yo, p2tog, k3, yo, k1, yo, k10, yo, p2tog 4. yo, p2tog, k16, yo, p2tog, k3, p18, yo, p2tog, k3 5. k3, yo, p2tog, \*k8, twl, twr\*, k5, p2tog, k3, yo, p2tog, k3, yo, k1, yo, k1, yo, k1, yo, k10, yo, p2tog 6. yo, p2tog, k20, yo, p2tog, k3, p17, yo, p2tog, k3 7. k3, yo, p2tog, \*k8, twl, twr\*, k4, k2tog, k3, yo, p2tog, k6, yo, k1, yo, k13, yo, p2tog 8. yo, p2tog, k22, yo, p2tog, k3, p16, yo, p2tog, k3 9. k3, yo, p2tog, \*k8, twl, twr\*, k3, k2tog, k3, yo, p2tog, k13, SLO, yo, p2tog 10. yo, p2tog, k13, yo, p2tog, k3, p15, yo, p2tog, k3 Repeat these rows, decreasing the center body, until you only have 2 stitches left in the center section. Then knit two rows of garter stitch (one RS and one RS row), and bind off all remaining stitches. I bind off by doing: K1, K1, slip left needle into the front of both stitches on the right needle and knit together; knit the next stitch, slip left needle into the front of both stitches and knit together. Repeat until one stitch remains and tie off.
Finishing
When you've bound off your scarf, weave in any loose ends. Soak the scarf in cold/tepid water for about 15 minutes, squeeze gently to remove water, then wrap in a dry towel to remove excess water. (I usually step on the towel a few times to "wring" out more water.) locking surface and pin out the neck edge and each leaf on the bottom edge Enjoy!


