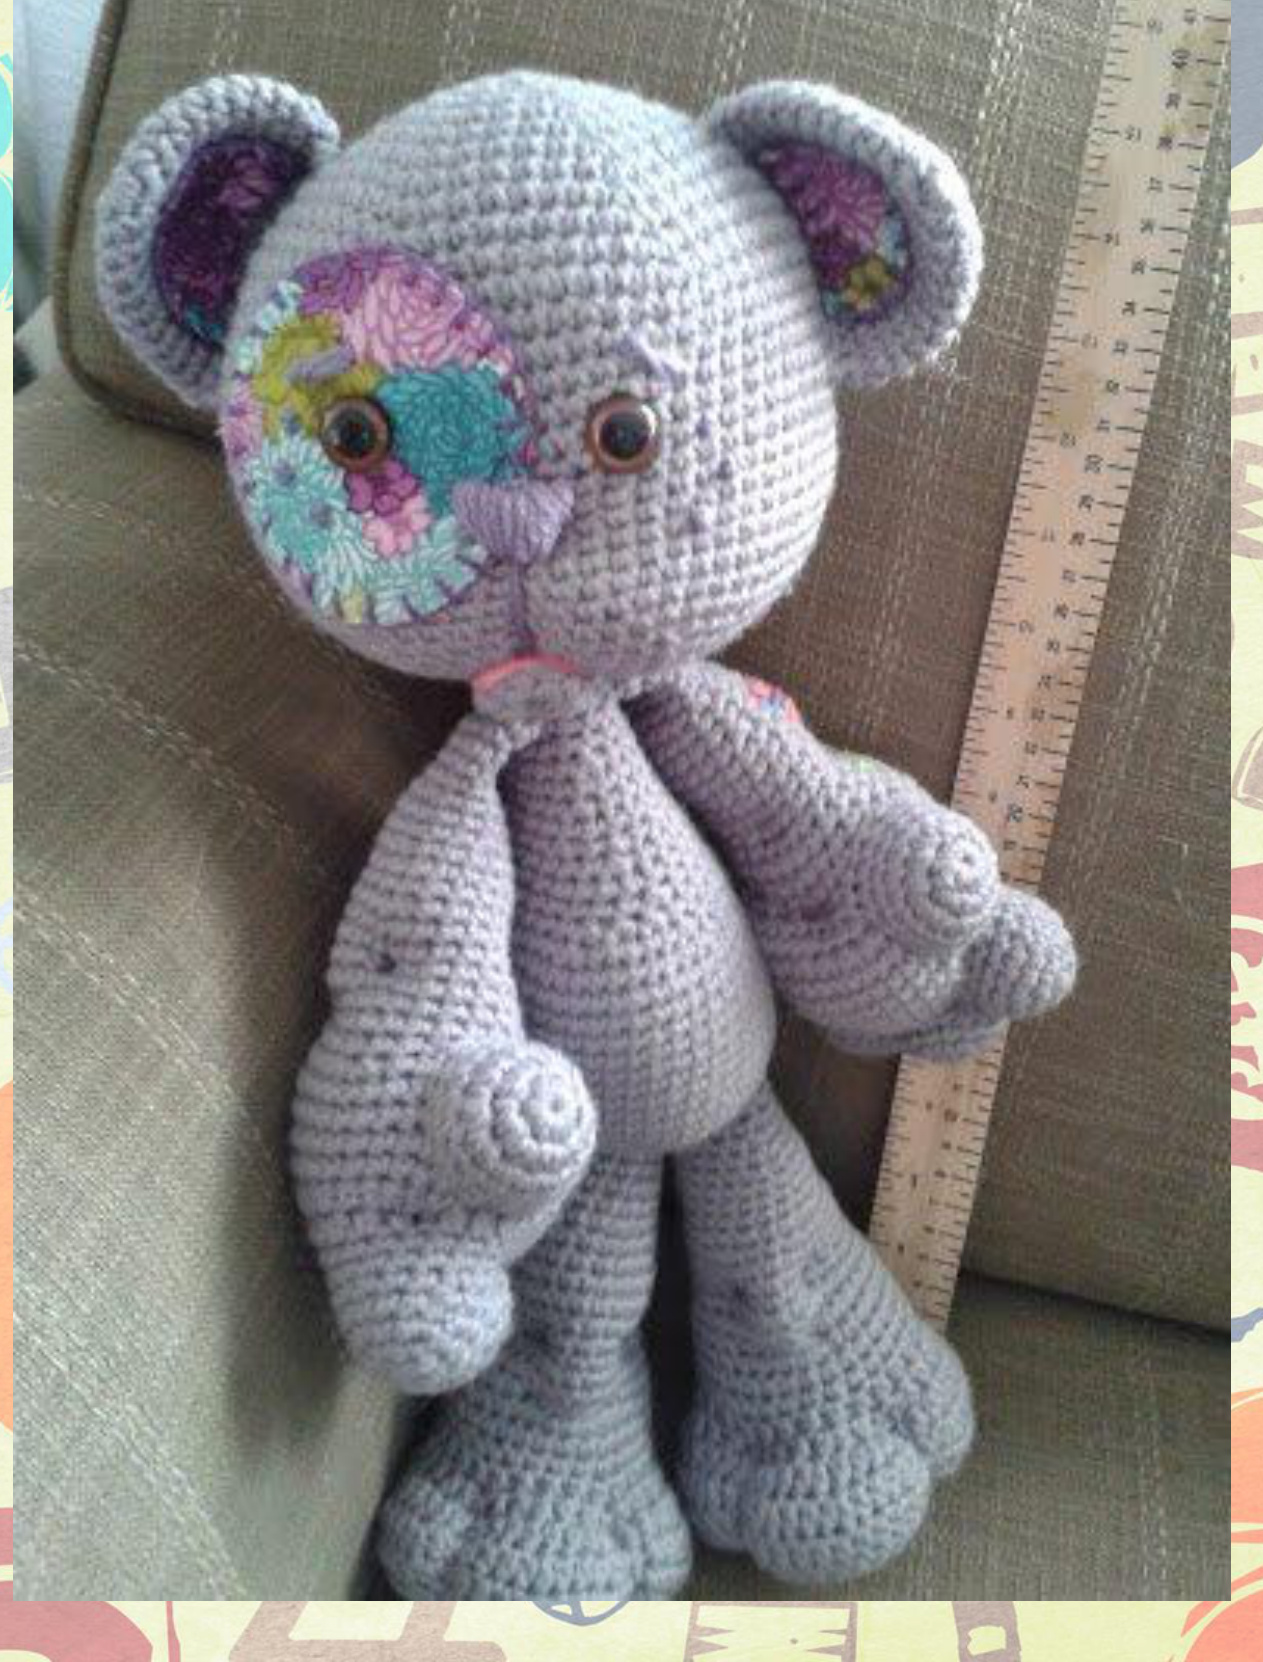
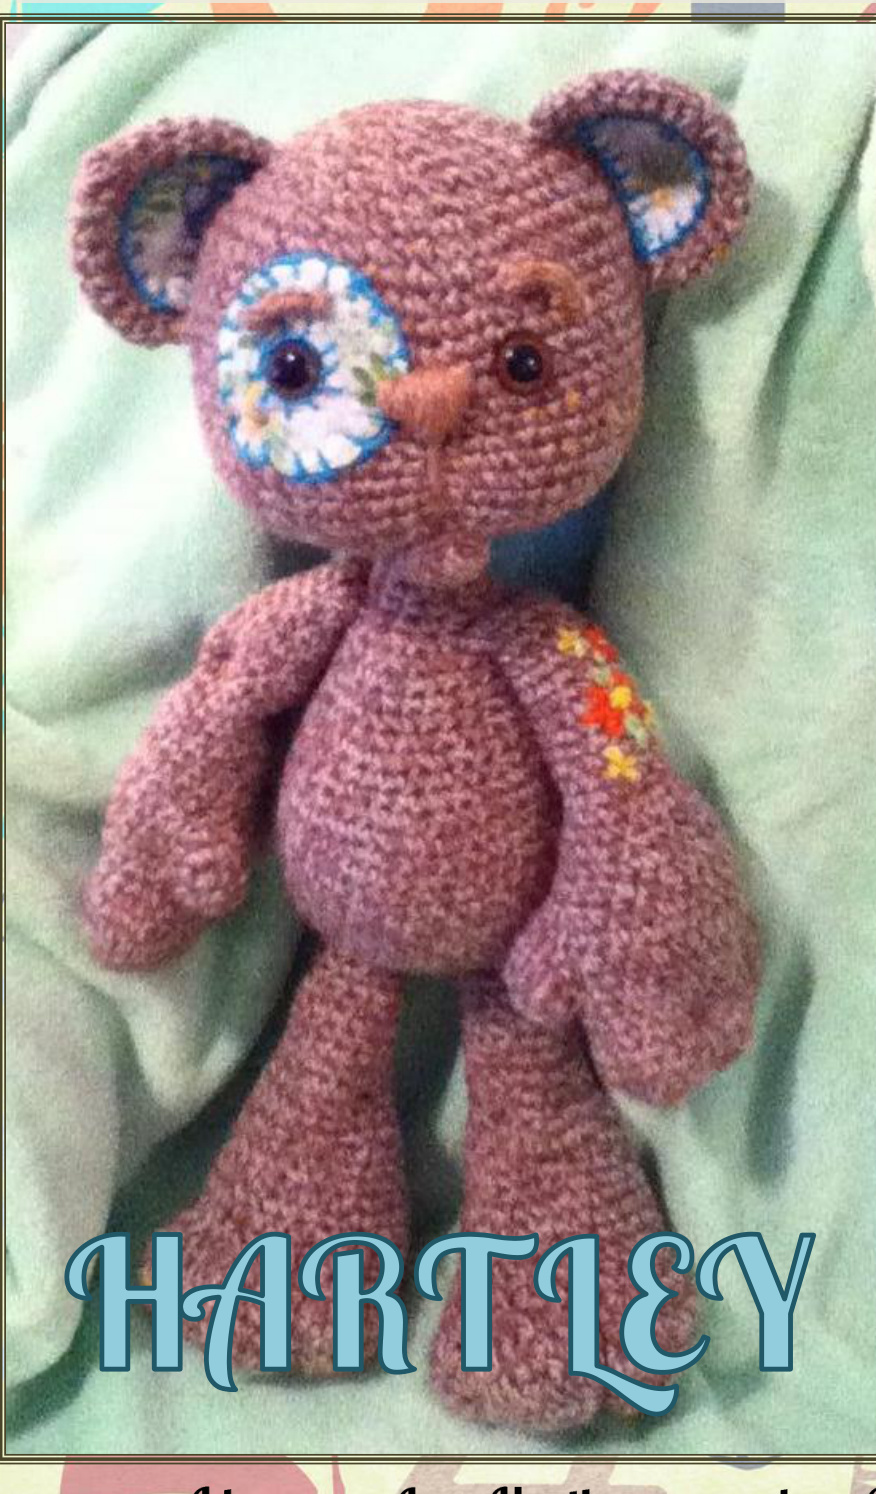
Hartley is named after my Papa Hartley. He started as a free form bear and I Love him. I received so many requests for him that I decided to write a pattern for my fellow "hookers." (Sorry - spell check does not offer a plural form of “people who crochet'") Now others can whip up a Hartley of their very own. His finished height is about 15"' tall..so he's taller than the average bear (just like my Papa who was 6'6" (and the tallest man in the Canadian Army during Wwil). I tried to include as many pictures and detailed explanations as possible, so this pattern is quite lengthy. The order of the pattern is a little random because Hartley can be stitched in any order you chose. If you have any questions or comments, please let me know. Thanks again for choosing Hartley.
Supplies:
Worsted weight yarn (l used a giant ball of red heart yarn - the one that is the size of a watermelon - Hartley took about half of it. 16mm (ish) safety eyes (2) Fabric scraps (for patches) Fine gauge yarn (for embroidery & stitching patches A 2nd color of yarn for nose and eyebrows. 4.mm hook (but you can use whatever you prefer) The guage and weight of the yarn should be enough hat when stitched tightly, Hartley will hold his shape and stitches do not have gaps that reveal stuffing. A sharp point tapestry needle (for stitching around patches. A blunt tapestry needle (for stitching features)
Stitches/Abbreviations:
SC (single crochet) SC2tog (single crochet 2 together) 2SC (2 single crochet stitches in 1 stitch. SCx2 (Single crochet in each of the next two stiches. Eg: SCx8 - SC in each of the next 8 stitches) HDC (half double crochet)
H&AD (make 1 hehe)
1. Start with a Magic ring of 6 SC's (6) 2. 2SC in each stitch around (12) 3. SC in 1st stitch, 2SC in next. Repeat around. (18) 4. SC in 1st 2 stitches, 2SC in next. Repeat around (24) 5. SC in 1st 3 stitches, 2SC in next. Repeat around (30) 6. SC in 1st 4 stitches, 2SC in next. Repeat around (36) 7. SC in 1st 5 stitches, 2SC in next. Repeat around (42) 8. SC in 1st 6 stitches, 2SC in next. Repeat around (48) 9. SC in 1st 7 stitches, 2SC in next. Repeat around (54) 10. SC in 1st 8 stitches, 2SC in next. Repeat around (60) 11. SC in 1st 9 stitches, 2SC in next. Repeat around (66) 12. To 25. SC Around 26. SC2tog, SC x 8 - Repeat around (60) 27. SC2tog, SC x 7 - Repeat around (54) 28. SC2tog, SC x 6 - Repeat around (48) 29. SC2tog, SC x 5 - Repeat around (42) 30. SC2tog, SC x 4 - Repeat around (36) 31. SC2tog, SC x 3 - Repeat around (30) 32. SC2tog, SC x2 - Repeat around (24) 33. SC2tog, SC - Repeat around (18) Stuff the head - attach eyes and patch. (see instructions on need to un-stuff the head, though, to put the back on the eye 34. SC2tog - Repeat around (12) 35. SC2tog - repeat around (6) Stitch the bottom shut and attach to body...
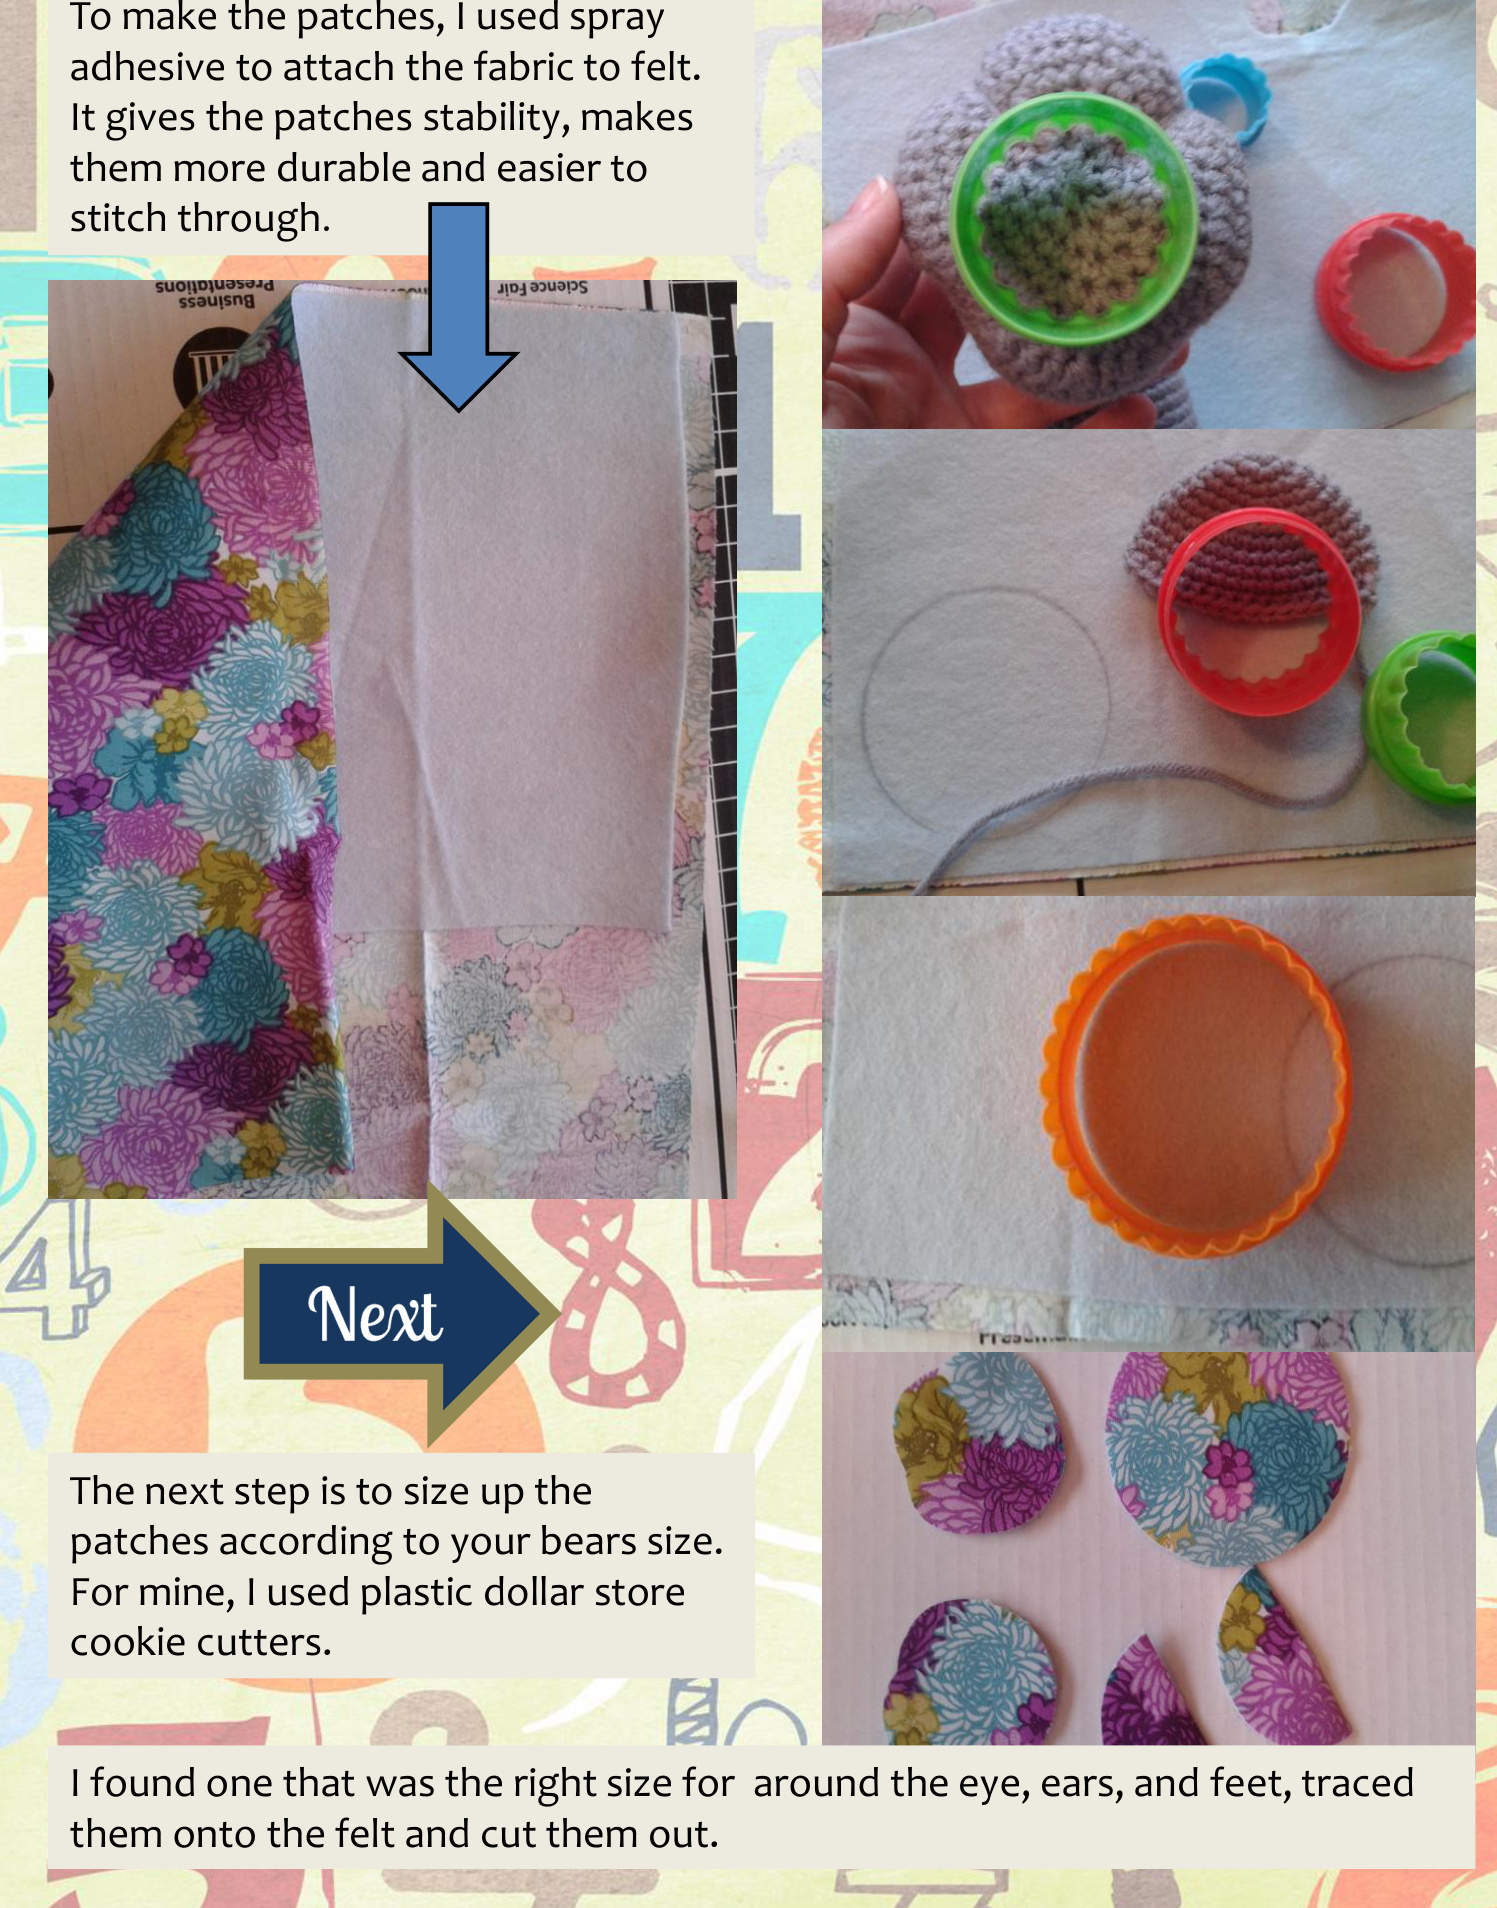
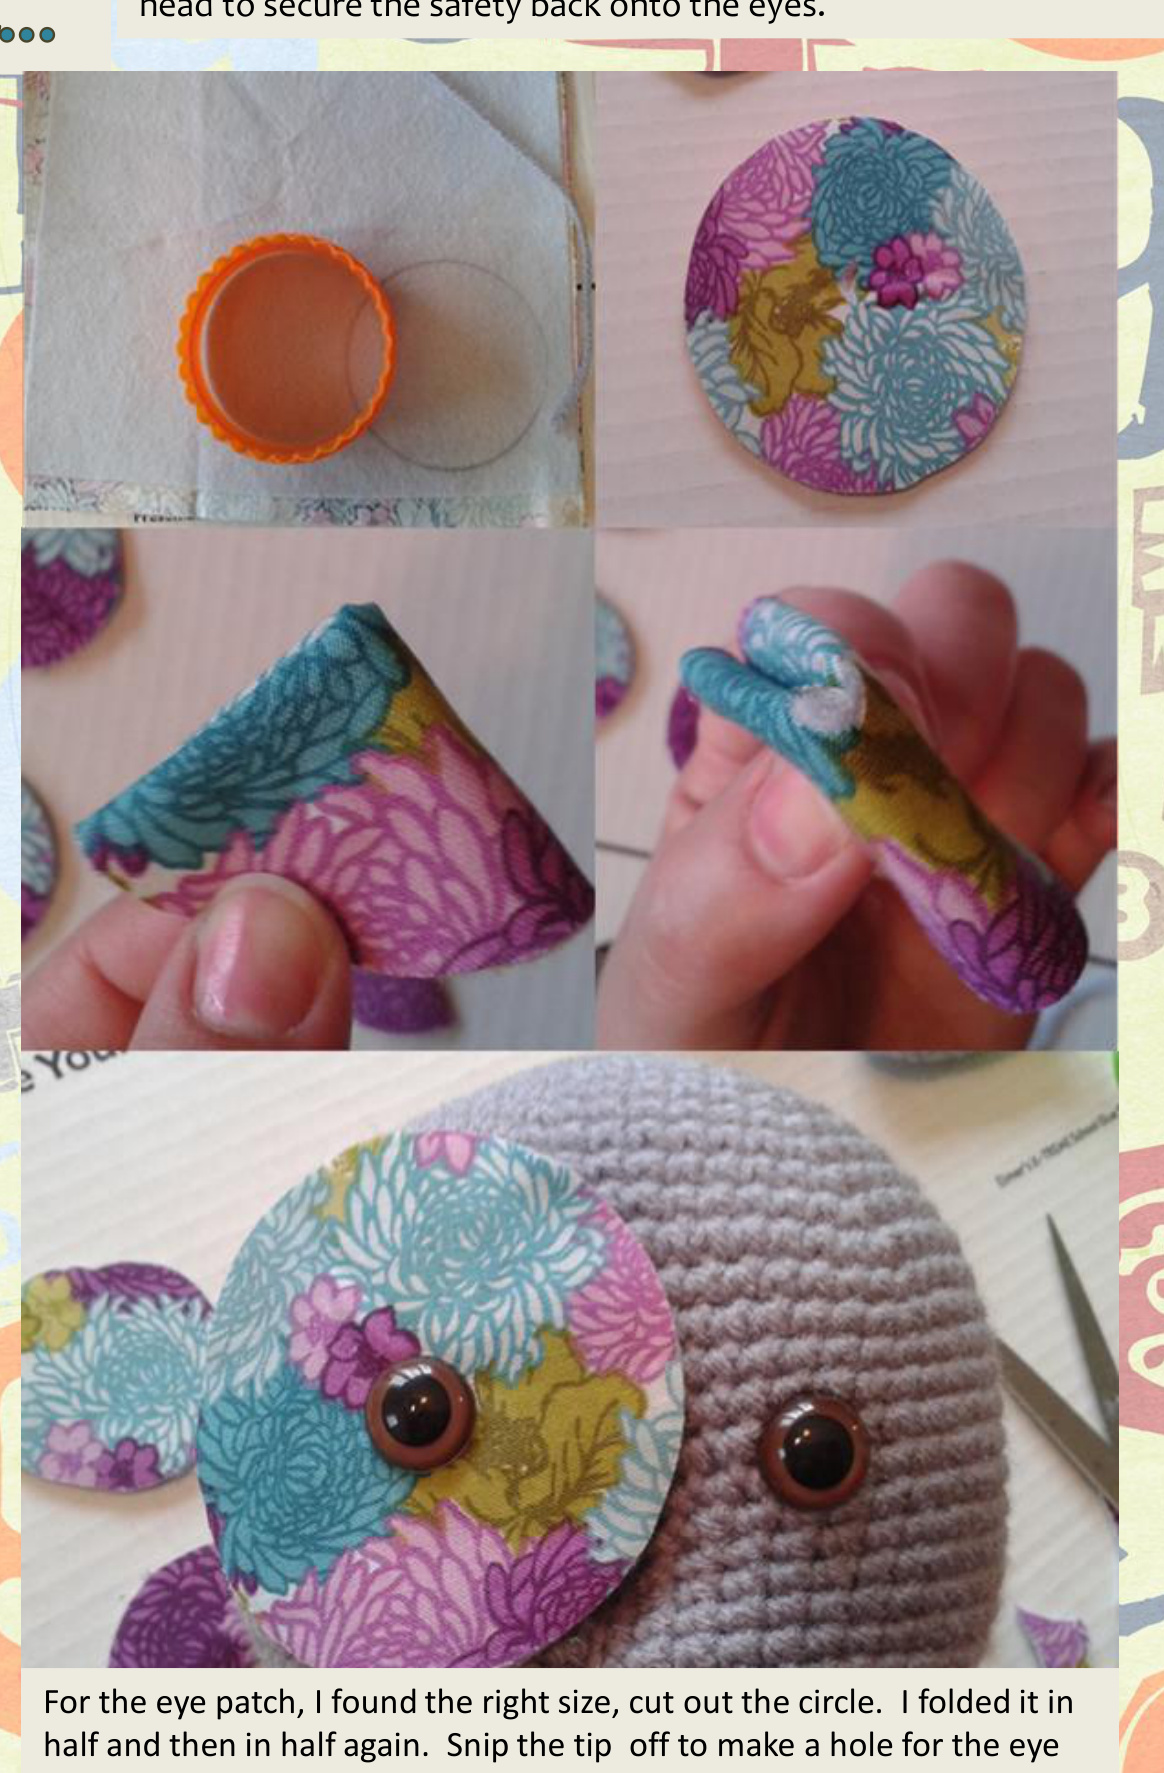
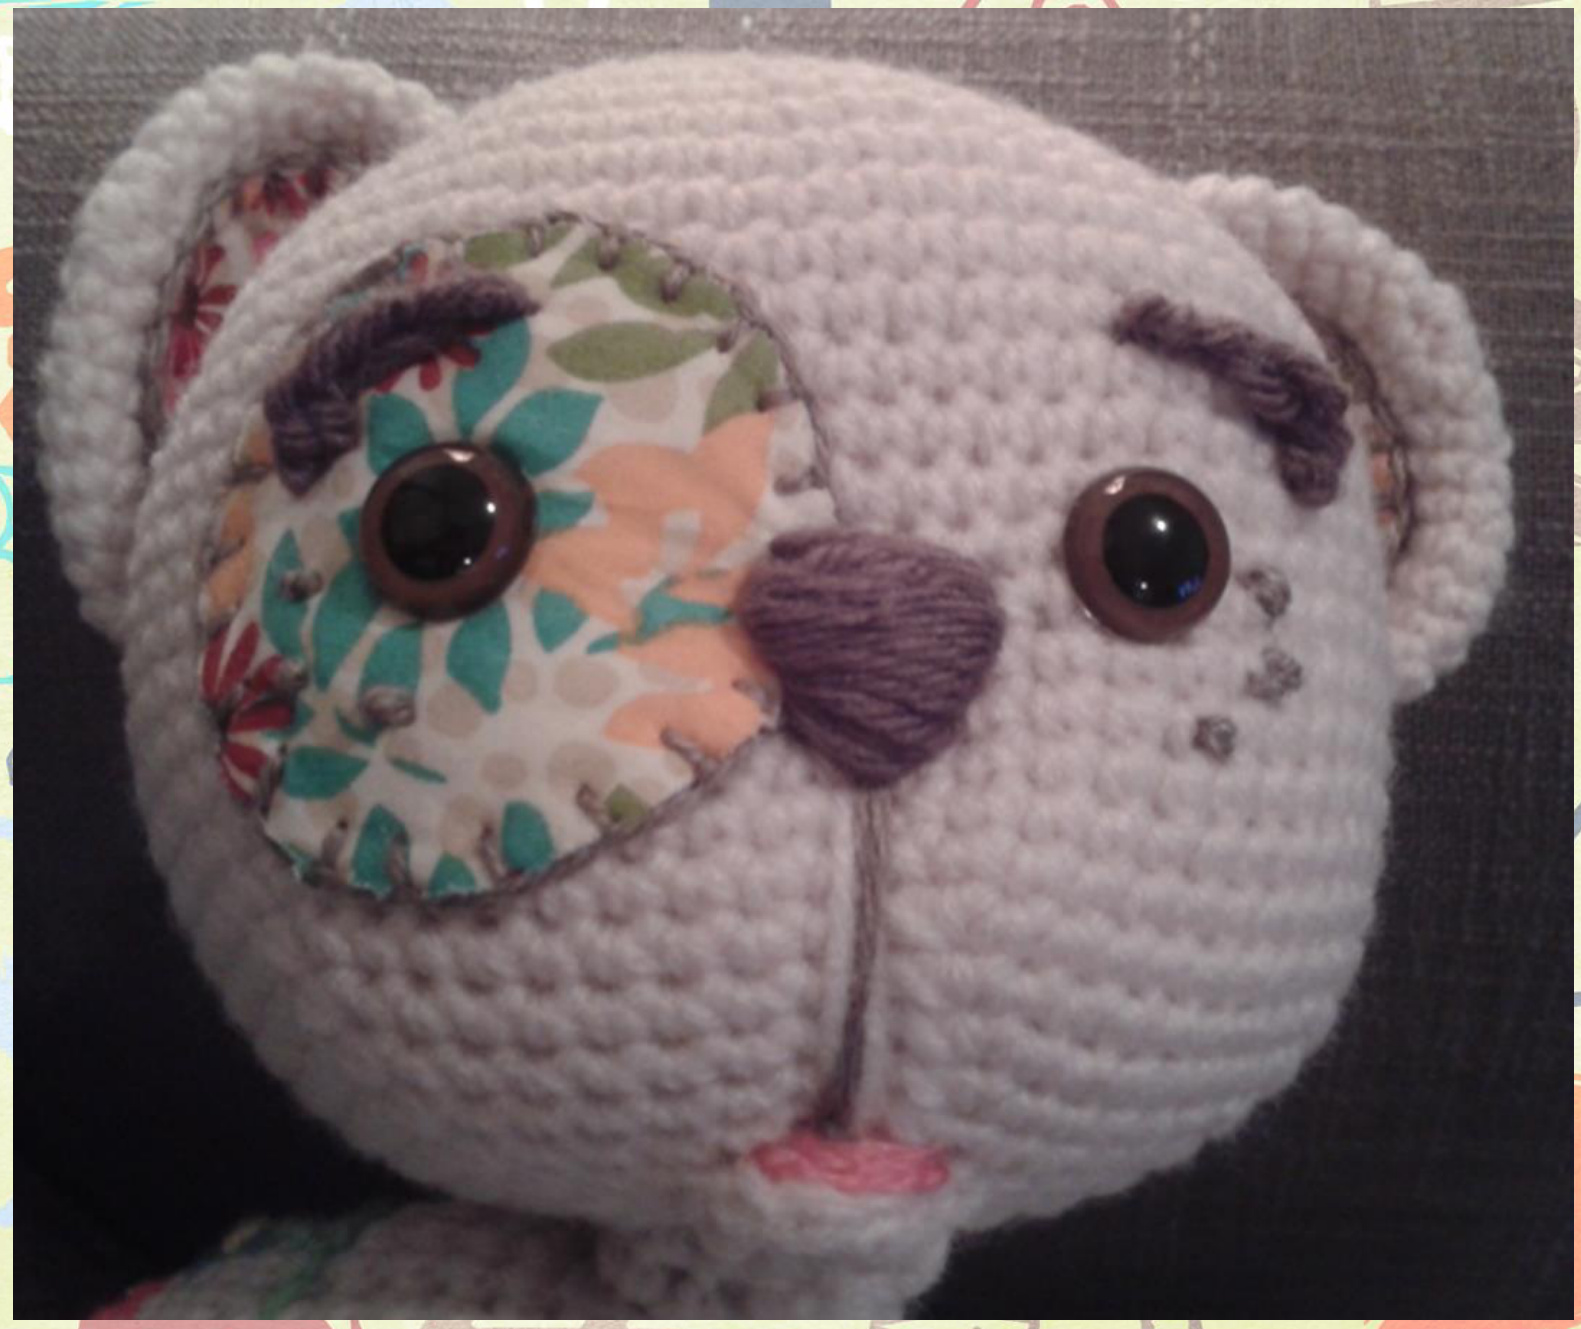
Sye patch... To figure out the patch size and eye placement, stuff the head at row 33. You can push the eyes through the patch, into the head, then un-stuff the post to poke through. Poke the eye through the hole and then push it into the head in the right spot. I put my eyes about 15 rows down. Once the eyes are fastened in place, stuff the head and stitch it closed.
Sars (make 2)
1. Start with a magic ring with 6SC's 2. 2SC in each stitch around 3 SC in 1st stitch, 2SC in next stitch - repeat around (18) 4. SC in ist two stitches, 2SC in 3rd stitch - repeat around (24) 5. SC in 1st three stitches, 2SC in 4th stitch - repeat around (30) 6. 2SC in 1st stitch, SC in next 9 stitches - repeat around (33) 7. To 12. SC around.
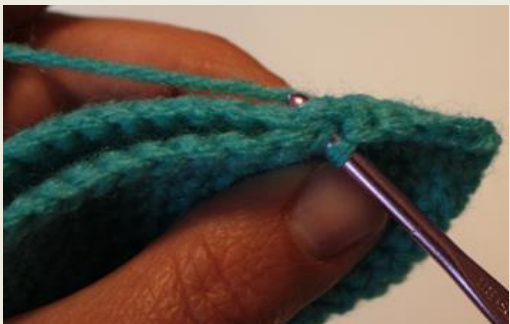
Slip stitch and chain 1. Fold the ear in half and SC across, stitching through both layers of the ear. (see pic) Slip stitch to tie off the end and leave a long tail for sewing on to the head. (note: You will need to sew the patches on before sewing it to the head)
Car patches...
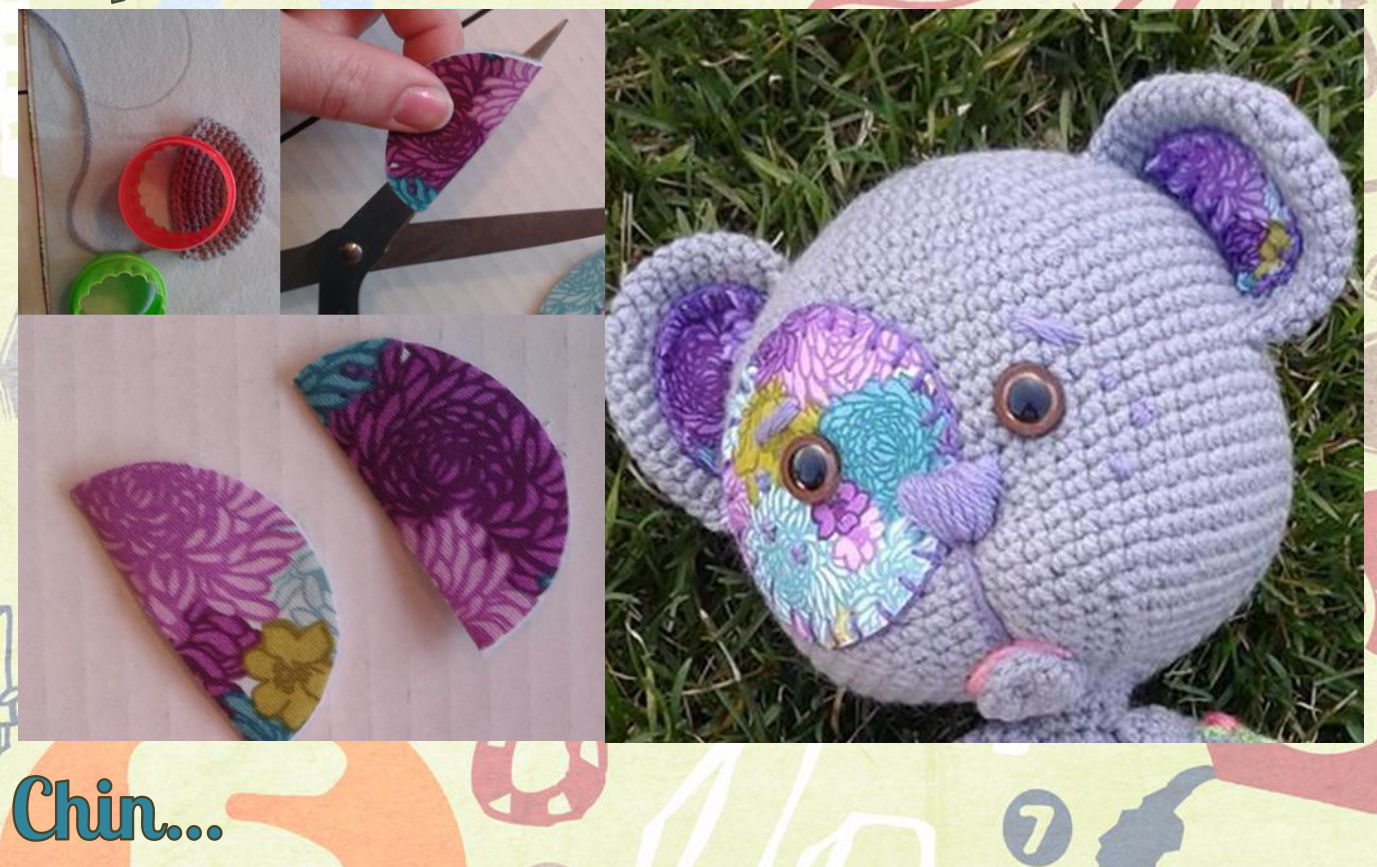
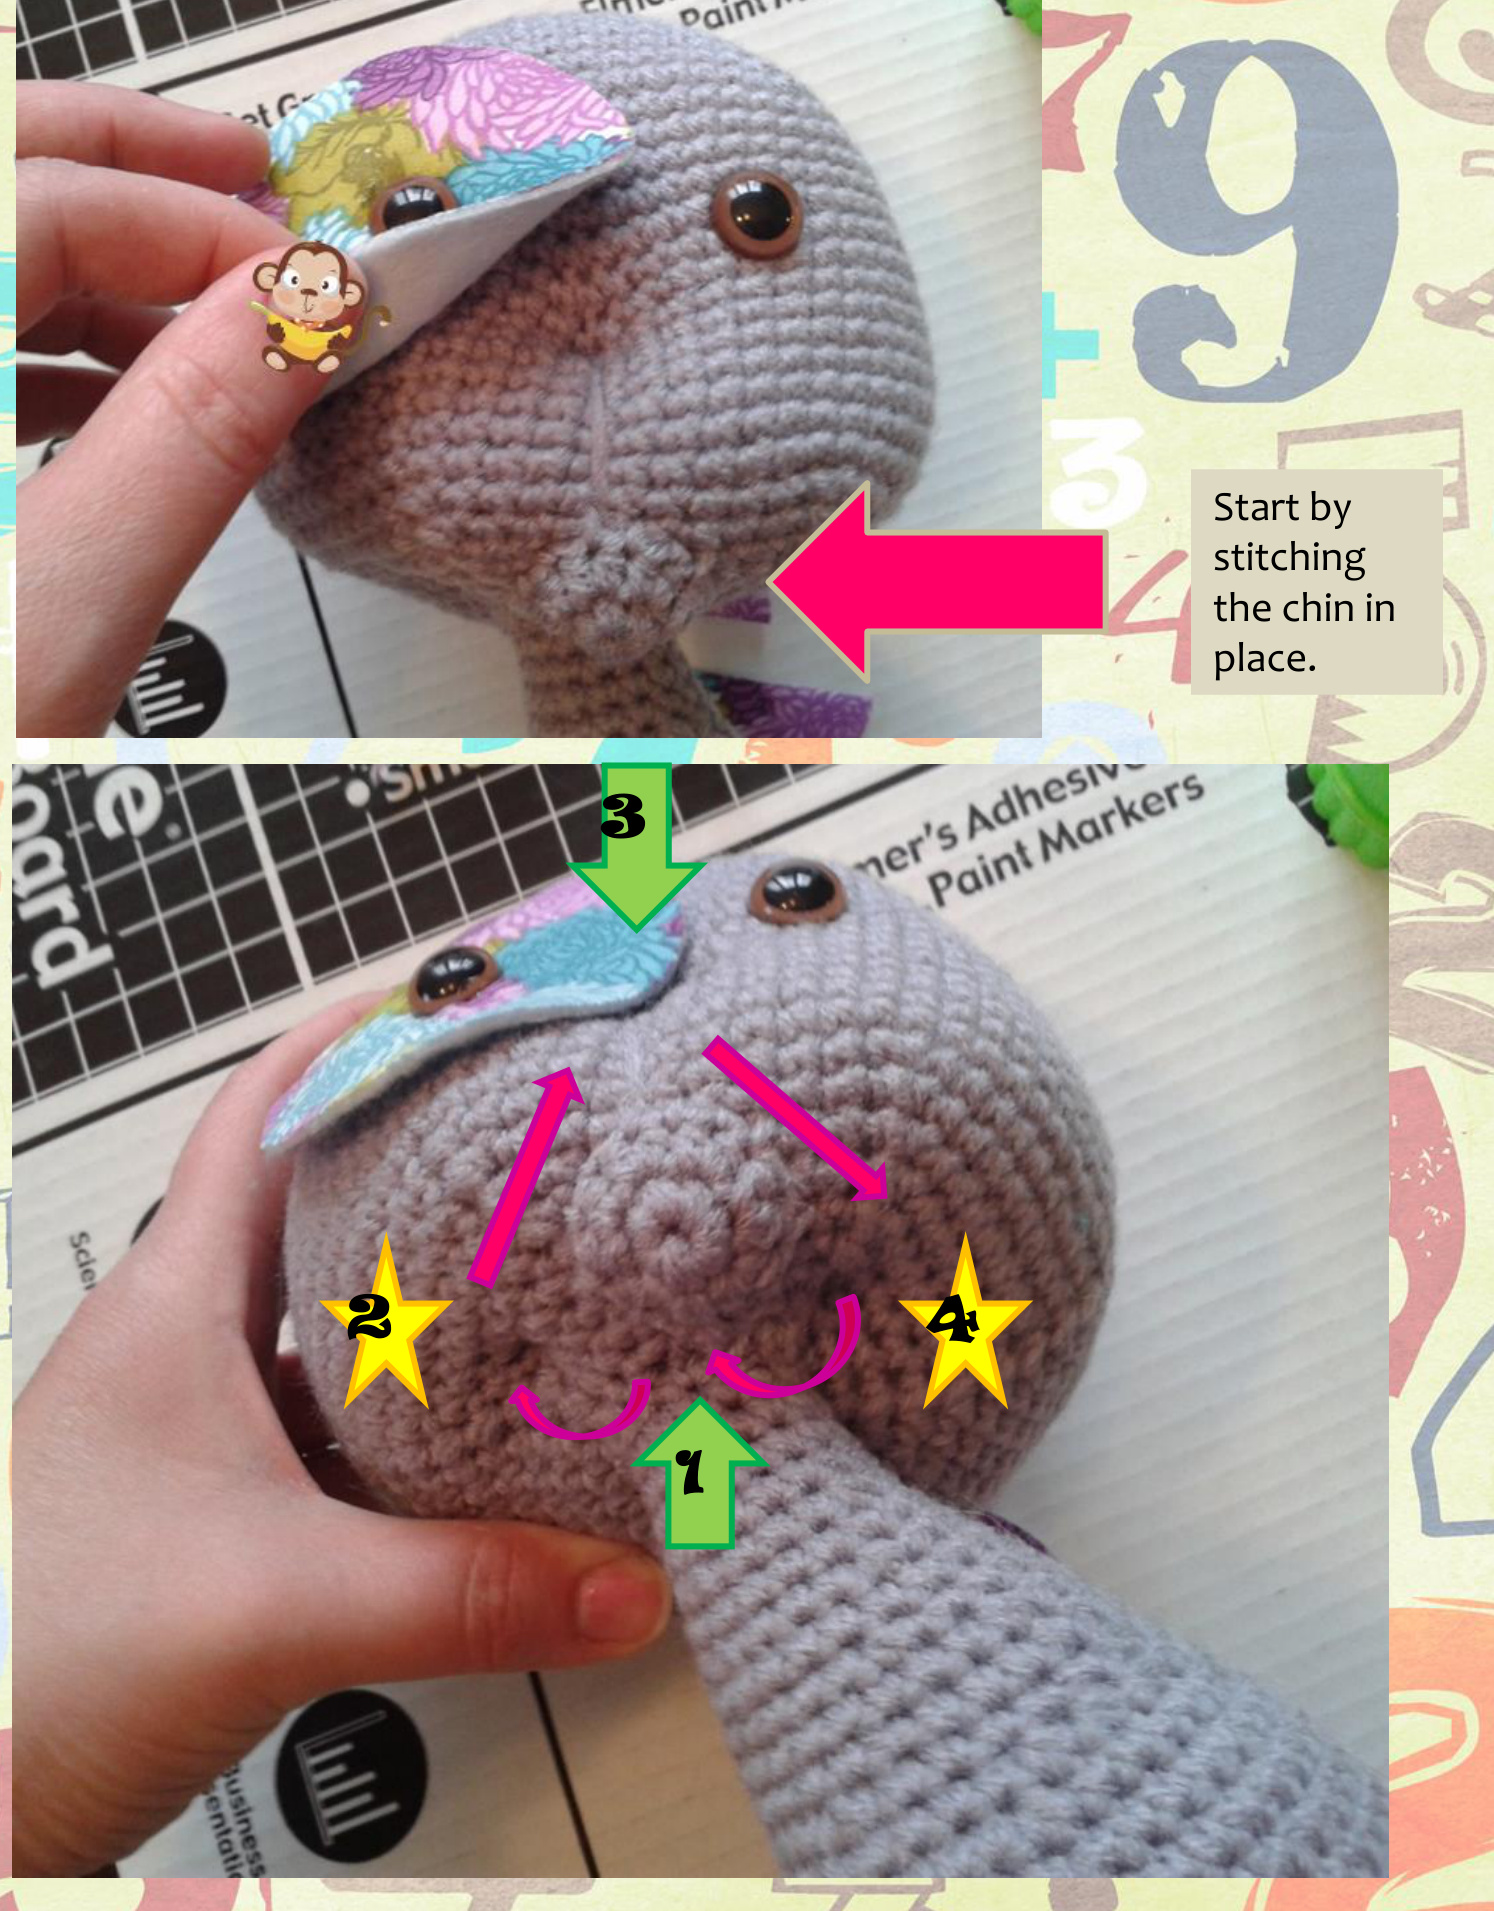
7. Start with a magic ring with 6SC 2. 2SC in each stitch around 3. SC in first stitch, 2SC in next - repeat around (18) Slip stitch to tie off. See the instructions for the face for a picture of sewing the chin on. Stitch a strand of pink for his bottom lip.
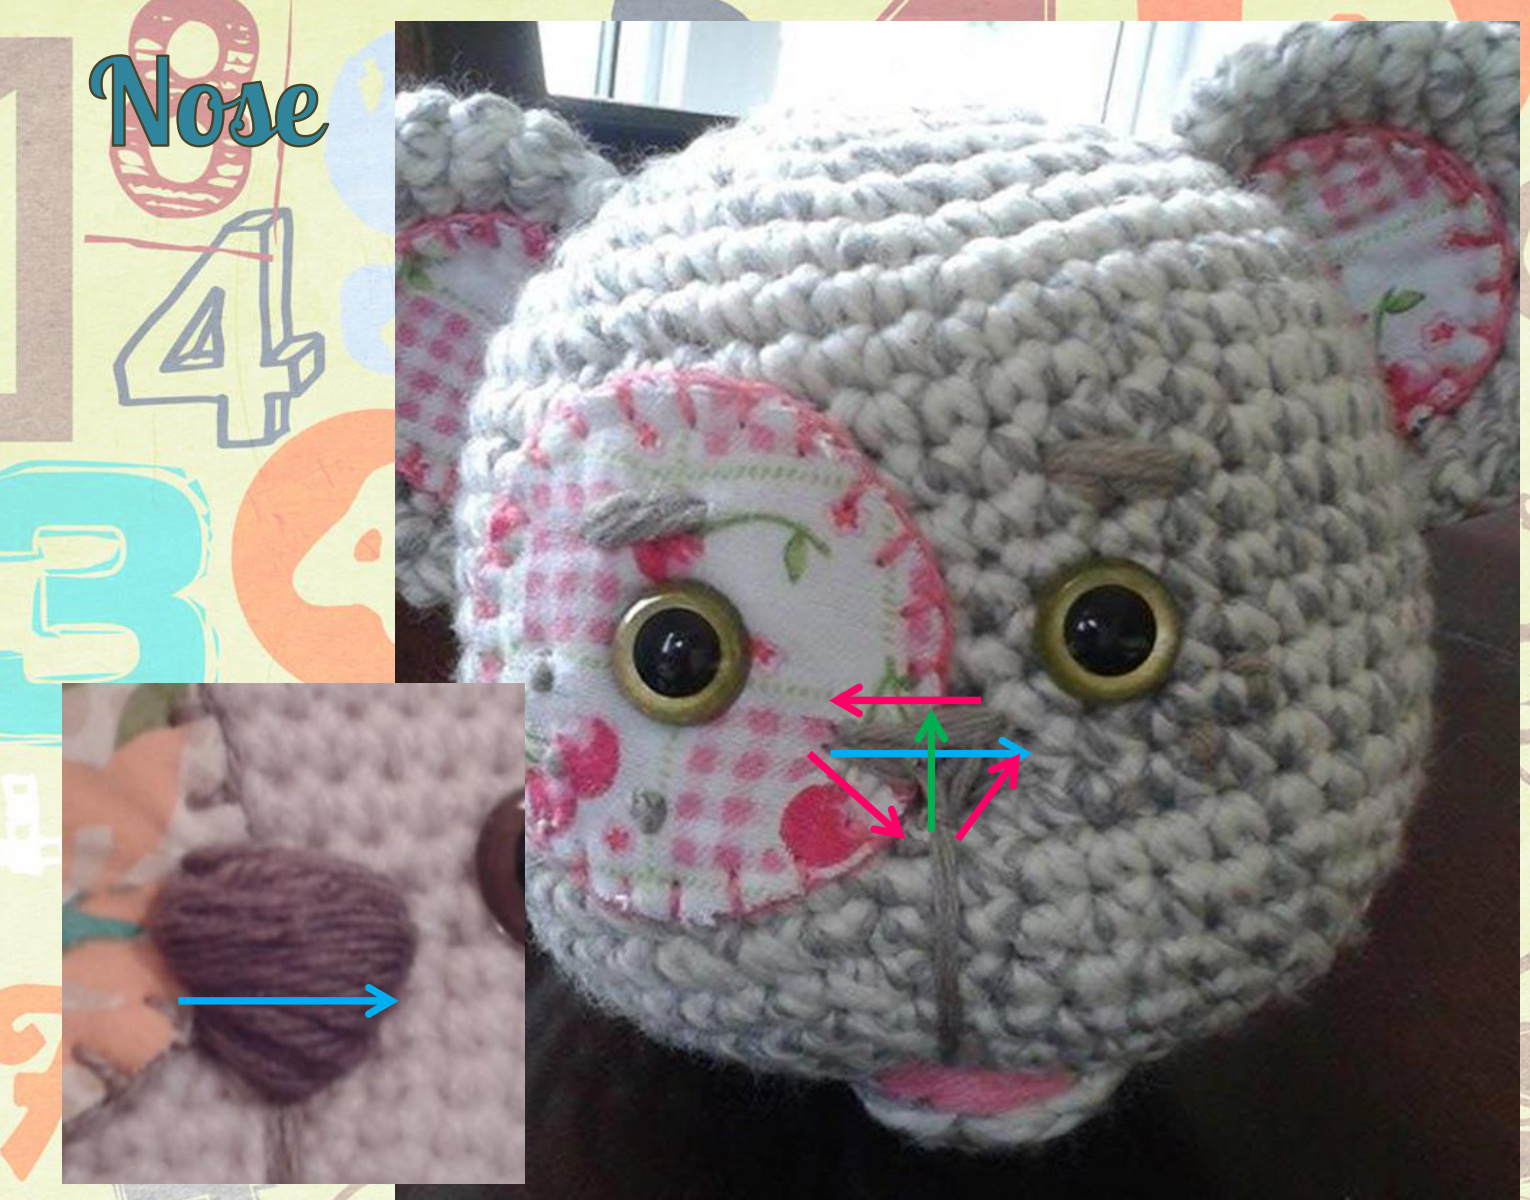
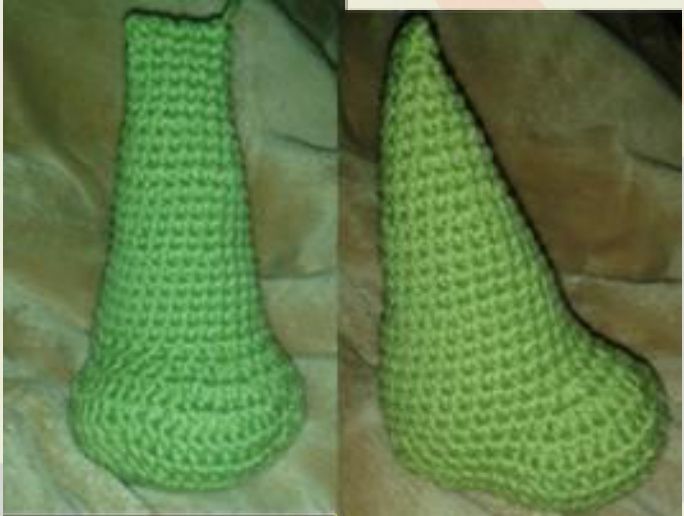
Start by stitching a triangle outline in the shape of the nose. (pink arrows). Note that 1 corner of the nose will overlap the patch so you will have to stitch through it. Next, you will stich in horizontal rows to fill in the triangle. Last - (green arrow) stitch vertical lines to finish. Be sure to catch the edge of stitches as you go to anchor your stitching into the bear.
yebrows and Freckles
The eyebrows are a chain of 6. Leave a long tail at each end. Stitch the beginning strand into the eyebrows to bury it. Use the long tail at the end, to sew them onto the face wherever you chose. An alternative for eyebrows are to make simple line stitches instead. I like the bushy ones, though. For the freckles, I tied knots. And the pink for the mouth is a simple whip stitch.
BODY
Start with a magic ring of 6SC 2. 2SC in each stitch around (12) 3 SC in 1st stitch, 2SC in next - repeat around. (18) 4 SC in first 2 stitches, 2SC in next - repeat around (24) 5 SC in first 3 stitches, 2SC in next - repeat around (30) 6. SC in first 4 stitches, 2SC in next - repeat around (36) 7. SC in first 5 stitches, 2SC in next - repeat around (42) \*Note: From this point forward, the rows will not necessarily start and/or end of the first stitch of the row. Complete each row with the stitches indicated. 14. SC2tog, SC x 38 15. SC2tog x 3, SC x 34 16. SC2togx2, SC x 34 17. SC2tog, SC x 33 18. 2SC x 3, SC x 10, SC2tog, SC x 8, SC2tog, SC x 10 19. SC x 17, SC2tog, SC x 4, SC2to0g, SC x14 (34) 20. SC x 8, SC2tog, SC x 4, SC2tog ×3, SC x 4, SC2tog, SC x8 (29) 21. SC x 5, SC2tog (4 times) SC x 2. 22. SC around. 23. SC x 10, SC2tog, SC x 12 24. SC x 8, SC2tog, SC x 3, SC2tog, SC x 9 SC around. (22) SC x 6, SC2tog, SC x 3, SC2tog, SC x 3,SC2tog, SC x 4 SC around. 28. SC x 4, SC2tog (3 times), SC x 4. 29. Sc around (16) 30. SC x 4, SC2tog, SC × 4, SC2tog, SC x 4 31. SC around (14) 32. SC around. Slip stitch and tie off. \*\*Stuff and shape the body.

(make 2)
22. 2HDC, HDC x2 (5 times), SC to end of row. (35) 23. 2HDC, HDC (x10) SC × 5, HDC × 5, SC ×5 (45) 24。 2HDC, HDC × 2 (3 times), SC2tOg, HDCx2, 2HDC, HDCX2, 2HDC, HDCX2, SC2tOg, 2HDC, HDCX2, 2HDC, HDCX2, 2HDC, HDCX2, SC x4, HDC x 7, SCx4. 25. HDC X10, SC2tog, HDC x10, SC2tog, HDC ×10, SC ×2, HDC2tog, HDCx2, HDC2tog, HDCx2, HDC2tog, SCx3. Slip stitch to tie off and leave a very long tail. Sew the bottom of the foot shut. Make sure you leave a very long tail... (See instructions on next page)
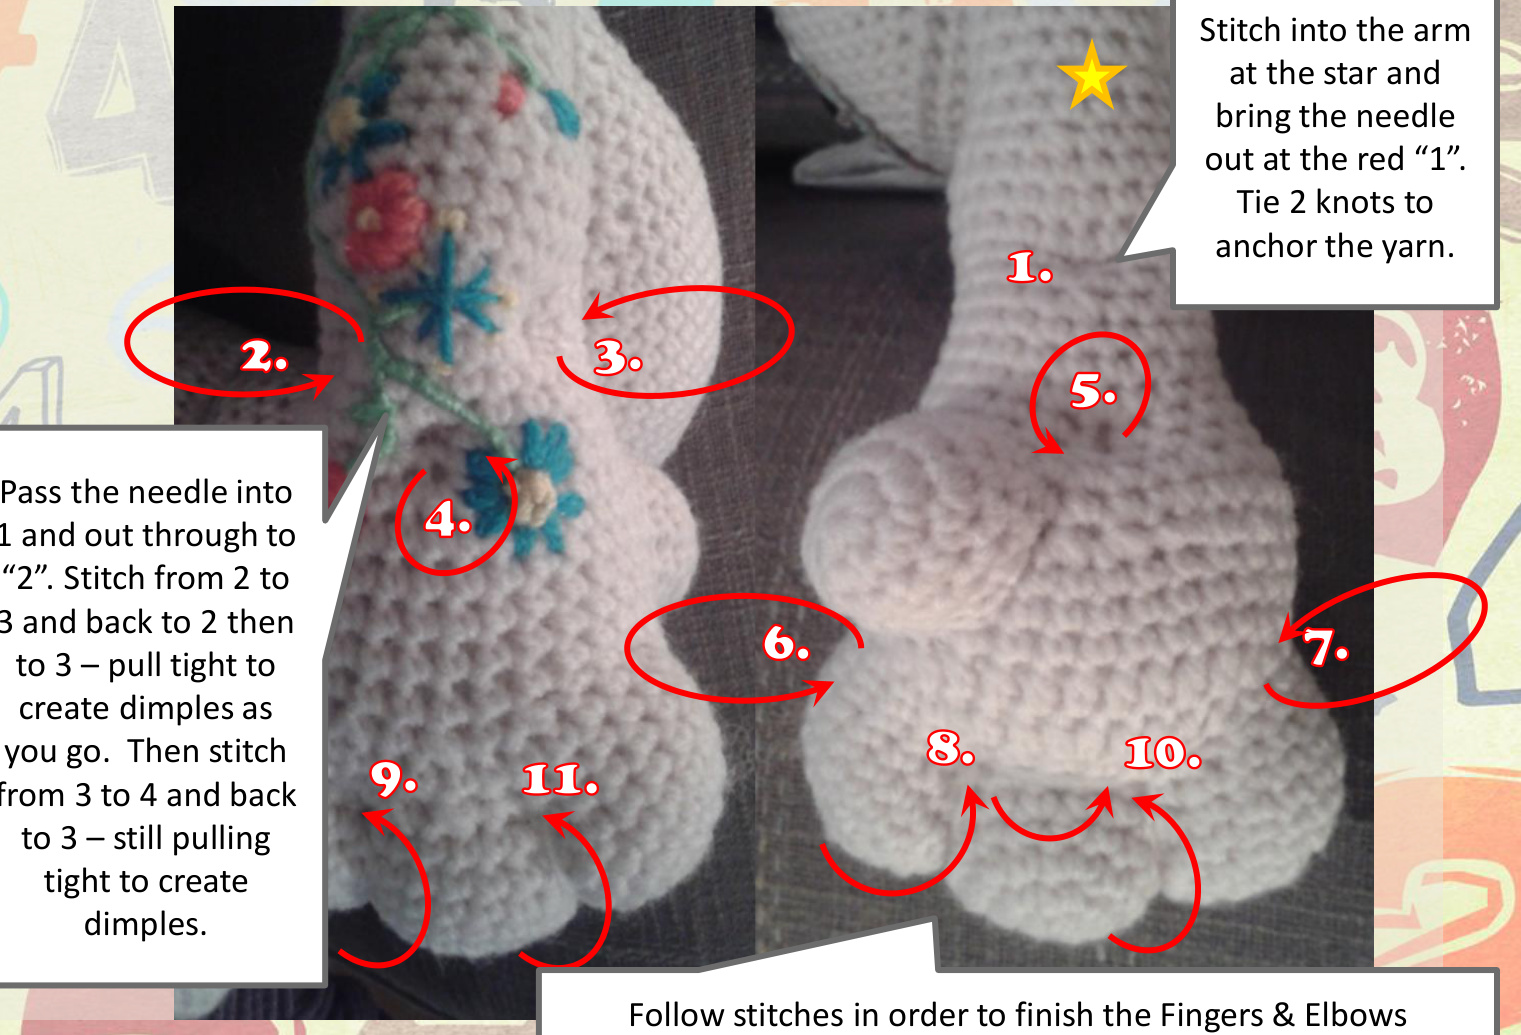
Stitching in the toes and knees...
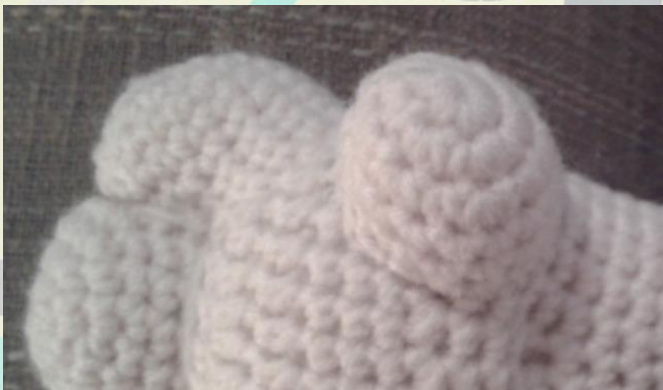
Once the bottom of the foot is sewn shut, leave a long tail to sew in toes. Stuff the leg to the shape of a foot with 3 toes (see pic). The toes will be stitched by using the long tail from stitching the bottom closed.
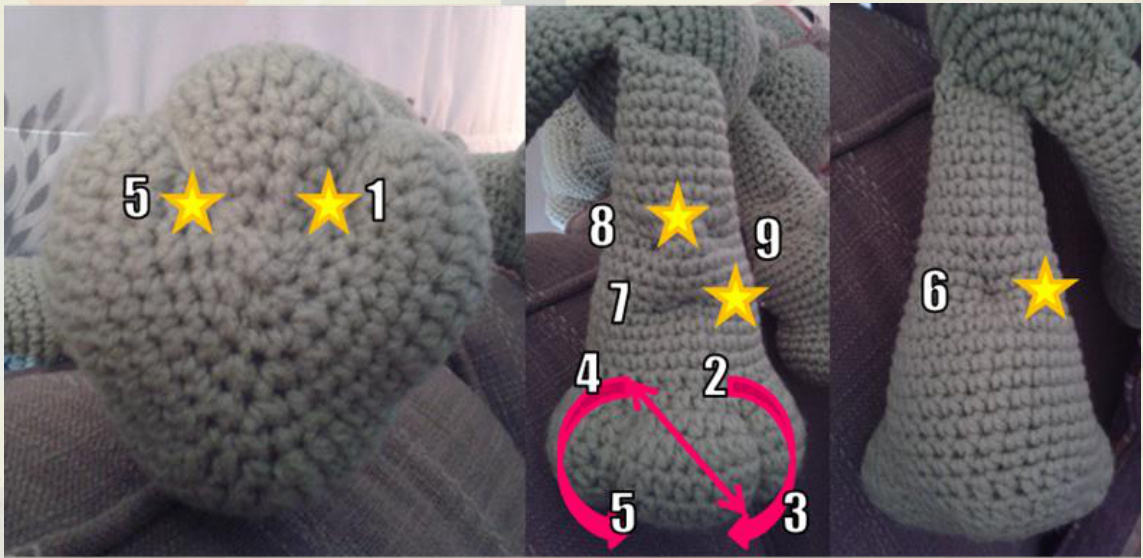
Use the long tail from stitching the bottom closed - Start on the bottom of the foot at #1 and stitch as follows; 1. Stitch up through #1, coming out at #2. 2. Wrap yarn around the front of the foot, (#3) and back into #1. (You'll want to squeeze the front of the foot together (compress it) so that it will make the toes obvious. Stitch that loop a 2nd time so that it holds its stitch. 3. Poke the needle from the bottom of the foot (at #1) up through the foot - crossing over to come out at #4. 4. Stitch from #4 to #5 twice (again - compressing the foot and stitching around twice to make sure the stitch stays in place. 5. When you come out at #5 the 2nd time - tie a knot to make sure everything stays in place. 6. Pass the needle up through the foot again - from #5, up through the back of the leg - coming out at #6. Tie another knot - to hold the back of the knee in place - but also to make sure it doesn't pull up on the bottom of the foot from the previous knot. 7. Pass the needle through the back of the leg - coming out in front at #7 which sits at row 20. Count over 5 stitches, then pass the needle back through the leg again - coming out at #6. 8. Next - pass the needle through the leg again at #6, coming out at #8. Count 2 rows up and pass the needle through the leg, coming out at #9. 9. Repeat for this side of the knee - passing the stitch back through to #8 to ensure that the knee is secure. 10. Tie a knot (keep it at the stitch), then bury your yarn and snip off the end.
Foot patche...
Size and place a fabric patch on the bottom of the foot. Use a blanket stitch to attach the patch to the bottom of the foot. Once the legs are stitched, shaped and the patches are sewn on - attach the legs to the bottom of the body.

The hands are a little bit “"friggy" so I've broken down the steps as far as I possibly can with a gazillion pics to follow along. I'll apologize in advance to those who are bored by my ramblings. @
HANDS
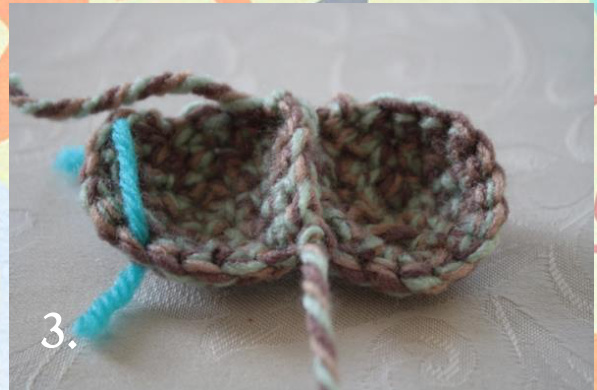
Fingertips - Make 6 (3 for each paw)
Row 1 - Make a magic ring with 6 stitches Row 2 - 2SC in each stitch around (12) Row 3 - SC in 1st stitch, 2SC in next stitch (repeat around) (18) Slip stitch to tie off. Keep going until you have finished all 6 - set them aside in groups of 3...like this!
Thumbs... (make 2)
Row 1: Make a magic ring with 6 SC Row 2: 2SC in each stitch around Row 3: 2SC in the first 6 stitches, sc in next 6 stitches Row 4 & 5: SC around Slip stitch and tie off, leaving a long tail for sewing later.
Keep things tidy...
I found it much easier to keep straight when I sewed in the ends of each fingertip before trying to assemble the hand. You'll have 2 tails off of each fingertip. The outer one (like in pic A) and the one from the center (Pic B) Sew in the ends to hide them so that they all look like Pic C.
lave stitched in all the ends, your 3 fingertips should look like this

Sorry...the picture of the tidy thumbs is missing. Finger tipa (hehe get it?? Tips about the finger tips! Haha)
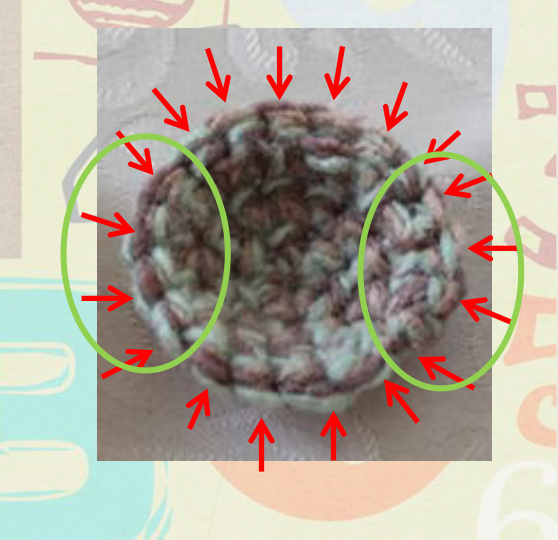
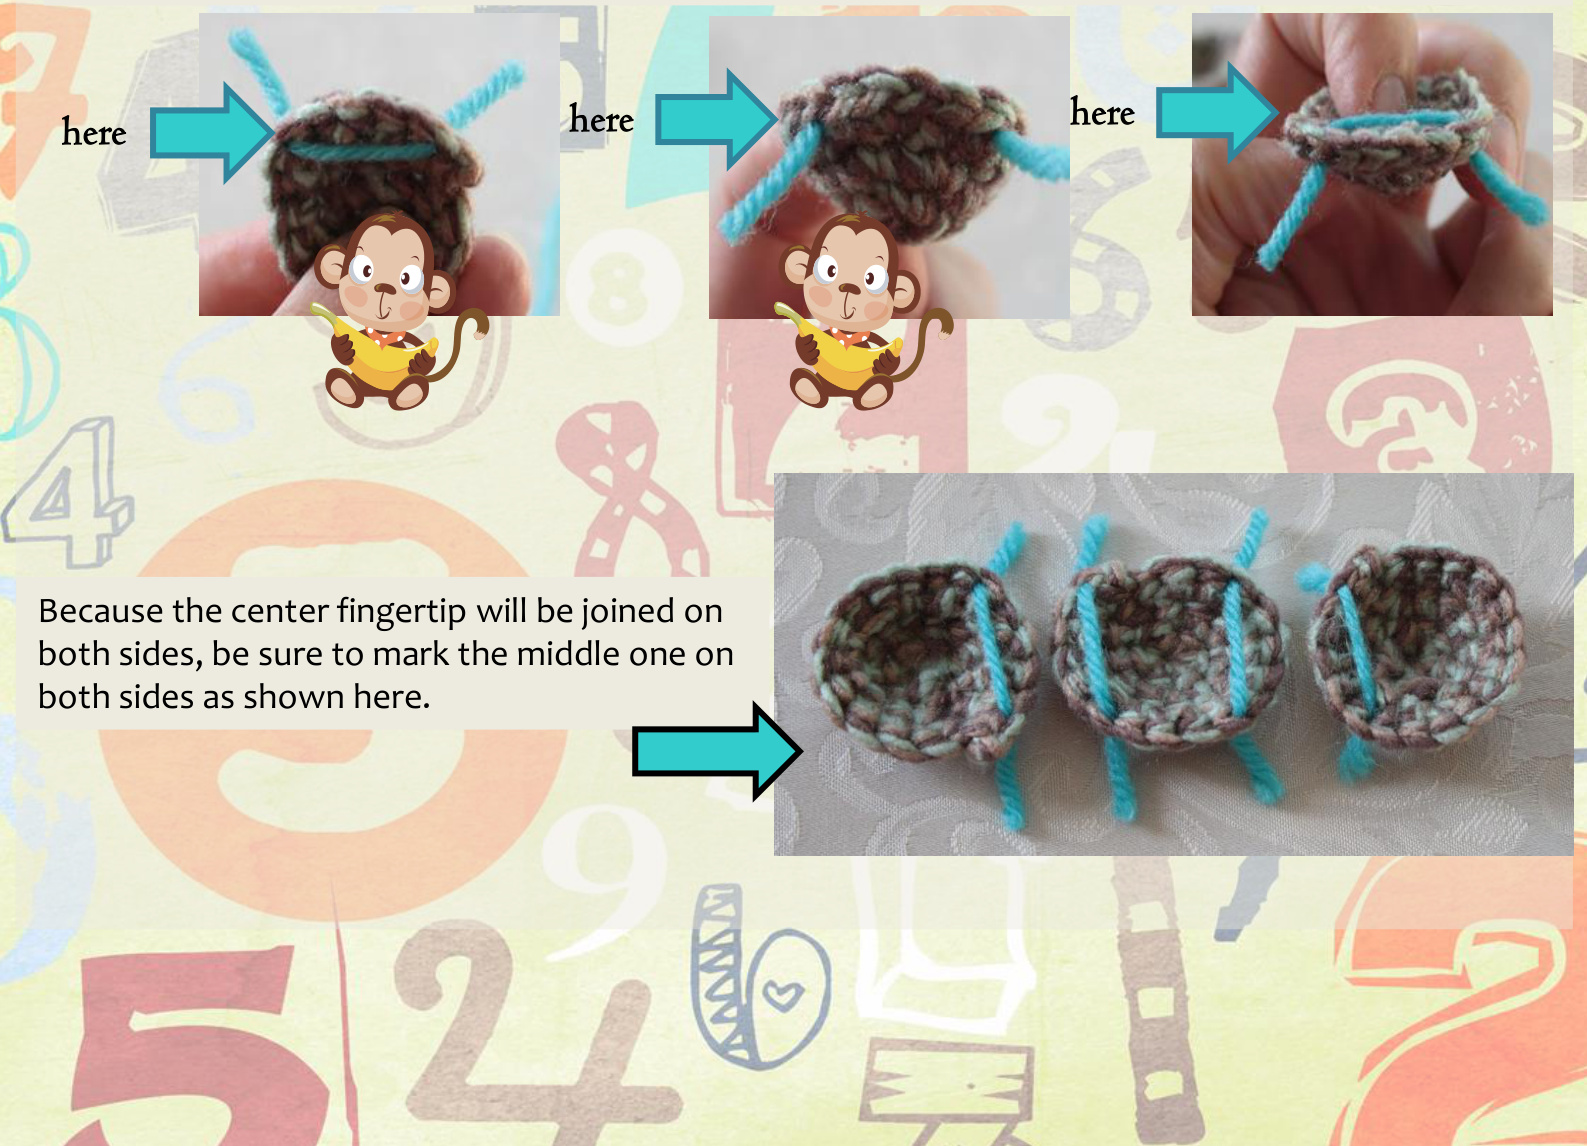
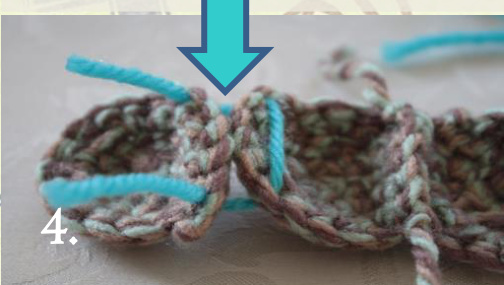
Each fingertip has 18 stitches around. It's very important to keep a close count as you stitch around in order to have it shape properly. When stitching them together, you will be stitching each finger by the 4 stitches circled in green. The middle fingertip will be stitched on both sides, while the outside fingertips will only be stitched on one side. To make sure you are joining the right stitches, start by marking them.
Marking fingertip...
Use a different color yarn to mark the stitches. Sew into the first and out through the 4th as shown in the pics... (\*note\* The pictures show the stitches marked at 1 and 6 - ignore that... mark them at 1 and 4)
Joining Fingertips...
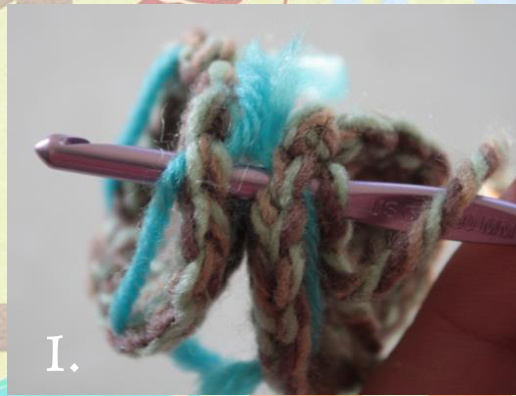
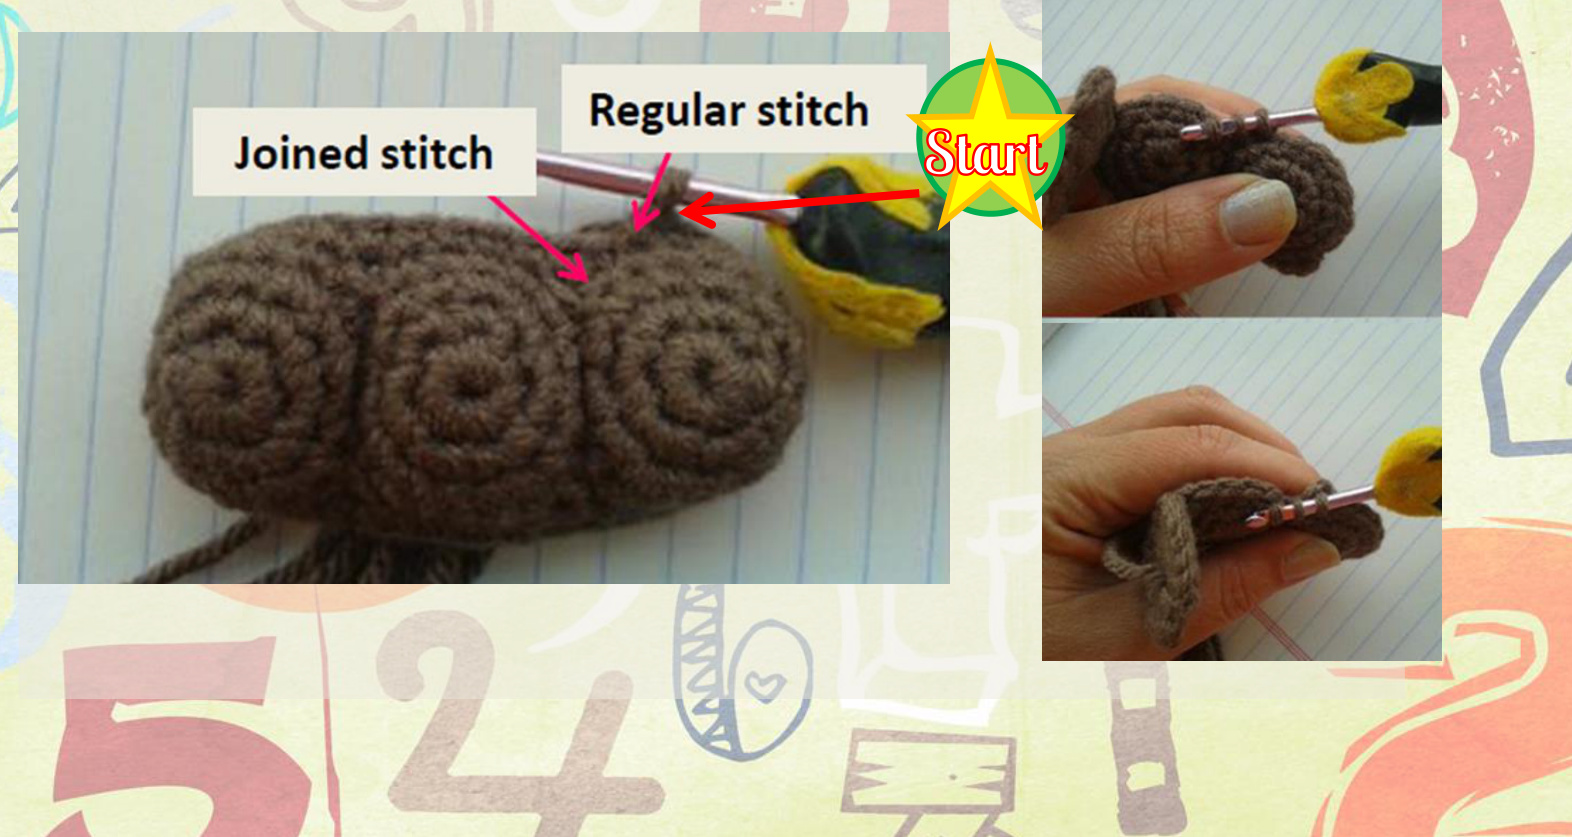
To join the fingertips, stitch (SC) through both fingertips at the same time, starting with the 1st of 6
Continue to SC through all 6 of the marked stitches and remove the piece of yarn used to mark that group of 6 stitches.
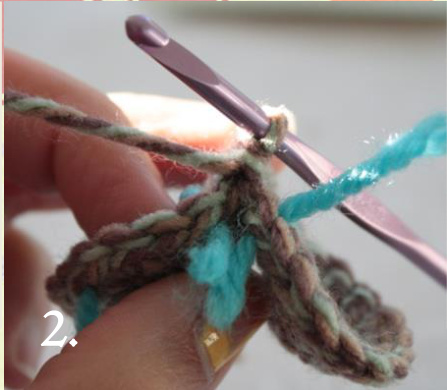
When you have stitched all 6 stitches, it will look like this. When joining the 3rd fingertip, you might find it easier to stitch through the marked stitches as shown. Do whatever works best for you.
SC through the 6 marked stitches to join and remove the yarn used to mark the 6 stitches.
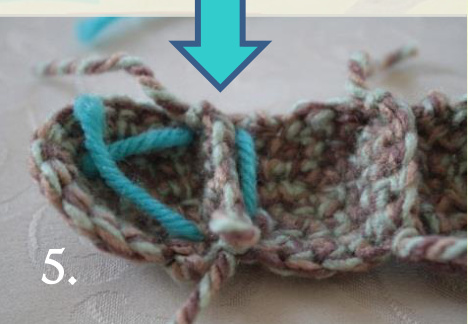
This is what the joined fingertips will look like.
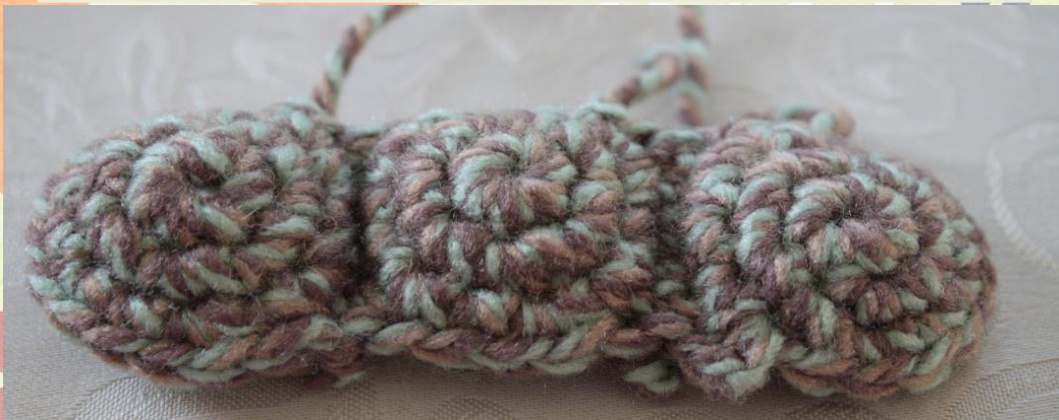
Groan - I know - more numbers. @ sorry - Make sure that when everything is connected you have 12 stitches on each side and 3 in the middle.
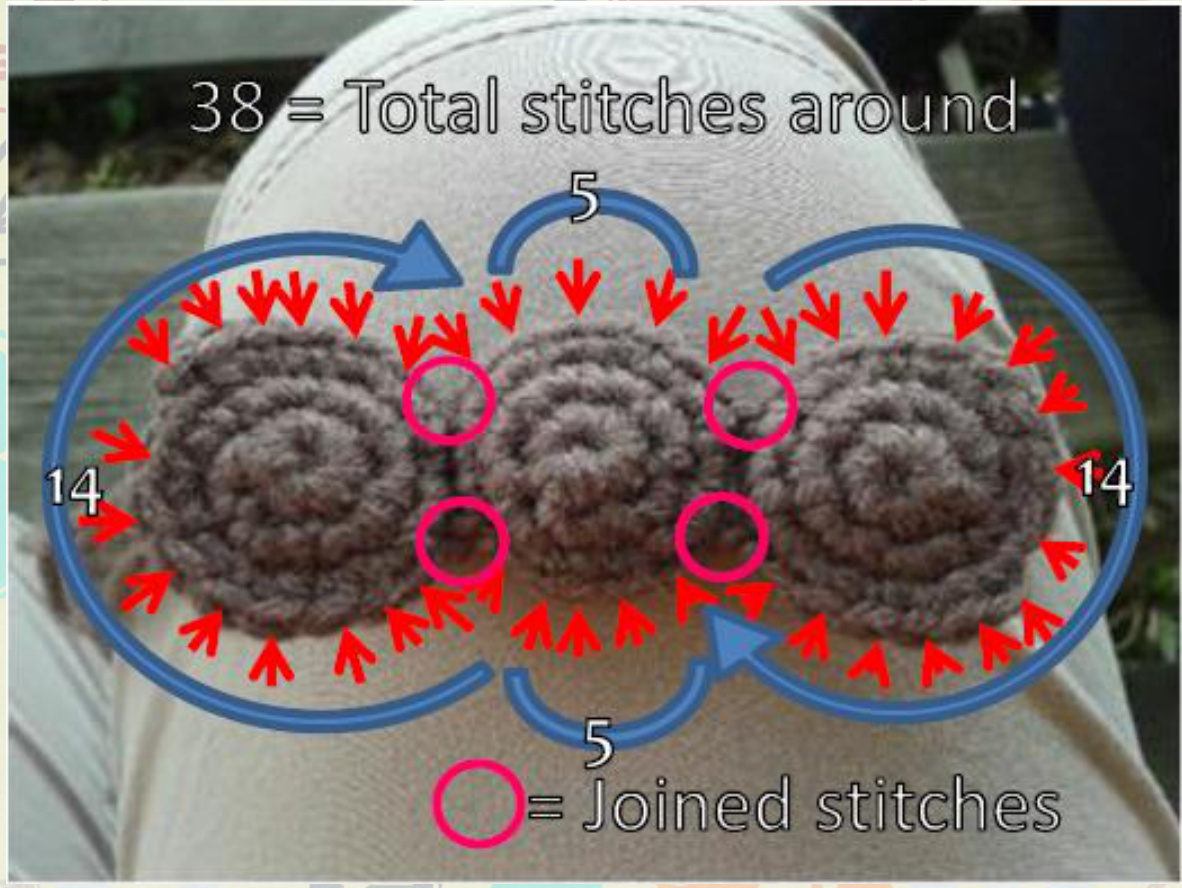
Joined stitches are the stitches that you stitch through to join the 3 fingertips. When stitcheing the first row, at each one of the “joined stitches" you will SC2tog using 1 regular stitch and 1 joined stitch (see pic)
Hands...
Start in the stitch marked with the star, (see pic on page 14)
4. SC, SC2tog (through one of the joined stitches), SCx4, SC2tog (through one of the joined stitches), SCx13, SC2tog (through one of joined stitches), SCx4, SC2tog (through one of the joined stitches), SCx13 (38) 5 SC around 6. SC2tog, SCx4, SC2tog, SC x 11, SC2tog, SCx4, SC2tog, SC 7. SC2tog × 3, SCx11, 2HDC, HDC, 2HDC, HDC, 2HDC, SCx12 8. SCx15, HDCx10, SCx10 9. HDC2tog x3, SC around (32) 10. SC Around 11. SC around 12. SCx12, 2SCx3, SCx2t0gx3, 2SCx3, SCx8 (35) 13. SC around 14. SCx12, SC2togx3, SCx5, SC2t0gx3, SCx6 (29) 15. SC2tog, SCx6 (repeat around) (25) 16. t0 20. SC around 21. SCx12, SC2tog, SC, SC2tog, SC around (23) 22. to 26. SC around 27. SCx12, SC2tog, SC, SC2tog, SC around ( 21) 28. t0 30. SC around 31. SCx10, SC2tog, SC, SC2tog, SC around (19) 32. to 36. SC around 37. SCx8, SC2tog, SC around (18) 38. to 40.SC around Slip stitch to tie off - leave a long tail for sewing. Stuff and shape the hand and stitch it shut.
Thumbs & Fingers & Elbows and such.
Once the arm is stuffed and sewn shut, attach the thumb. Before closing it completely, stuff the thumb, then stitch closed. Tie in the loose end of thread.
Thumbs
1. Start with a magic ring of 6SC 2 2SC in each stitch around 3. SC in 1st stitch, 2SC in next - repeat around. 4. SC2tog x 3 - repeat around. Slip stich to tie off. Leave a long tail to sew to hand. Sew halfway around on to hand - then stuff. Keep stitching and stuffing until it's completely stitched into place.
Fingers & Elbows and such..
Finishing touche...
That's all folks! @ Yu should now have a handsome Hartley at your fingertips. Or, in the case of the picture below...Lloyd. @ I hope the pattern didn't drive you too crazy and that he was worth the effort. Thanks again for choosing my pattern.