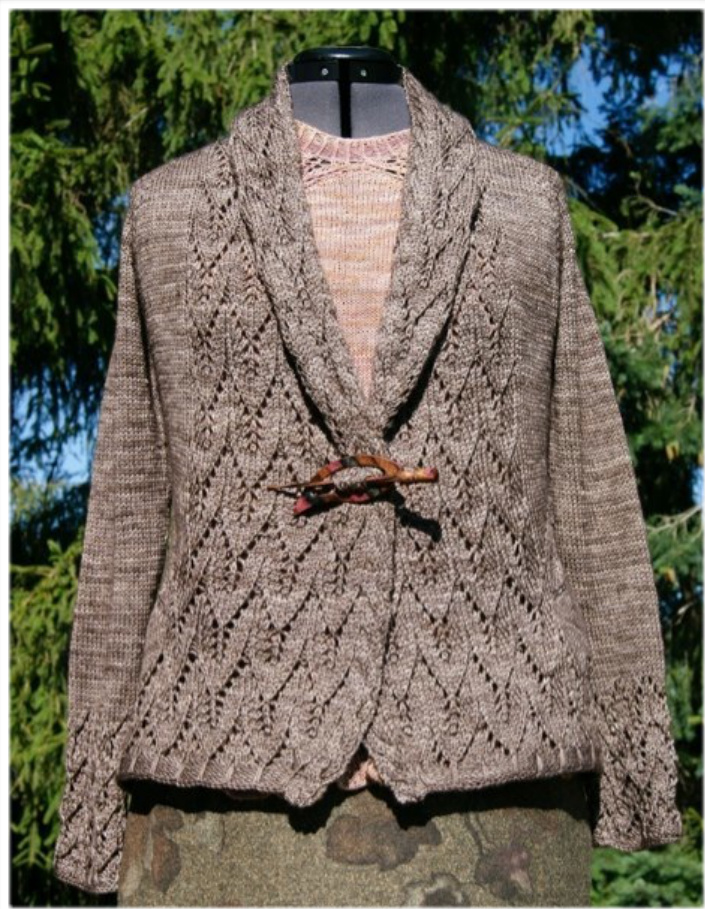
Autumn Rosina Jacket
Material
600 g (XS), 600 g (S-M1), 650 g (M2), 700 g (L), 800 g (XL), 1000 g (XXL) - DK weight, yardage 200 - 215 m / 100 g. [Original yarn: (a) DyeforYarn - DK/ SilkMerino yardage 212 m /1oo g; (b) Madelinetosh -Tosh DK colour Dust Bowl, yardage 209 m/ 100g.] 4.0 - 4.5 mm circular needle, 40, 60 and 8o cm; one set of 3.5 mm double pointed needles (dpn) or 3.5 mm 40 cm circular needle; cable needle (optional) Stitch markers (m)
Finished Measurements
Bust: 86 cm (XS), 90 cm (S), 95cm (M1), 103 cm (M2), 108 cm (L), 115 cm (XL), 120 cm (XXL). Garment is worked with 2 cm ease. Gauge: 20 (22) sts and 26 (28) rows = 10 cm using 4.0 mm (4.5 mm) needles.
General Remarks
The Rosina Jacket is worked in rows top down from neck. The shawl collar is knitted first, and stitches for shoulders and body are subsequently picked up from the long, non-cable side of the collar. Raglan shaping and Rosina pattern on the back are knitted at the same time. Since a couple of steps occur simultaneously, it is strongly recommended to read the instructions first before commencing the project.
Requirements
The increases for both raglan shaping and Rosina pattern on the back are slanted, e.g. M1L (= left leaning single increase leaning) and MiR (= right leaning single increase), M2L (= left leaning double increase) and M2R (= right leaning double increase). MiR - right leaning single increase: insert left needle from front to back into horizontal strand between the two stitches, left leg of stitch points to the front, knit (k1). M1L - left leaning single increase: insert left needle from back to front into horizontal strand between the two stitches, right leg of stitch points to the front, knit from the back (kib).
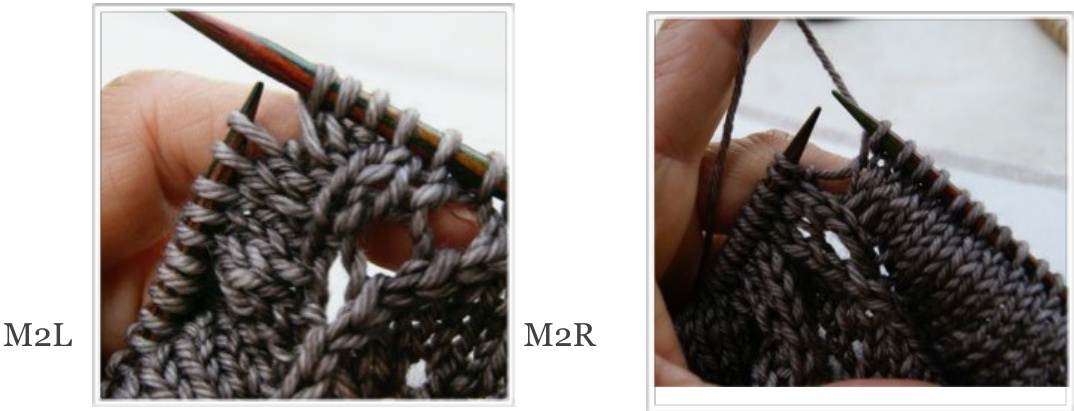
M2R - right leaning double increase: \* insert left needle from front to back into horizontal strand between the two stitches, left leg of stitch points to the front, knit; repeat once from \*. M2L - right leaning double increase: \* insert left needle from back to front into horizontal strand between the two stitches, right leg of stitch points to the front, knit from the back (kib); repeat once from \*. Provisional cast-on, see Alpis Tutorial Pattern Remarks:
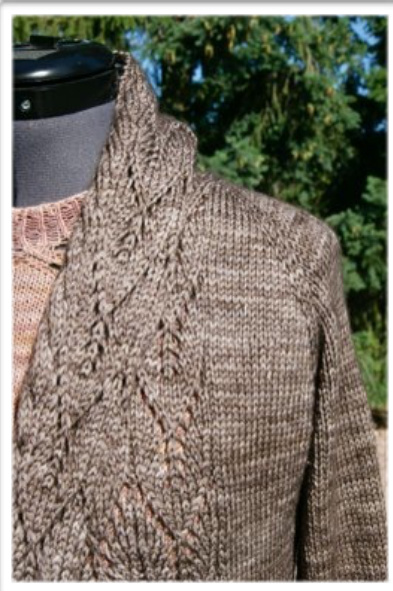
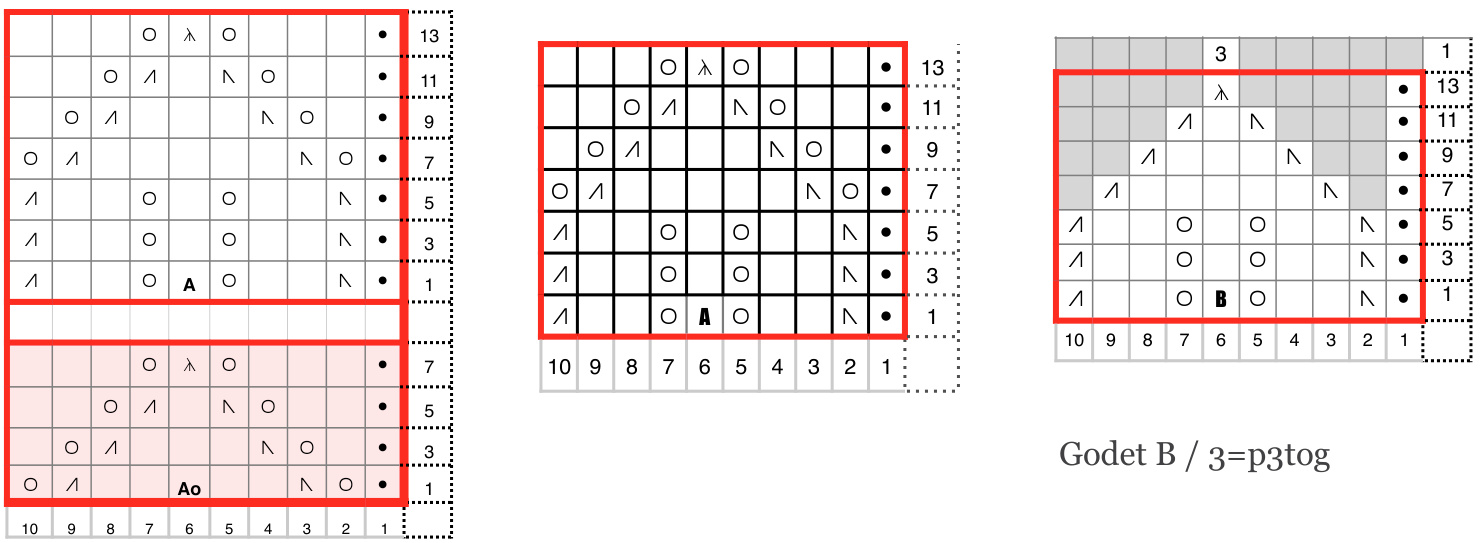
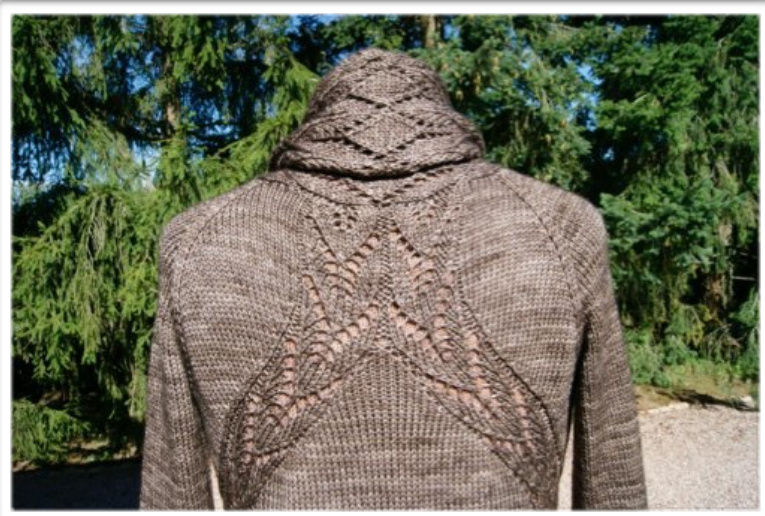
Shawl Collar: The collar is knitted from the centre outwards using a provisional cast-on and working Charts Ao and A for the Rosina pattern. WR rows are worked as stitches appear, with yarn-over's (yo) being purled. Selvage stitches (sst) are knitted. The cable is worked in stockinette stitch over 6 sts on the outer sides of both collar halves in mirror fashion, e.g. the cable points always towards the 'inside'. For the cable on the right side of collar transfer the first 3 stitches onto cable needle (cn), hold to the front, knit the next 3 stitches and then knit the stitches from cn. For the cable on the left side of collar transfer the first 3 stitches onto cn, hold to the back, knit the next 3 stitches and then knit the stitches from cn. Cables are worked after every 6th or 8th row (dep. used yarn) in a RS row along the entire length of the jacket. The cable doesn't require a cn and can be worked without, if preferred. In the 6th repeat (XS-L), 7th repeat (SL-XXL) of the collar pattern Chart A, the outer pattern repeat next to the cable will be gradually eliminated by working it as Godet B. This decrease will enhance the shawl collar effect. The lower corners of the shawl collar are rounded. This is achieved by working the outer pattern repeat next to the cable as Godet B. The rounded corners are worked in the last two chart repeats. Back Pattern: The back pattern consists of two parallel Rosina Charts A, which form the “Back Chart". Back chart 1 is worked in a straight direction 2 times for size XS -- L and 3 times for size XL -- XXL.
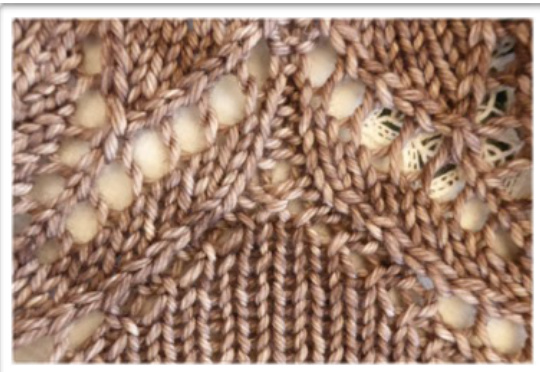
In the 13th row (RS) of the 2nd (XS - L) or 3rd (XL - XXL) chart repeat, respectively, a stitch increase is made between the two centre purl stitches (e.g. between stitch 11 and 12), by inserting the needle into the horizontal strand between these two stitches. This stitch is purled in the following WS row, and leads to \*branching’ of the
two back charts.
The following 2. back chart is worked once for all sizes. 'Branching' of the two Rosina charts starts in at the first (RS) row of the 2. back chart by working up to two stitches before the first purl stitch of the first chart repeat, knit 2 together (k2tog), work chart once, M1L, work until first purl stitch of second chart repeat, MiR, work chart once, slip, slip, knit (ssk). The number of stitches between the two \*chart branches' increases by 2 stitches every 2nd row. The 3. back chart is worked continuously until collar and the Rosina branches on the back converge. For this work up to three stitches before the first purl stitch of the first chart repeat, knit 3 together (k3tog), work Rosina chart once, M2L, proceed until first purl stitch of second chart repeat, M2R, work Rosina chart once, slip 2, knit 1, pass 2 slipped stitches over (s2-k1-p2sso). The number of stitches between the two charts increases by 4 stitches every 2nd row. The last chart of the back pattern is worked as Godet B with M1L and MiR increases and corresponding decreases. It should be noted that in particular in the 3. back chart crinkles could appear along the decreases. These are normal and will even out after washing and drying of the jacket.
Part 1- Collar
Left Collar:
Provisional cast-on for collar 60 sts (XS-XL), 70 sts (XXL). Set up row = Wrong side (WS): Selvage stitch (selvst),\*k1, p9\*, repeat between \* \* 4 times (XS-XL), 5 times (XXL), k1, p6, k1, selvst. 1. Row = Right side (RS): selvst, p1, k6, Chart A0 - 5 times (XS-XL), 6 times (XXL), p1, selvst. Work rows 1-8 of Chart Ao once, then 2 times Chart A ending with row 14 (WS). The cable pattern has 8 rows and is worked over 6 knitted stitches. Cables are made in a RS row, e.g. row 7, 15, 23, etc. Move 3 sts to cn and hold to back, k3, knit stitches from cn. Leave stitches without binding off, don't break yarn! Insert marker to indicate centre back opposite cable edge
Right Collar:
Undo provisional cast-on and pick up stitches. Don't remove marker. You should have 6o sts (XS-XL) or 70 st (XXL), respectively. Please note that the pattern looks more 'symmetrical', if in the 1. row of Chart Ao the decreases are worked as ssk instead of k2tog.
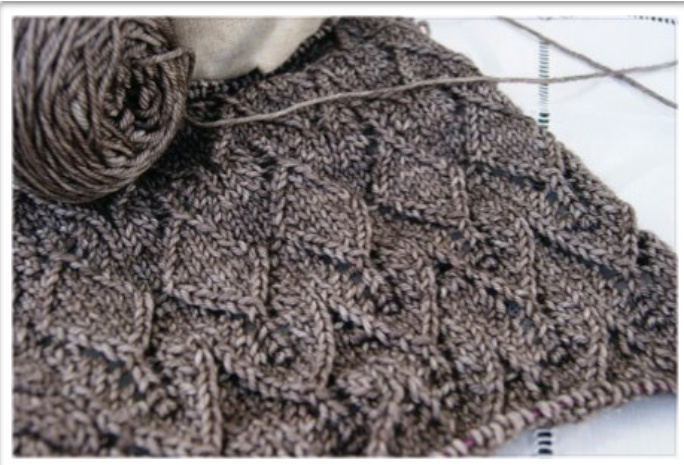
Begin with a RS row according to: selvst, row 1 of Chart A0 5 times (XS-XL), 6 times (XXL), p1, k6, p1, selvst. The cable is worked similar to the left collar (e.g. 6 sts wide, 8 rows high), but with a mirrored twist, e.g. move 3 sts to cn and hold to front, k3, knit stitches from cn.
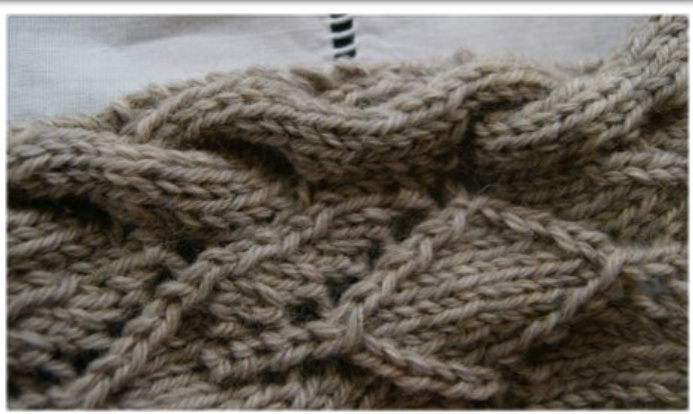
Be careful that the pattern of Chart Ao matches on left and right side of collar. Be aware that, since the cable is changing direction, a little “bump' will form where both sides of collar join (see photo). Work Chart Ao once and continue with Chart A, bearing in mind the direction of the cable (e.g. stitches on cn are hold to front). Continue knitting until right collar side reaches length of left collar side. Both sides are finished with a WS row, since setting up of the raglan pattern occurs on the right side (face of fabric) of the jacket in a RS row.
Back Charts 1, 2, 3
| 入 | O | O | 入 | O | 13 | ||||||||||||||||||
| O | N | O | O | N | O | 11 | |||||||||||||||||
| O | N | O | 9 | ||||||||||||||||||||
| O | 13 | O | O | O | N | O | 7 | ||||||||||||||||
| 11 | O | N | N | 5 | |||||||||||||||||||
| O | N | 1 | O | O | 3 | ||||||||||||||||||
| O | N | O | O | 1 | |||||||||||||||||||
| 22 | 21 | 20 | 19 | 18 | 17 | 16 | 15 | 14 | 13 | 12 | 11 10 | 9 | 8 | 7 | 6 | 5 | 4 | 3 | N |
Back chart 2: Increases MiR and M1L lead to increases of stitch count by 2 every 2nd row. Work this chart once for all sizes. Back chart 1: Work 2 times for XS-L, work 3 times for XL-XXL
| N | O | 不 | O | M1R | M1L | O | O | 13 | |||||||||||||||||||||||||||||
| N | N | O | M1R | M1L | N | O | 11 | ||||||||||||||||||||||||||||||
| N | N | O | M1R | M1L | N | O | 1 | 9 | |||||||||||||||||||||||||||||
| N | O | N | M1R | M1L | O | N | O | 1 | 7 | ||||||||||||||||||||||||||||
| N | N | M1R | M1L | N | 1 | 5 | |||||||||||||||||||||||||||||||
| N | N | M1R | M1L | N | 1 | 3 | |||||||||||||||||||||||||||||||
| N | O | O | N | M1R | M1L | O | O | N | 1 | 1 | |||||||||||||||||||||||||||
| O | 入 | O | 8 | O | 入 | O | 13 | ||||||||||||||||||||||||||||||
| 入 | O | 入 | O | M2R | M2L | O | 入 | O | 不 | 13 | ||||||||||||||||||||||
| 入 | O | N | M2R | M2L | O | 1 | N | O | 11 | |||||||||||||||||||||||
| 入 | O | N | M2R | M2L | N | O | 9 | |||||||||||||||||||||||||
| 入 | O | N | O | M2R | M2L | O | N | O | 7 | |||||||||||||||||||||||
| 入 | N | M2R | M2L | N | 人 | 5 | ||||||||||||||||||||||||||
| 入 | 1 | N | M2R | M2L | 1 | N | 人 | 3 | ||||||||||||||||||||||||
| 入 | 1 | O | O | N | M2R | M2L | 1 | O | O | N | 人 | 1 | ||||||||||||||||||||
Back chart 3: Increases M2R and M2L lead to increases of stitch count by 4 every 2nd row. Work this chart until back Rosina branches converge with collar.
Part 2 - Top-Down Raglan - Shoulders and Body
From the entire collar edge (not the cable edge) stitches are picked up knit wise and as tight as possible (in order to avoid formation of holes, pull out cable of circular needle slightly). Pick-up: Work left collar pattern until last purled stitch in row 1 of Chart A, k1 (former selvst of left collar), then pick up knit-wise from the collar edge 52 sts (XS), 54 sts (S), 60 sts (M1), 64 sts (M2), 66 sts (L), 68 sts (XL), 70 sts (XXL), k1 (former selvst of right collar), work row 1 of right collar pattern Chart A. For a symmetrical appearance it is recommended to pick up the first half of stitches until marker in centre back is reached, e.g. 26 sts (XS), 27 sts (S), 30 sts (M1), 32 sts (M2), 33 sts (L), 34 sts (XL), 35 sts (XXL), then turn and repeat picking up the second half of stitches from the other end. the direction of the cables on the left and right side of the collar is aways mirrored Total number of stitches after pick-up: 172 sts (XS),174 sts (S), 180 sts (M1), 184 sts (M2), 186 sts (L), 188 sts (XL), 210 sts (XXL).
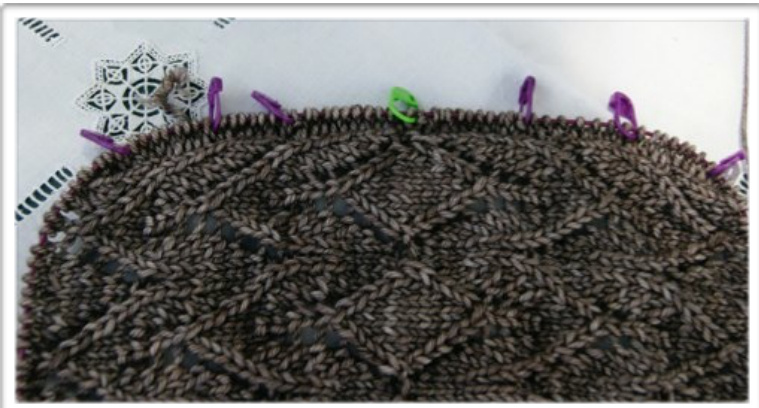
Set-up row (WS): Work right collar pattern over 59 sts (XS-XL), 69 sts (XXL), p2 (XS-M1), p3 (M2-XXL) = right front, pm, p8 (XS), p8 (S), p10 (M1), p10 (M2), p10 (L), p10 (XL), p10 (XXL) = right sleeve, pm, p17 (XS), p18 (S), p19 (M1), p20 (M2), p21 (L), p22 (XL), p23 (XXL), m (= centre back), p17 (XS), p18 (S), p19 (M1), p20 (M2), p21 (L), p22 (XL), p23 (XXL) = back, pm, p8 (XS), p8 (S), p10 (M1), p10 (M2), p10 (L), p10 (XL), p10 (XXL) = left sleeve, pm, p2 (XS-M1), p3 (M2-XXL), work right collar pattern over 59 sts (XS-XL), 69 sts (XXL) = left front. Row 1 (Rs) - first increase row (for raglan) and back pattern set-up: Work left front according to pattern (it should be row 3) until one knitted st before m, MiR, k1, m, k1, MiL, work left sleeve knit-wise until one st before m, M1R , k1, m, k1, M1L, k5 (XS), k6 (S), k7 (M1), k8 (M2), k9 (L), k10 (XL), k11 (XXL), work first half of back chart 1 (row 3), m, work second half of back chart 1 (row 3), k5 (XS), k6 (S), k7 (M1), k8 (M2), k9 (L), k10 (XL), k11 (XXL), M1R, k1, m, k1, M1L, work right sleeve knit-wise until one st before m, M1R, k1, m, k1, M1L, k1, work right front according to pattern (it should be row 3).
The progress of the "Rosina" pattern (Chart A) on both front and back is always the same, e.g. the same rows are worked on front and back!
Row 2 (Ws): Work all stitches as they appear, yo are purled.
Row 3 (Rs) - raglan increase:
Work left front according to pattern until one knitted st before m, MiR, k1, m, k1, M1L, work left sleeve knit-wise until one st before m, M1R , k1, m, k1, M1L, k6 (XS), k7 (S), k8 (M1), k9 (M2), k10 (L), k11 (XL), k12 (XXL), work first half of back chart 1, m, work second half of back chart 1, row 3, k6 (XS), k7 (S), k8 (M1), k9 (M2), k1o (L), k11 (XL), k12 (XXL), MiR, k1, m, k1, M1L, work right sleeve knit-wise until one st before m, M1R, k1, m, k1, M1L, k1, work right front according to pattern. Row 4 (WS): Work all stitches as they appear, yo are purled. Repeat rows 3 (increase row RS) and 4 (WR) 20 (XS), 22 (S), 24 (M1), 26 (M2), 28 (L), 30 (XL), 32 (XXL) times. At the same time for the V-neck on front increase through M1L and M1R 3 times in every 13. row (XS-M1), 5 times in every 11 row (M2), 6 times in every 9. row (L), 9 times in every 7. row (XLXXL) next to the last purled stitch in collar (next to Rosina pattern, not the cable). Back chart 1 is worked 2 times (XS-L) or 3 times (XL-XXL), respectively. In row 13 of the 2nd (XS-L) or 3rd (XL-XXL) pattern repeat a stitch increase is made knit-wise, according to back chart 2, between the two centre purl stitches by inserting the needle into the horizontal strand between these two stitches. This stitch is purled in the following WS row and leads to “branching’ of the two back Rosina charts. Continue branching as shown in back chart 2, which is worked only once for all sizes: Work up to two stitches before the first purled stitch, k2tog, work Rosina chart once, M1L after last purled stitch, work until first purled stitch of second chart, MiR, work Rosina chart once, ssk after last purled stitch. You can remove the centre back marker now, as it is no longer required. The stitch count between both charts increases by 2 every 2nd row. In the following back chart 3 is worked continuously until collar and back pattern converge: Work up to three stitches before the first purled stitch, k3tog, work chart once, M2L after last purled stitch, work until first purled stitch of second chart, M2R, work chart once, s2-k1-p2sso after last purled stitch. The stitch count between both charts increases by 4 every 2nd row. At the same time for size Xs-L: In the 6th chart repeat of collar pattern work the Rosina chart next to the cable Gjust this single one) as Godet B.
Stitch count after raglan increases:
| size | right collar | right front | right sleeve | back | left sleeve | left front | left collar | total (= body) |
| XS | 49 | 26 | 52 | 79 | 52 | 26 | 49 | 131 |
| S | 49 | 28 | 56 | 85 | 56 | 28 | 49 | 141 |
| M1 | 49 | 30 | 62 | 91 | 62 | 30 | 49 | 151 |
| M2 | 49 | 35 | 66 | 97 | 66 | 35 | 49 | 167 |
| L | 49 | 38 | 70 | 103 | 70 | 38 | 49 | 179 |
| XL | 49 | 43 | 74 | 113 | 74 | 43 | 49 | 199 |
| XXL | 59 | 45 | 78 | 119 | 78 | 45 | 59 | 209 |
C Part 3 - Separate Body and Sleeves C
Stitches of sleeves are placed on holder or scrap yarn, and the “body” (= right front, back and left front) is worked according to the established collar and back Rosina pattern, respectively.
Set-up Row (RS):
· Work collar pattern and 26 sts (XS), 28 sts (S), 30 sts (M1), 35 sts (M2), 38 sts (L), 43 sts (XL), 45 sts (XXL) for left front, remove marker, · place the following 52 sts (XS), 56 sts (S), 62 sts (M1), 66 sts (M2), 70 sts (L), 74 sts (XL), 78 sts (XXL) (= left sleeve) on holder or scrap yarn, · cast-on 2 sts (XS), 2 sts (S), 2 sts (M1), 3 sts (M2), 5 sts (L), 5 sts (XL), 5 sts (XXL), pm, cast-on 2 sts (XS), 2 sts (S), 2 sts (M1), 3 sts (M2), 5 sts (L), 5 sts (XL), 5 sts (XXL) (= left underarm), remove m, · work 79 sts (XS), 85 sts (S), 91 sts (M1), 97 sts (M2), 107 sts (L), 113 sts (XL), 119 sts (XXL) for back, remove m, · place the following 52 sts (XS), 56 sts (S), 62 sts (M1), 66 sts (M2), 70 sts (L), 74 sts (XL), 78 sts (XXL) (= right sleeve) on holder or scrap yarn, · cast-on 2 sts (XS), 2 sts (S), 2 sts (M1), 3 sts (M2), 5 sts (L), 5 sts (XL), 5 sts (XXL), pm, cast-on 2 sts (XS), 2 sts (S), 2 sts (M1), 3 sts (M2), 5 sts (L), 5 sts (XL), 5 sts (XXL) (= right underarm), remove m, · work 26 sts (XS), 28 sts (S), 30 sts (M1), 35 sts (M2), 38 sts (L), 43 sts (XL), 45 sts (XXL) and collar pattern for left front.
Total stitch count body:
XS: 139 sts [+ 56 sts (2 times) on holder for sleeves] S: 149 sts [+ 60 sts (2 times) on holder for sleeves] M1: 159 sts [+ 66 sts (2 times) on holder for sleeves] M2: 179 sts [+ 72 sts (2 times) on holder for sleeves] L: 199 sts [+ 80 sts (2 times) on holder for sleeves] XL: 219 sts [+ 84 sts (2 times) on holder for sleeves] XXL: 229 sts [+ 88 sts (2 times) on holder for sleeves] Continue according to pattern, until collar pattern and both Rosina branches of back chart converge. The last back Rosina chart is worked as godet:
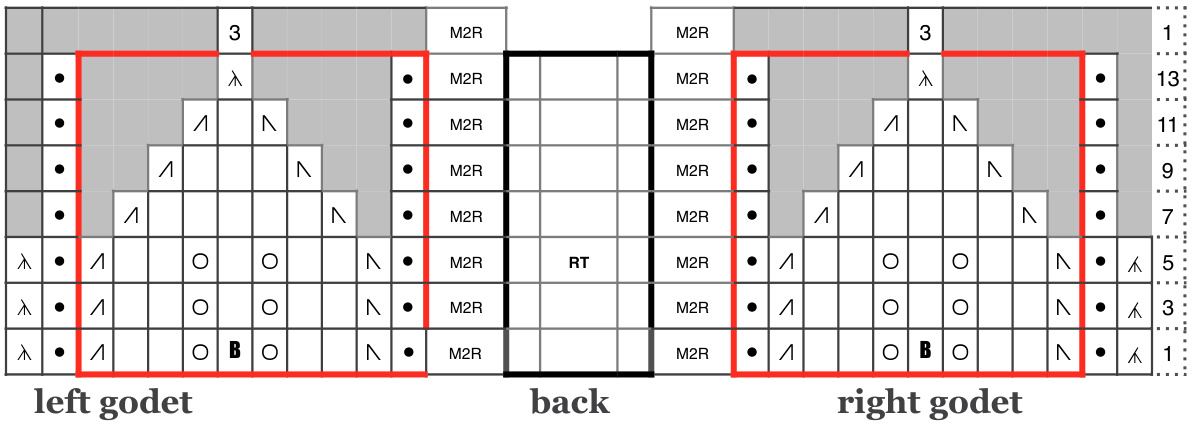
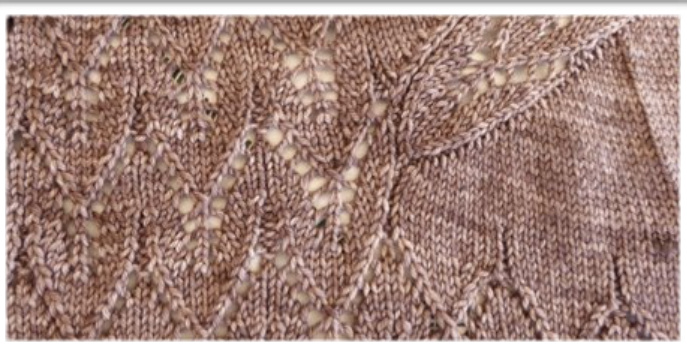
Detail of godet joining collar pattern Important: Please note that after completion of the godets on both right and left side, the stitch count between the collar pattern should be: [(stitches /1o) - 1]. Adjustment can be made, if required, in row 13 of the godet pattern through MiL or MiR, respectively. Continue working both sides of the collar according to the established pattern. At the same time the pattern for both fronts and back (= stitches between the collar) is set up according to Chart Ao, which is followed by Chart A: . Until row 6 (incl.) of collar chart A: k9, p1 on RS, (work stitches as they appear on WS). Check photo above for clarity. · From row 7 onwards: proceed according to Chart Ao across both fronts and back followed by Chart A. The progress parallels that for both sides of the collar. The charts below show right and left front, including the collar.
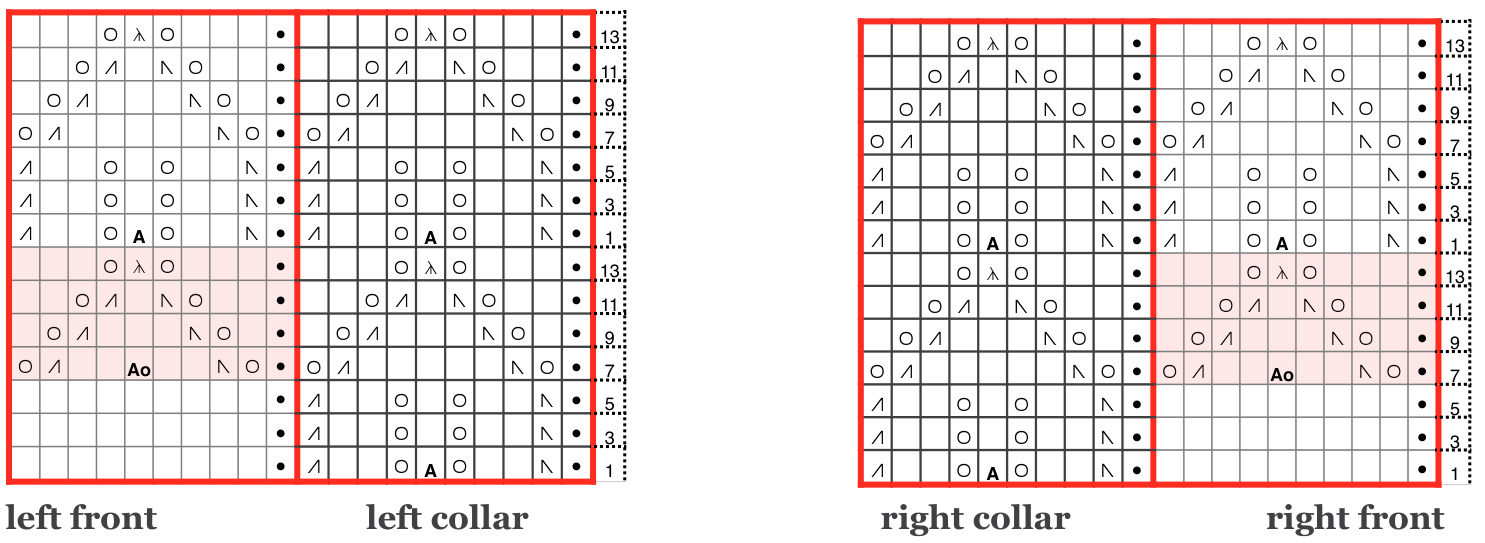
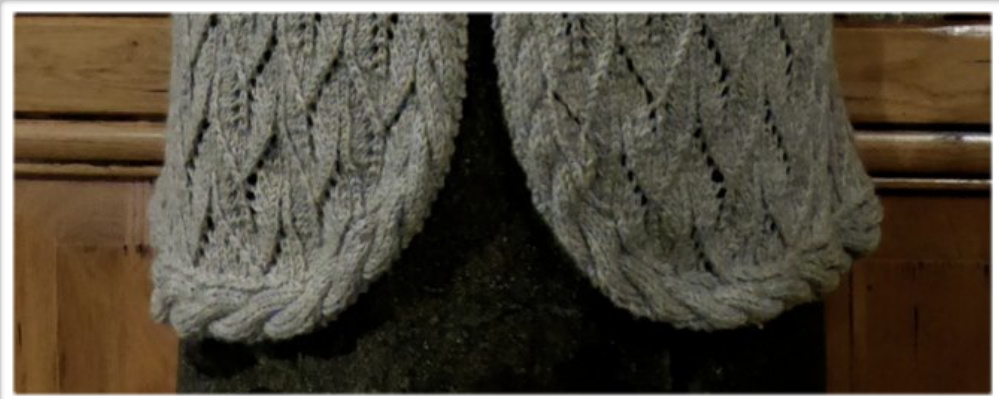
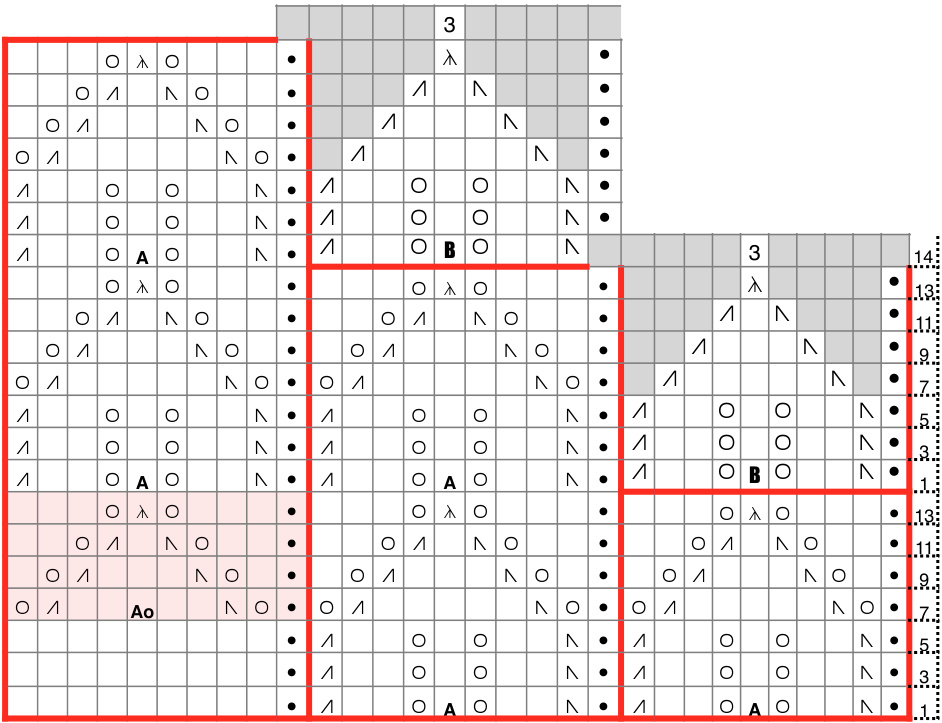
Depending on the desired length of the jacket, Chart A his worked 2 times (for short version - as shown on page 1) 0r 3 times (for longer version, not shown). In order to achieve slightly rounded corners at the lower edge of the jacket, work in the last chart repeat one Rosina chart at the respective outer edges (e.g. the Rosina chart directly adjacent to to the cable) as Godet B. For more distinct corners, work Godet B for the two Rosina charts next to the collar cables.
The charts below show the edge for the left front for slight (a) and distinctly rounded (b) corners. The right edge is worked accordingly. Please note that the chart does not include all repeats for the collar pattern.
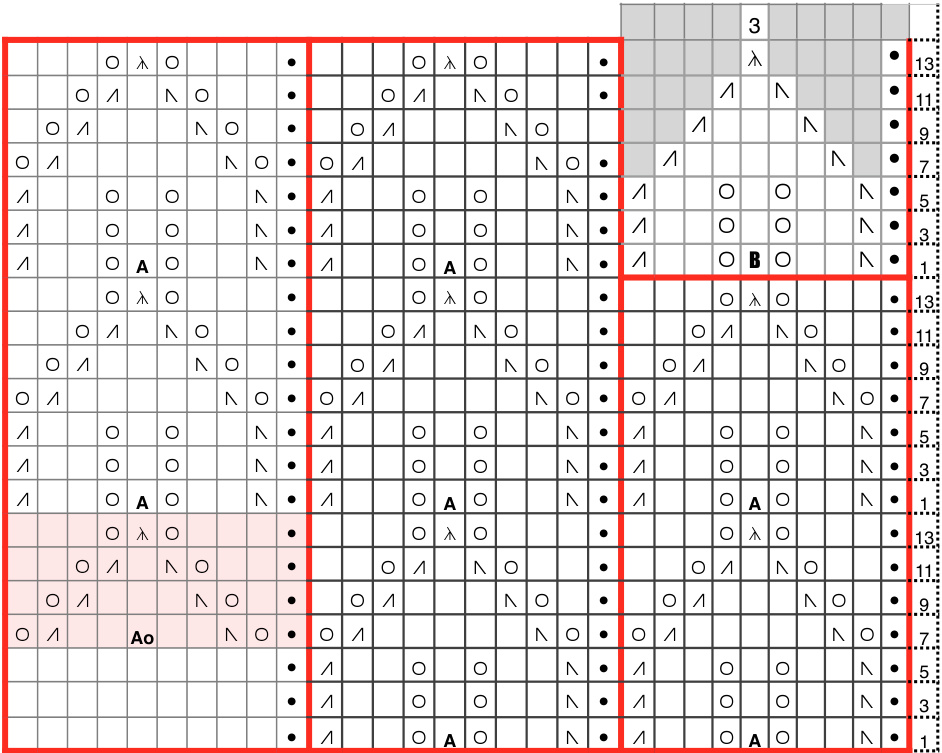
(a) Left front with slightly rounded corner, right front is worked accordingly.
Detail Godet B
| 3 | 1 | |||||||||
| 入 | 13 | |||||||||
| N | 11 | |||||||||
| N | 9 | |||||||||
| N | 7 | |||||||||
| N | 5 | |||||||||
| A | N | 3 | ||||||||
| O | B | N | 1 | |||||||
| 10 | 9 | 8 | 7 | 6 | 5 | 4 | 3 | 2 | 1 |
ront with distinctly rounded corner, right front is worked accordingly The jacked should always be finished in row 14 of Chart A!
Facing
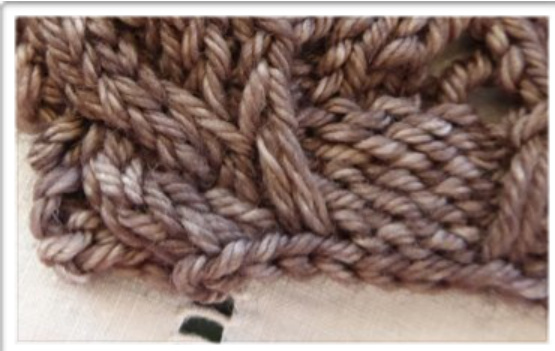
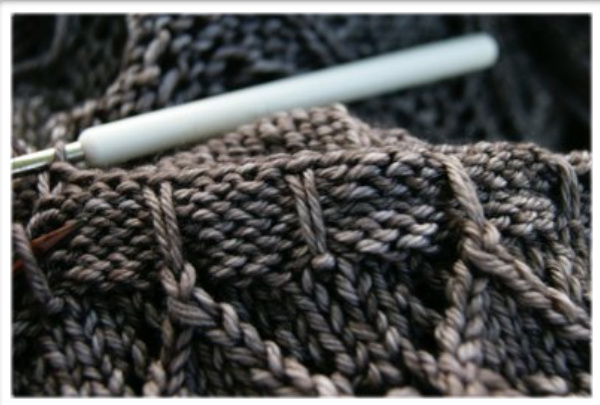
The lower edge of the jacket is finished with a facing, which requires reducing the cable stitches on both front sides by 2 stitches. This is achieved by decreasing the central 4 sts of the cable to 2 sts through two k2tog. The remaining 4 sts are cabled as usual. At the same time the facing is made between the cables on both sides of the jacket: Row 1 (Rs): cable, \*slip stitch (sst) with yarn in back (the centre and purled stitches of Chart A are worked as slipped stitches), p4\*, repeat between \* \*, sst (yarn in back), cable. The first and last slipped stitch are the tip of godetB). Row 2 (WS): cable, \* sst with yarn in front, k4\*, repeat between \* \*, sst (yarn in front), cable. Repeat these two rows once. Bind off all stitches in following RS row knit-wise. Please avoid an elastic bind-off. A nice finished edge can be obtained using a crochet bind-off (see photo below).
Cabled Edge
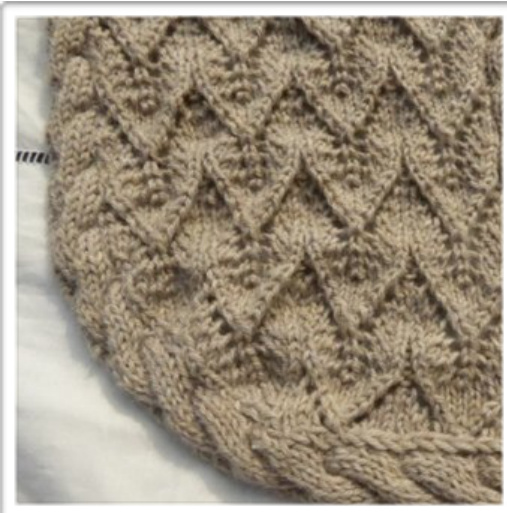
Repeat rows 2-5 until centre back. It is also possible to “frame′ the lower edge of the jacket with a cable (if sufficient yarn is available). Right corner: End with row 14 (WS) of Chart A and Godet B, turn. Row 1 (RS): selvst, cable (p1, k6), p3tog, k1, turn. Row 2 (WS): sst with yarn in front, cable (k1, p6, k1), selvst, turn. Row 3 (RS): selvst, cable (p1, k6, p1), ssk (= last stitch of short row with next stitch), turn. Row 4 (WS): like row 2, turn. Row 5 (RS): selvst ,cable (p1, k6, p1), slip one, knit two together, pass slipped stitch over (sl 1 - k2tog - psso - this decrease involves the last stitch of short row and the next two stitches), turn. The stitches of the cable frame are twisted after every 8th or 1oth row (dep. used yarn) to minimize gathering' of the knitted fabric.
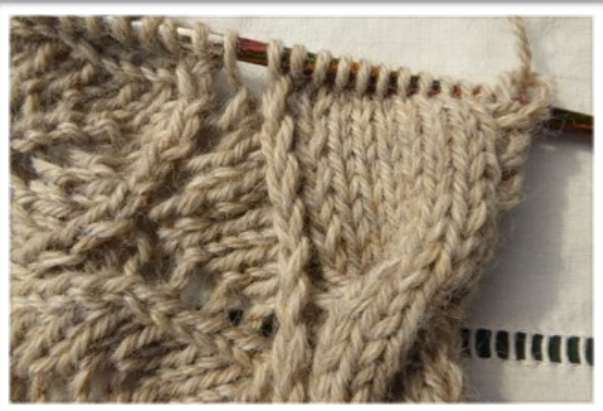
Left corner: On WS row work selvst, cable (k1, p6, k1), p3tog, turn. Row 1 (RS): sst with yarn in back, cable (p1, k6, p1), selvst, turn. Row 2 (WS): selvst, cable (k1,p6, k1), p2tog (= last stitch of short row with next stitch), turn. Row 3 (RS): like row 1, turn. Row 4 (WS): selvst, cable (k1, p6, k1), p3tog (= last stitch of short row with next two stitches), turn. Repeat rows 1-4 until centre back. Join both cables with an invisible Kitchener stitch to finish off the ^frame'.
Part 4 - Sleeves
Move sleeve stitches from holder onto 40 cm circular needle (or set of dpn), e.g. 52 sts (XS), 56 sts (S), 62 sts (M1), 66 sts (M2), 70 sts (L), 74 sts (XL), 78 sts (XXL). Pick up from the underarm 3 sts (XS), 3 sts (S), 3 sts (M1), 4 sts (M2), 5 sts (L), 5 sts (XL), 5 sts (XXL), place m, pick up from the underarm 3 sts (XS), 3 sts (S), 3 sts (M1), 4 sts (M2), 5 sts (L), 5 sts (XL), 5 sts (XXL) and close to round. Stitch count for sleeves: 58 sts (XS), 62 sts (S), 68 sts (M1), 74 sts (M2), 80 sts (L), 84 sts (XL), 88 sts (XXL). Work 12 (XS), 12 (S), 10 (M1), 8 (M2), 6 (L), 6 (XL), 6 (XXL) rounds in stockinette stitch. Decrease round: Work up to 4 sts before m, k2tog, k2, m, k2, k2tog (decrease = 2 stitches/round; it is recommended to work both decreases as k2tog). The decrease round is worked 5 (XS), 7 (S), 6 (M1), 9 (M2), 8 (L), 10 (XL), 12 (XXL) times in every 14. (XS), 13. (S), 12. (M1), 10. (M2), 11. (L), 6. (XL), 5. (XXL) round. Total decreases = 10 sts (XS), 14 sts (S), 12 sts (M1), 18 sts (M2), 16 sts (L), 20 sts (XL), 24 sts (XXL). Stitch count after decreases: 48 sts (XS), 48 sts (S), 56 sts (M1), 56 sts (M2), 64 sts (L), 64 sts (XL), 64 sts (XXL). For the sleeve cuffs the number stitches must be divisible by 8!
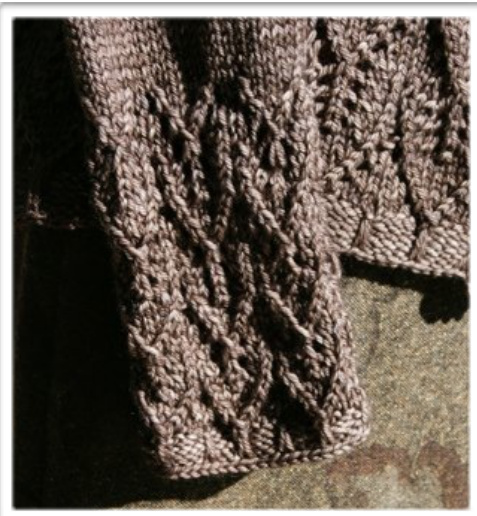
The length of the sleeve depends on your personal preferences (in other words: it's up to you), but keep in mind that the sleeve cuff has a length of 12 cm. Note: When considering the length of the sleeve, be aware that in particular merino/silk yarns stretch considerably after washing and blocking. It is therefore recommended that you make the the sleeves 3-6 cm shorter. The cuff is worked in a modified Rosina pattern, according to Charts Co and C. The pattern repeat has 8 sts so that the Rosina chart is repeated 6 (XS-S), 7 (M1-M2), 8 (L-XXL) times. Work Chart Co once, followed by Chart C (which you may repeat as often as desired - the photo above shows 3 repeats as in the chart). Finish after a 9th row.
| 入 | O | 9 | ||||||
| O | 1 | N | O | 7 | ||||
| O | N | O | 5 | |||||
| A | O | N | 3 | |||||
| O | C | O | N | 1 | ||||
| 入 | O | 9 | ||||||
| 1 | N | 7 | ||||||
| O | A | N | O | 5 | ||||
| A | O | N | 3 | |||||
| O | C | O | N | 1 | ||||
| 入 | O | 9 | ||||||
| N | 7 | |||||||
| O | N | O | 5 | |||||
| O | N | 3 | ||||||
| O | C | O | N | 1 | ||||
| O | 入 | O | 5 | |||||
| O | N | O | 3 | |||||
| O | CO | N | O | 1 | ||||
| 8 | 7 | 6 | 5 | 4 | 3 | 2 | 1 |
Chart Co and C for sleeve cuff.. The facing of the sleeve cuff is worked as follows: \*sst with yarn in back, p3\* repeat between \* \* , and work a total of 4 rounds with this pattern. Bind off all stitches knit-wise with a crochet hook. Repeat for second sleeve. sh and dry jacket lying flat, and enjoy wearing it on a hopefully sunny autumn day
Appendixe
Abbreviations:
MiL - increase, leaning left; instructions HIER MiR - increase, leaning left; instructions HIER M2L - double increase, leaning left M2R- double increase, leaning right Body - fronts and back m - marker pm - place marker sts - stitches k2tog - knit 2 stitches together p2tog - purl 2 stitches together k3tog - knit 3 stitches together p3tog - purl 3 stitches together sst - slip stitch dpn - double pointed needle cn - cable needle s2-k1-p2ss0 - slip 2, knit 1, pass 2 slipped stitches over s1-k2tog-psso - slip one, knit two together, pass slipped stitch over ssk - slip, slip, knit selvst - selvage stitch yo - yarn over Legend to symbols: purl knit O yo ssk 八 k2tog 入 S1-k2tog-psso不k3tog.

nake stitch by inserting needle into the horizontal strand between these two stitche placeholder, no stitch Special thanks to Barbel, Ira, and Petra observant, patient, persistent, humorous and resourceful, not only with regards to test knitting this pattern. ? It is due to Uta Wile's commitment that the Rosina pattern may now also be a “challenge" to the creativity of English speaking knitters. Without you, this pattern would not be what it is now. This pattern is for private purposes only and is protected by copyright. FadenStille 2014 Webseite: http: //fadenstille.blogspot.fr/


