Simply Crocheted Stitch Markers
Designed by Peggy Laipple aka PickleSoup Please see copyright details at the end of document. I love the soft loop for going over precious needles! These stitch markers would be great prizes for a knitting design contest, door prizes for your local knitting group or guild, something to exchange in a swap, or just something fun to make for yourself or a friend.
Materials:
Cotton crochet thread:
size 10, 20, 30, your choice (I haven’t tried 70 or 80 yet- if you do, let me know). Choose mercerized (meaning smooth and not fuzzy) in any color (solid or variegated). Hopefully it will contrast with the colors you normally knit. Linen or silk threads would be wonderful, too. I just haven't tried them. Markers made with fuzzy yarn
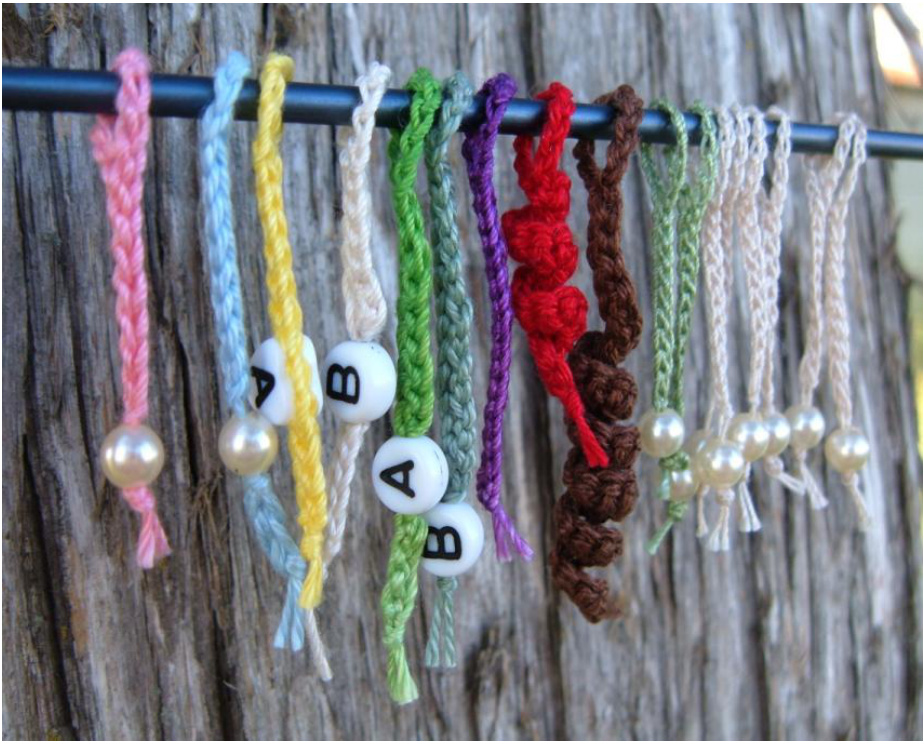
may be hard to see to pass from one needle to the other, plus could shed on your knitting project. Beads in a size comparable to your thread. You want something easy to string (I usually use a size 10 Susan Bates hook to string beads), but not with so big a hole that you have to tie a knot the size of a boulder to keep the bead on there. I dug around in my junk bead jar, raided my daughter's stash and begged some heart shaped alphabet beads off of my knitting friend. Steel crochet hook in a size comparable for your thread. I used a US 5 with size 10 thread, probably a 7 or so with size 20 thread and a 10 with size 30 thread. Size and gauge is not critical for this project. You optimally want a stitch marker that will be small enough on your needle to not create ladders in your knitting, but not so tight around your needle that it is hard to slip from one needle to the other. You may have to make a practice one or two before you're happy with the loop size and length as it is personal preference. It is hard to make them all identical in length unless you are extremely precise. Either count all your stitches and try to make them all identical or go willy-nilly and make them all different on purpose (that's my preference). The finer thread (size 30) will make markers that take up much less space on the needle- perfect for socks and lace. The pink one measures $1\;^{1}\!/\!\!_{2}\!\!\!^{\;\bullet}$ from tip to tip, the brown one measures 2 3/8."’ That is a US size 3 needle in the picture- so you can see these aren't very big.
Note:
Unless otherwise noted, the slip stitch is not made in the front or back loop (the 'V') of the chain, but in the bump on the back. These instructions will just tell you to éslip stitch in chain? for ease of wording. (Pink marker in picture does NOT show this technique. It was made by putting the sl st in the front loop only.) The knot at the end is a basic one where you hold both threads together- wrap them around like a pretzel and pull the end through the hole- tightening the knot close to the work.
Instructions
VARIETY 1- In the beginning... was the basic garden variety (pink in the picture):
(first numbers are what I used for size 10 thread- what I used for size 20 and 30 threads are given in parenthesis, respectively) Begin by making a slip knot 3 inches or so from the end of your thread (or however much length you need to comfortably tie a knot). Ch 20 (28, 36). Being careful not to twist the work- sl st in $10^{\mathrm{th}}\,(14^{\mathrm{th}}$ $18^{\mathrm{th}},$ ch from hook (this variety you sl st in the back loop of the V in the chain- See notes for following varieties).Sl st in each ch to the end. Cut thread $3^{\circ}$ from work and pull out the last loop to secure. Thread a bead or two or three on the two strands of thread and tie. (You could tie a knot between each bead if you so desire.) Trim ends to desired length and let them hang or thread a needle and weave them back up through the Worktohide.
VARIETY 2- the beginning but expanded (light blue in picture):
Work the same as variety 1 (except see Note above) until the bead is threaded on the tail end. With both threads held together, tie a slip knot as close to the bead as you possibly can. Still using both threads held together as the working thread, ch 3 or 4 with a larger size hook than the rest of the work (I used size 1 or 2). Pull working thread through last loop and tighten. Trim ends to $3/8^{\circ}$ or weave in (see variety 1). VARIETY 3- can't get out (yellow with A heart bead in picture): (requires a bead with a little larger hole; good for asymmetrical shaped beads) Work the same as variety 1 until you have worked sl sts to within $5/8^{\circ}$ Or so from the end. Ch 3 or 4 (to fit over bead- may take more or fewer- depending on thread and bead sizeadjust to fit). Place heart shaped alphabet bead by stringing from the bottom- up and onto the original ch. Push bead up under the chains you just made. Sl st as close to the bead as possible. Continue to sl st in each ch to end. Cut end and pull through last loop. Tie knot and cut 1/4"' end or weave in. VARIETY 4- how DID you get that bead on there? (cream B and green A- cream has sc & dc on either side of bead- kind of ugly): (requires bead with a little larger hole) Work the same as variety 1 until you have worked sl sts to within 5/8" or so from the end. (You can make one sc or dc here if the hole on your bead is a lot larger around than the work). Cut thread about 12-18" from hook- pull through loop to secure it. Thread bead with both ends- the original chain and the long working thread you just cut and pulled through. Push bead up over the original chain close to last st worked, pulling long working thread through bead to smooth, too. Insert hook in back loop as close to bead as possible. Pull up loop with cut thread, pull up loop again. Sc in same space as pulling up the loop (if possible- in next ch if too tight) . Sl st to end. Cut working yarn and pull through last loop to secure. Tie off and cut leaving $1/4^{\circ}$ end or weave in.
VARIETY 5- light and loose (sage green B in picture):
Ch desired number- 20 (28, 36). Sl st in $10^{\mathrm{th}}(1\bar{4}^{\mathrm{th}},\,18^{\mathrm{th}})$ ch from hook. Sl st in next 2 chains. \*Chain 1, sl st in $2^{\mathrm{nd}}$ chain from hook.\* Repeat between \* to end, ending with a sl st regardless how you come out. Work any variety (1-4) of beading detail as above. VARIETY 6- curly (brown in picture- red is 1 sl st, then 2 sc's each ch to end): Ch up to twice your normal desired number- 35 (45, 65). Sl st in $10^{\mathrm{th}}\,(14^{\mathrm{th}},\,18^{\mathrm{th}})$ ch from hook.Sl st in each ch for $^{1\!}/\!_{2}^{\;,\;\;\;}$ or so. Make 2 sc in each ch to end. Tie off and cut leaving $1/4^{\circ}$ end or weave in. No bead detail necessary. The purple one in the picture was a flub but it hangs pretty straight. Someone told me you make the curlies by single crocheting EXTREMELY tightly the whole length. Well, I thought I could get it tighter by using a smaller hook, so I tried that: first ch with size 5 hook, change to size 10 hook, sl sts in back bump. It doesn't make a curly one, but it doesn't look too bad. Hangs straighter than variety 2, but it is kind of stiff. The 2 sage green and 6 cream markers with the pearls are made with size 30 thread and a size 10 hook. Size difference (thickness) is significant.
Abbreviations:
$\mathrm{Ch}=$ chain $\scriptstyle\mathrm{Dc}\,=$ double crochet $\mathbf{S}\mathbf{c}=$ single crochet Sl st(s) $=$ slip stitch(es) Simply Crocheted Stitch Markers $\copyright$ Peggy Laipple. You may NOT sell my design, pattern, idea, or photos to anyone in any way, shape or form. _ However, please make a thousand of these for yourself, your friends, family, loved ones, strangers, even! Just not for profit.


