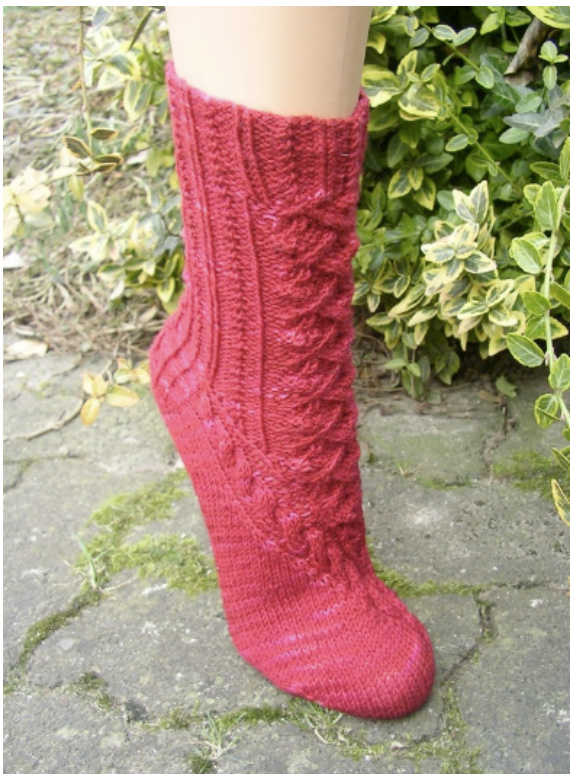
JabberSock
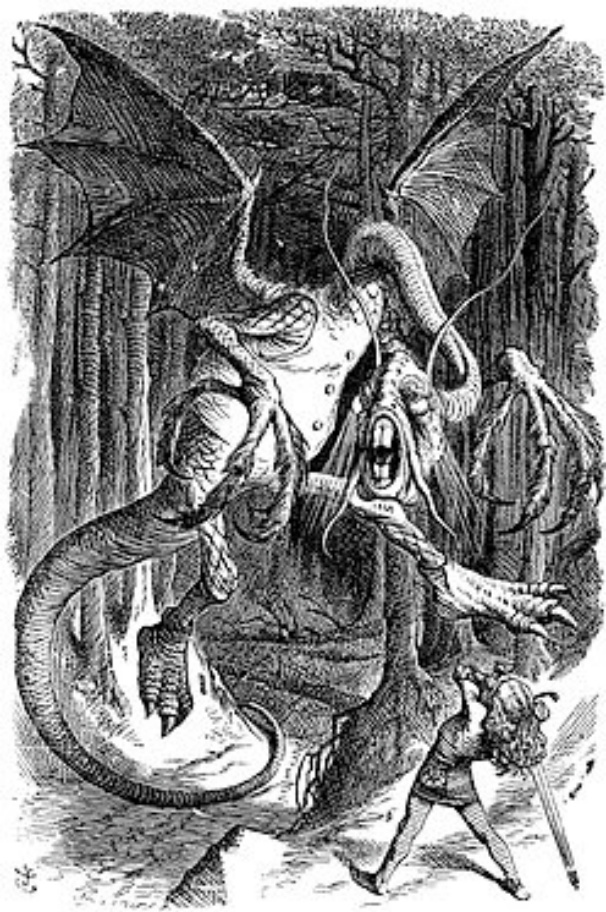
I was asked to design a "dragon" sock for the Drachenwolle aniversary KAL. what an honor! I debated long and hard over what sort of dragon I'd pick, but finally, when the stitch patterns spoke to me, I realized it had to be the Jabberwock from Lewis Carroll's famous poem. Many of the words Carroll uses are nonsense (l'm still not sure if "mimsy" indicates a good feeling or a slightly nauseous one), but some of them make sense to me. Wiffling, for example. what could that be except a shuffling, sort of two-step down the road? I've always imagined it as a cross between Snoopy's happy dance and Michael Jackson's moonwalk down the lit up sidewalk. As for a "Vorpal Sword" even Carroll couldn't tell us what it meant. I've always imagined it as one of those wavy swords from fantasy novels-- completely impractical, but pretty to look at. Anyway, in these socks, it cuts through the wiffling footsteps over the foot of the sock. I hope you enjoy knitting them up as much as I enjoyed designing them. Skill Level: Intermediate; knowledge of sock construction, cabling on both sides of the fabric, and "reading" your knitting will all be essential skills. Materials & Tools: US Size 1 (2.25 mm) sock needles (either DPN or Magic Loop are okay, but ML knitters may need additional stitch markers); tapestry needle, tape measure, stitch markers, & cable needle (or the ability to cable without a needle). Yarn: Approximately 400 yds (365m) of sock yarn. Gauge: 8 stitches and 12 rows/rounds to the inch (2.5cm) in stockinette stitch Sizing: A Small (Large) sock measures 8(9) inches or 20.5(23)cm in circumference around the ball of the foot and the cuff of the sock; Leg height and foot length are adjustable to preference and fit.
Stitch abbreviations
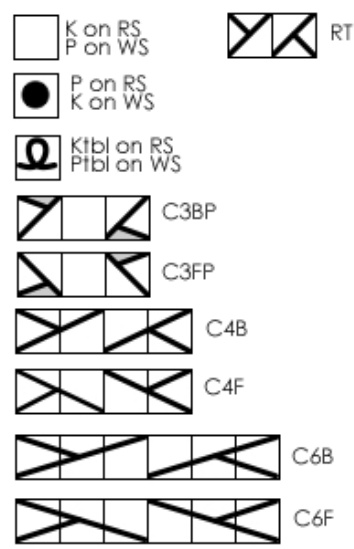
K= Knit one stitch (or as many as indicated) P= Purl one stitch (or as many as indicated) RT= work a Right Twist, or slip one stitch to a cable needle and hold to the back. Knit one stitch, then knit the cabled stitch. Ktbl= Knit one stitch through the back loop (or as many as indicated)
Ptbl= Purl one stitch through the back loop (or as many as indicated) K2tog= knit two stitches together as one P2tog= purl two stitches together as one SSK= Slip, slip knit: Slip two stitches as though to knit them (slip them individually), return them to the left hand needle and knit them together through the back loop. PM= Place a stitch marker SM= Slip the stitch marker, maintaining its place in the knitting C4F= Cable worked over 4 stitches crossing in the front of the work. ON THE RIGHT SIDE, Slip 2 stitches to a cable needle and hold to the front of the work, K2tbl, then K2tbl from the cable needle. ON THE WRONG SIDE, Slip 2 stitches to a cable needle and hold to the front (between you and the knitting), P2tbl, then P2tbl from the cable needle. C4B= Cable worked over 4 stitches, crossing behind the work. ON THE RIGHT SIDE, Slip 2 stitches to a cable needle and hold to the back of the work. K2tbl, then K2tbl from the cable needle. ON THE WRONG SIDE, Slip 2 stitches on a cable needle and hold to the back (away from you, behind the stitches you're working), P2tbl, then P2tbl from the cable needle. C3FP= Cable worked over 3 stitches, crossing in front of the work, with a purl stitch. ON THE RIGHT SIDE, Slip 2 stitches to a cable needle, P1, K2tbl from the cable needle. ON THE WRONG SIDE, Slip 1 stitch to a cable needle, and hold to the front of the work (between you and the knitting), P2tbl, K1 from the cable needle. C3BP= Cable worked over 3 stitches, crossing behind the work, with a purl stitch. ON THE RIGHT SIDE, Slip 1 stitch to a cable needle, K2tbl, P1 from the cable needle. ON THE WRONG SIDE, Slip 2 stitches to a cable needle and hold to the back (away from you, behind the stitches you're working), K1, P2tbl from the cable needle. C6F= Cable worked over 6 stitches, crossing in front of the work. Slip 3 stitches to a cable needle and hold to the front of the work, K3, K3 from the cable needle. C6B= Cable worked over 6 stitches, crossing behind the work. Slip 3 stitches to a cable needle and hold to the back of the work. K3, K3 from the cable needle.
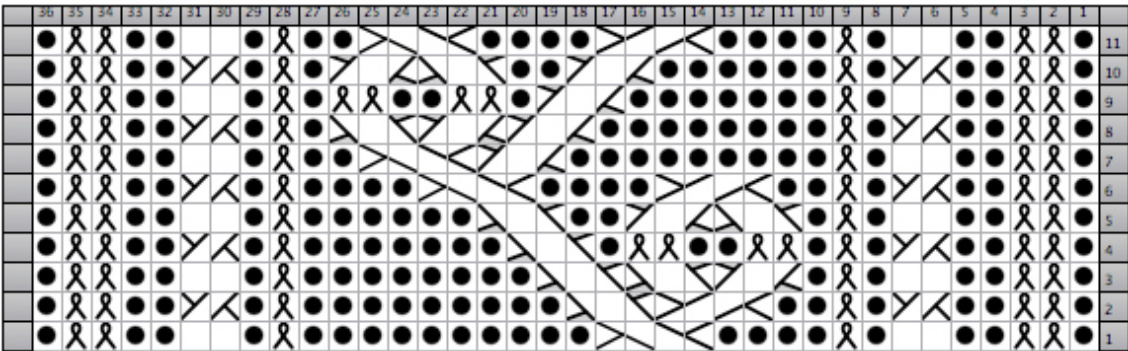
CUFF: Cast on 64 (72) stitches and join for working in the round, being careful not to twist the stitches. Small Cuff round 1: [Ktbl, P2, Ktbl] repeat to the end. Small Cuff round 2: [Ktbl, P2, RT, P2, Ktbl] repeat to the end. Large Cuff round 1: [P1, K2tbl, P1] repeat to the end. Large Cuff round 2: \*\*[P1, K2tbl, P2, RT, P1] 4x P1, K2tbl, P1, repeat from \*\* to the end. Alternate working the cuff rounds until the work measures 1.5 inches (4cm), or until the cuff reaches the desired length. Finish after working a Round 2. LEG: Begin working the appropriate size Wiffling chart. Each chart round represents half the stitch count and should be worked twice to complete each round. IMPORTANT NOTE: Work chart round 1 ONLY once. Rounds 2-11 form the repeat. Continue working the chart until the leg reaches 5.5 (6.5) inches or 14(16.5) cm. Note which round you complete last. You'll continue from that point for the Heel Flap and Top of the Foot. HEEL FLAP: The heel flap is worked back and forth (as for flat knitting) over half the stitches and continues the pattern as it has been established. Heel Flap Row 1 (right side): S1, work stitches 2-32 (2-36) as charted, turn work. Heel Flap Row 2 (wrong side): S1, working in reverse direction and using wrong side stitch definitions, work stitches 31-1 (35-1). Repeat rows 1 & 2 until the heel flap measures 2.5 inches or 6.5 cm. Finish after working a right side row. HEEL TURN: The heel turn is worked back and forth using short rows, beginning with a wrong side row. Row 1: S1, P18 (20), P2tog, P1, turn work. Row 2: S1, K7 (both sizes), SSK, K1, turn work. Row 3: S1, P8, P2tog, P1, turn work. Row 4: S1, K9, SSK, K1, turn work. Row 5: S1, P10, P2tog, P1, turn work. Row 6: S1, K11, SSK, K1, turn work. Row 7: S1, P12, P2tog, P1, turn work. Row 8: S1, K13, SSK, K1, turn work. Row 9: S1, P14, P2tog, P1, turn work. Row 10: S1, K15, SSK, K1, turn work. Row 11: S1, P16, P2tog, P1, turn work. Row 12: S1, K17, SSK, Kl, small size stop here. Large size: turn work. Row 13: S1, P18, P2tog, P1, turn work. Row 14: S1, K19, SSK, K1. GUssET: The gusset returns to working in the round using the heel turn stitches, picked up stitches, and the reserved leg stitches. At this point, the pattern is written for DPNs, but Magic Loop knitters can easily continue using stitch markers to note needle placements. Set-up Round: Using the needle currently holding the Heel Turn stitches, and working on the right side of the fabric, pick-up one stitch in each of the slipped stitches along the side of the heel flap (this is now Needle 1). Using a second needle (Needle 2), work the next round of the wiffling Chart across the top of the foot stitches (you should have noted the round number when finishing the leg). Using a third needle (Needle 3), pick-up the same number of slipped stitches along the other side of the heel flap AND knit 10(11) of the heel turn stitches from Needle 1. This is the new beginning of the round, and should be the center of the heel.
Right Sock Only:
Gusset Round 1: On Needle 1, Knit to the last 10 stitches, PM, work the 9 stitches of the Vorpal Sword Chart, and using the last stitch of Needle 1 and the first stitch on Needle 2, work a SSK. On Needle 2, work stitches 2-32 (2-36) of the Wiffling Chart. On Needle 3, K1, SSK, knit to the end of the round. Gusset Round 2: On Needle 1, Knit to the marker, SM, work the 9 stitches of the Vorpal Sword Chart, K1. On Needle 2, work stitches 2-32 (2-36) of the Wiffling Chart. On Needle 3, knit all stitches. Gusset Round 3:On Needle 1,knit tothe marker, SM, work the 9 stitches of the Vorpal Sword Chart, and using the last stitch of Needle 1, and the first stitch on Needle 2, work a SSK. On Needle 2, work stitches 3-32 (3-36) of the Wiffling Chart. On Needle 3, K1, SSK, knit to the end of the round. Gusset Round 4: On Needle 1, knit to the marker, SM, work the 9 stitches of the Vorpal Sword Chart, K1. On Needle 2, work stitches 3-32 (3-36) of the Wiffling Chart. On Needle 3, knit all stitches.
Left Sock Only:
Gusset Round 1: On Needle 1, knit to the last 3 stitches, K2tog, K1. On Needle 2, work stitches 1-31 (1-35) of the wiffling and slip the last stitch to Needle 3. On Needle 3, work a K2tog using the slipped stitch and the first stitch belonging to Needle 3, work the 9 stitches of the Vorpal Sword Chart, and then knit to the end of the round. Gusset Round 2: On Needle 1, knit all stitches. On Needle 2, work stitches 1-31 (1-35) of the Wiffling Chart. On Needle 3, K1, work the 9 stitches of the Vorpal Sword Chart, knit to the end of the round. Gusset Round 3: On Needle 1, knit to the last 3 stitches, K2tog. K1. On Needle 2, work stitches 1-30 (1-34) of the wiffling Chart and slip the last stitch to Needle 3. On Needle 3, work a K2tog using the slipped stitch and the first stitch belonging to Needle 3, work the 9 stitches of the Vorpal Sword Chart, and then knit to the end of the round. Gusset Round 4: On Needle 1, knit all stitches. On Needle 2, work stitches 1-30 (1-34) of the Wiffling Chart. On Needle 3, K1, work the 9 stitches of the Vorpal Sword Chart, knit to the end of the round. Both Socks: Continue in this manner, decreasing every other round until 64 (72) total stitches remain. In each decrease round, work one fewer of the wiffling chart stitches as established. FOoT: The Vorpal Sword Cable pattern should confinuefoslashoverfhefopoffhefoof.To do this, redistribute the stitches but maintain the stitch marker's position. New stitch counts should be as follows: Needle 1: 16 (18) stitches; Needle 2: 32 (36) stitches; Needle 3: 16 (18) stitches. IMPORTANTNOTE!Workthefootof thesock until it reaches 1.5 inches or 4cm shorter than the desired total foot length-- this means you can stop AT ANY POINT in the foot instructions, and move on to the toe. I've included instructions for feet the size of Godzilla, should they be necessary; however, you need not complete them all before moving on to the toe instructions. In fact, I'd be really surprised if you did.
Right Sock Only:
Foot Round 1: Knit all stitches until the marker, SM, Work the 9 stitches of the Vorpal Sword Cable, K1. Work the remaining stitches of the Wiffling Chart. Knit the remaining stitches till the end of the round. Foot Round 2: Knit all stitches until the marker, M1, SM, Work the 9 stitches of the Vorpal Sword Cable, SSK. Work the remaining stitches of the Wiffling Chart. Knit the remaining stitches till the end of the round. Alternate working rounds 1&2 until the Vorpal Sword stitches are 1 stitch away from the left side of the top of the foot. After working a Round 1, continue with the following foot rows. Foot Round 3: Knit all stitches until the marker, M1, Sm. Work stitches 1-8 of the Vorpal Sword Chart, K2tog. Knit to the end of the round. Foot Round 4: Knit all stitches until the marker, SM, work stitches 1-8 of the Vorpal Sword Chart, Kl, Knit to the end of the round. Foot Round 5: Knit all stitches until the marker, M1, Sm. work stitches 1-7 of the Vorpal Sword Chart, K2tog. Knit to the end of the round Foot Round 6: work as for Foot Round 4, but work only stitches 1-7 of the Vorpal Sword Chart. Continue in this method, working one stitch fewer, until all the Vorpal Sword Chart stitches have been completed. Continue the foot, if more length is necessary, by knitting all stitches on every round.
Left Sock Only:
Foot Round 1: Knit all stitches on Needle 1. Work up to and including the last remaining stitch of the Wiffling Chart, K1. Work the 9 Vorpal Sword Cable stitches. Knit the remaining stitches till the end of the round. Foot Round 2: Knit all stitches on Needle 1. Work up to but NOT including the last remaining stitch of the Wiffling Chart. K2tog. Work the 9 Vorpal Sword Cable stitches, M1. Knit the remaining stitches till the end of the round. Alternate working rounds 1&2 until the Vorpal Sword stitches are 1 stitch away from the right side of the top of the foot. After working a Round 1, continue with the following foot rows. Foot Round 3: Knit all stitches on Needle 1. SSK, work stitches 2-9 of the Vorpal Sword Chart. M1. Knit to the end of the round Foot Round 4: Knit all stitches on Needle 1. K1, work stitches 2-9 of the Vorpal Sword Chart. Knit to the end of the round. Foot Round 5: Knit all stitches on Needle 1. SSK, work stitches 3-9 of the Vorpal Sword Chart. M1. Knit to the end of the round. Foot Round 6: work as for Foot Round 4, but work only stitches 3-9 of the Vorpal Sword Chart. Continue in this method, working one stitch fewer, until all the Vorpal Sword Chart stitches have been completed. Continue the foot, if more length is necessary, by knitting all stitches on every round. TOE (Both Socks): The toe of this sock is a standard wedge toe, worked (as much as possible) in stockinette. If pattern stitches remain, they should be worked down into the toe by continuing the decreases as indicated in Foot Rounds 2, 3, & 5, wITHOUT working the M1 stitches. If no pattern stitches remain, simply work the decreases as for a standard toe. \*\*If pattern stitches remain... Right Toe Round 1: On Needle 1, knit to the last 3 stitches, K2tog, K1. On Needle 2, K1, SSK, work the stitches that remain in either stockinette or in pattern as established by the foot decrease rounds, including the decrease, but EXCLUDING the M1 stitch. On Needle 3, K1, SSK, knit to the end of the round. Left Toe Round 1: On Needle 1, knit to the last 3 stitches, K2tog, K1. On Needle 2, Work the stitches that remain in pattern as established by the foot rounds, including the decrease, but EXCLUDING the M1 stitch, then knit to the last 3 stitches of the needle, K2tog, K1. On Needle 3, K1, SSK, knit to the end of the round. Both socks: 4 stitches should be decreased affer working Toe Round 1 Toe Round 2: On Needle 1, knit all stitches. On Needle 2, continue in pattern as established without working increases or decreases. On Needle 3, knit all stitches. Alternate working Toe Rounds 1 & 2 until all pattern stitches have been used, or until 40 stitches remain, whichever comes first. When all pattern stitches have been used, continue as for the stockinette toe as described below. When 40 stitches remain, work ONLY Toe Round 1(decreasing every round) until 20 stitches remain. Skip to "FINISHING." \*\*When no pattern stitches remain... Toe Round 1 (Right and Left no longer matter): On Needle 1, knit to the last 3 stitches, K2tog, K1. On Needle 2, K1, SSK, knit to the last 3 stitches, K2tog, K1. On Needle 3, K1, SSK, knit to the end of the round. Toe Round 2: Knit all stitches. Alternate Toe Rounds 1 & 2 until 40 stitches remain. Then work ONLY Toe Round 1 (decreasing every round) until 20 stitches remain.
FINISHING
Using Needle 3, knit the 5 stitches on Needle 1 (10 stitches each should now be on Needles 2 & 3). Break the yarn, and use the Kitchener stitch to close the toe. Weave in and trim all ends. Lightly block if desired. Go galumphing wherever you please in your new socks.
Left Vorpal Sword
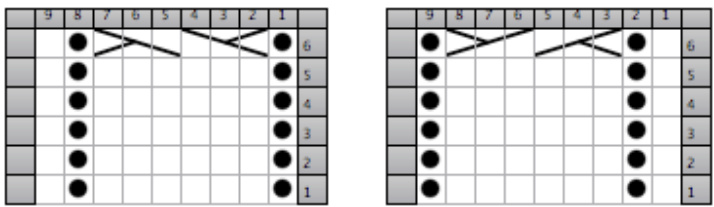
Right Vorpal Sword
Small wiffling Chart

Large Wiffling Chart