Wildlife Series
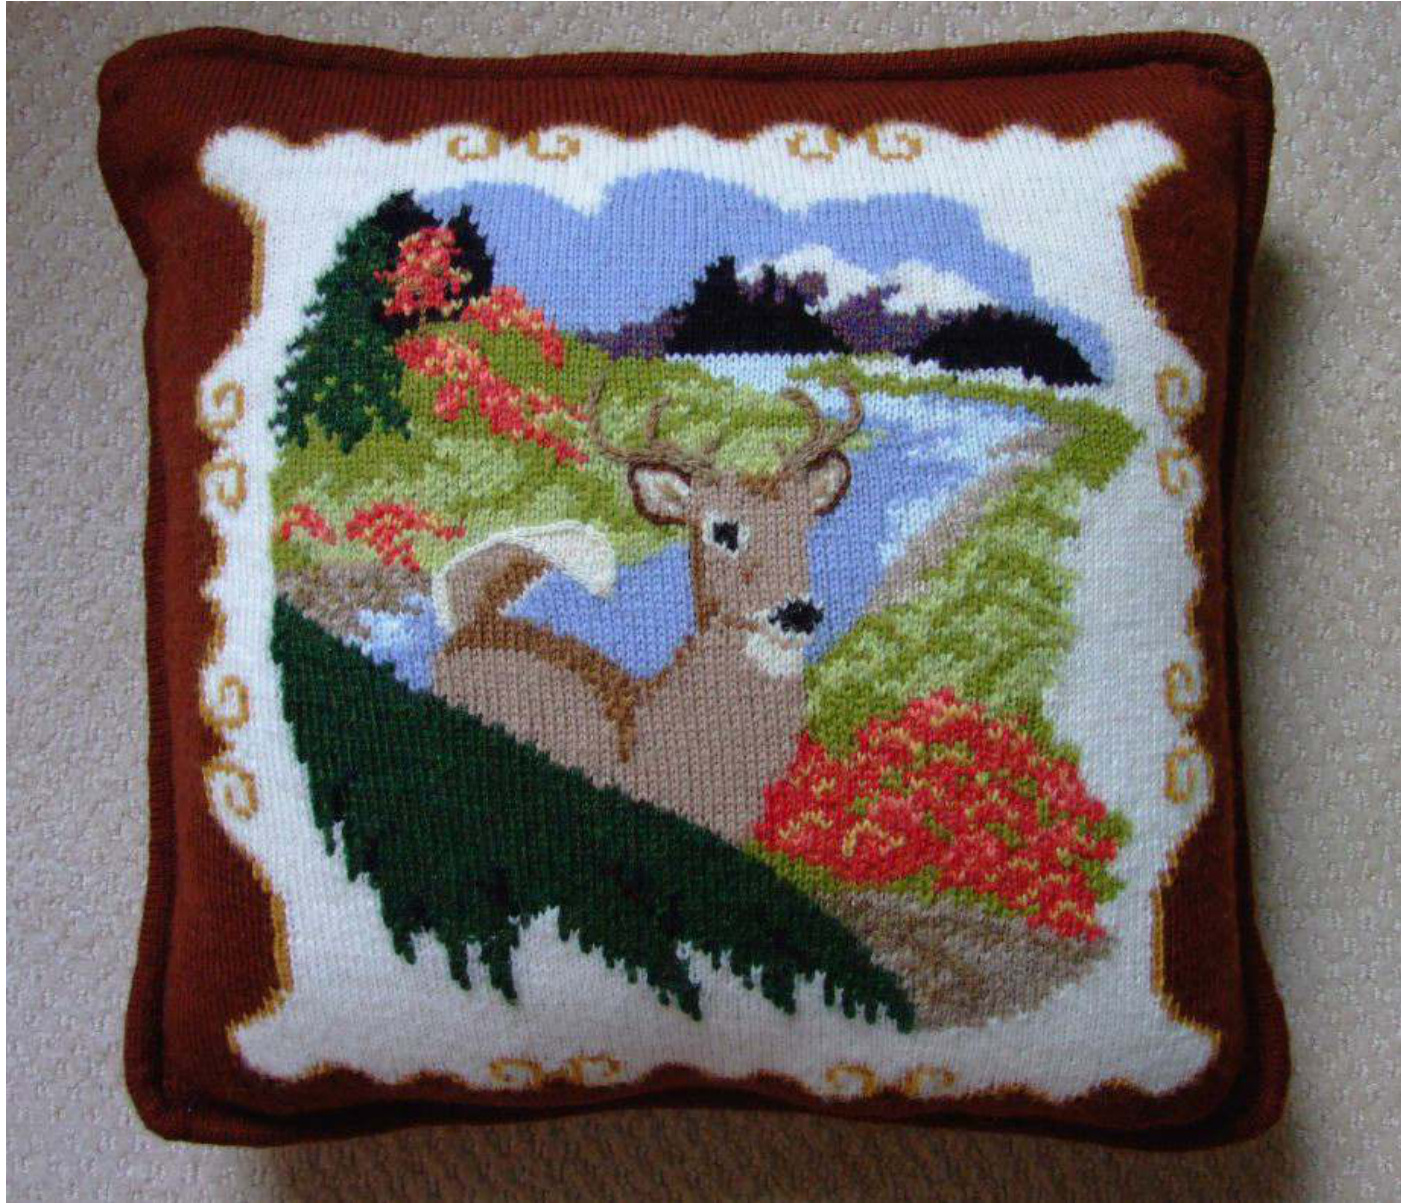
White Tail Buck - 16 inch Pillow with Knit corded Edge Copyright 2011 Judith A Helms
Contents
Knitting notes Main Chart Detail llustrations and Instructions
Knitting Notes
As before all my charts in this series are gauged for 8 stitches and 11 rows to the inch, using fingering yarn and a #1 needle ( I use a circular needle). It is very suitable for sport weight yarns also, but the pillow will be larger. 1. Knit the main chart first. 2. Add the details of the addtional fall colors as duplicate stitches . Detail stitches can also be applied using crocheted chains, crewel embroidery, cross stitch, or any stitches that will do the job. Experiment!! In this pattern I chose to use crochet chains for outline detail, and the antlers. Duplicate stitches were used for the extra splash of colors in the foliage. I have included chart inserts of the detail areas, for samples. These charts are but suggestions. It is not uncommon for me to change my mine and add a few things not in the original plan.
Knitting Supplies
Needles - 2 circle needles, size # 1, 47 inches long Why two? I knit the pillow with one. The second one is used to help block the pillow and knit the finishing rounds. Needles - 1 circle needle , size O to use for picking up stitches to complete tubing. Coiless Plns -These pins are used to mark or hold loose stitches for later adjustment. They are invaluable. Yarn - I use Knitpicks Palette fingering yarn. One skein of each color will be required. Two of the main frame color if you choose to knit the back of the pillow also. Pillow Form -16 by 16 inch square Poly fill Quilt Batting - to make cord with.
Yarn Colors
Border
Hazelnut brown(Main Color in Frame), use 2 skeins if knitting back, 3 if adding fringe. One skein each of the following: White Tumeric Soil Corinader Oster Camel Heather ( Soil, and Antlers and Tree trunk)
Buck
Doe Almond Foliage Forest Heather Teragon Green Tea Rasberry Heather Conch Semolina
Mountains
Clematis Heather/ white Back Ground Trees Black Sky Blue Bell
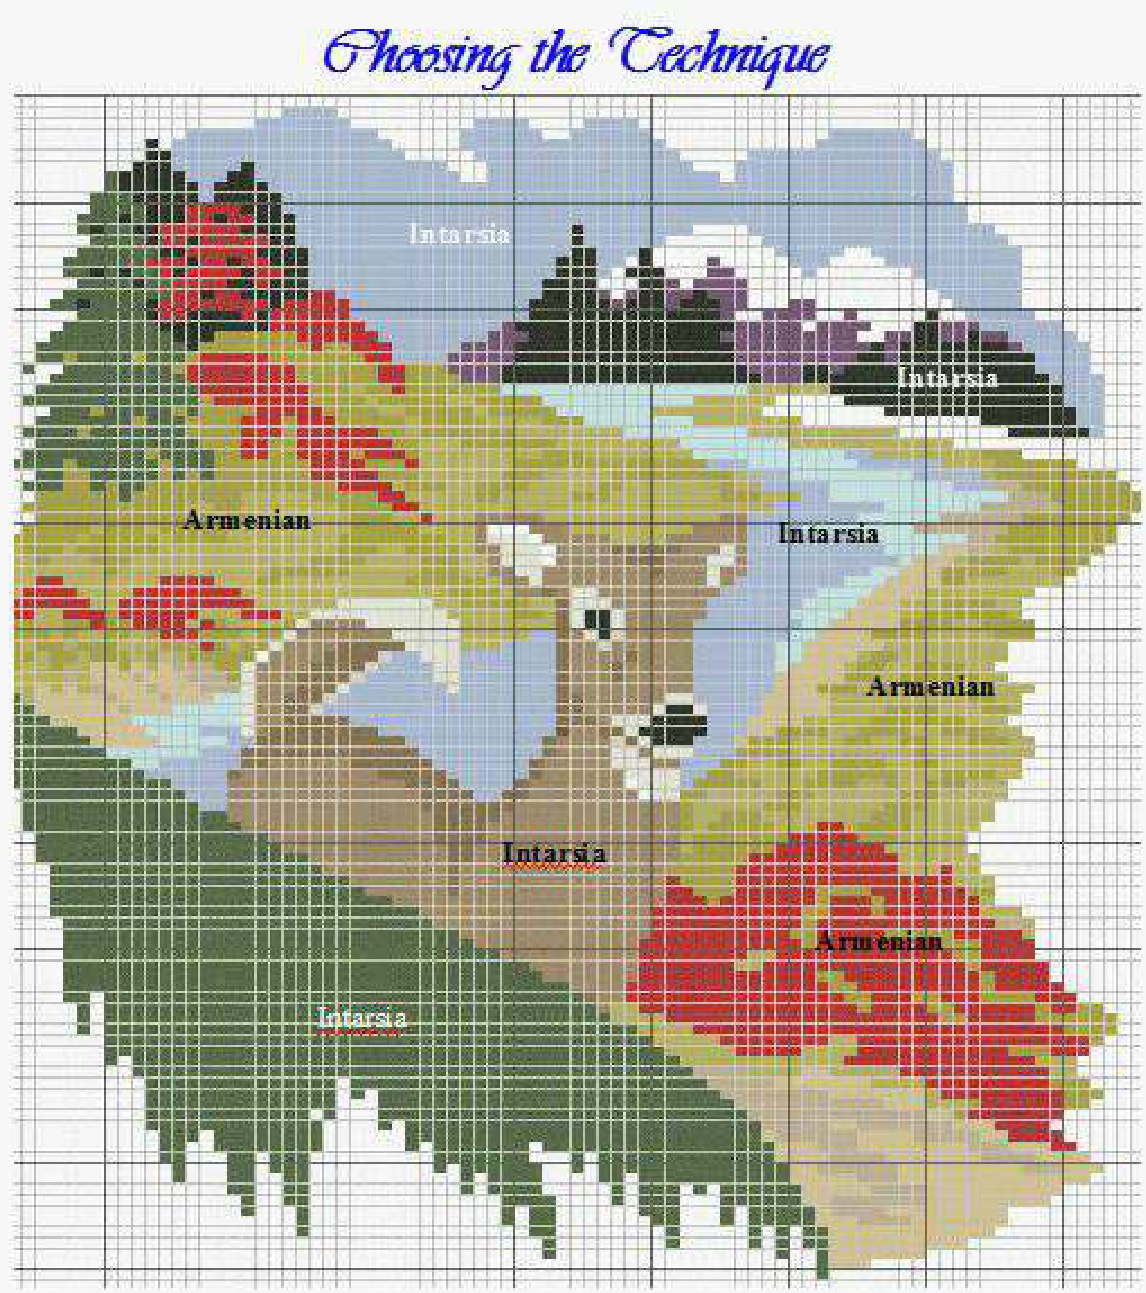
Once the chart is simplified,next comes choosing the knitting methods and techniques forspecific areas of the chart.Fromthe three method, FairIsle, Amenian knitting and Intarsia,I have chosen the following approachfor thisparticularchart. 1. Firbanch,buck, steam( including sand at waters edge),mountain, sno w, back ground trees, and sky=Intarsia Why?I wanted asingle layerwitha cleanlook 2.Greenery, shrubs, fir tee, oak,and backgiound trees = Aume nian lmitting Why? I like the blended colors in the foliage. It also gives a sortof textured look. The page above it taken from my"Painting with Yarn" E-book. These are the methods I used to knit this pillow. Of course, you can choose your ow
Beginning the Chart
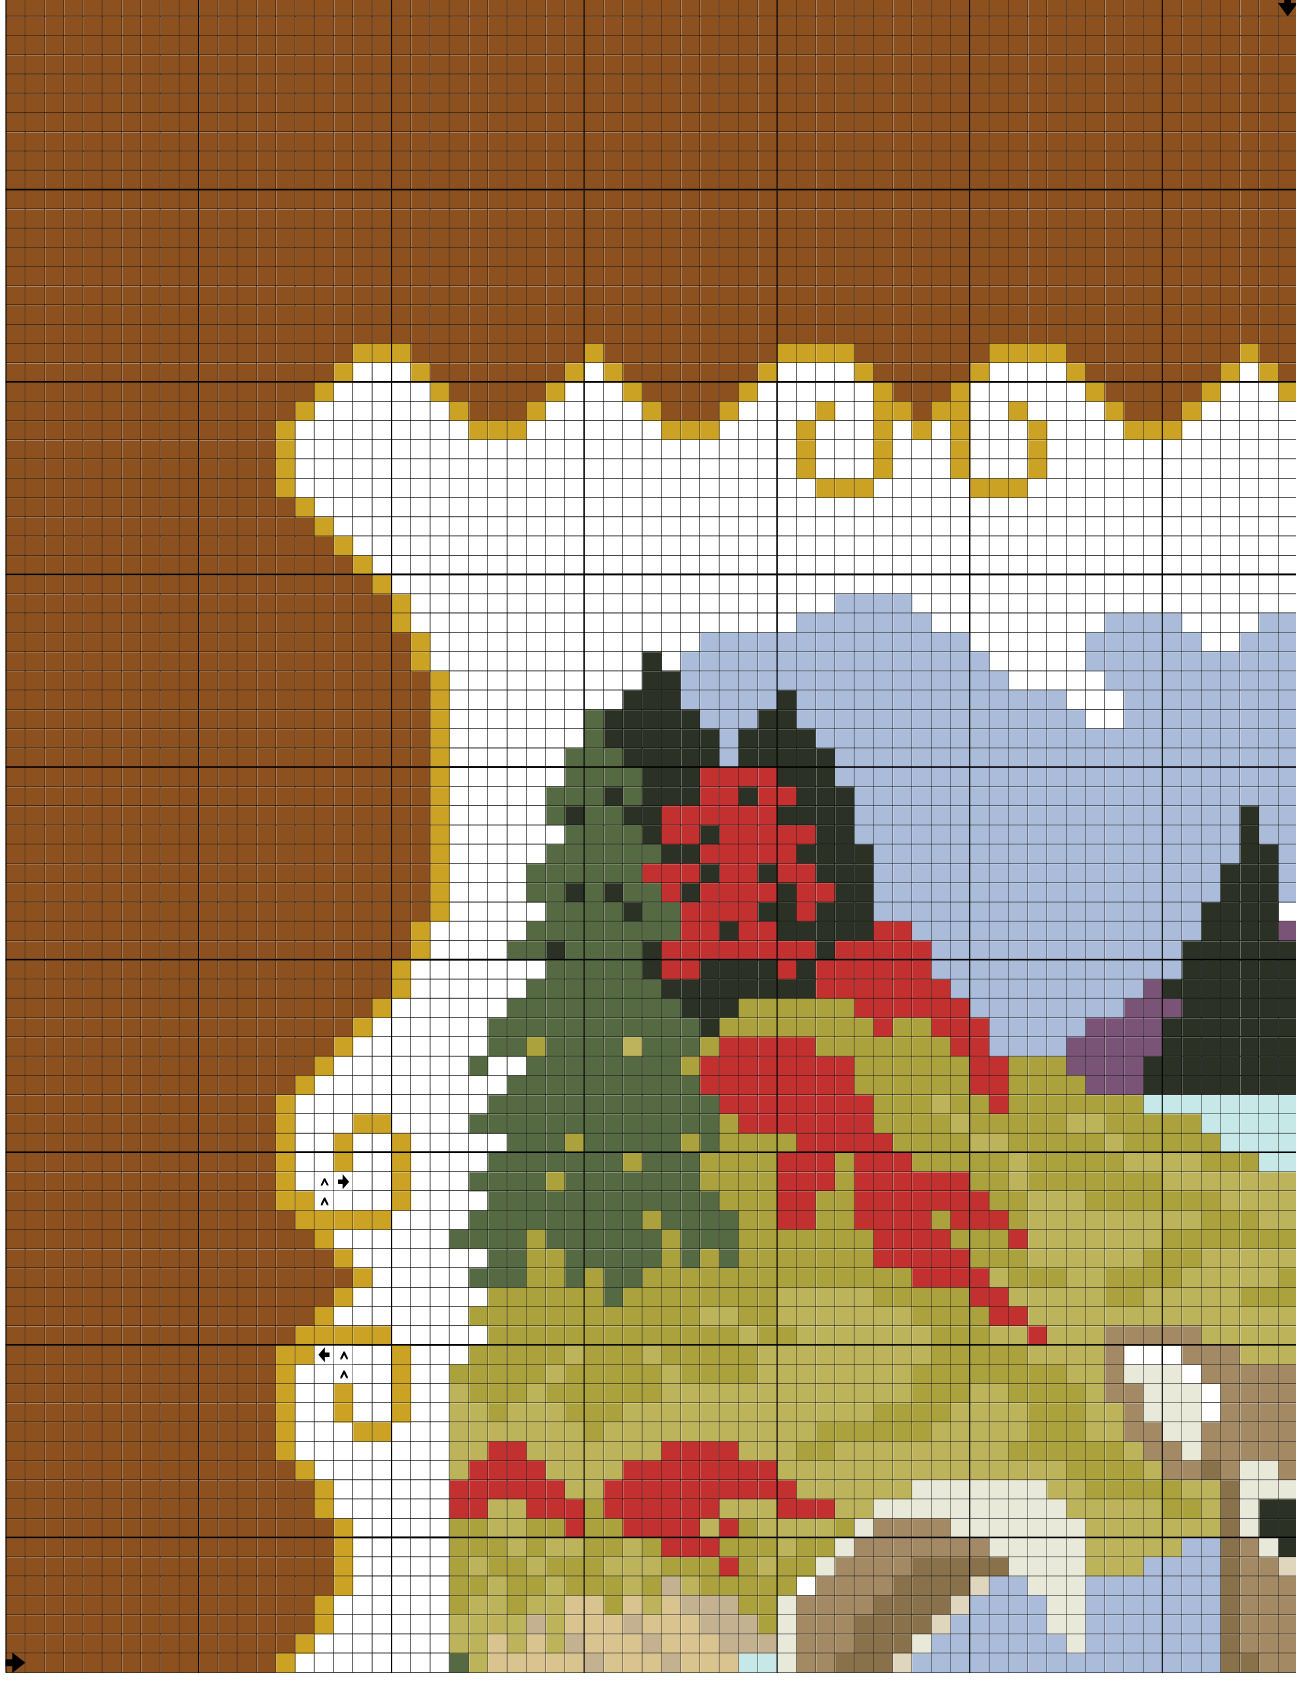
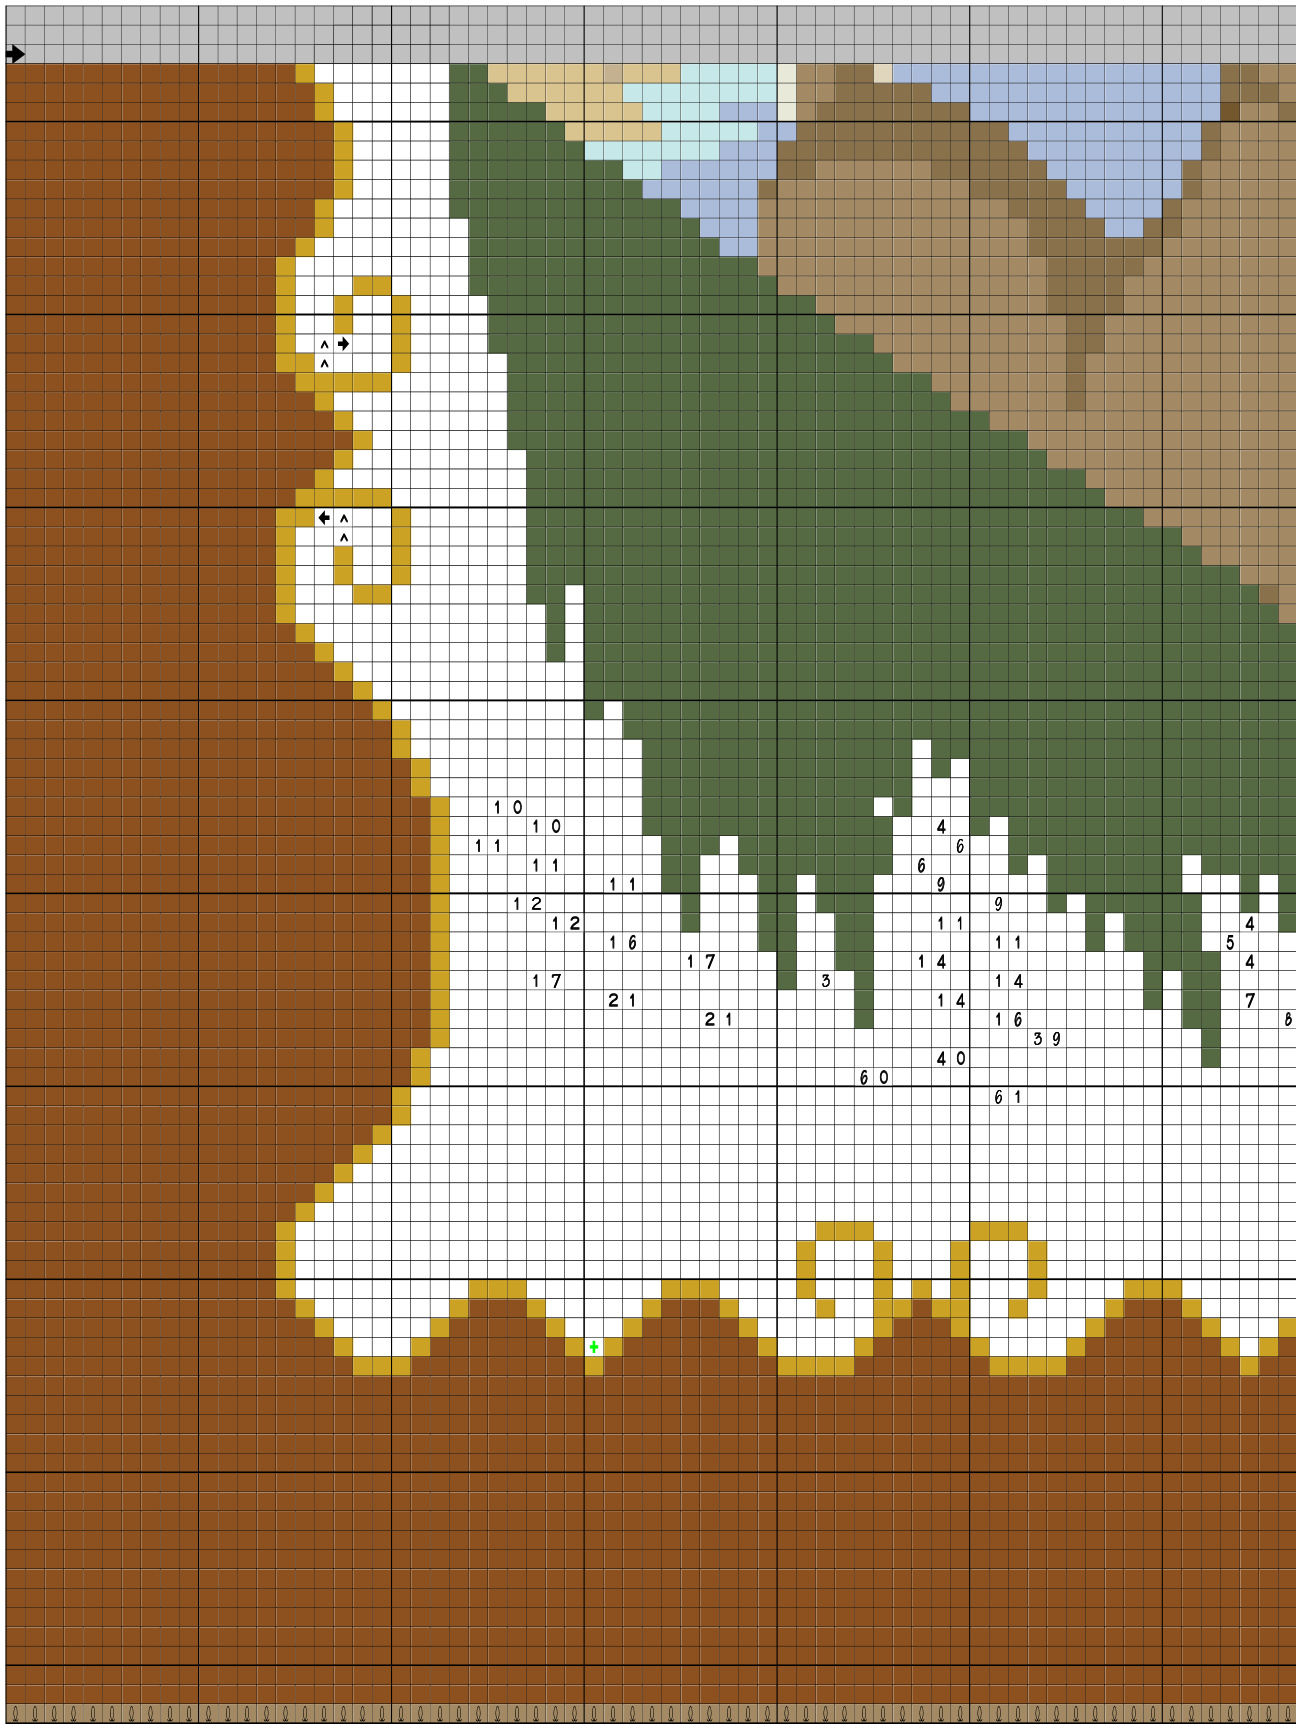
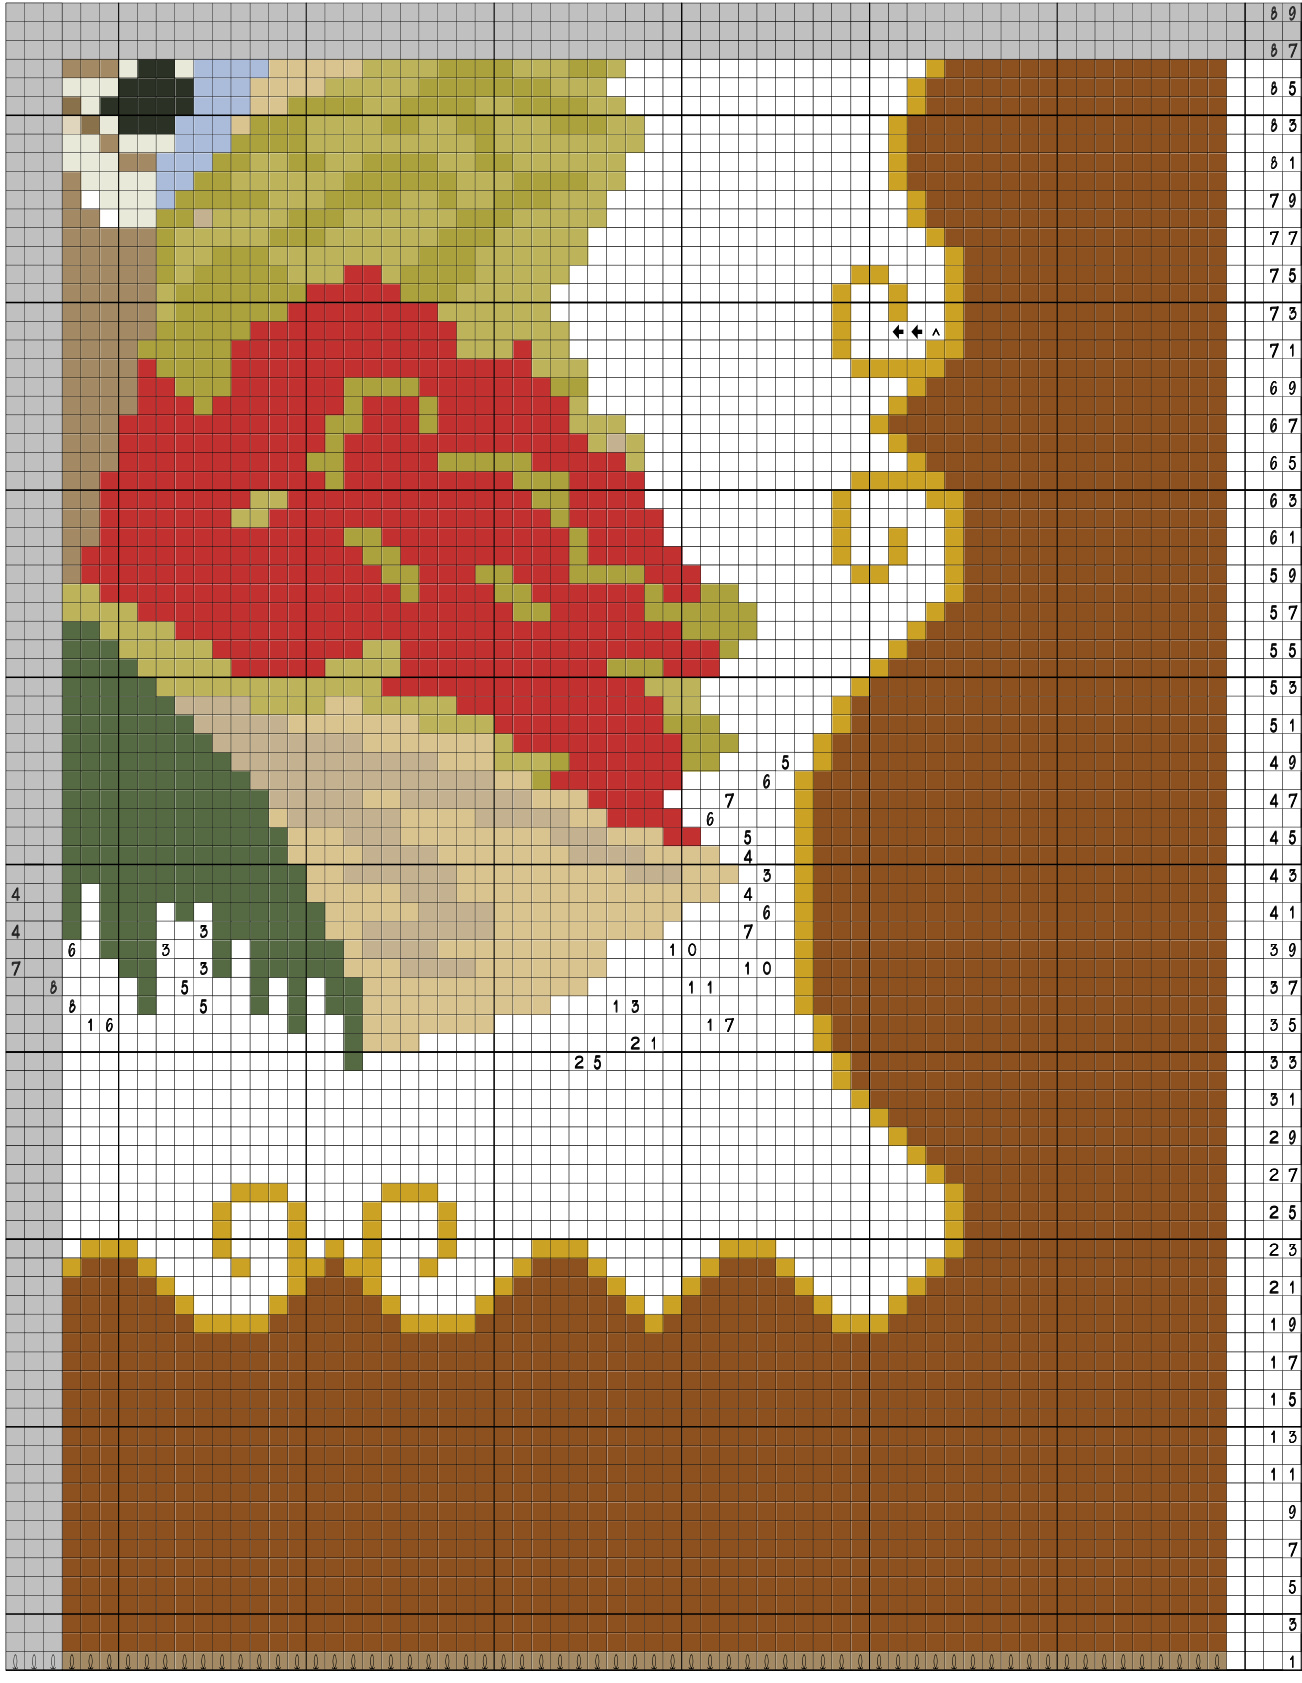
1. Cut and assemble the chart together. 2. You begin your pillow with a provisional crocheted chain, made with a piece of waste yarn or crochet thread. Use a hook (l use a 7) that mimics the gauge that you knit, or at least close to it. You will need to chain at least 139 loops. When finished, pull the last loop through, cut yarn to leave 6 inch tail, tie loop in tail. Turn the chain over to the back side. With your #1 knitting needle, and working Hazelnut Brown yarn, begin picking up the required stitches (129) through the single back loops of the chain. Be sure to keep checking your chain position, as it can easily turn on you if you are not careful. \* As an alternative provisional setup you can crochet loops over your knitting needle, then use these loops to knit in for your first row. 3. On the chart that follows, the cast on row is counted as row #1. You will eventually be adding another row as you knit around the entire pillow during the finishing process. 4. After finishing the last row of the chart, leave the stitches on your needle.
The Details
After finishing the basic knit, the next important step is checking for loose stitches. Once found, pull them to the back and attach a coiless pin. Next, weave in your ends with a sharp pointed needle that is able to penetrate the fibers of the yarns. I never loop them through the purl bars. It is very important that you take care of this first before starting on your detail stitches. With all those pesky ends out of your way you will enjoy fine tuning your work without having to deal with a mess of yarn ends on the back. You can plan on this taking you several days. I quite often unwind the plys and weave them in separately to reduce the bulk. Once your yarn ends are taken care of secure your loose stitches by using a single ply of the backgorund color of the area you are attaching them to. I twist the coiless pin to take up the slack, slip the pin out while holding the stitch in place. With your yarn needle and selected yarn, weaving in through the fibers of the stitch as well as the backgournd yarns. Next, weave in the ends of your attaching yarn. Besure to check that all stitches are secured.
Now for the Real Fun!
Fir branch and brushes
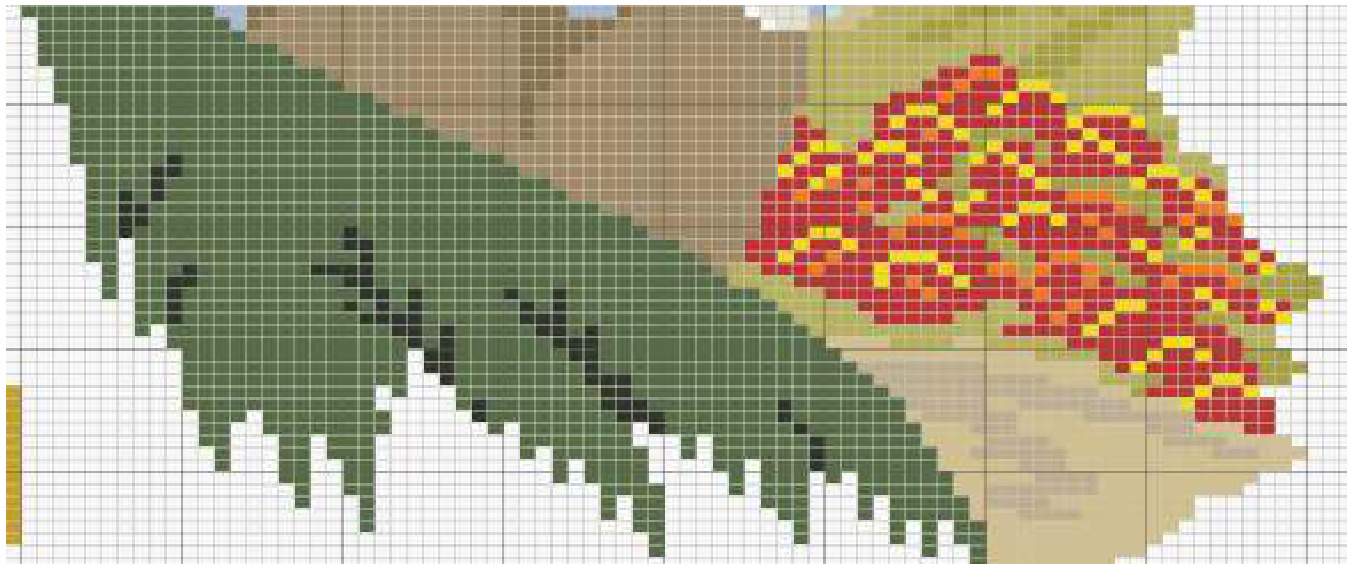
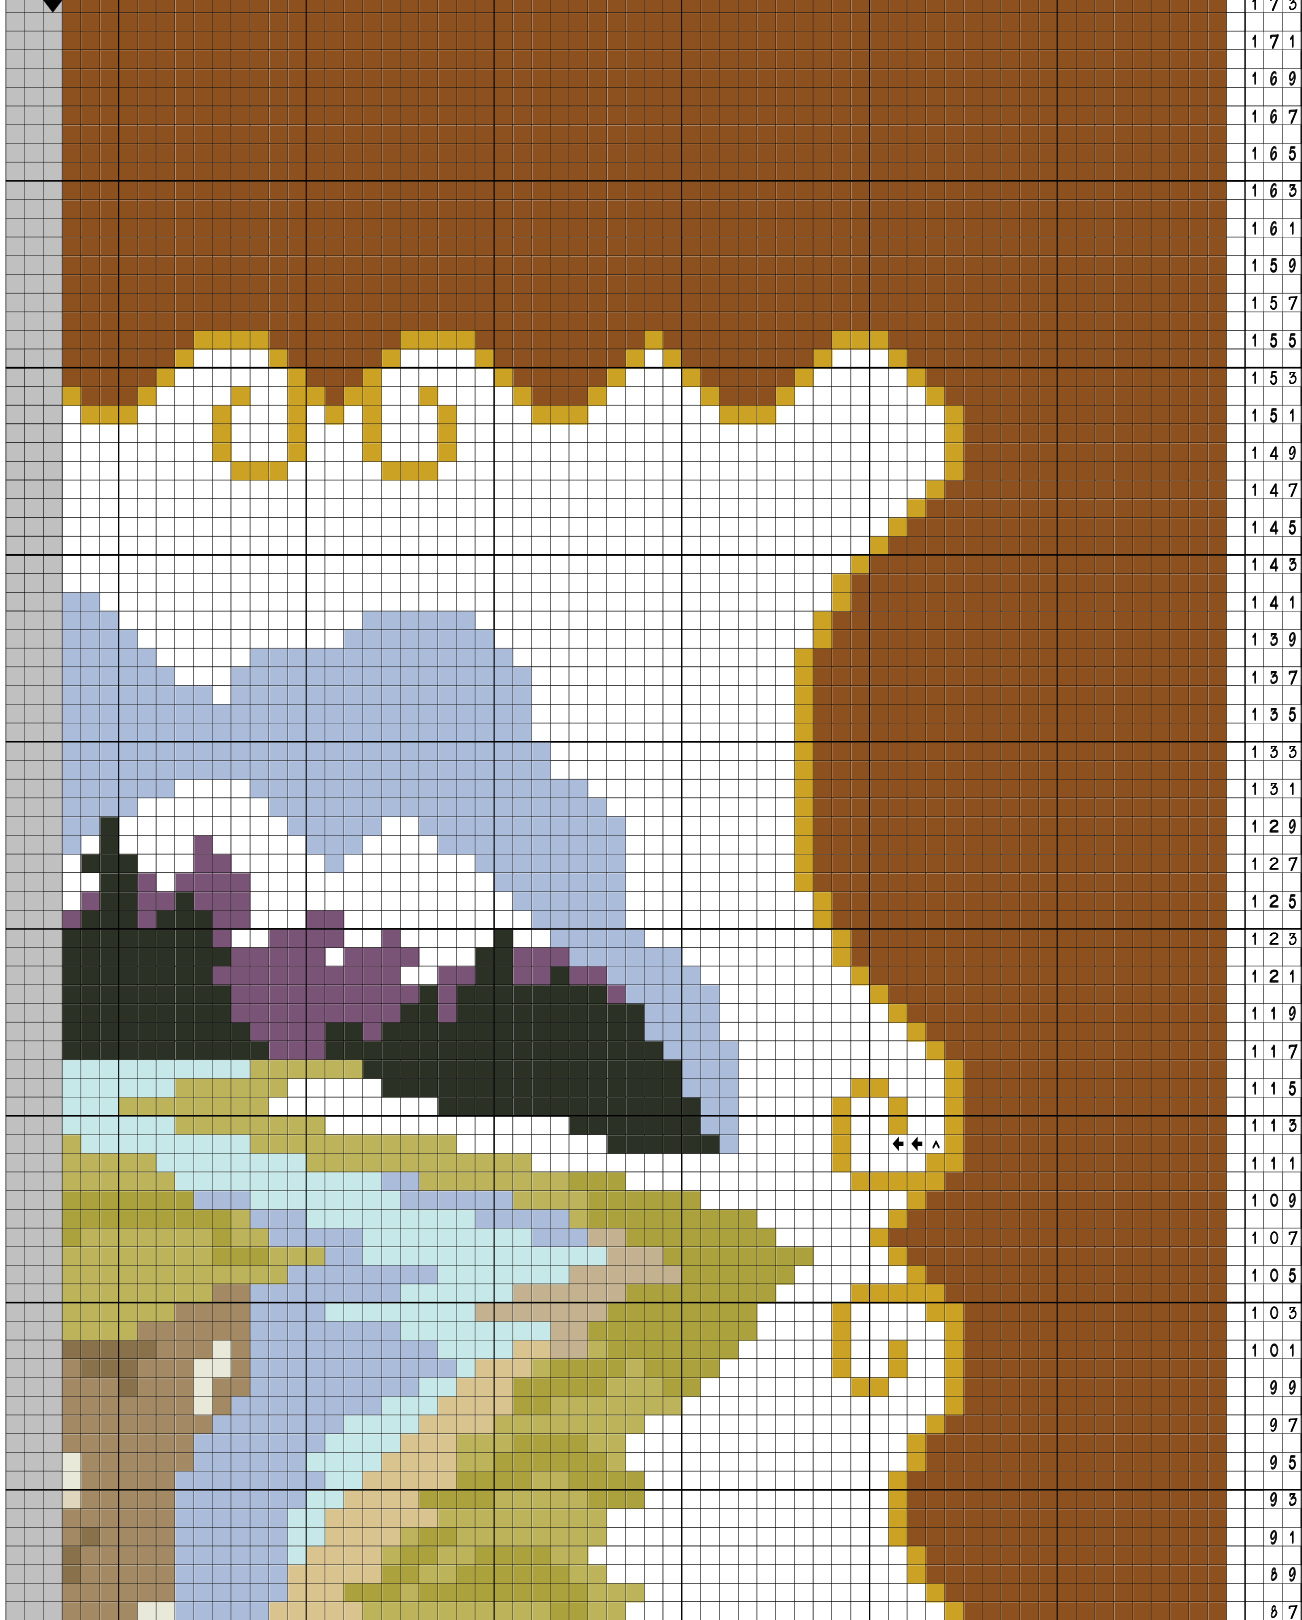
The above chart shows the duplicate stitches add to the brush and the fir branch. You can knit these in as you go,- I prefer to do it later. I use a single ply of yarn to do these duplicate stitches. This is a matter of taste. Try it, remember it can always be taken out. The duplicate stitches in black, can also be done in a darker green if desired. Check out Tutorials page at www.idahostixandstrings for further instructions. The next chart is for the upper left portion of the picture.
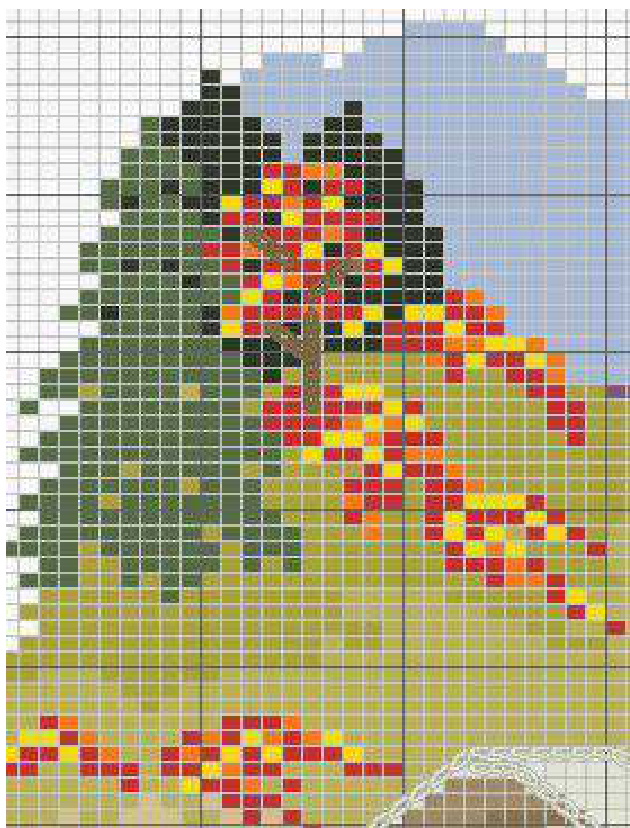
Buck Details

You will notice that I have detailed the buck with crocheted chains. The antlers are done with 2 ply yarn, and the other details are done with 1 ply of the yarn.
Finishing Up!
Once you have completed all your details and are satisfied with your creation, it's time to finish the pillow. 1. With the 47 inch circle needle you have ended the last row with, remove the last st, place marker (PM), then return the stitch to the needle. This marker, and the rest, will indicate your corner stitches (CS). 2. With right side of work facing you, turn pillow to right. You will now have the left side of the pillow in a horizontal position. Begin picking up stitches for side, sticking your needle tip down into the center of the last stitch of each row as follows; k 2, skip 1, K 2, skip 1, K 3, skip 1; [ : K 3, skip 1; K 2, skip 1; K 3, skip 1:] Repeat the pattern in []. You should have 126 sts on your needle for the side. Stop!! Put this needle (NA = needle A) aside. 3. Release stitches on provisional chain beginning at the end where your working yarn began. Carefully pull the chain back through the last loop. With wrong side of work facing you, place chain yarn in left hand while inserting the second 47 inch circle needle ( NB= needle B) into the loop of first stitch of the first row of your knitting. Pull the chain gently to the left, and continue to slide the stitches onto your knitting needle from back to front. Pick up the 129 loops. See "More Toes" tutorial on website for further instructions. 4. Slide the last stitch of the bottom row onto NA. You now have 127 stitches on the left edge of the pillow. Place marker. Knit 8 sts with NA. Slip the needle through so that all the stitches rest on the cord. You have turn the corner and have 8 sts knitted of the bottom row. 5. With NB,(where the remainder of the stitches you just released off the chain are) in your left hand pick up the other end of NB and knit across until one stitch remains on the needle. PM. K 1. 6. Using the same pick up rate as before begin picking up stitches in the center of the first stitch of every row as instructed in #2 above. end by knitting one stitch off of NA. Place marker. K next 8 stitches from NA. Pull NB through so that the stitches reat on the needle.
7. Reposition NA. Pick up opposite end of NA and begin to knit across to marker. You now have 127 stitches between markers. 8. -Slip marker, and M1(make one) in the bar between the stitches. Place another marker, isolating the CS. Rnd #1 - (mark beginning of round in the top left corner of the pillow). Continue around pillow "making one in the corners as instructed, remembering to add another marker to isolate the other corner stitches. Stop!!! Thread a contrasting yarn strand into a yarn needle and run it through the purl loops just under the last round. You can use several strands, leaving a 6 inch tail on each (I used 4). On one of the side edges mark 12 loops with a different color. This section will be used to indicate the loops adjacent to the botton hole opening you will be making on "pick up " round that will close the tube. It is important that you mark these loops(purl bars). You'll thank me later. Rnd #2 - Knit around, increasing one stitch each side of CS's. Don't forget to replace markers. Rnd #3 - Knit around -even. Rnd #4 - Repeat rnd #2. Rnd #5 - Repeat rnd #3. Rnd #6 - Repeat rnd #2. Rnd's 7-9 - Knit even. Rnd #10 - Knit around, decreasing one stitch each side of CS, as follows: Knit to 2 stitches before marker, SSK. Slip marker. K -CS. Slip marker. K 2 tog. Work in the same manner on each corner. Rnd #11 - Knit even. Rnd #12 - Repeat rnd #10. Rnd # 13 - Repeat rnd #11. Rnd # 14- Repeat rnd #10 Rnd #15 - Work even to middle of bottom edge. Bind off 16 stitches. This is the opening where you will insert your cording. Continue working even to beginning of next round. Rnd #16 - Closing the tube. Now we are going to use those loops we marked after rnd #1. With a #0 circle needle, turn you work so the back side(purl side) faces you. Beginning at the corner marker on you right (the bottom left corner of the pilow), slip the pick up needle into the marked purl loop from back to front. Work you way across (right to left)until you are on the stitch that matches the beginning of the round. Turn you work to the right side (knit side). Begin this round by knitting the stitch on your working needle with the stitch on the pick up needle together. You can K 2 tog, or you can slip one on the working needle, knit the one on the pick up needle and PSSO. Which ever way you choose will work-just get them knitted together. Continue working across all the picked up stitches. Stop!! Turn your work to the back side and repeat the pick up process, beginning at the next marker on you right. Turn your work to the right side and continue around until you come to where you have made the button hole opening for your cord. Knit 16 sts for the pick up needle only. Continue working around the the beginning marker. Your tube is now connected, and you have an opening for your cording. Next you will be knitting the seam allowance, used to sew the pillow on to it's cloth backing. Rnd #17- Knit even. Rnd's # 18-23- Repeat rounds #2-7. Bind off seam allowance.
Getting Prepared to Assemble the Pillow
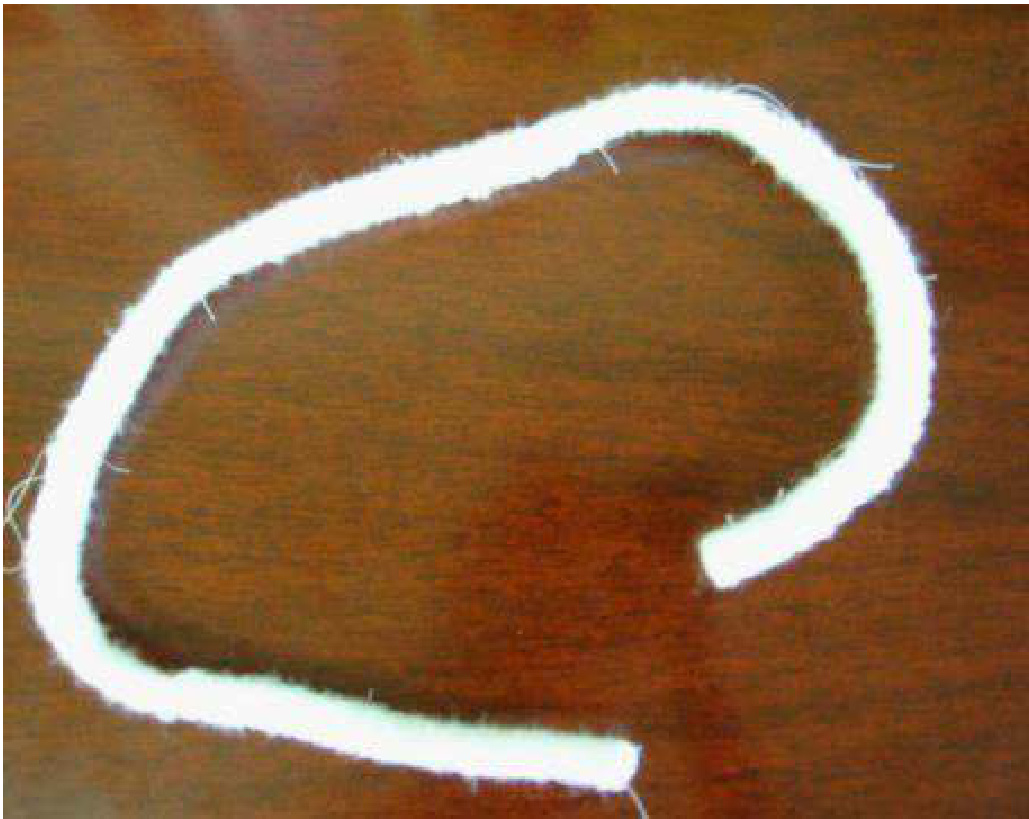
1. (Opt) I line the pillow top with a woven fabric that has been pre-washed, and pressed. I center the pillow top on the fabric and baste from the center out to hold it in place. Once it is attached firmly. I run a basting stitch along the outside edge of the tubing, making sure to put my stitches in the trench where the tube joins the seam allowance. Once that is done, your pillow top is assemble. 2. Cut the back piece 17 by 17 inches. (pre-wash and press) 3. Make you cording. I cut a strip of poly quilt batting about 1 1/2 inches wide, 72 inches long. Taking about four inches at a time I tightly roll it into a cord and fasten it (whip it together) with a needle and thread to hold it in place. See photo below.
Basic Assembly
1. With right sides facing each other, pin the pillow together with the back fabric on three sides (leaving the bottom open). Make sure that you go at least one inch around the bottom corners. Also, check to make sure to baste the tubing toward the center so it won't be caught in the sewing. Bast the two units togther. 2. Using the basting line as your guide, and the zipper foot on you machine, stitch around the three sides. 3. Trim and clip the fabric corners only. Turn right side out. 4. Insert your cording in the tube, with a large safety pin (Quilter's). Work it around gently. Make sure the tube is smoothly filled. Let the ends of the cord go for now. 5. Leaving ends of the cording loose, insert the pillow. Now, adjust the cording if necessary. 6. . Once your are satisfied with the look, cut the ends of your cording and attach the two ends together with a needle and thread. Try to make the connection smooth. 7. Close the button hole with matching thread, making sure you stitch it in the trench between the tube and the seam allowance. 8. Now hand stitch the remainder of the bottom edge to the pillow top as close to the bottom of the cording tube as possible.
Options
Making your own pillow form
Note - if you make your own pillow form of Polyester fill, you can wash the entire pillow and dry it on the form, as there is no cloth inside. See my website for instructions. The process is nery simple. Cut 2 or 4 sheets of Poly quilt batting the same size as the form you want to make. Why no seam allowance? It stretches. Machine sew three sides with 1/2 inch seam, slight cropping corners. Trim corners and turn to right side. Shape your corners gently. Now fill the center as full as you like with your favorite fill. When you think it's just about right, pin the top edge together and check it. You can use a #0 or #1 double point needle to stitck throught the surface (gently) and move the filling about a bit. When satisfied, fold in the seam allowance (1/2 inch) on open edge and hand sew together. Now you won't have to pay \$22 for a lumply form, AND the pillow can be closed on the bottom edge completely as it will dry on the form beautifully.
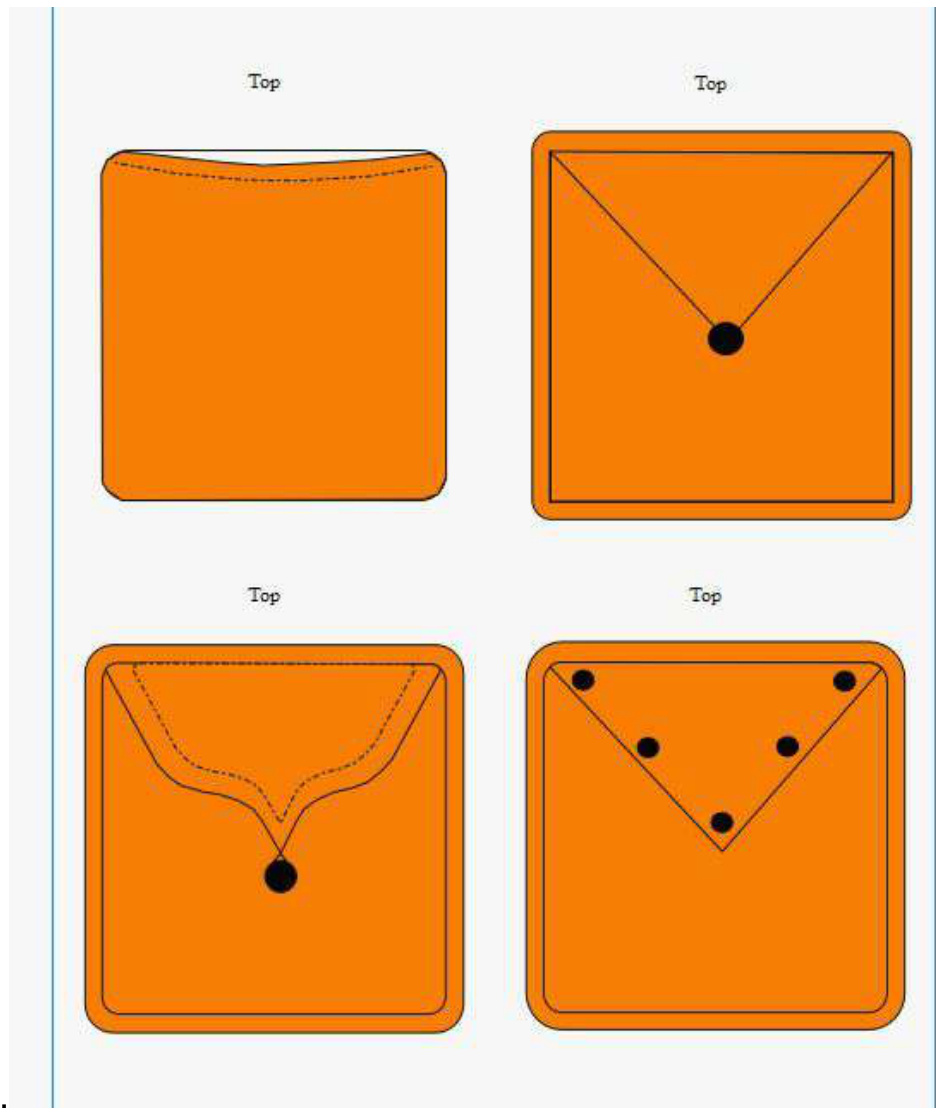
In the above illustration, you will see that a flap is created, then buttoned down to hold it is place. In the first picture at the top left, you see the back without a flap. This opening at the top is where you slip in the pillow form. The flaps can be decorative or not, depending on your mood. You could also use the open flap area to monogram the initials of your recipient, making it very personal. Use your imaginations. These are just some of my ideas for future pillows. Make sure you cut two pieces for your flap and sew it right sides together, then clip and turn. If you decide to put an round elastic loop on the point to loop over a button, don't forget to incorporate this into your tip before you sew it shut. Next, press is out carefully. I would stay stitch the top edge together so it holds it's shape. The next step for those who want to button affect is to make the button holes,(opt) monogram your initials, or anyting else you might think of), and finish preparing it to be assembled with the pillow top.
Preparing the Back of the Pillow
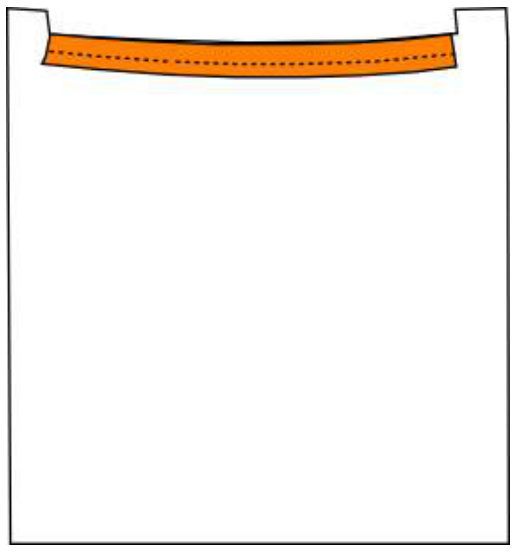
The main piece of the backing needs to be hemmed at the top. Iron down a 1/2 inch seam. Lay it back open. Measure in 1 inch from each corner. Place a pin. Stay stitch from pin to outside edge. Clip to seam. \* These tiny sections wil be sewn in as part of the main piece to incorporate the corners. Hem the remainder On your machine.
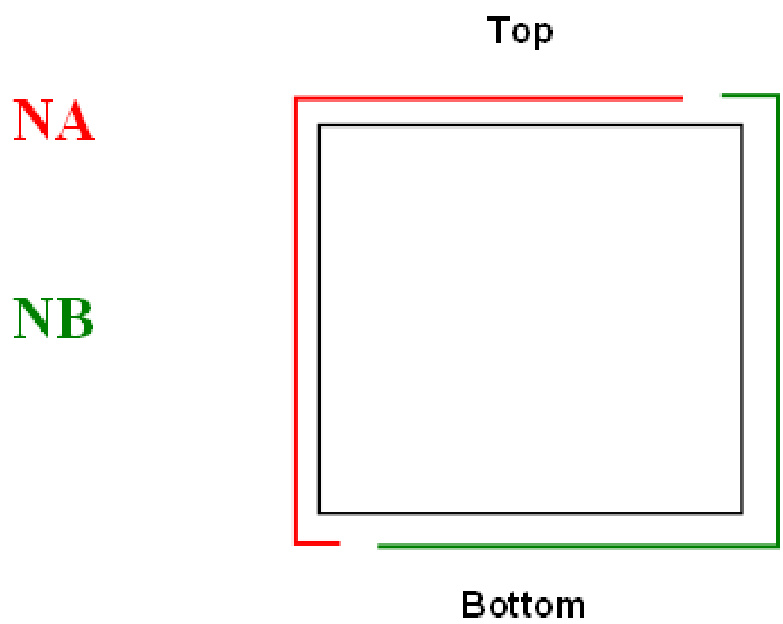
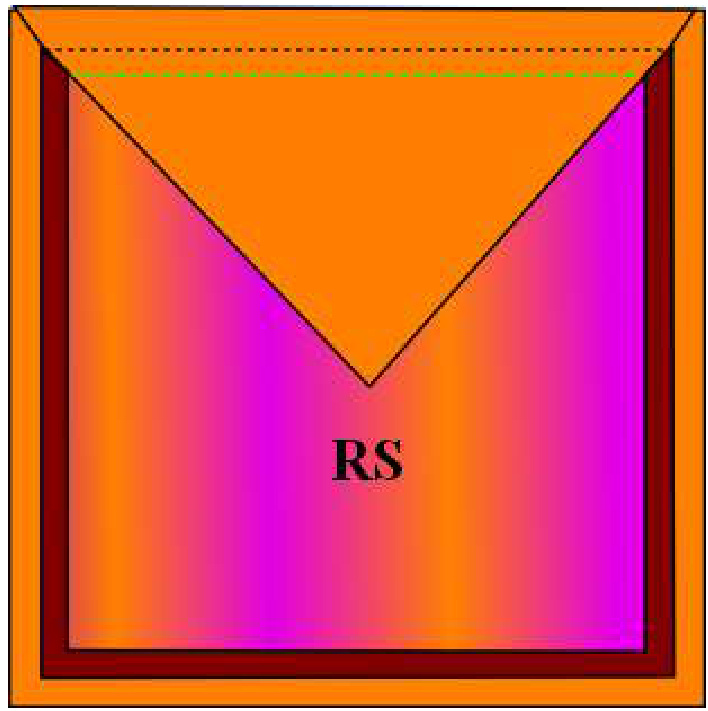
Optional Assembly 1. With right sides facing you attach the flap first, centering it on top edge. \* Note - Brown = tubing that is folded to center. Green= edge of cording tube under flap Dotted line is seam guide (basting)
2. Center back on pillow top with hemmed edge slight draping below seam. Pin down remainder of back to pillow. This time sew around the entire pillow. being careful not to catch the hemmed edge of the opening..

3. Turn right side out. 4. Follow instructions for inserting the cording in Basic Assembly. \* Note - Don't forget to sew on your button/ buttons. Happy Knitting KT


