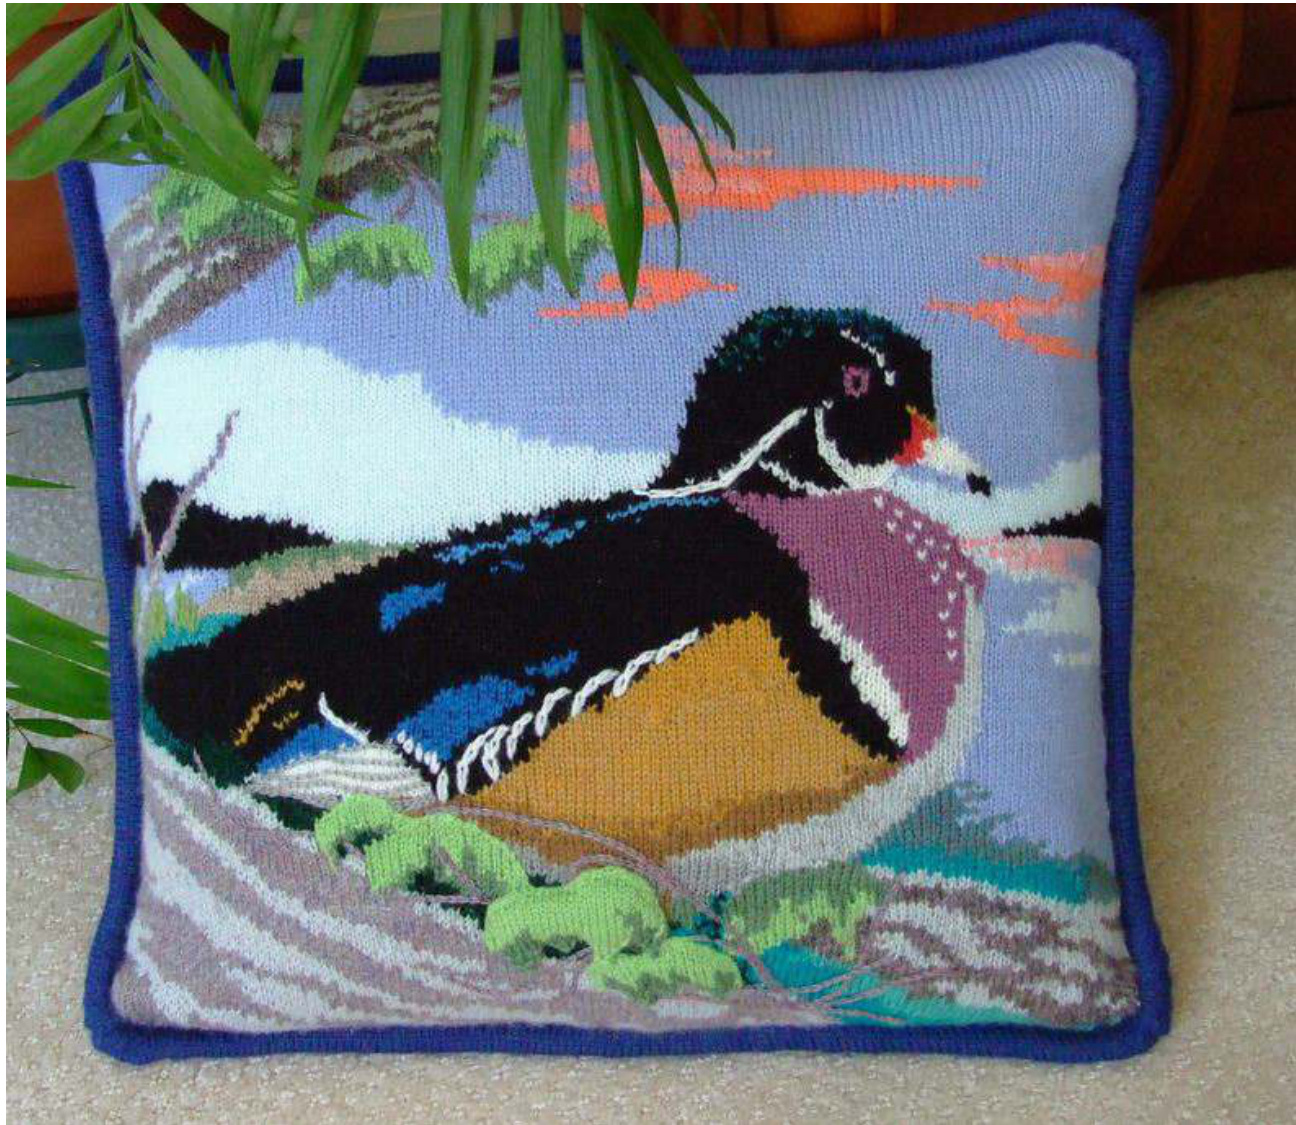
Wildlife Series
Wood Duck-16 inch Pillow Copyright 2012 Judith A Helms
Contents
Knitting notes-Main Chart-Detail llustrations and Instructions
Knitting Notes
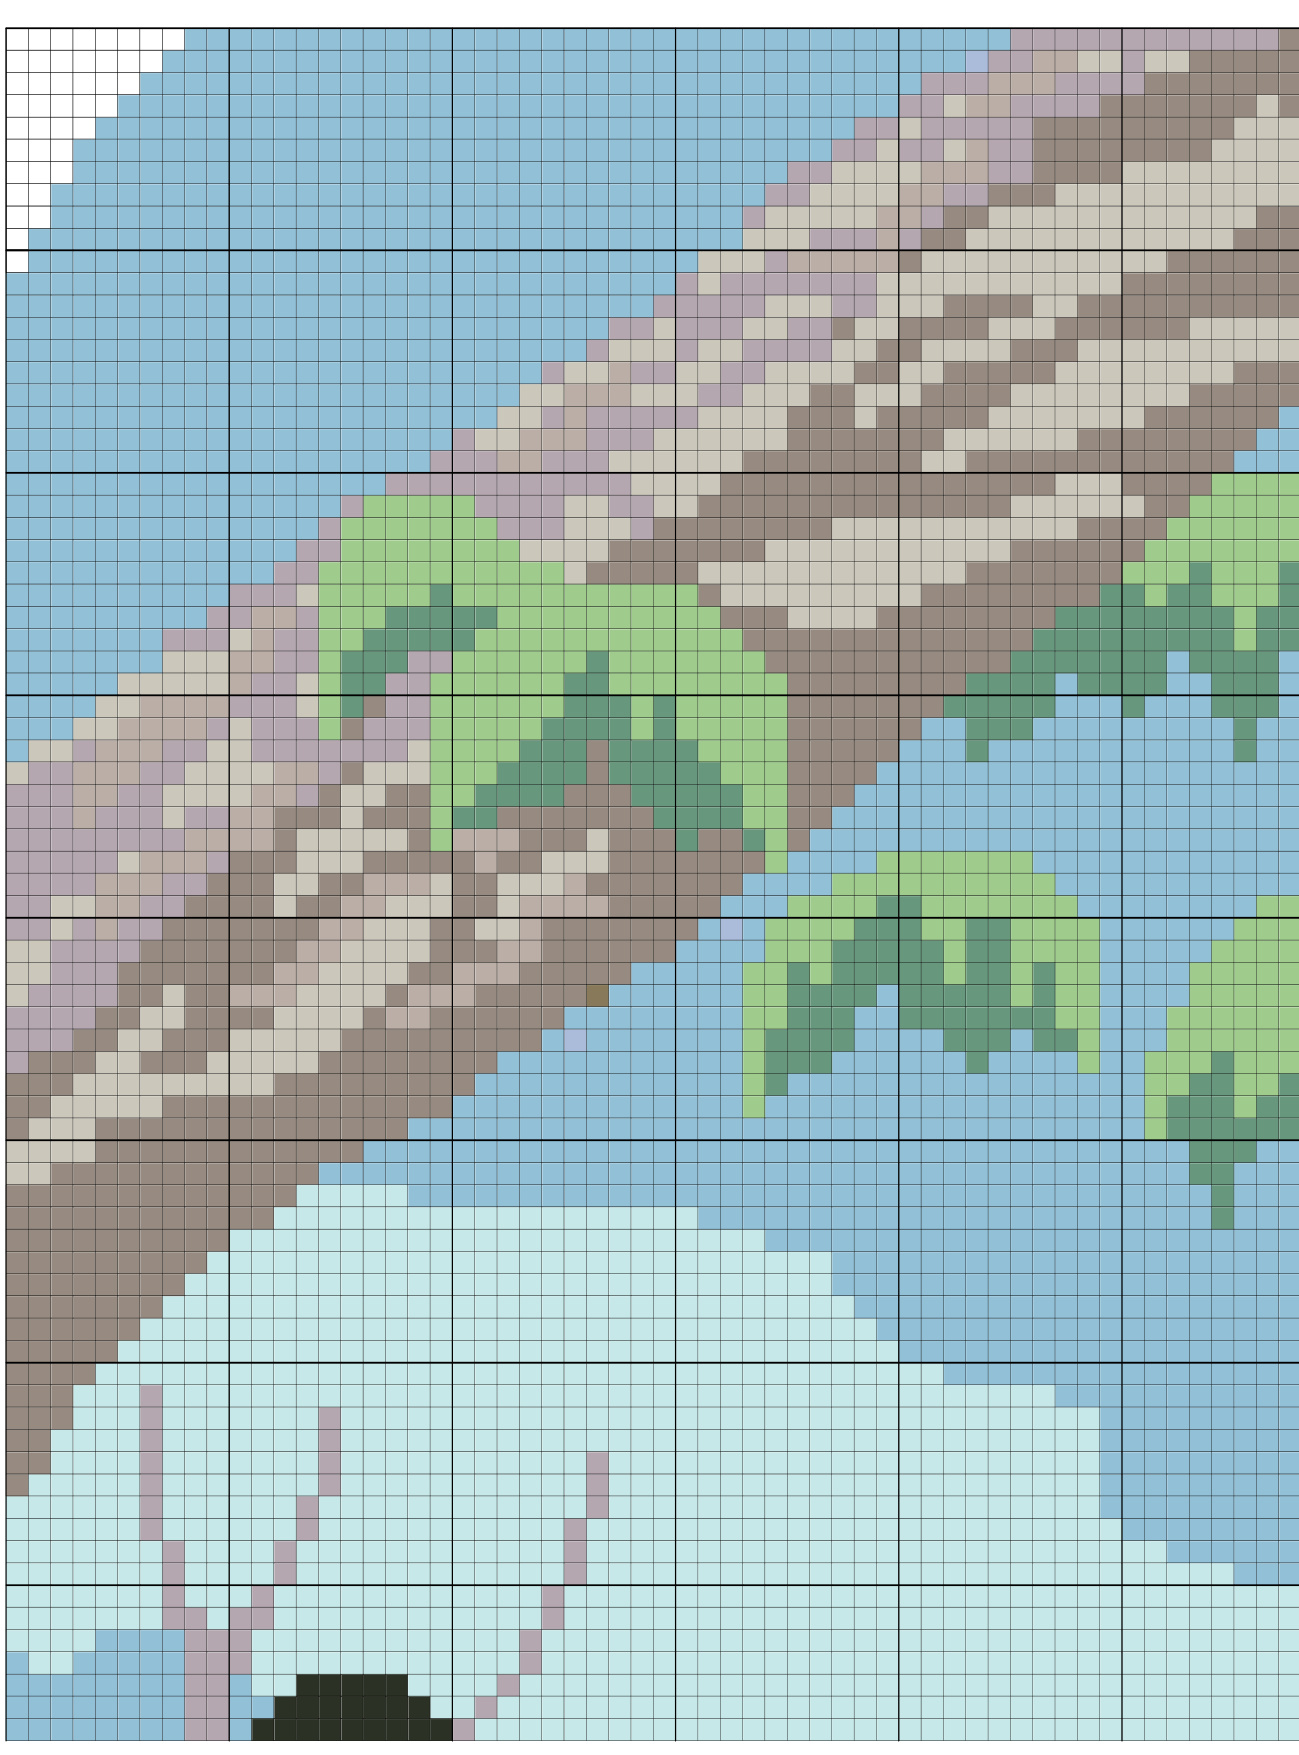
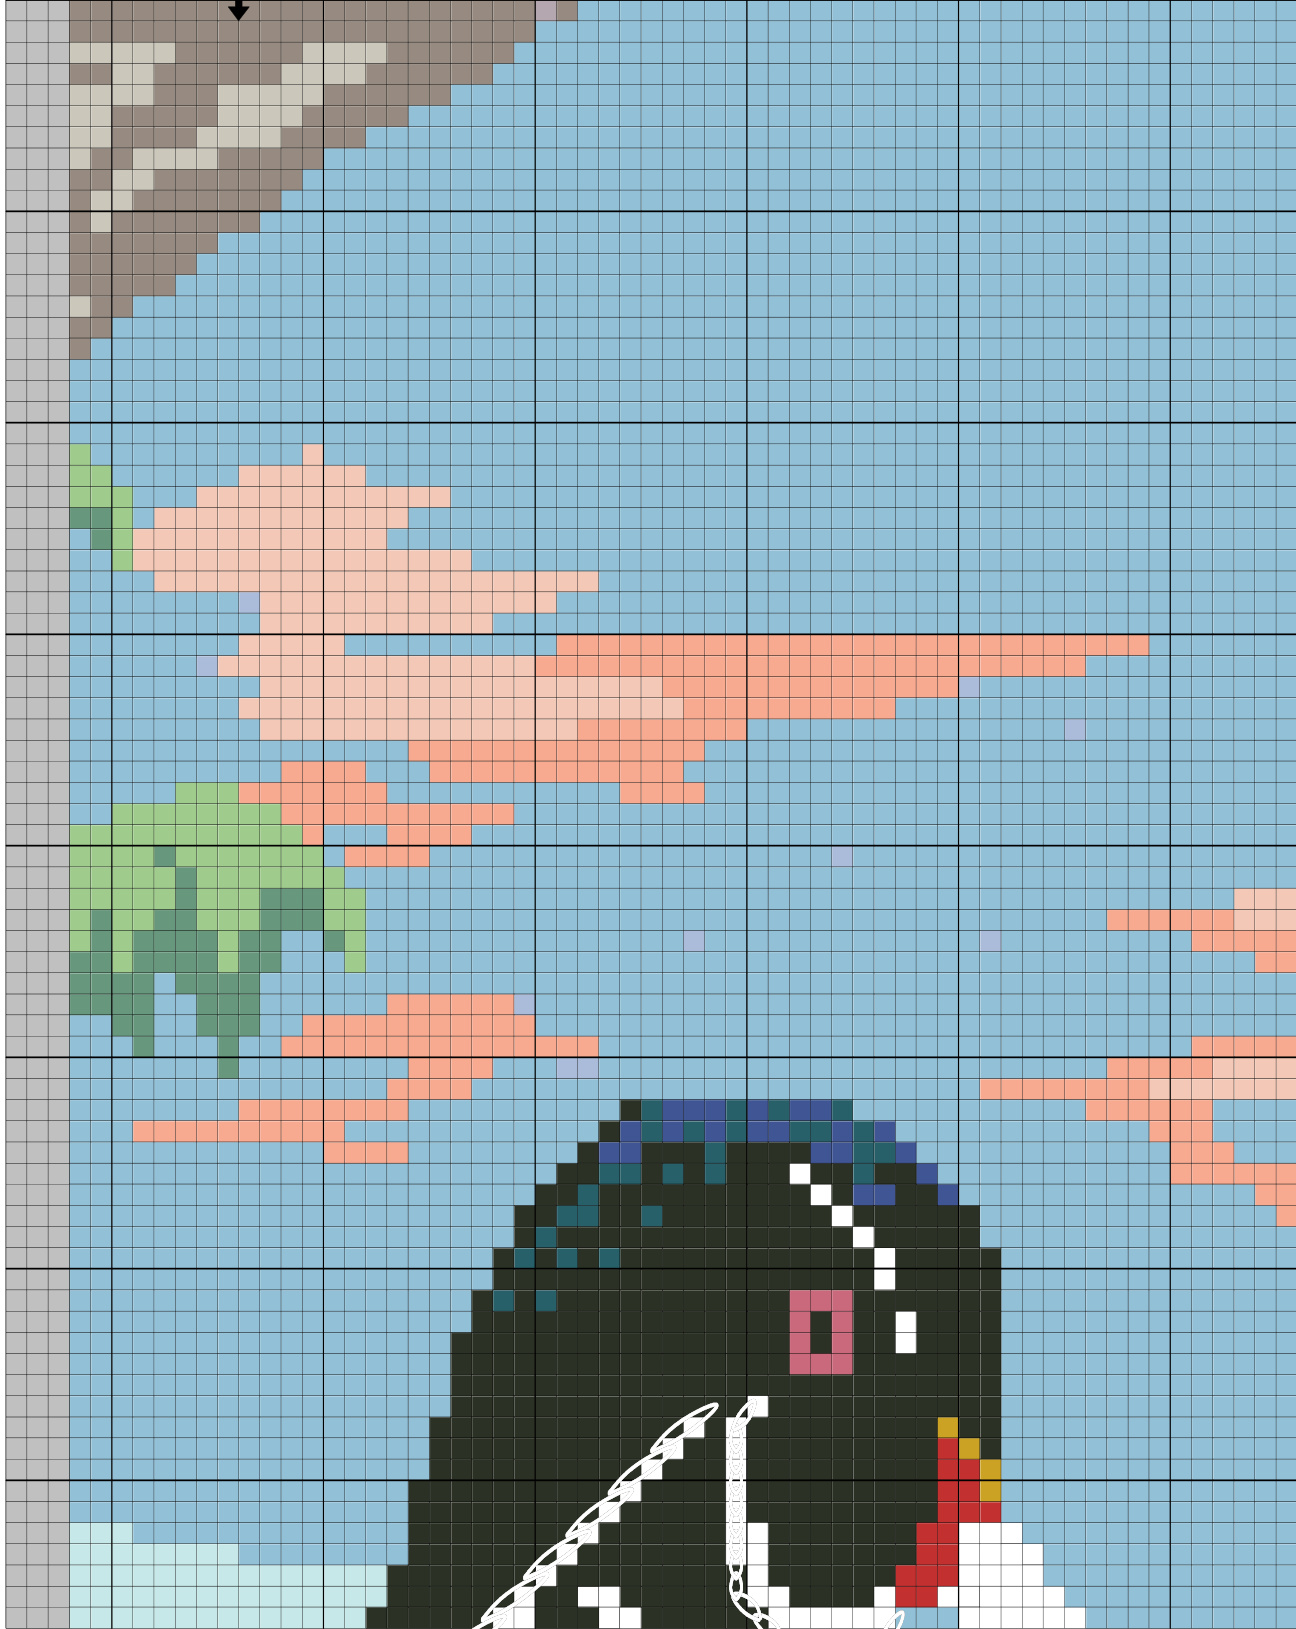
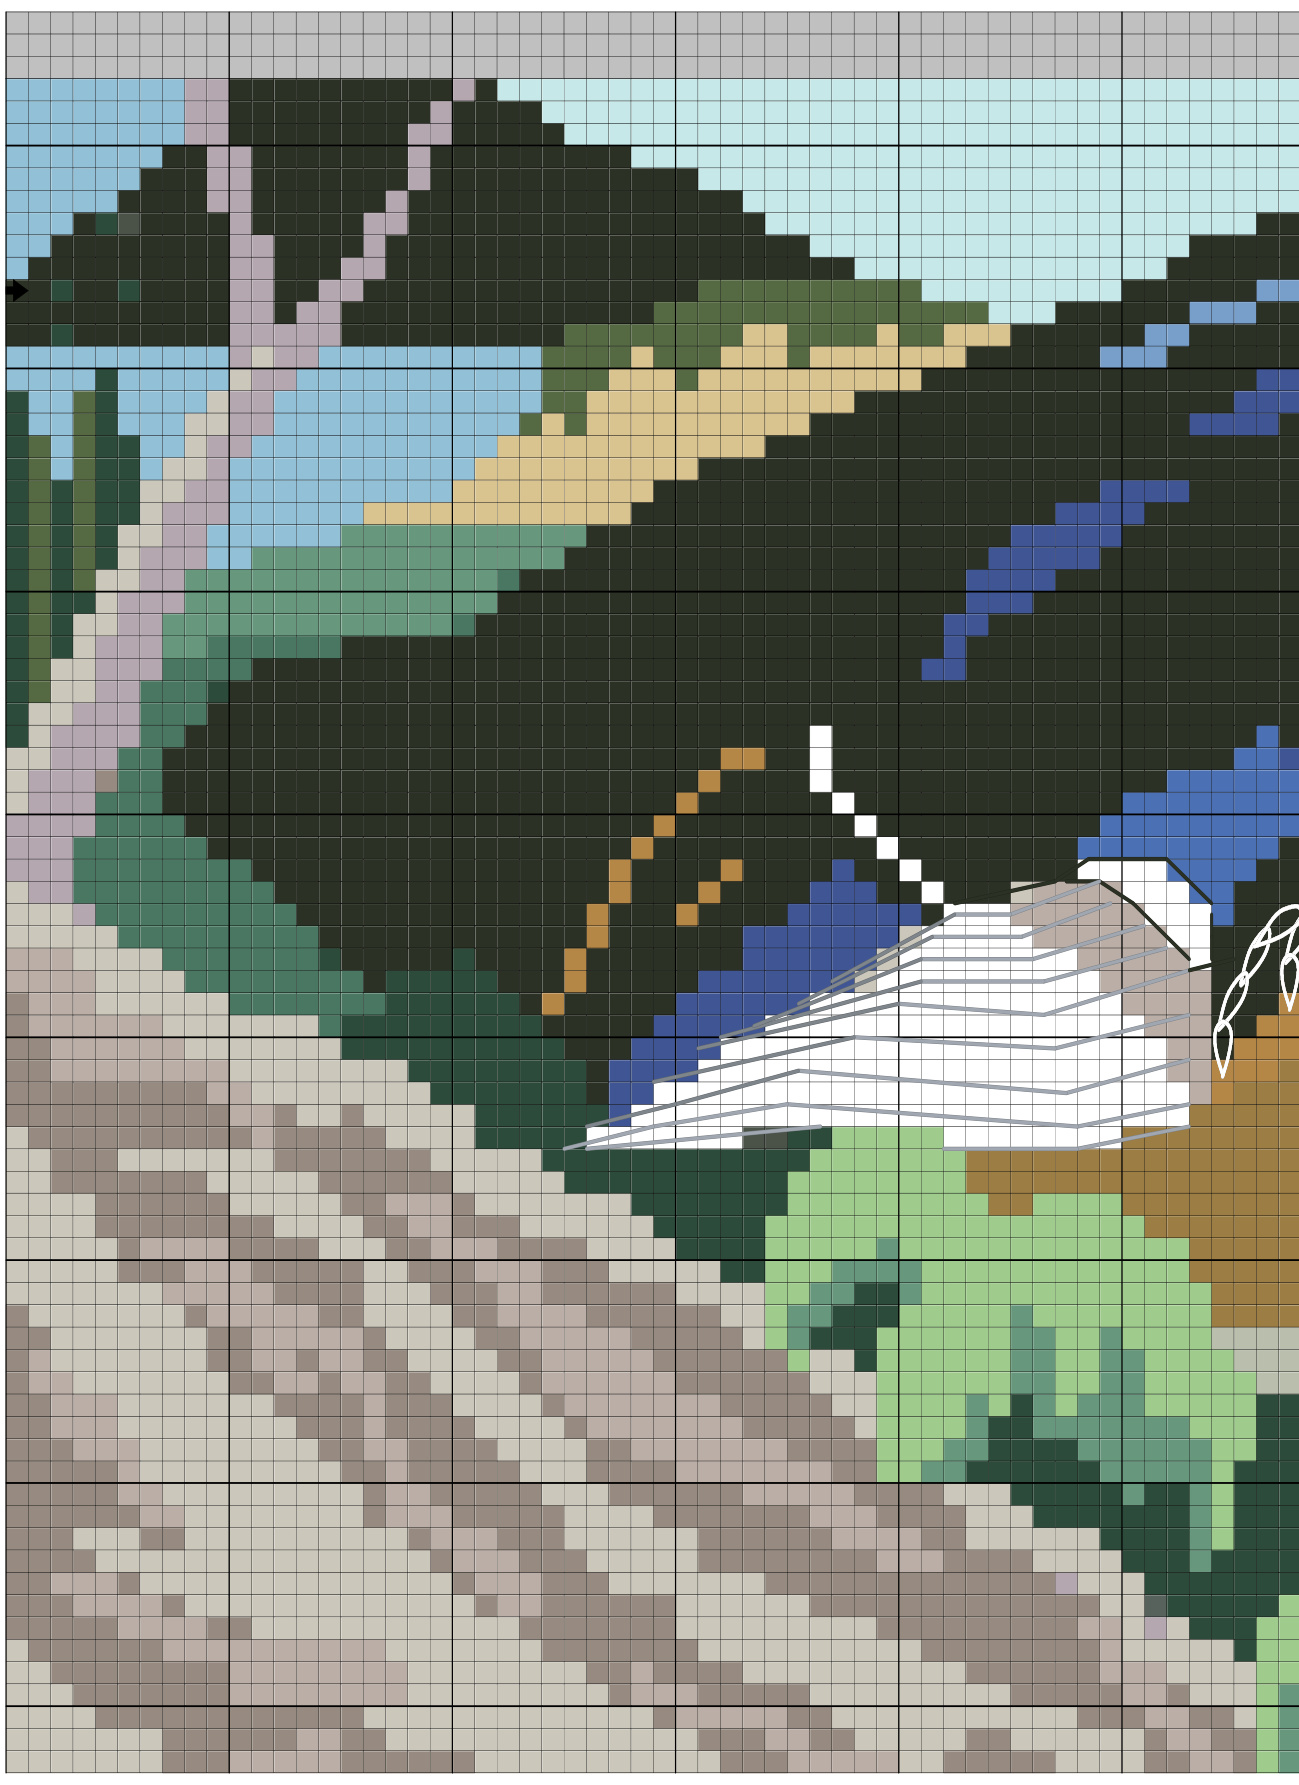
As before all my charts in this series are gauged for 8 stitches and 11 rows to the inch, using fingering yarn and a #1 needle ( I use a circular needles). Knit the main chart first, ignoring the detailed overlay stitches on the chart. Then add the other details as indicated in instructions following chart. I used the following techniques for each section Logs/leaves/portions of duck - Armenian knitting (weaving in carried yarn everyotherst.) Sky/Water - Intarsia The Cast On- is a provisional crocheted chain, plus 10- (123 chain loops). When the chain is complete, be sure to tie a knot in the end to remind yourself what end need to be opened to release the chain. Turn the chain over, count 5 chain loops in, then pick up 113 sts with working yarn through the single loop on the back of the chain. This is row #1 of chart. Crochet thread works well for the provisional chain. You can also crochet the loopover the needle itself.
Project Requirements
Needles - 2- 47 inch cricle needles, size 1 (2.50mm) - Gauge is 8 sts/11 rows Yarn - Fingering yarn ( I use Palette from Knitpicks). One skein of each of the following colors: \*These are just suggestions. You may have the yarns in your stash for this project. I will tell you that the cord tubing requires almost a full skein of yarn. Duck: White, Black, Blue, Lantana, Rasberry heather, Tumeric (gold), Suede Doe The side wing is a combo of Tumeric, Suede and Doe. Here again I blended two of the colors together using one ply of each color,then re-spun them together to blend the colors better. Sky/background: Clarity, Bluebell( You can also use Sky) Clouds : Blossom Heather and Conch Logs/branches: Mist, Silver, Iris Heather, Pumice I mixed Silver and Iris Heather together for the lighter lavender/grey look, and Pumice and Iris Heather for the darker log and shadowed areas. Mist was used for the light portions. I used the Iris heather to crochet the smaller branches in the "details" portion of the pattern. Experiment. Leaves : Any two shades of green will do. Water: Blue Bell,or Sky, Clarity, Blossom Heather, Conch, Teal, Opal Heather, Aurora. \* Some of the colors were blended as before. Use your imagination. Try blending some different shade of blues and greens. Fabric for back - 1/2 yard Pillow Form - 16 inch square Quilt batting (Poly fill) - to make cording with. You may also purchase the cording. Be sure to adjust you cording tube to the size of cord you choose. This pattern has instruction for a tube that is about 1 3/8 inch in circumference ( 15 rows)
The Chart
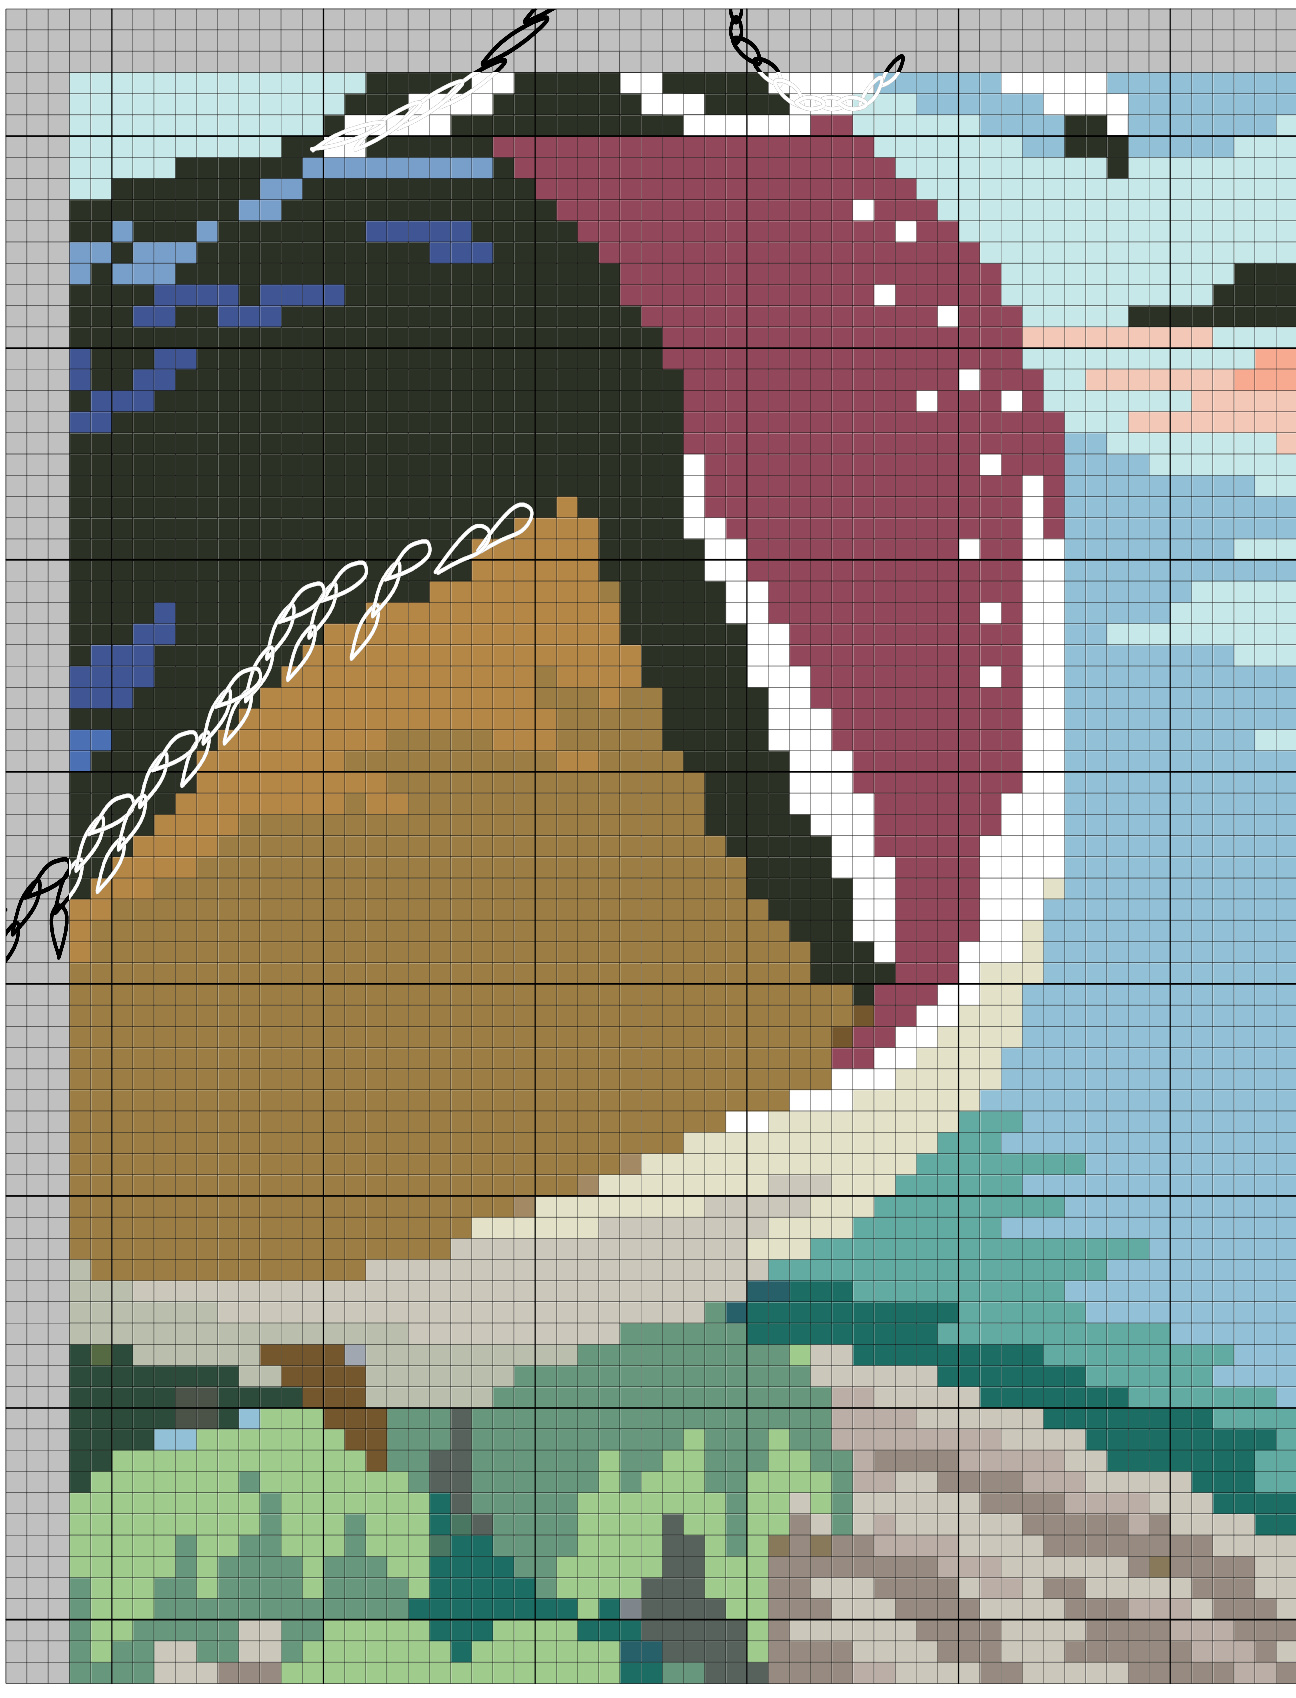
The Details
After finishing the basic knit, the next important step is checking for loose stitches. Once found, pull them to the back and attach a coiless pin. Next, weave in your ends with a sharp pointed needle that is able to penetrate the fibers of the yarns. I never loop them through the purl bars. It is very important that you take care of this first before starting on your detail stitches. With all those pesky ends out of your way you will enjoy fine tuning your work without having to deal with a mess of yarn ends on the back. You can plan on this taking you several days. I quite often unwind the plys and weave them in separately to reduce the bulk. Once your yarn ends are taken care of secure your loose stitches by using a single ply of the backgorund color of the area you are attaching them to. I twist the coiless pin to take up the slack, slip the pin out while holding the stitch in place. With your yarn needle and selected yarn, weaving in through the fibers of the stitch as well as the backgournd yarns. Next, weave in the ends of your attaching yarn. Besure to check that all stitches are secured.
The Duck Head
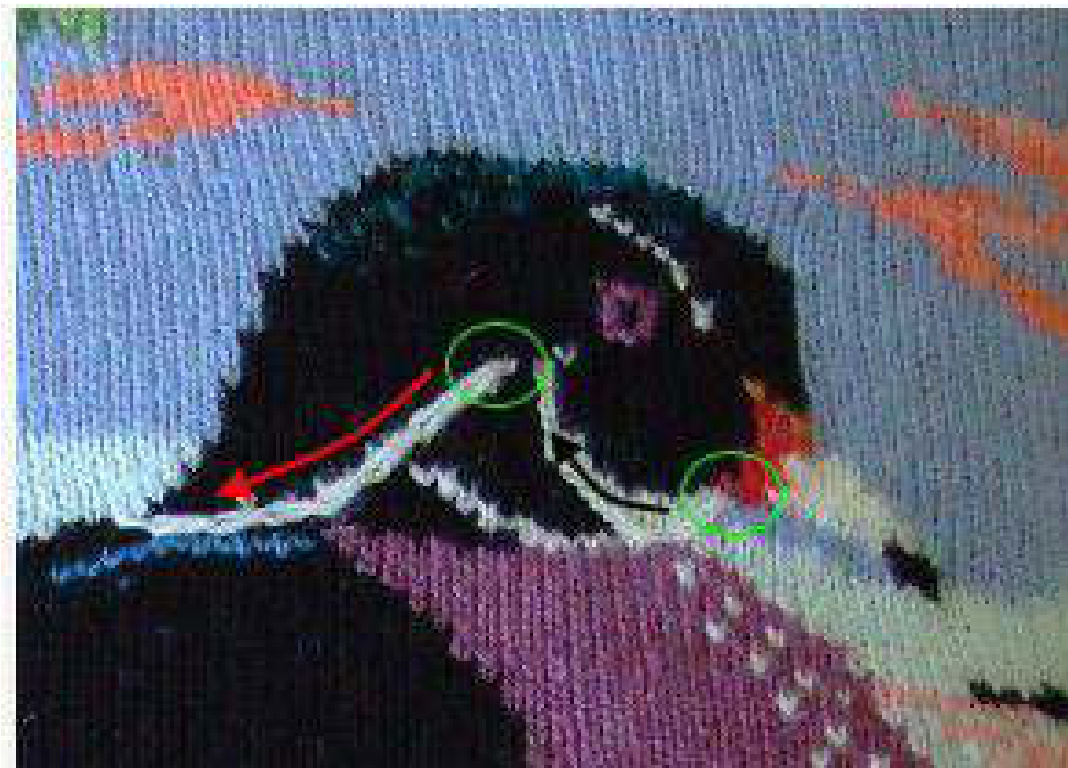
In the following photos the green circles indicate the beginning of the crocheted chains. The arrows gives you the direction in which I worked. The size of the loop is just a matter of choice.
Feather Detail

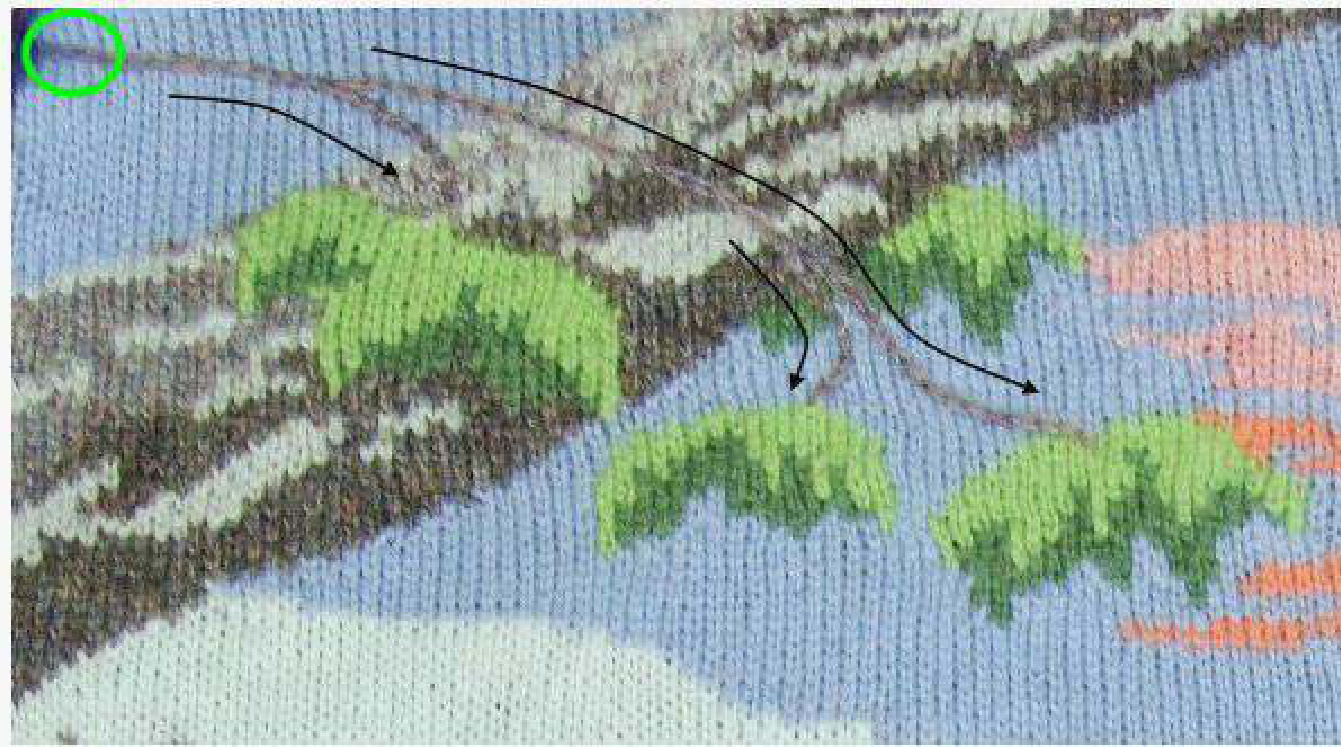
Branch Detail
Leaf Detail
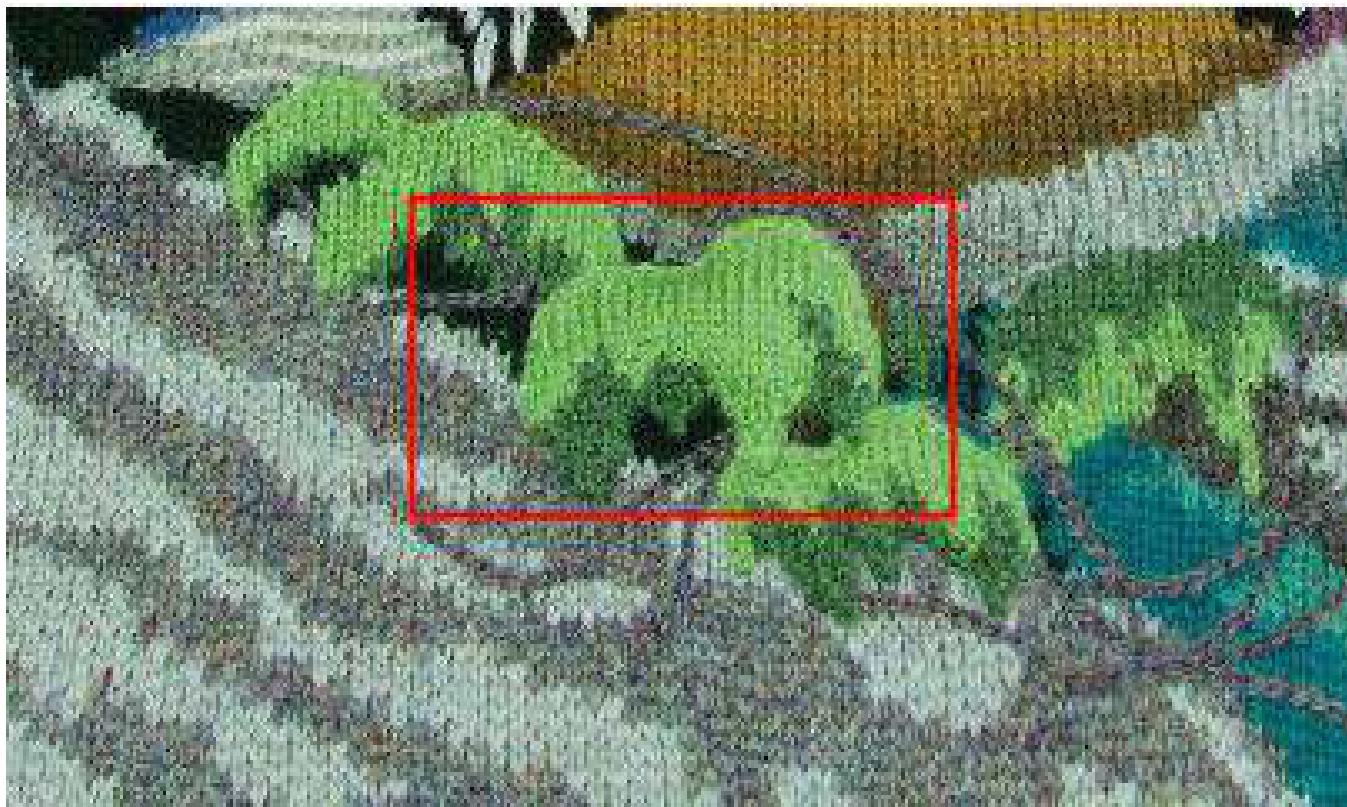
In the red box is a leaf which I knitted separately then attached by crocheting it on, matching the outline detail of the other leaves. This is an option which gives you a bit of a three deminsional look. The branches are crocheted chains using lris Heather. These branches can be placed anywhere you like. Use your imagination. Put in as much brush as you like.
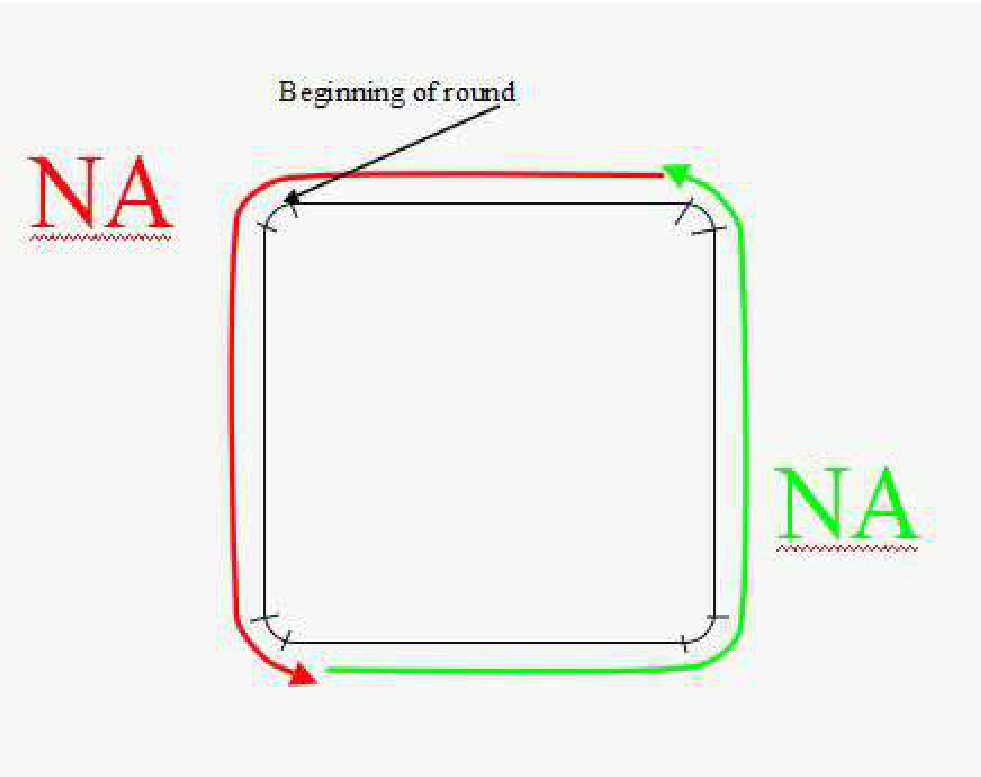
Picking Up the Edge Stitches
On needle A, (the one you knitted the pillow top with) place marker, pick up 11 sts across the mitered corner. Place marker. With the same needle, continue picking up 113 sts down the left side( 8sts to the inch). Place marker. Pick up 11 sts across the mitered corner. Pull needle A through so that the sts are riding on the cord portion of the needle. With needle B, (new needle) pick up the sts off the provisonal cast on, beginning at the bottom right corner. flip the pillow top up sp that you can see the purl side of teh bottom row. Next, carefully release the crocheted chain holding the stitches. Hold the crocheted chain yarn in the left hand. Insert the new knitting needle into the first stitch from back to front, then release the chain from the stitch as you pull the chain to the left. Repeat this process one stitch at a time untill all the 113 sts are on the knitting needle. turn you work back to the right side. Now, knit across the stitches that you have just picked up. Place marker. Pick up 11 sts across mitered corner. Place marker. Continue as before picking up 113 st to beginning of next mitered corner. Place marker. Pick up 11 stitches across mitered corner. Pull needle B through. On your left you will notice needle A hanging out of the next stitch, or the beginning of the last row of the chart. To begin knitting this round, reach down to the lower left corner, and pick up the opposite end of needle A. Pull the excess out of the cord so that your needle A tip is in the "start" position. Using the opposite end of the same needle, knit across to the first marker(upper left corner- the beginning of the round). Break off the tail of your yarn, leaving about 10 inches. Re-position your needle A, by slipping the remainder of the sts to the left onto the right end of the needle so that they are in the position illustrated below.
Blocking the Pillow Top

Above, you see the pillow top blocked on the needles (two 47 inch #1 circles) Needle A goes across the top and down the left side, needle B goes across the bottom and up the right side. When dry, it's all set up and ready for you to start knitting the seam allowance needed to attach it to a fabric back, or to begin knitting the tube for the cord. If you opt for the seam allowance, knit around for about 5/8 inch (6 rnds) adding at least 3 sts equally spaced in the mitered corners. If you opt for a knitted back, you can use an additional circle needles to slip the stitches on, or put them on a piece of waste yarn, using the same set up. When the back is knitted, simply use a 3 needle Bind Off to joint the three sides. Insert the form, then 3 needle bind off the open edge together. The next option is to add a fringe. If you opt for this be sure to order an extra skein of yarn.
Knitting the Cord Tubing
Once your piece has dried you are ready to knit the cording tube. Reposition Needle A by grabbing far end of the needle in the upper right corner. Using this end, and working from left to right, slide the 11 stitches at the lower left corner, 113 side sts, and 11 sts of upper left corner back on the needle, so you are ready to begin the first complete round of the tubing.
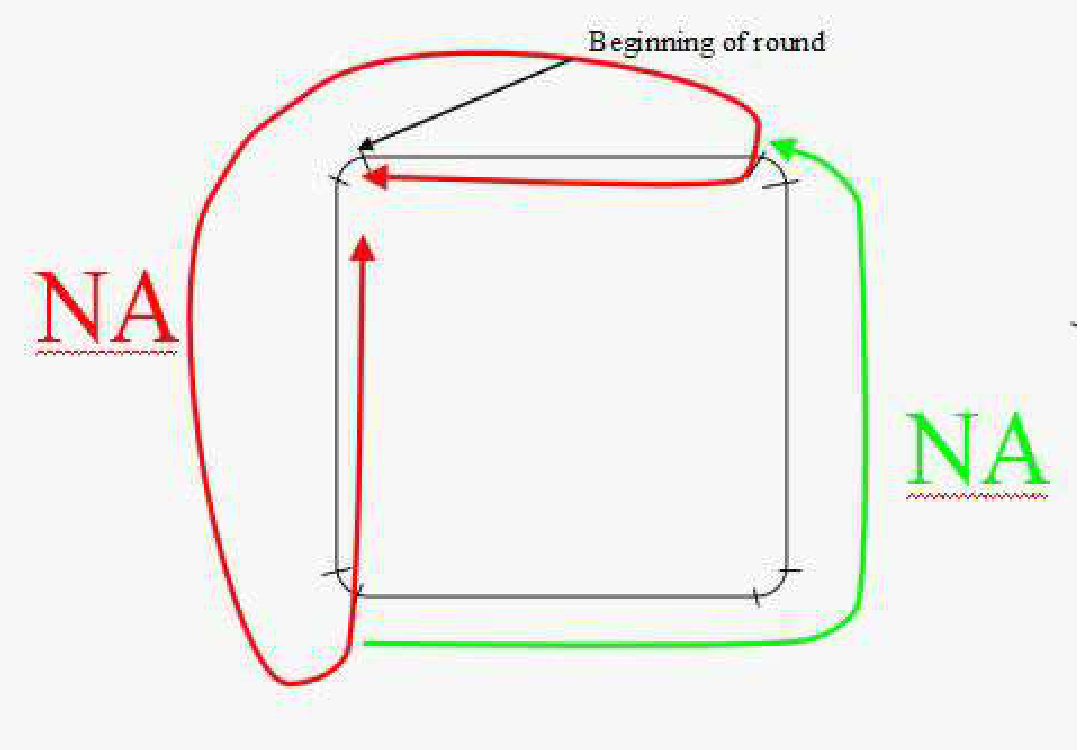
Rnd #1 - (mark beginning of round in the top left corner of the pillow). Mitered corner: Slip marker. K 2, yo, K 2, yo, K3, yo, K 2, yo, K2. Slip marker. K to next marker. Work mitered corner as before. Pull needle A through. Grab opposite end of needle B, upper right corner, take slack out of cord. Knit across stitches on bottom to marker. Slip marker, work mitered corner as before. Slip marker. Work to next marker. Slip marker. Work mitered corner as before. Pull needle B through. Stop!!! Thread a contrasting yarn strand into a yarn needle and run it through the purl loops just under the last round. You can use several strands, leaving a 6 inch tail on each (I used 4). On one of the side edges mark 12 loops with a different color. This section will be used to indicate the loops adjacent to the botton hole opening you will be making on "pick up " round that will close the tube. It is important that you mark these loops(purl bars). You'll thank me later. Rnd #2 - Knit around, slipping markers, and knitting though the back loop of the YO's for your increases. Rnd #3 - Knit around -slip markers. Mitered corner are worked as follows. Knit 3, YO, K 3, YO, K 3, YO, K 3, YO, K 3. Slip marker. Knit to next marker. Work corner. Pull NA through. Rnd #4 - Repeat rnd #2. Rnd #5 - Repeat rnd Work 3, YO inc's on corners as follows: K 6, YO, K 7, YO, K 6. Work around as before working inc's in corner. don't forget to slip your markers. Rnd #6 - Repeat rnd #2. Rnd's 7-10 - Knit even. Rnd #11 - Decrease round. Work corners as ound, decreasing one stitch each side of CS, as follows: Slip marker. Work corner -K 5, SSK. K 7, K 2 tog, K5. (19 sts) Work around as before, working dec in corners. Rnd #12 - work even, slipping markers. Rnd #13 - Decrease round. Work corners as follows: K 2, SSK; K 2, SSK; K 3, K2 tog, K 2, K 2 tog, K 2. (15 sts) Work around as before. Rnd #14 - NA work even. Rnd #15 - Decrease round. Work corners as follows: K 1, SSK; K 1, SSK; K 3; K 2 tog; K 1, K 2 tog; K 1. (11 sts) Rnd # 16 - With NA, work even. With NB work to center of bottom of pillow. Bind off 16 sts. This will give you the opening for your cord. Rnd #17 - Closing the tube. Now we are going to use those loops we marked after rnd #1. With a #0 circle needle, turn you work so the back side(purl side) faces you. Beginning at the corner marker on you right, slip the pick up needle into the marker purl loop from back to front. Work you way across until you are on the stitch that matches the beginning of the round. Turn you work to the right side (knit side). Begin this round by knitting the stitch on your working needle with the stitch on the pick up needle together. You can K 2 tog, or you can slip one on the working needle, knit the one on the pick up needle and PsSO. Which ever way you choose will work-just get them knitted together. Continue working across all the stitches on your pick up needle. \* Be sure to pick up the 16 stitches just below the ones you Cast off on the row before. You will sew the open edge shut after inserting the cord. Repeat the process of knitting the stitches together until the tube is closed, accept for the cord opening. Next, knit the seam allowance. dont forget to increase the same as before in rnds 1-6, then work and even round. Last round, bind off all sts.
Getting Prepared to Assemble the Pillow
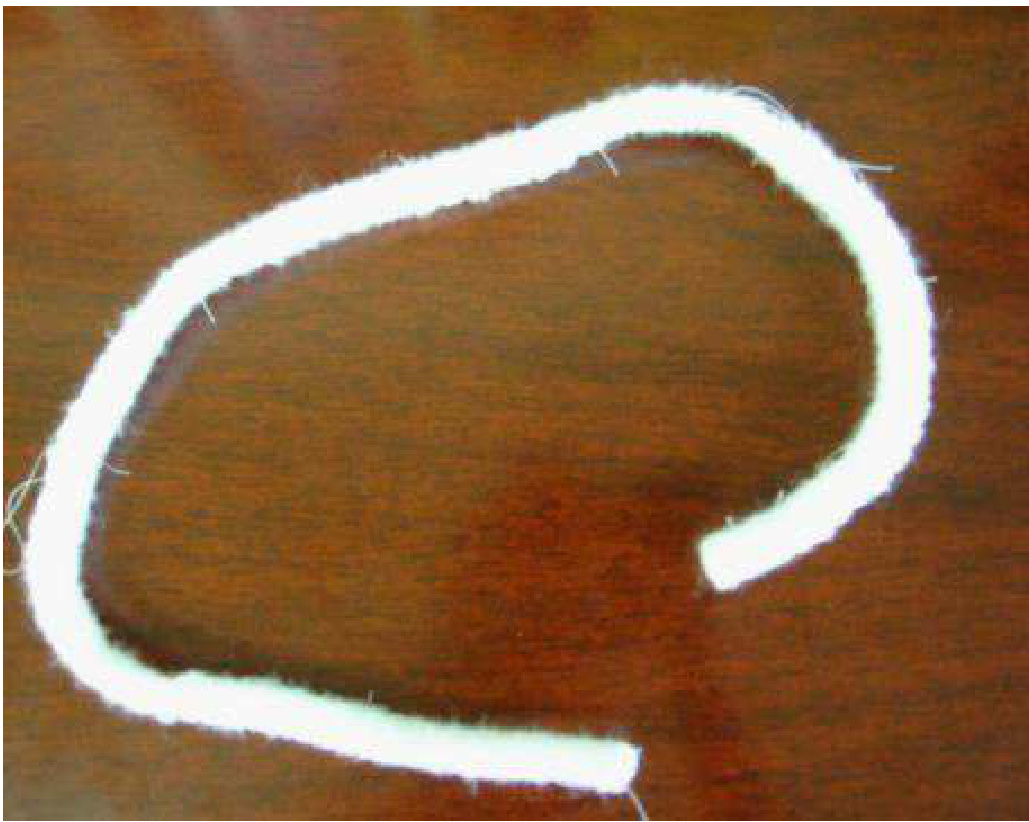
1. Prewash your backing fabric. 2. Cut the back piece 17 1/2 by 17 1/2 inches. (pre-wash and press) 3. Make you cording. I cut a strip of poly quilt batting about 1 1/2 inches wide, 72 inches long. taking about four inches at a time I roll it into a cording and fasten it(whip it together) with a needle and thread to hold it in place. See photo below.
1. With right sides facing each other, pin the pillow together with the back fabric on three sides, and around bottom corners, leaving the center section (about 14 inches) of the bottom of the picture open. 2. Baste the pillow top and the back together with a contrasting thread 3. Sew units together on machine .Trim and clip the fabric corners only. Turn right side out. 4. Insert your cording in the tube, with a large safety pin (Quilter's). Work it around gently. Make sure the tube is smoothly filled. Let the ends of the cord go for now. 5. Leaving ends of the cording loose, insert the\* pillow form (see end of this file for instructions). 6. Once your are satisfied with the look, cut the ends of your cording and attach the two ends together with a needle and thread. Try to make the connection Smooth. 7. Close the button hole opening with the needle and matching thread, or yarn. Weave in the ends of your yarn or thread into the tubing. 8. Folding in the seam allowance on the fabric, blind stitch the bottom edge to the knitted seam allowance in the trench at the bottom of the cording tube. Keep your stitches close so that it forms a strong seam. Note - if you make your own pillow form of Poly fill, you can wash the entire pillow and dry it on the form, as there is no cloth inside. See my website for instructions. The process is nery simple. Cut 2 or 4 sheets of Poly quilt batting the same size as the form you want to make. Why no seam allowance? It stretches. Machine sew three sides with 1/2 inch seam, slight cropping corners. Trim corners and turn to right side. Shape your corners gently. Now fill the center as full as you like with your favorite fill. When you think it's just about right, pin the top edge together and check it. You can use a #0 or #1 double point needle to stitck throught the surface (gently) and move the filling about a bit. When satisfied, fold in the seam allowance (1/2 inch) on open edge and hand sew together. Now you won't have to pay \$22 for a lumply form, AND the pillow can be closed on the bottom edge completely as it will dry on the form beautifully.


