Nick's Boring Scarf
Not a boring scarf at all but a way of knitting continuous squares on two needles which look as if they've been worked in the round. The basic pattern produces a garter stitch scarf that is far from boring to knit. It looks great in a plain colour but works well with variegated yarn too. The pattern can also be adjusted to change the shape, instructions for two variations are included.
How It's Done
Enough stitches for the base and two sides of the square plus four extra stitches to allow for shaping are cast on. Working in garter stitch the bottom corners are shaped by working double decreases at set points on every other row. At the same time one less stitch is worked at the end of every row until three quarters of the square is complete. The top quarter is then filled in’ by working backwards and forwards, taking in one extra stitch at the end of every row, until the square is finished. The square can then be cast off or more stitches can be cast on at each side to begin another square. That's the basic idea but the easiest way to understand how it's done is to knit a sample square. To work this square and any of the scarves in this pattern you will need to know how to do ‘wrap and turns′ and ‘double decreases'. I'll explain both of these here and then they will be abbreviated as 'w&t' and ‘DD' in the patterns. Wrap and turn Bring the yarn forward, slip the next stitch purlwise, take the yarn back again, replace the slipped stitch on the left hand needle, bring the yarn forward again and turn the work. You are now ready to knit the next short row having 'wrapped' the previous stitch. Double decrease Slip 1 stitch, knit 2 stitches together, pass the slipped stitch over (two stitches decreased). So, take the yarn and needles of your choice and, using the cable cast on, cast on 64 sts loosely. In the following row by row instructions the number in brackets refers to the number of stitches left unworked at the end of that row. Sometimes it is easier to count that number than the number of stitches knitted. Row 1: K63, w&t. (1) Row 2: K19, DD, K18, DD, K19, w&t. Row 3: K57, w&t. (2) Row 4: K17, DD, K16, DD, K17, w&t. Row 5: K51, w&t. (3) Row 6: K15, DD, K14, DD, K15, w&t. Row 7: K45, w&t. (4) Row 8: K13, DD, K12, DD, K13, w&t. Row 9: K39, w&t. (5) Row 10: K11, DD, K10, DD, K11, w&t.
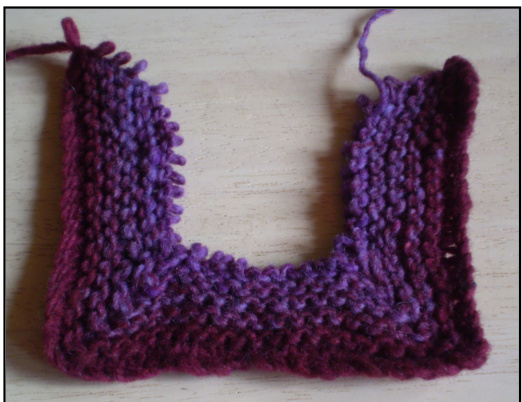
Sample Square after Row 10. Row 11: K33, w&t. (6) Row 12: K9, DD, K8, DD, K9, w&t. Row 13: K27, w&t. (7) Row 14: K7, DD, K6, DD, K7, w&t. Row 15: K21, w&t. (8) Row 16: K5, DD, K4, DD, K5, w&t. Row 17: K 15, w&t. (9) Row 18: K3, DD, K2, DD, K3, w&t. Row 19: K9, w&t. (10) Row 20: K1, DD, DD, K1, w&t. Row 21: K3, w&t. (11) Row 22: DD, w&t. Row 23: K2, w&t. Row 24: K3, w&t. Row 25: K4, w&t. Row 26: K5, w&t.
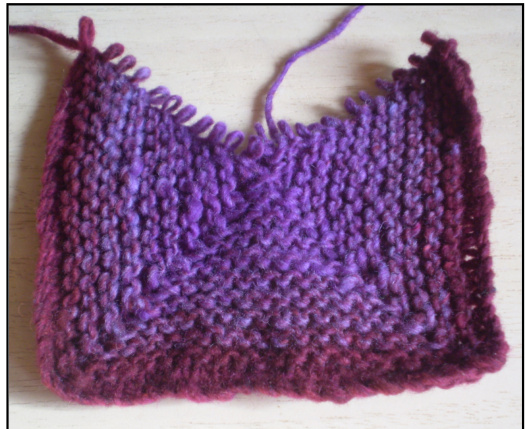
Sample Square after Row 22. Continue like this, working one more stitch on each row until you have worked K20, w&t.
Next row: Next row:
K21. K22 and cast off. One square done, the start of a blanket maybe?
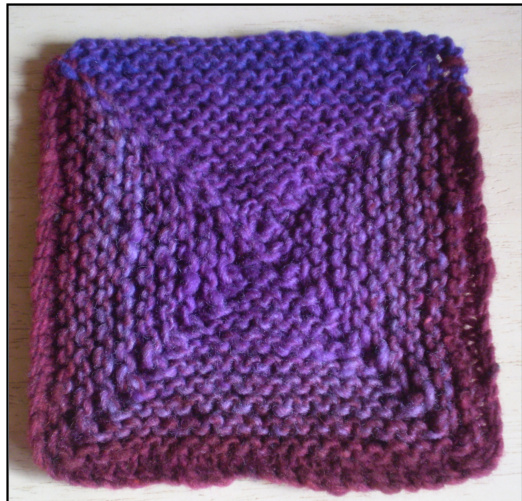
The completed Sample Square Studying these instructions will reveal certain patterns which can be used to apply this technique to any even number of stitches. Decide on your base number of stitches (this will be the width of your square) and cast on three times this number plus 4 stitches. · The first knit row is one stitch less than the total number of stitches. After this the number of stitches knitted on the odd numbered rows always decreases by six. On the first decreasing row knit the base number less one before the first double decrease and after the second. Knit the base number less two between the double decreases. On following even numbered rows these numbers decrease by two each time. At the end of the square there will be the base number plus two stitches on the needle. · To work a second square joined on to the first cast on the base number plus one at the start of the next two rows. Now for some scarf patterns.
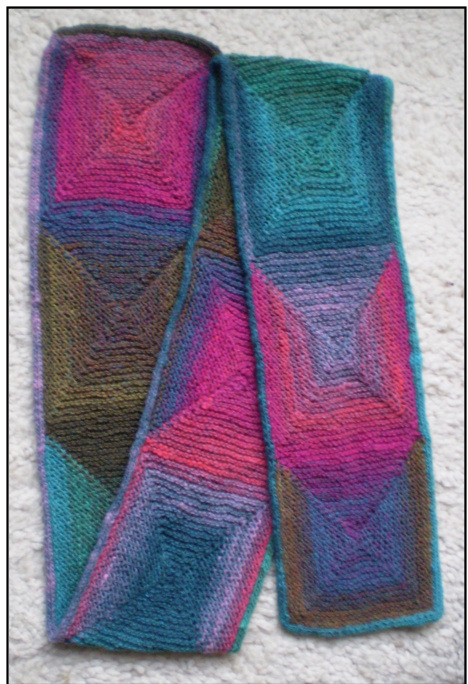
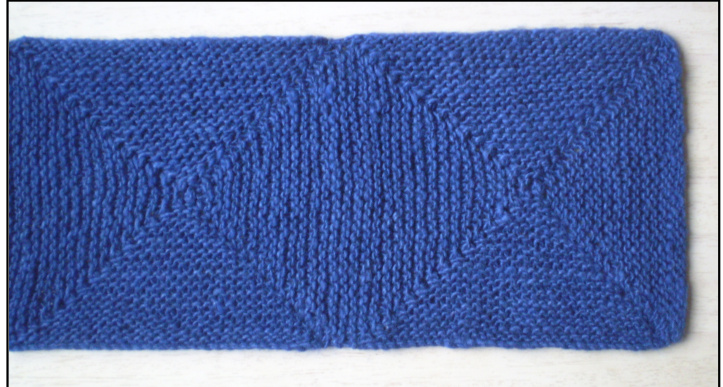
The Original Boring Scarf
This one was knitted in Noro Cash Iroha on 5mm / US size 8 needles. I used 150g yarn and the finished scarf measures $144\mathrm{~x~}19\mathrm{cm}\,/\$ 57" x 7/2".
Using the cable cast on cast on 94 sts loosely. Row 1: K93, w&t. (1) Row 2: K29, DD, K28, DD, K29, w&t. Row 3: K87, w&t. (2) Row 4: K27, DD, K26, DD, K27, w&t. Row 5: K81, w&t. (3) Row 6: K25, DD, K24, DD, K25, w&t. Row 7: K75, w&t. (4) Row 8: K23, DD, K22, DD, K23, w&t. Row 9: K69, w&t. (5) Row 10: K21, DD, K20, DD, K21, w&t. Row 11: K63, w&t. (6) Row 12: K19, DD, K18, DD, K19, w&t. Row 13: K57, w&t. (7) Row 14: K17, DD, K16, DD, K17, w&t. Row 15: K51, w&t. (8) Row 16: K15, DD, K14, DD, K15, w&t. Row 17: K45, w&t. (9) Row 18: K13, DD, K12, DD, K13, w&t. Row 19: K39, w&t.(10) Row 20: K11, DD, K10, DD, K11, w&t. Row 21: K33, w&t. (11) Row 22: K9, DD, K8, DD, K9, w&t. Row 23: K27, w&t. (12) Row 24: K7, DD, K6, DD, K7, w&t. Row 25: K21, w&t. (13) Row 26: K5, DD, K4, DD, K5, w&t. Row 27: K15, w&t. (14) Row 28: K3, DD, K2, DD, K3, w&t. Row 29: K9, w&t.(15) Row 30: K1, DD, DD, K1, w&t. Row 31: K3, w&t. (16) Row 32: DD, w&t. Row 33: K2, w&t. Row 34: K3, w&t. Row 35: K4, w&t. Row 36: K5, w&t. Continue like this, working one more stitch on each row, until you have worked K30, w&t. Next row: K31. Next row: K32, cast on 31 sts. Next row: K63, cast on 31 sts. You are now back to 94 sts and ready to begin the next square. Work seven squares in all (or as many as you want) and then cast off.
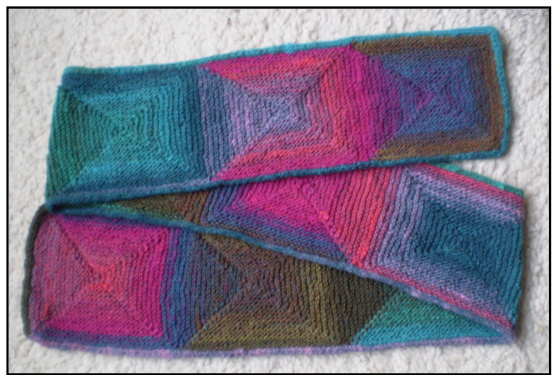
The Less Boring Scarf
This one is actually the same pattern as the original scarf but this time worked in Noro Kureyon sock wool on $4\mathrm{mm}\,/\,\mathrm{US}$ size 6 needles. I used one $100\mathrm{g}$ ball and worked nine squares. This scarf measures $145\,\mathrm{x}$ $15\mathrm{cm}\,/\,57"\mathrm{~x~}6"$ and I edged it by working attached three stitch I cord all round the finished scarf.
The Scarf With Holes
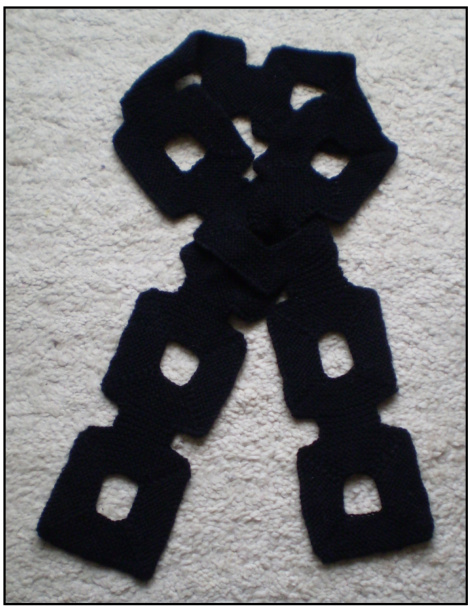
If, at some point during the first stage of shaping the square, you cast off your working stitches and then cast on new ones to replace them the result is a hole! I have used this technique to make a chained scarf with the holes linked by short strips of garter stitch. For this scarf I used aran weight yarn and 5.5mm /US size 9 needles. The scarf measures $142\,\mathrm{x}$ 13cm / 56" x 5" and has ten squares. Using the cable cast on, cast on 64 sts loosely. Row 1: K63, w&t. (1) Row 2: K19, DD, K18, DD, K19, w&t. Row 3: K57, w&t. (2) Row 4: K17, DD, K16, DD, K17, w&t. Row 5: K51, w&t. (3) Row 6: K15, DD, K14, DD, K15, w&t. Row 7: K45, w&t. (4) Row 8: K13, DD, K12, DD, K13, w&t. Row 9: K39, w&t. (5) Row 10: K11, DD, K10, DD, K11, w&t. Row 11: K33, w&t. (6) Row 12: K9, DD, K8, DD, K9, w&t. Row 13: K27, w&t. (7) Row 14: K7, DD, K6, DD, K7, w&t. Now for the hole: Row 15: K1, cast off 20 sts loosely, w&t. Row 16: K1, cast on 6 sts using the thumb method, K1, w&t. Now you have to fill in the remaining part of the top of the square: Next row: K8, w&t. Next row: K9, w&t. Next row: K10, w&t. Next row: K1l, w&t. Continue like this, working one more stitch on each row, until you have worked K20, w&t. Next row: K21. For the joining strips cast off 5 sts at the start of the next two rows and work 5 rows in garter stitch on these 12 sts. Next row: K12, cast on 26 sts. Next row: K38, cast on 26 sts. You are now back to 64 sts and ready to begin the next square.
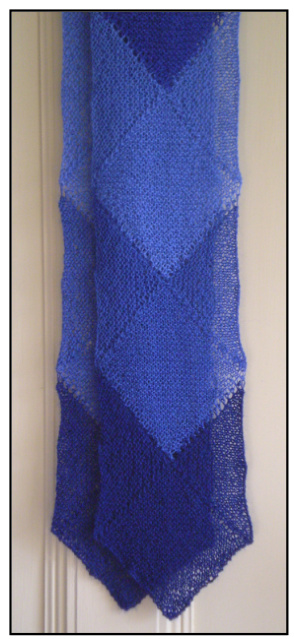
The Lacy Chevron Scarf
In this version the squares are less visible as I changed colour before filling in the last quarter of each square. The scarf is knitted in two identical halves which are then grafted together in the middle and I have worked pointed ends to continue the chevron pattern. I used shades of Appleton'sCrewel wool for this scarf which is a laceweight yarn and $3.25\mathrm{mm\,/}$ US size 3 needles. After blocking my scarf measures 170 x 13cm / 69" x 5".
Notes
I found that this lacewieght yarn was very difficult to graft neatly so don't say I didn't warn you! It also looked a very strange shape while being knitted but blocking sorted that out. When working the 'filling in’ rows after changing colours I didn't use a wrap and turn as this made the colours less distinct. This will leave a line of small holes in keeping with a lacy scarf. Cast on 1 stitch and increase (kf&b) at the start of each row until you have 32 sts on your needle. Now, using the cable method, cast on 31 sts. Next row: K63, cast on 31 sts. Row 1: K93, w&t. (1) Row 2: K29, DD, K28, DD, K29, w&t. Row 3: K87, w&t. (2) Row 4: K27, DD, K26, DD, K27, w&t. Row 5: K81, w&t. (3) Row 6: K25, DD, K24, DD, K25, w&t. Row 7: 75, w&t. (4) Row 8: K23, DD, K22, DD, K23. Row 9: K69, w&t. (5) Row 10: K21, DD, K20, DD, K21, w&t. Row 11: K63, w&t. (6) Row 12: K19, DD, K18, DD, K19, w&t. Row 13: K57, w&t. (7) Row 14: K17, DD, K16, DD, K17, w&t. Row 15: K51, w&t. (8) Row 16: K15, DD, K14, DD, K15, w&t. Row 17: K45, w&t. (9) Row 18: K13, DD, K12, DD, K13, w&t. Row 19: K39 w&t. (10) Row 20: K11, DD, K10, DD, K11. Row 21: K33, w&t. (11) Row 22: K9, DD, K8, DD, K9, w&t. Row 23: K27,w&t. (12) Row 24: K7, DD, K6, DD, K7, w&t. Row 25: K21, w&t. (13) Row 26: K5, DD, K4, DD, K5, w&t. Row 27: K15, w&t. (14) Row 28: K3, DD, K2, DD, K3, w&t. Row 29: K9, w&t. (15) Row 30: K1, DD, DD, K1, w&t. Row 31: K3, w&t. (16) Now change colour and, for this last section of the square, turn at the end of the rows without working a wrap and turn. Next row: DD. Next row: K2. Next row: K3. Next row: K4. Next row: K5. Continue like this, working one more stitch on each row until you have knitted 32 sts on your last row. Now, using the cable cast on, cast on 31 sts.
Next row: K63, cast on 31 sts.
You are now ready to begin the next square. After you have worked enough chevrons for nearly half your scarf (I worked five) change colour again but this time don't start a new square after finishing the last one but continue in plain garter stitch for 20 rows and leave the knitting on a spare needle. Work another half to match but, this time, only work 19 rows of garter stitch. The two sections of the scarf are now ready to graft together. To do this put the two halves together, one needle behind the other, so that you have a longish length of yarn coming from the back needle. This is needle B and the front one is needle A. Thread a wool needle with the yarn and proceed as follows: Thread yarn through the first stitch on needle A as if to purl, leave the stitch on the needle. Repeat for needle B. \*Thread yarn through the first stitch on needle A as if to knit, pull the stitch off the needle and thread yarn through the next stitch on needle A as if to purl, leave this stitch on the needle. Repeat for needle B Repeat from \* until you have grafted all the stitches together. At this point you can adjust the tension to make it look even. Abbreviations st/sts stitch/stitches K knit kf&b knit into the front and back of the stitch $\copyright$ Frankie Brown, 2009. My patterns are for personal use only and should not be used to knit items for sale.


