Pikachu Amigurumi Pattern
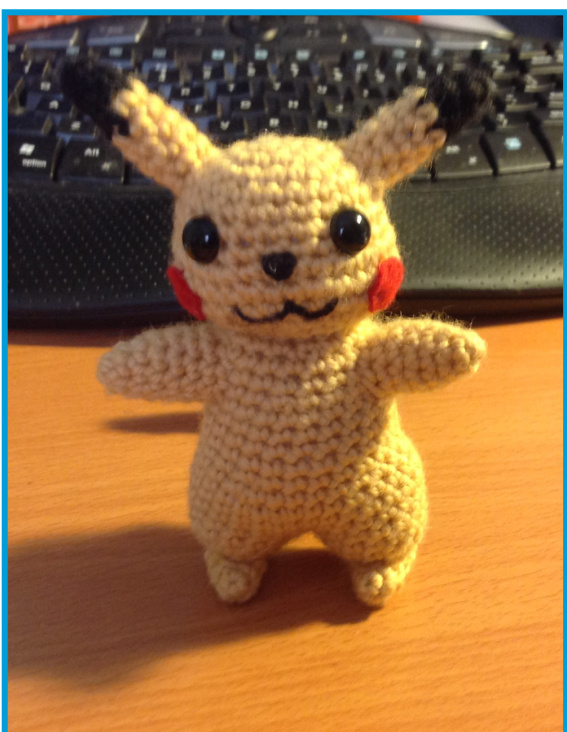
One of my friends asked me to make a Pikachu for their co-worker. They wanted a little guy that could sit on their desk and be inconspicuous. I've made Pikachu dolls before and they were rather big so I came up with this pattern! Unless otherwise stated, work in continuous rounds. Also, I assume that you have basic knowledge in crochet. If not there are many tutorials on YouTube. Good luck!
Materials Required:
Black, brown, and yellow coloured yarn Fibrefill 3.5mm (E) hook Yarn needle Red and black felt Safety eyes Pipe cleaner
Pikachu Amigurumi Pattern
Head:
Using Yellow Rnd 1: 6 sc into magic circle (6) Rnd 2: 6inc (12) Rnd 3: \*sc, inc\* x 6 (18) Rnd 4: \*2sc, inc\* x 6 (24) Rnd 5-8: 24sc Rnd 9: 4inc, 4sc, 4inc, 12sc Rnd 10-11: 32sc Rnd 12: 4dec, 4sc, 4dec, 12sC Begin stuffing the head. Continue stuffing as you work on the piece. Rnd 13: \*2sc, dec\* x6 (18) Attach safety eyes onto the head in the position shown above. Safety eyes are attached before the head is sewn closed. If using felt for the eyes skip this step. Rnd 14: \*sc, dec\* x 6 (12) Rnd 15: 6 dec F/O and weave in tail. Ears: (Make 2) Using Black Rnd 1: 4 sc into magic circle (4) Rnd 2: 4sC Switch to Yellow Rnd 3: \*sc, inc\* x 2 (6) Rnd 4-8: 6sc F/O and leave a long enough tail to attach ears to head.
Pikachu Amigurumi Pattern
Feet: (Make 2) Using Yellow Rnd 1: 3 sc into magic circle (3) Rnd 2: 3inc (6) Rnd 3-5: 6sc F/O and leave a long enough tail to sew closed the 6st opening and attaching feet to legs.
Legs and Body:
Using Yellow Rnd 1: 6 sc into magic circle (6) Rnd 2: \*sc, inc\* x 3 (9) Rnd 3: \*2sc, inc\* x3 (12) Rnd 4: \*3sc, inc\* x 3 (15) Rnd 5: 15sc Cut yarn and leave a long enough tail to join. Make a second leg based off pattern above but do not cut yarn. Sew the two legs together through 2 stitches. Stuff the 2 legs. Continue to stuff as the piece is worked. Rnd 6-9: 30sc Rnd 10: \*8sc, dec\* x 3 (27) Rnd 11: \*7sc, dec\* x3 (24) Rnd 12-15: 24sc Rnd 16: \*6sc, dec\* x 3 (21) Rnd 17-18: 21sc Rnd 19: \*5sc, dec\* x 3 (18) F/O and leave a long enough tail to attach body to head.
Pikachu Amigurumi Pattern
Arm: (Make 2) Using Yellow. Rnd 1: 6 sc into magic circle (6) Rnd 2: 6sc Rnd 3: \*sc, inc\* x 3 (9) Rnd 4-7: 9sc F/O and leave a long enough tail to sew arm to body.
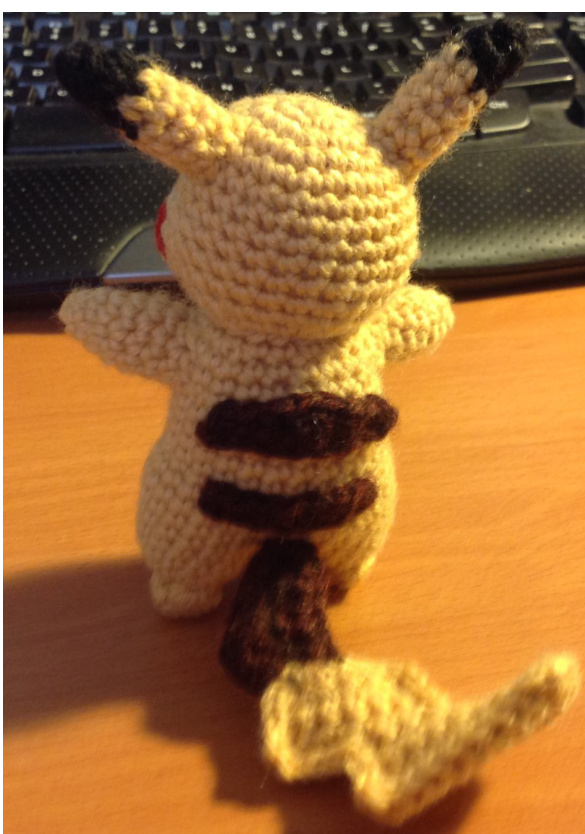
Tail:
Using Yellow. Row 1: ch 9 Row 2: sc in 2nd ch from hook, 7sc, ch 1, turn (8) Row 3-5: 8sc, ch 1, turn (8) Row 6: 3sc, ch 1, turn (3) Row 7: 3sc, ch 4, turn (3) Row 8: sc in 2nd ch from hook, 5sc, ch 1, turn (6) Row 9: 6sc, ch 1, turn (6) Row 10: 6sc F/O, turn, and attach Brown yarn to the 4st over. Row 11: 3sc, ch 3, turn (3) Row 12: sc in 2nd ch from hook, 4sc, ch 1, turn (5) Row 13: 5sc F/O and weave in tails. Make a second tail piece and leave the yellow and brown yarn attached. Single crochet together the two pieces with a pipe cleaner in-between. Use the yellow yarn for the yellow portion of the tail and the brown yarn for the brown portion of the tail. F/O the yellow yarn and weave in tail. Leave a long tail of brown yarn to attach the tail to the doll.
Pikachu Amigurumi Pattern
Stripes:
For the Large Stripe UsingBrown. Row 1: ch 9 Row 2: sc into 2nd ch from hook, sc, hdc, 2dc, hdc, 2sc F/O and leave a long enough tail to attach strip to back of doll. For the Smaller Stripe: UsingBrown. Row 1: ch 9 Row 2: sc into 2nd ch from hook, 7sc F/O and leave a long enough tail to attach strip to back of doll.
Pikachu Amigurumi Pattern
Assembly:
1) Attach the head to the body with the tail from the body. I just weaved in and out of each piece with the tail. Ensure the opening is in the bottom centre of the head. Firmly stuff the body before completely sewing openings closed.
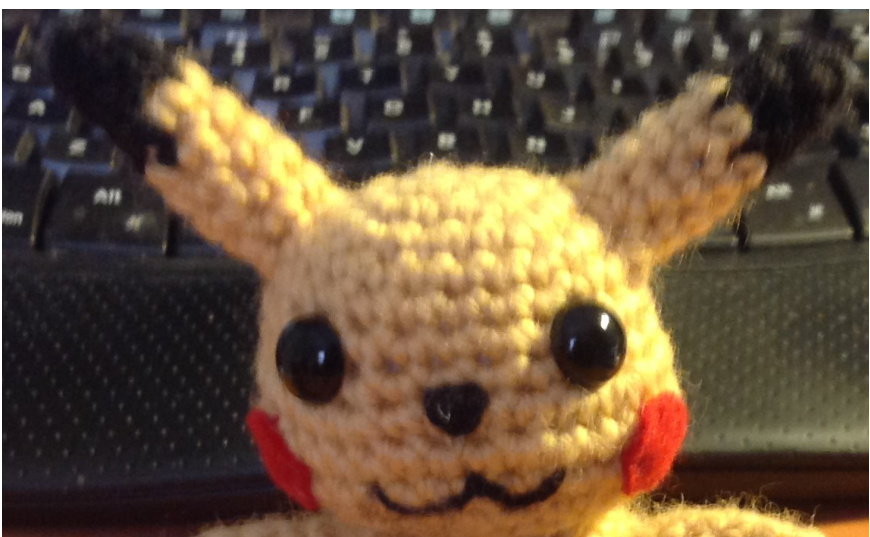
2) Sew the ears with the yarn tails as positioned in the above photo. Stuff the ears firmly to give them the correct shape. I used the yarn tail and whip stitched the ear. It may help to pin it in place before sewing them on. Ensure to stuff the ears firmly before sewing the openings closed. 3) Use red felt to create the cheeks. Cut 2 red circles and either sew or needle felt them onto the cheeks. 4) Use black yarn to create the mouth. I made the 'W' shape by first inserting the yarn into the head from the back and out through where the mouth begins. Next a inserted the needle 3 stitches over, then pulled the needle out in the middle of the yarn and down 1 stitch. I made a loop around the first length of yarn and pulled in to make the V' shape. I repeated this process again to make the full mouth. I then fastened off both ends of yarn and hid them in the head. 5) I ended up embroidering the nose with black yarn. Black felt can also be used to create the nose. The nose is a triangular shape and can either be sewn on or needle felted.
Pikachu Amigurumi Pattern
6) Attach the arms to the body with the tails from each piece. I used a whip stitch again. Pin the limbs in the desired position before attaching. 7) Attach the feet onto the bottom of the legs with the yarn tails. Ensure they are positioned correctly by pinning them into position before sewing. I used a whip stitch to attach them. 8) Attach the tail to the back of the doll. Ensure it is in-between both legs. 9) Attach stripes to the back of the doll. Ensure the bigger stripe goes above the smaller stripe. Center both stripes to the doll. Now it's complete! Hope you enjoyed making this cute little guy! And just in case for legal reasons.. Pikachu is a copyright of The Pokémon Company. This crochet pattern is an original pattern by Edward Yong (January 2015). Please do not claim this pattern as your own. If you wish to share this pattern, you may link to this pattern but please do not reprint it on your site. You may keep a copy for your own personal use but you
may not sell or distribute it, or sell items made from this pattern.


