
Getting Started
YARN Worsted weight-100g/165yds 2 Strands Joined Together Shown In: Red Heart Super Saver -Carrot
CROCHET HOOK
H8/(5.00 mm)-We recommend using Boye brand for the technique used in this pattern SIZE One size fits most adults & teens NOTIONS Tapestry needle Stitch markers Thread-exact color of yarn Sewing needle
GUAGE
Working in sc and using size H8/(5.00 mm) 2 Strands Joined Together 11 rows & 13 sts=4"/10cm
Lets Keep in Touch!
Email | guchetdesigns@gmail.com Etsy Shop | http://www.etsy.com/shop/GuChet Facebook|http://www.facebook.com/GuChet Web Site | http://www.guchetdesigns.com/ Youtube| http://www.youtube.com/Guchetdesigns Twitter|http://twitter.com/#!/GuChet 2009 - 2011 Gu'Chet All Rights Reserved. Reproduction prohibited. This original design pattern is property of Gu'Chet and is intended for personal use only. Please so not reproduce this pattern or product for sale without written permission.
Pattern Note
You willfirst crochet an edge band back and forth, then join together to form a ring, pick up new sts round the edge band & crochet the cloche in the round towards the top.
Jhe Signature
Chunky Beanie Hat
Sister to our Vintage Crochet Cloche Hat http://www.etsy.com/shop/GuChet STYLE. This beanie has it where it matters most. Designed in a chunky crochet texture with a oversized flower, you'll be looking for any excuse to wear it. From snow parkas to your favorite LBD, there isn't a thing this essential accessory won't glamify. INTERMEDIATE

Special Stitches
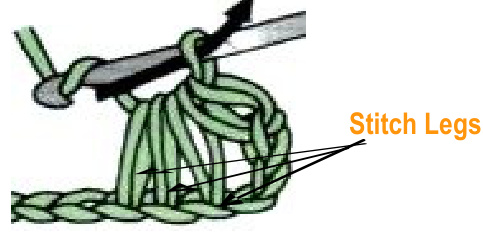
Sc3tog: single crochet 3 stitches together: insert hook into loops of stitch and draw up a loop, insert hook into next rear loop and draw up a loop, insert hook into next rear loop and draw up a loop, yo, draw through all 4 loops onhook. Kss-knitted single stitch (Edge Band only): sc in rear loop of each st (See photos below)
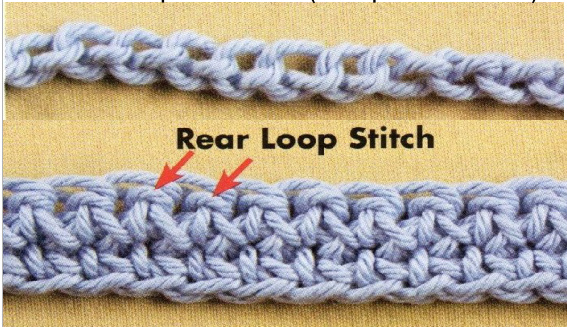
You can see a video of the KSS stitch here: http://www.youtube.com/user/Guchetdesigns Tip: The looser you crochet, the easier it is to work in the rear loops
Abbreviations
beg beginning ch(s) chain(s) dc double chain dec decrease inc increase(s) prev previous rnd round(s) rep rep(s) RS right side SC single chain sl st slip stitch SM stitch marker sp space(s) st(s) stitch(es) yo yarn over
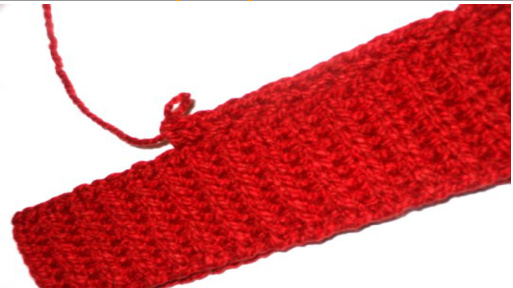
Ribbed Edge Band
Ch 10
Row 1(RS): KSS in rear loop of 2nd ch from hook (1st skipped ch counts as 1st st), and in each ch across—10 sts. Row 2: Ch 1(counts as first st now and throughout), turn; kss in rear loop of 2nd sc from hook and in each sc across. End with sc in both loops of ch 1 made at beginning of prev row—10 sts. Rep row 2 until ribbed band measures from beg 22 in/55.9 cm—DO NOT FASTEN OFF
Joining To Form Ring
Using whip stitch technique, join foundation ch to last row of band to form a ring--DO NOT FASTEN OFF. You will no longer work in rear loops From this point forward.
Picking Up Stitches To Form Hat
You will pick up 47 sts in Rnd 1 Rnd 1: Ch 2, working in Front loops only (sc in next st, dc in the next st), around. End with sl st in ch made at beg of rnd--47 sts. Rnd 2: Ch 1, (dc in next, sc, sc in next dc) around. DO NOT JOIN TO CH 1—47 sts. Place SM in Ch 1 to mark beg of rnds
At this point you will begin working in continuous rounds.
Working in continuous rnds, in established pattern (sc in dc, dc in sc), work even until hat measures approximately 4%2 -5" from beg.
Shaping Crown
TIPSFORSHAPINGCROWN
1. Try to avoid working a sc3tog directly before or after the front of your hat (which is were you worked the Ch 1 and placed a SM to mark beg of rnds) as this is the front of your hat. 2. Try to avoid working any sc3tog on top of another sc3tog! Space them evenly apart 3. When working a dc into a sc3tog (one row below), insert hook around front & back loops AND at the same time, grab one of the “legs' sc3tog. This will camouflage large gaps
NoteAboutDecreasing
Decrease= sc3tog (See Special Stitches) You will turn 3 sts (dc, sc, dc) into one sc. You will then dc in next st and continue with established pattern around. First Dec Rnd: Cont to work in established pattern (sc in dc and dc in sc) around, working three sc3tog evenly throughout the rnd. (6 total decreases made)--41 sts rem. Rep the previous Dec Rnd until 10 sts rem. (Tip #3 is critical when working dec rnds) Final Rnd: Ch 1, sc in ea rem st. End with sl st in ch 1 made at beg of rnd—-10 sts rem. Fasten off leaving 10" tail . Hat Finishing:Thread 10" tail onto tapestry needle. Weave yarn through 10 rem sts to pull closed. Thread matching thread onto sewing needle Sew Edge Band down at an angle Block hanging Edge Band lightly if desired
Octagon Flower
Ch 3, sl st to form ring. Rnd 1: Ch 1, 8 sc in ring. End with sl st in ch 1 made at beg of rnd. Rnd 2: Ch 1, [1 sc, ch 4, 1 tr] in sl st, \*ch 8, skip next sc, 1 tr, ch 1, 1 tr] in next sc. Rep from \* two more time, ch 8. End with sl st in 3rd ch. Rnd 3: Sl st in first ch 1 sp, ch 1, [1 sc, ch 3, 1 sc] in same ch 1 sp, \*[4 sc, ch 3, 4 sc] in next ch 8 sp, [1 sc, ch 3, 1 sc] in following ch 1 sp. Rep from \* two more times, [6 sc, ch 3, 6 sc] in last ch 8 sp. End with sl st in first sc. Rnd 4: Sl st in first ch 3 sp, ch 1, [1 sc, ch 2, 4 dctog] in same ch 2 sp. [ch 8, 1 sc in next ch 3 sp, ch 8, 5dctog in foll ch 3 sp] 3 times, ch 8, 1 sc in last ch 3 sp, ch 8. End with sl st in 4dctog. Rnd 5: Sl st in first ch 8 sp, ch 1 [4 sc, ch 3] twice in each ch 8 sp. End with sl st in first sc. Flower Finishing: Using needle and thread, Sew flower onto hat in desired location. Weave in all loose ends


