Felted Knot Bag
by k | knits
A simple and stylish felted bag, that's quick and easy to make, and even easier to use, with subtle shaping, and two ingenious handle design options, derived from traditional Japanese knot bags. Knitted in 100% alpaca or wool, this is the perfect felting project for beginners. The finished bag makes a great tote, or a knitting bag, or even a gift bag with a bottle popped inside. Difficulty: intermediate. Skills you will need: shaping by increasing and decreasing, picking up stitches, knitting in the round, knitting part rows, grafting (Kitchener stitch), wet felting, and blocking. (Tip: Perfect grafting is not necessary - felting will disguise any minor imperfections.) Please read through the pattern before you begin.
MATERIALS
Australian Alpaca Centre 100% Baby Alpaca [100% alpaca; 103m / 113yds per 50g (1.76oz) skein] color: 6358 Whisper - 9 skeins (knit with 3 strands held together) Alternative yarn : Blue Sky Alpacas Sport Weight [100% alpaca; 101m / 110yds per 50g (1.76oz) skein] 10 skeins (knit with 3 strands held together) Alternative yarn : Misti Alpaca Chunky [1o0% alpaca; 99m / 108yds per 100g (3.53oz) skein] 4 skeins (knit with one strand) As long as it can be felted (i.e. it is not superwash or machine washable yarn), a 1oo% wool yarn that knits to the same gauge could also be used. Alternative yarn : Cascade Yarns 220 Sport [100% wool; 150m / 164yds per 50g (1.76oz) skein] 7 skeins (knit with 3 strands held together) Alternative yarn : Knit Picks Wool of the Andes Bulky [100% wool; 125m / 137yds per 100g (3.53oz) skein] 3 skeins (knit with one strand) One 80cm (31") 8.00mm (US #11) circular needle One pair of 8.00mm (US #11) single-point needles (optional for flat knitting) Two non-identical stitch markers Sewing needle
GAUGE
12 sts. / 17 rows = 10cm (4") in st. st. before felting with 3 strands of yarn held together.
DESCRIPTION
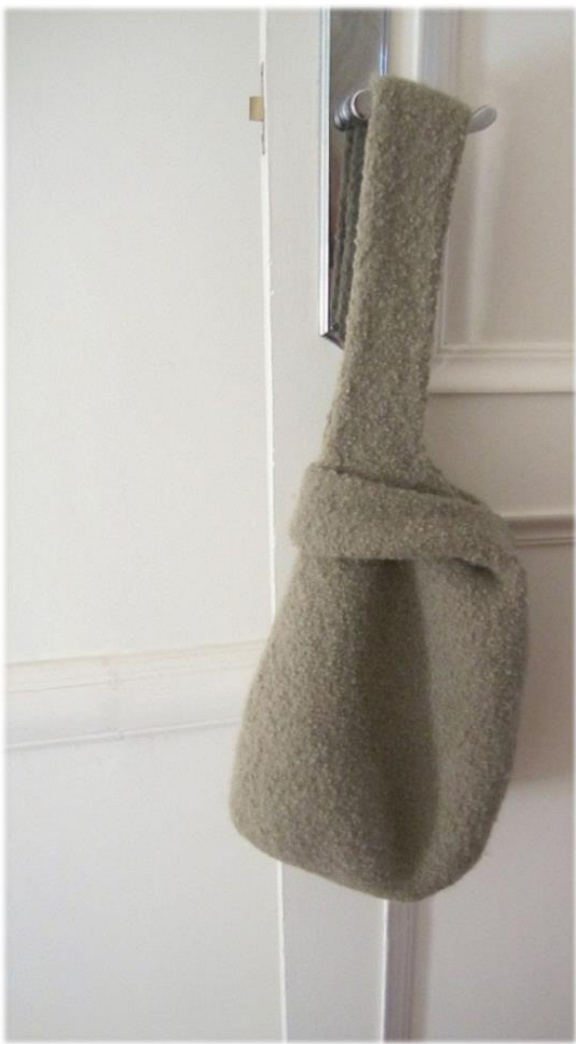
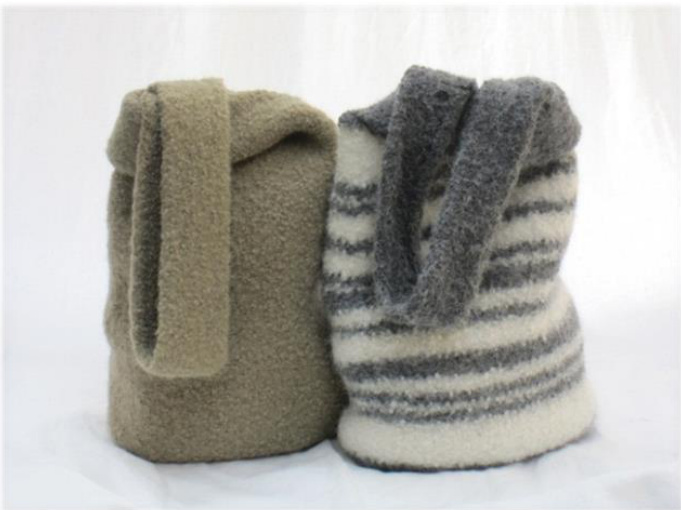
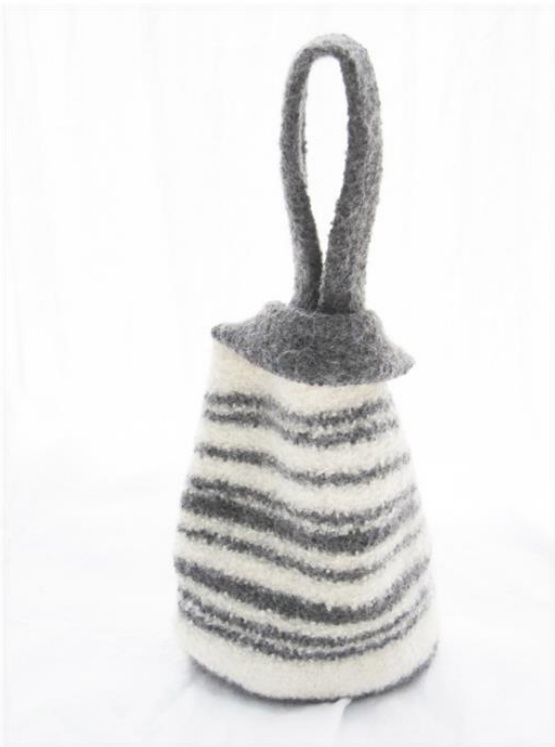
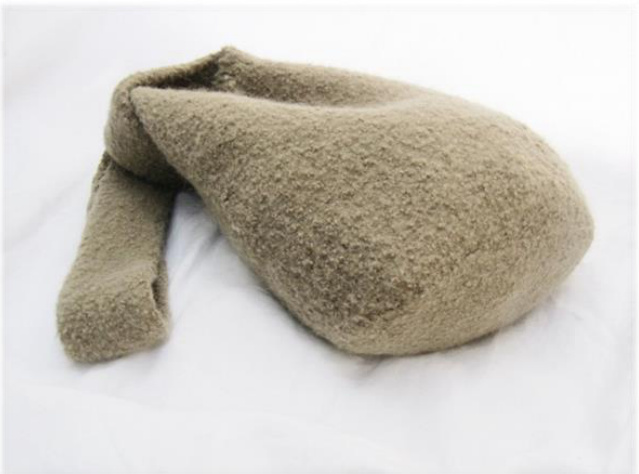
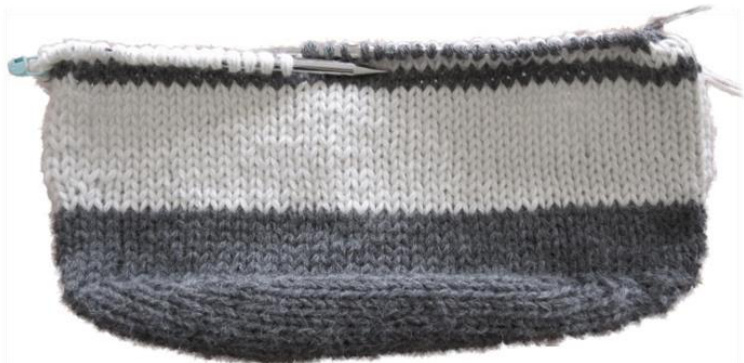
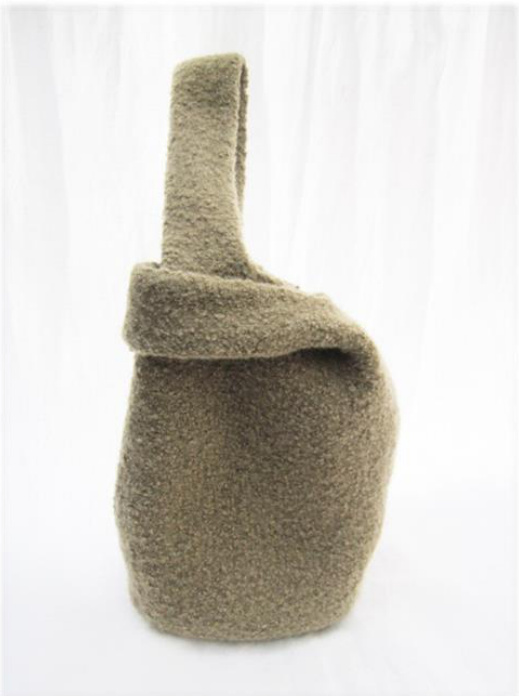
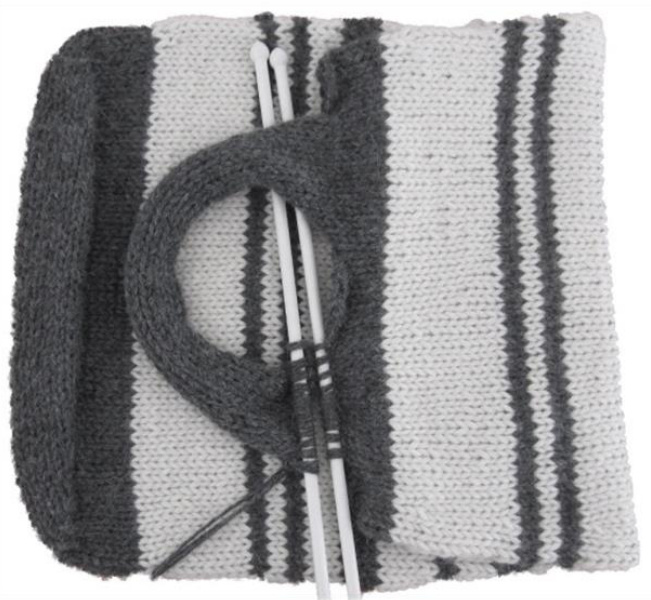
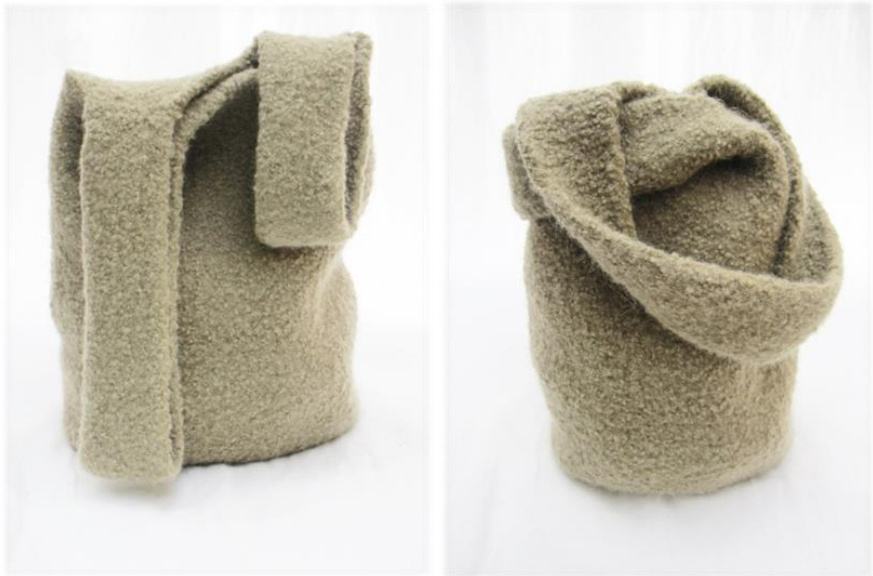
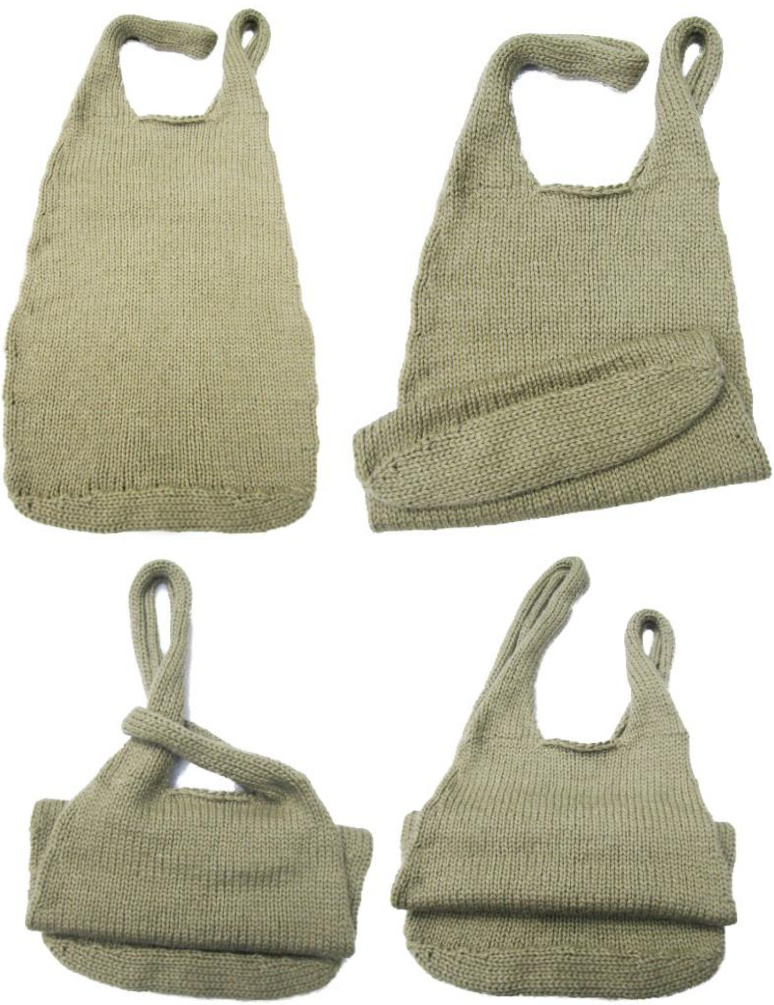
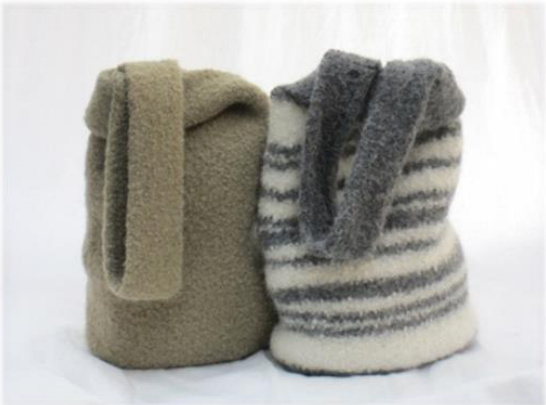
This bag is knitted in stages: First the oval-shaped base is knitted flat. Then stitches are picked up around the circumference of the base, and knitted in the round to form the body of the bag. Finally, the short and long handles are worked choosing one of two variations. In Option A (shown in green), both handles are attached so that they bridge the bag opening. In Option B(shown in stripes), the short and long handles are on opposite sides of the bag.
The whole project is knitted mostly in the round, in stocking stitch, and then wet felted, and blocked to the desired shape.
ABBREVIATIONS
k -knit p-purl sts. - stitches st.st.- stocking stitch (aka stockinette stitch): Worked flat: (on any number of sts) Odd rows: K. Even rows: P. Repeat these 2 rows. Worked in the round: (on any number of sts) Round one: K.Repeat this round. kfb - knit into the front and back of the stitch k2tog - knit 2sts. together pfb - purl into the front and back of the stitch p2tog - purl 2sts. together m1 - make a stitch by picking up the loop between the needles and knitting into the back. bo - bind off:(1) K2sts.(2) Slip the 2sts from the right hand needle to the left hand needle.(3) K these 2sts together through the back of the loop. K1.(4) Repeat (2) and (3) until all sts. have been bound off.
FINISHED MEASUREMENTS
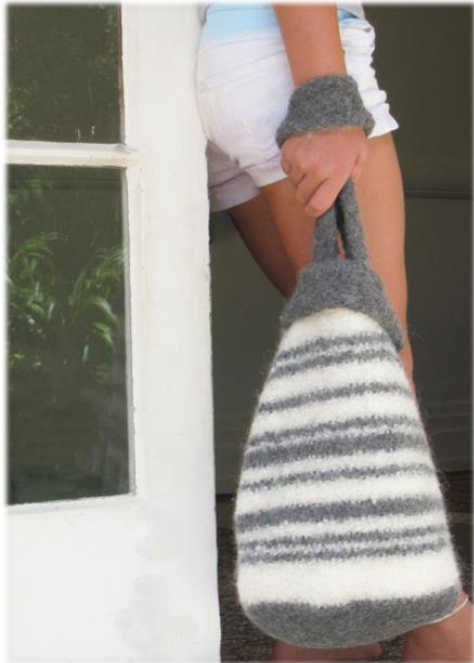
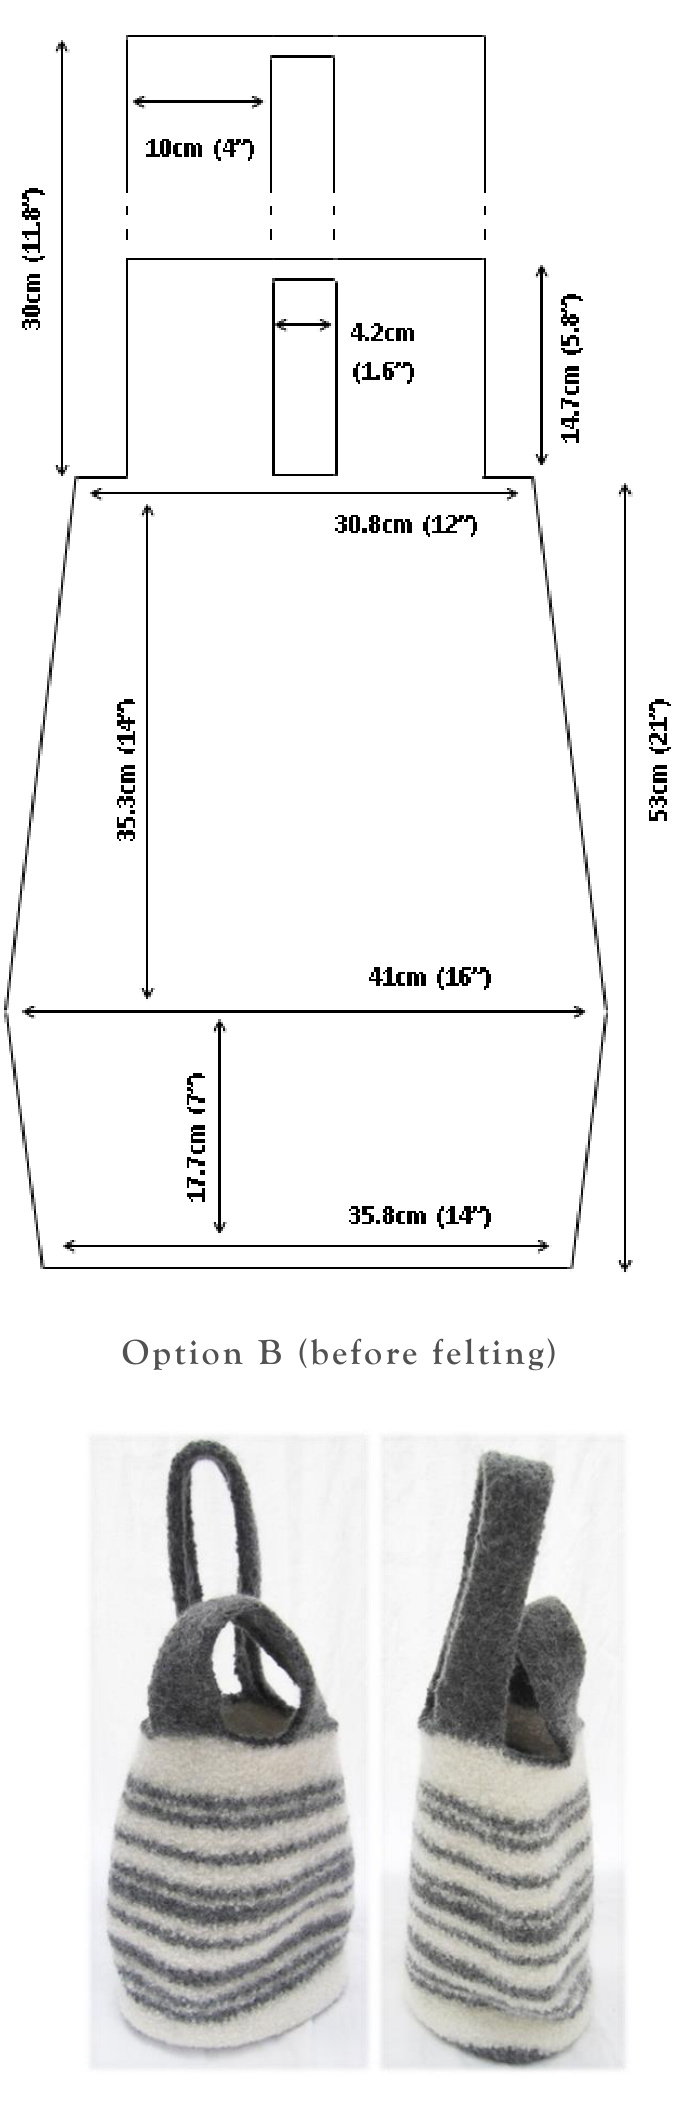
Approximate measurements after felting with the bag laid flat. More or less felting, and different yarns, may result in different finished measurements. Option A (shown in green): Width (base): 30cm (11.8");(top): 22cm (8.7") Height (flat): 38cm (15");(standing): 32.5cm (12.8") Handle length (short): 14cm (5.5"); (long): 23cm (9") Handle width (both): 5cm (2") Option B (shown in stripes): Handle length (short): 9.7cm (3.8"); (long): 23cm (9") Handle width (both): 5.5cm (2.2") Note: If you want to wear your bag as a shoulder bag, pleasecheckthe long handle measurement, as you may need more length.If this is the case,simply increase the number of rows worked for the long handle, (working the short handle as written).
You can expect your felted bag to relax a little, as like leather, it will soften with wear.
KNITTING
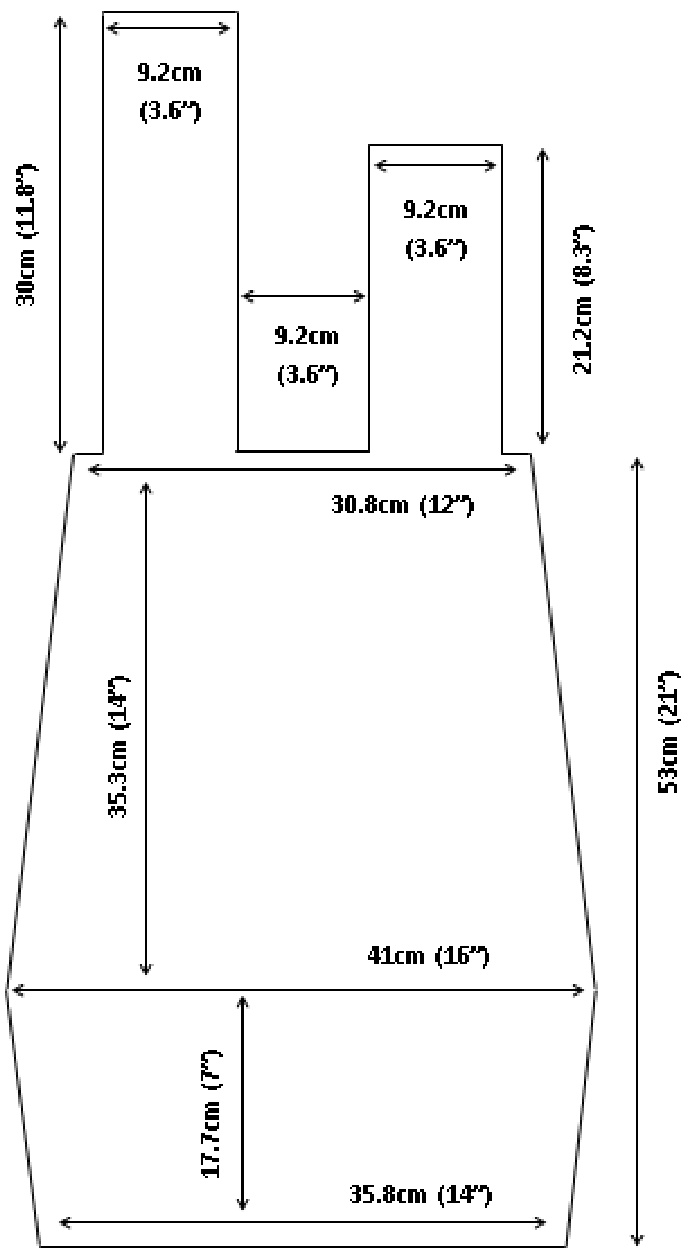
Work the base.
| 36cm (14") | |
| 12cm (4%") |
Cast on 2sts. Begin working flat in st. st. for 60 rows, shaping the base as follows:
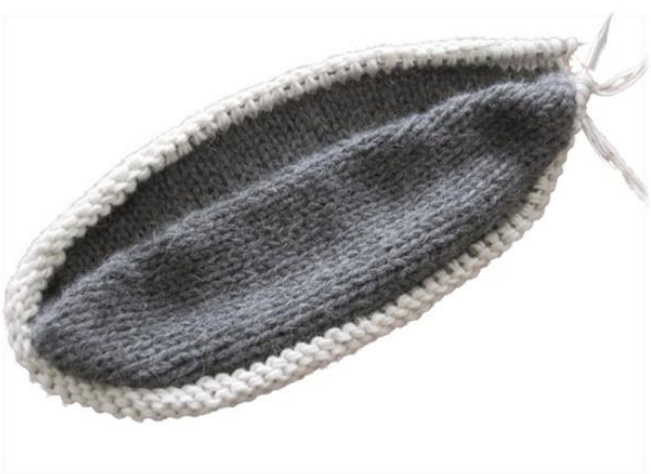
Base (before felting) Rows 14, 16, 6 20: P. Row 1: K (2sts). Row 2: Pfb twice. Rows 3, 5, 7: Kfb, k to the last st., kfb. Rows 4, 6, 8, 10: P. Rows 9, 6 11: K. Rows 12, 18: Pfb, p to the last st., pfb. Rows 13, 15, 17, @ 19:K. Rows 21-42: Repeat rows 19-20. Rows 43,45,47,49, 51:K. Rows 44, & 50: P2tog, p to the last st., p2tog. Rows 46, 48, 52, 56, 58: P. Rows 53-54: Repeat rows 51-52. Rows 55,57, 59:K2tog, k to the last st., k2tog. Row 60: P2tog twice(2sts).
Work the body. Knit the 2sts. remaining from the base. Place a stitch marker between these 2 stitches to mark the start of the round. Using a circular needle, pick up and knit 84 more stitches evenly around the circumference of the base (86sts). Tip: Using the ‘twothirds rule',picking up 2sts. for every 3 knitted rows - will give close to the required number of stitches.
Place a different coloured stitch marker opposite the first - between sts. 43 and 44 - to mark the side of the bag. Begin working in st. st. in the round. Rounds 1-9: K86. Rounds 10, 20, 30: K1, m1,k to 1 st. before marker, m1, k1, slip marker, k1, m1, k to 1 st. before end, m1, k1. Rounds 11-19: K90. Rounds 21-29: K94.
Rounds 31-38: K98. Rounds 39, 48, 57, 66, 75, 83: K1, k2tog, k to 3 sts. before marker, k2tog, k1, slip marker, k1, k2tog, k to 3 sts. before end, k2tog, k1. Rounds 40-47: K94. Rounds 49-56: K90. Rounds 58-65: K86. Rounds 67-74: K82. Rounds 76-82: K78. Rounds 84-90: K74. Work the handles Choose either Option A (shown in green), or Option B (shown in stripes):
Option A
Working flat, set-up the handles as follows: Bo 2sts., kl1, bo 1lsts., k11, bo 4sts., k11, bo 11sts., k11, bo 2sts. (74sts.) Join the yarn to the first set of 11sts., and work 72 rows in st.st. Using Kitchener stitch, graft together the 11sts. just worked, and the final set of 11sts. from the set-up row, taking care not to twist the handle. Join the yarn to the next set of 11sts. and work 102 rows in st.st. Using Kitchener stitch, graft together the 11sts. just worked and the remaining set of 1lsts.
Option B
Working flat, set-up the handles as follows: Bo 4sts., k12, bo 5sts., k12, bo 8sts., k12, bo 5sts., k12,bo 4sts. (74sts.) Join the yarn to the first set of 12sts., and work 50 rows in st.st. Using Kitchener stitch, graft together the 12sts. just worked, and the next set of 12sts. from the setup row, taking care not to twist the handle. Join the yarn to the next set of 12sts. and work 102 rows in st.st. Using Kitchener stitch, graft together the 12sts. just worked and the final set of 12sts.
Option A (before felting)
The knitting is now completed. As long as any loose ends are securely knotted and trimmed, there is no need to sew them in as they can be snipped off safely after felting.
Don't be concerned if the bag looks a little shapeless and owergrown - felting will shrink it and firm it up nicely.
WET FELTING
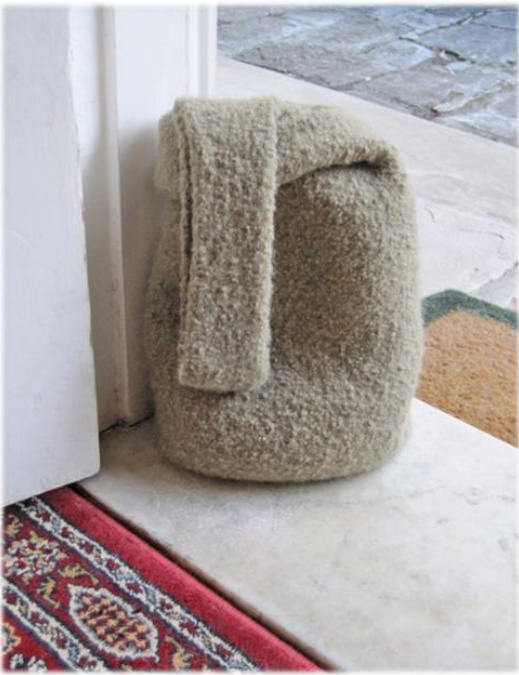
Felting is easy and effective, but not an exact science. Here are some pointers to get you started. For more information, Google is your friend. Felting occurs through the application of moisture, heat and agitation, and the amount of each determines the way in which the bag will felt. Generally the more heat and agitation, the more quickly felting occurs. Hand felting is slow, but gives more control over the finished product. Machine felting is quicker and easier, but can be harder to monitor. As a guideline, the green bag pictured was felted in a front-loading washing machine at 60C (140F) for 15 minutes, using a regular setting, rather than a setting with reduced agitation, such as you might use for delicates. A tiny amount of washing liquid was added, and progress was checked every 5 minutes to determine the degree of felting, and to ensure the bag wasn't felting to itself. This requires a machine that can be opened mid-cycle. With a machine that cannot be opened while in use, it is best to check progress at the end of a short, low temperature wash cycle, and repeat the wash cycle as necessary. The striped bag was felted at 40C (100F) - a lower, more colour-friendly temperature - and took 30 minutes to achieve the same degree of felting as the green bag. To gauge the amount of felting, check the stitch definition in the knitting - the more felting that occurs, the less stitch definition will be seen. It is quite likely the straps will felt more quickly than the body of the bag, so keep felting until both are evenly done. For more control over the wet felting process, it is a good idea to experiment by felting a swatch or two. When the bag is suitably felted, rinse it thoroughly in cold water, and either spin out as much water as possible, or roll it in towels to reduce drying time - which can be a couple of days. It is possible to machine-dry felted items, but as the drying process sets the felted fabric, for the best results pad the bag with a hand towel, and stand it upright to air dry, so that it blocks with gentle curves in the body, and a flat base.
FINISHING
Once dry, snip any loose ends, and shave off any unwanted fluffiness. Any minor lumps and bumps can be trimmed off with sharp scissors. Add a lining and surface decoration if desired.
VARIATIONS
For a smaller (larger) bag, try a smaller (larger) needle size. A thinner or thicker yarn would have a similar effect on the size of the finished piece. In all instances, the knitted fabric should be floppy rather than firm, to facilitate felting.
ABOUT THE DESIGNER

Karen Trudgian is an avid knitter and fibrephile, based in Sydney, Australia, who draws inspiration from her expansive stash of luxury yarns,much to the amusement -and occasionally concern - of her family and friends. You can e-mail Karen at kandikan@gmail.com, and find her on Ravelry as schuyler, which she pronounces sky - ler. ● Karen Trudgian, 2012-2013. No part of this publication may be reproduced, stored in a retrieval system or transmitted in any form or by any means without the prior written permission of the designer. This pattern, and any items derived from it, are for personal use only and are not to be used for any commercial purpose, profit, or gain.
MATERIALS: Australian Alpaca Centre 100% Baby Alpaca [100% alpaca; 103m / 113yds per 50g (1.76oz) skein」 color: 6358 Whisper -9skeins (knit with 3 strands held together); one 80cm (31") 8.00mm (US #11) circular needle; one pair of 8.00mm (US #11) single-point needles (optional for flat knitting); two nonidentical stitch markers; sewing needle GAUGE: 12 sts./ 17 rows = 10cm (4") in st. st. before felting with 3 strands of yarn held together.
DIRECTIONS:
(1) Work the base: Cast on 2sts. Begin working flat in st. st. for 60 rows, shaping the base as follows: Row 1: K(2sts). Row 2: Pfb twice. Rows 3, 5, 7: Kfb, k to the last st., kfb. Rows 4, 6, 8, 10: P. Rows 9, 11: K. Rows 12, @ 18: Pfb, p to the last st., pfb. Rows 13,15,17, 19:K. Rows 14, 16, 20: P. Rows 21-42: Repeat rows 19-20. Rows 43,45, 47,49, @ 51:K. Rows 44, 50: P2tog, p to the last st., p2tog. Rows 46,48,52,56, 58:P. Rows 53-54: Repeat rows 51-52. Rows 55, 57, @ 59: K2tog, k to the last st., k2tog. Row 60: P2tog twice (2sts).
(2) Work the body:
Knit the 2sts. remaining from the base. Place a stitch marker between these 2 stitches to mark the start of the round. Using a circular needle, pick up and knit 84 more stitches evenly around the circumference of the base (86sts). Place a different coloured stitch marker opposite the first -between sts. 43 and 44 -to mark the side of the bag. Begin working in st. st. in the round. Rounds 1-9: K. Round 10: K1,m1,k to 1 st. before marker,m1, k1, slip marker, kl, ml, k to l st. before end, m1, k1. Repeat rounds 1-10 twice more: 30 rounds. Rounds 31-38: K. Round 39: K1, k2tog, k to 3 sts. before marker, k2tog, kl, slip marker, k1, k2tog, k to 3 sts. before end, k2tog, k1. Repeat rounds 31-39 four more times: 75 rounds. Rounds 76-82: K. Round 83: Repeat round 39. Rounds 84-90: K. (3) Work the handles: Option A (shown in green) Working flat, set-up the handles as follows: Bo 2sts., k11, bo 11sts., k11, bo 4sts., k11, bo 11sts.,k11,bo 2sts. (74sts.) Join the yarn to the first set of 11sts., and work 72 rows in st.st. Graft together the 11sts. just worked, and the final set of 11sts. from the set-up row, taking care not to twist the handle. Join the yarn to the next set of 11sts. and work 102 rows in st.st. Graft together the 1lsts. just worked and the remaining set of 1lsts.
Option B (shown in stripes)
Working flat, set-up the handles as follows: Bo 4sts., k12, bo 5sts., k12, bo 8sts., k12,bo 5sts.,k12,bo 4sts. (74sts.) Join the yarn to the first set of 12sts., and work 50 rows in st.st. Graft together the 12sts. just worked, and the next set of 12sts. from the set-up row, taking care not to twist the handle. Join the yarn to the next set of 12sts. and work 102 rows in st.st. Graft together the 12sts. just worked and the final set of 12sts. Wet felt and finish as desired.


