Vintage
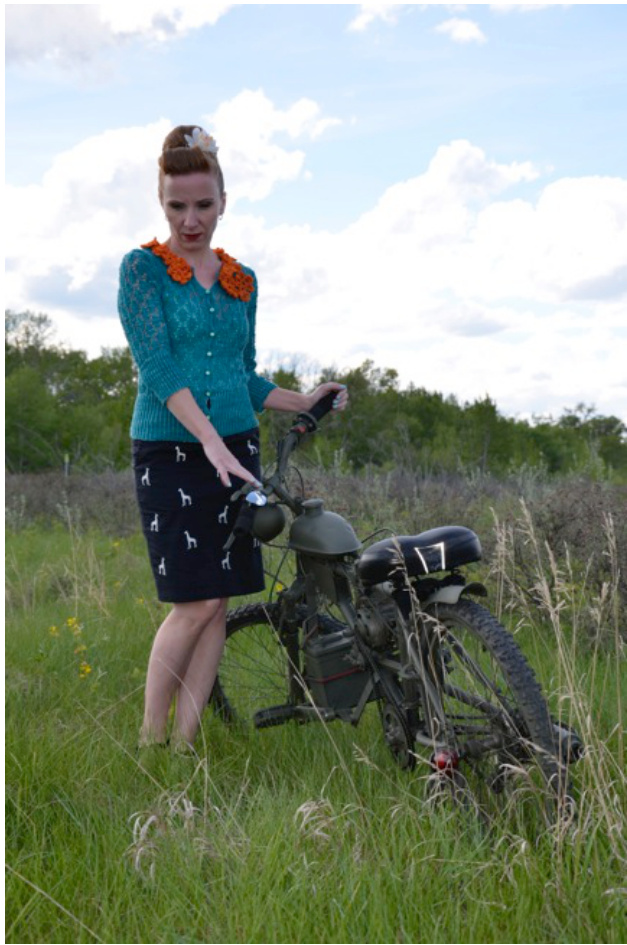
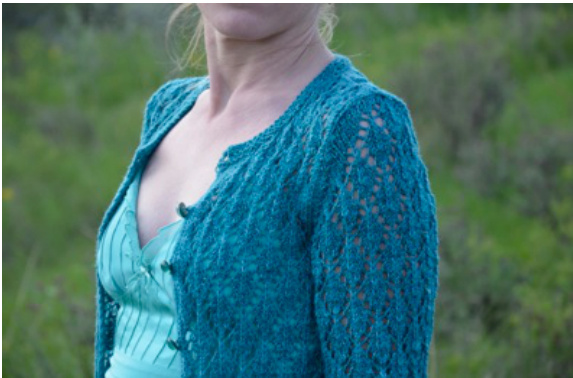
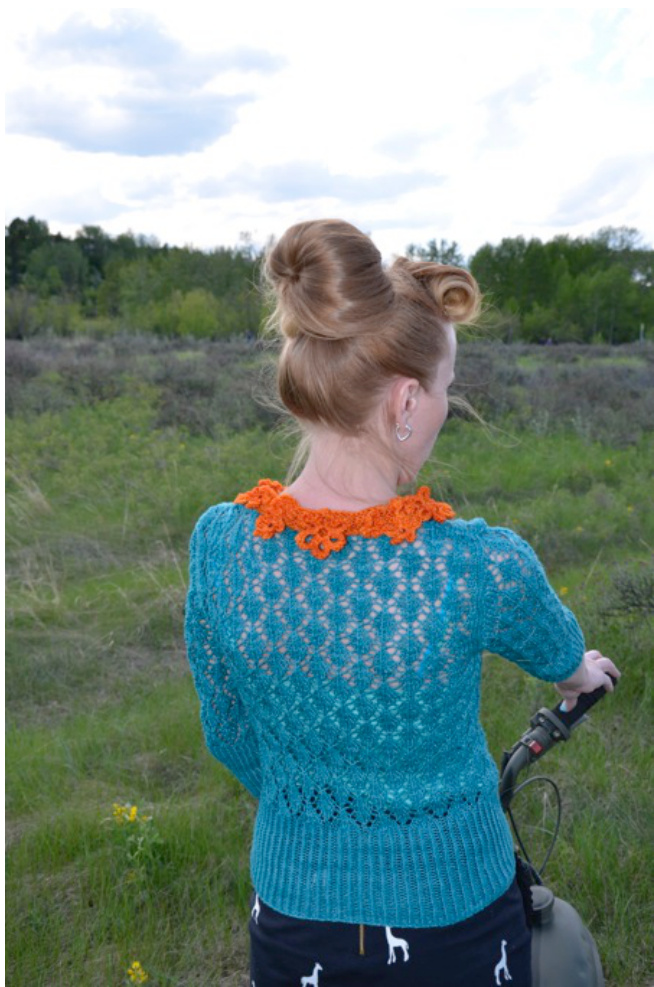
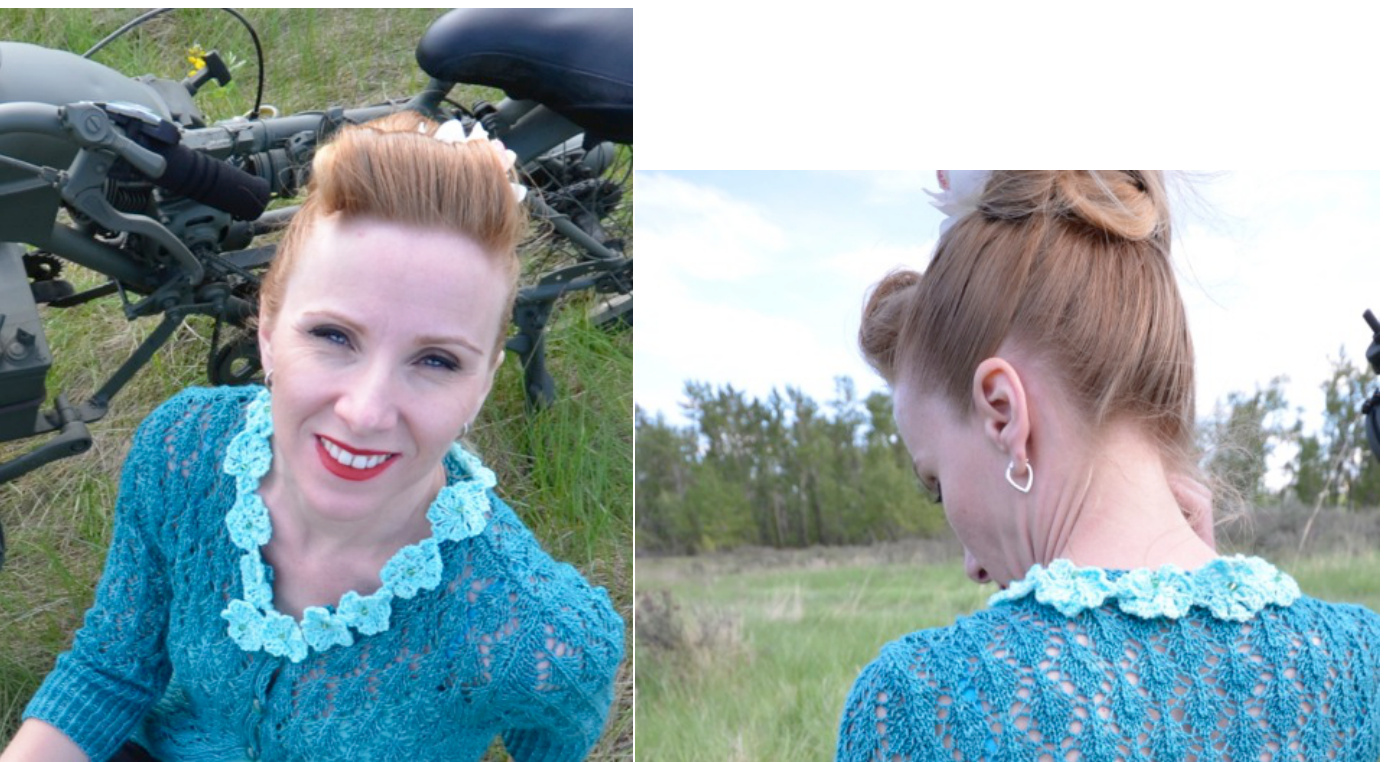
This vintage-style, lace cardigan is the perfect accessory for spring and summer. It is light enough to wear on warm days and warm enough to keep away the chill on summer evenings. The collar can be changed to suit your mood. A bright, flowery collar for a picnic in the park, a more sedate collar for an evening out or no collar at all - the choice is yours.
d images copyright 2013: Myrna Batten (mdbatten@shaw.ca). Pattern is for personal use onl) This pattern includes two different collar styles: a crochet flower collar and a knit flower collar, but the options are endless. How about a ruffled, picot or lace collar? With a little practice, you can add as many different collars as you can imagine, in any colour you wish.
Sizes:
Choose the size larger than your bust; some positive ease is recommended
Chest Circumference:
73 (85, 93, 103, 115, 130) cm: 29 (34, 37,41, 46, 52)"
Materials:
\*\*Madelinetosh "Tosh Sock"; 100% superwash merino wool; 395yd/361m per 120g skein For cardigan: 2 (3, 3, 3, 3, 3, 4) skeins; colourway Kelp For Collar A: 1 skein; colourway Citrus (actual yardage approx. 115yd/105m: highly dependent on number of flowers crocheted) For Collar B: 1 skein; colourway Robin's Egg (actual yardage approx. 60yd/55m; highly dependent on number of flowers knit) \*\* a note regarding yarn substitutions. This pattern works best with a yarn with drape and stretch.Cotton&cottonblendsarenotrecommended,but maybeused if additional lace repeats are added into the body of the garment and positive ease is chosen for the size 4.5 mm/US 7 circular needle (80cm (32")) or size needed to obtain gauge 3.5mm/US E crochet hook (for Collar A) 8 (8, 10, 10, 10, 10, 10) buttons for cardigan 5 small buttons for each collar tapestry needle for finishing 2 stitch holders beads for Collar B, 1 per flower (optional)
Gauge:
Lace (blocked) 32 sts= 16cm (6.25") 24 rows = 9cm (3.7") Twisted Rib (slightly stretched) 6sts x 7rows = 2.5cm (1") Please check your gauge.
Pattern Notes:
This sweater is worked in one piece from hem to armholes and then each of the front/back pieces are worked separately. The sleeves are worked flat and seamed, then sewn to the body of the sweater. Collars are made separately and pieced to fit the cardigan. Please read the notes on the last page for helpful hints on how to work the shaping into the lace pattern.
Abbreviations:
k: knit p: purl tbl: through the back loop pm: place marker sm: slip marker sl: slip stitch (purlwise unless noted) patt: pattern MC: main colour CC: contrasting colour RS: right side of garment WS: wrong side of garment k2tog: knit two stitches together (decrease one stitch, right slant) ssk: slip 2 stitches knit wise one at a time, then slip both of these stitches back to the left needle and knit them together through the back loops (decrease one stitch, left Slant) p2tog: purl two together (right slant on RS) p2togtbl: slip 2 stitches knit wise and then slip these stitches back to the left needle, purl them together through the back loops (left slant on RS) sl1-k2tog-psso: slip one stitch, knit two stitches together, pass the slipped stitch over the k2tog and off needle (centred double decrease) kfb: knit into the front and back of the same stitch (one stitch increased) m1L: make one stitch, left slant. With left needle pick up strand between needles from front to back, knit this stitch through the back loop. m1R: make one stitch, right slant. With the left needle pick up the strand between needles from back to front, knit this stitch. yo: increase 1 stitch by wrapping the right hand needle with yarn before knitting next stitch pinhole increase: pick up the strand between needles and knit without twisting (makes a smaller hole than a yo)
Stitch Patterns
Twisted Rib (over uneven number of stitches): Row 1: (k1tbl, p1) to last stitch, k1tbl Row 2: (p1tbl, k1) to last stitch, p1tbl Lace Stitch (see also Lace chart) Multiple of 8 stitches + 1: All wS rows: p Row 1: k1, \*yo, k2, sl1-k2tog-psso, k2, yo, k1; repeat from Row 3: k1, \*k1, yo, k1, sl1-k2tog-psso, k1, yo, k2; repeat from \* Row 5: k1, \*k2, yo, sl1-k2tog-psso, yo, k3; repeat from \* Row 7: k2tog, \*k2, yo, k1, yo, k2, sl1-k2tog-psso; repeat from \* to last 7 sts, k2, yo, k1, yo, k2, ssk Row 9: k2tog, \*k1, yo, k3, yo, k1, sl1-k2tog-psso; repeat from \* to last 7 sts, k1, yo, k3, yo, k1, ssk Row 11: k2tog, \*yo, k5, yo, sl1-k2tog-psso, repeat from \* to last 7 sts, yo, k5, yo, ssk Key: All WS rows: Purl O : Yarn Over : sl1-k2tog-psso / : k2tog :ssk
| O | O | A | O | O | 11 | ||||||||||||
| O | O | O | |||||||||||||||
| O | O | O | / | ||||||||||||||
| O | O | O | O | ||||||||||||||
| O | O | O | |||||||||||||||
| O | O | O | O | 1 | |||||||||||||
| Pattern Repeat | |||||||||||||||||
Cardigan Instructions:
Main Body:
CO 159 (185, 203, 229, 255, 289) sts. Work in Twisted Rib for 6 rows. Buttonhole row (repeat every 12 rows on the right front): RS: k1tbl, p2tog, yo, p1; continue in patt to end of row WS: work in patt to last 3 sts; purl (do not twist) yo stitch, k1, p1tbl Work even in Twisted Rib, working a button hole every 12th row, for 11 (11, 13, 13, 13, 14) cm; 4.5 (4.5, 5, 5, 5, 5.5)" from cast on edge ending with a RS row. Next row (WS): Work 5 sts in Twisted Rib ((p1tbl, k1) twice, p1tbl); purl to last 5 sts decreasing (p2tog) 12 (14, 16, 18, 20, 22) times evenly across; work last 5 sts in Twisted Rib. 147 (171, 187, 211, 235, 267) sts Next row (RS): Work 5 sts in Twisted Rib (k1tbl, p1) twice, k1tbl); begin Lace Pattern starting on row one of the chart, work to last 5 sts; work last 5 sts in Twisted Rib. Work even, repeating the Lace Pattern Chart 5 times. Remember to work 5-stitch Twisted Rib at beginning and ending of reach row, and continue to work Buttonhole Row every 12th row. End with a RS row (Row 11).
Shape armholes
Next Row (WS): (p1tbl, k1) twice, p1tbl; p 28 (36, 38, 42, 50, 56), bind off 8 (8, 12, 12, 12, 16), p 65 (73, 77, 93, 101, 113), bind off 8 (8, 12, 12, 12, 16), p to last 5 sts, (p1tbl, k1) twice, p1tbl You should now have 33 (41, 43, 47, 55, 61) sts for each front and 65 (73, 77, 93, 101, 113) sts for the back.
Back:
Join new yarn on RS. (Stitches for fronts can be left on the circular needle to be worked later or put on holders, whichever you prefer.) Refer to the notes and examples on the last page to help incorporate shaping into Lace Pattern. Slip the first stitch on each row (selvage stitch). Decrease Row 1 (RS): sl1, ssk, work in patt to last 3 sts, k2tog, k1 Decrease Row 2 (WS): sl1, p2tog, p to last three sts, p2togtbl, p1 Repeat Decrease Row 1 every RS row 0 (1, 1, 1, 2, 3) times more, while working all WS rows as follows: sl1, p to end. 61 (67, 71, 87, 93, 103) sts. Work even in patt for 41 (43, 45, 49, 49, 55) more rows, ending on a WS row.
Shape Shoulders
Bind off 9 (10, 11, 14, 15, 16) stitches at the beginning of the next four rows. Bind off 25 (27, 27, 31, 33, 39) remaining neck stitches.
Right Front:
Maintain buttonholes every 12th row. Decrease Row 1 (RS): Work 5 sts in Twisted Rib, work in Lace Pattern to last three sts, k2tog,k1. Decrease Row 2 (WS): sl1, p2tog, p to last 5 sts, work last 5 sts in Twisted Rib. Repeat Decrease Row 1 every RS row 0 (1, 1, 1, 2, 3) times more while working all WS rows as follows: sl1, p to last 5 sts, work last 5 sts in Twisted Rib. 31 (38, 40, 44, 51, 56) Work even in patt for 17 (19, 21, 19, 19, 19) more rows ending with a WS row (if you end on a RS row, knit one more row in pattern)
Neck Shaping.
Next Row (RS): Work 5 sts in Twisted Rib and place them on a holder. Bind off 0 (4, 4, 2, 5, 6) sts, work in patt to end. 26 (29, 31, 37, 41, 45) sts on needles. Decrease Row 1 (wS): sl1, p to last 2 sts, p2togtbl. Decrease Row 2 (RS): ssk, work in patt to end. Continue neck edge decreases (every row) as established until 18 (20, 22, 28, 30, 32) sts remain on needles. Work even in patt until the front is the same length as the back, ending with a RS row. d off 9 (10, 11, 14, 15, 16) sts at the beginning of the next two WS row
Left Front:
With RS facing join yarn. Decrease Row 1 (RS): sl1, ssk, work in patt to end. Decrease Row 2 (WS): work in patt to last 3 sts, p2togtbl, p1. Repeat Decrease Row 1 every RS row 0 (1, 1, 1, 2, 3) times more while working all WS rows as follows: work 5 sts in Twisted Rib, p to end. Maintain patt for 17 (19, 21, 19, 19, 19) more rows ending with a RS row (if you end on a WS row, knit one more row in pattern)
Neck Shaping.
Next Row (WS): Work 5 sts in Twisted Rib and place them on a holder. Bind off 0 (4, 4, 2, 5, 6) sts, work in patt to end. 26, (29, 31, 37, 41, 45) sts on needles. Decrease Row 1 (RS): sl1, work in patt to last 2 sts, k2tog. Decrease Row 2 (wS): p2tog, p to end. Continue neck edge decreases (every row) as established until 18 (20, 22, 28, 30, 32) sts remain on needles Work even in patt until the front is the same length as the back, ending with a WS row. Bind off 9 (10, 11, 14, 15, 16) sts at the beginning of the next two RS rows. Sleeves (make 2): Cast on 58 (58, 66, 74, 82, 90) stitches. Do not join Work in Twisted Rib for 10cm (4"), ending with a WS row. Change to Lace Pattern and work chart a total of 4 (4, 4, 4.5, 4.5, 5) times, ending with awSrow. Bind off 4, (4, 6, 6, 6, 8) sts at the beginning of the next two rows. Decrease Row 1 (RS): sl1, ssk, work in patt to last 3 sts, k2tog, k1. Decrease Row 2 (WS): sl1, p2tog, p to last 3 sts, p2togtbl, p1. Repeat Decrease Row 1 every RS row, purling all WS rows, until 26 (26, 30, 32, 32, 33) sts remain. Bind off 2 (2, 4, 4, 4, 5) sts at the beginning of the next two rows. Bind off 4 (4, 4, 4, 4, 5) sts at the beginning of the next two rows. Bind off final 14 (14, 14, 16, 16, 18) sts. d images copyright 2013: Myrna Batten (mdbatten@ shaw.ca). Pattern is for personal use onl)
Finishing:
Body Collar:
Sew shoulder seams. Place the right front live stitches on a needle and knit them. Pick up and knit bound off stitches of neck edge (if there are any) Pick up and knit along the neck edge (approximately 2 of every 3 sts), pick up and knit all bound-off sts along the back neck, and pick up and knit down along the left front edge (2/3). Pick up and knit bound off stitches (if there are any). Place the remaining left front live sts on the needles and knit them. Record the total number of sts for the collar. (This number is needed for the attachable collars.) Beginning with a WS row, knit 3 rows. On the next RS row, make buttonholes as follows: k2, work buttonhole (buttonholes worked as follows: pinhole increase, k2tog); continue around working buttonholes at right shoulder seam, centre back, and left shoulder seam, k to last 3 sts, work buttonhole, k1. (5 buttonholes total) Knit 2 more rows and bind off. Wash all pieces and block to measurements. Sew sleeve seams. Sew sleeve caps into body, easing the cap where necessary. Weave in ends. Sew on buttons opposite buttonholes on left front.


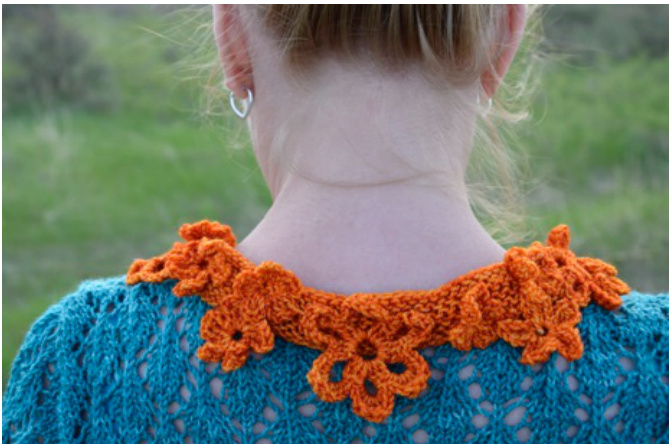
Attachable Collar A:
Using the contrasting colour A, cast on the number of stitches that you recorded for the body collar. Knit 8 garter ridges (16 rows) and bind off.
Abbreviations for Crochet:
ch: chain sc: single crochet dc: double crochet hdc: half double crochet tc: treble crochet sl st: slip stitch Ip: loop CL: cluster (see specific directions) Beg: beginning
Crochet Flowers:
With crochet hook and contrasting colour make the following flowers: Large Flower (make 3-4): Ch 7, join with sl st in first ch to form a ring. Round 1: ch 7 (counts as dc, ch4), \*3 dc in ring, ch 4, repeat from \* 4 times more, 2 dc in ring, join with sl st in top of beg dc (6 petals). Round 2: ch 1, \*(1 sc, 1 hdc, 1 dc, 3 tc, 1 dc, 1 hdc, 1 sc) in ch4 space, repeat from \* 5 times more, join with sl st to first sc, fasten off.
Med Flower (make 2):
Ch 6, join with sl st in first ch to form a ring. Round 1: ch 1, 12 sc in ring. join with sl st in first sc. Round 2: ch 1, 1 sc in same st, \* ch 7, sl st in sc just made, 1 sc in each of next 2 sc repeat from \* end last rep 1 sc in last sc, join to first sc with sl st (6 petals). Round 3: ch 1, \* 9 sc in ch 7 Ip, sl st between next 2 st, repeat from \*, join with sl st in sl st of previous round, fasten off.
Small flower (make 8-10):
Directions for 2-tc CL: [yo twice, insert hook in st, yo and draw up loop, (yo and draw through two loops) twice] twice in same st (2 incomplete tc on hook); yo and draw through all 3 loops on hook. Ch 5. Round 1: 2-tc CL in 5th ch from hook, ch 4, sl st in same ch, \*(ch 4, 2-tc CL, ch 4, sl st ) in same ch, repeat from \* 3 times more (5 petals), fasten off.
Smallest flower (make 8-10):
Directions for 2-dc CL: (yo, insert hook in st, yo and draw up loop, yo and draw through two loops) twice in same st (2 incomplete dc on hook); yo draw through all three loops on hook. Ch 4. Round 1: 2-dc CL in 4th ch from hook, ch3, sl st in same ch, \*(ch 3, 2-dc CL, ch 3, sl st) in same ch, rep from \* 3 times more (5 petals), fasten off.
Finishing Collar A:
Weave in all ends. With matching yarn attach flowers to collar, spacing the largest flowers around the collar as desired, then filling in the spaces with the smaller flowers. Sew buttons to the underside of the collar to correspond with the buttonholes on the bodycollar.
Collar B:
Optional: If desired, begin with garter stitch section as for Collar A. For a more delicate-looking collar, skip this step. Knit Flower (make enough to sit end to end around your collar with a couple of extra for filler, if desired. Sample shown uses 14 flowers.) With Contrasting Colour B and 3.75mm (US 5) needles cast on 42 sts. Row 1: k1, yo, \*(k5, sl 2nd, 3rd, 4th & 5th stitches on RH needle over the 1st stitch), yo; repeat from \* to last stitch, k1. (19sts) Row 2: p1, (p2tog) to end. Bind off all sts, and connect the ends to form a ring. Weave in ends and sew a bead into the centre of each flower, if desired. Attach flowers at petal tips and sew buttons to the underside to correspond with the buttonholes on the body collar. Notes on shaping while working lace. Please refer to the chart below for helpful hints on maintaining the lace pattern while working the garment shaping.
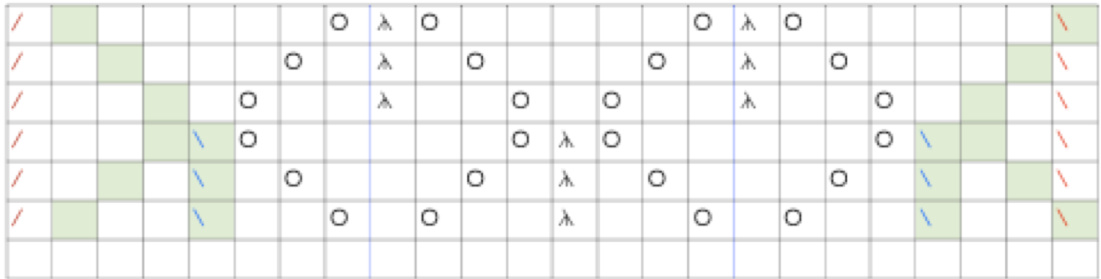
Examples of how the lace chart changes when shaping decreases are incorporated with the pattem. Note the line of red decreases at each end of the chart. These are for example only and should be for visualization purposes! For each decrease the shaded green boxes represent changes in the chart; either a yo is deleted or a double decrease is changed to a single decrease (blue decreases). The position of the body shaping (the red decreases) does not matter as long as the corresponding yo and double decrease are deleted/changed. Also note that the single decreases on each edge of the charts on the top three rows are eliminated, along with their matching yo's


