Adult Batman Beanie
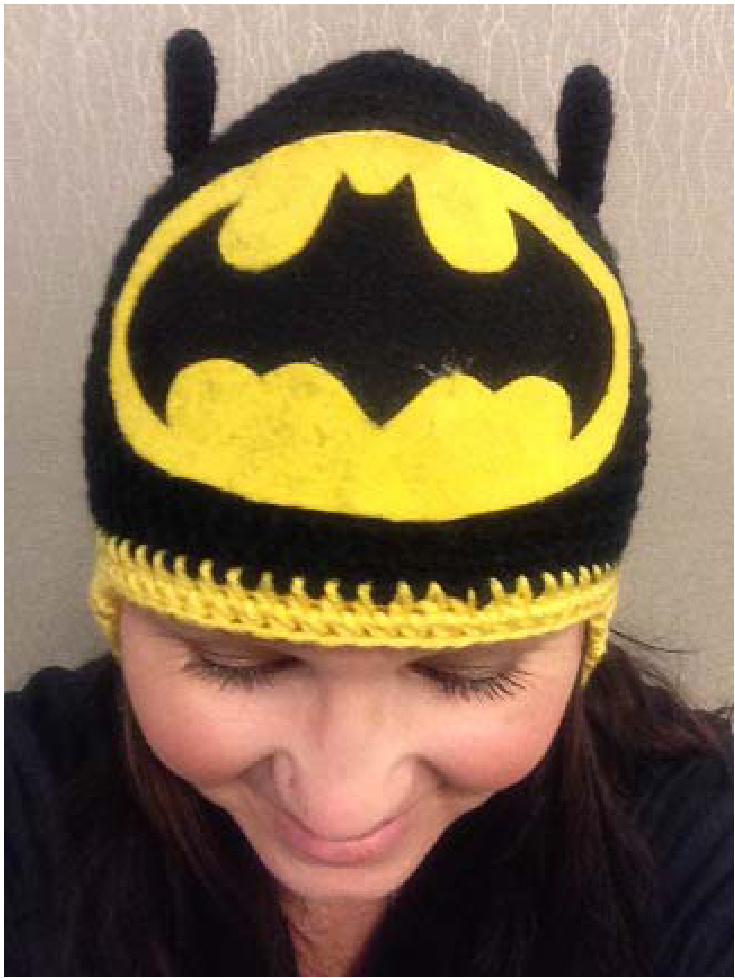
This pattern is written in standard US terms You'll need an H hook, worsted weight yarn, darning needle, felt in black and yellow, and either a hot glue gun or sewing machine (logo on the front can be hand stitched with needle and thread if you prefer). I used I Love This Yarn in Black, and yellow.
Special Instructions
At the end of each round you will "join the last stitch of the round to the first stitch of the round with a ss, chain one" this step creates an invisible seam, and makes it neater when chaining colors than it would normally look if just working in the round. The step, and the chain 1 does not count as a stitch for stitch countnumbers.
Color change instructions
When changing colors start your slip stitch into the first stitch of the beginning of the round by putting your hook through the first stitch, then with your new color yarn over and pull the new color through the stitch and the loop on your hook to complete the slip stitch, then chain 1 and continue with the rest of the pattern with the next stitch in the pattern going into the same stitch as the ss and chain one you just completed as is done in the previous rounds.
Hat:
Starting with Black Round 1: starting in a magic circle 12 hdc (12), join the last stitch of the round to the first stitch of the round with a ss, chain one Round 2: 2hdc in first stitch, 1hdc next stitch, repeat around (18), join the last stitch of the round to the first stitch of the round with a ss, chain one Round 3: 2hdc in first stitch, 1 hdc next 2 stitches, repeat around (24), join the last stitch of the round to the first stitch of the round with a ss, chain one Round 4: 2hdc in first stitch, 1 hdc next 3 stitches, repeat around (30), join the last stitch of the round to the first stitch of the round with a ss, chain one Round 5: 2hdc in first stitch, 1 hdc next 4 stitches, repeat around (36), join the last stitch of the round to the first stitch of the round with a ss, chain one Round 6: 2hdc in first stitch, 1 hdc next 5 stitches, repeat around (42), join the last stitch of the round to the first stitch of the round with a ss, chain one Round 7: 2hdc in first stitch, 1 hdc next 6 stitches, repeat around (48), join the last stitch of the round to the first stitch of the round with a ss, chain one Round 8: 2hdc in first stitch, 1 hdc next 7 stitches, repeat around (54), join the last stitch of the round to the first stitch of the round with a ss, chain one Round 9: 2hdc in first stitch, 1 hdc next 8 stitches, repeat around (60), join the last stitch of the round to the first stitch of the round with a ss, chain one Round 10: 2hdc in first stitch, 1 hdc next 9 stitches, repeat around (66), join the last stitch of the round to the first stitch of the round with a ss, chain one Round 11: 2hdc in first stitch, 1 hdc next 10 stitches, (72), join the last stitch of the round to the first stitch of the round with a ss, chain one Round 12-21: 1hdc each stitch around (72), join the last stitch of the round to the first stitch of the round with a ss, chain one Round 22: 1hdc each stitch around (72), change to yellow following color change instructions above. Round 23-24: 1hdc each stich around (72), join the first last of the round to the first stitch with ss If you are adding ear flaps continue on with ear flap instructions. If you are not then finish off at the end of row 24
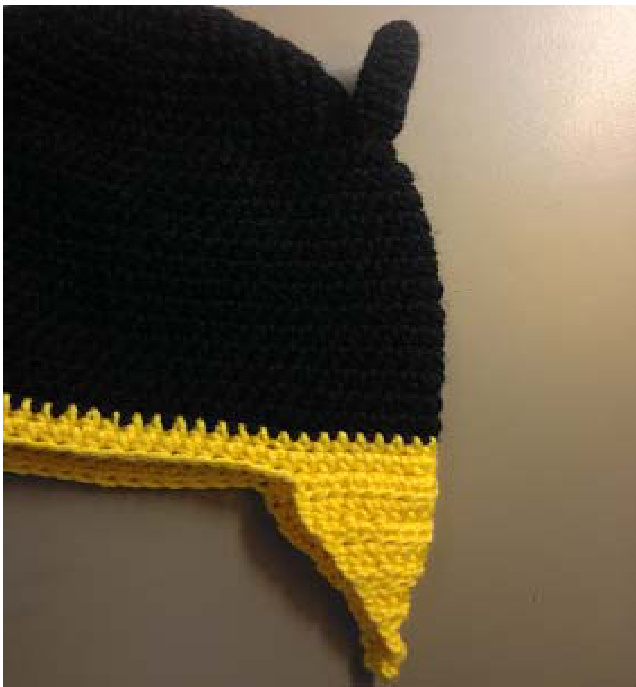
Ear Flaps:
GrayMarble Row 1: 18hdc across, chain one and turn Row 2: 1hdc across (18), chain one and turn Row 3: 3 tog2hdc, 1hdc next 6, 3 tog2hdc, chain one and turn (12) Row 4: 1hdc across (12), chain one and turn Row 5: tog2hdc 6 times (6), chain one and turn Row 6: 1hdc across (6), chain one and turn Row 7: tog2hdc 3 times (3), chain one and turn Row 8: 1hdc each stitch (3), If you're not adding tassels tie off at the end of your 3hdc for the row. If you are adding tassels chain 4 turn, and attach the end of the chain 4 to the first stitch in the row with a slip stitch. Tie off. This creates a space for you to add braided tassels. For the second ear flap count 15 stitches from either end of the first ear flap in the 15th stitch you will begin the second ear flap. This 15 stitch gap will be on the back of the hat.
Ears
IMake 2 In blacK Round 1: In magic circle 4sc (4) Round 2: 2sc in first stitch, 1sc in next, repeat (6) Round 3: 2sc in first stitch, 1sc in next 2 stitches, repeat (8) Round 4: 2sc in first stitch, 1sc in next 3 stitches, repeat (10) Round 5-7: 1sc each stitch around (10) at the end of round 7 finish off and leave a length of yarn for stitching.
Assembly
To attach the ears, fold the hat so that the ear flaps are folded in half (you wil have to do each one separately)
Once folded in half use a stitch marker to mark the crease in the 8th row from the top. Stitch the ear where you have the stitch marker on both sides. For the Batman Logo; I printed a copy of one I liked off the Internet and cut it out in card stock to use as a stencil. I then cut out the oval shape in both the black and yellow felt. Then I cut the bat shape out of the yellow felt, laid the yellow felt on top of the black felt and sewed them both to the front of the hat with my sewing machine. If you choose to add tassels you can take multiple strands of yarn (length of your choosing) and thread them through the holes you left at the end of your ear flaps. Divide your strands into 3 sections and braid them, tie them in knots at the ends. Pattern copyright Melissa Sanchez 2014. Do not copy or share this pattern. If you sell products made from this pattern, please credit Melissa Sanchez/Maloosas as the designer.


