Frankie's Knitted Stuff
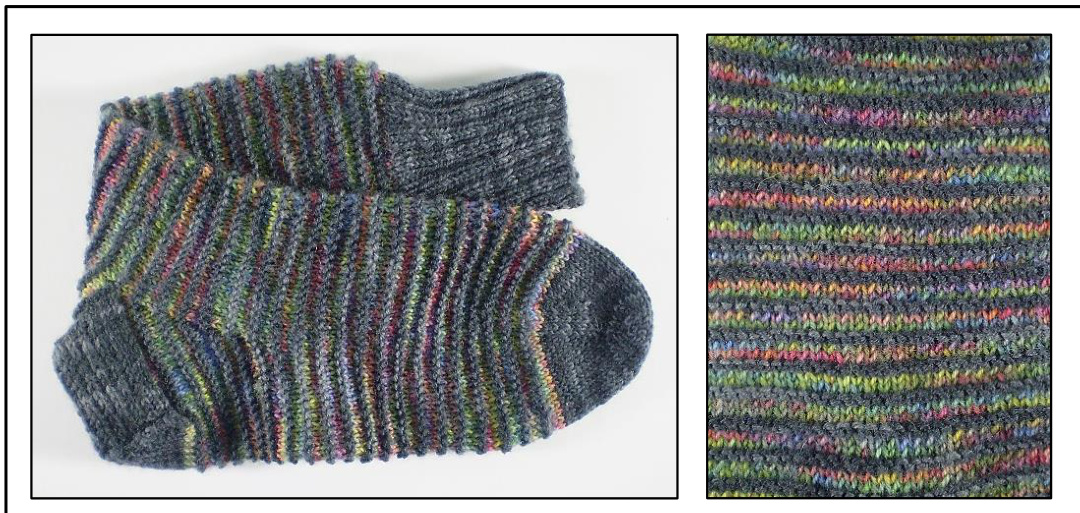
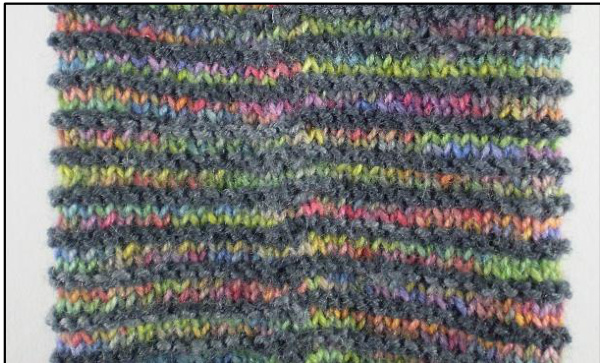
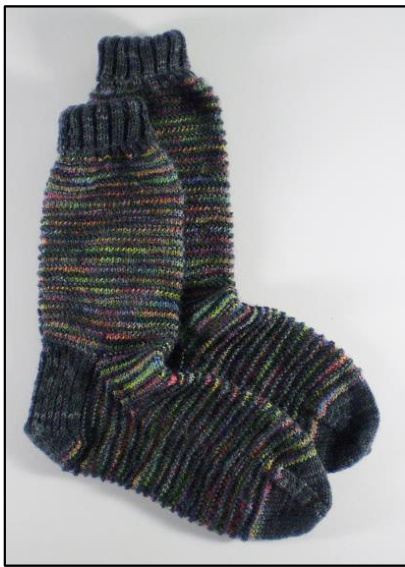
These adult socks feature the stitch pattern used in my Pippi baby patterns, two knitted rows in a dark, plain colour followed by two rows in stocking stitch in a contrasting, variegated yarn. This is a good use for those sock yarns with a short colour run which look nice in the ball but are often not very interesting when knitted up.
Measurements
All these measurements were taken with the sock off the foot; obviously it will stretch when put on. The leg and foot lengths could easily be adjusted. Around the leg 20 cm / 8" Leg (including heel) 28 cm / 11" Leg (excluding heel) 20 cm / 8" Cuff 6 cm / 21/2" Foot (including heel and toe) 23 cm / 9" Foot (excluding heel and toe) 15 cm /6"
Yarn and needles
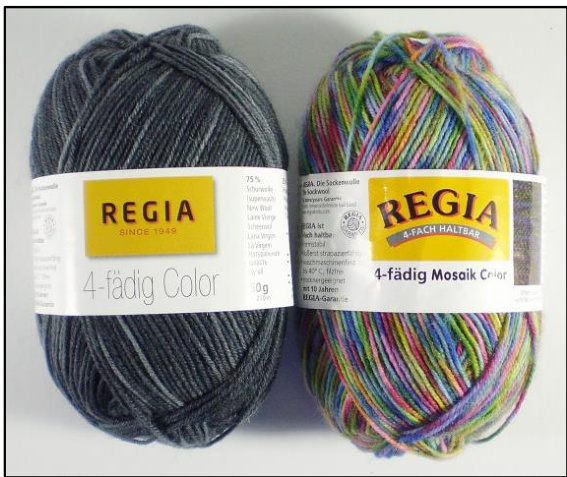
You can use any thin, sockweight 4 ply yarn (about 400 m / 100g) for these socks, choose one that has some nylon / polyester in as this will strengthen the socks. This is especially important for the heels and toes as these are the areas subject to most wear. You will need 55 - 60g of the main colour (M) and 35 - 40g of the contrast (C). Choose a solid or nearly solid colour for the main yarn and a variegated for the contrast. I used Regia Color (210 m / 50g) for my socks, shade 1933 for the main colour and 05560 for the contrast. The main colour is a slightly variegated dark grey while the contrast has a short colour run which works well with this pattern.
The socks are knitted in the round, using either one long circular needle and the magic loop method or five short double pointed needles. Use whichever method suits you, instructions are given for both. You will need size 2.5 mm / US size 1/2 needles or thereabouts. Tension: 17 stitches and 30 rounds = 5 cm / 2"2 in Pippi stitch. 18 stitches and 22 rounds = 5 cm / 2"2 in stocking stitch
Cuff
Using M, and the long tail method, cast on 60 stitches. Either divide the stitches into two for the magic loop method or into four if using double pointed needles. Work 30 rounds in K2, P2 rib.
Leg
This is worked in the Pippi stitch pattern. Read the notes below before starting. Rounds 1 & 2: C Knit. Round 3: M Knit. Round 4: M Purl. Avoiding the jog'. When working in the round, you are actually knitting a spiral so there is a step at the beginning of each round. This doesn't matter if you are using one yarn but shows up when you are knitting stripes. To minimize this, follow these tips: 1) On Round 1 work the first stitch in M and then continue in C. 2) Tug the yarn when changing colour to tighten the stitches. This is especially important at the start of Round 3. 3) At the start of Round 3 take the new yarn (M) under the old (C) before knitting the first stitch. You will still be able to see the join but it is fairly smooth.
So, work 20 repeats of the four round Pippi stitch pattern or until the knitting measures about 20 cm / 8" from the start. You can adjust the leg length at this point but make sure that you finish on Round 4 of the pattern.
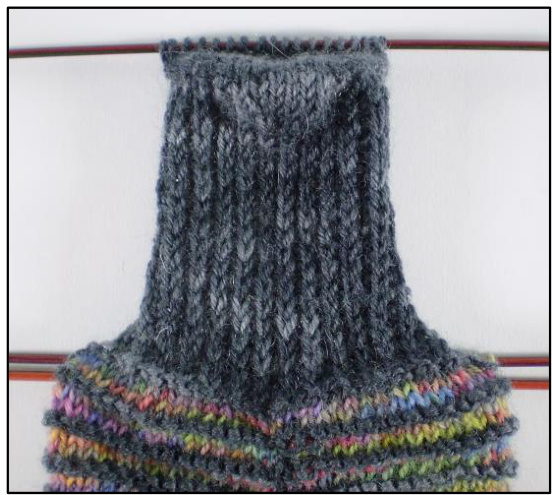
Heel Flap
This is worked back and forth, using the main colour only. I re-arranged the stitches at this point so that the join would be at the back of the finished sock. To do this you need to work the heel on the last 15 and first 15 stitches of the round. If working with double pointed needles, this will mean using the stitches on the fourth and first needles. With the magic loop method you will have to re-arrange the stitches so that the last 15 and first 15 stitches of the round are on one needle, ready to knit. Whichever method you are using, you will need to cut both yarns and re-join M at the start of the 30 heel stitches. The heel flap is worked, appropriately enough, in heel stitch. Row 1: S1 1 kwise, K1, \*sl 1 pwise wyib, K1, repeat from \* to end. Row 2: Sl 1 pwise, P to end. Work 36 rows in this two row pattern. The resulting fabric is padded to make the heels wear well.
Turning the Heel
This is worked in short rows, turning before the end of each row, and is the point at which that straight tube of knitting starts to look like a sock. At the start of each row, slip the first stitch knitwise for knit rows and purlwise for purl. This is not included in the instructions below so as to simplify them. Row 1: K17, SSK, K1, turn. Row 2: P6, P2tog, P1, turn. Row 3: K7, SSK, K1, turn. Row 4: P8, P2tog, P1, turn. Row 5: K9, SSK, K1, turn. Row 6: P10, P2tog, P1, turn. Row 7: K11, SSK, K1, turn. Row 8: P12, P2tog, P1, turn. Row 9: K13, SSK, K1, turn. Row 10: P14, P2tog, P1, turn. Row 11: K15, SSK, K1, turn,Row 12: P16, P2tog, P1.
You should now have 18 stitches left on your needle.
Shaping the Foot
To maintain the stripe pattern, the foot rounds must begin at the bottom of the heel flap, so cut the yarn. The first round of the foot will be in the contrast yarn. Beginning at the bottom of the right side of the heel flap, pick up and knit 18 stitches up the side of the heel. Use C and work through both loops of the edge stitches. Now knit across the 18 stitches at the top of the heel and then pick up and knit 18 stitches down the other side. This gives you 54 stitches. Keep these on one needle if you are using the magic loop method but divide them between two needles for double pointed needles. Now knit across the 30 instep stitches that you left at the end of the leg. Knit one more round in C.
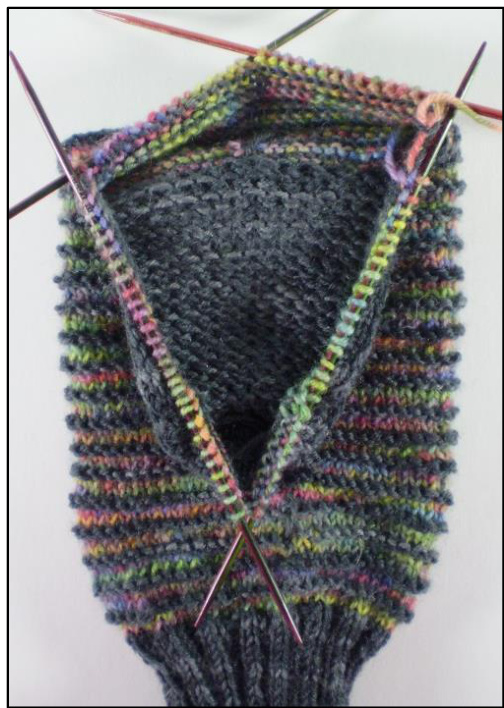
As you can see, there are lots more stitches on the foot side of the sock than on the instep. These have to be reduced before the foot can be knitted. To do this, stitches will be decreased at each end of the foot stiches. That will be at the start of the first needle and the end of the second with double pointed needles or at the start and end of the first needle with the magic loop method. So, change to M (you are now at Round 3 of the Pippi stitch pattern, remember the tips for avoiding the jog) and continue in pattern, shaping the foot as you go: Round 1: Foot: K1, SSK, K to last 3 sts, K2tog, K1. Instep: Knit. Round 2: Knit or purl as stitch pattern dictates. When you have 30 foot stitches and 30 instep stitches (60 in all) you are ready to knit the foot.
The Foot
Carry on in the Pippi stitch pattern until you have worked 20 pattern repeats, counting from the solid colour heel. Then knit two more rounds in C. You can adjust the length of the foot here as long as you end with two rounds in the contrast colour.
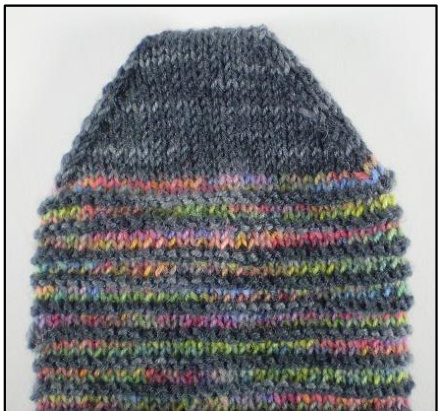
The Toes
These are worked in the main colour, although you might like to knit just the first stitch of the first round in C for a smooth transition. The toe shaping is done in the same way as for the foot but this time the shaping is done at the start and end of both the foot and the instep stitches. This will be at the start of the first and third needle and the end of the second and fourth for double pointed needles and at the start and end of each needle if using the magic loop method. Round 1: Foot: K1, SSK, K to last 3 sts, K2tog, K1. Instep: K1, SSK, K to last 3 sts, K2tog, K1. Round 2: Knit. Repeat these two rounds until you have 24 stitches left, ending with Round 2, a plain knitted round. Now, with the remaining stitches on two needles, graft them together. This gives a seamless finish and is well worth learning. Hold the two needles together with the wool coming from the needle at the back (needle B), the needle in the front is needle A. Cut the wool, leaving a long end, thread a blunt needle with it and start grafting: Thread through the first stitch on A purlwise and the first stitch on B knitwise, leave both stitches on their needles. \*Thread through the first stitch on A knitwise and pull it off the needle. Thread through the next stitch on A purlwise and leave it on. Thread through the first stitch on B purlwise and pull it off the needle. Thread through the next stitch on B knitwise and leave it on. Repeat from \* until all the stitches are grafted together.
Now all you have to do is darn in the ends and knit another sock to match.
Abbreviations
st / sts stitch / stitches K knit P purl sl1 slip one stitch kwise knitwise pwise purlwise wyib with the yarn held at the back of the work SSK slip, slip knit (see below) K2tog knit two stitches together P2tog purl two stitches together slip, slip, knit Slip two stitches knitwise (or knitwise followed by purlwise) one at a time, insert tip of left needle into stitches from above, put yarn round right needle and knit both stitches together.
Frankie Brown, 2014.
My patterns are for personal use only and should not be used to knit items for sale. Please do not use them for teaching purposes without my permission.


