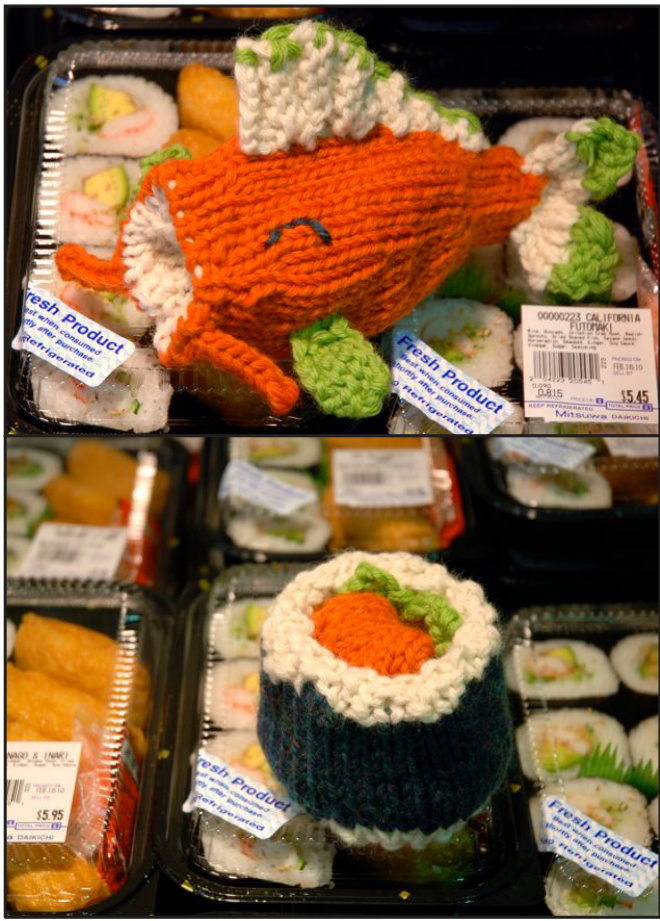
Sushi Fishy
A knit amigurumi patten by fanga Klouden based on tle Fish ta Sushi Amigurumi by Trene Kiss. Jarn: A" couple ounces of orange, white/natural, and green/ black should suffice.
Notions:
Size 8 circulars or double-pointed needles (adjust needle size to your yarn choice) for a worsted weight yarn, and size 9-10 circulars if doing 3-needle bind-off. Doublepointed needles for I-cord. Abbreviations &fechniguey: See end of pattern for abbreviations and a brief explanation of techniques.
Fisk body:
Note: 3-needle bind-off leaves a ring of red in the white rice. If that bugs you, one way to dodge that is to make the last row of the fish mouth and the last row of the sushi rice green and then bind off with green. Alternatively, you can bind off both pieces separately and sew them together. Or kitchener. Cast on 8 stitches (I used Judy's Magic Cast-on) in orange. Begin knitting in the round. When [stitches are in brackets] repeat to end unless otherwise indicated. Round 1: K all stitches (8) Round 2 and all even rows: K all stitches Round 3: [K1, M1, K1] (12) Rounds 5-9: K all stitches (12) Round 11: [K1,M1, K3] (15) Round 13: [K1, M1, K4] (18) Round 15: [K1, M1, K4, M1, K4] (22) Rounds 17: K all stitches (22) Round 19: [K1, M1, K5, M1, K5] (26) Round 21-23: K all stitches (26) Round 25: [K1, M1, K6, M1, K6] (30) Round 27-29: K all stitches (30) Round 31: [K2t0g, K5, K2tog, K6] (26) Round 33: [K2t0g, K3]4x, K2tog, K4 (21) Round 35: [K2tog, K5](18) Rounds 37-39: K all stitches (18) Place all 18 stitches on holder (or use another set of circs for the sushi).
WUhiskers:
Pick up 3 stitches near edge. Work 7 rows of I-cord. Slip 2 stitches Kwise, K1, pass slipped stitches over. Cut yarn and pull through remaining loop. Repeat on other side. Doval Fin: Cast on 6 in white. Row 1: K6 Row 2 & 3: P6 Row 4: K5, wrap & turn Row 5: K5 Row 6: P4, wrap & turn Row 7: P4 Row 8: K6 (work wraps with knit stitches as you come to them) Row 9: SSK, K4 Row 10 & 11:P5 Row 12: K4, wrap & turn Row 13: K4 Row 14: P3, wrap & turn Row 15: P3 Row 16: K5 (work wraps with knit stitches as you come to them) Row 17: SSK, K3 Row 18 & 19: P4 Row 20: K4 Row 21: SSK, K2 Row 22 & 23:P3 Row 24: K3 Row 25: SSK, K1 Row 26 & 27: P2 Row 28: K2 Row 29: SSK Cut yarn and pass through remaining loop to bind off. Use a green yarn to embroider the top edge of the fin. (Sorry! I just couldn't figure out an easy way to do multi-color AND get the right shape!) Side Fin: (make 2) Cast on 7 stitches in green. Row 1: K5, wrap & turn Row 2: K5, Row 3: K5, wrap & turn Row 4: K5 Row 5: Cast off (don't bother working in the wraps) and K2tog the last two stiches. fail: Cast on 8 stitches in white. Row 1: K8 Row 2: P2, M1, P4, M1, P2 Row 3: K2 , P1, M1 purlwise, K4, M1 purlwise, P1, K2 R0W 4: P2, K2, P4, K2, P2 Change to green yarn. Row 5: K2, P2, K2, turn (holding remaining 8 stitches) Row 6: P2, K2, P2, turn Row 7 : SSK, P2, K2tog Row 8: SSK, K2tog, pass 1st stitch over second. Cut yarn and pull through loop to bind off 1st side. Join green yarn and repeat rows 5-8 with remaining stitches.
Sushi:
Notey: The sushi is all knitted in one piece to avoid seaming. If you really prefer to seam, you can knit each piece (rice bottom, nori, rice top) separately and sew them together. For the M1 on the first row of the rice, I've been doing a loop cast-on increase. Feel free to pick the increase you like best. Also, for a “ricier" texture, I started doing a seed stitch beginning on round 5. Instructions for the seed stitch version of the rice follow the stockinette instructions. Rice Bottom: Cast on 6 stitches in orange. Begin knitting in the round. Round 1: K1, M1 all the way around. (12). Rounds 2: Knit around Round 3: [K1, M1, K1, M1, K1] (20) Rounds 4: K10 in orange, switch to green, K10 Round 5: Switch to white. [K2, M1, K1, M1, K2] (28) Rounds 6: Knit around Round 7: [K3, M1, K1, M1, K3] (36) Rounds 8: Knit around Change color to green (or black) for Nori: Stockinette stitch for 12 rounds. Change back to white for Rice Top: Round 1 & 3: Knit around Round 2: [K2, K2t0g, K1, K2tog, K2] (28) Round 4: [K1, K2tog, K1, K2tog, K1] (20) Round 5: [K7, K2tog, K1] (18) Leaving stitches on needles, close the hole where the rice bottom was cast on and weave in all ends. Rice Bottom (Seed Stitch): Beginning with round 5: Round 5: [K1, P1, M1, K1, M1, [P1, K1]2x, M1, P1, M1, K1, P1] Round 6: [P1, K1] Round 7: [K1, P1, K1, M1, P1, M1,[K1, P1]3x, M1, K1, M1, P1, K1, P1] Round 8: [P1, K1] Rice Top (Seed Stitch): Round 1: [K1, P1] Round 2: P1, K1, P2t0g, K1, P2t0g, [K1, P1]2x, K2t0g, P1, K2tog, P1, K1 Round 3: [K1, P1] Round 4: P1, K2tog, P1, K2tog, P1, K1, P2tog, K1, P2tog, K1 Round 5: [[K1, P13x, K1, P2t0g, K1] Finishing: Attach fish tail and fins to fish and embroider/sew on eyes. Weave in all ends. Return 18 stitches of fish back to needles. Turn rice/nori inside out and stuff inside fish's mouth so the 18 stitches of the fish and the 18 stitches of the rice line up. The fast way: Using another pair of circs at least one size larger, attach sushi to fish using 3-needle bind-off. The pretty way: Kitchener stitch the sushi and the fish's mouth together. Abbreviatons &fehnigques: K: Knit P: Purl M1: Increase 1 stitch by picking up the strand between two stitches with your left needle and knitting into the BACK of the strand. When purling, purl into the back of the strand (which is kind of a pain, I'll admit). K2tog: Decrease 1 stitch by inserting your right needle into the the next two stitches on your left needle and knitting one stitch. SSK: Decrease 1 stitch by inserting your right needle into the first stitch on the left needle as if to knit and slip it from the left needle to the right. Repeat with the next stitch. Insert your left needle into the both stitches from the front of the first stitch and knit the stitches together. Pick up: Using a crochet hook, pick up stitches by inserting the crochet hook through the knit fabric, grab your yarn and draw a loop back up through the fabric. Transfer each loop to your knitting needle. I-cord: Using double-pointed needles, knit across a row of stitches and then WITHOUT TURNING, slide the stitches back to the other end of the needle and knit the next row, pulling the yarn tightly the first 1-2 stitches of each row. Repeat until you have a cord of desired length. Slip Kwise: Insert your right needle into a stitch as if to knit it and slip it onto the right needle unworked. PSSO: Pass slipped stitches over---insert your left needle into the stitches you slipped and pull them over the last stitch you worked and off the right needle. Wrap & turn: On knit: bring the yarn from the back to the front and slip the next stitch from the left needle to the right. Turn your work, and slip the slipped stitch from your left needle to your right again. Purl across remaining stitches (your yarn will “wrap" around the slipped stitch as you purl the next stitch). On purl: Same as knit except you bring the yarn from the front to the back and knit after turning your work and slipping the first stitch. Work wraps: When you reach a wrapped stitch, insert your right needle into the wrap and gently lift it onto your needle then knit it together with the stitch you are working. Hold remaining stitches: Slip stitches to a cable needle or stitch holder and ignore them until later. Loop cast-on: With a stitch on your right needle, bring your thumb down over and back up under your yarn to make a loop of yarn around your thumb. Transfer loop to your right needle 3-needle bind-off: Place two needles with stitches on them side-by-side in your left hand. Take a 3rd needle in your right hand and insert the right needle into the first stitch on both left hand needles. Knit 1 stitch. Repeat to knit a second stitch, then slip first stitch on right needle over the second to cast off. Repeat until all stitches are cast off. Kitchener stitch: Use a yarn needle to cast off stitches in stockinette pattern. Knitty.com has a great tutorial. Judy's Magic Cast-On: Again, Knitty.com has a great tutorial for this technique. Updated: uly 2010. $\copyright$ Fanya Klouden, 2O10.Do what you want with your Binished objets, but standard copyright laus apply to tle pattern. Fedback? Contact Poleamilla on Ravelry.com!


