Crochelist's KNTED
COMMUTER SOCKS: TOE-UP, SHORT-ROW AND PORTABLE
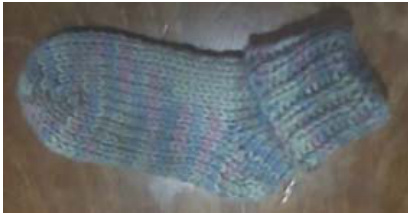
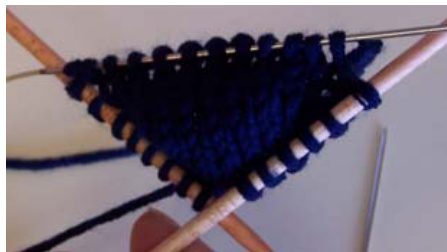
I spend way too much time on the bus, so I try to spend that time knitting. Elizabeth Zimmermann's idea that knitting a sock per week on the bus results in 25 pairs a year for holiday gifts sent a call to my knitting muse. Socks are small and, with a few modifications, easily portable. This is my basic sock pattern. I start with a short row toe, knit the instep in the round, then a short row heel which is exactly the same as the toe, then the ankle and the cuff. The resulting sock is a tube with a toe, heel, and finished edge.
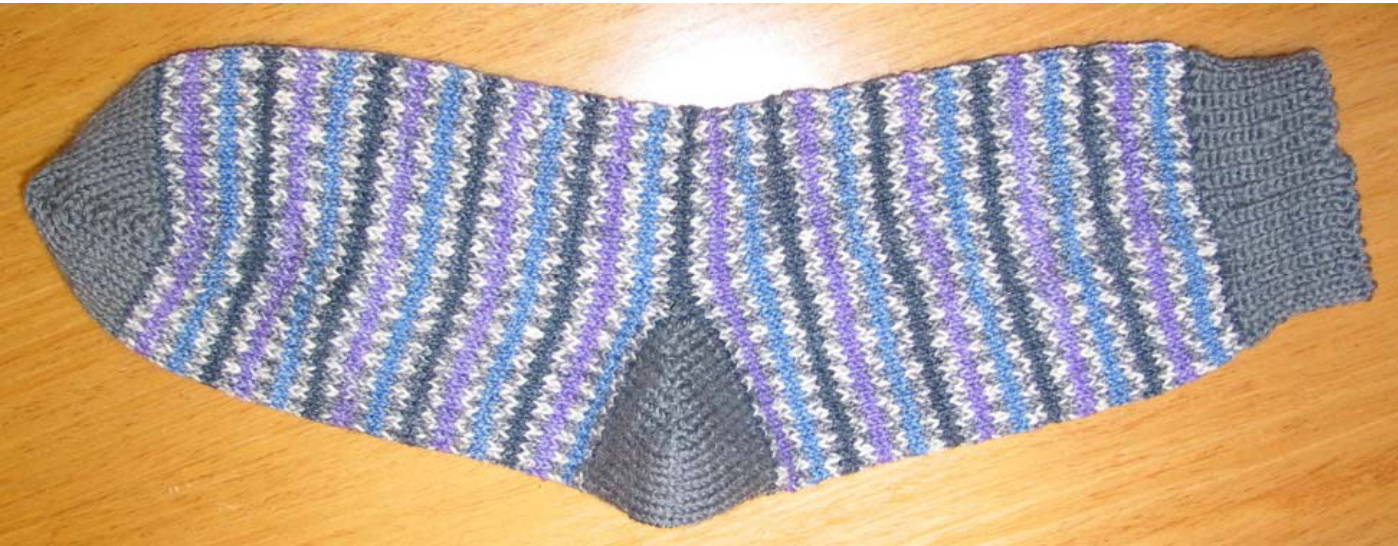
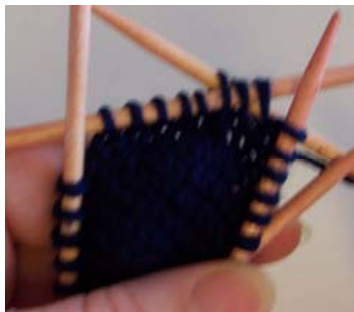
When I use a self-striping yarn, I use a contrasting yarn for the heels, toes and cuff. This means that each round with the self-striping yarn has exactly the same number of stitches so the stripes are always consistent. Lace patterns or even entrelac can be integrated into the pattern because the number of stitches around is always the same. The short row technique for the heels and toes exchanges the traditional heel flap, turned heel and gusset for a diagonal line that seems to involve a lot of extra wraps that have to be turned back and forth. Keep the faith. All those extra wraps reinforce the short row join. The commuter method has several advantages. By starting with the toe, there is no final grafting or Kitchener stitching By using five needles instead of four, the sock in process can be folded flat and the needles will not poke through their transport bag. Also, the five needle approach increases mobility of the unused needles which results in less laddering. By using the extra circular needle for the provisional cast on, there are no live stitches to find or lose, and the stitches formed by the cast on are the same size as all the others. Ever want confirmation that a sock will fit? After completion of the toe, the circular is available as a temporary safe haven for the live stitches while the recipient tries on the sock. By using a suspended row counter to count down while knitting the instep and ankle tubes, it isn't even necessary to remember the total number of rows needed before starting the next section. Those who have dealt with the unique challenge of counting rows while on a moving vehicle can appreciate this. By using the Commuter Sock pattern, there is no hole at the corner of the heel! These adaptations make it easier to knit on the bus regardless of conditions. When lighted size 1 dpns are commercially available, the commuter sock method will be ready for anything. The Toddler Sock is a quick way to learn the techniques. If you don't have toddlers in your life, please consider making a donation; those that accept hat donations accept socks also. Your local yarn shop or guild will probably know about several collection programs. The Women's Medium Sock is a good second sock, leading the way to AnybodySocks. My thanks to EZ for recommending sock knitting as a good use of commuting time and for her idea of the afterthought heel and to Priscilla Gibson-Roberts for making short row socks a reasonable alternative to the "standard" sock pattern. Emily Green (an instigator extraordinaire who encouraged me to write out my pattern and then provided the photographs), Barbara Garrett (who volunteered me for the Front Range Knitting Guild presentation), the Longmont Friday Night SNB group (best beta-testers anywhere) and H&H Knitters (amazing proof readers) were all invaluable. And thank you to Jill, the bus driver who gets me home safely at the end of the day.
I. Abbreviations
KKnit PPurl KW Knit-side Wrap: bring yarn to front and bring to back over top of right needl PW Purl-side Wrap: bring yarn to back and pull over top of right needle. SKF Slip stitches Knit-wise from Front SKB Slip stitches Knit-wise from Back SPF Slip stitches Purl-wise from Front SPB Slip stitches Purl-wise from Back RReturn: slip stitches back to left needle without changing orientation P3TogB Purl 3 together from the Back: insert needle from the back from left to right through three stitches and purl them all together K3Tog Knit 3 together: insert needle from left to right through three stitches and knit them together K3TogB Knit 3 together from the Back: insert needle from right to left through three stitches and knit them together WWrap St Stitch Pr Stitch-Wrap Pair Tr Stitch-Wrap-Wrap Trio
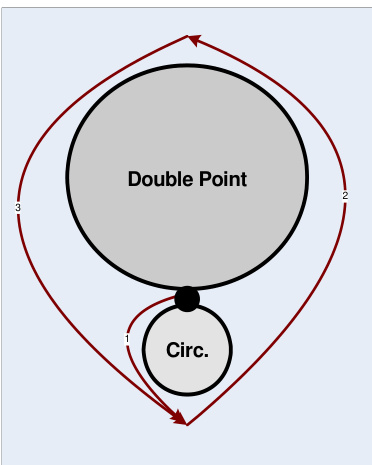
I1. Turkish Wrap Provisional Wrap Cast On Technique
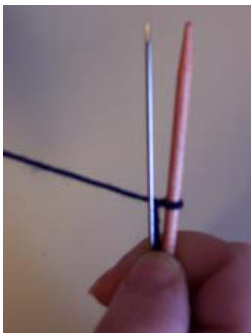
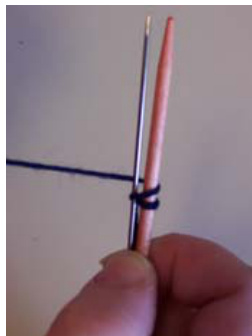
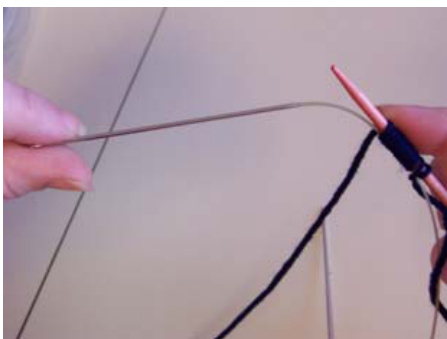
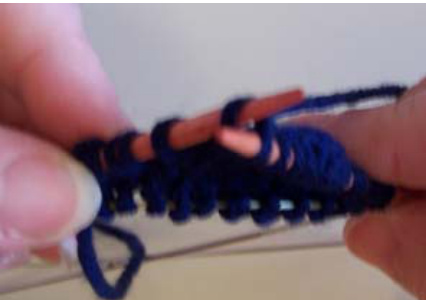
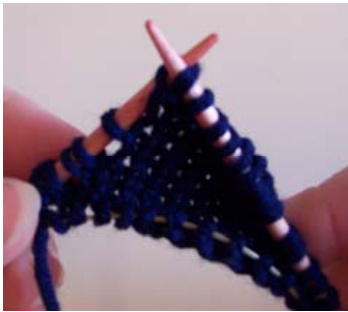
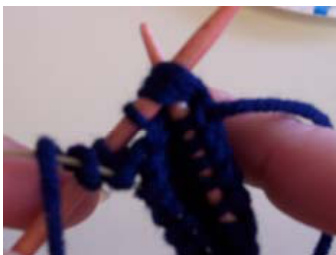
Tie a slip knot and put loop on dpn with the knot at the bottom of the needle (black dot). Hold the circular needle below the dpn with the points facing you. Wrap the yarn counterclockwise around both needles together. Note: The slip knot is the first stitch. Pull circular needle so that those loops now rest on the cable part of the circular needle.
bouncing objects, it is helpful to tape the circular needle points end to end. It may not eliminate the fascination, but it will prevent the non-knitter from removing the needle without your permission.
I11. Instructions for Toddler Sock:
Materials: superwash worsted weight yarn Size 5 double-pointed needles (set of 5) Size 1 (or smaller) 16"-24" circular needles
Gauge: 5 stitches per inch. Cast on 12 using Provisional Wrap Cast On Technique.
slip knot and 2 needles
2 stitches
pull circular needle Row 1: K11, leave 1 St, turn Row 2: PW, P10, leave 1 St, turn Row 3: KW, K9, leave 1 St + 1 Pr, turn Row 4: PW, P8, leave 1 St + 1 Pr, turn Row 5: KW, K7, leave 1 St + 2 Pr, turn Row 6: PW, P6, leave 1 St + 2 Pr, turn [check: 11 St, 1 St] [check: 1 St, 1 Pr, 9 St, 1 St] [check: 1 St, 1 Pr, 8 St, 1 Pr, 1 St] [check: 1 St, 2 Pr, 7 St, 1 Pr, 1 St] [check: 1 St, 2 Pr, 6 St, 2 Pr, 1 St] [check: 1 St, 3 Pr, 5 St, 2 Pr, 1 St] At the end of the section there will be 1 stitch, 3 stitch-wrap pairs, 5 stitches, 2 stitchWrap pairs, and 1 single stitch.

PW: purl-wise wrap

KW: knit-wise wrap
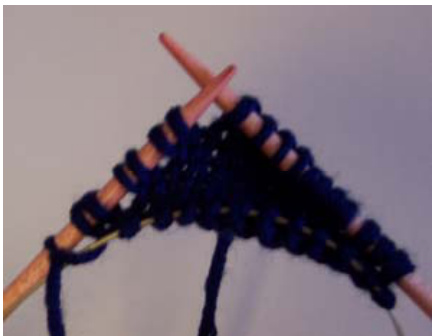
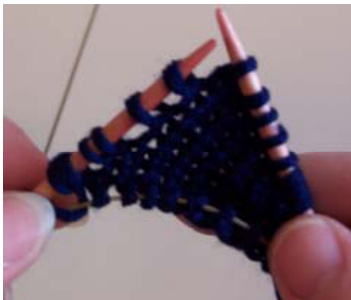
row 6 completed ToeTip Row7: KW, K6, leave 1 St + 2 Pr + 1 W, turn [check: 1 St, 3 Pr, 5 St, 1 W, 2 Pr, 1 St] Row8: PW, P6, leave 1 St + 2 Pr + 1 W, turn [check: 1 St, 2 Pr, 1 Tr, 5 St, 1 W, 2 Pr, 1 St] Making the sixth knitted and purled stitch will split the first pair. At the end of toe tip there will be 1 stitch, 2 stitch-wrap pairs, 1 stitch-wrap-wrap trio, 5 stitches, 1 wrap, 2 stitch-wrap pairs, and 1 stitch. loeincreuse Row 9: KW, K6, SPB2, R2, K3Tog, leave 1 St + 1 Pr + 1 W, turn [check: 1 St, 2 Pr, 1 Tr, 6 St, 1 W, 1 Pr, 1 St] Row 10: PW, P7, SKF3, R3, P3TogB, leave 1 St + 1 Pr, + 1 W, turn [check: 1 St, 1 Pr, 1 Tr, 7 St, 1 W, 1 Pr, 1 St] Row 11: KW, K8, SPB2, R2, K3Tog, leave 1 St + 1 W, turn [check: 1 St, 1 Pr, 1 Tr, 8 St, 1 W, 1 St] Row 12: PW, P9, SKF3, R3, P3TogB, leave 1 St + 1 W, turn [check: 1 St, 1 Tr, 9 St, 1 W, 1 St] Round 13: KW, K5, on another needle K5 SPB2 R2, K3Tog, DO NOT TURN, slide stitches to tip of circular needle, on another needle K6 from circular needle, on yet another needle K6 from the circular needle (there shouldn't be any more stitches on the circular needle after this).
2 wraps to be turned
slip purl-wise through back loop
return
knit three together
purl three tog from back
round 13 halfway Instep Round 14: K3togB , K5, K6, K6, K6 (total of 24 stitches on the four needles). Rounds 15-33:K24 Heel Before starting heel, make sure it will be in line with the toe. Row34: K6, on same needle K5 turn Rows 35-45: Repeat rows 2-12 Round 46: KW, K5, on another needle K5, SIP2, R2, K3tog, DO NOT TURN, K6, K6 Round 47: K3togB, K5, K6, K6, K6
knit three tog back Ankle Rounds 48-52: K24 Cuff Rounds 53-74: (K1, P1) 12 times Bind off very loosely. Hide tails and fold down cuff.
IV. Variations
BABY SoCKs: Use the same directions with size 3 needles, size O00 circular needle and sport weight yarn. NEWBORN SOCKS: Use the same pattern with size one needles, size OOO circular needle and baby or fingering yarn.
V. COMMUTER SOCK: WOMEN'S MEDIUM PATTERN
Materials: 100 g of sock yarn set of five size-1 double-pointed needles size 000 circular needle 16"-24" length Gauge: 8 stitches per inch Cast on 32 using Provisional Wrap Cast On Technique. If using two colors, begin with the toe color. My contrast is often gray because it seems to match most of the Fair Isle style self striping yarns. Toe Taper Row 1: K31 leave 1 St, turn Row 2: PW, P30 leave 1 St, turn Row 3: KW, K29, leave 1 St + 1 Pr, turn Row 4: PW, P28, leave 1 St + 1 Pr , turn Row 5: KW, K27, leave 1 St + 2 Pr, turn Row 6: PW, P26, leave 1 St + 2 Pr, turn Row 7: KW, K25, leave 1 St + 3 Pr, turn Row 8: PW, P24, leave 1 St + 3 Pr, turn Row 9: KW, K23, leave 1 St + 4 Pr, turn Row 10: PW, P22, leave 1 St + 4 Pr, turn Row 11: KW, K21, leave 1 St + 5 Pr, turn Row 12: PW, P20, leave 1 St + 5 Pr, turn Row 13: KW, K19, leave 1 St + 6 Pr, turn Row 14: PW, P18, leave 1 St + 6 Pr, turn Row 15: KW, K17, leave 1 St + 7 Pr, turn Row 16: PW, P16, leave 1 St + 7 Pr, turn (47 stitche: ToeTip Row 17: KW, K16, leave 1 St + 7 Pr + 1 W, turn Row 18: PW, P16, leave 1 St + 7 Pr + 1 W, turn (49 stitches and wraps on needles) Row 19: KW, K16, SPB2, R2, K3Tog, leave 1 St + 6 Pr + 1 W, turn Row20: PW, P17, SKF3, R3, P3TogB, leave 1 St + 6 Pr +1 W, turn Row 21: KW, K18, SPB2, R2, K3Tog, leave 1 St + 5 Pr + 1 W, turn Row 22: PW, P19, SKF3, R3, P3TogB, leave 1 St + 5 Pr +1 W, turn Row 23: KW, K20, SPB2, R2, K3Tog, leave 1 St + 4 Pr + 1 W, turn Row 24: PW, P21, SKF3, R3, P3TogB, leave 1 St + 4 Pr +1 W, turn Row 25: KW, K22, SPB2, R2, K3Tog, leave 1 St + 3 Pr + 1 W, turn Row 26: PW, P23, SKF3, R3, P3TogB, leave 1 St + 3 Pr +1 W, turn Row 27: KW, K24, SPB2, R2, K3Tog, leave 1 St + 2 Pr + 1 W, turn Row 28: PW, P25, SKF3, R3, P3TogB, leave 1 St + 2 Pr + 1 W, turn Row 29: KW, K26, SPB2, R2, K3Tog, leave 1 St + 1 Pr + 1 W, turn Row 30: PW, P27, SKF3, R3, P3TogB, leave 1 St + 1 Pr + 1 W, turn Row 31: KW, K28, SPB2, R2, K3Tog, leave 1 St + 1 W, turn Row 32: PW, P29, SKF3, R3, P3TogB, leave 1 St + 1 W, turn Round 33: KW, K15, on new needle K15, SPB2, R2, K3tog, pull circular to get stitches from the cord to the needle, on third needle K16, on fourth needle K16. Instep If using two colors, tie on second color here. Cut the contrasting (toe) color, leaving a long enough tail to reasonably secure it. Round 34:K3TogB, K15, K16, K16, K16 Round 35:K16, K16, K16, K16 Repeat Round 35 for 5.5 inches, adding or subtracting depending on the length or your foot. Heel If using two colors, tie on the contrasting (toe) color here. Do not cut main color yarn. Make sure the heel lines up with the toe. Row 1: K16, on same needle K15, leave 1 St, turn Rows 2-32: Repeat rows 2-32 from Toe If using two colors, follow directions for Row 33; if using one color, Round 33. Row 33: KW, K15, on another needle K15, SPB2, R2, K3Tog Round 33: KW, K15, on another needle K15, SPB2, R2, K3Tog, continuing around K16, K16 Ankle If using two colors, cut the contrasting color and return to the main color. Round 34: K3 TogB, K15, K16, K16, K16 Round 35: K16, K16, K16, K16 Repeat Round 35 for 4-6" as desired. Cuff If using two colors, tie on the contrasting color and knit one more complete round before starting rib. Use your favorite rib for one inch. Bind off very loosely. (I'll put an exclamation point here if you think it would help!) Hide the ends.
VI. Gauge
Gauge is one of the mysteries of the knitting universe, a four-letter word which surrounds u. Swatch until you get gauge and still your loved one's sweater will fit an orangutan or a child's birthday sweater could be worn by their favorite doll. Lies, damn lies, and gauge swatches. There is a simple reason for this phenomena. Gauge swatches are an attempt to flout one of the principles which govern the universe, the Heisenberg Uncertainty Principle. Simply stated, the act of measuring something changes that which is measured. In practical knitting terms, the act of attempting to get gauge means you won't. The best possible result is a first approximation of your true gauge. So many factors affect gauge: rows versus rounds, wood versus metal, the knitter's mood, surroundings, energy level... Commuting can compound these factors. Yet there is a simple solution - knit socks! Socks are forgiving. Sleeves have to be sewn onto something else to be useful, socks stand alone (albeit together). Is one sock a little bigger than its mate? Chances are that one foot is little bigger than the other also. Stand a little straighter and proclaim "Design Feature!" for all to hear. Other techniques of making fabric have come and gone due to style and utility. Knitting has survived the centuries because the fabric has memory and is flexible. In the quest to clothe ourselves, feet are a challenge. Feet swell, shrink, and move a lot in different directions. A foot covering must be able to cope with these factors. A sock, especially one knitted in the round, foots the bill perfectly (OK, report me to the Bad Pun Police). Take advantage of this fact and knit socks. In fact, with a little numerical alchemy, you can knit commuter socks for anybody.
VI1. Commuter Socks for Anybody Pattern
Preparation to knit Commuter Socks for Anybody requires gathering five numbers and doing two calculations. Please breathe. If you have caught a ball, your inner mathematician has done calculus. You are a knitter and these are plug and chug equations, barely algebra. Inhale, exhale.
Number Gathering Step 1: Gauge
But, but, but you said... I know. Pick your needle size and yarn. Knit a swatch. There is no need to get my gauge, you already have your gauge. For Commuter Socks for Anybody my gauge doesn't matter; your natural gauge is all that counts. You are the center of your sock knitting universe. From the swatch determine your SPI (Stitches Per Inch) and RPI (Rows Per Inch).
Number Gathering Step 2: Foot measurements
Determine the L (Length) and C (Circumference) of the foot soon to be wearing commuter socks.
Number Gathering Step 3: Clinginess Factor
The perfect sock is a bit smaller than its host foot. Clinginess is how much smaller it should be. Pick a number from this line: 0.8 is tight, 0.9 is clingy, 1.0 is baggy. Since C is already Circumference, call this number CF for Clinginess Factor.
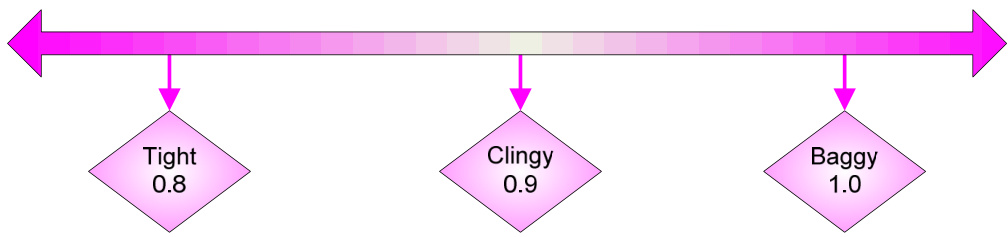
Please note that if you are knitting socks for someone with diabetes or other circulation issues, baggier is better as a tight sock will make the issues worse.
Calculation One: Number of stitches around
SPIx C x CF = (Magic) Look at the chart and find the number of Stitches Around that is closest to your Magic number. SCO (Stitches Cast On) is needed for the next calculation. Also make a note of P (pairs) needed.
| Stitches Around Stitches Cast On Pairs | 24 12 3 | 32 16 4 | 40 20 5 | 48 24 6 | 56 28 7 | 64 32 8 | 72 36 9 | 80 40 10 |
Calculation Two: Number of rows for the instep
(RPIx Lx CF)-SCO = (Alchemy)
Start Knitting
Cast on SCO stitches. It is impossible to phrase this so it doesn't sound redundant. Toe Taper Row 1: Knit all but last stitch, turn Row 2: PW, P all but last stitch, turn Row 3: KW, K up to the first pair, turn Row 4: PW, P up to the first pair, turn Repeat rows 3-4 until the left side of the front (the knit side) has P pairs. ToeTip Row 1: KW, K until the first pair is broken, turn Row 2: PW, P until the first pair is broken, turn Row 1: KW, K across to first W, SPB2, R2, K3Tog, turn Row2: PW, P across to first W, SKF3, R3, P3TogB, turn Repeat rows 1-2 until no pairs remain on the left. Note, there will be singles and wraps. Round 1: KW, K to middle, on another needle K up to first wrap. SPB2, R2, K3Tog, DO NOT TURN, on 3rd needle knit half stitches from circular needle, on 4th needle, K the rest of the stitches from the circular needle. Instep Round 1: K3TogB, K remainder of stitches Round 2: Knit Repeat row two until you have the number of rows calculated for the instep (also known as the Alchemy number). Heel Repeat toe making sure heel lines up with the toe. Ankle Repeat Instep until it is your preferred length. Cuff As much as you like of the rib of your choice. Bind off very loosely Hide ends.
VII1. Adding some texture
Any pattern with a 2-, 4- or 8- stitch repeat can be integrated into the instep and cuff. Consult your favorite stitch dictionary and find a pattern that appeals to you. If the stitch is flat, it can be used all the way around the instep as well as the cuff. Somewhat bumpy? Knit plain stockinette on the bottom and the pattern on the top of the instep (and of course all the way around the cuff). If the pattern is bumpy, only use it on the cuff. If you are an entrelac addict, go for it.

IX. FAQs
What is the point of all those wraps? The wraps allow the original stitches to go up and over the heel and toe without a break in their path. They give structure and additional support to the short row joins. Why turn the wraps back and forth? Why not just make yarn overs so the extra loops will be going the right way? After a turn, there are two ways the yarn can be wrapped, clockwise and counterclockwise. Due to the locations of the end of the last stitch on the last row and the first stitch on the next row, the amount of yarn needed for the two directions is not the same. Wraps with less yarn pull the short rows together tighter. But now the yarn is not the direction on the needle that it needs to be for the outside stitches to continue in an unbroken line. Since there is no such thing as a free lunch, the wraps have to be turned around before being gathered into the K3Tog or P3TogB stitches. Why does the first round of the instep start with K3TogB? By continuing around (knitting) instead of going back (purling) to pick up those last Wraps, the little holes at the corners of the heel section are avoided. On one side of the heel, the stitches are joined together through the back, on the other side through the front. This stitch is on the "through the back" side, but is approached from the front, resulting in K3TogB.


