Sipp-a-Ro0 ColorJoy by LynnH
? 2008 by Lynn D.T. Hershberger http://ColorJoy.com · Lynn@ColorJoy.com A perfect bag for a small aowenture! Sometimes we need to take a bottle of water along on a jaunt, but no hand is available to hold it. A shoulder-strap version is fine for walking. However, on a bicycle or when pushing a stroller it is better to find a hands-free method with a short strap. This felted bottle bag fits a common half-liter bottle (with hints for larger bottles). Here is a kangaroo pouch, easily accessible, for on-the-go folks with style. Intermediate (knitting in the round on DPN's, stranded colorwork) Constructiovu: In the round on 4 double-pointed needles (3 holding, 1 working); begun with stockinette rectangle. Double I-Cord strap with buttonhole. NeedUe Size: 1 set (of five)size 6.5mm / 10-1/2 US double-pointed needles (DPNs). Gauge: Appx. 16 st / 4 inches stranded stockinette in the round, before felting (mine was 5 st / in stranded before blocking. Gauge is not crucial in this pattern. If you know you habitually knit very snugly or very relaxed, change needle size to adjust appropriately. Yarn:(1) $100\mathrm{gm}$ skein of MC1 (main color) standard knitting worsted, solid color, with appx. 220 yd to $100\mathrm{gm})$
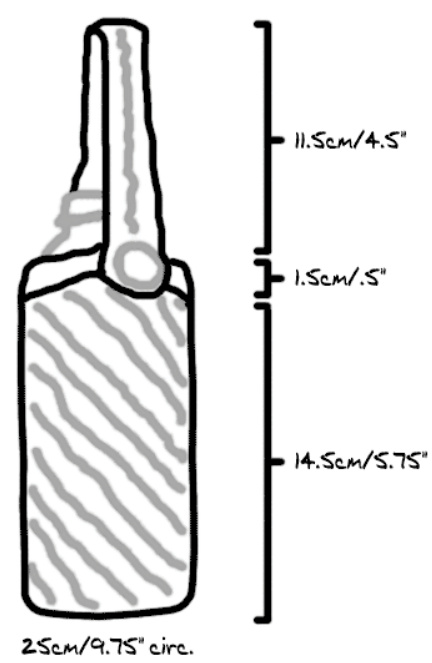
(1) $50\mathrm{gm}$ skein of contrasting CC1, with 105yd per $50\mathrm{gm}$ (I actually used under $25\mathrm{gm}$ Sample in photo used Nashua Creative Focus Worsted wool/alpaca Turquoise CFW3743 (MC), and Di.Ve Autunno Grey/Turquoise 48162 (CC). Color Hint: Go for either warm/cool contrast or dark/light contrast. Contrast is key to success! Noto/xras: Oneutton (choose afe feling, tobe sure ofutohole size and sligly aller plainbackingbuttoharp sewin needewiththea-sizedeye anduttl/swing threadang needle/large eyed needle for working ends in. Yar Sub:MC: MalarigWrsted sonsidCacade 0 PatnsClasicMein,El Classic. CC: Southwest Trading Karaoke solid. Also try any of the MC suggestions. Size: The picturedbag fts ahalf-literbole whichmeasures inch/ $23\mathrm{cm}$ circumference and 7-1/2inch / $19\mathrm{cm}$ tall. (Hints included for bottles appx. 10 inch/ 25cm circ., any height.) NtTyadlfila the size of your own project. My bags fnished at approximately $80\%$ of their pre-washed size, and fete rather easily.

Sipp-a-Ro0 ColorJoy by LynnH
@ 2008 by Lynn D.T. Hershberger http://ColorJoy.com · Lynn@ColorJoy.com [Abbreviations K: Knit. P: Purl. St: Stitch. Rnd: Round. BOR: Beginning of Round. M1: Make One. Increase by creating abackward e-wrap loop like the cast on shown below. (If you prefer, you can instead pull up the loop between stitches from previous row, knitting into that twisted loop.) Sl: Slip (as iftpurl).Enter stitch with right needle facing lef, where thetips ofbth needles are pointing inppoit directions. Pull sitch onto right needle without making a stitch. This method avoids twisting the stitch. MC: Main Color, a solid color, includes strap. CC: Contrast Color. Kfb: Knit in Front and Back of next stitch (an increase). PU: Pick up and knit (make new stitches with new yarn at a fnished edge). RH: Right Hand.
CAST ON
Using size $10\;1/2$ DPNS, cast on 8 sts on with backwards loop (also called half hitch/e-wrap).
BEGIN BAG
We start with a simple rectangle. This rectangle willbecome the centerof the bottom of yourbag. You will knit flat for 8 rows. After the 8 rows, you will start to knit in the round. Note Throughout this patern,al sliped stchs aesliedas f to purlYour neeles il have theirtis pointing in different directions, rather than both toward the ceiling.) This makes sure the stitches are not twisted on the needl after sipping. Worka in ttfrwssltst tichfallt tst as Base Rectangle Stitch Pattern (Stockinette, knit flat) Row 1: K all sts. Rows 2, 4, 6, 8: Slip 1, P rest of sts. Rows 3,5,7: Slip 1, K rest of sts. You are done with your rectangle when you have fnished purling Row 8 and are ready to knit again. Your rectangle may look as though you have fnished only 7 rows, because the fnal purl row istill on the needle. Do not include the cast-on row in your count.
Sipp-a-Ro0 ColorJoy by LynnH
@ 2008 by Lynn D.1. Hershberger http://ColorJoy.com $\bullet$ Lynn@ColorJoy.com Transition Stitches Knit 4 sts (later this needle will hold 6 sts). Note: the poin fter this transition ill become the center of your palm. It also will be the Beginning Of your Round (BOR). You do not need a stitch marker to mark the BOR, because the triangle of needles will be asymmetrical and you will be able to identify the spot as you work. If you prefer to divide stitches evenly by adding another needle, mark the fabric here with a safety pin or pin-like stitch marker anchored into the fabric.
BEGIN KNITTING CIRCULARLY
We nowwi kni aroud theftherectanglThsinvolve pickinuandkitin creatin nwsttch with working yarn on the thre edges where you not currently have live stitches on your needle.
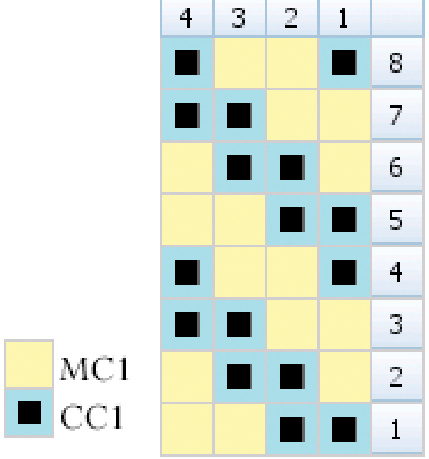
Neede 1
With a new needle, knit the remaining 4 sts from the original needle. Continuing to use the same needle, turn corner and pick up and knit in the frst 2 chain stitches (elongated because of slipping stitches every other row) from the side edge.
Needue 2
With a new needle, pick up and knit in the other 2 chain stitches from the first side edge. Turn corner counter clockwise. Continuing with same ndl, PU into the first 4 cast-on stitches from your starting edge. Count carefully before you start,to find all the stitches you need. Usually you need to fudge an extra stitch at the end of thisedge.
Neede 3
With new neede pick up and knit in the last 4 cast on sts (this corneris wonky, pick up where you can). Turn corner counter-clockwise, and PU into the frst half of the chain sts (2 sts) on the second side edge of the starting rectangle. Neede 4 Start with yet another ndl. PU in the last half of the chain sts from the final side edge (2 sts). Then onto this same ndl, knit the 4 transitional stitches you worked just before you started the circular process. Note that this point will become the Beginning Of Round, or BOR. ecure a safety pin or other marker into the fabric of the bag at this point for reference when working chart. You now have 24 stitches divided evenly over 4 needles.
Increase Round
For one round, Kfb in every stitch. You should now have 48 total stitches.
Transition Round
K all sts in MC. Copyright 2008 Lynn DT Hershberger (LynnH) - Sipp-a-Roo - February 2008
Sipp-a-Ro0 Coloroy by LynnH
@ 2008 by Lynn D.1. Hershberger http://ColorJoy.com $\bullet$ Lynn@ColorJoy.com (If you have a larger bottle which measures appx. 10 inches / $25\;\mathrm{cm}$ on this round instead $^{*}\mathrm{k}5$ Kfb\* repeat to end, increasing total stitches to 56. You willalso knit the bag taller. This willrequire more yarn.)
COLORWORK SECTION
(If making larger bag, redistribute your stitches so that each needle holds a multiple of 4 stitches.) Knit chart for approx. 9inch / $'~23c\mathrm{m}$ of colorwork (on mybag this included 4 fullrepeats/32 rows), repeating rows 1-8 from bottom t top, stopping mid-chart if necessary. (If you are making bag for a larger bottle, measure the height you wish and multiply times 1.2; then knit that resulting measurement before starting the top edge.)
TOP EDGE/PURL RIDGE
Cut CC. Remainder of bag is knit in MC1.
Transition Round
K all sts for I full Rnd. (You may need to re-distribute stitches between needles at times during each round at this point.)
Decrease Round
\*P1, P2Tog, P2Tog, P1, $\mathrm{P}2\mathrm{Tog^{*}}$ , repeat to end. You didhave a multiple of 8 stithes, now you have a multiple of 5 If you are offby a stitch or two, do not worry as it will not be obvious. (If you chose a largerbag, the repeat willnot work evenly. Just stop when the round is done.)
Purl 1 Fuu Rnd
Now you willknit around where you pick up abump on the inside, tomake a stronger and nicer-lking ee. JB: Join Bump. Here's how: Pick up one “purl bump” from inside (behind the last knit row) and mount on left-hand needle. Knit this together with the next stitch, as a K2Tog. Notes:amake certainto pick up anMC pul bump, bbecausofth decreae row, the pul bumpneed nt be directly below the stitch you are working; just choose a nearby purl bump in MC.
The Join-Buwp Round
\*JB, K1, JB, $K2^{*}$ Repeat to end of Rnd. (If you chose a larger bag, the repeat will again not work evenly.)
Sipp-a-Ro0 Coloroy by LynnH
@ 2008 by Lynn D.T. Hershberger http://ColorJoy.com $\bullet$ Lynn@ColorJoy.com
Cast Off
Cast off using either a US single-crochet or this stretchy alternative cast off:
Stretchy Alternative Cast Off
Knit 2 sts. Place those two stitches back on the left needle and K those 2 sts together through back loop (TBL), creating one St on right needle. $^{*}\mathrm{Kl}$ more, place both stitches back on the left needle and K them tog TBL.\* Repeat chosen cast of for entire round until one st remains on RH needle. Break/cut yarn. Pull yarn end through last lop to fasten. Work in all ends.
BUTTON STRAP
PU 9 sts just under bound-off edge. Transition Turn work and purl back one row. (Working yarn will pass over bound off stitches in one spot.) Turn again to face outside of bag.
Double-l-Cord
Cording Row: Knit 5 sts, bring yarn forward between needles slip 4 sts as ifto purl (do not twist sts). Turn Work. Repeat cording row (pulling yarn across back of 4 sts to wrap first stitch). These 2 rows $=1$ garter ridge. Continuetoknit double -cordas in aboveboxuntil youcount 1 garterrides on thecenter stitchof the strap and are ready to begin a right-side row. Buttonhole and Strap Finish K3, SSK, YO (loosely) ending with yarn in front, slip 4 sts as if to purl. Turn. K5 (loosely), bring yarn forward, Slip 4 purlwise. Knit 2 more cording rows as above. Cast off until 2 remain on lft nedle. KTog those on lft needle, lift right stitch over lft to cast ofnal stitch, cut/break yarn, pull end through, (making final loop no longer a loop). With large-eyed needle, work yarn end very loosely on underside of flap, around the buttonhole. Do not tighten this at all, in fact, stretch hole gently with your fingertips to loosen a bit. The extra wool will strengthen the hole. Work in all remaining ends.

Sipp-a-Roo ColorJoy by LynnH
@ 2008 by Lynn D.T. Hershberger http://ColorJoy.com $\bullet$ Lynn@ColorJoy.com
SHRINK/FULL/FELT
Place bag in nylon net wash bag or pillowcase. Place in washer with a few items of the same general color groupings, and which do not hold lint. Jeans work well if the colors are compatible, towels do not. Wash in a load with much agitation and a small amount of detergent/laundry soap (or no-rinse wool wash of your choice). Check first after 10 minutes, then every 5. Stretch into shape every time you check. Stop when size is satisfactory and fabric is to your liking. Rinse gently in warm water, blot partiall dry, place bottle inbag and leave in well-ventilated area to dry fully. Note: You can shrink byhand with abit of soap/detergent and rubbing or otherwise adding friction evenly. It takes a while just relax into the process.
FINISHING

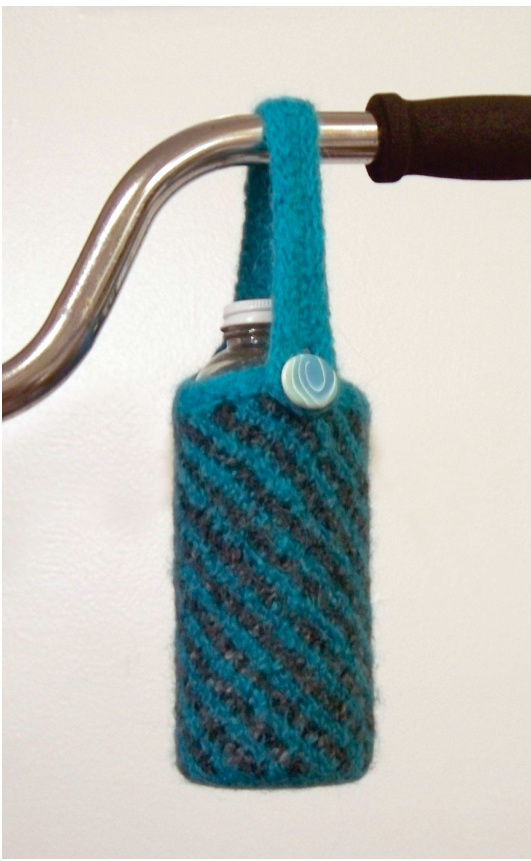
Attach button using standard sewing needle and strong buttonhole thread or strong doubled sewing thread. Use a smaller backing button on inside during sewing (sew both buttons on at one time) to strengthen the area, as shown in photo:
Lynn D. TroldahL Hershberger (AKA LynnH) LynnH has always been focused on color. whether it be polymer clay, printmaking orfiber. Visit LynnH's SockTour, patterns, handpainted yarns and blog/column at http://www.ColorJoy.com, or write to her at: Lynn@ColorJoy.com Try another ColorJoy by LynnH pattern! Visit http:// ColorJoy.cow/shop
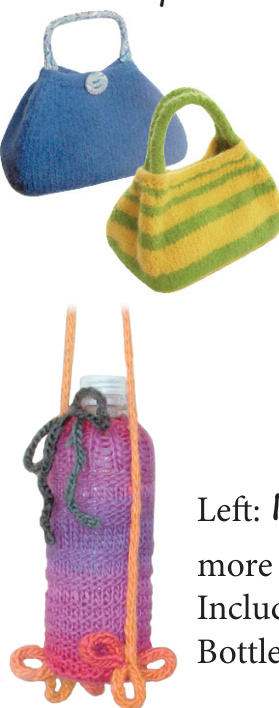
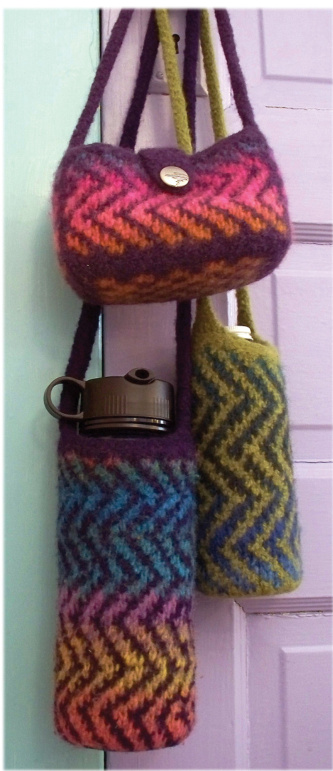
Left: Sassy Suwmer Handbag You want a quick weekend knit, You need a smaller bag for summer, You like color, -or- You are interested in Fibonacci Stripes. Right: ZigBagZ Mini Collection BottleZig: For active folks on the go, half-liter or sport. SportZig: Holds a liter water bottle or a 2-cup Thermos(tm). BabyZig: Perfect for wallet, keys and cell phone.
Left: Bags to Go!
more of a formula than a pattern, putting you in charge of final size. Included are guidelines to make one of two different types of bags (Water Bottle Holder, and Sunglasses/ Camera/ Wallet Holder).


