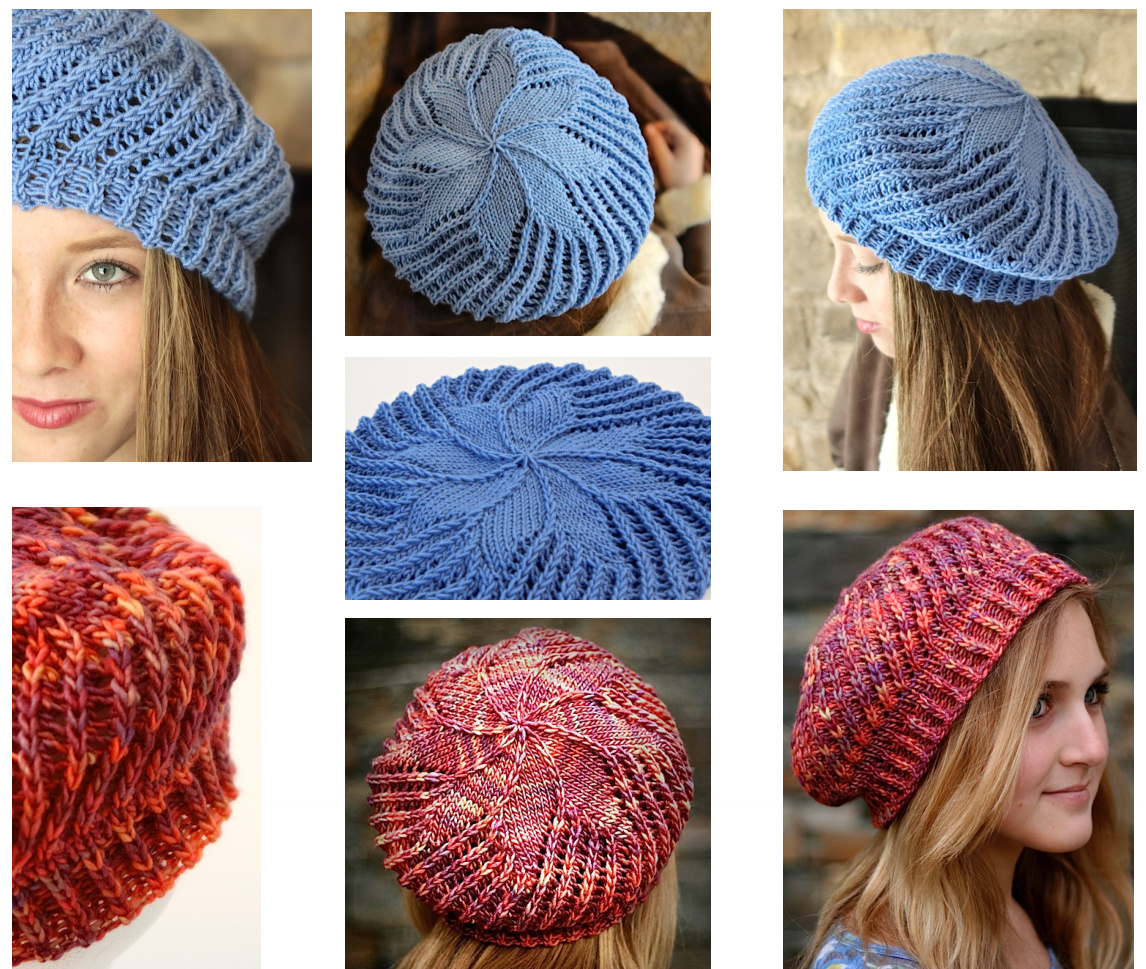
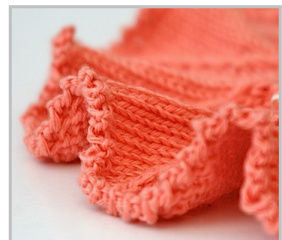
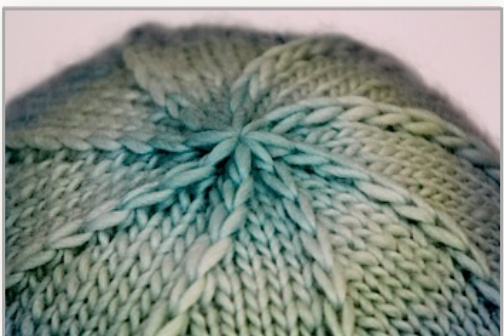
Estrellita Beret or Slouch
The Showy Decrease is the star of this hat! It's used in the both Showy Rib brim and the raised star pattern.
More Information Available Online
1. The pattern page on our website has links to downloadable charts, photos, more. 2. More detailed information about the Resilient Cast On, Showy Decrease, Double Decker Hat Top and Knit 1 B&F are available on our Iechniques page online. 3. Our blog posts are full of descriptions, tips, charts and sample swatches. You can use the live links in this pattern or to to blog.knittingnuances.com.
| Gauge Label gauge of 18 to 22 sts = 4"(10 cm) in stockinette stitch. The larger gauge still works if it's a single ply yarn that can be knit to the tighter gauge, i.e. the Mochi Plus. | ||
| Brim: Knit gauge of 25 sts = 4" (10cm) in Showy Rib pattern. This equates to a knit gauge of 22 sts in st st. Hat: 20 sts per 4"in st st. See needle sizes below | ||
| Yarn A single ply yarn that has some loft and is not slippery works best for this pattern, an alpaca blend for example. Similar yarns are Manos and Cascade Highlands Duo. Merino may have too much drape. | ||
| ·Malabrigo Silk Merino (50% merino, 50% silk), 150 yds per 50g skein, color # 049; 135 yds (1 skein), gauge 5.5 sts per 1" Crystal Palace Mochi Plus( 80% merino, 20% nylon), 98 yds per 50g ball, color Seafoam, 130 yrds (2 balls), gauge 4-4.5 sts per 1" 50 gm ball, blue color 463, 22 sts per 4", 1 ball. (not my favorite) | ||
| Size | ||
| 1 size, women's medium. 18" brim, 8" height. | ||
| Knitting Notions | ||
| Brim Needle: One 16-inch circular as needed to get gauge of 22 sts per 4 inches in stockinette. US 4-6 (3.5 - 4.0 mm) Main Hat: Two 16-inch to 24-inch circular needles (or long magic loop) one size larger than rib needle. US 5-7 (3.75 - 4.5 mm) Note:TheMochiPlus&MalabrigohatswereknitwithUS5&6 Tapestryneedletoweave inends ·8 stitch markers | ||
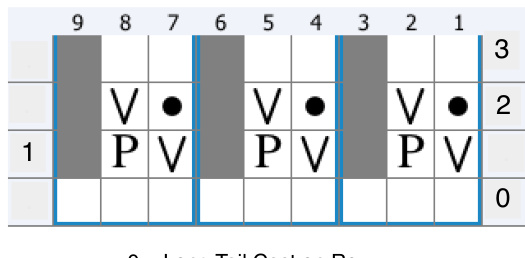
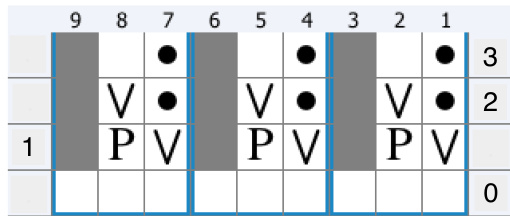
| Legend | ||
| Abbreviations | knit knit 1 b&f k2tog | |
| Beginning of Round | ? purl M make 1 Loop V slip yarn over reversed No Stitch | |
| BOR | End of Round | |
| EOR k | knit | |
| k1bf | k1 back & front (see pattern notes) | |
| k2tog | knit 2 together | |
| m1 | twist yarn loop and place on right needle.Yarn tail points to back. | |
| p | und | |
| sl | slip 1 | |
| sl2kp | slip 2 sts tog knitwise, k1, pass 2 slip sts over. | |
| ryo yarn over in reverse You candownload a freeResilientCastOn andShowy Decrease tutorials with photos on our web site at KnittingNuances.com/Techniques. | ||
Pattern Notes
Resilient Cast On
To create this more elastic edge, cast on 1/3 more stitches than working stitches. The number of stitches is reduced on the next row by passing one stitch over another every other stitch. The cast on is important to provide the stretch needed for a hat brim. Tutorial page included at end of pattern.
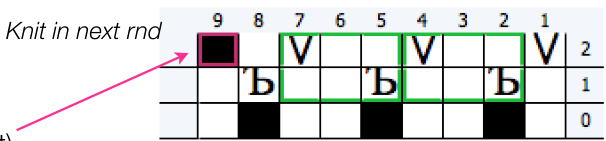
Showy Decreases and Raised Rib
The Showy Decrease connects lines of k2tog decreases using slip stitches on the next round. It not only creates a continual line, but raises the decrease up off the knit fabric creating a decorative element. When worked in a rib it really enhances the depth. More our website Techniques Section.
Double Decker Hat Top
Sixteen stitches remain prior to closing the top of the hat; 8 raised Showy Decrease sts and 8 standard knit sts. The hat is closed in 2 steps; the Showy Decreases create a second layer that adds texture to your hat top. Tutorial page included at endofpattern.
k1bf (knit 1 back & front)
sl1 kwise, return to left needle, k1 into back, leave on left needle and k1 into front loop. A photo tutorial is available on our blog showing the benefits of reversing this popular increase. blog.knittingnuances.com
m1 (make 1 increase)
Add a twisted loop of yarn to the right needle to increase 1 st. Use this in place of a lifted make one increase which would pull yarn from the adjacent Showy Decrease. It is used in place of a reverseyarn over on thesetup row only.
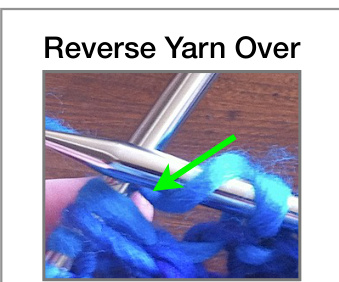
ryo (reverse yarn over)
A reverse yarn over increase is paired with a k2tog to create vertical Showy Decreases without an eyelet. When you yarn over in this direction, you can knit or purl it normally on the next round or row to close the eyelet (instead of working it through the back loop). It also prevents the rib from stretching out so don't ignore this step (see blog post September 2015). To yarn over in reverse, wrap the yarn counterclockwise over the top of the right needle. Since it is following a purl in this pattern, the yarn starts in the front, goes under the right needle then over the top so it sits like this / on the needle.
Before You Start
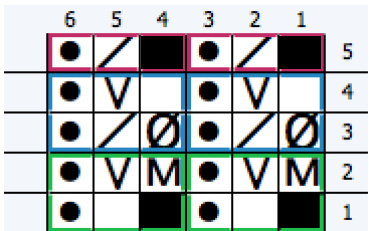
A Showy Rib is wider than a standard one. Test the gauge and try the technique with this flat swatch. ·Cast on 19 sts Set Up (in green) · Row 1 (RS): \*k1, p1\* k1 · Row 2 (WS): k1 \*k1, sl1 wyif, m1\* k2 (now 27 sts) Repeat (in blue) · Row 3 (RS): k1, p1 \*ryo, k2tog, p1 \*k1 · Row 4 (WS): k1 \*k1, sl1 wyif, p1\* k2 (see note on ryo on page 2 Repeat rows 3 & 4 until you get the hang of it. Finish (in red) Row 5 (RS): k1, p1 \*k2tog, p1 \* k1 (now 19 sts) Finished swatch, excluding edge stitch should measure 4" slightly stretched.
Knitting Instructions
Resilient Cast On
Cast on 120 sts with smaller brim needle. Do not cast on too loosely. · Slide the sts to the other end of the circular needle to start slip pattern. Work a pass over decrease every other stitch as follows: \* s3,psso \* The middle stitch of the 3 is passed over the end stitch like a bind off so 2 stitches remain. (80 sts remain) Do not join. Next Row (RS): \*sl1, p1\* Purl the single stitches and slip the piggybacked sts with yarn in back. Next Rnd: Join, place marker for beginning of round. Add this pretty eyelet detail: \*k1, yo, s2kp, yo \*
Set Up Showy Rib
Rnd 1: \*k1, p1\* to establish rib pattern. Purl the yarn overs from the previous round. Rnd 2: \*m1, sl1,p1\* (now 120 sts)
Showy Rib Brim
Rnd 3: \* ryo, k2tog, p1\* ·Rnd 4: \*k1, sl1, p1\* Note: k1 will close the ryo from the prior round Knit last 2 rnds for 1.5 inches from cast on edge, ending on Rnd 4 + Rnd 5: \*k2tog, k1\* eliminating extra Raised Rib sts (80 sts) ·Knit 3 rnds
Set Up Showy Spiral Hat Pattern
Switch to larger needle. Rnd 1: k1 \* k1bf, k2 \* to last 2 sts, k1bf, k1 (now 180 sts) Rnd 2: sl1 \* k2, sl1\* to last 2 sts, k1. Ihe last st on this round is worked as part of k2tog on next rnd (shown in pink on chart). Single Showy Rib Flat Swatch
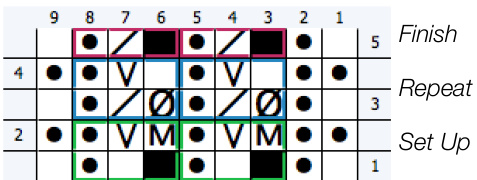
| No Stitch |
| knit |
| purl |
| make1Loop |
| slip |
| yarnoverreversed |
| k2tog |
Single Showy Rib
Showy Spiral Set Up
Rnd O is the knit round before
Start Showy Spiral Pattern
Rnd 1 [Decease Rnd]: \*k2tog, yo, k1\* You will recognize EOR when there is only 1 st after k1 so you can't k2tog. Rnd 2 [Setup Rnd]: \* sl1, k2 \* to last 3 sts, sl1, k1. The last st on this rnd is worked as part of k2tog on next rnd. At BOR the slip st determines the action. If it is already slipped then k2tog with st before it. Continue Showy Spiral pattern for 5, 5.5 or 6 inches from cast on edge, ending with decrease round (see note to the right). Place BOR marker 1 st before end (after the last yo). The last knit st becomes part of the next round.
Decreases
Decreases are worked over 8 repeats starting with 15 sts each. 1st Decrease (120 sts to start, 15 sts per repeat) > Set Up: k1 \* sl1, k2\* 4 times, sl1, k1, place marker. > Decrease: k2tog, k1 \*k2tog, yo, k1\* 3 times for each repeat. 2nd Decrease (112 sts, 14 sts per repeat) Set Up: \*k2, sl1\* 4 times, k2 Decrease: k1, k2tog, k1, \* k2tog, yo, k1\* 3 times, k1 3rd Decrease (104 sts, 13 sts per repeat) > Set Up: \*k1, sl1\* twice, \* k2, sl1\* twice, k3 > Decrease: k2tog \*k2tog, yo, k1\* 3 times, k2 4th Decrease (96 sts, 12 sts per repeat) Set Up: k1, sl1 \*k2, sl1\* twice, k4 > Decrease: k2tog, k1 \*k2tog, yo, k1\* twice, k3 5th Decrease (88 sts, 11 sts per repeat) Set Up: \*k2, sl1\* twice, k5 Decrease: \* k1, k2tog \* twice, yo, k5 6th Decrease (80 sts, 10 sts per repeat) Set Up: \*k1, sl1\* twice, k6 Decrease: k2tog twice, yo, k6 7th Decrease (72 sts, 9 sts per repeat) > Set Up: 7: k1, sl1, k7 Decrease: \* k2tog, k7\*
Remaining Decreases
On the next round separate sts onto two needles with four repeats each. The stitch markers are moved back 1 st so they follow the slip stitch. To set up next round: k1, place BOR marker then start round. > Set Up: knit 7, sl1, pm > Decrease: knit to last 2 sts in repeat, k2tog Repeat last 2 rnds, slipping the last st on set up rounds until there are 2 sts per repeat remaining.
Finishing the Hat Top
Close remaining 16 sts with Double Decker Hat closure instructions on last page. Weave in remaining ends. Steam the hat lightly to relax yarn.That's it your done! Spiral Pattern
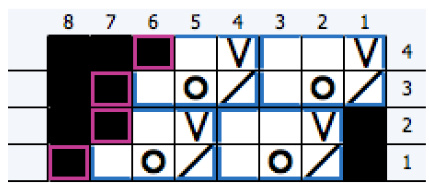
The last stitch (shown in pink) is the firstst of thenextround.
Hat Height
Knit to 5" for slouchy hat, 5.5" for a subtle beret (shown on models) or 6" for a more dramatic beret shape.
Stitch Markers
Because of the spiral nature of the pattern, the last st of the set up rnd will become the 1st st of the next decrease rnd. This means the BOR marker will always be in the way of the 1st k2tog. Once you are comfortable with the pattern, you can remove the marker and follow the directions for recognizing the start of a next rnd. The cast on yarn tail will also help you locate the initial beginning of round.
Basic Resilient Cast On
for knitting in the round
Overview
Here's a simple cast on idea that took a bit of testing to get 'right' so it doesn't flare. Here are the three basic steps: 1. Cast on 1/3 more stitches than called for in the pattern. 2. Pass one stitch over another every other stitch to reduce the number. 3. Eliminate some of the bulk by slipping every other stitch on the next row. This basic version of the Resilient Cast On adds flexibility and nice nubby detail. 1. Cast on 1/3 more stitches than called for in the pattern using a long tail cast on. You don't need to “cast on loosely". The give comes from the extra stitches, but please not too tightly either. Tip: It's easier to cast on a few extra stitches and pull off the unneeded ones after you count, than it is to add more. 2. Slide the stitches to the other end of the circular needle to start slip pattern. This 'row' does not require any knitting so drop your working yarn. The number of cast on stitches are reduced to the working number by passing one stitch over the other every other stitch. Like this: \* sl3, psso \* . Themiddlestitchof the3ispassedover theendstitchlikeabindoffso2stitches remain. Continue to end. Pull down on the stitches across the length of the needle to 'set' thecast on row. Count to make sure you have the right number of working stitches. · There are now 2 types of stitches: solo stitches and piggybacked stitches. · The \*knit' side of the long tail cast on faces you as you cast on and still does as you work the‘pass stitch over' row. Since we want the nubby edge to show, this is the 'wrong' side and you'll start knitting with a Right Side Row. 3. Do not join. Turn and work a Right Side Row, alternating purls and slip stitches. You will pur into the single stitches and slip the piggybacked ones with yarn in back. \*p1, sl1 \* · Since you're slipping with yarn in back, the yarn will alternate each stitch --back for the slip and front for the purl just like a rib. 4. Join making sure the nubby edge is on the outside of the hat or other project. Follow your pattern for the following rows. If you are modifying an existing pattern, consider adding one or more rows of 1x1 rib in established pattern, to enhance the edge and prevent rolling. Not just a pretty face! More cast on stitches add more flexibility, making it a great option for wavy edges.
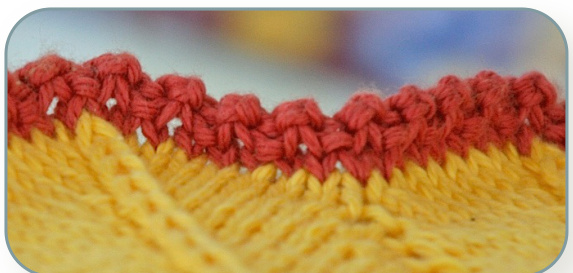
Thiscastoncreates abeautiful nubbyedgewhen workedwith a nicesolidyard like thisCascade UltraPima Cotton.If you'd like thenubby texture but are using a soft core yarn consider using 2 strandsfor the initial cast onrow only.
Sample Transition to Stockinette Still becareful about roll.
0 = Long Tail Cast on Row
Sample Transition to 1x1 Rib
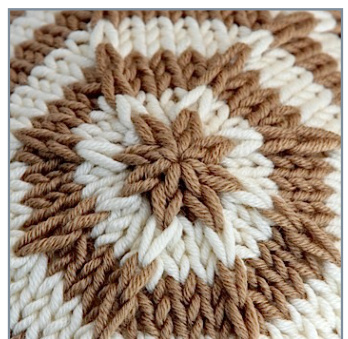
Double Decker Hat Top
Add texture and interest where there's been none before with this easy two-tier hat closure. Here's a fun new technique that's quick, easy and can work on almost any hat pattern.We combine it with our ShowyDecrease forreal punch.
Separating the Stitches
The hat crown is shaped by decreases every other round until there are just 2 stitches per decrease set remaining For example, if you are working 8 decreases there will be 16 stitches remaining. These stitches alternate in two categories: those that are part of a Showy Decrease and those that are not. After your last decrease round: > cut the working yarn with a 12" tail and thread it through a tapestry needle. The sts are still on 2 circular needles. Half the stitches are slipped onto the yarn tail by alternating as follow: 1. Slip 'normal' stitches onto the tapestry needle with yarn tail 2. slip raised Showy Decrease stitches onto the other end of the same needle (or a separate yarn scrap if you are using Magic Loop method).
The Lower Layer
·With the tail running through all the normal sts, pull tight to close. 8 sts remain on your 2 circular needles.
The Upper Layer
Run the tapestry needle and yarn tail through the remaining stitches. Slide off knitting needles and pull tight to close. · Run the tapestry needle and yarn through the small circle of raised stitches again a few times to augment the height (optional). . Push the tapestry needle down through the center of the hat top and weaveinremainingends. More information and project photos are available on our web site at KnittingNuances.com/Techniques.
Adapting Existing Patterns
These hats use 8 deceases every other round, which is typical for hat shaping. At the top there are 8 sets of 2 (16 stitches) remaining. For our patterns one of these stitches is a raised Showy Decrease. If you're using another pattern, decrease until you have 2 stitches for each decrease set. Split the stitches in half as above, closing every other stitch on the lower layer and slipping the others to close on top. We recommend no fewer than 6 sets of stitches (12 total) for this technique.
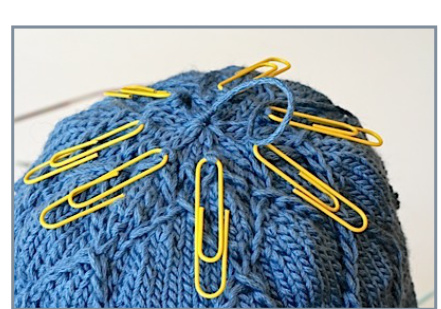
For demonstration purposes, the raised stitches were placed on holders (OK, paperclips) to separate them. The tail has been run through the lower stitches ready to be pulled tight.
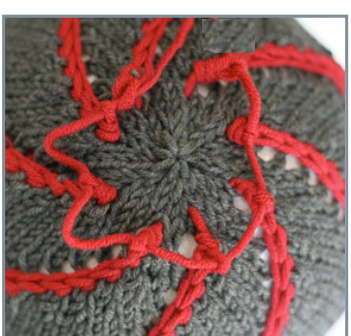
For this 2-color Galaxy Hat, the lower tier is closed with the gray yarn while the upper stitches will be closed with the contrasting red yarn.
Star Top Option
Cut a 15" tail. After you've pulled the lower layer tight, knit 1 more round with the upper layer stitches for this star effect.


