Kerfuffle Mitts written with handspinners in mind
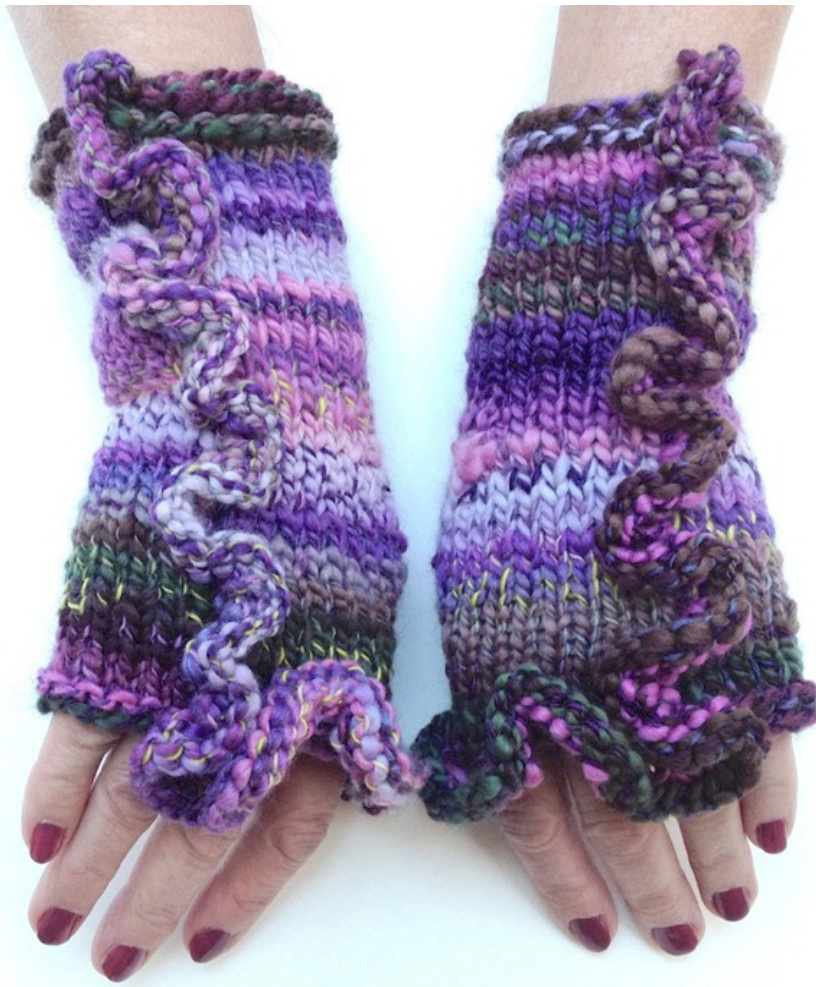
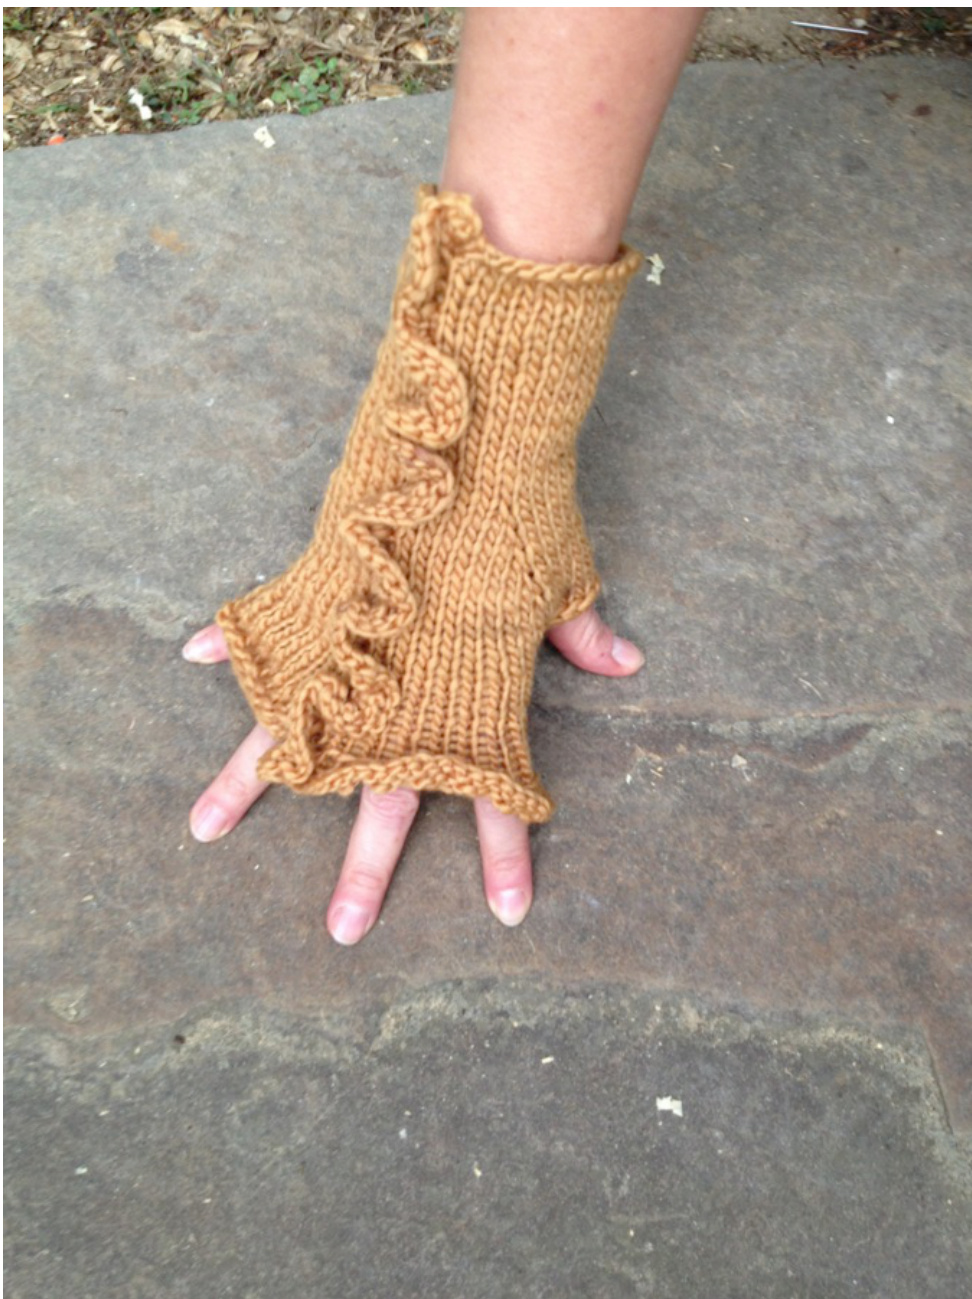
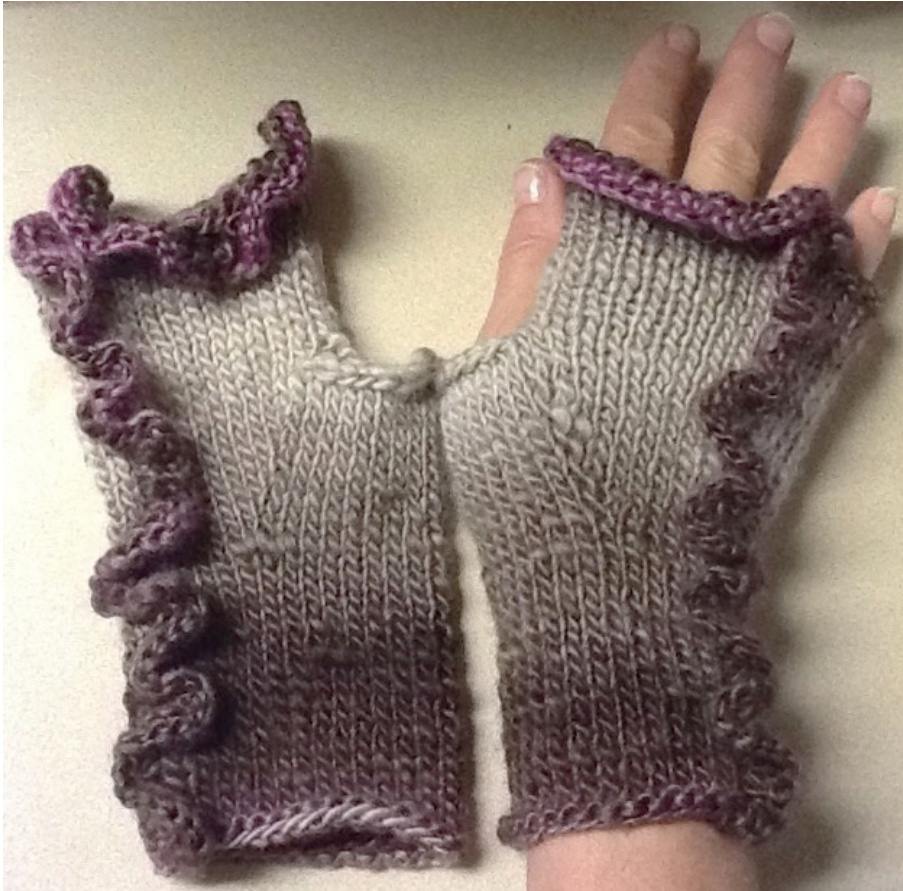
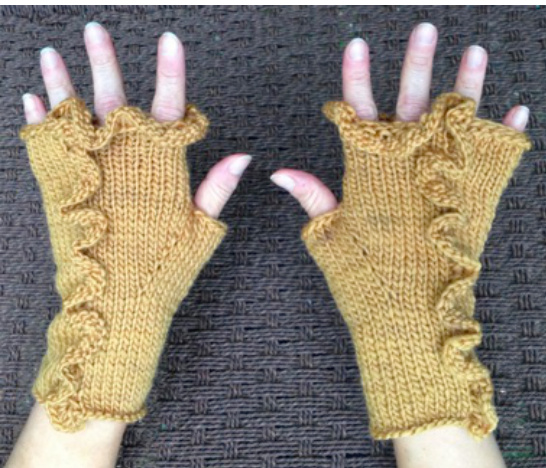
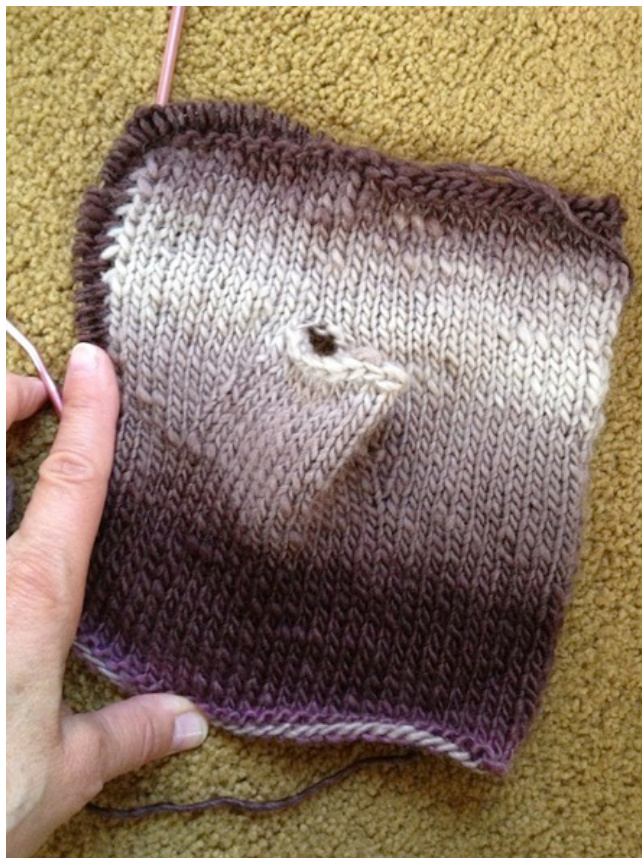
a simple fingerless mitt with a riotous little ruffle Yarn and Yardage: approx 120 yds heavy worsted/aran weight yarn Needles and Notions: one pair Us 9/5.5mm needles of your preference for kniting back and forth, one Us 9/5.5mm circular for knitting ruffle (optional but helpful), tapestry needle for finishing, two stitch markers Gauge: 16 sts/22 rs over 4 inches in stockinette. Row gauge does not have to be exact. Finished Measurements: circumference 7 inches, length 9" including ruffle (8 1/4" withou1 ruffle) These simple worsted weight mitts have a riotous little ruffle that snakes up the back of the mitt and curves around the outer 2/3 of the top edge, but ends before it rounds the index finger to the palm. This way you get the snazz of a ruffle without the fuss. And they are a snap to knit. I would call the skill level "nearly newbie" because the mitt itself is easy enough for any newbie knitter who can cast on, knit, purl and bind off. They are worked flat and sewn up so there is no need to know how to knit in the round and the thumb does not require any extra finishing. The tiny ruffle adds a bit of a twist, though. You'll need to know how to pick up stitches, yarn over and increase by knitting more than once into the same stitch. And you'll learn a little about selvedge edges and finishing with the added plus of a nifty little increase for those who understand knitspeak. See how great they look knit in ombred yarn? (of course it looks great in a solid too.) I spun the yarn for these sepia colored ombre mitts from LVltd for Three Waters Farm"Sepiatone Rosalie' BFL top. You'll find a tutorial for this yarn on my blog. Those of you who don't spin can get a similar effect by using a worsted or chunky weight version of Noro or other gradient yarn of that weight with long color changes. If you would like your mitts to have reasonably identical color changes, you need to begin knitting both mitts from the exact same point in the yarn's color sequence.
Abbreviations
RS = Right Side of fabric wS = Wrong Side of fabric slk = slip one as if to knit slp = slip one as if to purl m1 : increase by casting on with backward loop cast on (see pg 5 for "a nifty little increase") CDl: center double increase; [kl, yo, kl] into the same stitch.
Method
Begin the same way for both hands. When you get to the Thumb Wedge, placement for wedge will be different on each hand, but instructions after marker placement will be the same till you get to the bind off. Note: to form a chain selvedge (see pg 5), you must slip the first st of every row. This will be understood in the pattern unless otherwise noted. There are only two rows in the entire mitt in which the first st is not slipped; the first row and the last. Instructions for slipping stitches are included on row 20 for accuracy of marker placement.
LEFT HAND
Cast on 34 sts. set up row 1: knit every stitch (do not slip first st of row) (RS row) set up row 2: purl Row 1: knit Row 2: purl Knit in stockinette as set for 19 rows ending with a RS row.
Thumb Wedge
Row 20 (ws): sllp, p5, place marker B, p14, place marker A, purl 14. Row 21: s1k, knit to marker A, m1, pass marker, knit to marker B, pass marker, m1, knit to end of row (36 sts) Row 22 and all even rows: purl Row 23: repeat row 21 (38 sts) Row 25: repeat row 21 (40 sts) Row 27: repeat row 21 (42 sts) Row 29: repeat row 21 (44 sts) Row 30: purl Row 31: knit Row 32: purl Row 33: knit to marker A, remove marker, bind off 13, remove marker B, knit to end (31 sts total). Row 34: purl across, making sure you snug the stitches when you span the thumb opening to connect the sts for the hand. Rows 35 - 47: continue in stockinette as set Row 48 (wS): knit all sts
Ruffle
Circular needle highly recommended. Row 49: Using a circular needle, bind off 18 sts (13 total sts rem), work CDl in each of 12 rem sts to end of row (36 sts total), pick up and work one CDl into the front loop of each chain selvedge (see pg 5) down left hand side of fabric (24 chains total, 72 sts total on side) (109 sts total in entire ruffle row) Row 50: purl Row 51: bind off all sts.
Finishing
Sew up side seams in the prettiest way you know how so that ruffle stays on the right side of the fabric. You may want to reinforce the thumb opening by working duplicate stitch into the 2 stitches at the base of the thumb but this is purely optional. Block or steam and wear proudly.
RIGHT HAND
Cast on 34 sts and work first 19 rows as for left Hand. Row 20 (ws): sllp, p 13, place marker B, p14, place marker A, p6 Work rows 21-48 as for Left Hand. Row 49: Break yarn. Using a circular needle, slip first 13 sts onto rh needle, attach yarn, bind off 18 sts. Break yarn. Slide remaining live stitches to the other end of the circular needle because you will be working them from right to left after you pick up the right hand edge. Attach yarn at lower right hand corner of right side of fabric with RS facing, pick up and knit one CDl into the front loop of each chain selvedge (24 chains, 72 sts total), then work one CDl into 12 live sts, knitting the last stitch plain (36 sts). Ruffle row has 109 sts total). Row50: purl Row 51: Bind off all sts. Finish as for Left Hand
Pattern Notes
The Chain Selvedge
The edge of the fabric, commonly referred to as the selvedge, plays an important part in ths pattern. Selvedges are formed by the first and last stitch of every row. In these mitts, we're going to use a "chain selvedge" which is formed by slipping the first stitch of every row, both on the right side and wrong side of the fabric. It's simple! All you have to do is enter the stitch and pullit off the needle without working it. On the right side or knit row, you'll enter the stitch as if to knit. On the wrong side or purl row, you'll enter the stitch as if to purl. You always work the last stitch of the row. This forms a nice chain up the side of the fabric at a rate of one chain for every two rows of knitting. It is very easy to see this chain and because of its enhanced visibility, it makes it very simple to pick up the right number of stitches for the ruffle and leave a nice row of loops for sewing up the mitts. When it's time to pick up stitches for the ruffle, you will work into the half of the loop of this selvedge chain that is closest to the right side of the work, leaving the other half of the loop to fall to the wrong side for sewing your seam. Once sewn, it actually looks like the ruffle grew out of a continuously knit fabric. How cool is that?.
A Nifty Little Increase
In this pattern I give the direction to m1, which I have described as "cast on one with backward loop cast on". This works just great as is, but if you hate to stop to cast on, try this nifty little increase in it's place. June Hemmons Hiatt call it the "twisted running thread increase" in her bible The Principles of Knitting. You can work it twisting the same way every time, or you can twist the stitch in opposite directions for right and left if you prefer. Just insert your RH needle under the running thread between the stitch you've just knit and the next stitch and place that thread on the LH needle to knit it. Of course, if you don't twist that stitch, you'll end up with a hole, because an untwisted stitch of this nature would be the same as a yarn over. The twist doesn't happen when you put the thread on the LH needle, it happens when you form the stitch depending on how you have placed the thread as follows: R twist (leans to right): place thread on left needle with right leg forward, knit into the back (left) leg of the stitch. L twist: (leans to left): place thread on left needle with right leg back, knit into the front (left) leg of the stitch. Happy Knitting @ Find me online: Ravelry Facebook Pinterest Twitter: @LynneVogel Etsy
Yarn credits:
Main photo pg 1 and detail pg 4; two-ply handspun from Three Waters Farm polwarth/tussah top in SpringBouquet. Ombred yarn pg 2; handspun singles from LV Itd for Three Waters Farm BFL top in "sepiatone Rosalie". Golden tonal pg: LV Itd Au Naturel worsted singles in Grape Leaves w/Cochineal. Substitute with 120 yds of your favorite heavy worsted weight or aran weight ya