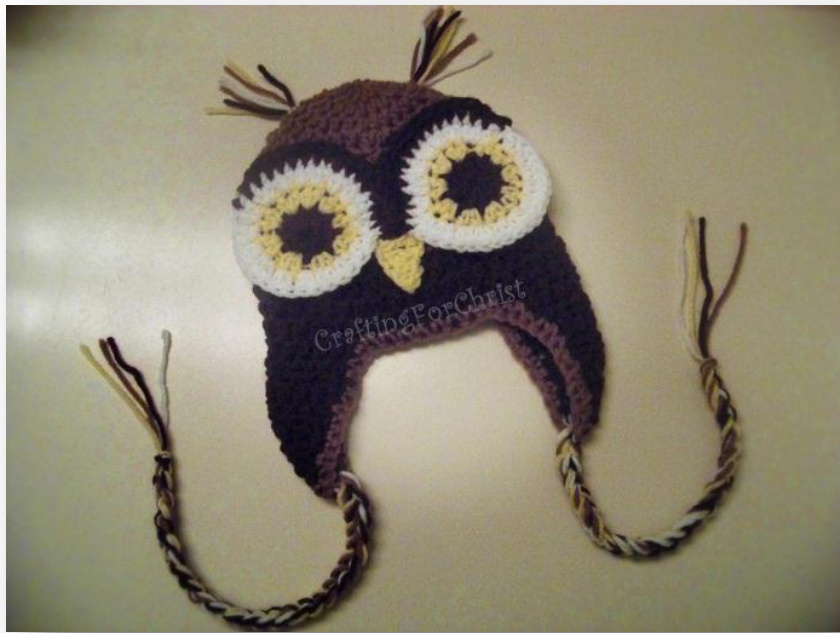
B's " Owl Hoo" Hat Pattern
Materials :
Red heart worsted weight (4m) light brown (main color) Red heart worsted weight (4m) dark brown Red Heart Worsted Weight (4m) light yellow Red Heart Worsted Weight (4m) white Crochet Hook: H Yarn needle
Stitches Used:
Dc = Double Crochet Sc = Single Crochet Sp = SpaceSI St = Slip stitch Ch = Chain Rnd/s = Round/s
This Pattern was written for 0- 3 months
For best results please get measurements of the child's head you are making this for. You can try a larger hook size for larger hat, or a smaller hook size to make a smaller hat. Average Head Sizes: Preemies- 9-12" 0-3 month -13" - 14" 3-6 month- 14" - 17 " 6-12 month-16" - 19 " And Toddler-small child-18" to 20 "
Instructions:
With light brown... Ch 2, R1: 12 hdc in the second ch from hook, join with sl st to first hdc made. R2: 1 hdc in the same sp where you joined, 2 hdc in next hdc, \*1 hdc in the next hdc, 2 hdc in the next hdc; Rnd 3: Repeat \*to\* around, join with sl st to first hdc made. Rnd 4: 1 Hdc in the same sp where you joined and 1 hdc in the next hdc, 2 hdc in the next hdc , \*1 hdc in each of the next 2 hdc, and 2 hdc in the next hdc\* ; repeat \*to \* acround, join with sl st to beginning hdc. Rnd 5: 1 H dc in the same sp where you joined and 1 hdc in each of the next 2 hdc, 2 hdc in the next hdc , \*1 hdc in each of the next 3 hdc, and 2 hdc in the next hdc\* ; repeat \*to \* acround, join with sl st to beginning hdc. Rnd 6: 1 H dc in the same sp where you joined and 1 hdc in each of the next 3 hdc, 2 hdc in the next hdc , \*1 hdc in each of the next 4 hdc, and 2 hdc in the next hdc\* ; repeat \*to \* acround, join with sl st to beginning hdc. \*\* Change Color\*\* With Dark brown... Rnd 7-12: 1 Hdc in each hdc around, join with sl st to beginning hdc.
Earflaps:
R1: 1 hdc in the next 10 hdc, ch 1 turn R2: 1 hdc decrease in the first 2 hdc, 1 hdc in each hdc across until you reach the last 2 hdc, 1 hdc decrease in the last 2 hdc, ch 1 turn R3: 1 hdc in each hdc across, ch 1 turn R4: 1 hdc decrease in the first 2 hdc, 1 hdc in each hdc across until you reach the last 2 hdc, 1 hdc decrease in the last 2 hdc, ch 1 turn R5: 1 hdc in each hdc across, ch 1 turn R6: 1 hdc decrease in the first 2 hdc, 1 hdc in each hdc across until you reach the last 2 hdc, 1 hdc decrease in the last 2 hdc, ch 1 turn R7: 1 hdc in each hdc across, ch 1 turn R8: 1 hdc decrease in the first 2 hdc, 1 hdc in each hdc across until you reach the last 2 hdc, 1 hdc decrease in the last 2 hdc; \*\*Now before you start Rnd 9 only\*\* slst down side of 1t earflap back to the base of hat, slst across 12 hdc, ch 1 Rnd 9-17: repeat rounds 1-8, at the end of round 17 fasten off. Rnd 18: Change Color to main color, and sc around the entire hat. fasten off.
Eyes: (make 2)
\*\*With Dark brown, Ch 2 12 hdc in 2cnd ch from hook Fasten off Brown, and Attach yellow, Ch 2 1 hdc in same sp as ch 2 2 hdc in next hdc, and 2hdc in each hdc acround, join with sl st to 1"t ch 2. Attach White, Ch 2, 1 hdc in same sp as ch 2 2 hdc in next hdc, and 2hdc in each hdc around, join with sl st to 1"t ch 2. Attach Dark brown, Ch 2 1 hdc in next hdc, and 1hdc in each of the next 20 hdc (or about half way around the eye)fasten off.\*\* (Repeat from \*\* to \*\* again for the other eye) Fasten Off, leave a tail to sew eye on to hat.
Beak:
With yellow Ch 6 1 sc in 2cnd ch from hook, 1 sc in next ch, 2 hdc in next 2 ch's 1 dc in next ch 1 tr in next ch, Fasten off, leaving a tail to sew beak on to hat.
Ears Of Owl: Make 2
Take 1 strand of each color and cut about 12 inches or so and you can either hand braid them or you can use a large hook and chain a braid them together. Do not braid or chain the whole 12 inches, leave about 3 inches of strands for fringe. Sew to the top of each side of the hat.
Braided Straps: (make 2)
Take 1 strand of each color and cut about 12 inches or so, attach to end of earflap and you can either hand braid them or you can use a large hook and chain a braid. That's it, You're Done! DISCLAIMER! \*You may sell the item/s made with the pattern, but as always..Please Do not sell the pattern.\*\* Thank You for Your Purchase! We'd Love For You To Visit Us On Ravelry @Crafting For Christ Designs Φ On Facebook @ Crafting For Christ Designs, Share Pics Of Your Finished Item/s or If You Need Any Additional Information About A Pattern Please Leave A Comment. Again, Thank You for Your Purchase


