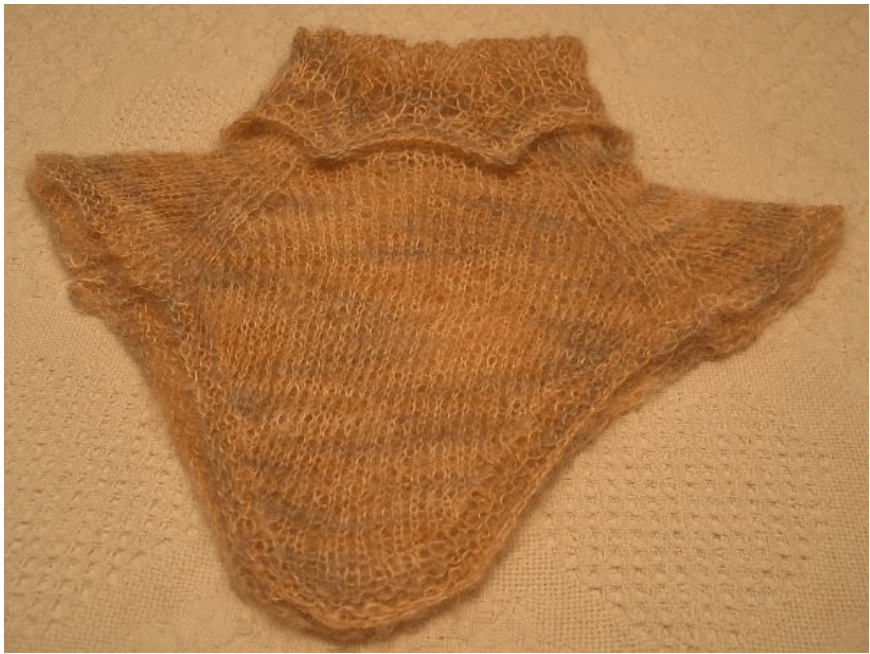
Materials: #7 Needle (I'm using a long circular using the magic loop method, but 2 circulars or DPN's would work) Yarn: Fiesta Heaven $64\%$ Brushed Kid Mohair, $28\%$ Wool, $8\%$ nylon 260 yds / 2 oz skein (one skein made this dickie and a pair of matching hand mitts) Gauge: 4 sts $\l=\l1$ inch CO 60 Sts VERY loosely. I used a single #13 needle and a long tail cast on. Knit one round Purl one round Start Horseshoe Lace Pattern: Rows 1 and 3: Knit Row 2: $\ast\mathsf{K I}$ , YO, K3, (S1, K2tog, PSSO), K3, YO ---Repeat from \* around R4: ${\bf*p1}$ ,K1, YO, K2, (S1, K2tog, PSSO), K2, YO, K1--Repeat from \* around R5 and 7: P1, K9 around R6: ${\bf*p1}$ , K2, YO, K1, (S1, K2tog, PssO), K1, YO, K2---Repeat from \* around R8: \*P1, K3, YO, (S1, K2tog, PSSO), YO, K3--Repeat from \* around These 8 rows are your pattern rows. Repeat the pattern once (3" high) Slip the next stitch to the right hand needle, wrap the yarn to the back and slip the stitch back onto the left hand needle. Turn your work inside out. We are changing directions of knitting so that we can work the rest of the dickie from the front'. Knit one round. Work 2" of K1, Pl ribbing. Knit 2 rows of stockinette stitch, placing markers before the first stitch, after the ${{\bf1}0}^{\mathrm{th}}.$ the $30^{\mathrm{th}}$ and the $40^{\mathrm{th}}$ stitch. (This divides the dickie into 2 shoulders of 10 stitches each and a front and back of 20 stitches each. I arranged my knitting so that the middle of the shoulders were where my loop came through. That way, the increases were not done by where the needles split.) Begin increasing: Rnd 1: $\ast\upkappa\updownarrow$ , Mi by knitting into the stitch below the next stitch and into the stitch itself. Knit to one stitch before marker. Knit in stitch 2 rows down of the last stitch on your right needle, $\upkappa1^{*}$ You will follow this same pattern all to the end of the round. Rnd 2: Knit. Repeat these 2 rounds stopping after an increase row until the shoulder is 3" past theribbing. Begin short row shaping for front and back. Knit to 1 stitch before shoulder marker (you will have knit across the front section). \*Turn. Slip 1 stitch purlwise and purl to within I stitch of the shoulder. Turn. Slip 1 stitch knitwise and knit to 1 stitch shy of turned stitch. Repeat short rows until there are 8 stitches left to work (Slip 1, purl 7, turn). Now knit around past the next shoulder and work the short rows on the back. There are many ways to pick up the turned stitches to avoid having gaps. I would knit up to the turned stitch, slip it knitwise onto my right needle, locate the shoulder of the stitch 2 rows down, place it on the left needle, slip the turned stitch back to the left needle and knit the two together through the back. This is basically a SsK using the shoulder of the stitch from a couple of rows down for the second s.
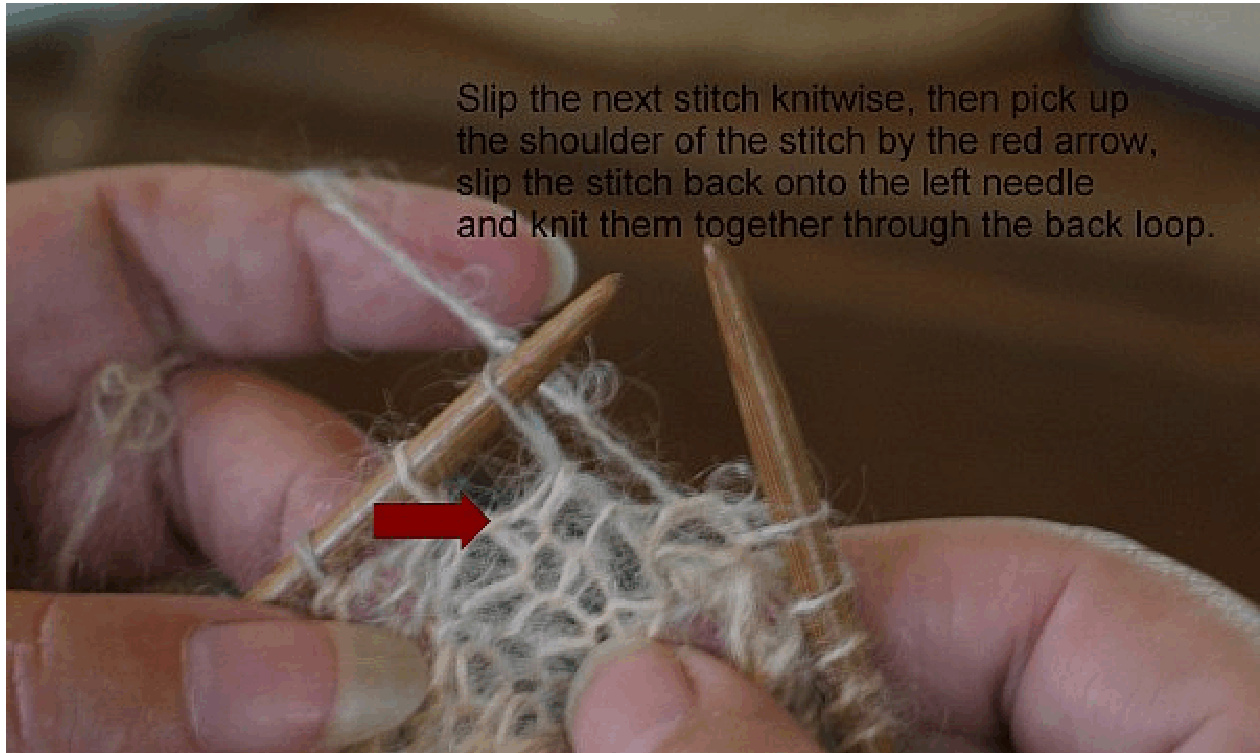
Once you have repeated the short rows on the back section, continue knitting to the end of the round. Knit one row, maintaining the increases at the markers. when picking up the turned stitches on the other side, I used a K2 together, picking up the back leg of the turned stitch one row below.

Purl one row. \*Knit one row maintaining increases. Purl one row\* Repeat between \* until the shoulder is as wide as you want it to be. Approx. 3 /4 inch. Bind Off Loosely. Elaine Jones Driftwood 2008


