Zipped Cushion Covers with Fabric or Knitted Piping
Includes step-by-step instructions for creating your own fabric or knitted piping!
Page 2 Introduction
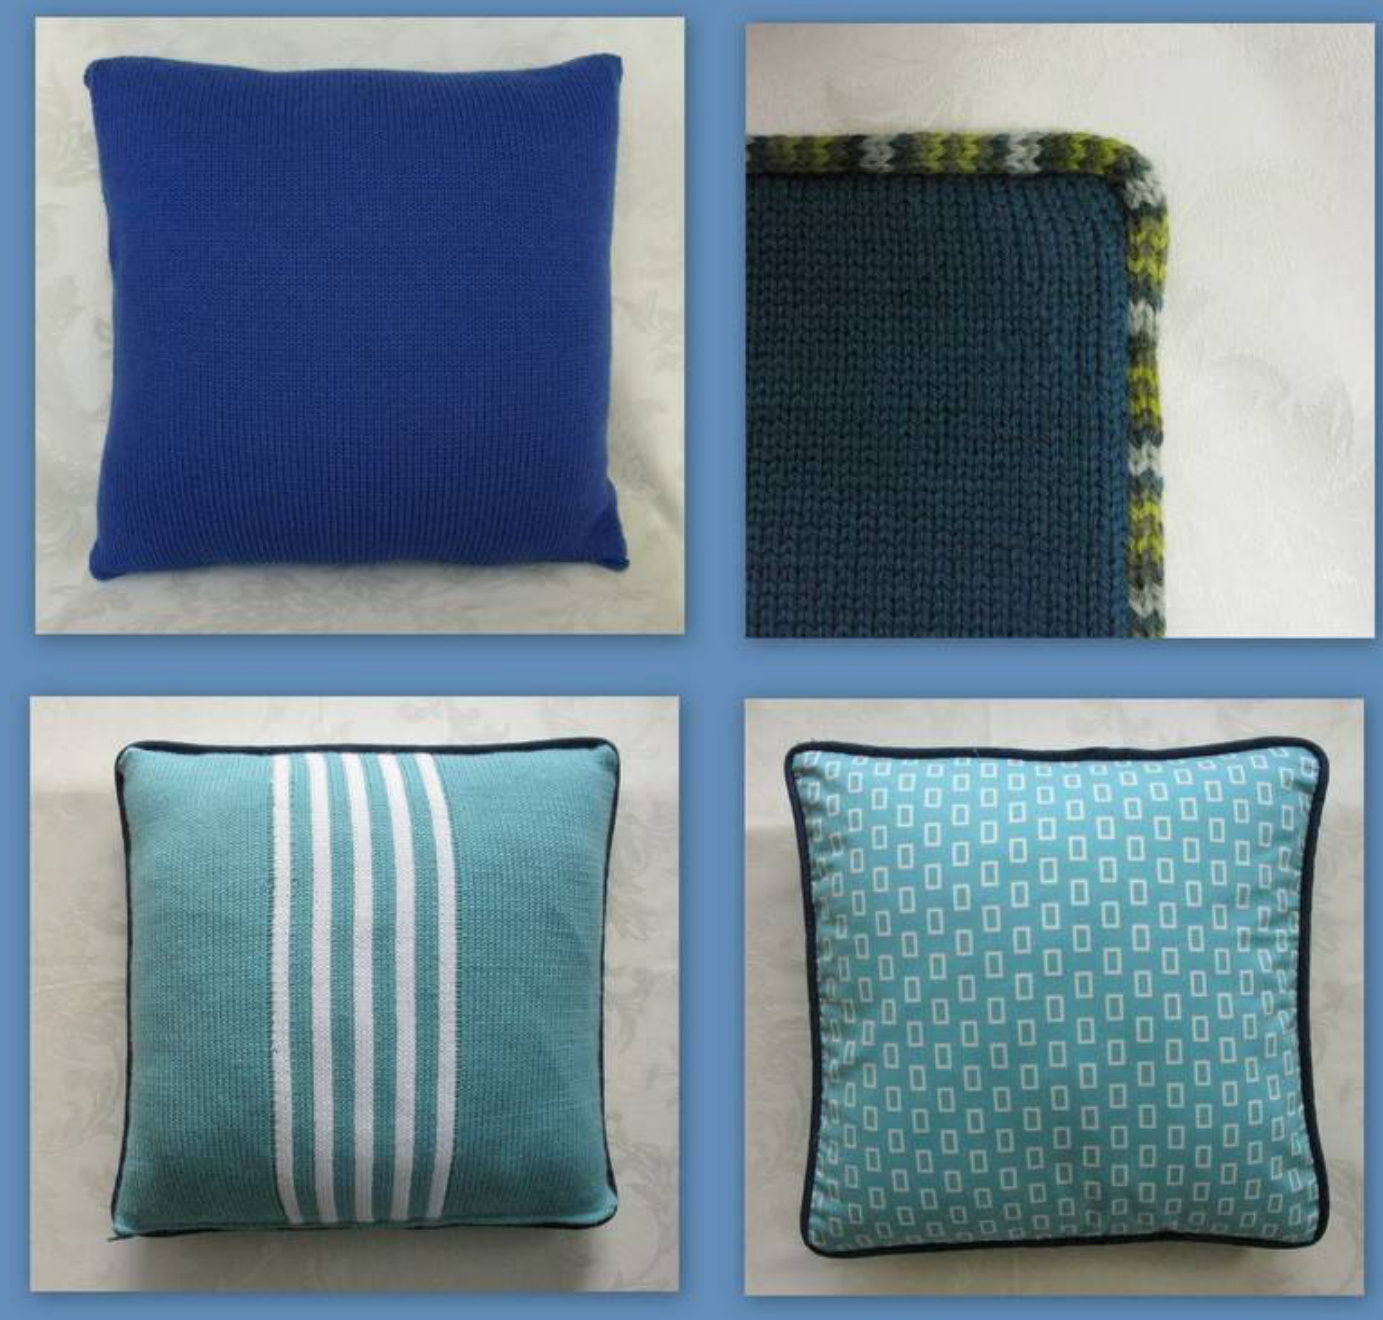
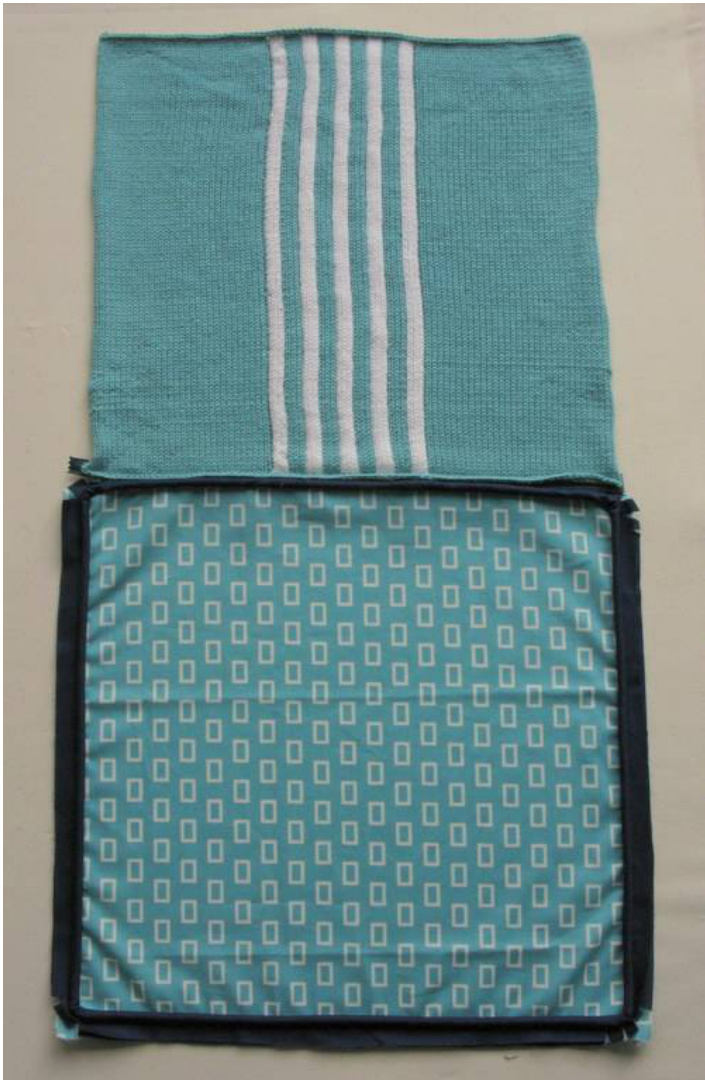
In this pattern, Ill show you how to make three different cushion covers that feature a zip fastening and optional piping. You have the choice of: A knitted cushion cover with a zip fastening (top left photo); A knitted cushion cover with a zip fastening and knitted piping (top right photo); and A half-knit half-fabric cushion cover with a zip fastening and fabric piping (bottom two photos). You'll need knitting and sewing skills to make these cushion covers.
Features
The pattern includes: Instructions on installing a zip, and shortening a zip if it's too long for the cushion cover. Detailed step-by-step instructions with clear photographs that show you how to: Create your own fabric piping from scratch; Create knitted piping that has no visible beginning or end; and O Attach the piping onto your cushion cover. You could even use these instructions to add piping to other cushion cover designs that have separate back and front pieces.
Yarn for One Cushion Cover
Yarn for one cushion cover (two knitted sides): 5 (5, 6) balls Cleckheaton Country 8 ply, 100% wool, approx. 95m per 50g ball. Or substitute approx. 425 (475, 550) metres [465, 520, 605 yds] of 8 ply / DK yarn. Yarn for half a cushion cover (single knitted side) Main colour: 3 (3, 4) balls Cleckheaton Country 8ply wool. Or substitute approx. 250 (275, 300) metres [275, 305, 330 yds] of 8 ply / DK yarn. Contrast colour for vertical stripes: 1 (1, 1) ball Cleckheaton Country 8ply wool. Or substitute approx. 70 (75, 80) metres [80, 85, 90 yds] of 8 ply / DK yarn. Wool yarn is recommended.
Materials andTools
Two 4 mm [US size 6] knitting needles, 0r the needle size required to obtain the correct gauge. One 40cm x 40 cm [16 in x 16 in] cushion inner. One zip that is the same length as the width of the cushion cover or longer. Thread to sew the zip. Sewing machine with a regular foot and a zip foot. Darning/tapestry needle with a blunt tip. Tape measure. Scissors. Pins. Row counter (optional). Materials for knitted piping - refer to the How to Add Knitted Piping to your Knitted Cushion Cover section of this document. Materials for fabric piping - refer to the How to add Fabric Piping to your Half-Knit Half-Fabric Cushion Cover section of this document.
Cushion Inner Sizes and Measurements
This pattern is designed for a 40 cm (width) x 40 cm (height) [16 in x 16 in] cushion inner. Three sizes are provided because the actual thickness of the cushion inner may be quite different depending on the amount of stuffing - see photo below.
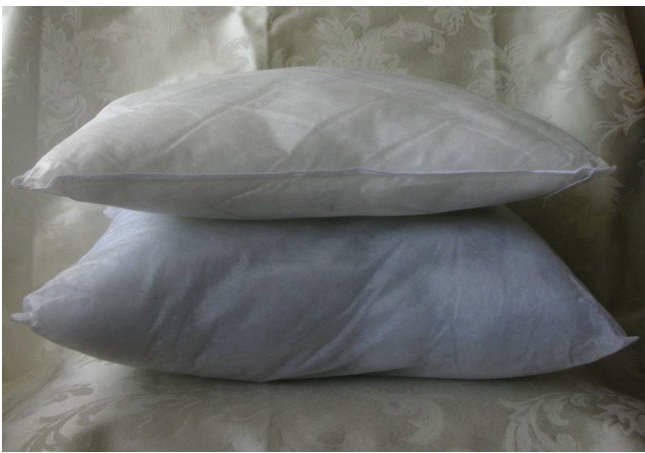
Measure across the fullest part of your cushion inner both horizontally and vertically. Choose the cushion inner size from the list below that is closest to the measurements you've taken. 40 x 40 cm [16 x 16 in] across fullest part 43 x 43 cm [17 x 17 in] across fullest part 46 x 46 cm [18 x 18 in] across fullest part you started. You should practice the technique before attempting to knit the vertical stripe pattern. 2. You'll also need to interlock the yarn each time you encounter the first stripe in the row (with the exception of the first row), to prevent holes in your knitting. Interlocking is a technique commonly used in intarsia knitting and there are many tutorials on the internet that will teach you this technique.
Gauge
21.5 stitches x 30 rows = 10 cms [4 ins] in stocking stitch. If the gauge swatch is too small, knit another swatch using larger needles and measure again. If the gauge swatch is too large, knit another swatch using smaller needles and measure again.
Abbreviations
approx. - approximately cm/cms - centimetre / centimetres CC - contrast colour CO - cast on 8 ply/DK - double knit in, ins - inch, inches m - metres / metres MC - main colour patt - vertical stripe pattern RS - right side st/sts - stitch / stitches st st - stocking/stockinette stitch WS - wrong side yds - yards
Vertical Stripe Pattern
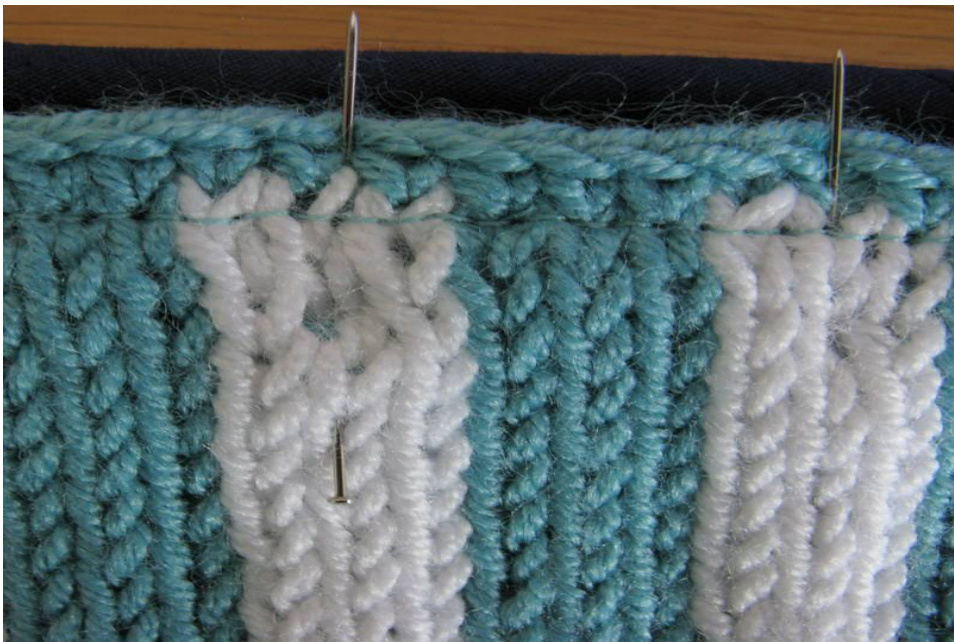
Row 1: K28 (31, 35) using MC, \* K3 using CC, K3 using MC; rep from \* 3 more times; K3 using CC, K28 (31, 34) using MC to end. Row 2: P28 (31, 34) using MC, \* P3 using CC, P3 using MC; rep from \* 3 more times, P3 using CC, K28 (31, 35) using MC to end. Repeat rows 1 and 2 to produce the vertical stripes. Tips for beginners of colourwork 1. If you haven't tried stranded knitting before, there are lots of tutorials on the internet to get
Cushion Cover Side 1
CO 83 (89, 96) sts. Work 112 (120, 130) rows in st st / patt or until work measures 37 (40, 43) cms [14.5, 16, 17 ins]. Cast off. If you are making the half-knit half-fabric cushion cover with fabric piping, go to the “Block Knitting' section below.
Cushion Cover Side 2
CO 83 (89, 96) sts. Work 112 (120, 130) rows in st st or until work measures 37 (40, 43) cms [14.5, 16, 17 ins]. Cast off.
Block Knitting
Weave in loose yarn ends. Block the cushion cover sides so that they measure 37.5 (40.5, 43.5) cms [14.75, 16, 17 ins] wide x 37.5 (40.5, 43.5) cms [14.75, 16, 17 ins] high. If you are making the cushion cover with fabric piping, follow the instructions in the How to add Fabric Piping to your Half-Knit Half-Fabric Cushion Cover section below.
How to Shorten a Zip (if required)
Fit your regular sewing foot onto your sewing machine with needle centred. Change your stitch to the zig-zag stitch. Adjust the stitch length so that it is zero or close to zero, and set the stitch width so it is wide enough to straddle the zip's teeth. Page 4 Close the zip. Measure your cushion cover to determine the length of the zip. Measure the zip from the top stop towards the bottom stop and mark the length required on the zip. Hand-wind the sewing machine needle onto one side of the zip's teeth where you've marked the zip. Sew side-to-side on the spot at least 10 times to create a new bottom stop. Cut off the end of the zip about 1.5 cms [5/8 in] beyond the new bottom stop.
Install Zip
Pin the cast on edge of one of the cushion cover sides alongside the teeth of the zip. Ensure that the cast on edge of the knitting partially covers the zip's teeth. Both the zip and the right side of the cushion cover should be facing upwards. Fit the zip foot onto your sewing machine. Sew the cushion cover side close to the zip's teeth. The sewing stitches should be on the st st part of the cushion cover, not the cast on edge. Repeat on the other side of the zip with the second cushion cover side. If you are making a cushion cover with knitted piping, follow the instructions in the How to add Knitted Piping to your Knitted Cushion Cover section below.
Seam Edges of Cushion Cover Without Piping
Use mattress stitch (for vertical seams) and an invisible horizontal seam (for horizontal seams) to sew your cushion cover pieces together. If you haven't used these seaming techniques before, search for tutorials on the internet.
Personalising your Cushion Cover
If you want to decorate your cushion cover, my Two Easy One Piece Cushion Covers pattern contains a few ideas to get you started. The pattern's free - just click through to my store to download it. You can also vary the vertical stripe pattern by moving the stripes to the left or right, or varying the number of stripes. Obviously, you'll need more CC yarn if you decide to increase the number of stripes, or if you knit stripes on both the back and the front of a cushion cover.
How to Add Fabric Piping to your Half-Knit HalfFabric Cushion Cover
Overview
1. Make a fabric casing for the piping cord; 2. Attach the piping onto the cushion cover; 3. Shorten a zip if required; 4. Install a zip onto the cushion cover; and 5. Sew the sides of cushion cover together.
Materials
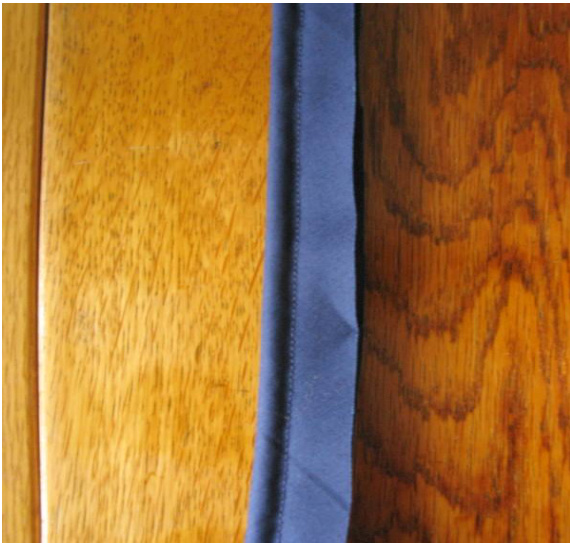
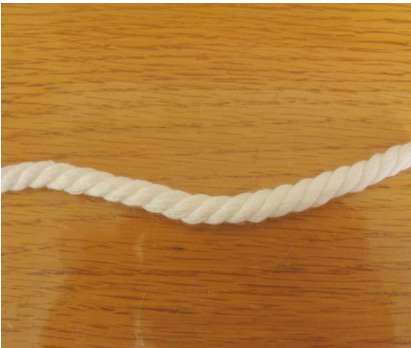
The knitted side of the cushion cover. This piece should be blocked to make seaming easic Fabric for the other side of the cushion cover. Ensure the piece of fabric is the same size as the knitted side of your cushion cover, plus an extra 3 cms [1.25 in] in width and an extra 3 cms in height. The extra fabric provides a 1.5 cm [5/8 in] seam allowance all around the fabric side of the cushion cover. Piping cord with a diameter of 0.6 cm [0.25 in] (refer to photo). You'll need enough piping cord to go around the perimeter of the knitted side of the cushion cover, plus an allowance of at least 10 cms [4 ins]. I recommend you buy a little more just in case! Fabric to cover the piping cord. The amount of fabric you need depends on the size of the cushion cover, and the number of joins you are prepared to accept. One metre [1 yd] would be ample for most cushion covers. · One zip that is longer than, or the same length as, the width of your cushion cover. · Thread for sewing.
Tools
· Sewing machine with a regular foot and a zip foot. Scissors. Long ruler. Tape measure. Tailor's chalk for marking lines. Pins. Seam ripper tool. Iron. Protractor or other tool for measuring angles (optional - only required if you're fussy about cutting your fabric strips at a 45 degree angle!)
Page 6 Instructions
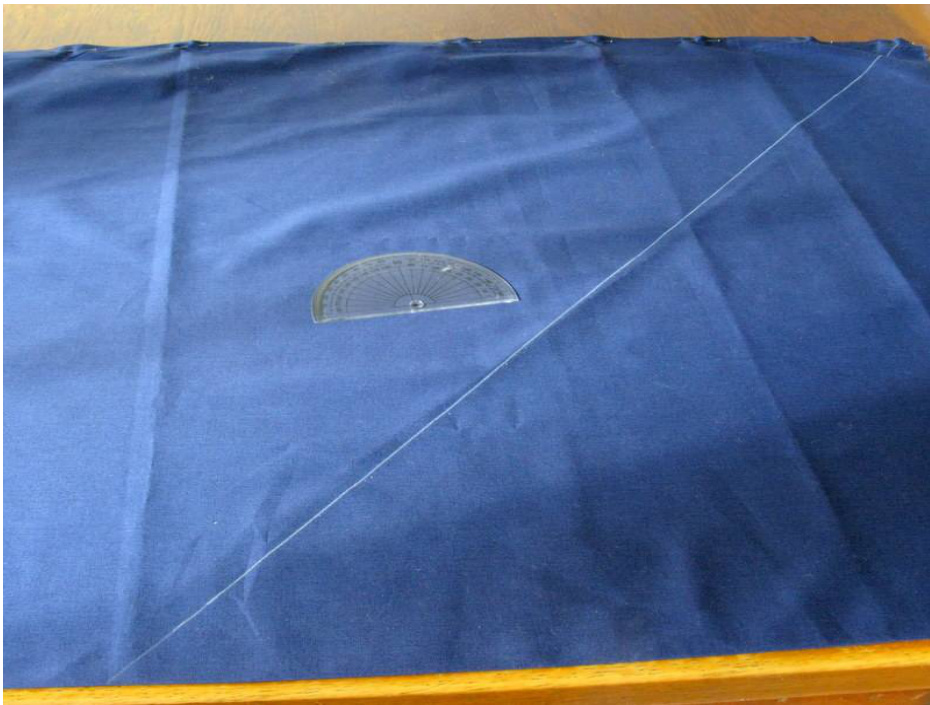
Step 1: Make the fabric strips for the piping cord casing (a) Straighten both ends of the fabric. (b) Lay out the fabric. The strips will be cut diagonally, preferably at a 45 degree angle to produce a stretchy cover for the piping cord. Mark your first diagonal line. Note: In my photos, I've folded the fabric in half. This approach allows me to mark and cut two strips at once, but it only works if the fabric is the same on both sides. If there is a right side and a wrong side on your fabric, you'll need to lay out the fabric in a single layer.
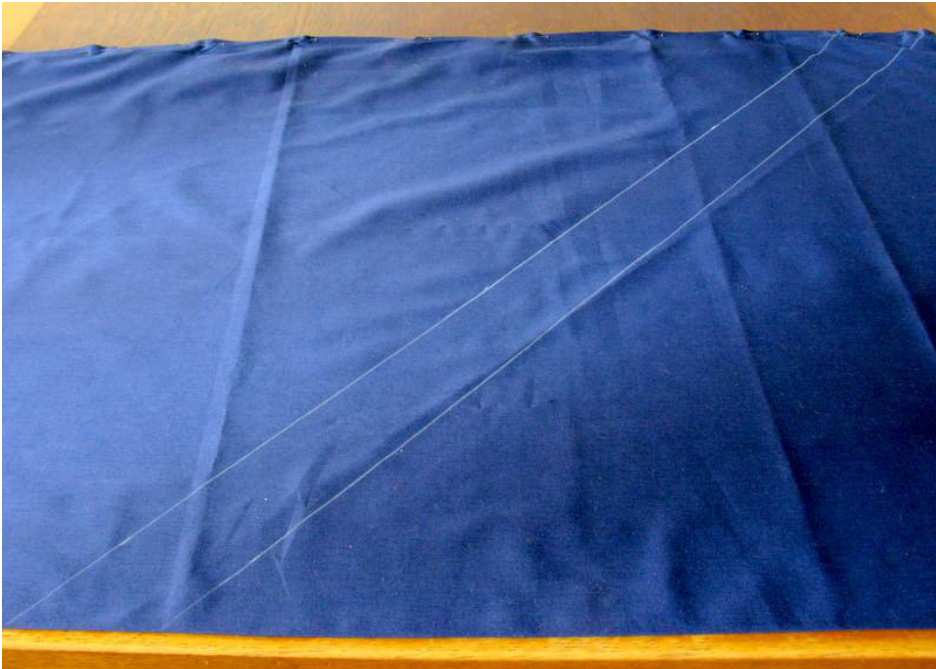
(t) Calculate the width of the strip using the following formula: Width = the circumference of the piping cord plus a 3 cm [1.25 in] seam allowance. Mark the next diagonal line one strip width away from the first diagonal line.
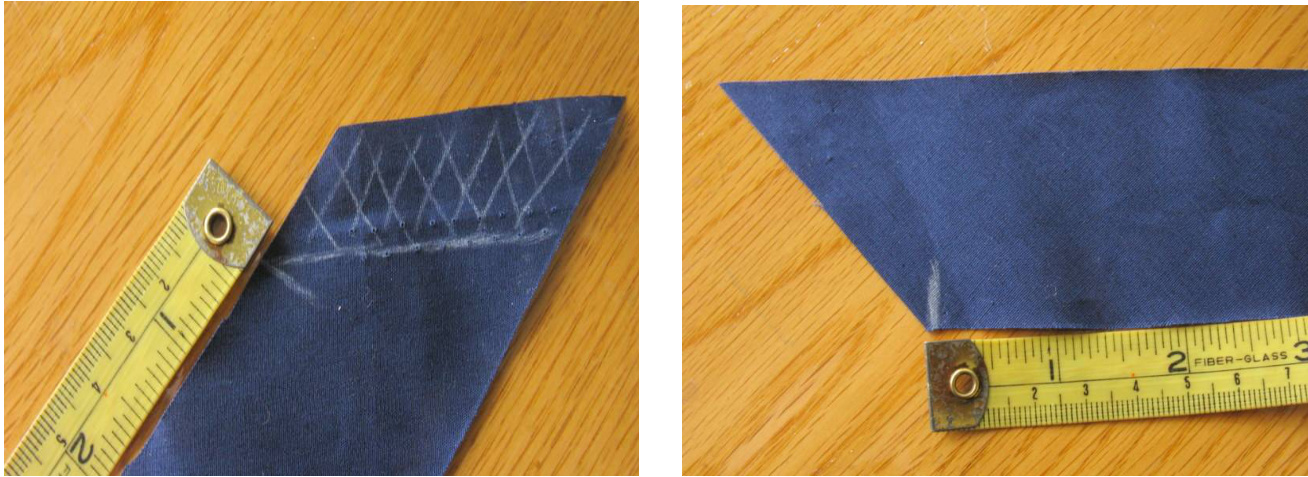
(d) Determine how many strips you'll need to cover the piping cord. i.Measure the length of the strip you've just marked but exclude the triangular ends and/or the selvedge in your calculations, Refer to the photos below where I've used tailor's chalk to indicate where you should start and stop measuring. Subtract 3 cms [1.25 in]from your measurement to allow for joins at each end. i.Calculate the total length required by using the piping cord formula in the “Materials”? section above. Divide this total by the strip length you've just calculated to determine the number of strips you'll need. iii. Mark the required number of strips on your fabric.
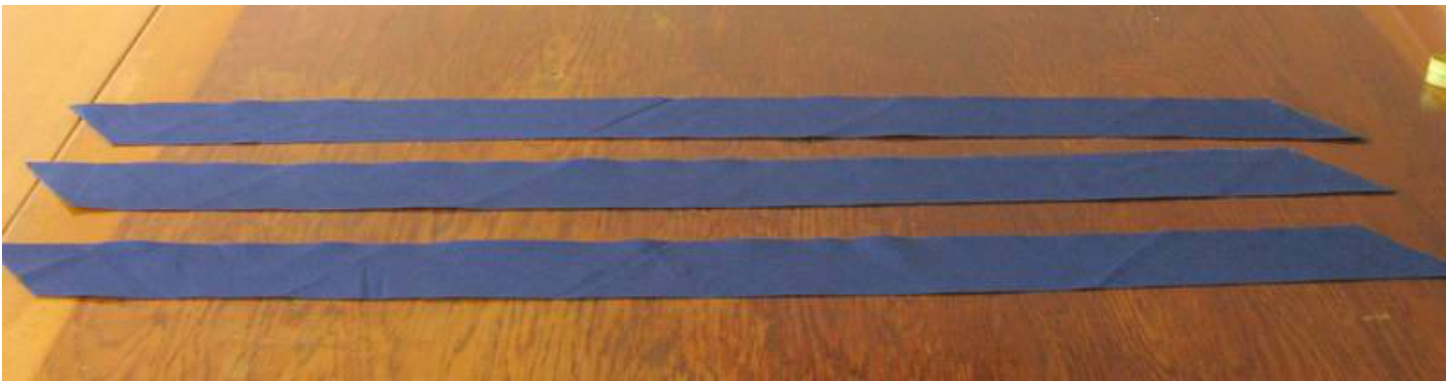
(d) Cut the fabric strips. Retain the triangular ends of the strips, but remove the selvedg If you've folded the fabric, cut the strip along the fold to create two strips. This is what the strips should look like after they've been cut.
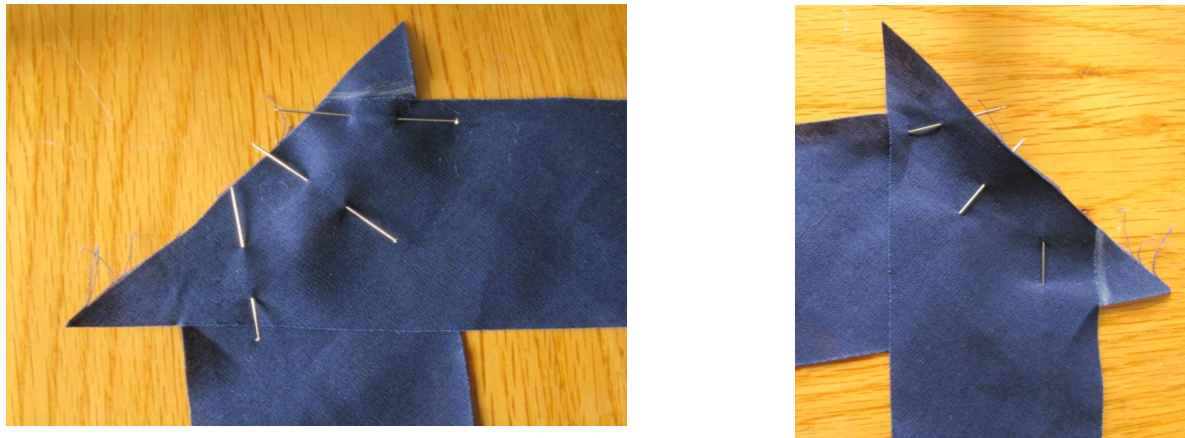
(a)Pin two strips together at right angles with the right sides of the fabric facing each other. Ensure that there is a 1.5 cm [5/8 in] allowance where the edge of the strip and the triangular tip meet. Flip the strip over and check that there is a 1.5 cm [5/8 in] allowance on the other side as well. The 1.5 cm [5/8 in] allowances are marked by tailor's chalk in the photos below. Page 8
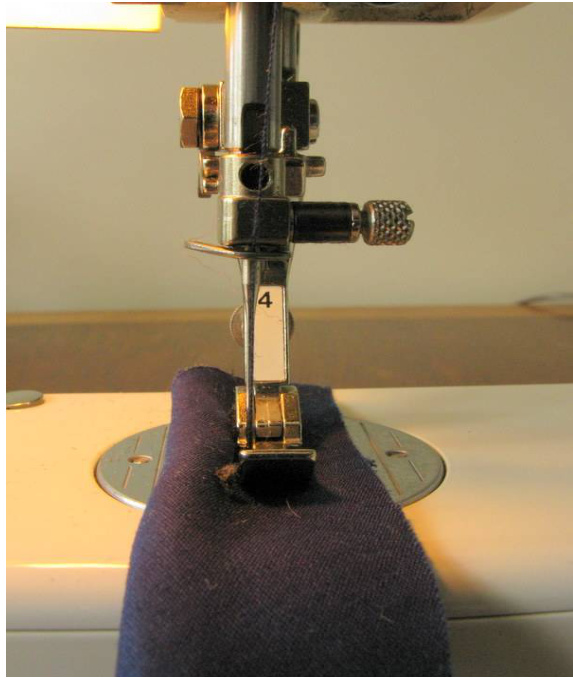
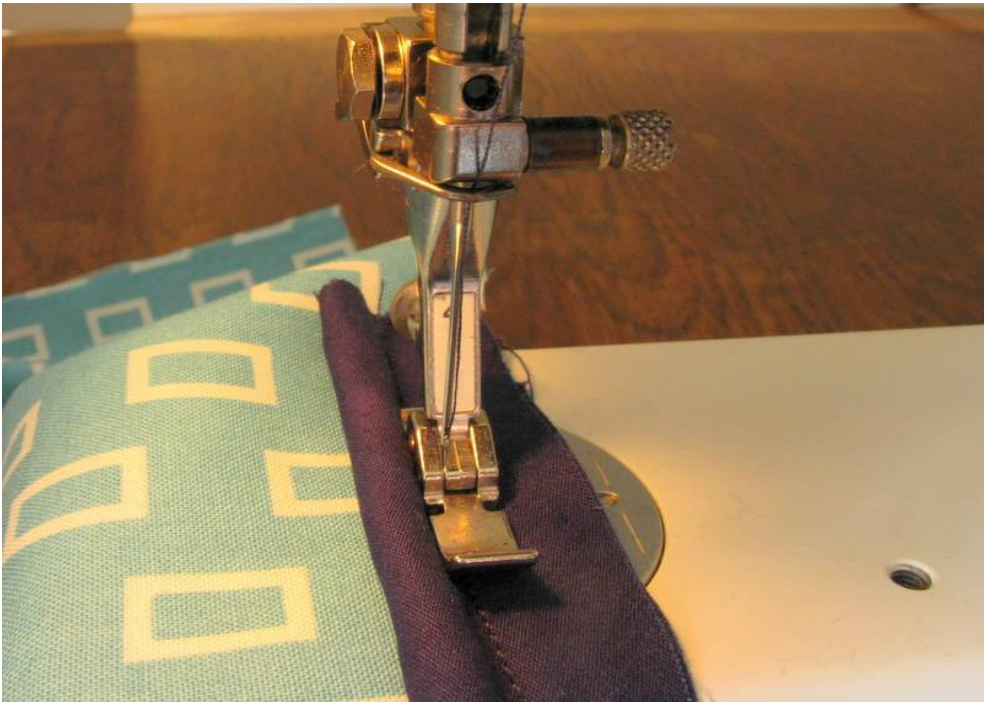
(b) Sew a 1.5 cm [5/8 in] seam across the diagonal. Sew the other strips together in the same way. You should now have one long fabric strip. Iron the seams flat, and cut off the triangular tips highlighted in the photos. (a) Fit the zip foot onto your sewing machine. Ensure the needle is positioned to the left side of the zip foot. Cut your piping cord to length ensuring there is an allowance of at least 10cms [4 ins] (refer to Materials section for more information). Place your piping cord on the wrong side of your fabric strip, and fold the fabric strip in half thereby encasing the piping cord. The right side of the fabric should be facing upwards. Start sewing.
(b) Continue to fold the strip and encase the piping cord until you've sewn the whole length of the piping cord. The seam doesn't have to be right up against the piping cord. In fact the final finish will be neater if the seam is a little to the right of the piping cord because the seam won't be as obvious once it's fastened to the cushion cover. Cut off the excess fabric beyond the end of the piping cord.
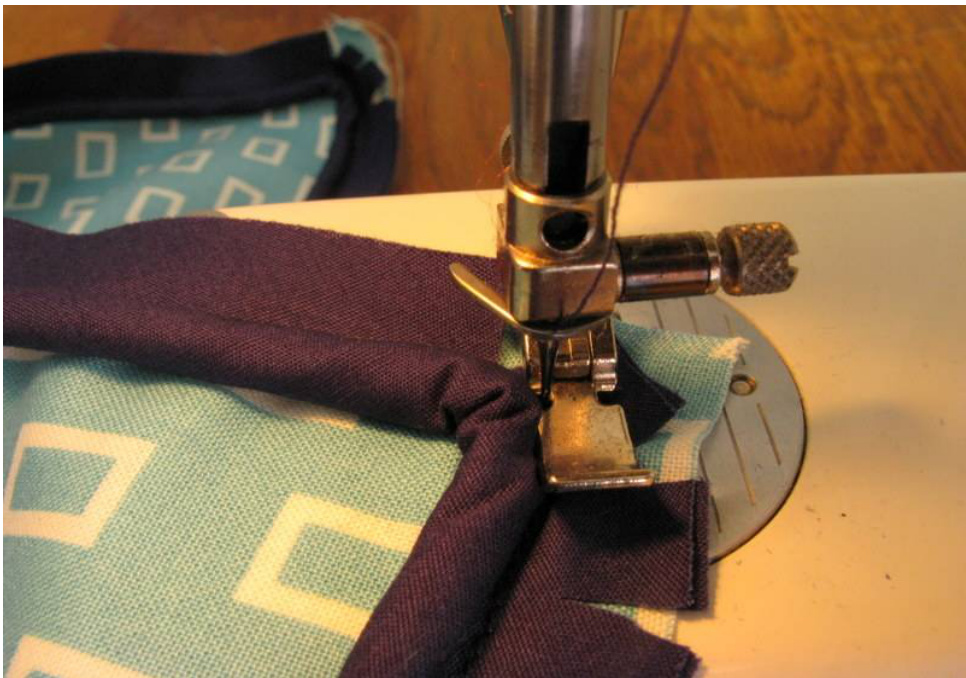
Step 4: Sew the piping onto the fabric side of the cushion cover (side 1) (a) Decide which edge of side 1 will be the bottom of your cushion cover. The bottom edge will be where the piping beginning and end will be less obvious. (b) Place the piping on the bottom of side 1 with the fabric right side up and the piping cord facing away from the raw edge. The piping should be placed away from any corners to make it easier to join the piping. Start sewing the piping, leaving about 5cm [2 ins] of the piping free to join with the other end. Sew as close to the piping cord as you can.
Page 10
() When you approach a corner, cut a few snips in the piping seam allowance so that the piping can bend around the corner.
(d) When you have nearly sewn all around the cushion cover, the piping will overlap the 5cm [2 ins] allowance that you left at the beginning. Stop sewing at this point.
(e) Open up the stitching on the piping to expose the piping cord. Lay the exposed piping cord alongside the start of the piping cord. Cut the exposed piping cord so that both ends of the piping cord meet.
(f) Fold the fabric with the removed stitches so that it neatly covers the two ends of the piping cord and overlaps the start of the piping cord. You may need to trim the fabric to the right length. Sew the remainder of the piping to the cushion cover.
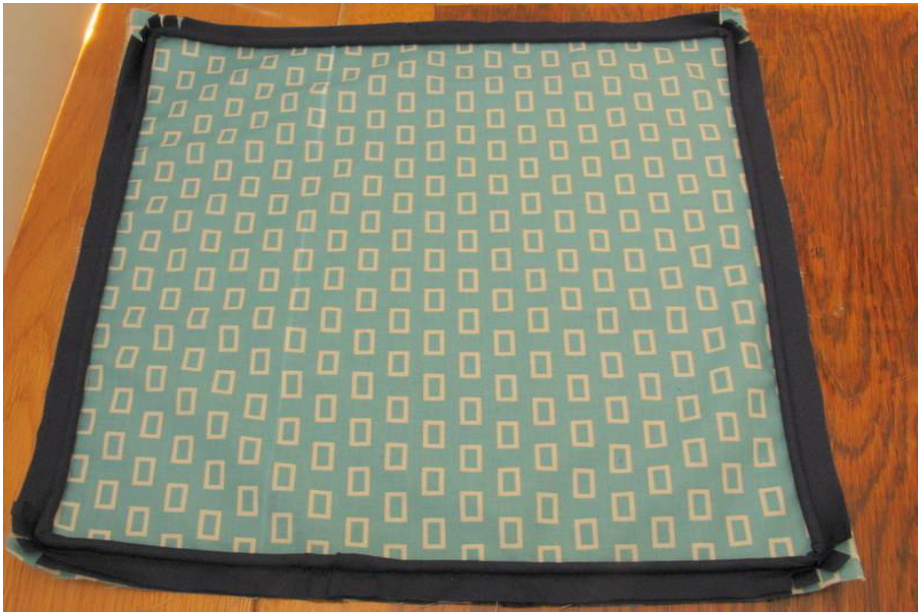
This is what side 1 should look like.
Step 5: Shorten the zip (if required) (a) Fit your regular sewing foot to your sewing machine, with the needle centred. Change your stitch to the zig-zag stitch. Adjust the stitch length so that it is zero or close to zero, and set the stitch width so it is wide enough to straddle the zip's teeth. (b) Close the zip. (c) Measure your cushion cover to determine the desired length of the zip. Exclude the seam allowance at each end in your measurement. Measure the zip from the top stop towards the bottom stop and mark the length required on the zip. (d) Hand-wind the sewing machine needle onto one side of the zip's teeth where you've marked the zip. Sew side-to-side on the spot at least 10 times to create a new bottom stop. Cut off the end of the zip about 1.5 cms [5/8 in] beyond the new bottom stop. There's an example of a shortened zip in step 6 below.
Page 12
Step 6: Sew the zip onto the cushion cover
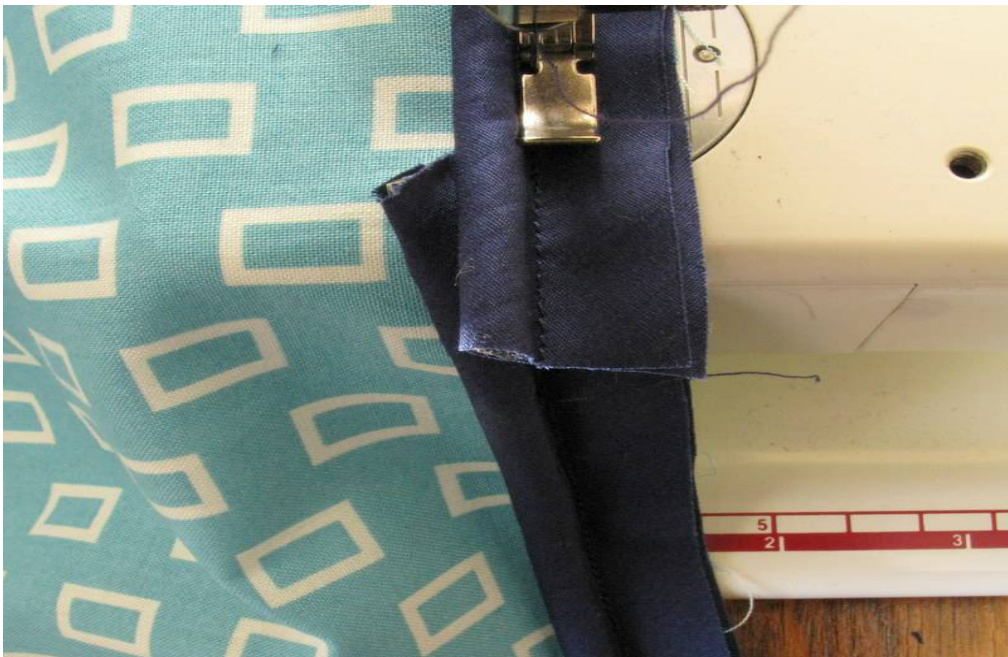
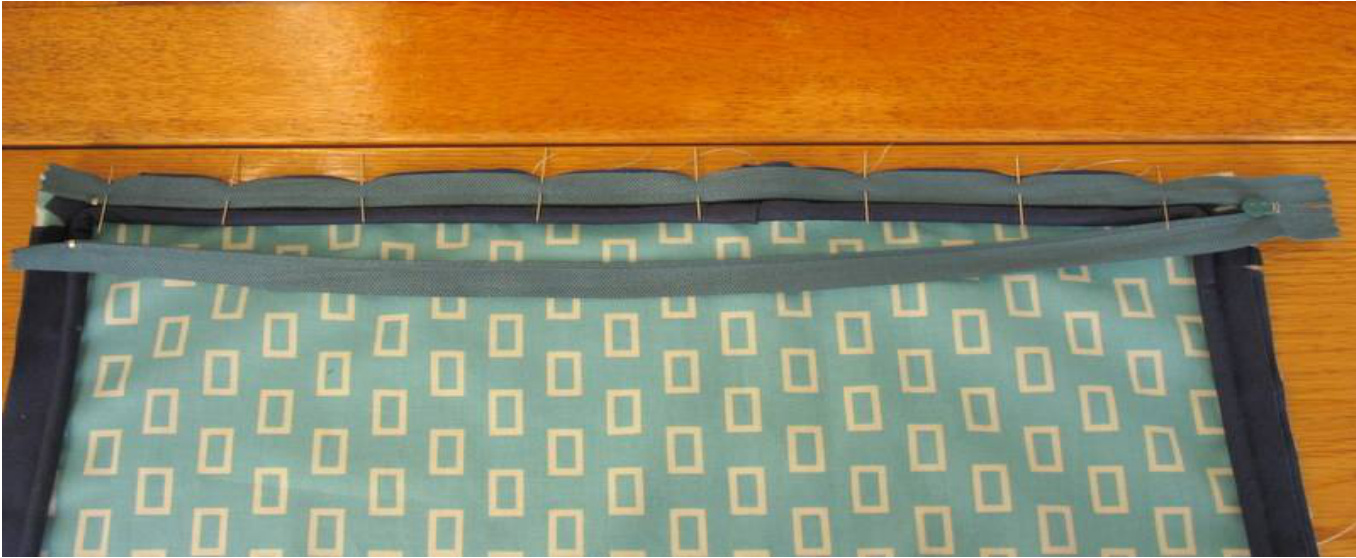
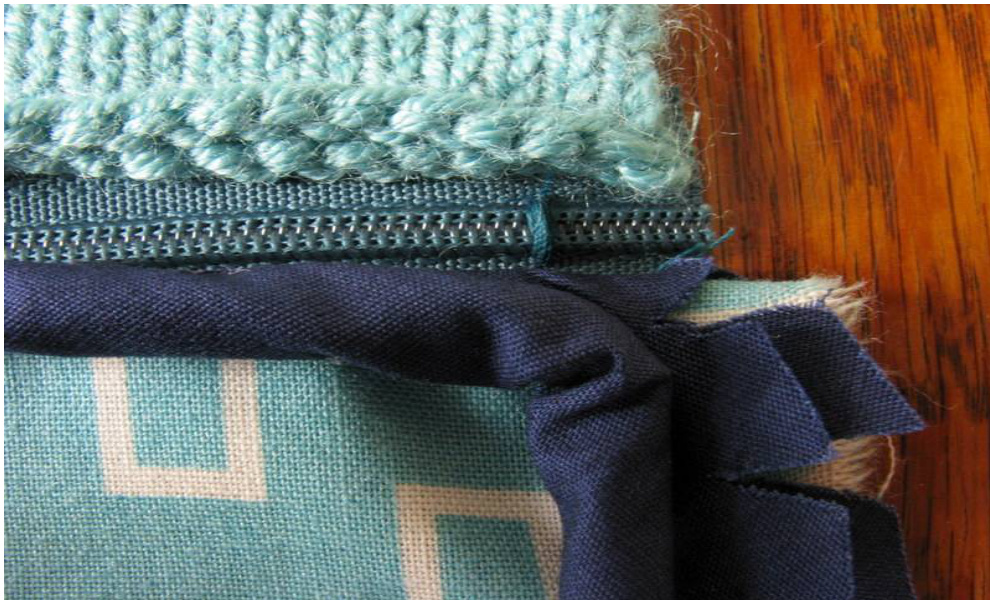
(a) Open up the zip. Place the zip facing downwards along the bottom of side 1. The teeth of the zip should be up against the piping. Pin the zip in place. (b) Check that you've fitted the zip foot on your sewing machine and that you've positioned the needle on the left side of the foot. Sew alongside the piping. Close the zip and turn it over. (c) Now it's time to sew the zip onto the knitted side of your cushion cover (side 2). Pin the cast on edge of side 2 along the other side of the zip. Ensure that the cast on edge of the knitting partially covers the zip's teeth. Both the zip and side 2 should be facing upwards. (d)Sew close to the zip's teth. The sewing stitches should be on the stocking stitch part of side 2, not the cast on edge.
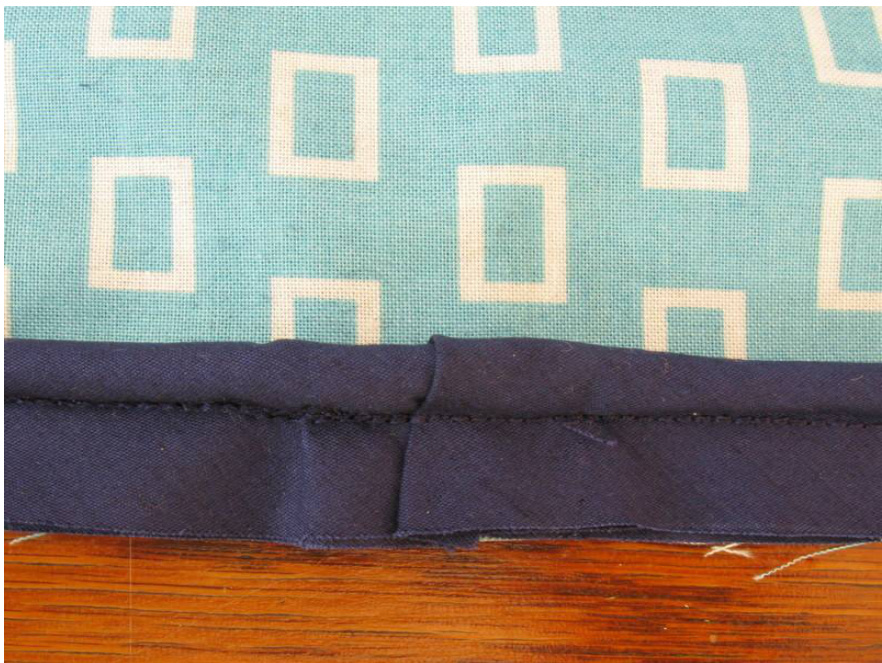
The zip and the bottom edges of the cushion cover should now look something like this.
And the two cushion cover pieces should look like this:
Step 7: Sew both sides of the cushion cover together (a) Fold side 2 over side 1 with their right sides together. Pull the each edge of side 2 over the piping cord far enough to allow the edge to be sewn by the sewing machine. Do not stretch side 2 all the way to the raw edges. Pin in place. (b) Partially open the zip so you can turn the cushion cover right side out after all the seams have been sewn :-). Sew the remaining three edges of the cushion cover together using the zip foot on your sewing machine. Keep your stitches as close to the piping as possible. (c)Zig-zag or overlock the fabric edges to prevent fraying if necessary. (d) Turn your cushion cover right side out.

Page 16
How to Add Knitted Piping to your Knitted Cushion Cover
Overview
These instructions will show you how to: 1. Knit an “I-cord" casing around the piping cord (an I-cord is a knitted tube); 2. Attach the piping to the cushion cover as part of the seaming process; and 3.Join the two ends of the piping together to create a tube with no visible join and no visible beginning orend.
Materials
Two knitted cushion cover sides that are joined along one edge with a zip fastening. Both sides should have been blocked to make seaming easier. Smooth waste yarn in a contrasting colour. The yarn should be the same weight as the yarn used in your cushion cover. Piping cord with a diameter of 0.6 cm [0.25 in] (refer to photo). You'll need enough piping cord to go around the perimeter of one side of the cushion cover, plus an allowance of at least 10 cms [4 ins]. I recommend you buy a little more just in case! It's a good idea not to cut your piping cord to the calculated length until you reach step 4 of these instructions. One 50g ball of 8 ply/DK yarn for knitting the I-cord casing. Wool yarn is recommended.
Tools
Two 4 mm [US size 6] double pointed needles or the needle size required to achieve the finish you want for the casing. Crochet hook that is the same size as the double pointed needles. · Darning/tapestry needle with a blunt tip. Scissors. Tape measure.
Instructions
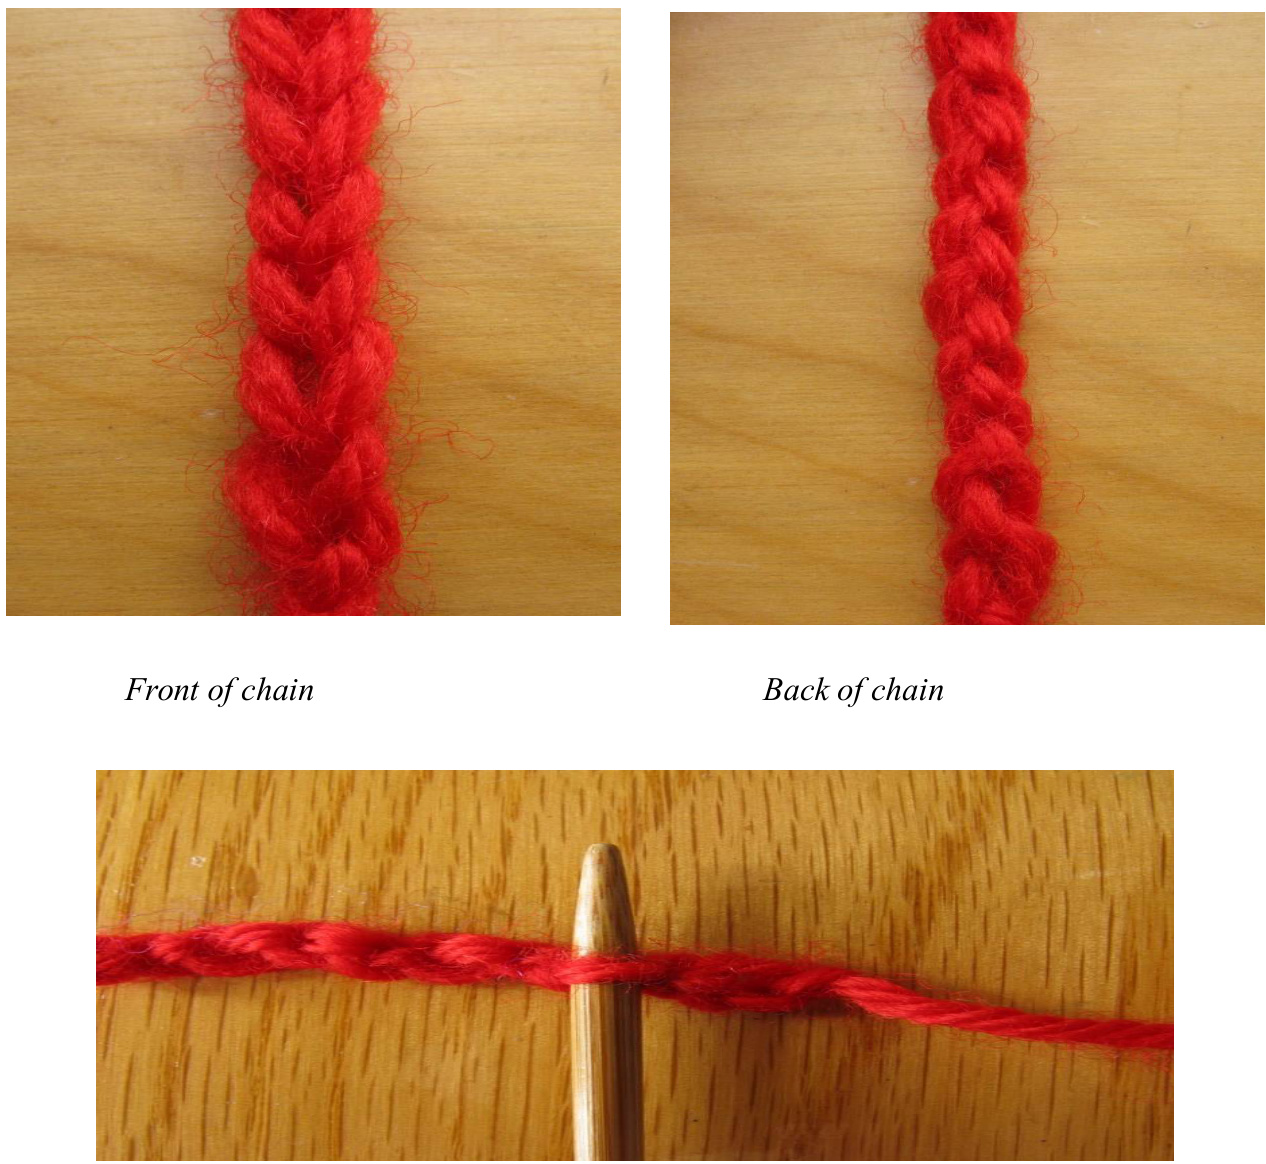
First of all, you'll need to decide how many stitches you need to cover the piping cord. Cast on several stitches using your usual cast on technique and follow the instructions in step 2. You may need to knit several test I-cords to determine the optimal number of stitches. To give you an idea, I found that 5 stitches covered a 6mm [0.25 in] piping cord nicely using double knit yarn and 3.75 mm [US size 5] needles (I'm a loose knitter!) Step 1: Cast on stitches using the provisional cast on technique (b) Crochet a chain. The number of links should equal the number of stitches you need for the I-cord, plus a few extra links at both ends. Cut the yarn and pull the yarn end through the last link to tie it off. If you look at the front of the chain, you'll see that the chain looks like a series of"v's". If you turn the chain over, you'll see a series of bumps along the back of the chain.
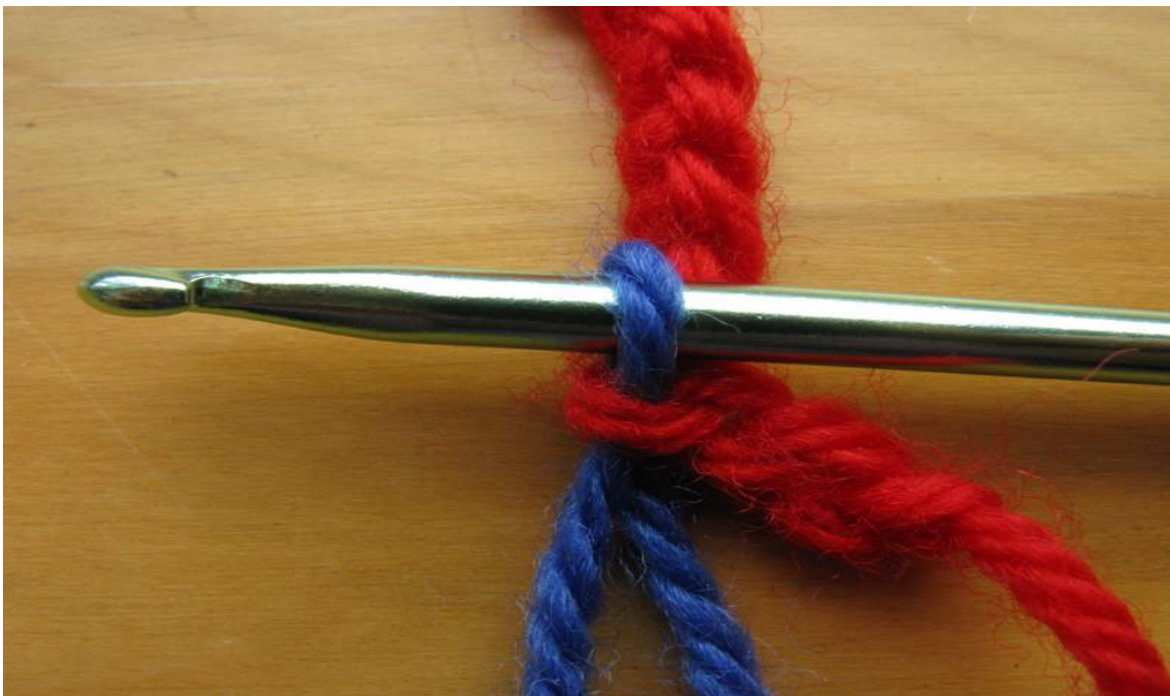
A bump in the back of the chain (c) Insert the crochet hook through one of the bumps 2-3 stitches from the start. Hook the yarn you're going to use for the casing through the bump to create a stitch.
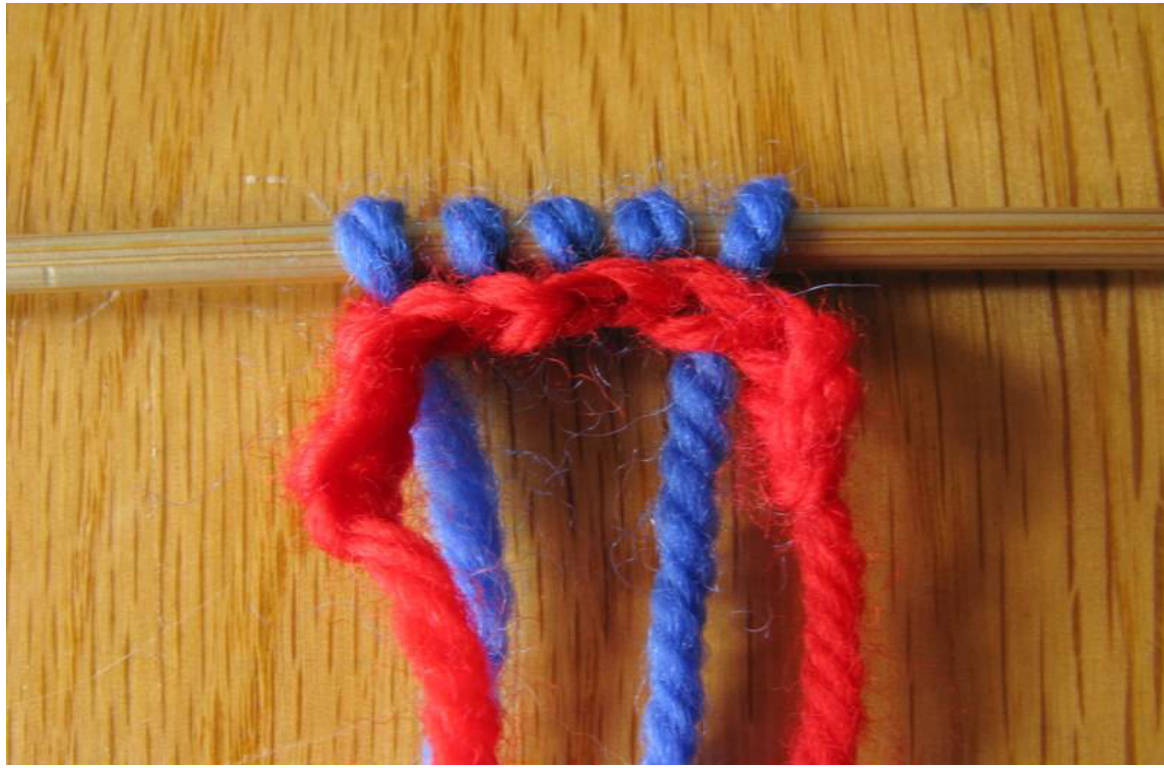
Page 18 (d) Repeat with the next bumps. Once you have the required number of stitches on your crochet hook, transfer the stitches onto one of your double pointed needles.
Step 2: Knit an I-cord
In these instructions, I'll refer to an “I-cord"’ as the knitted tube or casing which encases the piping cord. The word “piping will refer to the combination of the piping cord and the I-cord. (a) Do not knit the cast on stitches. Instead, slide the stitches to the other end of the double pointed needle, and turn the needle around so the other side of the stitches are facing you. The yarn attached to the ball of wool (the working yarn) should be to your left. (b) Hold the piping cord at the back of your stitches, leaving at least 5 cms [2 ins] of piping cord above the needle.
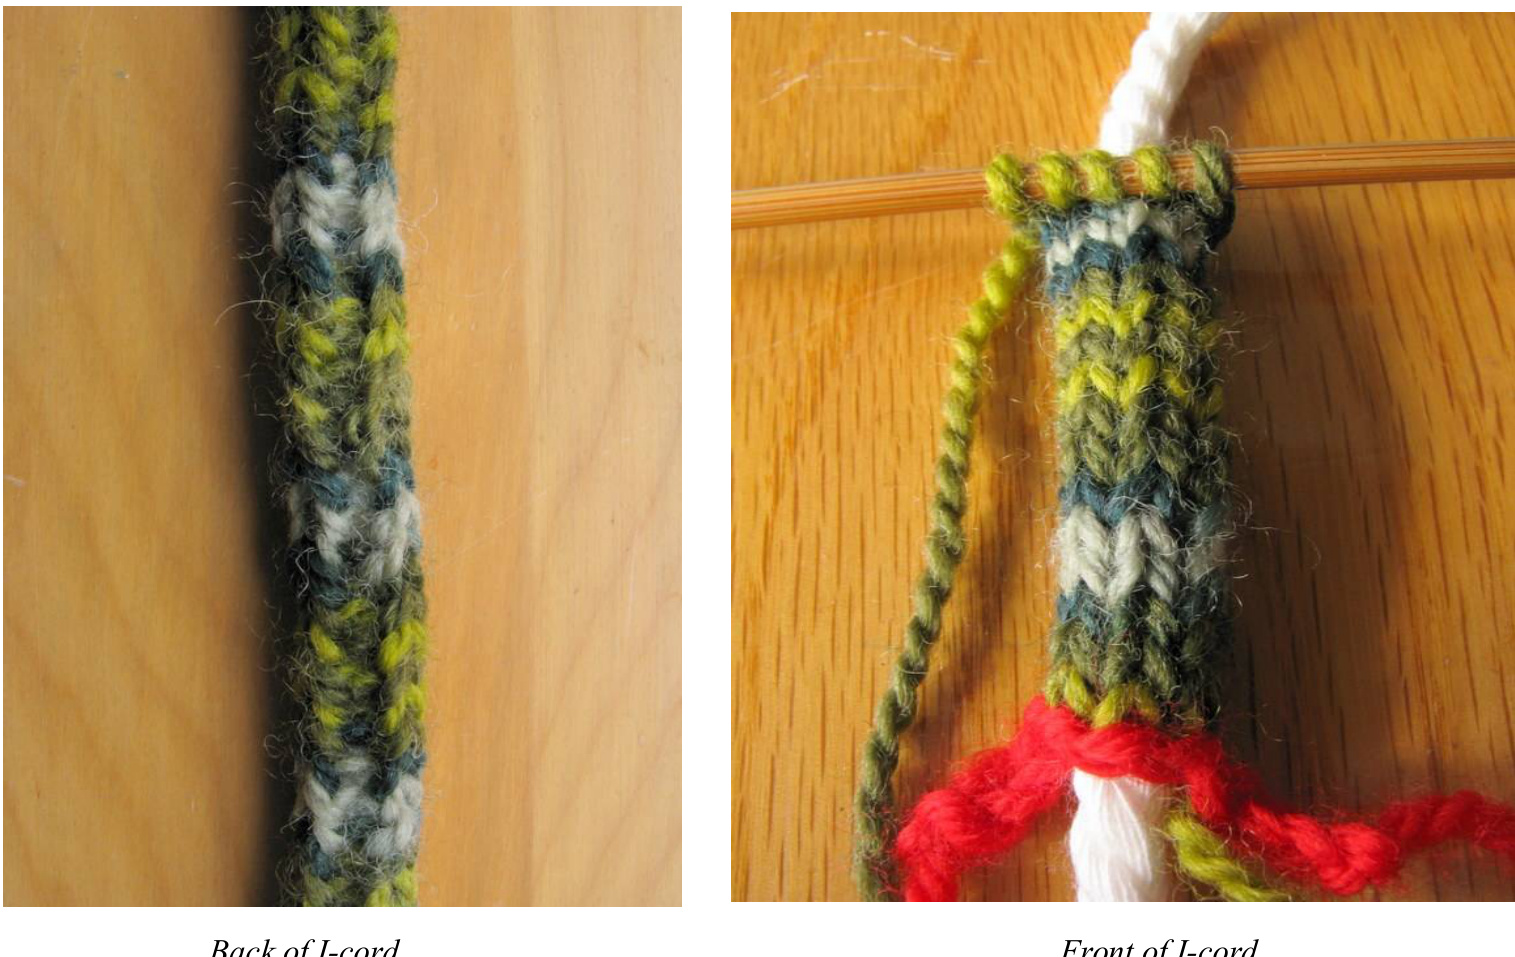
() Bring the working yarn around behind the piping cord and knit one row. You'll see in the photo below that the yarn is wrapped around the back of the piping cord.

Slide the stitches to the other end of the needle - but this time, do not turn the needle around. (d) Repeat step (c) repeatedly to create your I-cord. Ensure that you bring the working yarn behind the piping cord each time. Pull the yarn behind the piping cord firmly to close the gap. At first, the back of the I-cord will look a bit messy, but it should become tidier as you knit more rows. Don't worry too much if it's a little messy in places, because the back of the I-cord will be sewn into the seam.
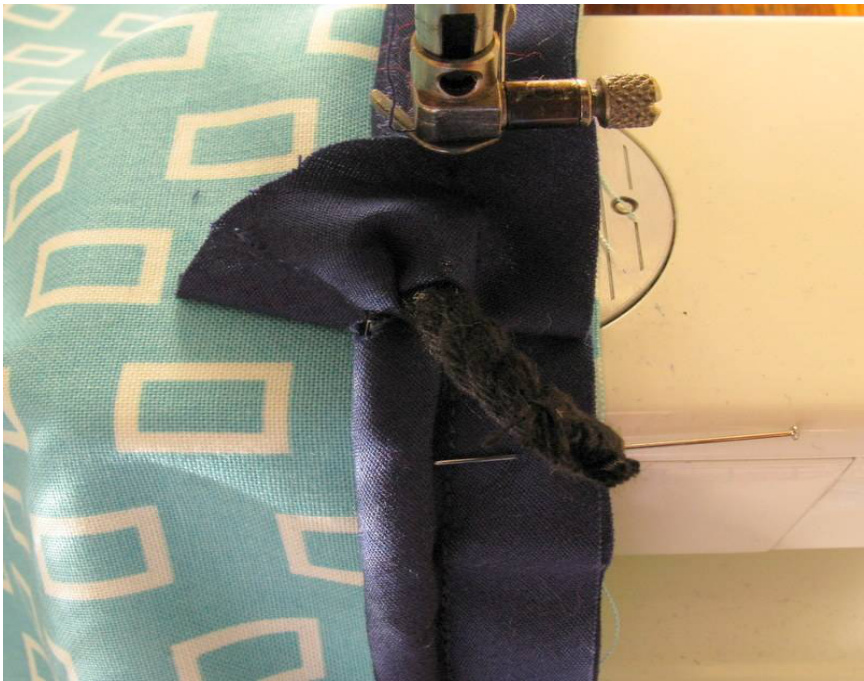
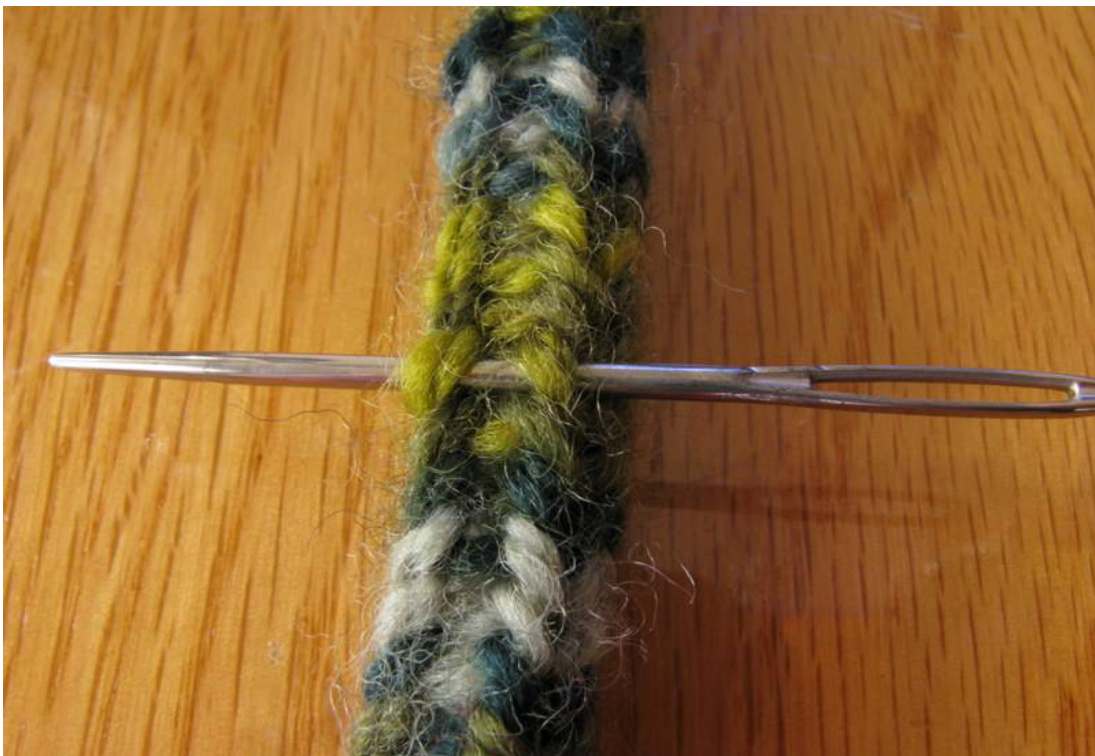
As you work upwards, your I-cord will start covering the piping cord. Periodically pull the piping cord upwards about 5 cms [2 ins] and pull the knitting downwards. Be careful not to twist the knitting as you pull the knitting down. (e) Continue to knit your I-cord until it's about 5 cms too short to go round the edges of the cushion cover. Thread some waste yarn through the live stitches, remove the double pointed needle, and tie the waste yarn into a circle. Ensure there is some piping cord protruding from both ends of the Icord. Step 3: Attach your piping to cushion cover (a) Place the provisional cast on end of the piping on the bottom of the cushion cover. The end of the piping should be placed away from any corners so that it's easier to join both ends of the piping. (b)Use mattress stitch (for vertical seams) and an invisible horizontal seam (for horizontal seams) to sew your cushion cover pieces together. If you haven't used these techniques before, there are websites on the internet that provide step-by-step instructions. As you seam your cushion cover pieces together, insert the darning needle into the back of the piping to ensure that the piping is firmly attached (refer to the photo below).
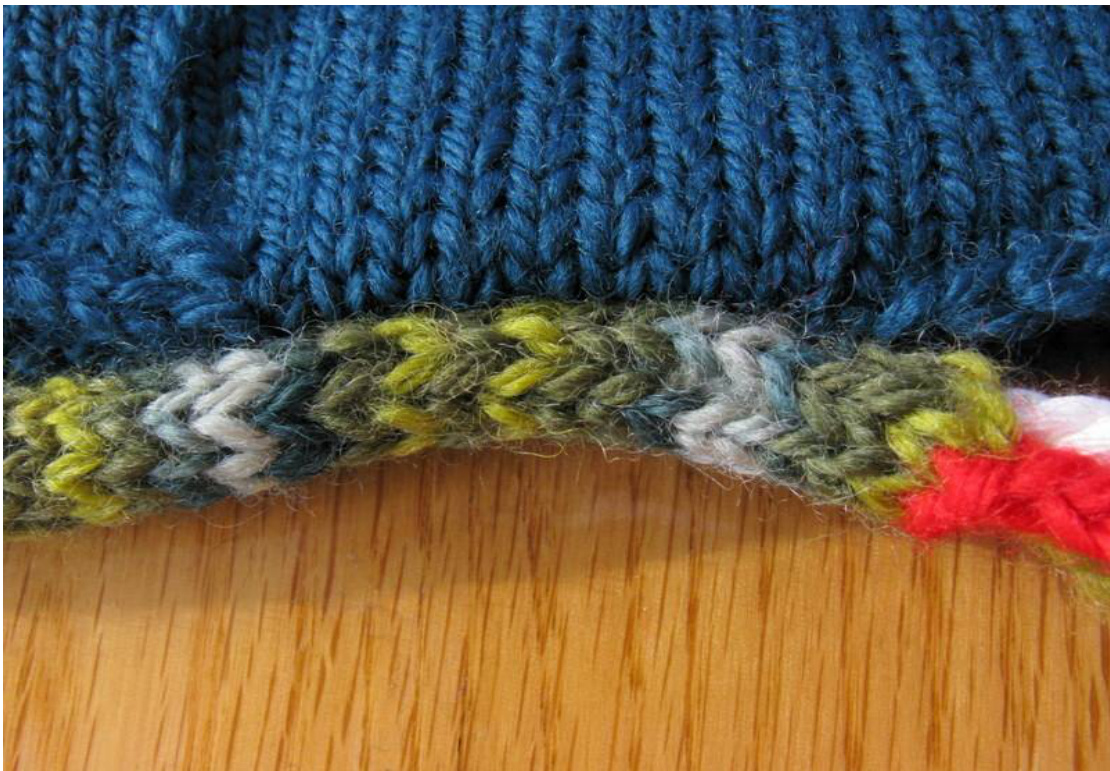
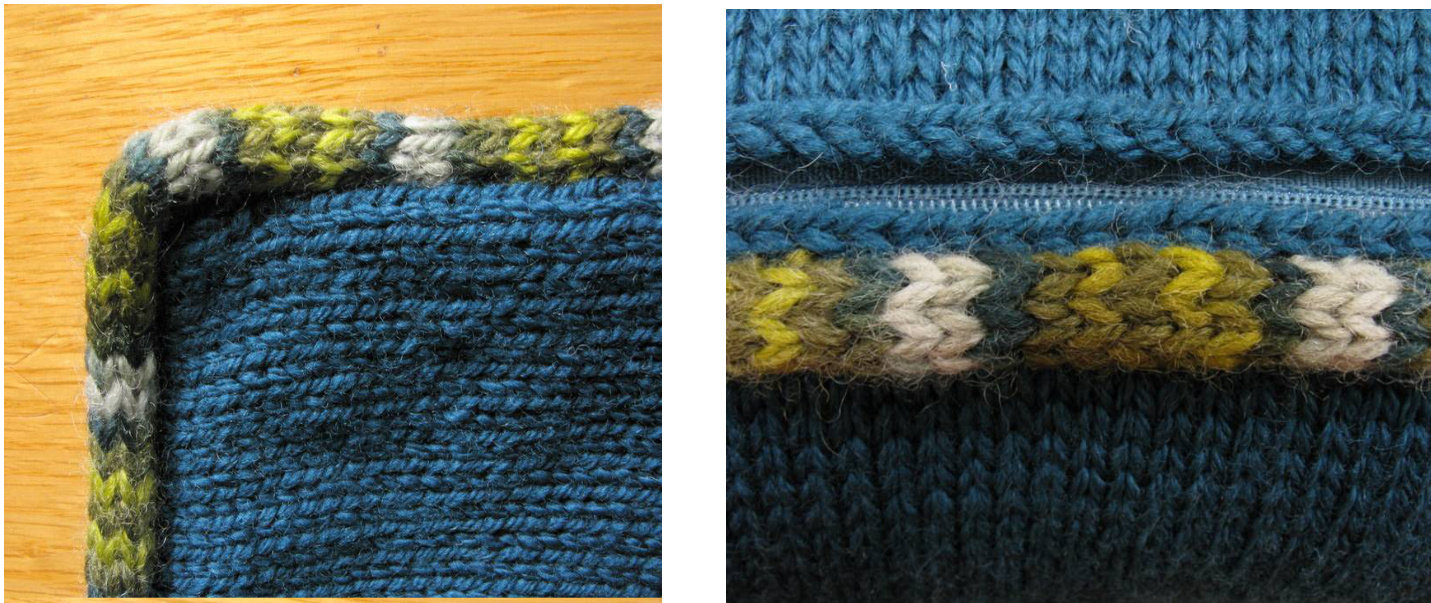
The piping should look like this once it's attached to the cushion cover.
(c) Bend the piping around the cushion cover corners as you seam and attach the piping. If your cushion cover has a zip, sew the piping along the front of the cushion cover alongside the zip.
Page 22 (d) Continue seaming and attaching the piping until you are about 5cms [2 ins] away from the start of the piping.
Step 4: Join the ends of the piping together (a) Cut each end of the piping cord so that they meet in the middle.
(b) Knit your I-cord until you reach the end of the piping cord, then start knitting the I-cord around the other end of the piping cord. You can cheat and tape the two ends together if you find this step too fidly. Stop knitting your I-cord when it reaches the provisional cast on. (Note: I turned the cushion cover over in this photograph in case you're wondering why the provisional cast on is now on the left. Sorry!).

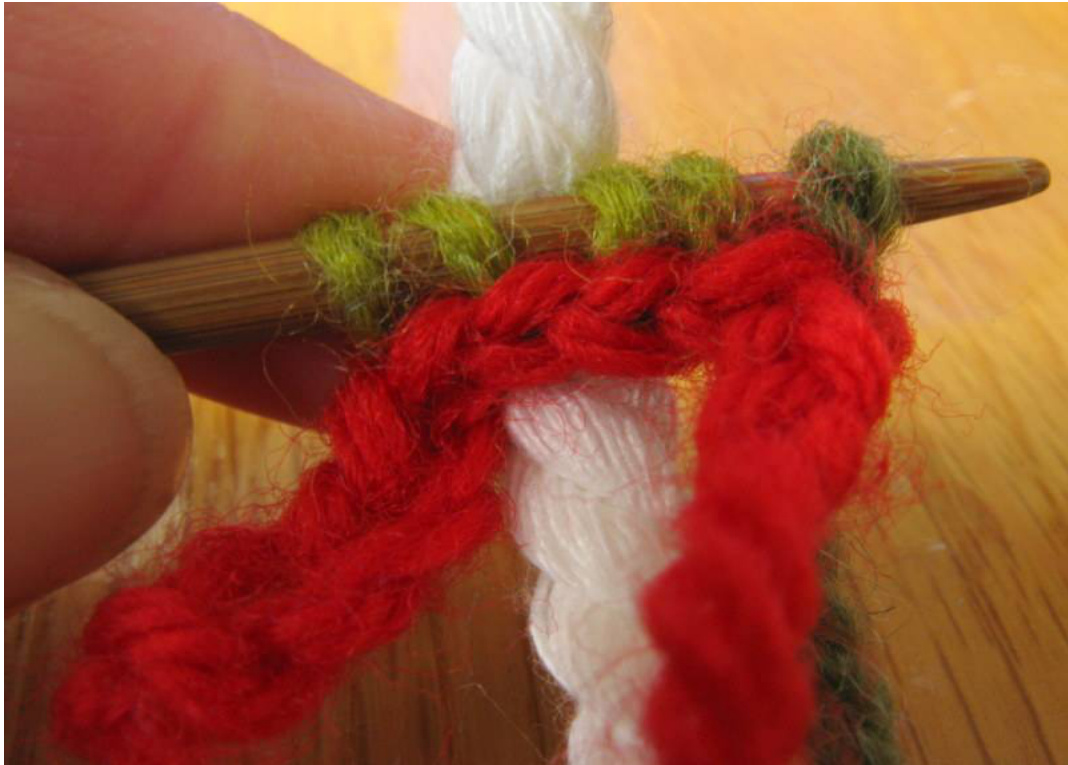
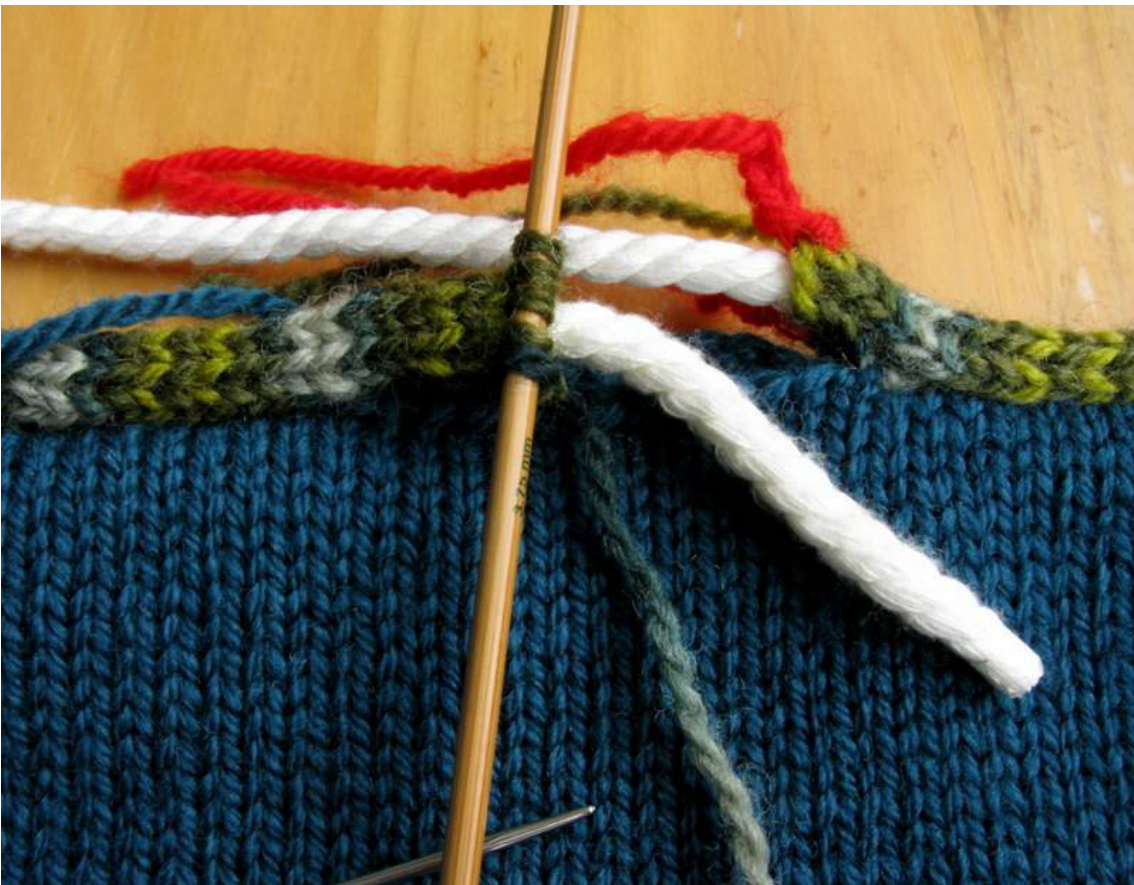
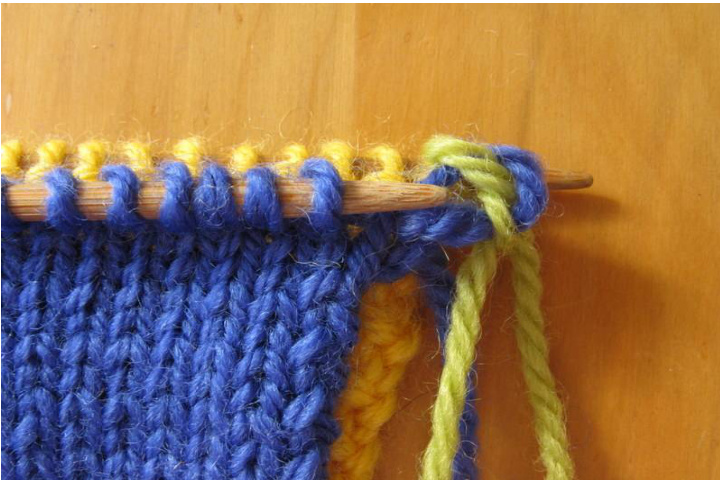
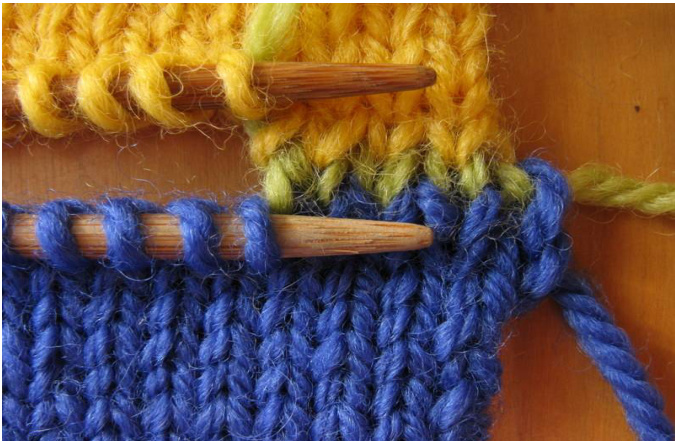
(a) Carefully remove the waste yarn used in the provisional cast on and transfer the stitches onto a double pointed needle. You should how have two sets of live stitches. (b) In the photos below, I've used three different coloured yarns and two flat pieces of knitting to make it easier for you to learn Kitchener stitch. You'll use the same technique to create a seamless I-cord around your piping cord. (c) Cut the working yarn leaving plenty of yarn to stitch the I-cord ends together. Thread the working yarn through the darning needle. Line up the live stitches so that they are parallel to each other with their wrong sides together. In the following instructions, I'll refer to the blue piece of knitting as the \*blue side” and the yellow piece of knitting as the “yellow side". The two pieces will be grafted together using green yarn.

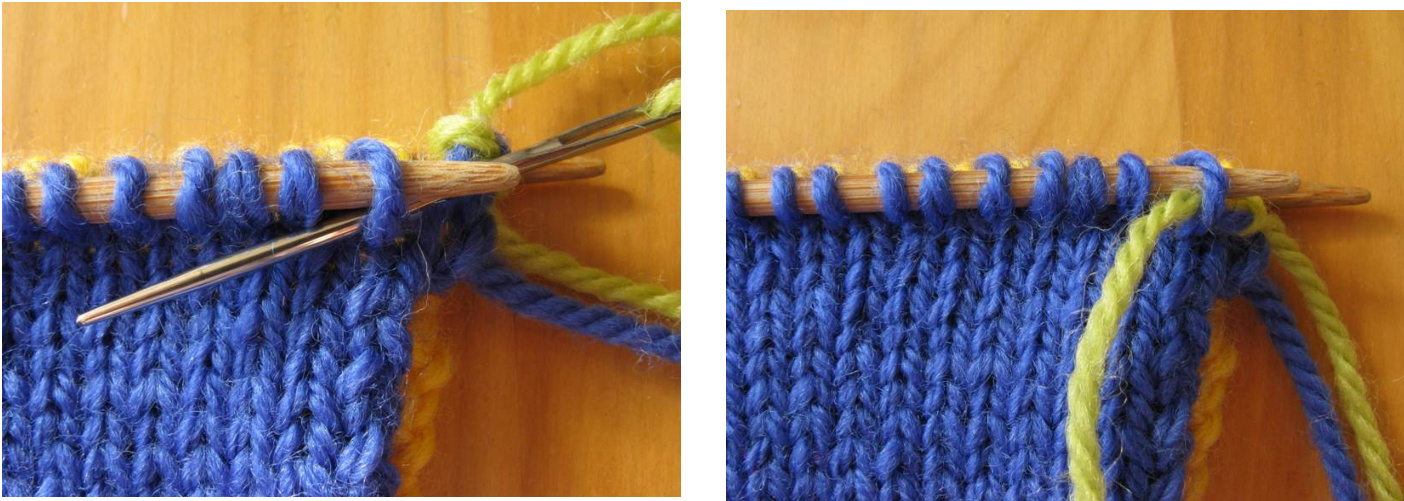
(d) Setting up: i. Insert the darning needle through the first stitch of the blue side as if you're purling the stitch. Pull the yarn through. Don't worry about pulling the yarn through neatly at this stage.
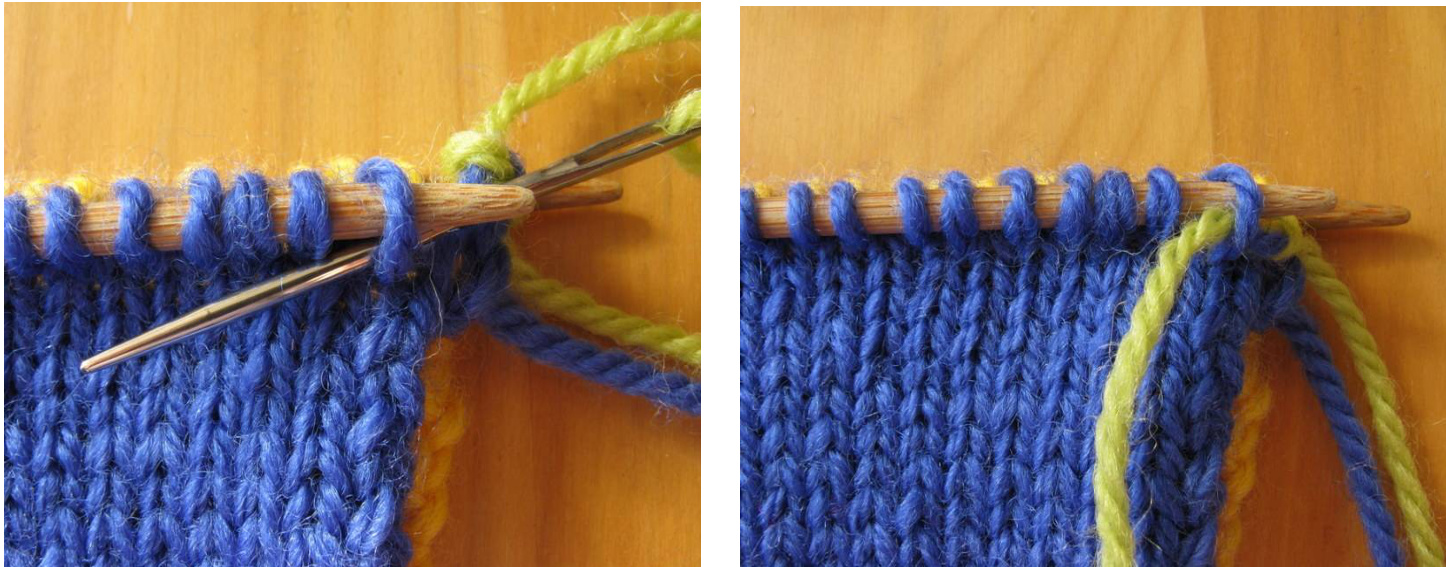
i.Insert the darning needle through the first stitch of the yellow side as if you're knitting the stitch and pull the yarn through.
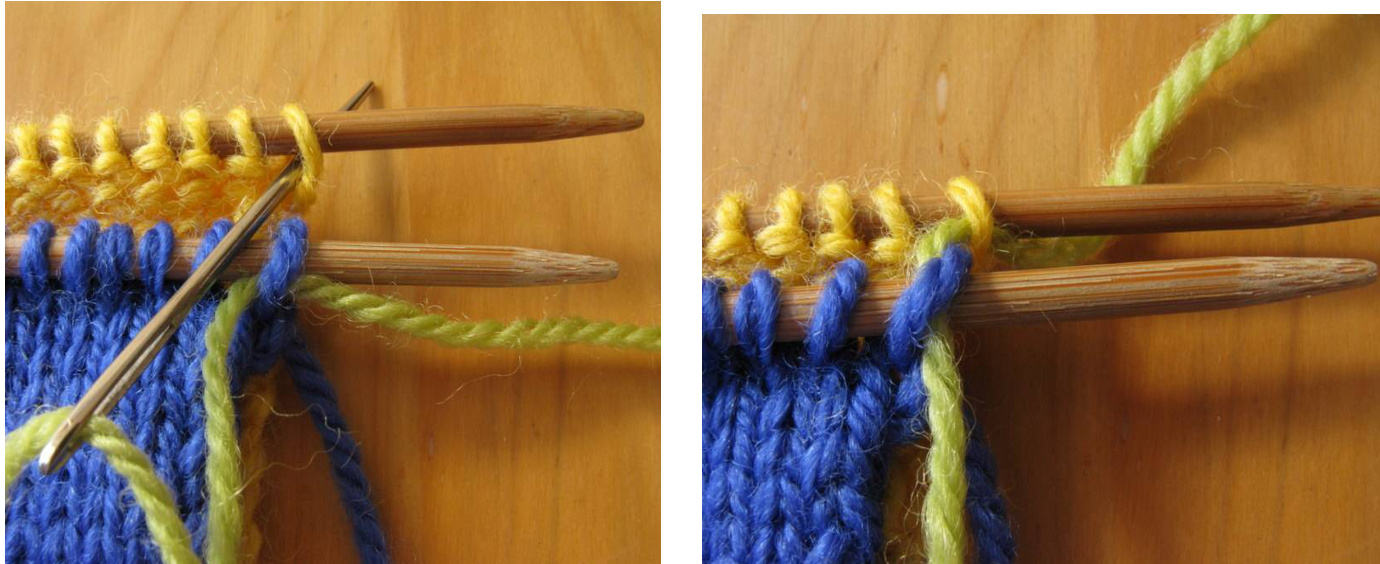
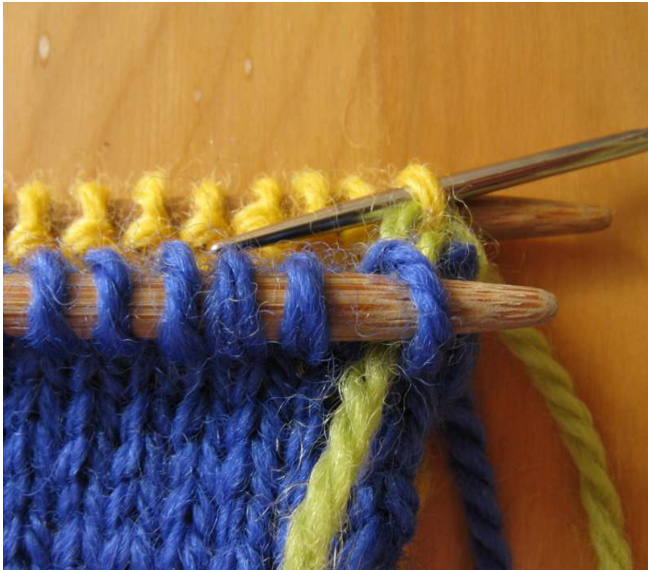
(e) Repeat steps (e)(i) through (e)(iv) below until you have only one stitch left on each of your double pointed needles: i. Insert the darning needle through the first stitch on the blue side as if you're knitting the stitch and slip the stitch off the double pointed needle. Pull the yarn through.
i. Insert the darning needle through the next stitch on the blue side as if you're purling the stitch and pull the yarn through. Leave the stitch on the double pointed needle.
Page 26
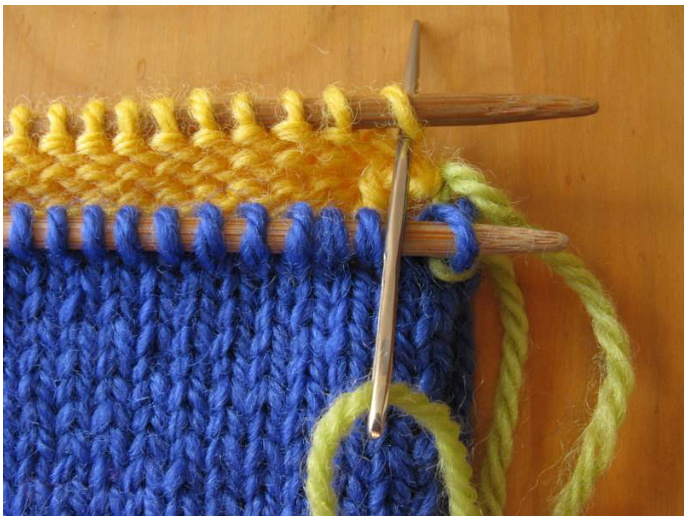
ii. Insert the darning needle through the first stitch on the yellow side as if you're purling the stitch. Slip the stitch off the double pointed needle, and pull the yarn through.
iv. Insert the darning needle through the next stitch on the yellow side as if you're knitting the stitch. Pull the yarn through and leave the stitch on the double pointed needle.
NOTE: Pull the yarn through loosely after each step. After you've grafted a few stitches - and you've completed all 4 steps so you know where you're up to - you can tighten up the grafted stitches so they match the surrounding stitches. Tighten each of the grafted stitches from right to left by tugging on each stitch in turn using your darning needle.
g off. At this point, you should have just one stitch on each of your double pointed needle:
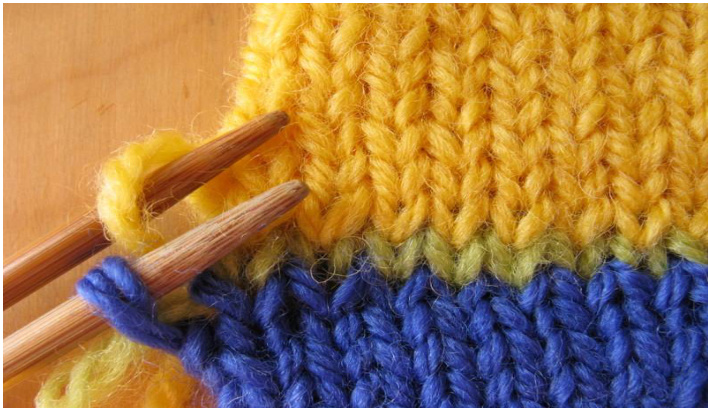
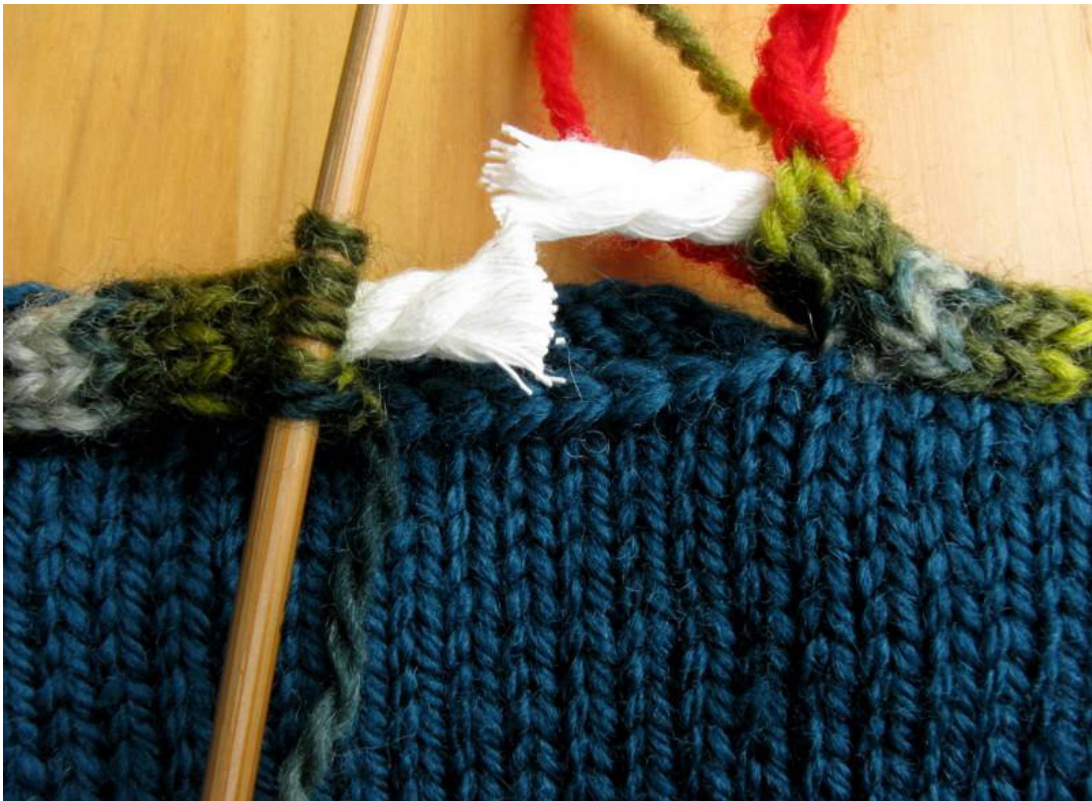
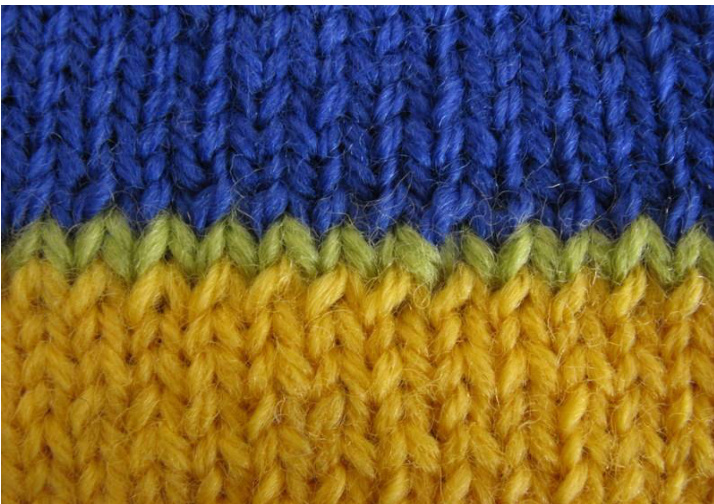
i.Now perform step (e)(i) above, followed by step (e)(i) i.Fasten off, and weave in the yarn end. This is what a grafted piece of knitting should look like.
Step 6: Complete the seaming Sew the remaining piping into the cushion cover seam. Weave in any left-over yarn ends.


