Articles ofa Domestic Goddess
Blog:http://articlesofadomesticgoddess.com Facebook:www.facebook.com/ArticlesofaDomesticGoddess Pinterest: http://www.pinterest.com/ArtofaDG/ Twitter:https://twitter.com/ArtofaDG GooglePlus:https://plus.go0gle.com/u/0/b/101204168639133824202/+ArticlesofaDomesticGoddessCrosby/posts Instagram:http://instagram.com/articlesofadomesticgoddess Youtube:https://www.youtube.com/channel/UCbYID1pXkKAcZpYI20ebkgA Craftsy Store: http://www.craftsy.com/user/2289606/pattern-store Ravelry Store: http:/www.ravelry.com/designers/articles-of-a-domestic-goddess Etsy Shop: www.etsy.com/shop/ArtofDomesticGoddess
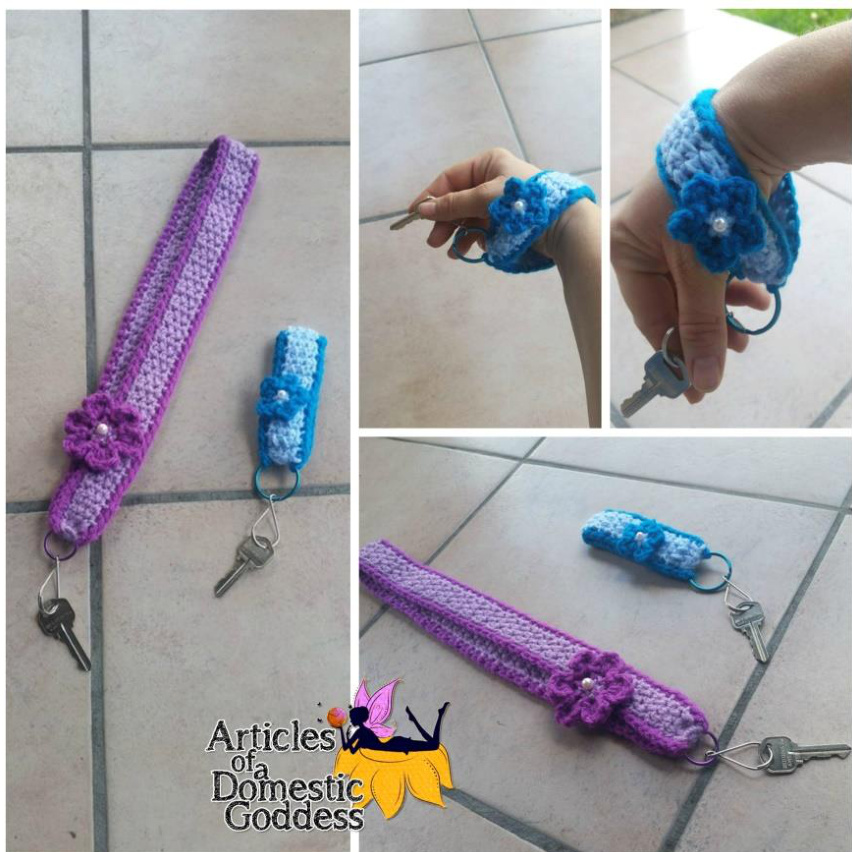
Key Lanyardy for Teacher or Nurse
Materials: H Hook Preferred Yarn: Red Heart Super Saver Tapestry needle Scissors Measuring tape (to check gauge) Key Chain Ring Key Clip Pearl for flower center if desired

Beginner
Gauge: With H hook: 2" x 2" square = 7hdc by 5 rows
Articles ofa Domestic Goddess
Blog: http://articlesofadomesticgoddess.com Facebook: www.facebook.com/ArticlesofaDomesticGoddess Pinterest:http://www.pinterest.com/ArtofaDG/ Twitter:https://twitter.com/ArtofaDG Google Plus:https:/plus.go0gle.com/u/0/b/101204168639133824202/+ArticlesofaDomesticGoddessCrosby/posts Instagram:http://instagram.com/articlesofadomesticgoddess Youtube:https://www.youtube.com/channel/UCbYID1pXkKAcZpY120ebkqA Craftsy Store: http://www.craftsy.com/user/2289606/pattern-store Ravelry Store:http://www.ravelry.com/designers/articles-of-a-domestic-goddess Etsy Shop: www.etsy.com/shop/ArtofDomesticGoddess A Note about Gauge: For those of you who do not understand how gauge works, or are looking to learn more on the subject, I have written a very helpful blog on gauge that has proved helpful when trying to figure out how big/small of a hook/yarn to use. If you still need help after you've browsed this, please let me know and I willtry to help in any way that I can. http://articlesofadomesticgoddess.com/2014/05/matching-gauge-and-why-it-is-so-important/ A Note about Technique (The Golden Loop Method): This is not just for amigurumi items; it will help in ALL areas where crochet is involved. (Although, it helps most with amigurumi because of the nature of tight stitching.) I know I often hear of people having trouble “making their stitches tight enough” or they frequently have problems matching gauge (even if their items turn out okay on sizing, it doesn't necessarily mean there isn't improvement to be made.) Itoo had many problems when learning to create amigurumi objects when Ifirst started out. I have written a helpful blog that should help to pinpoint the areas that need improvement so that you,too, can create beautiful amigurumi items. There is ALWAYS room for improvements to be made, no matter how long you have been crocheting. Later, you will notice that all items are improved by using this easy method! If you still need help after you've browsed this, please let me know and I will try to help in any way that I can. http://articlesofadomesticgoddess.com/2014/04/amigurimi-technique-that-willalways-work-and-will-change-the-way-you-crochet-forever/ Abbreviations:
(NOTETHATNOTALLABBREVIATIONSWILLBEUSEDINTHISPATTERN)
MC - Magic Circle For a tutorial on the magic circle, visit my blog at the following link: http://articlesofadomesticgoddess.com/magic-circle-tutorial/ CH - Chain ST; STS - Stitch or stitches SC - Single Crochet SC2TOG - Single Crochet 2 together HDC -Half Double Crochet HDC2TOG - Half Double Crochet 2 together DC - Double Crochet DC2TOG-Double Crochet 2 together TR - Treble Crochet SLST - Slip Stitch FO - Fasten Off X after a number = number of stitches to work in after current stitch (ex: sc 2X = sc in next two stitches) Tips: Ch 1, Ch 2, or Ch 3 turning chain at the beginning of the round does not count as first stitch. First stitch in the round will be in the same stitch as the turning chain.
Articles of a Domestic Goddess
Blog:http://articlesofadomesticgoddess.com Facebook:www.facebook.com/ArticlesofaDomesticGoddess Pinterest:http://www.pinterest.com/ArtofaDG/ Twitter:https://twitter.com/ArtofaDG Google Plus:https://plus.g00gle.com/u/0/b/101204168639133824202/+ArticlesofaDomesticGoddessCrosby/posts Instagram:http://instagram.com/articlesofadomesticgoddess Youtube:https://www.youtube.com/channel/UCbYID1pXkKAcZpYI20ebkqA Craftsy Store: http://www.craftsy.com/user/2289606/pattern-store Ravelry Store: http://www.ravelry.com/designers/articles-of-a-domestic-goddess Etsy Shop:www.etsy.com/shop/ArtofDomesticGoddess
UP THIRD LOOPS OF HDC FOR ENTIRE PAT
(This makes the lanyard more sturdy, so that it can hold more weight. You may also just do a regular hdc if you feel more comfortable doing that and it will work.) If yow are unyure how to pick up 3rd loopy in hdc, see thiy video httpy://www.youtuhe.cow/ watch?v=mEDVgAhhtpU
Neck Length:
Insert hook and yarn into circle of key chain ring. 3sc in circle, turn Row 1-100: Ch 1, hdc in each across, turn (3) FO and fold like picture and then sew to back of first row. You may also sl st to attach back across last row if you don't want to finish off. Whichever you decide to do, make sure it is attached to through the 1st row of sc. This was written for an average sized woman. (Should fit comfortably around a woman's neck who has a 22 inch head) You may want to add more rows for larger women or men. Remember, it must fit over their head and you want it not tobe tight around theneck.It is bettertobe longerthantoo short!
Wrist Length:
Insert hook and yarn into circle of key chain ring. 3sc in circle, turn Row 1-30: Ch 1, hdc in each across, turn (3) FO and fold like picture and then sew to back of first row. You may also sl st to attach back across last row if you don't want to finish off. Whichever you decide to do, make sure it is attached to through the 1st row of sc. This was written for an average sized woman. (Should fit comfortably around a woman's wrist who has a 7 inch wrist) You may want to add more rows for larger women or men. Remember, it must fit over their hand and you want it not to be tight around the wrist. It is better to be longer than too short!
Articles of a Domestic Goddess
Blog:http://articlesofadomesticgoddess.com Facebook:www.facebook.com/ArticlesofaDomesticGoddess Pinterest:http://www.pinterest.com/ArtofaDG/ Twitter:https://twitter.com/ArtofaDG GooglePlus:https://plus.g0ogle.com/u/0/b/101204168639133824202/+ArticlesofaDomesticGoddessCrosby/posts Instagram:http://instagram.com/articlesofadomesticgoddess Youtube:https://www.youtube.com/channel/UCbYID1pXkKAcZpY120ebkqA CraftsyStore:http://www.craftsy.com/user/2289606/pattern-store RavelryStore:http://www.ravelry.com/designers/articles-of-a-domestic-goddess Etsy Shop: www.etsy.com/shop/ArtofDomesticGoddess
Contrasting edging:
Sl st in circle with contrasting color, then sl st into side of lanyard and sc around (Do this on both sides of lanyard) Large Flower for neck lanyard: With light color Round 1: 6sc in mc, join (6) Color change to dark contrasting color in join Round 2: Ch 1, (sc, ch2), RPT O around, join to first sc (6 ch2 sps) Sl st into next ch 2 sp Round 3: (Ch2, 3dc, ch2, sl st into next ch 2 sp), RPT O around (6 petals) Sew pearl to center and attach to lanyard. Small Flower for wrist lanyard: With light color Round 1: 5sc in mc, join (5) Color change to dark contrasting color in join Round 2: Ch 1, (sc, ch1), RPT 0O around, join to first sc (5 ch1 sps) Sl st into next ch 2 sp Round 3: (Ch1, 2dc, ch1, sl st into same ch 1 sp, sl st into next ch 1 sp), RPT O around (5 petals) Sew pearl to center and attach to lanyard.


