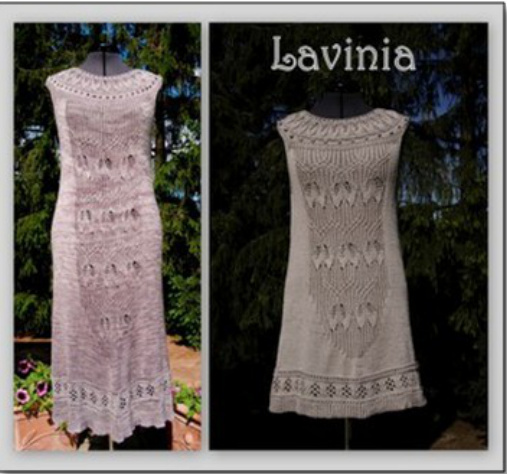
Lavinia Shirt/Tunic/Dress
Yarn: Any kind of summerly cotton or silk (blend)) Dress - size 38-42 approx. 400g (100g/420m) = 1680m Tunic - size 38-42 approx. 300g (100g/420m) = 1260m Shirt - size 38-42 approx. 200/250g (100g/420m) = 840/1050m Notions: circular needles: 3mm - 40cm and 3.25mm - 60 and 80cm 5 stitch markers, cable needle Gauge: Lavinia dress Dibadu Seda Grande color "Lavinia" 420m / 100g - 29 sts and 30 rows = 4" / 10cm Instructions: This dress is knit top down in the round. Yoke: Cast-on stitches have to be a multiple of 4 + 1. Photo1 Construction details are given for sizes 36-38/40/42-44. For sizes in between, the stitch count can be adjusted by 4 stitches. Adding/subtracting 4 stitches at the top of the yoke will end in 10 sts at bottom of yoke. CO 109/113/117 sts with 3mm circular needle with yarn held double over your thumb to get a firm cast-on.
Double cast-on:
worked like long-tail cast-on but with tail yarn held double. The tail yarn has to be twice as long as for the simple long-tail cast-on. There are single stitches on the needle; only the edge is with yarn held double. After the stitches have been cast-on cut off tails and sew them in.
Abbrevations:
st (s) - stitch(es) rd - round r - row pm - place marker slm - slip marker n - needle k - knit p - purl yoyarnover ktbl - knit through back loop k2tog - knit 2 together sk2p - slip, knit 2, pass slipped stitch M1L - make 1 left M1R -make 1 right f- front b - back ssk - slip-slip knit slipped stitches tog Join for working in round by knitting the first and last st together, place marker to mark beg. of round = 108/112/116 Ssts. -6 change to longer needles to check if the yoke fits and adjust cast-on stitches if necessar Repeat from \* to \*. Bold = increase rows! Rd 1: purl 2: knit 3 : \*k2tog, yo\* 4: knit 5: \*ktbl, p3\* 6: \*ktbl, p3, m1l \* change to 60cm needles =135/140/145sts 7,8,9,10: \*ktbl, p4\* 11: \*ktbl, yo, p4, yo\* 12: \*ktbl, k1, p4, k1\* 13: \*ktbl, yo, k1, p4, k1, yo\* 14: \*ktbl, k2, p4, k2\* 15: \*ktbl, y0, k2, p4, k2, yo\* 16: \*ktbl, k3, p4, k3\* 17: \*k1, M1R, k3, p4, k3, M1R\* (= 2 increases without yarn over) 18: \*k5, p4,k4\* leaf has 9 st.sts 19: \*k3, k2tog, p4, ssk, k2\* leaf has 7 st.sts 20: \*k4, p4, k3\* leaf has 7st.sts 21: \*k2, k2tog, p4, ssk, k1\* leaf has 5 st.sts 22: \*k3,p4, k2 \* leaf has 5 st.sts 23: \*k2, k2tog, p4, ssk\* leaf has 3 st.sts 24: \*k2, M1L, p4, M1L, k1 leaf has 3st.sts photos 2 + 3 25: move marker 0ne st back \* sk2p, p6\* = 189/196 /203sts 26: \*k1, p6\* 27,28: purl 29: \*k1, M1r, k6, mlr\* (Pattern repeat = 9 sts) 30,31: knit 32: k5, \*M1R, k9\* k4 (Pattern repeat = 10sts) = 270/280/290sts = 27, 28, 29 leaves 33: \*1 nupp, k4\*\* (with heavier yarn the number of nupps can be cut in half by only making a nupp from the increased sts., i.e. \*nupp, k9\*) photo4 Nupps - - k1, p1, kl, pl, k1 into same st - turn. Knit 5 sts, turn, slip stitches one by one to right needle, pull yarn through all 5 sts, k remaining st, pull yarn tight. 34 : \*knit 1 tbl of nupp, k4\* 35, 36: knit 37, 38, 39: purl 40, 41, 42, 43 : \*ktbl, p1\* =270,280, 290sts The yoke is now finished. Next row = set up row (chart A below bold line) Division and set up row (chart A) Divide for shoulders, front and back: mark with 4 markers, start counting from center back (marker, beg. of round), knit in pattern: \*ktbl, p1 \* Mark CENTER front with additional marker! Sizes 36-38: pm, 47sts, pm, 40sts, pm, 48sts, pm, 48sts, pm, 40sts, pm, 47sts i.e. 40 sts for shoulder, 95sts front, 40 sts for shoulder, 95 sts back = 270 sts Size 40 : pm, 49sts, pm, 42sts, pm, 49sts, pm, 49sts, pm, 42sts, pm, 50sts i.e. 42 sts for shoulder, 98sts front, 42 sts for shoulder, 98 sts back = 280 sts Size 42: , 50sts, pm, 44sts, pm, 50sts, pm, 50sts, pm, 44sts, pm, 51sts i.e. .44 sts for shoulder, 101sts front, 44 sts for shoulder, 101 sts back = 290 sts
Set up row front chart A for all sizes:
Bind off shoulders and set up front and back. Change to 3.25 needles. Increase row for a comfortable fit of front and back. Begin at center back:
Back (first half):
Knit to 8 sts before marker, at the same time equally increase 12 sts (50/52/53sts), pm \*p1, k1\* 4x to marker. = 8 border sts. Bind off sts between marker (shoulder) (40/42/44sts)
Front:
\*p1, k1\* 4x (8 border sts), pm k15/16/27, pm; ktbl, 25x: m1l after every purl st. (chart A = 76 sts - ktbl, p2), pm, knit 15/16/17, pm, \*p1, k1\* 4x to marker. = 8 border sts.
Back (second half):
Bind off sts between marker (shoulder) (40/42/44sts) Knit with second circular needle \*p1, k1\* 4x to marker. = 8 border sts. Knit to beg. of round, at the same time equally increase 12 sts (m1r). (50/52/53sts) Knit to pm, slm, \*p1, k1\* 4x. Turn and knit back separately (keep track of rows), (Count rows) (leave front on first needles) The back stays on needles and front is continued separately. Front Knit front in rows, ktbl on left side = purl tbl 8 border sts (\*p1, k1\* 4x), slm, k 15/16/17, slm, chart A, slm, k 15/16/17 , slm, 8 border sts (\*p1, k1\* 4x). Turn Increases for armholes same as back. Knit as many rows as for back.
All sizes
Basic bind off for shoulders. The bind-off should not be stretchy for a better fit. Check if leaf-pattern (chart A) is centered (front)
Back for all sizes: apart from border sts work \*p1, ktbl\*
Increases for armholes (all sizes)
To join back and front to shoulders I recommend knitting the last stitch of back and front with one stitch of shoulder. Photo6 For the armhole-increases: in every other row M1R before or after border stitches until desired size of opening is reached (approx. 26-30 rows). Try on to check the size of the armhole. Foto7 Back and front are now worked separately, back and forth i.e. ktbl must be worked in back rows accordingly: twist st and purl. Work the same number of rows for back and front. Join to knit in the round by knitting the selvedge stitches of both parts together and pm before and after these stitches to mark side stitch for further increases. Photo8 Continue with border stitches for 4 rows. Photo9 Increase at the sides as follows: Photo10
Increases for dress all sizes
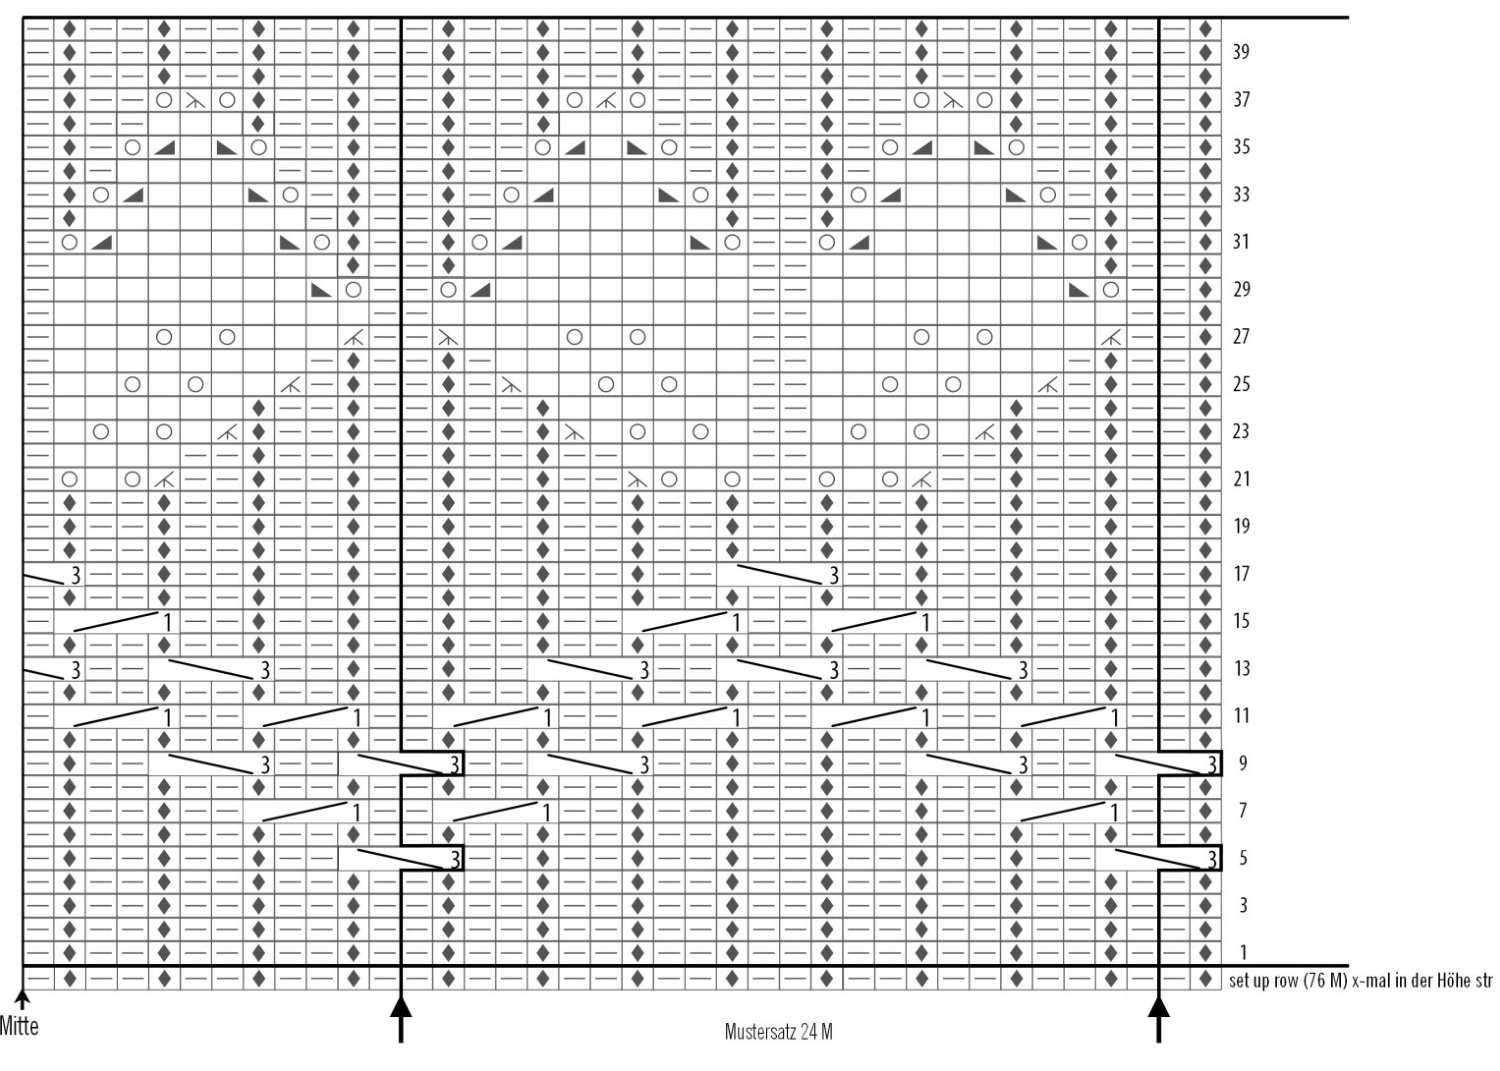
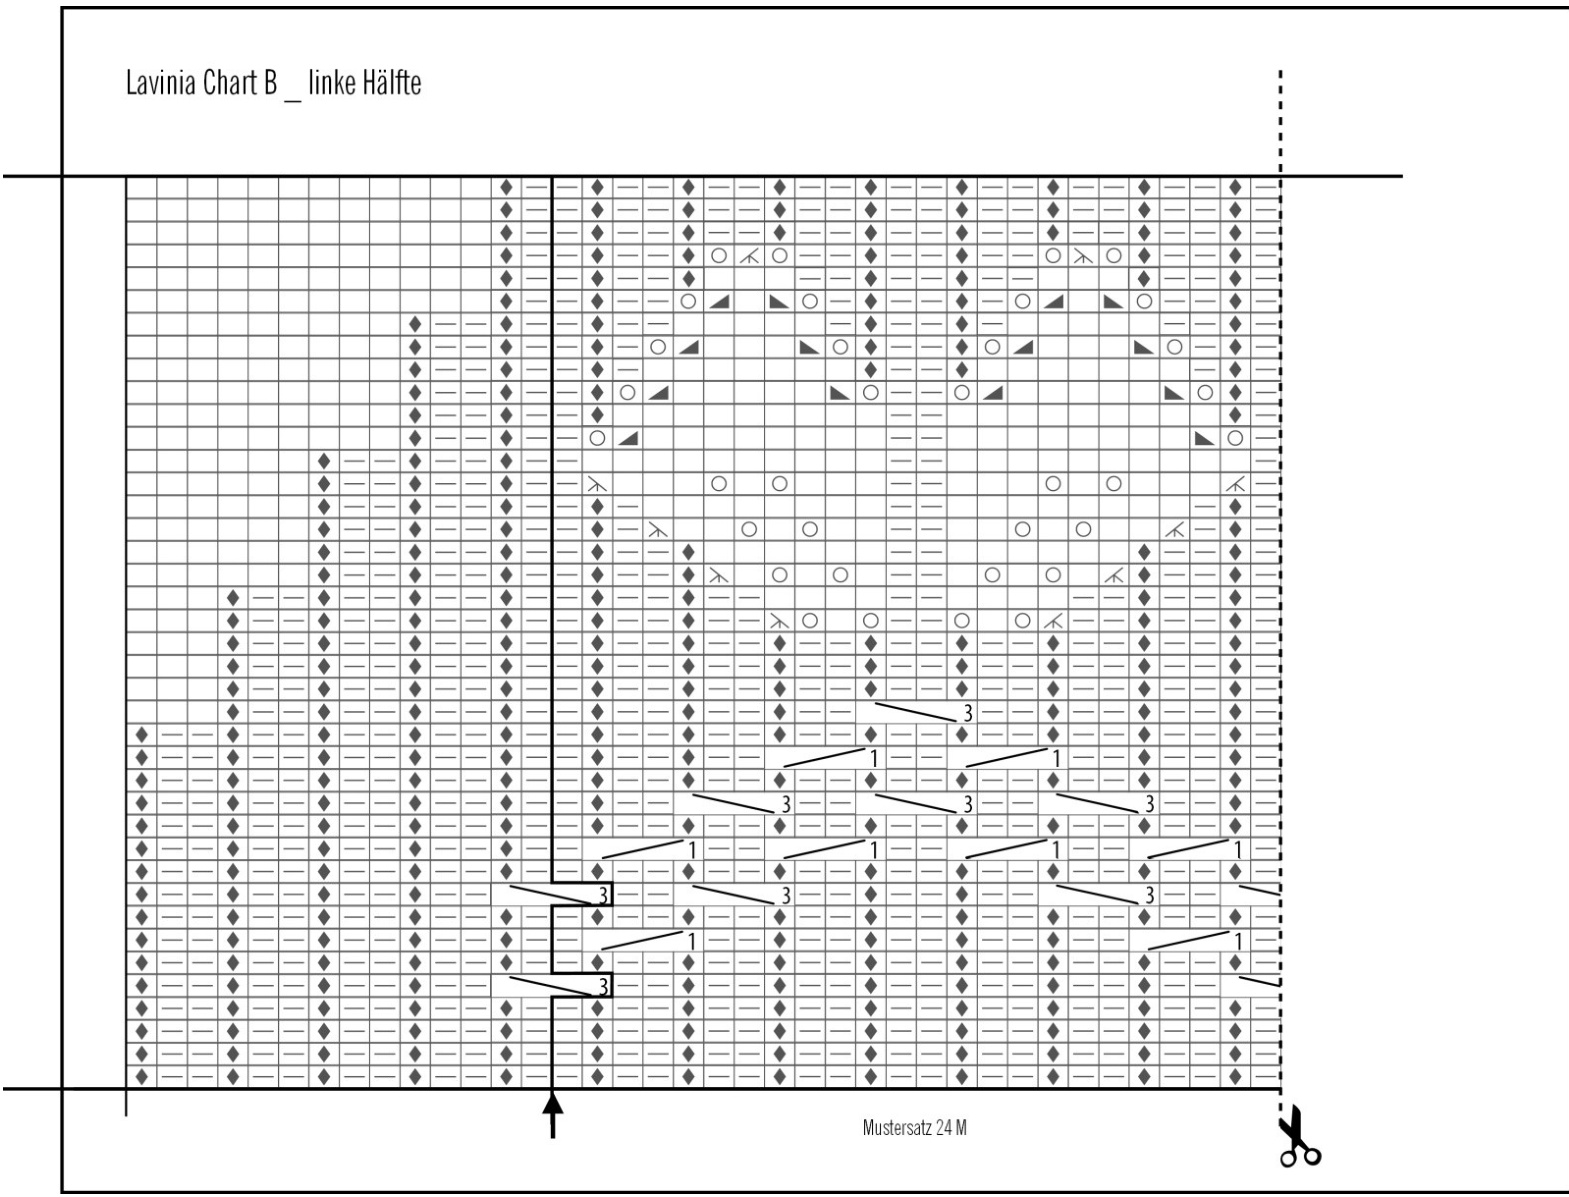
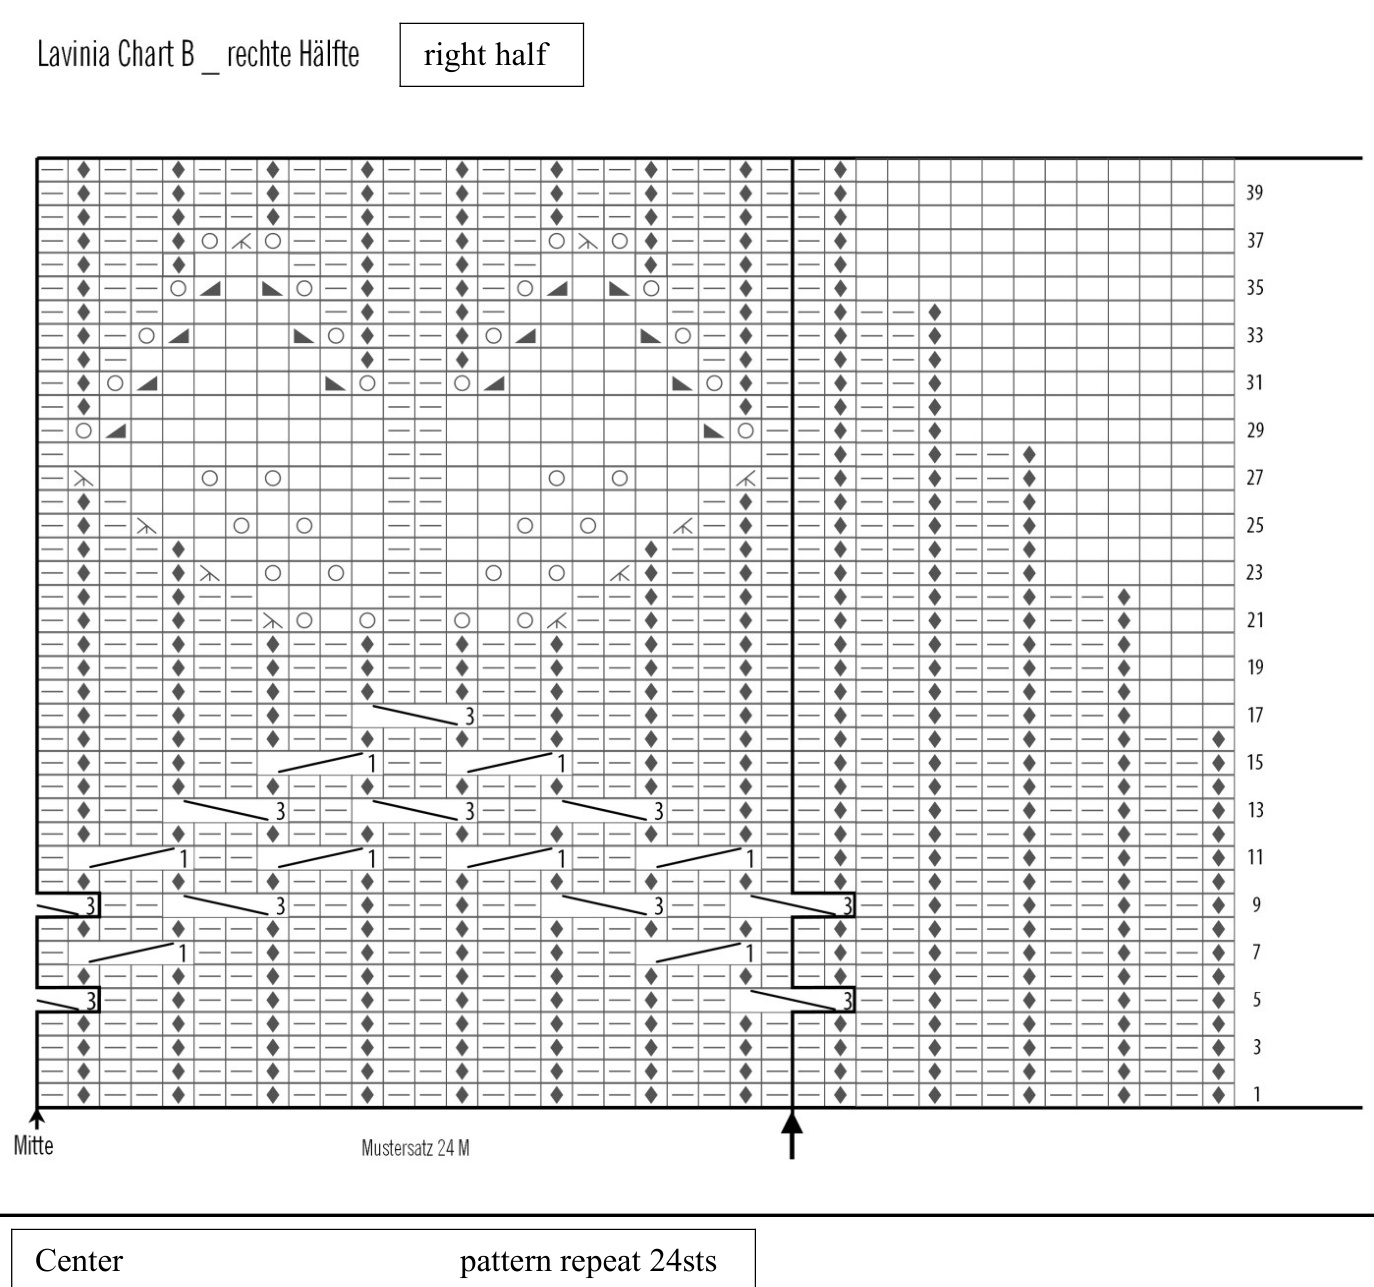
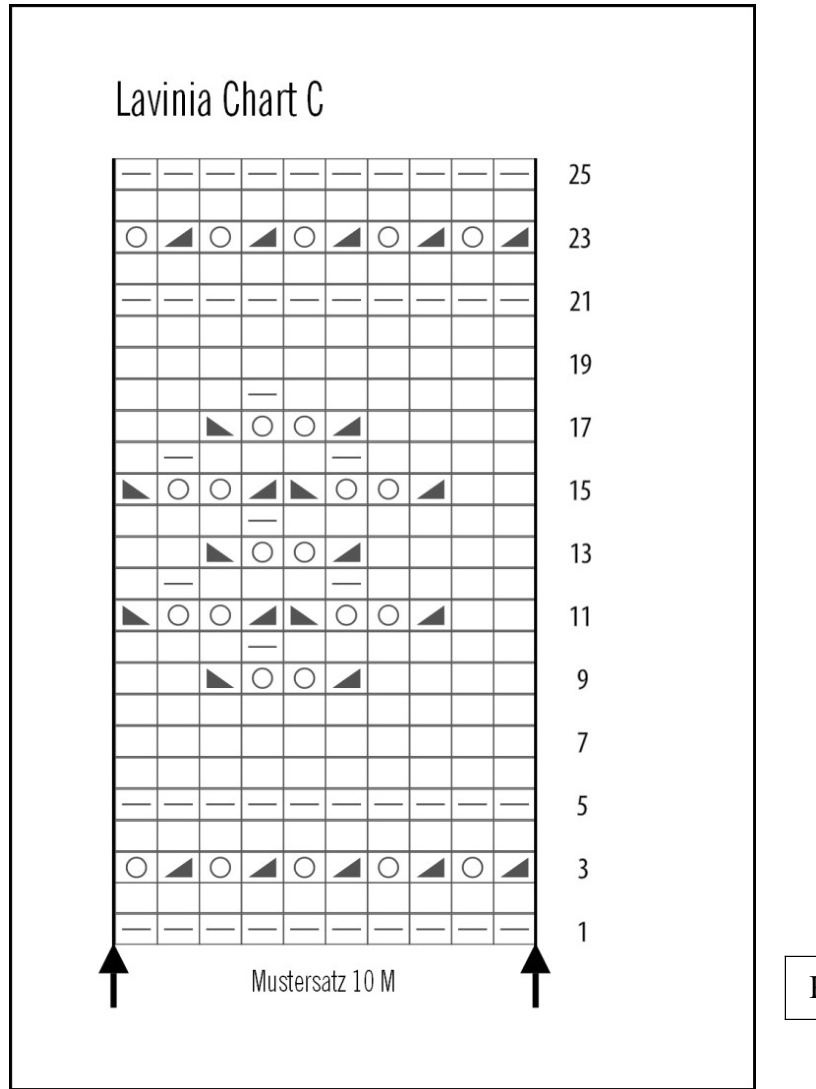
M1R every 8th row before and after marker (5x): increased stitches per round = 4 sts. Continue increase 1x after 12 rows, 1x after 16 rows, 1x after 20 rows, 1x after 24 rows The increases can be multiplied if desired, this will increase the amount of yarn used. Chart A: 1x for shirt Chart A: 2x for tunic Chart A: 3x for dress Chart B for all three versions: 1x, rows 39+40 can be repeated as desired to change the length of the garment. After completing chart B knit 4cm in stockinette stitch, keep in mind that the number of stitches has to bedivisible by 10 sts before starting with chart C!! If you round out of yarn for the shirt, knit only rows 1-3 from chart C!
Chart C
Work 1x. I recommend knitting the double yarn overs as simple yo and knitting them in the next round as kl, pl. The pattern looks more even that way. Photo10 After completing chart C the ruffle will be worked \*ktbl, p1\*, at the same time increase in the first row! Increase: work in pattern for 7 sts beginning with ktbl, m1l, repeat \*working in pattern and increasing after 7sts\* to end. For more ruffles increse after 5 sts., keep in mind that the dress could get heavier and requires more yarn. The dress should be tried on regularly to check if the width and length are okay. Bind of loosely after desired length of ruffles (min. 20 rounds) Finishing: Sew in ends. Soak dress in lukewarm water with some detergent, squeeze slightly, pull to shape and dry flat. This pattern was completed in harmonious collaboration with Ferula - http:/ferulitablog.pedropenola.eu/. I am thankful for her precious inputs and wonderful charts. I would like to thank all the participants of the Lavinia knitting project for their help, attention and patience. For further information concerning yarn usage and cast-ons check the completed projects on Ravelry. This pattern is the property of Fadenstille. It is copyrighted, and is for personal and non-profit use only. http://fadenstille.blogspot.fr/ A detailed instruction with photos can be found on Fadenstille's blog. Have fun knitting and wearing the Lavinia dress! Symbols and Charts: Swatch
I advise to make a swatch, especially since the cables require some skills. The cables are explained in detailed in the charts how they are worked. Please note! The cables are not the usual cables, they are only ways of how the stitches are knit in a specific order, i.e. 2 stockinette stitches are crossed in front of a purled "background". The yarn overs at the border of the leaf should be worked very tight, you can try to knit the yarn overs through the back loop to avoid holes. If you like them as holes knit them as indicated. It is useful to soak and block the swatch. Chart A and B can be printed as 4 A4 sheets, cut at the marked lines and taped together. The set up rows are only knitted once. Photo12
Symbols
K1
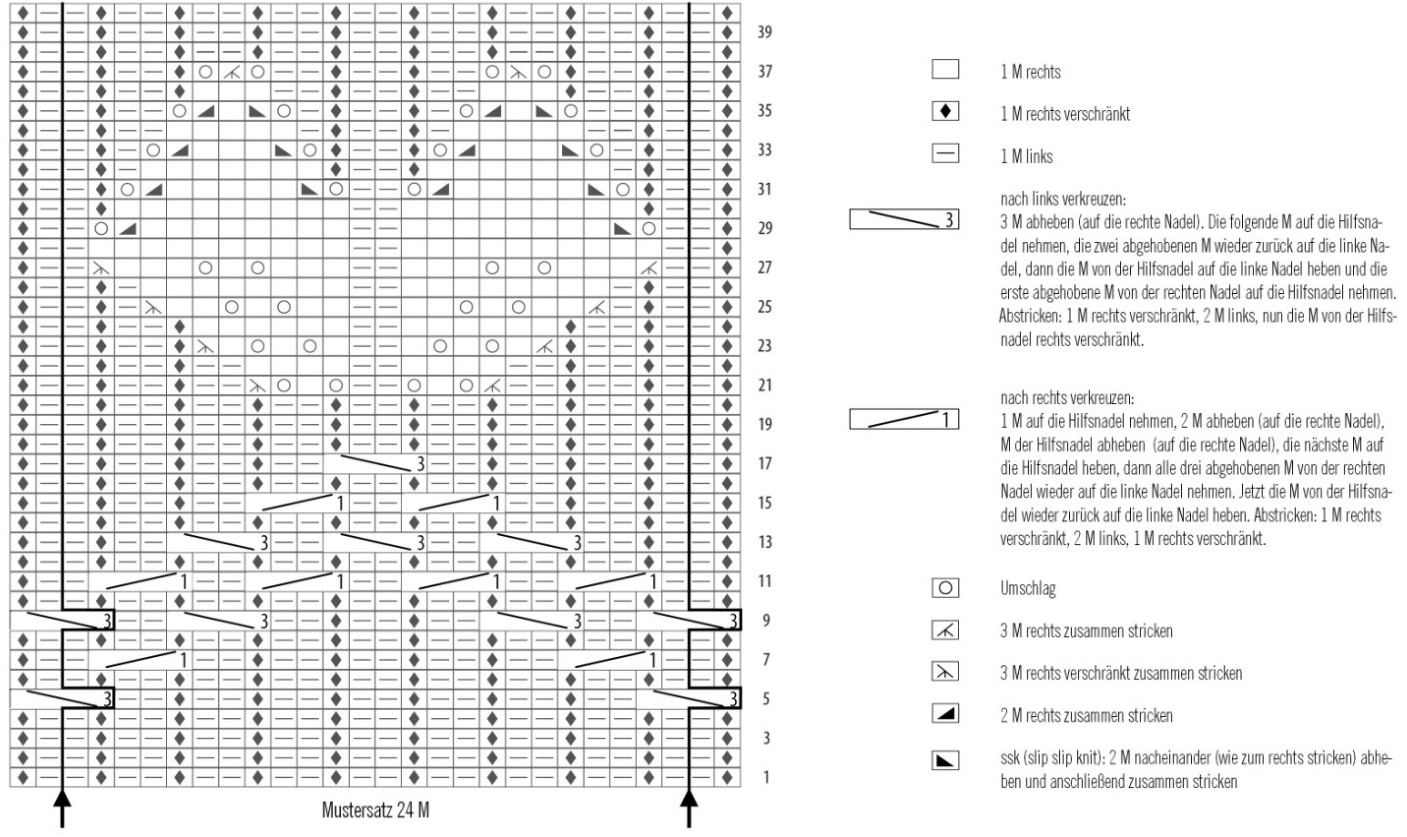
1 M rechts verschrankt Ktbl 1 M links P1 nach links verkreuzen: 3 M abheben (auf die rechte Nadel). Die folgende M auf die Hilfsnadel nehmen, die zwei abgehobenen M wieder zurick auf die linke Nadel,danndieMvon derHilfsnadel auf die linkeNadel hebenund die erste abgehobene M von der rechten Nadel auf die Hilfsnadel nehmen. Abstricken:1 Mrechtsverschrankt,2Mlinks,nun dieMvon derHilfs nadelrechtsverschrankt. Cross to left: Slip 3 sts to right needle. Slip next st to cable needle, slip sts 2+ 3 from right needle back to left needle, slip st from cable needle to left needle, slip first st from right needleto cable needle. Ktbl, p2, knit st from cable needle tbl. 1 M auf die Hilfsnadel nehmen, 2 M abheben (auf die rechte Nadel), M der Hilfsnadel abheben (auf die rechte Nadel), die nachste M auf die Hilfsnadel heben, dann alle drei abgehobenen M von der rechten NadelwiederaufdielinkeNadelnehmen.JetztdieMvonderHilfsnadel wiederzurick auf dielinkeNadel heben.Abstricken:1 Mrechts verschrankt, 2 M links, 1 M rechts verschrankt. Cross to right: Slip 1st to cable needle, slip 2 sts to right needle, slip st from cable needle to right needle, slip next st to cable needle, slip 3 slipped sts from right needle back to left needle, slip st from cable needle to left needle. Umschlag 3 M rechts zusammen stricken 3 M rechts verschrankt zusammen stricken Ktbl, p2, ktbl Yarn over K3tog K3tbl K2tog ssk 2 M rechts zusammen stricken ssk (slip slip knit): 2 M nacheinander(wie zum rechts stricken)abhebenund anschlieBendzusammen stricken
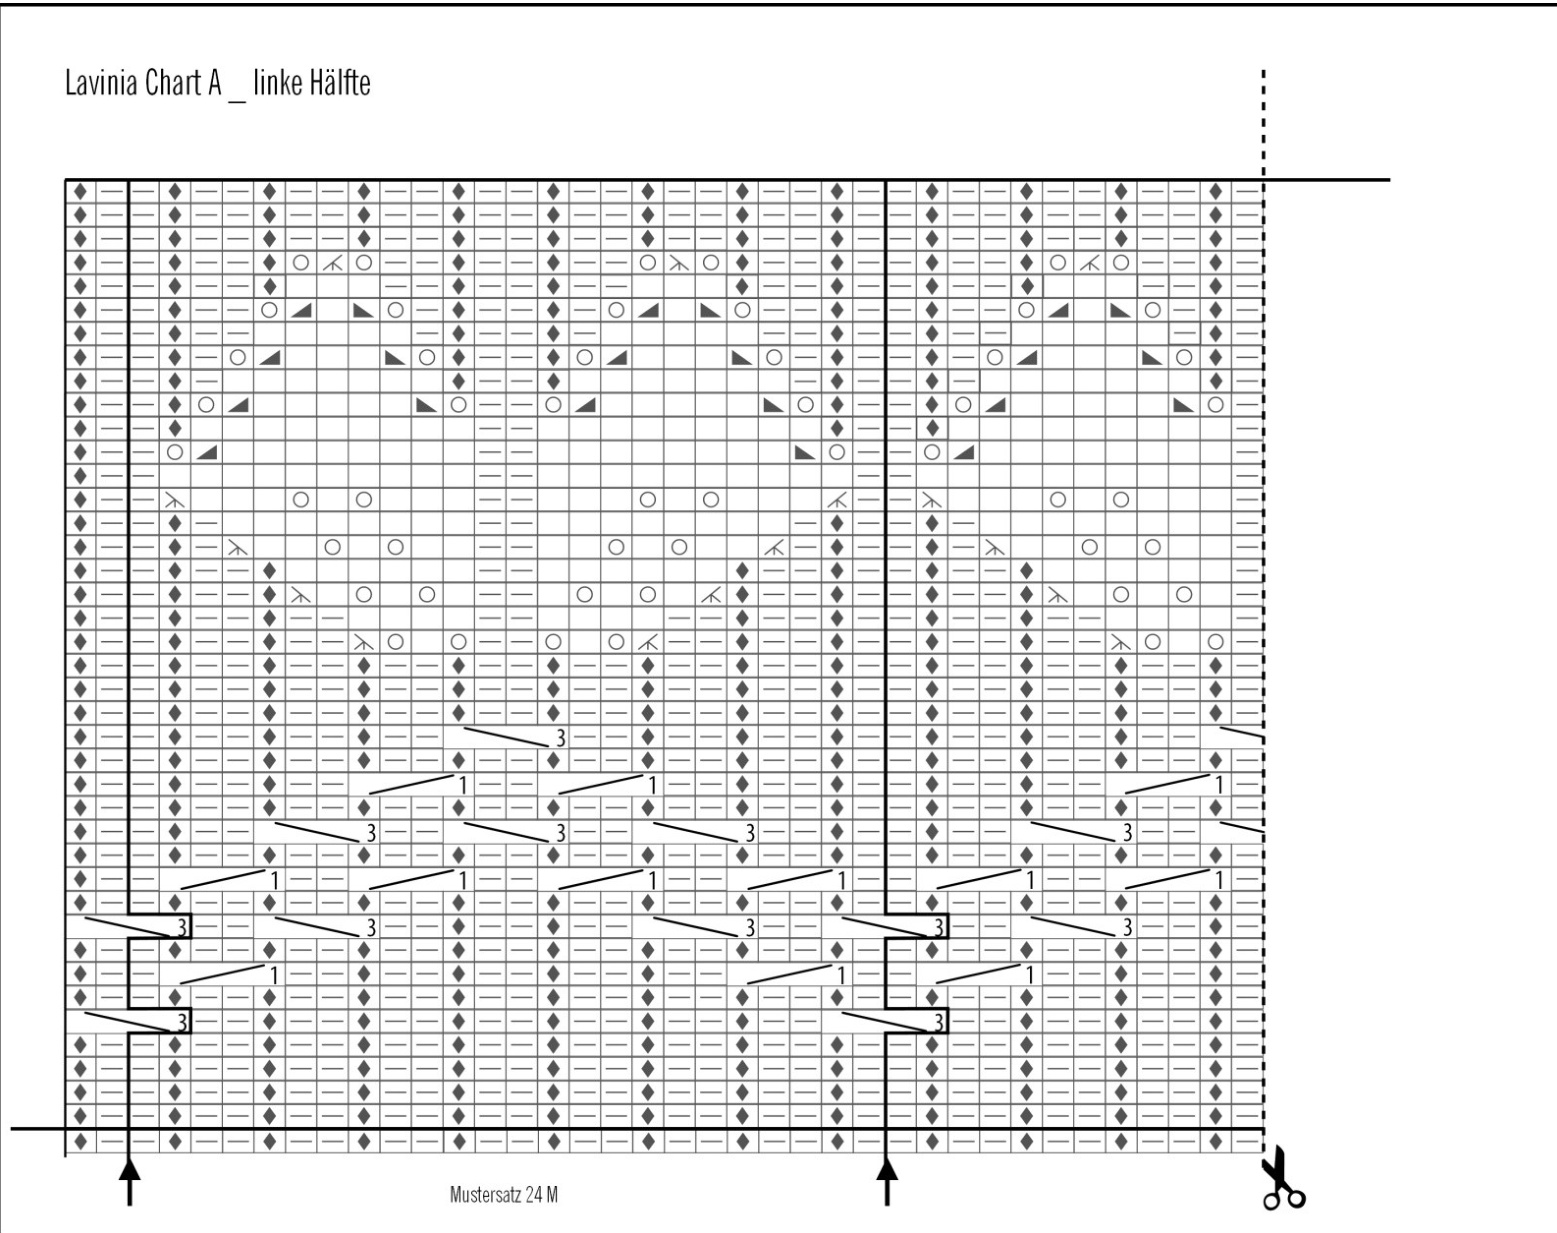
Lavinia Chart A _ rechte Halfte
I recommend knitting the double yarn overs as simple yo and knitting them in the next round as k1, pl, to make the pattern look more even
Photos:
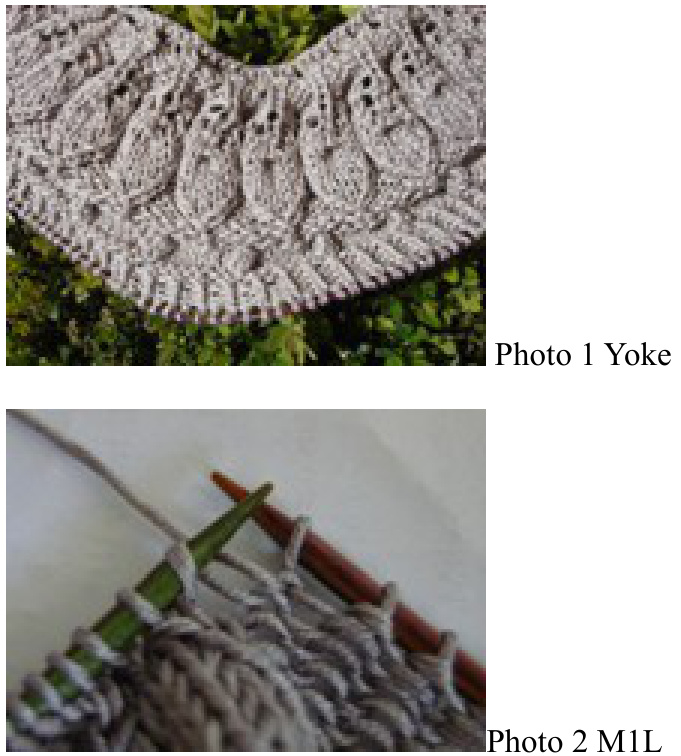
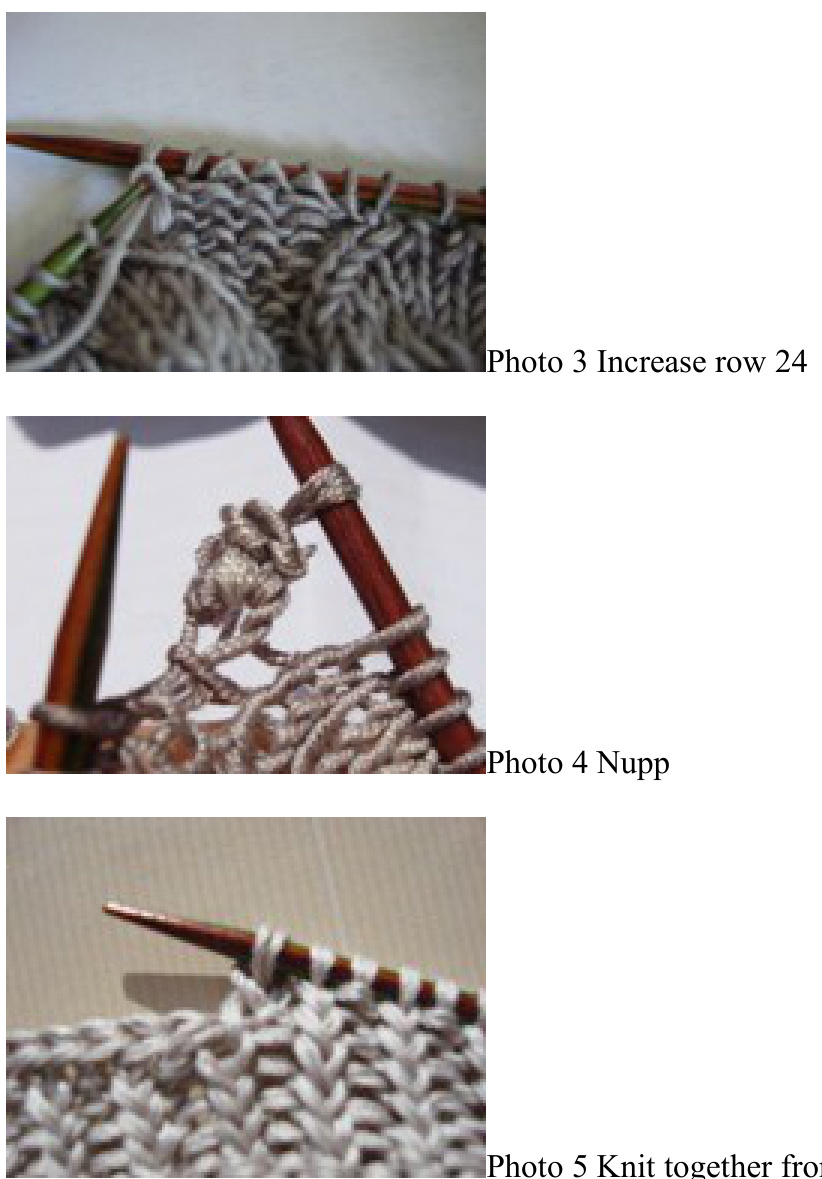
Photo 5 Knit together front and shoulder stiti
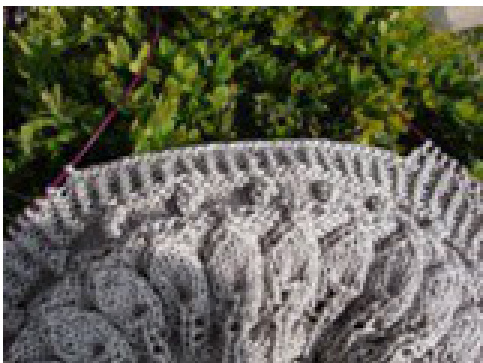
Photo 6 Soulders (bound off)
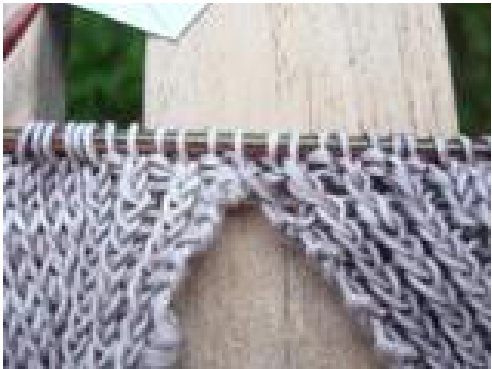
Photo 8 border stitches
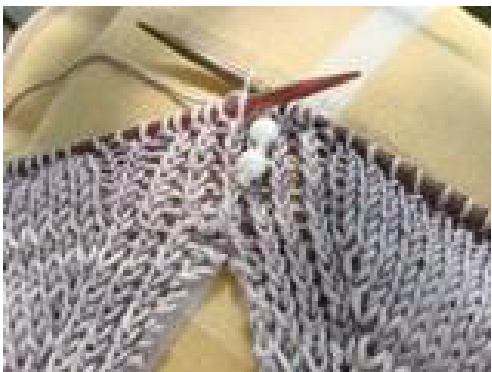
Photo 8 border stitches
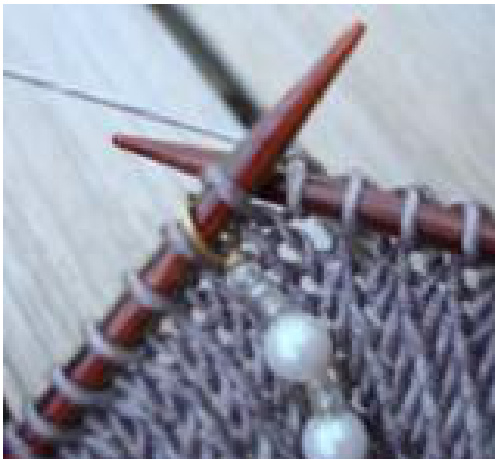
Photo 9 Incres rows side seam
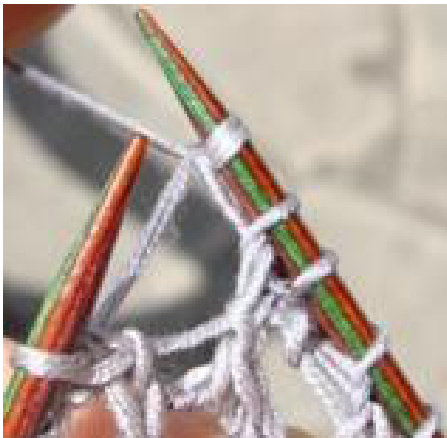
Photo 10 Chart C k1, p1 from yo


