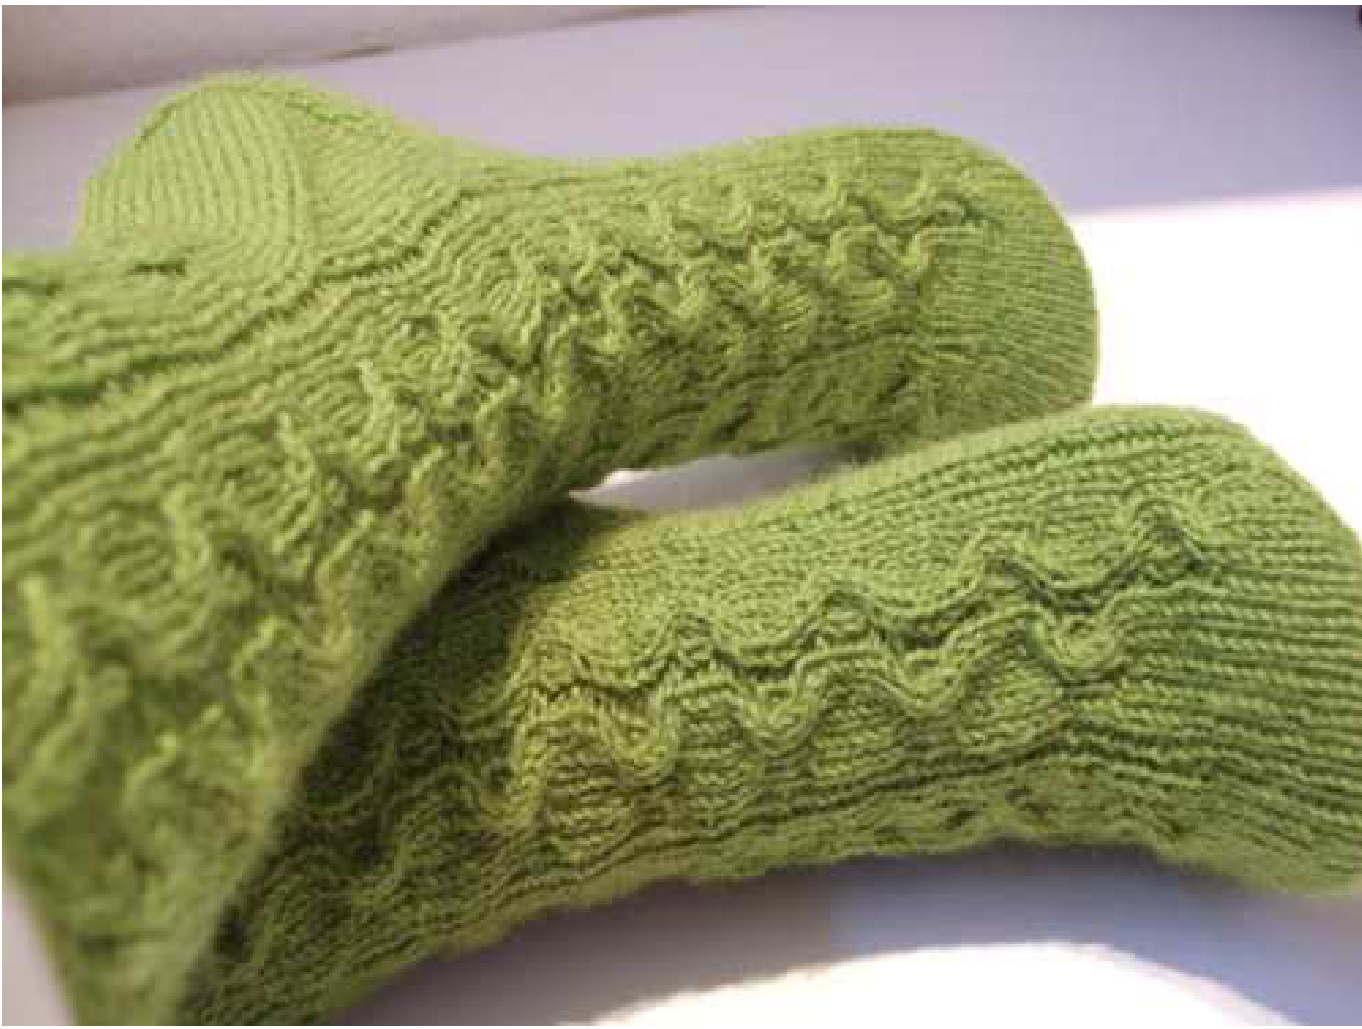
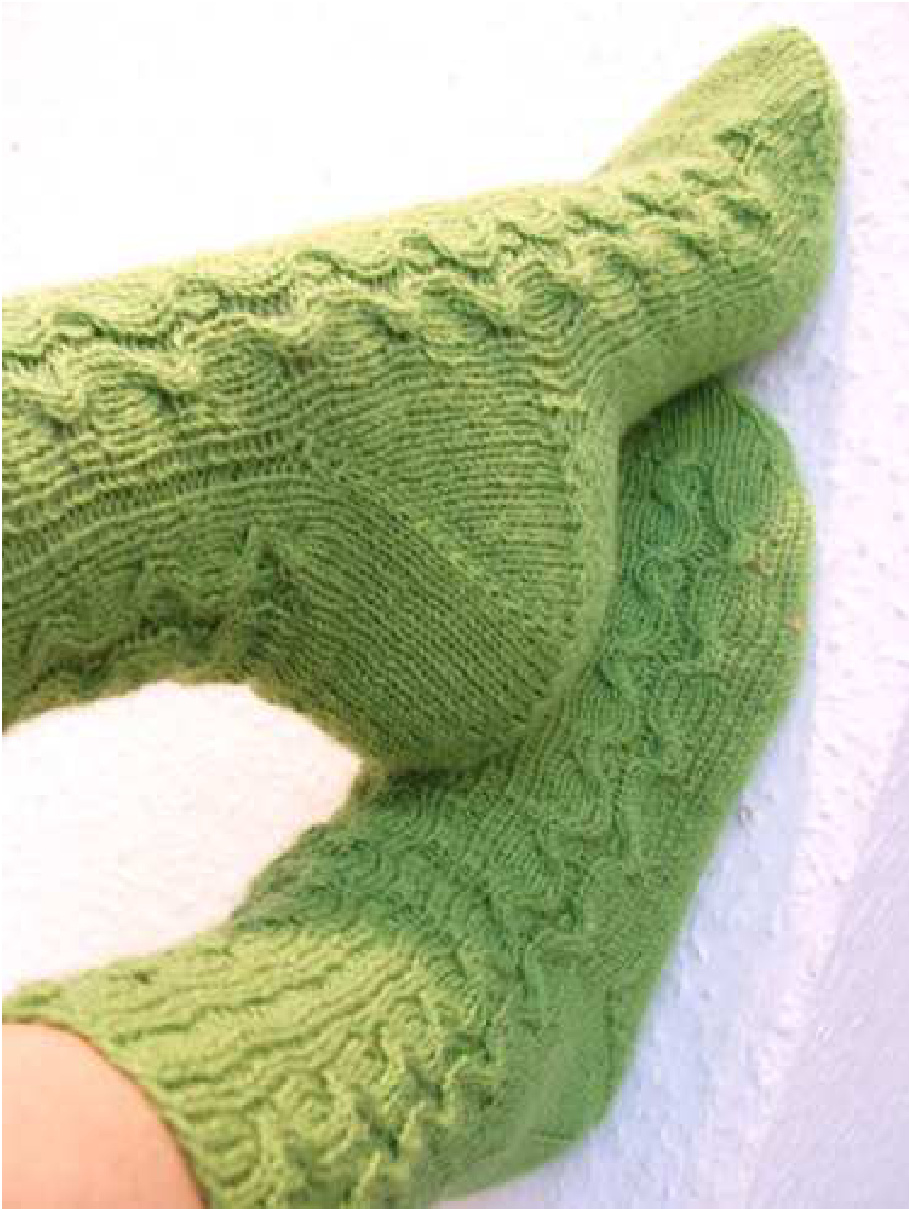
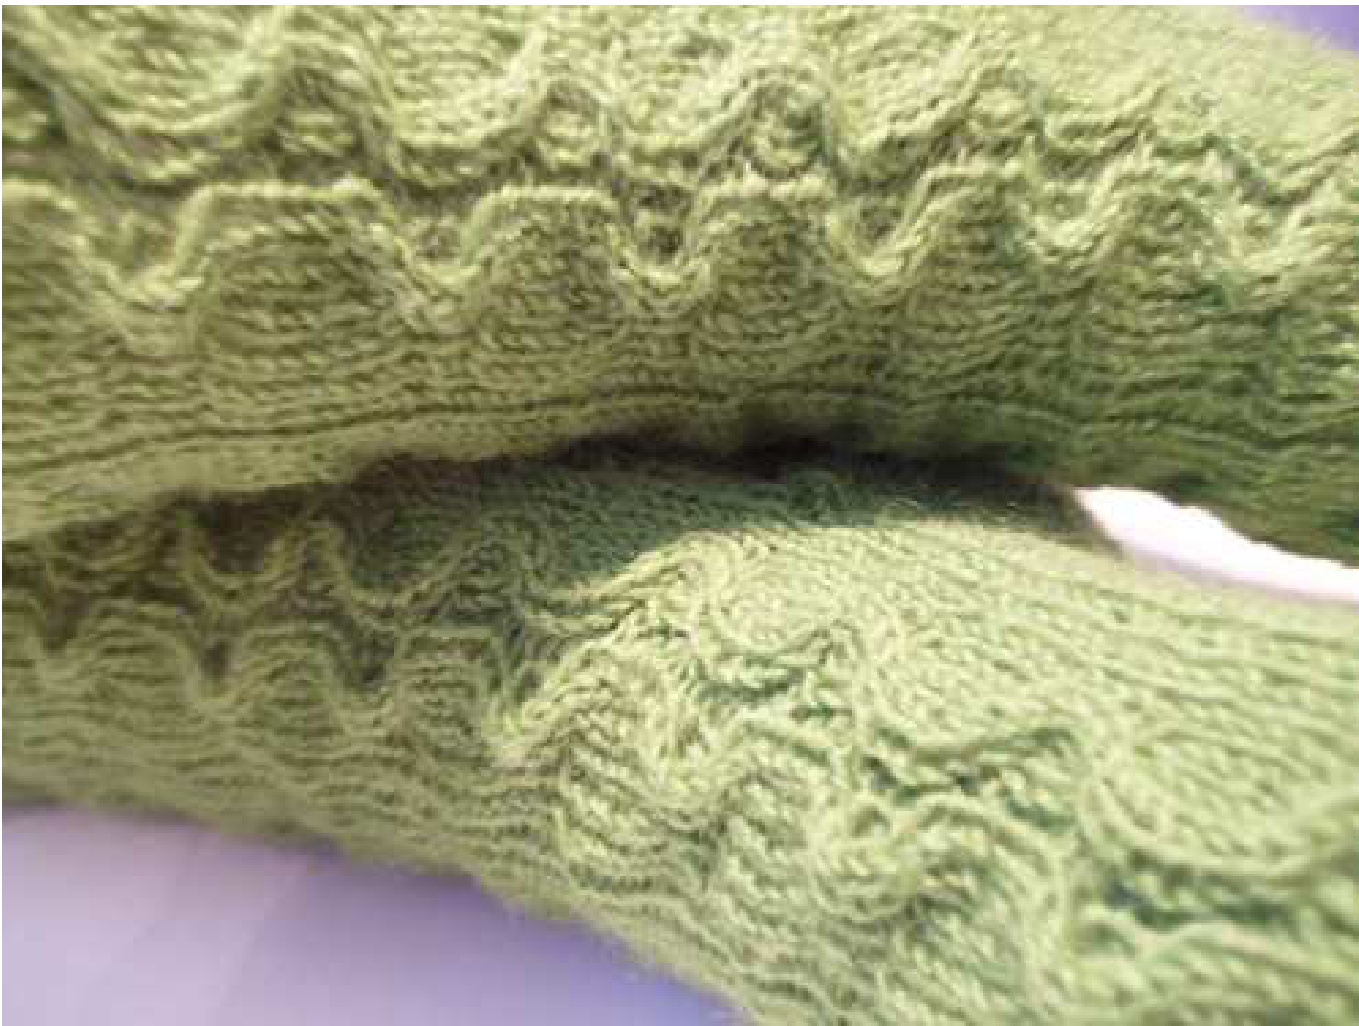
Snaky
Material:
100 g of fingering weight yarn, LL 420 m/100g set of four 2.5mm (US 1 1/2) DPNs, 3 stitch markers, 1 yarn needle
Abbreviations:
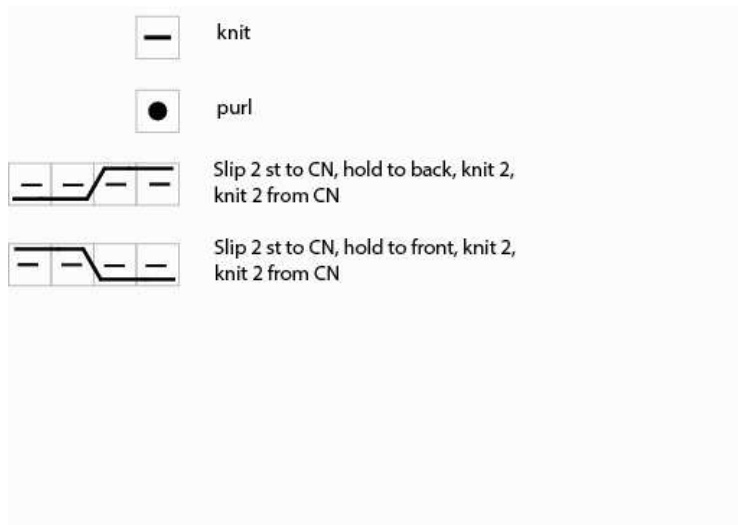
unikatissima's m1R = using the tip of left needle, pick up from the back the strand of yarn between the last stitch worked and the stitch on the left needle. Knit this created stitch through the front loop, creating a twist in it ssk = slip one stitch knitwise, slip a second stitch knitwise, place both slipped stitches back on left needle, and knit together through the back loop p2tog =: purl 2 stitches together @ 2015 - nur fur den privaten Gebrauch! Verkauf und gewerbliche Nutzung nicht erlaubt.
Leg
Cast on 56 / 64 st., using the German twisted Cast On.
(http:/www.garnstudio.com/lang/en/video.php?id=230), join to work in the round and distribute the stitchesover3needles: Needle 1: 14 (16) st. Needle 2: 28 (32) st. Needle 3: 14 (16) st. Work 3 rounds like Setup-Chart. Change to Pattern Chart and work to desired length of leg. Now we start with heel and gusset. I always like to work this kind of heel, you work in rounds and don't need to pick up stitches at the side of the heel. It's following the fleegle heel, and you don't need to pick up stitches later at the side of the heel. But if you like, you can work all other kind of heels.
Heel and Gusset
Theheel willbeworked over needle1and 3. The increases for the gusset are worked everyotherrowatthefirststartoftheheel needles.
Round 1
Needle 1: k 14 (16) st. to the end of needle, place Marker, m1L, Needle 2: work in pattern chart Needle 3: m1R, place marker, k 14 (16) st. to the end of the needle.
Round 2:
Work all stitches as they appear.
Round 3:
Needle 1: k 14 (16) st., sl MM, m1L, knit to the end of needle Needle 2: work in pattern chart Needle 3: knit to marker, m1R, sl MM, knit to the endofneedle
Round 4:
Work all stitches as they appear. Repeat round 3 and 4, until your stitches on the heel needles are doubled. Take note of the last row of chart worked, because the pattern will continue over the instep. @ 2015 - nur fur den privaten Gebrauch! Verkauf und gewerbliche Nutzung nicht erlaubt.
Heel Turn
Now we are working in rows only using the heel needles (needle 3 und needle 1). I recommend to distribute the stitches from needle 2 over 2 needles, because working needle 3 and 1 together. You are now working further the stitches from needle 1 with your needle. Place a marker to indicate the center of the heel. Row 1: K 3, ssk, k1, turn Row2: Slip 1 st. purlwise, p7, p2tog, p1, turn Row3: Slip 1 st. purlwise, k8 (1 st before the gap), ssk, k1, turn Row4: Slip 1 st purlwise, p9 (1 st. before the gap), p2tog, p1, turn Row5: Slip 1 st. purlwise, k10, ssk, k1, turn Row6: Slip 1 st purlwise, p11, p2tog, p1, turn Continue in the way, ending on a knitside row: Slip 1 st. purlwise, k28 (32), ssk, k1 le right side of your needle are 2 stitches unworked, but we will decrease in the next rount Resume working in rounds. Needle 2: in pattern chart Needle 3: k1, ssk, (the gap is closed now), knit to marker (center of heel) and remove it.
Foot
Now we are working again with a second needle over the back of the foot and using 1 needle for the instep. Round 1: Needle 1: knit all stitches Needle 2: work in pattern chart Needle 3: knit all stitches
Decrease Round:
how to knit stitches in the wrong side rows on page 3 of this file find the symbols & abbreviations and the pattern shows only the right side rows the decrease round every other row, til you have reached your desired number of stitches

@ 2015 - nur fur den privaten Gebrauch! Verkauf und gewerbliche Nutzung nicht erlaubt. Continue working in rounds, knit all stitches of needle 1 and 3, working in pattern chart on needle 2 until foot measures approximately 4 cm shorter than desired length.
Toe
Now we are working the decreases for the toe.
Round 1:
Needle 1: Knit to 3 stitches before end of needle, k2tog, k1 Needle 2: k1, ssk, knit to 3 stitches before end of needle, k2tog, k1. Needle 3: k1, ssk, knit to end of needle. Knit 3 rounds even, then repeat the decrease round. \*knit 2 rounds even, repeat the decrease round\* 2 times \*knit 1 round even, repeat the decrease round\* 4 times \*1 Runde glatt rechts, 1 Abnahmerunde\* 4 mal Repeat the decrease round every round, until 8 stitches remain.
Finishing
Cut the yarn, leaving an 20 cm tail. Close toe using a kitchener stitch (http://www.garnstudio.com/lang/en/video.php?id=60
@ 2015 - nur fur den privaten Gebrauch! Verkauf und gewerbliche Nutzung nicht erlaubt.
SetupChart-56Maschen

ChartA-56Maschen
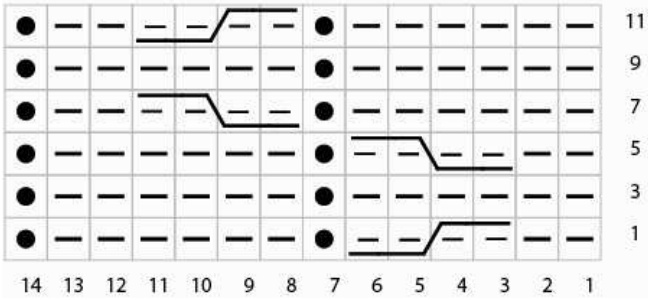
Setup Chart-64Maschen

ChartA-64Maschen
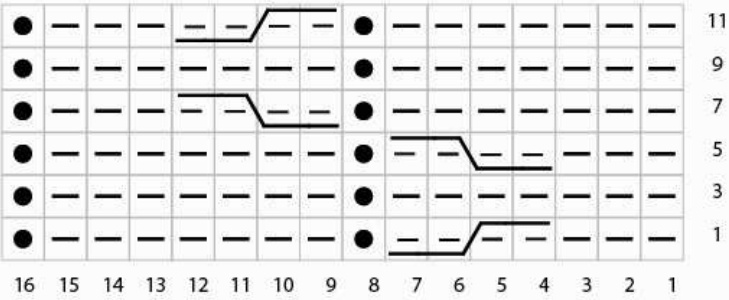
On even rounds work all stitches as they appaer.
@ 2015 - nur fur den privaten Gebrauch! Verkauf und gewerbliche Nutzung nicht erlaubt.


