Double Breasted Seed Stitch Jacket
Elinor Brown elinor@knitlawrence.org http://exercisebeforeknitting.com/
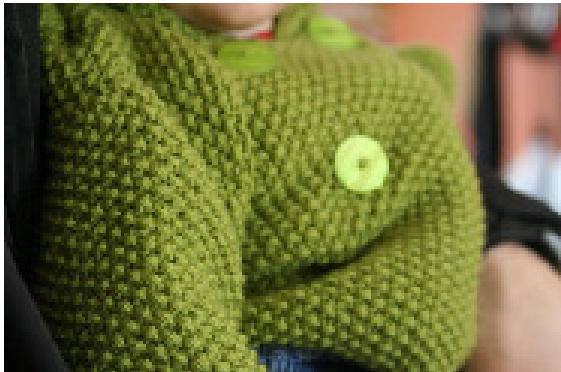
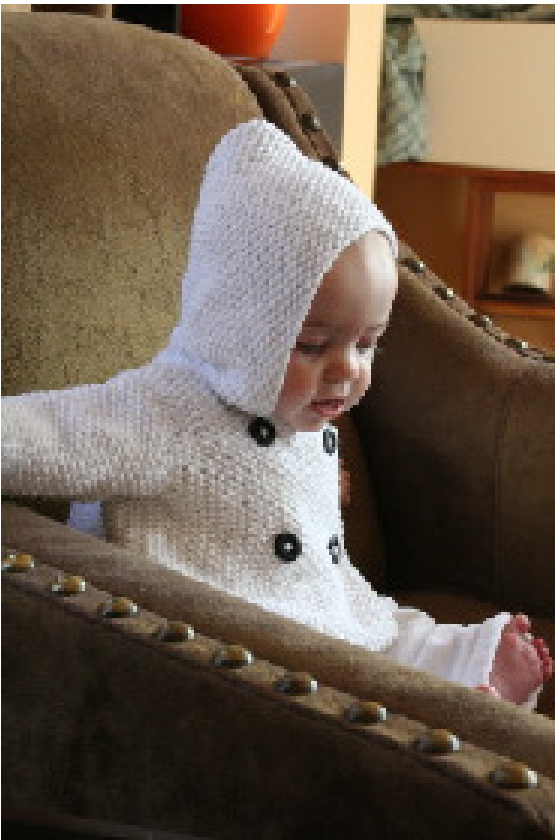
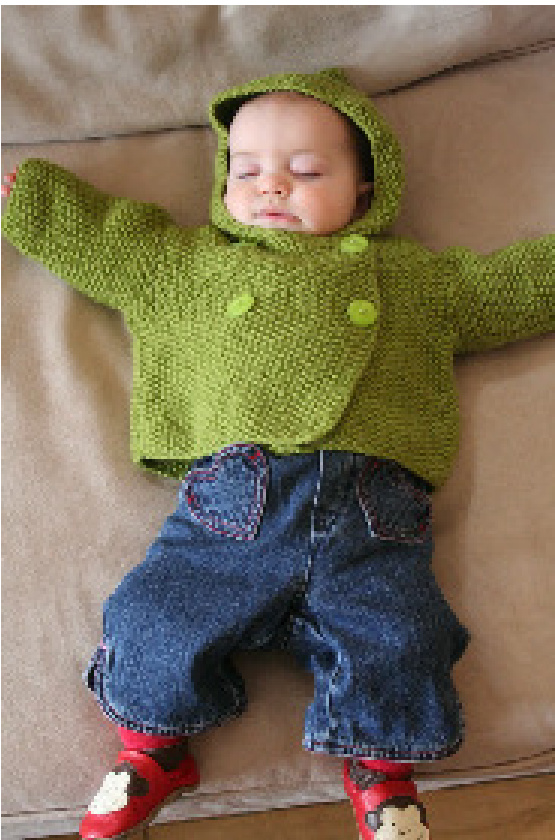
Since many infants loathe hats, hooded jackets are ideal winter garments that save parents the trouble of keeping track of hats. You might also consider making a pair of mittens on a cord to run inside this jacket. Your little baby will be nice and toasty! One nice thing about this jacket is that since it is knit in reversible seed stitch, you do not need to know immediately the sex of the intended recipient (that is, if you care about which side the buttons are placed). If you choose, knit the garment up but save the finishing until after the baby is born. It is the seaming that determines the button placement.
Sizes
3-6 months, 6-9 months, 9-12 months, 12-18 months
Finished Measurements:
Length from back of the neck to bottom edge: 11.25" (12.5", 13.5", 14.5") Chest circumference: 18.5"(20", 21", 22.75")
Materials:
2 (3, 3, 4) skeins Cascade 220 (100% wool; 220 yd [203 m]; 100g), color: #7814 \*white version is shown in Lion Brand Cotton-Ease US7 24” or 32" circular needle, or size required to obtain gauge Four buttons (7/8" - 1" in diameter) tapestry needle
Yarn Substitutes:
Any worsted weight yarn will do: Mission Falls 1824 Wool or Cotton, Cascade 220, Plymouth Encore Worsted, Lion Brand Cotton-Ease, Knit Picks Wool of the Andes, etc.
Gauge:
19 stitches and 36 rows = 4"” in seed stitch
Abbreviations:
K knit P purl S1 slip BO bind off CO cast on
Double Breasted Seed Stitch Jacket
Elinor Brown elinor@knitlawrence.org http://exercisebeforeknitting.com/
Buttonbole Row 1: (RS) K1, Purl 1, bring yarn in back. [ Sl1 as if to purl and bring the yarn in front. Keep yarn in front. Sl1, pass 1st slipped stitch over the 2nd stitch Sl1, pass 2nd slipped stitch over the 3rd stitch Sl1, pass 3rd slipped stitch over the 4th stitch Reverse the 4th stitch, place the stitch back on the left needle. Reverse the last stitch on the right needle. Pull yarn tightly and make a backward loop from front to back over the right needle. Pass the last stitch on the right needle Over this loop. Make 4 such backward loops, k2tog, p1 and continue on (i.e. do not turn work).] Pattern 10 stitches in \*k1, p1\* pattern, ending with yarn in back. Repeat buttonhole shaping from [ to ]. Pattern to end. ButtonboleRow2: (WS) Pattern as usual but when you reach the newly made loops, knit and purl into the backs of them. \*\*NOTE: The buttonboles I suggest come from Elizabeth Zimmerman. I chose this style because it makes a sligbtly tigbter buttonbole. If you would prefer to make your buttonboles by binding tbem off, work the buttonbole rows as follows and use sligbtly larger (probably about 1") buttons: AlternativeButtonboleRow 1: (RS) K1, P1, bind off 3, work 10 stitchbes in patern, bind off 3, continue in pattern to the end of the row. AlternativeButtonboleRow2: (VS) Pattern until you reach the first set of bound off stitches. Cast on 3, continue to next set of bound off stitcbes, cast on 3, pattern to tbe end of the row.
BoolzondEronto. Dackaiia1'Toiits
Cast on 124(132, 136, 142) stitches. Row 1 (WS): \*P1,K1\* Row 2 (RS): \*K1, P1\* Repeat rows 1 & 2 until piece measures 6"(6.75", 7.5", 8") in, ending with WS. One the next row (RS), work Buttonhole Rows 1 and 2 (or use Alternative Buttonhole Rows 1 and 2).
Divide for fronts:
On the next row (RS), pattern 32(34, 35, 37) stitches, BO 8, pattern
Double Breasted Seed Stitch Jacket
Elinor Brown elinor@knitlawrence.org http://exercisebeforeknitting.com/


Many thanks to the test knitters Lisa St. Amand, Kellie McCoy (Cottage Knitting) and Kelly Porpiglia (Kelp! Knits) for their valuable input! 44(48,50,54) stitches, BO 8, pattern 32(34, 35, 37) stitches to end.
Left Front:
Work back and forth on the left front until the piece measures 8.5"(9.75", 10.5", 11.25") ending with a WS row. On the next row (RS), work Buttonhole Rows 1 and 2 (or use Alternative Buttonhole Rows 1 and 2). Neck Shaping: Next row (RS), BO 12 stitches. Decrease 1 stitch at neck edge on the following alternative row and every other row thereafter until 12 stitches remain. Continue until front measures 11"(12.25", 13.25", 14.25"). Bind off remaining 12 stitches.
Back:
Join yarn to back piece and work until even with the front shoulders, BO 12 stitches at the beginning of the next two rows. Bind off all stitches.
Right Front:
Work same as front, reversing neck shaping and omitting buttonhole rows.
Sleeves:
CO 34(36, 38, 40). Work in seed stitch. Increase one stitch at each end of needle every 10 rows 5(6, 6, 7) times. 44(48, 50, 54) stitches. Work until sleeve measures 6.5"(7.25", 8.5", 9.25"). Bind off.
Hood:
CO 74(78, 82, 82) stitches. Work in seed stitch until piece measures 5.5"(5.5", 6", 6.25). Decrease 1 stitch at each end for the next 6 rows. 62(66, 70, 70) stitches remain. Bind off.
Finishing:
Join back and fronts at shoulder seams. Fold the hood in half and sew the cast-on edge together for the back of the hood. Baste the hood seam to the middle of the back. Find the last bound off stitch on each side of the hood. Baste these to each of the jacket fronts where the neck decreases begin. The hood will appear too large. You will need to sew the hood in place, easing in the extra hood fabric. The extra ease allows makes room for those large baby heads! Note: It is easy to sew this bood on slightly off center. The basting is worth the effort. Sew in sleeves, seam up underarms. Place buttons. Weave in ends.


